The CPP will return tomorrow. Today is the last day to enter for prizes. The prizes I have will further inspire your creativity. Did you do your responses so you can be in the drawing?
Rules: Anyone who posts a response to any of the prompts between May 27 and the post for prompt #111 will be entered for a prize. You can post in the Flickr group and/or on the post for the prompt to which you are responding. Yes, I know the end of school and vacation time have kicked your butts, but it is time for creativity. 5 minutes a week is all I ask. I reserve the right to change the rules if I feel I need to do so.
If you do a response to any prompt (there are 110), you will be entered into the drawing. Anyone who gets a friend to do a response will get two entries. You have some drawing friends, right? Poets? Mixed media artist friends? Thread painters? Photographers? No creative endeavor will be excluded. Sign them up. BTW, all rules are subject to change at my discretion.
As a reminder: these will not be quilt related prizes, but creativity related prizes.
Angela is a new friend from the Bay Area Modern Quilt Guild. I have mentioned her a couple of times in conjunction with those meetings. She is the one that turned me on to the New Handmade book.
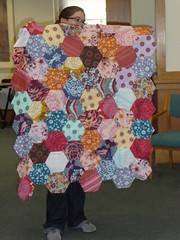
Angela participated in the Kona Challenge. She agonized and really worked hard on her design. I love her quilt. It shows her hard work and came out really well. Her agony paid off.
She wasn’t able to make this quilt from one charm pack. She bought extra fabric (don’t you think that is Robert Kaufman’s whole idea?). She played around with the pieces, drew designs, carried them around, cut and rearranged until she had something that was fabulous. It worked.
She asked “OK–you said sewing in a circle. What order do you do the seams, then? Sew piece 1 (center hexie) to piece 2, then piece 1 (center) to piece 3, then adjoining seams of 2 and 3?
I’m not positive I’d be able to keep track of my design if I sew in circles/chunks rather than rows. It’s sort of a mosaic-y thing. Once I get everything laid out, I’ll be able to tell better. It’s not a problem with method, just me knowing how best to make sure I get pieces in the right place!”
My response, slightly edited for clarity, was: If I understand what you mean, remember that the goal is to have no hexagon edges raw. This means that each side of the hexagon will be sewn to another side of another hexagon. This may be different on the edge of the quilt, depending on what the designer (you!) decides to do about borders, but for the middle, you want each hexagon edge to be sewn to another hexagon edge.
Remember: no sewing into the seam allowances!
I am going to show you how to do this with 3 hexagons to start. Go get 3 hexagons, I’ll wait.
3 hexagons
Put them on your design wall or on your floor and gaze at them. See the V formed by the top of the 2 bottom hexagons? Pay attention to that. You will need it later.
Start with 2 hexagons
First, you sew two sides together. These will be two separate hexagons that you have already marked. Remember, you can mark with the Jinny Beyer Perfect Piecer and a Sewline pencil or with your favorite ruler and marking tools.
Put one Hexagon right sides together
Put the first 2 hexagons right sides together and sew between the marks. Don’t sew into the seam allowance. If you did sew into the seam allowance, rip out the stitches outside of the marks.
2 hexagons sewn together
When you open those pieces you will have 2 hexagons sewn together. YAY!
3 hexagons
Second, for the third piece, you have to do a Y seam eventually (hope I explained clearly enough in the post how to do it). Remember that I told you to pay attention to the V? There will be a V where the two already sewn hexagons meet and that is where you will place the 3rd hexagon.
You will need to sew 3 seams total to completely add the third piece to the first 2 already sewn pieces.
Adding 3rd hexagon
Third, you line up the third piece with piece 1, right sides together, so that one side of piece three will be sewn to one side of piece 1. The side of piece one to which you sew should be one part of the V referenced above.
Fold over Hexagon 3 to hexagon 2
Fourth, once you have sewn one side of piece three to one side of piece one, you fold the neighboring side on piece three right sides together to the adjacent side of piece two. You will fold it on to the other side of the V.
Fifth, sew the second side of piece three to the second side of piece two.
3 hexagons sewn together
Now you have 3 hexagons sewn together. AND you did a Y seam. That wasn’t scary, was it?
Hexagon Flower
Sixth, press from the back so all of the seams twirl in the same direction.
In terms of keeping track of the pieces, because you want to sew them in a certain order, you need to lay the pieces out and look at them as you sew. I understand that many people don’t have a design wall. A design floor works just as well. You may need to pin your pieces together in the order you will sew them and take lots of photos. I also have pinned numbers to my patches or blocks so I know what order to sew in.
Let me know if you have further questions about the hexagons.
This is not a scary process. Just slow down a bit, follow the directions and you will be fine. You can do it!
Other:
Pam’s recent podcast about her hexagon project is posted on her site. she is very funny in calling this a Point and Laugh-a-long, which makes me laugh.
Sandy also posted a much more helpful and informative post that had actual content about how to do the project (not that Pam’s post was not helpful or informative, because it was) rather than just blathering on about process, which is what I tend to do. In Sandy’s most recent podcast she talks about the practical aspects of cutting hexagons and how she had success on the Kaye Wood method.
Here are a couple of different takes on hexagon quilts. This one from Random Thoughts do or di won’t work with the method we are using unless you figure out how to put the sashing in between the hexies. if you do figure that out, then you can use the directions all of us have posted to put the piece together. I don’t know if the sashing is more complicated than sewing a strip around the outside. This is a question I would ask TFQ about.
This photo from Sunset Sewing is a really nice variation of a hexagon quilt. I can’t tell whether it is a variation of the Spiderweb pattern.
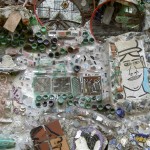
This is one of the tops/pieces that inspired my hexagons…..well sent me over the edge, really, because I had been drooling over TFQ’s for quite a while.
Here is the latest block. Use colors of your choice – 2 or 3 will look good. In case you need them, directions are also posted : 3 Rail Fence #11 Directions.
These are all fairly easy because they will create interest when you put them together. Have fun.
Yes, Fabric of the Year 2010 is finished. I took it to the photographer today so that it can be professionally photographed before it goes to the San Jose Museum of Quilts and Textiles Show. This is not a great picture, because the quilt is too large for my quilt holder (DH) to hold it out straight. I will replace it when the professional photos come back.
Inspiration
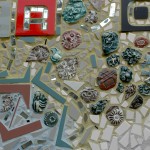
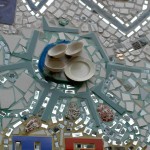
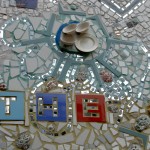
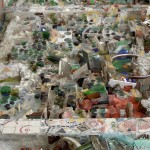
A friends shared the link to this hotel with their wonderful inspirational rooms. If you want to be in a fairy tale, check out these photos.
Pattern Drafting
As you may remember, I really struggled with trying to figure out how to layout the FOTY 2010 diamond quilt. Unlike rectangular shapes, the diamonds weren’t quite as straightforward. DH helped me figure it out, so it all worked out in the end.
This topic came up again when I was back East with my SIL who now has an Accuquilt Go Baby. We were looking at the book that came with the device and the quilts were not inspiring. She wanted a chart or list of blocks she could make with each of the templates. I was thinking that this would work for those of us who cut our scraps into regular squares or triangles to have them ready for ….. something. For example, she and I (from our different points of view) would like to be able to say “I have triangles that make 2″ finished half square triangles, what can I make?” What blocks? What overall design, if applicable? What are my choice for the parts I have?”
This is related to the FOTY problem, to which I linked above, because in that case, I wanted to say “I have 340 diamonds, how big can I make a rectangular quilt?”
I searched for a chart or a list specifically related to the Accuquilt device, but couldn’t find anybody thinking that way. When I step back, I think that nobody else must think this way. Does everyone say I want to make an Ohio Star or a Lone Star or a hexagon quilt and then go from there? It seems to me that this would make scrap quiltmakers happy.
Do you know of such a chart? Have you started one?
Media
SIL bought the Jinny Beyer Perfect Piecer that I discussed a couple of weeks ago, because she is going to start on her Eye Spy quilt. It didn’t come with very comprehensive directions about the possibilities for what we could do with it. Granted, the ruler is pretty self explanatory, but we wanted to know more (do you sense a theme here? She and I feed off of each other in terms of quilt information). We went on to YouTube and saw an interesting video from Wish Upon a Quilt (bought some stuff from them recently and found their customer service to be excellent). The video was not specifically about how to use the Perfect Piecer, though the presenter did go into it a little, but we found that what information she gave was helpful in terms of looking at the Perfect Piecer. I wasn’t able to find any other videos, more comprehensive or not on using this tool, but hope that someone will make one. I have Jinny Beyer’s Handpiecing book, Quiltmaking by Hand and will look in there to see if she goes into it at all. It may also be in her puzzle balls book, Patchwork Puzzle Balls. I don’t think this ruler will help me with the Flowering Snowball, but one can dream.
My computer is declining to recognize any device plugged into a USB port. What a pain on a lot of levels, let me tell you. As a result, I wasn’t able to update my iPod before my workout on Wednesday. That meant no Sandy, Pam or Frances to whom I could listen. Fortunately, I had downloaded an episode of Crafty Garden Mom. I was reluctant to start listening even though everyone was saying what a great podcast it was as I was just reluctant to add another addiction to the list, but I was short of podcasts. Boy, am I glad I did. I love Tanesha’s voice and content!
Other Artists
Joanna Figueroa of Fig Tree Quilts had a blog post up recently about Sit Upons. Sit Upons are a Girl Scout staple project, but they are great for other uses as well. I wasn’t even thinking about these types of projects, but I am thinking about decorating. I saw these and was so taken with how professional they look, how taut they are and how nice the buttons look. I love the colors, but have to be careful, because I get them home and find that I have nothing to go with them.
Blocks and Piecing
Adrianne and other in the BAMQG are participating in the Farmer’s Wife Sampler Quilt-a-Long. These quilt-a-longs are so interesting to me. Back in the first days of general access to the Internet, we did swaps. I keep trying to compare that to this new phenomenon. Anyway, I was reading the blog post on this QAL written by one of the organizers. She mentioned holding her templates in place with glue stick while rotary cutting around them! I would have never thought of that. I think of drawing around templates with a pencil, Sewline or SCUF, but not actually rotary cutting around them. Very interesting.
The BAMQG is also doing a block-a-long or quilt-a-long. I am not sure which. People are making blocks that start with a letter of the alphabet-going in order- and then they will make a sampler. Some are using the Farmer’s Wife book and other are just using block books and Quilter’s Cache. Camille Roskelly is doing the Farmer’s Wife QAL and I love her blocks. I wish they were mine. I haven’t decided if I am going to make the blocks, but if I do they will be in the same colors as CR’s.
I was at Mark Lipinski‘s house last week and he really breathed new life into me for the CPP. Get ready. The CPP will return within the next 2 weeks. Did you do your responses so you are in the drawing?
Rules: Anyone who posts a response to any of the prompts between now and the post for prompt #111 will be entered for a prize. Yes, I know it is end of school and vacation time. If you do a response to any prompt (there are 110), you will get into the drawing. Anyone who gets a friend to do a response will get two entries. You have some drawing friends, right? Poets? Mixed media artist friends? Thread painters? Photographers? Sign them up. BTW, all rules are subject to change at my discretion.
As a reminder: these will not be quilt related prizes, but creativity related prizes.
Were you planning to wait until the last minute? Please do it now. My life will be better if you don’t. Post the link in the appropriate comments section.
I hadn’t been to Lancaster County, PA in a long time, so SIL was kind enough to drive me to Philadelphia and stop at some fabric shops along the way. We enjoy shopping together. We have the opportunity to catch up as we drive around. She never does that trip to Lancaster County alone, so I get to help her renew her fabric.
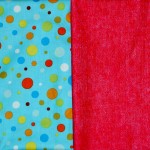
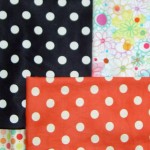
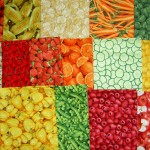
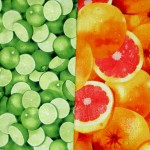
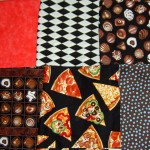
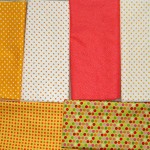
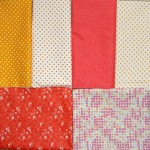
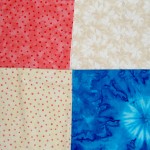
We mapped out 8 or so shops, but only made it to three. I was happy to find enough food fabrics to make the Disappearing Nine Patch. One of the shops had a lot.
In general, I did see a lot of brown and muddy colors. I tried to be careful and not buy those. I also tried to be cognizant of the light. It is hazy in that area when it is hot and that affects how I see the fabrics.
We started out with a list of stores on the Quiltart website. Thanks, Judy! We used SIL’s GPS to find directions to all the shops. The GPS made us make a lot of left turns, which wasn’t always easy.
Dutchland
Dutchland Quilt Patch
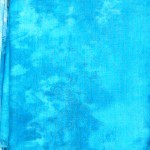
This was a two story store with a lot of Amish looking gift items and a lot of potpourri. Two Amish women were working there (one was in training). The fabric was upstairs in a light aqua room. They had fat quarters and a large number of bolts of fabric. I bought a few pieces, some FQs for a friend and some embroidery needles. Their colors were a little on the murky side for me. I did enjoy talking with the young woman who cut my fabric. She commented on the motifs and colors we chose and talked a little about her own sewing.
Dutchland FabricsFabric Shack
Fabric Shack, formerly Lapp’s Dry Goods
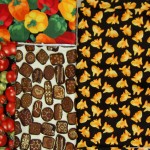
Next we went to the Fabric Shack, formerly Lapp’s Dry Goods. This is a quilt/fabric store in a former house in the middle of a bunch of farms, e.g. it is not on a commercial strip of stores. SIL and I have been to this store in the past. I like the former name better. There is something unappealing about the word ‘shack’. It didn’t matter because the first thing I saw when I walked in were the Farmer’s Market food fabrics. This store also had LOTS of fabrics. In addition to regular quilting cottons, they had the pre-quilted fabrics, a whole room full of flannels, Moda pre-cuts, books and FQs.
We had to wait a long time when we went to check out because the lady in front of us was buying multiple cuts of 10 yards each! She told us she was making Stack-n-Whack or One Block Wonder quilts and was buying so much fabric, because she was stocking up for the summer! Later, SIL explained how the technique worked and I looked at her book, but am not sure I’ll be making one using that method.
Buggies
One of the things we saw, which was not a surprise to me, were Amish buggies everywhere. Obviously, people had to get around and they were using buggies. I enjoyed watching them drive by as we waited in the Fabric Shack to check out. The horses were gorgeous and looked sleek and well taken care of. Next door to the Fabric Shack was a mini buggy parking lot.
Zook's
Zook’s
Zook’s had the most fabric of any of the Amish stores we visited. They had arranged all of their fabric by manufacturer, which I thought was an interesting way of arranging it. It seemed to make it easy for them to find fabrics when people called.
We spent the next 2.5 hours in traffic getting to Philadelphia. Bleah! I would have liked to have gone to Sauder’s, but I found plenty of fabric on this trip.It gives me something to which to look forward in the future.
Scooter Bike
I also saw these scooter bikes everywhere in Lancaster. I don’t know if they are really called scooter bikes, but that is what they look like. I seriously thought about buying one for the Young Man, but didn’t have the energy to figure out how to ship it home, so I left for this trip. Perhaps another time. I thought they would be very useful for getting around a college campus. I am not sure how one would compare to a bike as I have never tried one out.
While in Philadelphia, I tried to go to Spool Sewing. I looked up their hours, walked over within the specified time and they were closed. 🙁 Oh well. Perhaps I’ll go to Philadelphia again and they will be open.
A few days later, I drove up to New Jersey to co-host Mark’s radio show. As I drove, I wondered why there were no quilt shops with big signs on the side of the road that I could see from the highway. If I could see it, there was half a chance that I could stop at the store. 😉
Pennington Quiltworks
Pennington Quiltworks
Wishes do come true, because not 5 minutes after thinking that, I saw a huge sign for Pennington Quiltworks. How could I not stop? Pennington Quiltworks was bright and cheerful. When I arrived the place was buzzing with activity. There was a large group of ladies having fabric cut and getting ready to leave. I found out later that there were 17 of them in the group and they were working on a very bright and cheerful friendship quilt.
On Friday, I had to choose between Mt. Vernon and quilt shops. Sigh! It is hard being a grown up. I really wanted to go to Mt. Vernon and see their new visitor center and the garden re-do, but I also wanted to go to quilt shops. SIL said I couldn’t do both, so we went to the quilt shops. 😉
Capital Quilts Capital Quilts was our first stop. This used to be SIL’s local quilt shop, but I think that Patches (see below) is closer to her. I have been to CQ at least twice before. They have great fabric. They have a lot of batiks, more of the Kaffe Fasset fabrics than I have seen at other shops, some Philip Jacobs and Amy Butler. They also have machines. The thing I like about this shop is that they haven’t sacrificed fabric space for machines.
G Street
G Street has moved since I was there last. The space was a lot smaller and their quilting cotton inventory was quite picked over. I heard someone say that they were doing inventory soon, so I am guessing that the selection would have been a lot bigger if I visited next week. They had a number of interesting rulers. I found a few more food fabrics to add to my group. The store manager helped us and she said that RJR is only printing what stores order. Makes it hard to reorder a popular fabric.
Needles & Pins
This is a small Frederick, MD shop which I visited once before. In some respects it is what I think of when I think of the quilt shop in Marie Bostwick‘s Cobbled Court novels, except smaller. I remembered it as being quite dark. This time, even though it was raining, I found it to be quite bright and stocked some cheerful fabrics. They also had a small selection of the felted wool pincushions that I like. They had a great quilt hanging up in the shop. My problem with it was that it was made from Civil War fabrics. It was a BOM and each block came with the fabrics.
I found this situation to be the case in a couple of stores. A few of the shops were doing a BOM in Civil War fabrics and there was no alternative. A quiltmaker was not able to buy the patterns without the fabric and was not able to buy an alternative colorway such as large scale prints or batiks. Of course, everything about the Civil War is very popular in this area and the fabric seems to be quite prevalent as well. Not my thing, though and it makes me wonder if I am alone in this or if they are cutting out a bunch of potential customers. I assume these stores know their customer base?
Patches
Patches Quilting & Sewing
Patches was a great shop. It is also in a house right up from the Mt. Airy main drag. The people were really friendly and the place was crammed, CRAMMED, with fabric, notions, tools, patterns, rulers, thread, books and machines. There was no available space because every surface had something to look at or buy.
Did I mention rulers? This store had more rulers than I have ever seen at one store. They had the Quilt in a Day Flying Geese rulers that I mail ordered. They had the Clearview 60 degree triangle rulers that Pam, Sandy and I have been agonizing over in THREE SIZES! I was amazed. I didn’t even know that ruler came in 3 sizes. The shop also had the Starmaker ruler that Kaye Wood uses in the video on how to cut the hexagons from strips. I have never EVER seen that ruler. They didn’t have very many sizes of the Creative Grids rulers, but a person can’t have everything and I really have no reason to complain about their selection of rulers, if you couldn’t tell.
Patches Ruler Wall #1
They had great fabric. I could have bought almost everything there, but just had to stop, because I was getting overwhelmed. The employees were very friendly, especially Pam who, in addition to telling us everything about the store, it’s products and classes also acted as local tour guide by telling us about local restaurants.
Sisto's
Sisto’s
Sisto’s was our next stop and it wasn’t as well stocked with fabric as Patches. I think it got the short end of the impression stick, because we went to Patches first. They had a lot of machines and I was able to finally buy some bobbins for my machine. Crazy that I have to fly across the country to buy bobbins! We talked to them for a long time about the HQ18 (I think that is the model). It is the HandiQuilter longarm machine. The woman we spoke with knew a lot about the machine and was very friendly. They had a lot of space in the shop, but most of it seemed to be filled with machines rather than fabric.
I asked about Anna Maria Horner patterns at a couple of shops and was shocked to find that they had never heard of her or her patterns. I found it odd, but, again, I think that the shops must know their customer base. I didn’t check to see if FreeSpirit had any fabric in these shops. Perhaps FreeSpirit doesn’t have a rep in the area? Odd, though.
I designed (or think I did!) a lot of blocks at the end of the year. When I looked at this one again, it reminded me of a Merry Go Round, thus the name.
There are a few more pieces in this blocks, but it is still not difficult. The Nine Patch Go Round #10 directions tell you what to cut and how big.
As I have mentioned around the web, I was on the East Coast last week. I don’t like to announce the fact that I am going to be gone, so I apologize if anyone was confused. I was at a conference for my job, which you might remember if you heard Creative Mojo (I promise to stop mentioning this eventually). If you didn’t hear Creative Mojo, you can listen to the podcast.
Mark & Jaye
One of the things I did back East was co-host the Creative Mojo podcast with Mark Lipinski. I was really nervous and even more nervous when he posted on FB that he had been admitted to the hospital early that week. I wasn’t sure what was going to happen and wondered if I would find a note on the door with a key telling me how to turn on the headset and microphone so that I could fill in for him. Fortunately for me (and all of you!) Mark is a consummate professional with the motto of “the show must go on.” He was working on the script when I arrived, so Jeff entertained me. Jeff Turner has a smile that lights up the room. Toby, Mark’s friend and the owner of the Kindred Quilts, was also there to talk about creative book clubs. I thought it was funny that they were both from, or had lived in, California! Small world!
Mark came down when he was done with the script and told me what to do. I had to read or review a bit of a couple of the books whose authors would be on the show. I also had to read an article from another author and think of comments to interject. I also had to read the script and be familiar with the way the show would go.
Mark's House
Mark’s house is gorgeous. On Quilt Out Loud, Mark’s house looks like a mansion. In reality, there are a lot of rooms, but it seems to be well proportioned. The colors they used to paint the rooms are wonderful and bold. The hall is a bright citron green. The living room is bordering on a warm white, but has a tinge of orange or yellow. The living room, as are all the rooms, so beautifully decorated. They look like a decorator did them, but there is no feeling of not being able to sit down. The living room is very comfy as well as well put together. The guest bath is a light purple and Mark’s office is a wonderful sunshiney yellow. Mark’s office is filled with books. I kept getting distracted during the podcast looking at his books. He and I have a lot of the same books. His are not piled on the floor (note to self: get a new bookshelf!), but well organized in cube cubbies.
Mark talks a lot about his hoarding tendencies. While I did see the Pod (he wouldn’t let me in), I didn’t see any hoarding tendencies. House Beautiful could walk into his house and start a photo shoot. I felt funny taking photos of the inside, so I didn’t and I would have stayed longer except Mark really looked like he needed to go to bed.
The show went really fast and I had a lot of fun doing it. All I did to become the co-host was email Mark and I was in. It was fun.
The highlight of the trip was visiting with my SIL and the family. My BIL is a great cook and has no problem substituting to help me deal with my food intolerances. I really enjoy visiting with my SIL. We usually do a sewing or quilting project. We really work well together and it made me think of how much I like working with certain other quiltmakers on projects.
TFQ is another with whom I enjoy working. She and I work really well together, too. Remember the Cheerful Baskets? She has a great (can’t say this enough) sense of color and is good at giving me the pieces to sew in an orderly manner. I wish they both lived closer, but I also enjoy going to visit. I wish it were easier to visit.
I always learn something new when SIL and I sew together. She has a large workspace which allows two people to work together without stepping on each other. SIL has a pseudo-professional stand-alone embroidery machine. She has been having fun making Christmas ornaments, Boy Scout patches and other things with it. She had an idea for the NSGW pillows, so we played around with the software that comes with the machine and designed some motifs.
Chain piecing pillow covers
She stitched them out (well, caused them to be stitched out) while I was at the conference. When I returned, we made them into pillows. When I made the last Teacher pillows I thought that I should quilt them, but was really too lazy. SIL reminded me about the quilt-as-you-go method, so I used that to quilt and sew the tops simultaneously. The good thing about that method is that you can make the back as big as the pillow form and then you know where to stop. The other good thing is that you can use up random bits of batting.
We made 2 pillows for the Native Daughters’ (sister organization to the Native Sons for women) upcoming convention and one for my MIL (SIL’s mom). The one for my MIL was a bit of a mistake. We felt like we didn’t have quite enough fabric for it, so we didn’t want to make it for the grand Parlor. However, once the piece was finished we really liked the way it came it out and my adjust what we do in the future to take what we learned into consideration. We also embroidered 3 additional centers for pillows for the Native Sons raffle pillows for next year. I hope I don’t put them somewhere where I can’t find them!
Mosaic Block
We also worked a little bit with SIL’s new Accuquilt Go Baby cutter. She had some parallelograms she had cut and we wanted to try the Jinny Beyer Perfect Piecer. In looking for a comprehensive video on using the Perfect Piecer, we found a video with an interesting block called Mosaic (I kind of doubt that is the real name, but I haven’t looked it up and I could be wrong) using parallelograms. She cut and intended to sew, but she was busy picking out greens for a green quilt, so I sewed. I am now an Accuquilt Go convert. Those patches lined up perfectly and there was only one small point matching problem.
In Lancaster County, we had bought fabric for a shirt for my BIL, so we worked on that, too. I was her assistant on that project since I am not much of a garment maker. I like it when I get to sew on my work-vacations.
Capital Quilts
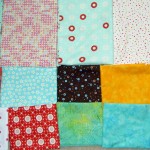
SIL saw the above quilt, which is a 9 patch alternated with a snowball block. You can buy the pattern or take the class at Capital Quilts.
Sisto's Star Table Runner
Sisto’s had a couple of nice quilts available for us to view as well. This looks paper pieced, but it could also be done, I think, with Y seams (at which you all will be experts after you work on the hexagons.
Tilted 9 Patch
If you don’t mind sewing on the bias, this looks like you could make regular 9 patches and then trim them to be tilted.
Link to the 30's
This quilt is from the book, Link to the 30’s, which we saw hanging in Sisto’s Janome room. You can probably buy the book by calling Sisto’s. It is a book, along with the previous volume, that I have been thinking of buying. It is a project book, but the quilts aren’t all ‘quick & easy’. I thought it was done very well and I liked the way the blocks were not chopped off.
Link to the 30's - detail
I wasn’t able to quickly discern the block so I took the detail above. I would have to look at the quilt closer to see the block and I simply wasn’t tall enough.
In case you are wondering about the conference I attended, it was great. it was a lot of work in terms of listening and understanding and bringing information back to my workplace. Not interesting in terms of quiltmaking, though.
The CPP will continue. I need some people to play with on this project. That means you!
So far there is only one entry for the creativity prizes, so what is holding you up? Do you need a pep talk?
Rules: Anyone who posts a response to any of the prompts between now and the post for prompt #111 will be entered for a prize. Yes, I know it is end of school and vacation time. Do a response while in line at the grocery store on the back of a receipt.
If you do a response to any prompt (there are 110 words so far), you will get into the drawing. Anyone who gets a friend to do a response will get two entries. You have some drawing friends, right? Poets? Mixed media artist friends? Thread painters? Photographers? Sign them up. BTW, all rules are subject to change at my discretion.
These will not be quilt related prizes, but creativity related prizes. Like a deck of creativity cards.
Were you planning to wait until the last minute? Please don’t wait until the last minute. My life will be better if you don’t. Do your response NOW and post the link in the appropriate comments section.
As President of a Board of the NSGW, DH gets around the state quite a bit. He is well trained to take photos of quilts for me. I think he is interested as well when he sees one. Last weekend he went to Sutter Creek for a meeting at the Amador Parlor Native Sons hall. In that hall he saw this quilt.
It is a crazy quilt and is made from ribbons from various Native Sons events.
He said there were no blocks, per se, and, yes, he does know what a block is, but I can see a kind of Dresden Plate in there as well as a fan.
NSGW Quilt detail
These photos are taken with his cell phone, but you can see the detail of the ribbons in the detail photo.