
I liked the way this group of colors looked together. Even though I didn’t have enough to really make a large picture, I thought this was worth showing. It makes me think about how I want to arrange the triangles.
Commentary about works in progress, design & creativity
I liked the way this group of colors looked together. Even though I didn’t have enough to really make a large picture, I thought this was worth showing. It makes me think about how I want to arrange the triangles.
The Kona Charm Challenge sponsored by Robert Kaufman is all over the quilt world news. last weekend, after the BAMQG meeting, I worked on my border.

The border took me most of Sunday to put on. I realized later that I should have used EQ to figure out the sizes.

This is one of the secondary designs I was trying to preserve. It is the one I saw first.

Later, as the top came together, I also saw a kind of Ohio Star.

My inspiration came from the Manteca quilt show and this quilt by Traudi King, Fun with Scraps.
Selecting fabric is a very personal choice. I have a group of fabrics for my sampler class with Frances and I needed to choose some background-esque fabric to go with the Four Patches for my Double Four patch block. These are large blocks and I don’t normally work in this size, so I found it challenging.
I fell back on Lorraine Torrence‘s old adage: Make Visual Decisions Visually. That is the best advice I have EVER gotten in quiltmaking. Go take a class from Lorraine and buy her books. She is awesome.

I liked the bold graphic-ness of this print, but thought it might be too large.

I thought for sure this would work, but the cherries felt too scattered. They need to be hemmed in a little.

Something in the color was off with this print. The aqua in the Bliss print is more green while the small flowered print is more on the turquoise side.
")
This is the same print as the first one, but the flowers are smaller. I like the way you can see more of the flowers. Success!

I chose the last print and above is how the finished block looks.

Media
I listened to an episode of Pat Sloan’s Creative Talk Radio with Amanda Herring of the Quilted Fish. She described her new fabric line from Riley Blake. It is called Sugar & Spice. THEN the Fabricworm sent out a teaser a week or so ago and I can’t get the fabric in the teaser out of my head. ERGH!!! Those fabrics would go perfectly with my red & aqua quilt even though I am not buying them.
I heard about Matt and Shari on Mark Lipinski’s Creative Mojo and was so impressed with all the information on their website. They have all sorts of different projects, info about color, lighting, etc. They have a section on framing a quilt block, which includes the book I learned to quilt with, Diana Leone’s The Sampler Quilt. I have the original edition, which I still use for the binding lesson and the newer edition, which has great blocks.
Creative Mojo is growing on me. Mark is interviewing a lot of interesting people and telling me about a lot of interesting books. I hope I can meet him someday and have some of his fortune rub off. 😉
I was looking at my Google Reader for once since it was pouring rain and I didn’t want to go out for my usual lunch time walk. I saw a post from Fresh Lemons showing the Sugar Pop line of fabric. It looks so much better in her photo than it does in my workroom and I am starting to think that if this rain lasts much longer, I am going to have to breakdown and paint over the life sucking beige that still exists in my space.
Bari J, who is getting lots of press right now for her relatively new book, was the guest hostess on Wednesday Night Live with Lisa Fulmer of C&T publishing. She was demonstrating embroidery stitches and tools. There is more information on Creating the Hive.
On My Mind-Revisted
A few weeks ago I made a list of projects. I did that because those projects were cluttering up my mind. They are, with their status:
Other things I finished recently:
I am not bragging, really. I seem to need to feel like I am accomplishing something!
Shows
I am so sad that I am not rich enough to run off to NYC for the weekend, because I will be missing the Red & White quilt show at the Armory. The Lizzie B Girls have a great post with lots of fab photos on their blog about it. If you go, tell me how you like it.
Doing Good
Last call for Stars for San Bruno! I know the Sendai and Christchurch earthquakes have overshadowed the fire in San Bruno, but any contributions you make will be greatly welcome. See more information on my 3/24 post.
 You can also help the modern quilt community with relief for Japan. Check their new site. Tamiko is also doing her part. You only have until the end of the week, so click this link now!
Making
Here is a tutorial for making wonky cross blocks. You never know when you might want to make wonky cross blocks!
Need some kimono?
Project Selvedge
I saw an ad for a Michael Miller contest for fabric design. I have the perfect design, but I uploaded it too late. The directions said it could be done through 3/24, but on the West Coast, we often get shortchanged on the timezones. Oh well. Perhaps next time. I did put it up on Spoonflower, but can’t sell it, because I haven’t ordered a swatch.
I had an appointment with Colleen yesterday to talk about the quilting for the Frosted Stars, the Frosted Stars Leftovers and the Purple Quilt. I wanted to bring the Fabric of the Year 2010 top over as well, but I wasn’t able to even start the back. My life felt like it was spiraling into complete craziness this past week as things just continued to get heaped on to me. To add to the general life craziness, my work computer is acting up. It has been for awhile, but it reached new heights of not working on Wednesday afternoon and I lost patience. Nothing would load (web pages, local programs, nothing) and I could hear the hard drive churning away, which I knew was a very bad sign. Finally, on Wednesday afternoon, completely and totally fed up, I went to my boss, told him him the problem and asked him if I could just read my email from home on Thursday if my computer was working the same way. He said if my iPad was faster, I should just go home and use that on Thurs. WOOHOO!
Sadly, his IT staff came in early and did a stopgap fix on my computer. It was much better on Thursday, so I had to stay at work instead of hang out at home with my iPad next to my sewing machine. 😉 Oh well.
The computer problems just added to my stress and in light of the craziness, I decided I had to be okay with not getting the back of the FOTY 2010 finished. I talked to Colleen and will bring it in two weeks when she is back in town and ready to quilt again. That means I have two weeks to finish the back.

This past week wasn’t a complete quiltmaking desert. I did get a break on Monday when I didn’t have to take the Young Man to his regular Monday appointment and I took the opportunity to finish the FOTY 2010 top! Yay! I feel so good about that.
All the diamonds were sewn together and the border strips were cut, so I just had to sew them on to the top. It took me a long time – about 3.5 hours. I never think that borders and backs are going to take long, but they always seem to take longer than I expect. Oh well.
I learned a couple of things making this top. First, my deadline was to piece the whole top at the CQFA Retreat. It turned out that I wasn’t ready to piece this whole top. Diamonds require finding my sweet spot of piecing. I had to develop a rhythm and a method and I hadn’t done it by the time I reached the retreat. Second, this was a top that needed me to take my time. I ripped out much of the piecing I sewed at the retreat. A lot of people don’t care about points being cut off and I am not going to beat myself up about every single point, but I absolutely don’t want my bad technique to distract viewers from the overall look of the quilt. Finally, this quilt needed to be pieced slowly and carefully.


I have been lamenting my pictures (my whole blog, really) lately and these two show great detail, but they are not great photography. I am pretty pleased with the color layout on the pink and white section.
The diamonds are not in perfect positions colorwise, but I have improved since FOTY 2009.
In the photo of the pinks and whites, I am really pleased that I clustered the whites in the corner. In FOTY 2009 I put them along the left side one on top of the other and I decided that wasn’t as effective in terms of the colorwash idea. It is very difficult to get a really smooth colorwash effect when using prints. As I said, I think I improved over last year.
My mom kept telling me to move diamonds AFTER I had already sewn them and finally I had to tell her to make her own colorwash quilt!

As I mentioned in a post earlier this week, I will be making a block or two from Joel Dewberry fabric. I have the fat quarter laid out on my ironing board (see previous comments about horizontal space in my workroom!), because my design wall is full, and there is no horizontal space.
As I was finishing the FOTY, I kept pressing bits and pieces. When I was pressing the corner of the inner border on top of the JD fabric, I noticed how interesting this particularly corner looked with the JD fabric as the border. I didn’t want that active a print on the outside of this quilt, but I thought it was interesting.

When I started piecing Sunday (the only day I had to piece over the weekend) the above photo shows where I started. I felt a little quilt nervous breakdown-ish. The reds and pinks were really making me a bit crazy. I gave myself the day to finish the top, but part of me didn’t think I would get through it.

I started off by unsewing a whole bunch of patches that I had pieced just to get something done on Thursday or some normally non-sewing day. Unsewing got me into the groove of sewing. Above you can see that I have started to get the reds and pinks under control. There was some kind of shift in my brain and working slowly through each patch allowed me to get into the groove and make progress.

Above: four large chunks left to sew together.

The top above is finished. At least the main part is finished. I haven’t decided if I will add another grey border to accommodate the quilting process. I am concerned that the dots won’t match. As I turned away to come to the computer to write, I thought about piping as a way to accommodate the distortion of the quilting process and the dots not matching.
Not completely finished, but well on its way. If I can get the back done I can take it be quilted! YAY!

I hung up FOTY 2009 in my hallway yesterday. It can be seen when people walk in the front door. I received a ton of compliments on it, which was very kind of people. I was planning to take it to work, but needed to solve a quick decorating dilema and decided to keep it at home for awhile. I have to think of something new to hang in my office as I am getting tired of seeing Seeing Red when I walk in.
In the meantime, I am still working on FOTY 2010 steadily, though I wasn’t able to do much more than unpick a few yellows this past week.

Pretty much, this is where I started this week. There were still lots of gaps in the blues, but I had started to piece the smaller pieces into larger. One can ‘chunk‘ this type of quilt in the piecing process, but not as easily, or for as long, as when piecing square or rectangular patches. At some point I had to piece long rows together.
Part of this has to do with the arrangement of this particular quilt. The colorwash type arrangement doesn’t lend itself well to piecing the patches into chunks of four patches, as I was able to do with the Eye Spy quilt.

Aren’t the blues behaving nicely? The placement is not ideal and I would do it differently if I had unlimited tints, hues, values and shades, but my FOTY rule is that I have to use what I have, and so far I am happy.

You can see, above, the whole blue section pieced.

I am heading towards the pink on the bottom. Now that the blues are behaving nicely, the pinks are becoming little brats. It reminds me of the Mandrakes in the book, Harry Potter and the Chamber of Secrets. That big gap has reappeared in the pink area. Grrrr!
I have been contemplating the yellow and pink sections and doing a bit of playing with their arrangement. I am not terribly fond of a big line of greens or yellows or pinks slashing through the quilt. I prefer more of a blob arrangement (like the pinks are in the above photo – more of an organic shape). I am not sure at this moment how I will have them blend into each other – the blue to pink – if I do the blob arrangement. I don’t have enough yellows, greens and oranges to wash very completely. I think the green to yellow to orange is much easier, but there is a space consideration up towards the top. I’ll have to play around and see what works.

The fabric I ordered with my Fabricworm gift certificate arrived about 2 days after I ordered it. This is a different look than I usually buy, but I like it. Not sure what I will make out of it. I am thinking I will use it together, but we will see. I have to finish FOTY 2010 first! You can see it all at the Piece O’Cake website fabric page. There is a wonky 54-40 or Fight quilt on their home page today. I don’t know how long the links will work, though.

As soon as I arrived home from the retreat, I put up the portable design wall and organized the diamonds. They were pinned on the design wall, so I didn’t have to do much for the part that was already sewn. All the unsewn diamonds were just in the bag of pieces.

My next task was to put all of the reds and pinks back on the design wall. Above, I have put all the diamonds I could fit back up on the design wall.

I was really trying to fix that bottom right hand corner, which meant working on the blues.

The blues are getting better. I am making progress.

But not all of the blues are cooperating.

I felt like I needed to take a lot of pictures, so when I have succeeded in a section I have a record. I am nervous that I will need to recreate it if the diamonds get rearranged. I live with creative people and sometimes they think they are helping by rearranging things.

More with the blues.

Minor changes, but the piece is looking better.

Trying to make the leap from blue to green to yellow is proving to be a challenge. I don’t think there is such a thing as a dark yellow and that one green (smack in the middle of the photo above) is really sticking out and doesn’t seem to fit anywhere.
Back to it!
My retreat project, as you know from all of my preparations, was the Fabric of the Year quilt for 2010. I had high hopes that I would get the whole thing pieced. I enjoy doing the colorwork at the retreat, because I can get a lot of different opinions and I like knowing what other people see. Also, I feel like I have more space to spread out.

Above is the way I started the FOTY on Friday afternoon.

Above is the dark corner. Again, I was trying for the a colorwash kind of look across the quilt from right to left.

As I laid out the piece, it was interesting to see, visually, the amount of darks and colors.

This was the first layout. You can see a bit of the red next to the purple. Eventually, I took all the red off of the design board and put blue next to the purple. I did a backwards ROY G BIV working from right to left, though if you look at it when it is finished, the ROY G BIV will read correctly (see below).

Above, you can see that I have changed out the red for the blue in the center and put the red on the left edge. Most of the diamonds I have to work with for this project are blue. The design wall was not large enough for me to put up all of the patches, so the reds and pinks only got a representative sampling to begin with. As I worked through Friday afternoon and evening, then Saturday, I came to the realization that this piece was going to take longer than I thought. Putting it together was a lot more of an intellectual exercise than I expected. Part of the reason, I think, was that I wanted to put it together in chunks, which made the spaces created by the sewn seam allowances end up in strange places.

Those seam allowance spaces became unexpectedly large as I sewed, which turned out to make keeping track of where pieces went really difficult.

One challenge was the different amounts of colors I had. Another challenge was that the fabrics mostly did not consist of only one color. I tried to block out all but the background or dominant color in my mind in order to place the patches, it wasn’t always possible.

Above, which is the upper left hand section, is the least formed part of the quilt, and still, in the photo above, in quite a bit in flux.

In some ways putting the piece together got easier as I sewed larger chunks together. In other ways, it got to be more of a problem, because the spaces, as I mentioned, between the chunks got larger.

The bottom left corner was really my big problem. I don’t know what happened, but something happened early on and I still haven’t completely resolved the problem in that corner. I am working through it, but as I don’t seem to have a photo of the whole piece after I moved the red, it is proving to be a challenge. I am having to lay out that corner again as I go along. Lots of unsewing is required.

Are you bored yet?
The top right and middle were ok and I was able to sew some large chunks together.

No matter what I did with that bottom right corner, there still seemed to be large missing chunks of patchwork. Sigh. At this point, in addition to taking big deep breaths, I realized I wasn’t going to get the piece finished. Not what I wanted to face, but I wanted to do a good job and that was the reality.
It was a bit liberating to admit that, because I felt like I could look at the piece and didn’t have to rush straight to sewing.

I was able to put a few pinks up as the seam allowances shrank the whole piece, leaving more space. I had faint hope that some miracle would occur and I would finish the piecing.

I was also able to add some of the reds that didn’t fit when I started.

The large seam allowances seemed to keep moving as well.

This was the well behaved part of the quilt right before I took the whole thing down so I could go home.

IYellows and oranges were ignored, for the most part.

Virginia took this picture while she was visiting. It is really helpful to see what other people see in my pieces.

Julie helped me roll up the piece in the flannel of the portable design wall so I could bring it home and set it up again. My plan is to chip away at the rest of the layout and piecing. Not finishing puts me behind in my mind’s quiltmaking schedule, but I am sure there is a reason that I didn’t finish. I certainly didn’t expect the intellectual piecing challenge of this project. I am sure it is good for me.

I figured out why the other layout didn’t look right. In very tiny writing at the end of the first instruction, the pattern said “repeat for side 2.” I generally skim directions, so I didn’t see it the first time around and had to carefully read every word to find that crucial piece of the process. I am glad I did!

I picked out a dot to go with these fabrics. The charm pack didn’t have quite enough squares for the pattern, but that shouldn’t be a problem. However, I didn’t finish FOTY 2010 at the retreat, so I will have to put this on the back burner until I do finish it.

I am working on a, as yet unnamed, purple project using the fabrics on the bottom of the photo to the left. Those fabrics are from a Birch Bundle I bought at the end of the summer. The project is based on a picture I saw on Flickr and posted here in September.
I was cutting the rectangular patches for the piece in a random manner as I pressed fabrics, but wasn’t really ready to get busy until this week. I ordered some possible fabrics and got busy sewing yesterday.
I thought the Crocus (on the right, above) would be perfect. I picked it out using a color card that TFQ brought with her when we went to PIQF. I finally got around to ordering it. When it arrived, I looked at it in various lights around my house. Then I laid it out with the other two solids: Violet (left) and Deep Violet (middle). the two additional purples are from Free Spirit.
The Crocus is too grey/dusky for my project. That was clear from looking at it. That left me to decide from the two other choices. I think this experience is a good reminder for me to remember that a piece of fabric that looks good in a small piece may not be as perfect when I see it in a larger piece.

In order to make the choice, I laid out some of the pieced rectangles on the Violet. The photo above looks a lot more red than the real thing. Still, I should consider that the red may show up more in certain lights. The quilt will be going to live in a much different lighting situation.

I am liking the Deep Violet. There is a lot more pink in the above piecing that I intend in the overall quilt. I need to stop the random cutting and be more organized about my cutting now that I am serious about piecing this.
A discussion came up at the CQFA meeting on Saturday about Jelly Rolls. As you know, I used a Jelly Roll for the Zig Zaggy top, It’s a Merry & Bright Wrap and I am in the process of using one for the Frosted Stars. As I mentioned in a previous post, I had been hearing about Jelly Rolls and wanted to try one. Why not, right? It is always good to have an informed opinion.
One member had a few questions about them and so we started talking. Another member chimed in about how using someone else’s color choices took all the creativity out of making a quilt. She kind of went on and on for a bit about it. After she had finished I felt compelled to say that using someone else’s color choices might be a good way to learn to use colors that you wouldn’t normally choose. There is a gold in It’s a Merry & Bright Wrap that I wouldn’t ever pick myself, but works very well with the off shade of blue included in the Merry & Bright Jelly Roll by Sandy Gervais.
This conversation got me to thinking about color choices and how I work with color. I realized that I work in a couple of ways.
1. I choose colors in which I am interested in working. I see a color or a fabric and it gets me thinking about a quilt or a bag or a tote in those colors. At this moment, that means that I am collecting aqua and red fabrics and setting them aside in order to make a quilt in the future. I don’t know what quilt, though am leaning towards a basket quilt.
2. I also like working with whole lines of fabric. I like being part of a creative endeavor that someone else started. In a strange way, it is like a round robin. Like the It’s a Merry & Bright Wrap quilt, for which I made no decisions (pattern, whole line of fabric), I found solace in not making decisions. Also, if I am making a difficult quilt, like the Zig Zaggy quilt, which requires a lot of thought in construction, I find that putting the color choices aside allows me to focus on the sewing techniques and process.
2A. I am also enjoying the groups that Cynthia and her staff at Birch Fabrics/Fabric Worm put together. They are usually not a whole line of fabric from one designer , but fabrics that go together and have a variety of scales and designs. I haven’t actually made a quilt with one of her groups yet, but I am putting them together after washing and cutting patches in order to be ready to go when I start the next quilt. I am finding that I am also adding other fabrics in that I will go well.


3. Sometimes, I see something that inspires me.I have been driving by the house pictured for YEARS. In the last year or so, they painted it this rose and pumpkin color. I never have my camera with me when I go by, but today I was nearby and did have my camera so I swung by to snap some shots. I think I will make a quilt in these colors, but will add some violet as well. I think violet would look fabulous with the pumpkin and rose. There is an orange tending towards pumpkin dot (like the Ta Dots) that I have seen around. I haven’t had a chance to dig through my collection of dots to see if I have it, but it is on my list. Of course, I have to make visual decisions visually and will have to see.
4. Sometimes color doesn’t matter and I work with light and dark and a certain pattern. The Pineapple quilt is an example of this type of fabric selection. I am not sure if one would call this ‘color’ selection per se. Once inside such parameters, I do make rules for myself such as no like colors next to each other or only complementary colors next to each other etc. It usually depends on my mood.
5. Monochromatic color schemes, like the Blue Janus quilt are also intriguing me lately. I like the monochromatic color scheme, because it helps my eye discern the different types of blues, or reds or whatever color I have chosen for the color scheme. When you have 300 blues together they all look a bit different.
6. Rainbow/color wash type quilts have really been good exercises lately. The FOTY quilts have really been good for this. I have to admit that I am not liking the way I blended the colors in FOTY 2008. I don’t know what I was thinking. I do like the quilt, but in this color wash type of colorwork, the colors should blend more. It could be that my idea of this type of colorwork has evolved since FOTY 2008. I did a much better job on FOTY 2009. Maureen helped and I learned a lot from working with her on the colors. FOTY 2010 with the diamonds is next. We’ll see how that goes. In general, I like trying to blend the colors. I think the quilts are very attractive and they are an intellectual challenge to make.
How do you pick your fabrics?

Here is another batch of FOTY Diamonds. I diligently pressed and cut for a good portion of the weekend. This isn’t a very lively batch. I am working my way through the stack that TFQ pressed and for some reason this is not a cheerful batch.
I have to admit that cutting the patches makes me think about sewing the project together and that prospect makes me a little bit anxiety ridden. I am thinking about using the P&B Fizz as the anchor colors. I still want to do a colorwash with the diamonds, but thought that if I lined them up in color order across the quilt, I could use them to start laying out the piece.
My other idea was to arrange them like a Lone Star and radiate the other fabric diamonds off of them from the center.
For the moment, however, I need to cut diamonds out of my fabric.
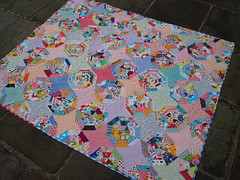
Katy over at I’m a Ginger Monkey has posted her finished Spiderweb. I have been thinking harder about my Spiderweb and, especially, the massive number of random sized strips I have been saving for it.
Katy’s rendition of this pattern is very bright and cheerful. I like the pinks she has used for the background