Making a Corner Store Block

Do you remember the Corner Store quilt? I started this tutorial back in 2012 and decided that I would post it. I don’t know why I never finished it, but here it is, a blast from the past. Good topic for a Throwback Thursday, don’t you think?

________________________________________________________________________

I thought a tutorial might be in order for these Corner Store blocks, so you can start on your own. Why would you want to make these blocks after I felt so miserable about the top I made? Because you can choose a different background. You can make the pieces larger. You can do a better job. I have laid the groundwork. Go forth and do better!

Supplies:

  • Basic sewing kit
  • Rotary kit
  • Square rotary ruler in a size slightly larger than the cut size of your blocks (I used a 6″ x6″ Creative Grids ruler)
  • Sewing machine
  • Leftover triangles or squares cut in half on the diagonal. There is no particular size, though larger triangles will be easier to work with.
  • Background fabric to accommodate the size of your quilt.
  • Optional: Judy Martin Point Trimmer

This tutorial discusses a type of foundation piecing.

(A) 4x4 squares
(A) 4×4 squares

First cut some 4×4 squares of your background fabric. Note, you do not have to use white (or Kona Snow as I selected). I would, in fact, suggest something not in the white or cream realm. I think a nice light yellow or creamy kind of grey would look better. Yes, if you choose something else you may need to eliminate triangles in that color range. It will be worth it, because the triangles will show up better against a background that contrasts well.

Nota bene: The triangles you will cut are right triangles. You can take some squares and cut them in half on the diagonal.

Also, you can choose a different sized background square. You can start with a large square to accommodate very large prints in the triangle portion. The directions are the same regardless of the sizes you use. Experiment and see what look appeals to you.

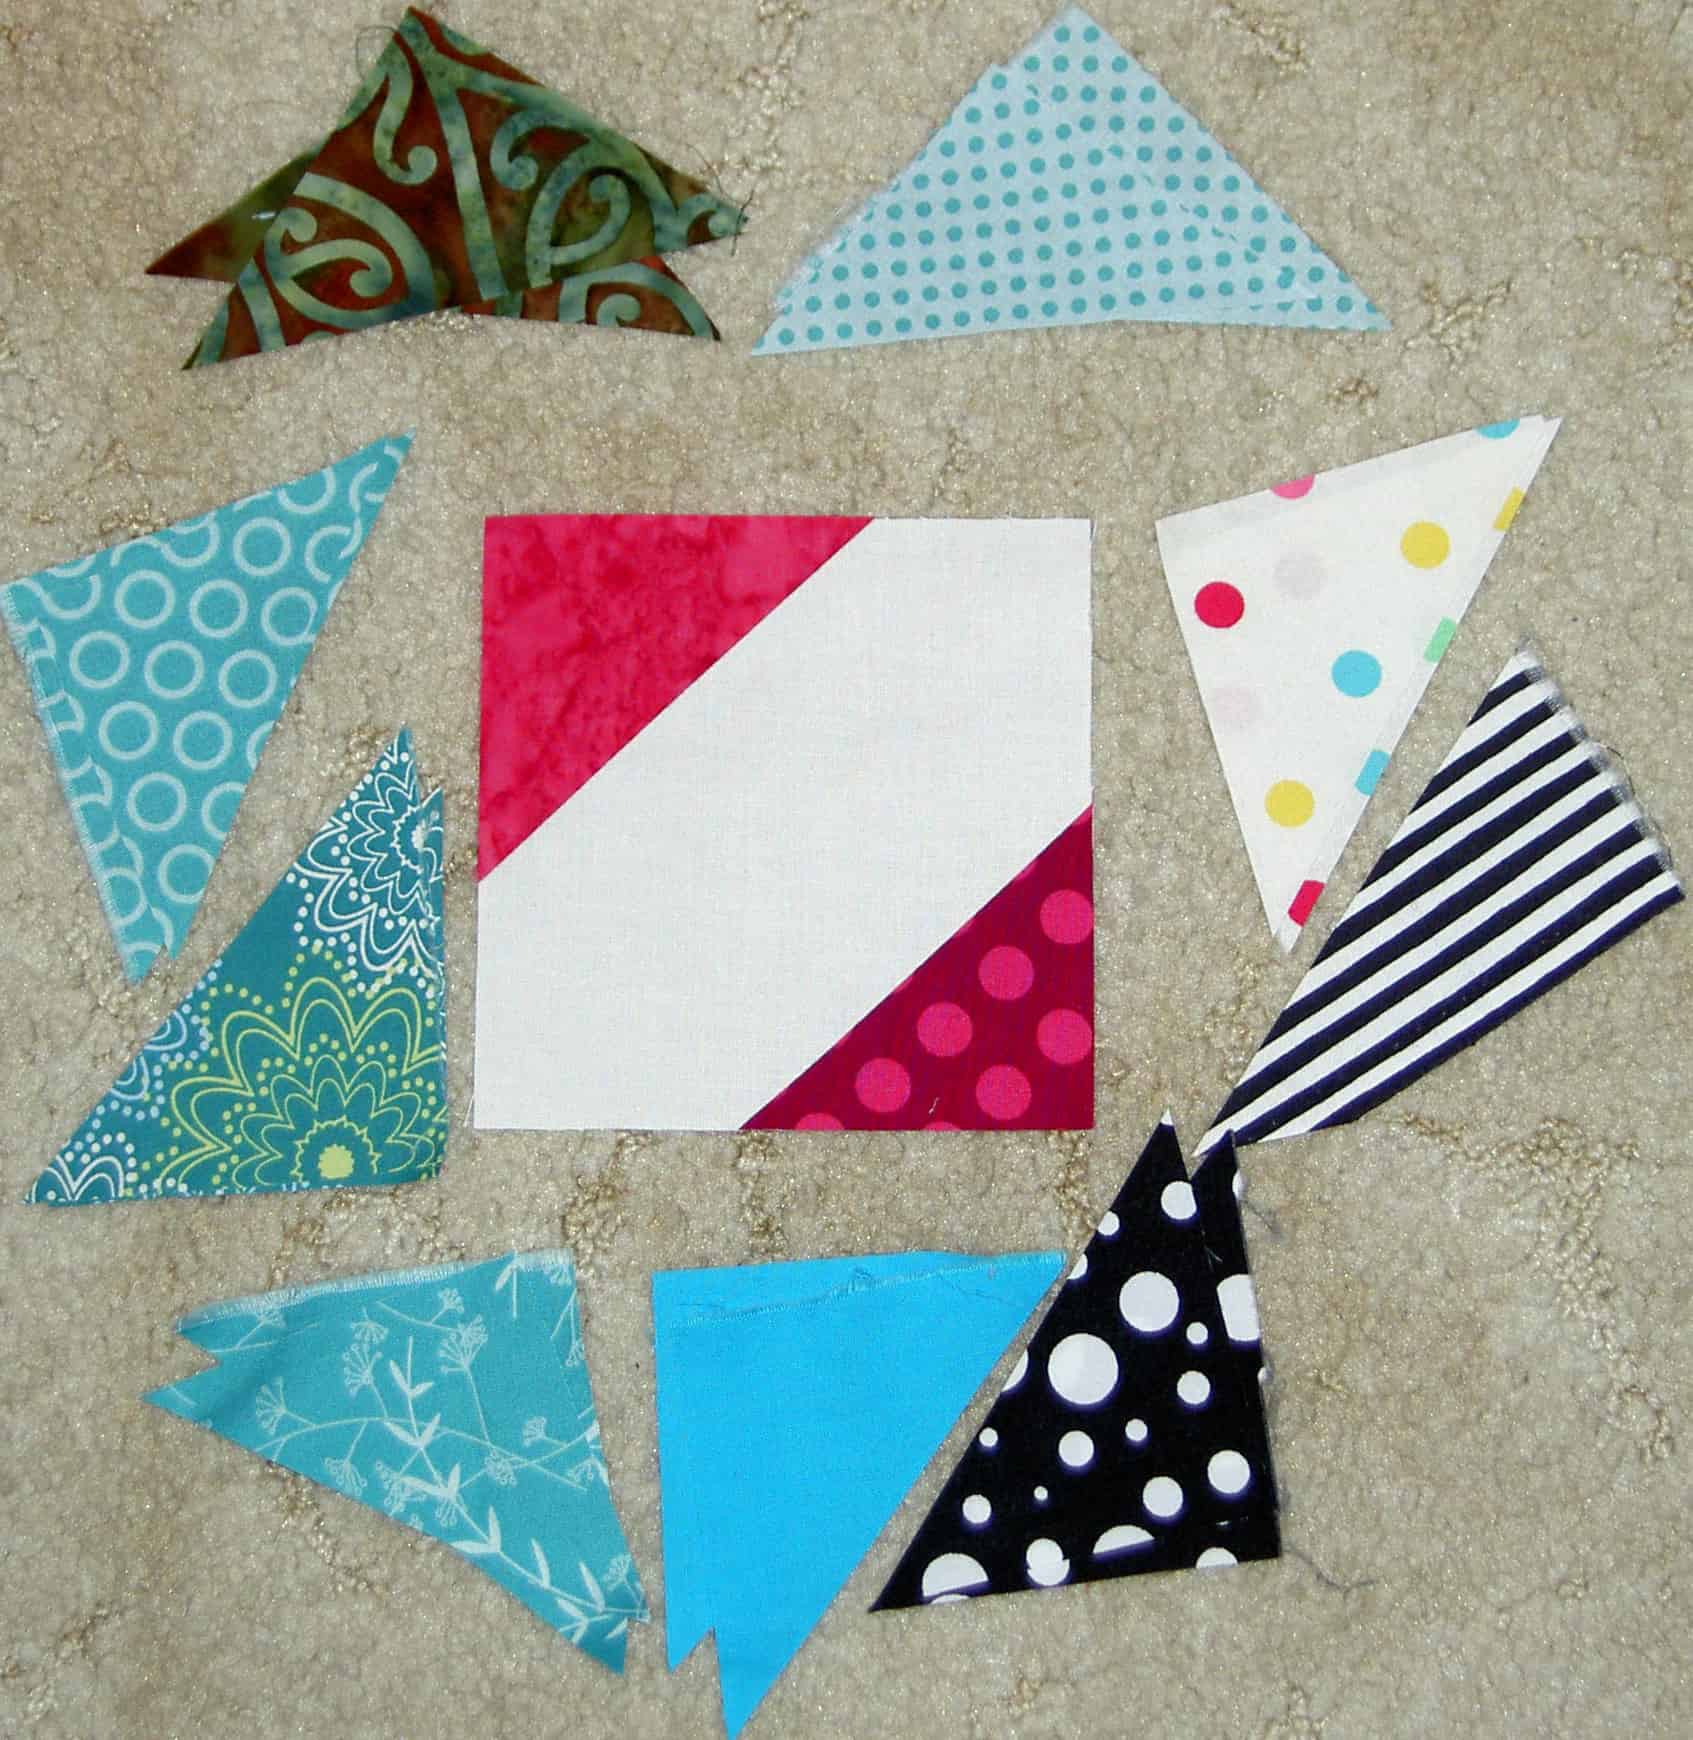
Next: find scraps or cut triangles from yardage. Cut different sized squares in half on the diagonal or use a triangle ruler to cut the shape. You do not have to be precise and there is more movement in the quilt if the triangles are different sizes. The only guideline on size is to make sure that a little bit of the background shows once you sew the triangles to the background.

Once you have your triangles and background squares, it is time to prepare to sew.

Pin Triangle to background

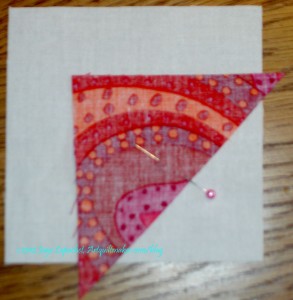
Next: Position a triangle on your background square, right side of the triangle down on the right side of your background fabric, and prepare to pin in place.

Before you pin, you will need to fold the triangle back on itself, approximating a quarter inch seam so you can ensure that your triangle covers the foundation/background fabric.

If the ears of the triangle are about a quarter inch over the edge of the foundation/background fabric, you should be in good shape.

If you have the Judy Martin Point Trimmer, you can trim off the ears of your triangle and position the now blunt edges of the triangle against the two sides of the foundation/background square.

Sew and press
Sew and press

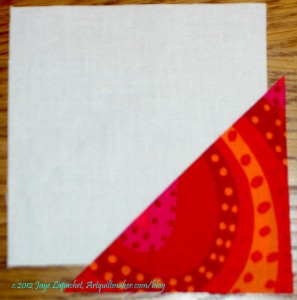
Sew along the hypotenuse (the long side) of the triangle using a quarter inch seam allowance, then press the triangle back along the seam line.

Once you are sure your triangle has covered the foundation/background fabric, you can fold back the triangle and trim the excess foundation/background fabric away.

Corner Store block and patches

You will need to put two triangles on each square, so follow the directions above for the second triangle. Once both triangles are sewn to the foundation, use your square ruler.

After while, you will have a big stack of blocks. My quilt has 288 blocks. It is large enough to top a double bed, but my BIL uses it as a large nap quilt on the couch. You can make more or less blocks, depending on the size you want. (Nobody pays me to do this so you’ll have to lay out the blocks as you make them and figure out your perfect size on your own.)

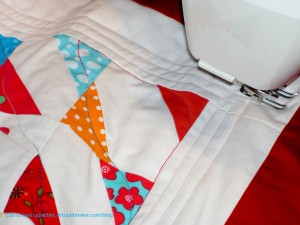
Layout the blocks. Shuffle them around so different colors are touching each other and you have a pleasing layout. Using my tutorial on Chunking, sew your blocks together.

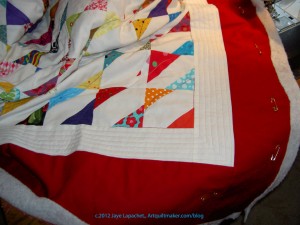
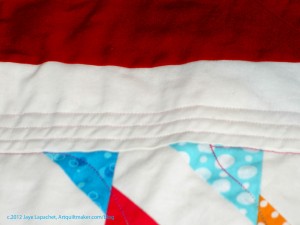
I wanted to give the quilt blocks some space, so I added an inner border that matched the background fabric and then added my outer border.

Corner Store Finished

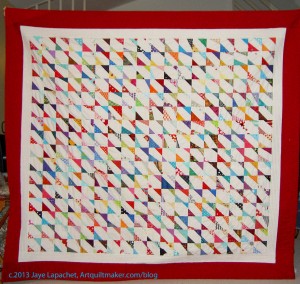
And this is what you get if you make a whole lot of these blocks!

_______________________________________________________________________
Quiltin Jenny
I am linking up with Jenny over at Quiltin’ Jenny blog

First Finish (Corner Store)

This is a post that I have written a little differently from most of the posts I write. I am going to write and then post it right away. Normally, I write a few days ahead and schedule my posts so I am not in a rush to get something posted at the last second.

We had a nice New Year’s Eve and also a nice New Year’s Day. We went and saw Skyfall last night after going to dinner. Today we watched the Rose Parade, did some stuff around the house and then went to our BIL and SIL’s house for a potluck-football watching-socializing kind of day.

I planned on being at the machine a good portion of the day, but didn’t want to seem anti-social, so I worked on the Corner Store while watching the Rose Parade and on the Garden while over at SIL’s.

Corner Store Finished

Why is this all relevant? Because I finished the Corner Store this morning! I wasn’t looking for such a big finish, but I do like to finish something on New Year’s Day as a way of setting the tone for the New Year. I suppose it is my version of a resolution since I don’t make the normal kind of resolutions.

I had a little bit of binding left and two repairs (don’t ask). Just stitching away for half an hour got the job done.

This quilt will go to my brother-in-law, who is ill. I hope he wraps up in it and feels people hugging him all the time.

Take a look at the last post about quilting this piece. It might be a long time until you read about me quilting again! 😉

Quilting the Corner Store

Border & Center Quilted

I spent several hours last week quilting the Corner Store.

Yes, she who does not normally quilt large pieces quilted a large quilt.

I went easy on myself, because my shoulder is acting up again and I didn’t want to be crippled when I had so much to do for the holiday. My pile of quilts to be quilted is getting ridiculous (7 that I can remember), though, and I wanted something to give to my BIL to provide some comfort while he goes through radiation treatment.

Quilting the 1st Border

I used to be a good quilter (not like Colleen, but I could hold my own). I stopped quilting large pieces when I hurt my neck and am way out of practice. I wanted to go easy on myself and I didn’t want to try anything too ambitious, so I stuck with straight lines and gentle curves. I have to admit that my original idea for the first border (white) was to fill it with a line of large circles. I couldn’t fix the tension enough to make it look good, so I went with the straight lines. It kind of looks like a frame, if you squint.

Corner Quilting
Corner Quilting

In the last photo (left), you can see some of the quilting in the center. I used a Valdani variegated thread that I bought in Chicago several years ago. I don’t really like variegated thread, but it works in certain circumstances.

You can also see how I used the walking foot to measure the space between the quilting lines. I kind of like doing that as it seems to be a consistent measurement.

The quilt won’t win any prizes, but if it provides some comfort, I will be happy.

You also might be interested in reading:

  1. Corner Store Again
  2. Corner Store Once More

Corner Store Again

Corner Store with Red Border

As you might remember there were good comments on the next to the last post I wrote about the border of this quilt. Rhonda was right, not that I doubted her, of course. This quilt looks a lot better with a red border on it.

I did a trial run of the border in another post and, then, sewed it on last weekend. Do you ever have times in your quilt work where you have a lot of little things to do – make a binding, sew on a border, fix a hole, print foundation templates – that all seem to stack up before you can move on with projects? I had a weekend like that last weekend. I never feel like I get a lot done when I have those lists of things to do, but the weeks that follow are full of amazing productivity.

I really am so much happier with this quilt now that it has a red border. One thing I completely forgot about was the binding. I had made a white binding, which was no longer appropriate for this quilt, so I also made a red binding for the quilt.

As I have mentioned, I may quilt this myself. My quilter has so many of my quilts and they are languishing a bit. My machine is so much easier to use and no longer frustrating since it was serviced and I have a spool of thread that would work. I think I could quilt this quilt – simply and get it out of the house.

Quilting a quilt does take up space on my machine and does hamper my piecing productivity. I guess I have to become OK with the entire quiltmaking process. I have been avoiding quilting for the last couple of years. Perhaps it is time to get back in the saddle.


Corner Store Once More

Corner Store Red Border

Apparently, I am still thinking about this quilt and you are, too.

Rhonda wrote in a comment “I’ve been thinking a lot about this quilt. Probably because the whole idea of a “souless quilt” is so sad! If this were my souless quilt, here’s what I would do. I would keep it as is, including the white border that is the same width as the squares. Then I would add a 6- or 8-inch wide border in a warm solid color, maybe red, or orange, or magenta. The border would need to be wide enough to balance out the white with color. I would probably do the binding in the same solid as the wide border. Maybe then it would look like the border was trying to contain/constrain all those active little triangles that are dying to get out of the box, and create some tension. Some applique on the border of escaping/leaking triangles would be fun, too. That’s it. That’s all I’ve got.”

When she wrote that I thought I would see how the quilt would look with a red border. I’m not sure, though I do see an improvement. I bought the red for something else, but it does add something to the quilt. I would have to make the back larger, if I decided to add another border.

Analysis of the Corner Store

Corner Store Finished Top

Last week, I talked about finishing this piece and how it had no soul.This realization kind of sent me into a bit of a tailspin, because I am not used to quilt tops having no soul. I got a lot of great comments, which you should go and read. Everyone had great suggestions and insights. I really appreciated the comments.

I had a long discussion with TFQ about this piece and I finally came to the conclusion that the ratio of color to Kona Snow is off. That means that there is too much Kona Snow for the amount of color I included. It could be that this pattern, which originally came from Pretty Little Mini Quilts, was never really suited to scaling it up. In my version, the blocks are small, but the piece is still fairly large.

Still, I think that there is not enough color and too much white. I think that white can lighten a piece and give a fresh look, but I think the quiltmaker has to be careful about how much white to use. I think I have to agree with TFQ that too much white can suck the life out of a piece.

I was upset about this quilt and it did make me think, but I am glad I have bumped up against the “white wall.” I am glad I pushed the envelope and seem to have a limit. It is good for my development as a quiltmaker. I also have to remind myself that I can’t make a masterpiece every time.

Corner Store – Late June Progress

Corner Store - Late June
Corner Store – Late June

After not having much time to sew, as described previously, I spent a lot of time sewing over the weekend. In fact, aside from a quick trip to dinner and a movie with my favorite date and a few other minor chores (no gardening!), I spent the whole weekend sewing.

The Corner Store seems to have taken me a long time. Looking back, I don’t think it should have been on my 26 projects list. After all, when I wrote the 26 Projects List it was just a placemat and an idea; it wasn’t really a UFO. Still and all, I put it on the list and I have decided that everything on the list will get a disposition.

Over the weekend, I made significant progress on this quilt. The picture above shows what I had done previously – most of the blocks were sewn together in groups of four. I had started to sew those groups together, but didn’t get very far, so that is what I worked on.

One after the other, I sewed the groups of four into groups of 8 and then the groups of eight into groups of 16. Basically, I chunked them.

In between, I pushed bits of the Pink Donation Quilt through the machine and made significant progress on that as well as a bit of progress on the yellow version which is the next donation quilt on the list. Another post for another day. Stay tuned.

Corner Store Finished Top

I finished the top and am well on my way to finishing the back. I am going to use a big piece of a Phillip Jacobs print called Japanese Chrysanthemum. This fabric was destined to be a very nice bag, but I think, even though I bought the pink colorway, that there is too much brown. I am just not a brown person.

I had planned to put a spiky border a la Gwen Marston. The Molly Flanders blog has a very nice tutorial, which shows a similar quilt to this one with the spiky border I decided not to make.

Ok, here is the confession. This is a pretty quilt top. It is well made, my corners match, etc, but this top has no soul. If I weren’t compulsive about getting project finished, then it would be an interminable UFO. I don’t know why it has not soul, but it doesn’t. I’ll finish the back, get it quilted and then figure out what to do with it. It is a little too girly for one of the boys, but we will see. So it goes, sometimes.


June Progress on Corner Store

June Progress
June Progress

It is hard for me to sew during the week, but I am making some progress.The iron issue is not resolved, so I have to figure that out (return current iron, which stinks to high heaven when on), but I am trimming and arranging blocks. My design wall is starting to be too small, but I will have to make it work.

I have 289 blocks to work with and I may make more. I don’t know what size I am aiming for, but my mind keeps saying “BIGGER!!!!”

I probably have enough triangles to make at least 50 more blocks, I don’t plan on making 50 more blocks, however you never know what the muse will scream at me.

Stay tuned.

More Corner Store

60+ New Corner Store Blocks

I was more exhausted that I thought I would be yesterday after getting home late from celebrating the Golden Gate Bridge’s 75th birthday. Over the weekend, I worked hard on the Corner Store blocks and I couldn’t work on them anymore. I didn’t have a clear path moving forward on the project and needed a break.

Between Saturday and Sunday, before we went to see the fireworks, I made an additional 60 blocks. The blocks are now covering my portable design wall. I think the piece is large enough, though I did consider sewing another 34 blocks for two more rows. I have to decide what I will do for a border, if I will add a border.

The blocks are very easy to make, as I have said, but I wonder about the colors. I have a sneaking suspicion that ROYGBIV just does not provide enough colors for me. OR I could be forced to confess to the fact that I buy fabric in a small range of color families. In putting the new blocks up, I saw that similar colors ended up next to, or near, each other. Some weird quirk of quiltmaking fate?

Full Corner Store
Full Corner Store

After taking the photo of the new blocks, I put up all of the blocks and was pleased to see that the quilt is now starting to be large enough. It might actually be larger than a placemat, e.g. large enough, especially if I decide to put a border on it.

What would you do for a border?

Corner Store Progress – Mid May 2012

Whole Corner Store Mid-May 2012

What I want to rant about is a very bad and getting worse customer service experience that has nothing to do with quiltmaking. I need to get over it (or at least put it out of my mind), delve into the happiness that is Quiltland and tell you all about the Corner Store.

I was truly despairing of every finishing this piece. The blocks are small (3-7/8″) and I wanted to make something larger than a placemat. I thought I could just make blocks until I was 90 and then have a table runner.

Oh me of little faith. As I said before, I get more on this project finished, when I don’t focus on it. You know how you see things out of the corner of your eye, but if you look straight at them they disappear? That is what is going on with this quilt. I used the C.S. blocks as leaders and enders for the Wonky 9 Patch, as I think I mentioned.

C.S. Blocks finished before the W9P

Guess what? 68 (or so) blocks done!

No kidding. I do not jest. You can see, in the above picture, that I have made a total of 168 blocks. The piece is bigger than a placemat and a tablerunner now.

I thought the blocks I finished before I started the W9P would be the end until I got some more Kona Snow. As luck would have it, I found a piece of Kona Snow, clearly labeled (damn solids for not having a selvedge with words on it!) and about 14″ wide. I promptly cut it all up into 4″ squares and came up with about 75 squares. I was off. I thought I would never get through that many, but I don’t have very many of the squares left.

C.S. Blocks finished after the W9P

The new batch of Kona Snow is here and washed, so I am ready to cut some more and continue sewing.

I don’t think I am nearly done. I am thinking that I need to make at least another 121 blocks and then the border. I am thinking of the spiky border Gwen Marston talks about in Liberated Quiltmaking.

Anyway, progress is being made.

Corner Store Progress

New Corner Store blocks

I think this project will progress in fits and starts. I made the new blocks (on the right) while I was piecing the Flowering Snowball. I used the Corner Store blocks as leaders and enders. Such a useful, productivity improving technique.

I find that I put the blocks up on the design wall and I become uninspired to make more. Not sure why. I like them; I think the piece works well, is interesting and pretty. As a project I work on steadily, it wasn’t working for me yesterday. However, as leaders and enders in between a different project, I make a lot of blocks. What is that about?

And, the other question is, if I don’t work steadily on the Corner Store, what should I work on? I need some bang for my buck. Can I finish another top next weekend? VIMH#1 says I have to enjoy the process not just go for finished product.

All Corner Store blocks - May

I put all the blocks up. I have quite a few. They are small, though, so it isn’t enough. There is still a lot of red and pink. I made an effort to make blocks with no red or pink, but I have a lot of red and pink triangles, so it is hard.

This is not the final arrangement. I slapped them up on the wall and did a tiny bit of rearranging.

I also have to buy some more Kona Snow as background. The Pure Elements Linen, of which I have plenty, is different enough to be noticeable.

Corner Store Progress

Corner Store - May Progress

I know I am trying to finish the Flowering Snowball, but the hand piecing is slowing me down. Since th cut squares and triangles were sitting right by my machine, I just started sewing them together. I just needed to sew. In between sewing the Swoon, I made 20 of the Corner Store blocks.

These blocks are fairly easy to make if you have everything cut. As I have said, I like the variety of different sizes of triangles. I think it creates movement across the design field, but I think the viewer can see it better if the blocks are sewn together.

Lots of red in this group, but really awesome reds. I found another container of triangles with some more variety of color. The blocks will look different when I put them all up on the design wall and move them around.

I am not sure how many blocks I am going to need for a finished product, but I think the height of the piece will be 15 blocks down. If I make a piece that is 15 blocks x 15 blocks, I will need 225 blocks not counting the borders. I don’t have any idea of what type of border to add at this point. We’ll have to see.


Corner Store

Corner Store in process

In the book, Pretty Little Mini Quilts, I saw a small quilt similar to this. At the time, I was cutting up diamonds for FOTY 2010 and ending up with boatloads of triangles. I thought this project would be perfect.

I cut up some 5″ foundations and started to sew diamonds on to them. I sincerely disliked how much white was on the piece and how it overshadowed the scraps.

I started ripping the scraps off of all of the foundations and cut the foundations down to 4″. The other night, while I was watching TV, I pinned diamonds on to the newly trimmed founds and they are all ready to sew and trim again. I can use these pinned pieces as Leaders and Enders.

I have the little bit up on my design wall. It is making me excited about moving on to it as a quilt.

Corner Store Project

Corner Store Test
Corner Store Test

I have written a lot about the Corner Store pattern from Pretty Little Mini Quilts. This block is very appealing especially since I have been thinking about my scrap pile lately. I bought a large piece of Kona Snow and finally cut into it for the Zig Zaggy quilt and for this Corner Store project. I didn’t cut a multitude of pieces in advance (always a recipe for disaster for me), but I did cut some.

You are probably wondering why in the world I am starting  this quilt at the same time I started the Zig Zaggy quilt and am still working on the Blue Janus quilt. Insanity? Perhaps.

The true reason is that the box in which I store the triangles for this project is getting full. Also, I thought I would make a few blocks and see how they looked.

My first step was to ask TFQ for the dimensions. She has the Pretty Little Mini Quilts book at the moment. She emailed me back right away with a 3.5″ size. When I cut a few of  the squares I thought that looked terribly small. When I put one triangle on, the block did not look at all like the version I saw in Pretty Little Mini Quilts or on Flickr. I must have misunderstood the size. Again, something that should have been a quick chain piecing and trimming start to a project has turned difficult.

Difficult is a strong word. I have to test different squares sizes to see which one will suit the look I am trying to achieve. I wanted to focus on the Blue Janus quilt, so this was put to the side.

Stay tuned!