Pies & Points Blocks Really Done

Pies & Points Layout Complete

I finally finished the blocks and laid out the quilt the way I pretty much want it. I am still fiddling with the Pie half blocks, but otherwise this is how the quilt will look. Obviously, I have to fill in the background.

I am a little concerned about the large spaces of background, but I can’t really process how they will look with the white of my design wall showing through.

Pies & Points Blocks Heading Towards Done

Pies & Points blocks done

I am still working hard on Pies & Points. I have mostly finished the blocks, except for a couple of seams. I am also closing in a layout about which I am relatively happy, too.

There are a few adjustments I need to make.

I didn’t have enough of the right pieces to make all the blocks I wanted. I should have gone over to Friend Julie’s house and cut them using her Sizzix (we got the Sizzix die in the class), but I didn’t think I would need many pieces, so I cut a few by hand, then  cut a few more and a few more. I still have a few more to cut.

Once I get the layout done, I’ll have to start putting it together. You can see from the shapes that I won’t be able to put it together in rows exactly. I see some Partial Seams in my future.

Pies & Points Returns from the UFO pile

I took a class from Victoria Findlay Wolfe at QuiltCon about 1, 000 years ago (well, 2016). I think I mentioned that every time I rewrite my quilt to do list the same projects are listed as UFOs. I decided that some of these are going to get finished. I backtracked a little and decided to work on one then see how it went. Of course, I want to finish them all, but every journey requires the first step. My first step is Pies and Points.

I have also been in desperate need of a quilt project. Why starting one or jumping back into one was difficult, I don’t know.

The first step for actually working on the project was positive. I found the project and all the pieces were in the same bag. Yay! I had been talking about this project to myself for a few days, so I feel happy that I actually did something.

Pies & Points blocks from class

The second step was positive as well. I put the blocks I have made (4) on the design wall and I still like them. The background might be a bit boring, but well see how things go after I make a few more blocks.

Latifah Saafir Class

Put a Ring On It Pattern

Even though I can teach a vast number of quiltmaking skills, I don’t know everything. The guild hosted Latifah Saafir on Saturday via Zoom to teach us her pattern, Put a Ring on It*.

This pattern uses two of Latifah’s Clammies, the 12 inch** and the 8 inch**. I was super pleased to receive these as gifts between my birthday and Christmas.

The pattern is fairly complete and pretty easy to follow. The class was worthwhile, because Latifah gave us tricks and tips and helped us troubleshoot. The Clammy tool and the pattern really make this, essentially a Double Wedding Ring, pattern accessible to almost anyone. Obviously, I wouldn’t suggest it as a first quilt or if you haven’t tried curves, but otherwise, you can do it.

Martha Negley Vegetables

We had to select fabrics and cut pieces before class. I used an older Martha Negley fabric for the background. The background isn’t very much of the quilt. I wanted something different after looking at all the various versions of this quilt plus other DWR versions online. I didn’t want to make the traditional light background. I also didn’t want to copy the version on the cover. I thought of text prints for the rings, but defaulted back to my Frolic! color scheme with a variety of red-violets and the dark blue.

Two Rings Finished
Two Rings Finished

During class I was able to finish two rings. I wasn’t pleased with the green I chose for the squares. That was one good thing about being at home. I was able to grab some other fabrics and switch them out. I’ll mix up the rings so the green doesn’t look like big green blobs in the center of the quilt.

I am making a 9 block (1 ring=1 block) quilt. It will be about 48 inches x 48 inches. I didn’t want to commit to something larger and even this number of blocks is feeling like too much. I am going to power through. If I can get a ring a day done this week, I can finish all the ‘blocks’ by the end of the week and be ready to put the quilt together at the weekend. I don’t want this to become a UFO. I want to get it down and ready for quilting.

What I really wanted out of this class was to learn to use the Clammy rulers. I think I have started on that process, but didn’t get very far. This class was all about the Put a Ring On It pattern and making that. Learning various Clammy techniques was not on the agenda. That was sad. I hope Latifah comes up with a Clammy Sampler class. I get the sense that this tool is an awesome method for making circles in quiltmaking.


*No affiliation. Both a PDF and print pattern are available. I got the printed pattern and really liked the format.


**I use affiliate links and may be paid for your purchase of an item when you click on an item link in my post. There is no additional cost to you for clicking or purchasing items I recommend. I appreciate your clicks and purchases as it helps support this blog.

Baseball Catch All Caddy: Finished!

I took my first video/Zoom class on Saturday and I learned a lot. I had to come late as I had a presentation at 10, but worked ahead, so was almost at the point of the rest of the class when I joined in.

Baseball Catch All Caddy

After class, I decided to make another Catch All Caddy for my DH to put his stuff in. We both accumulate stuff on the dining room table. I made his first first, though I plan to make one for me, too, because I had baseball fabric out from my rummage through my backing fabrics a few weeks ago.

I did a couple of things different on this one. The pockets are made with tubes to so I left a little of the pocket fabric showing above the border fabric (dots). I thought that was an interesting idea and I wanted to try it.

I also used 40 weight thread for the top stitching. It goes through the machine with no problem and you can see it more than regular Aurifil. I don’t know if it is the right shape for DH to use, but we will see.

Catch All Caddy

BAM had its first Zoom workshop the other day and I took it despite some challenges. First, we had to do some prep work, which I did, but I think I went a little beyond, because I had a presentation and wouldn’t be able to join until late.

Catch All Caddy prep-complete

The Catch All Caddy was a bag that was given away at the 2013 retreat. I think it was one of the best bags given out when bags were still being made for retreats. Since then people who attended that retreat bring them to Sew Day and workshops, using them to organize tools and carrying their other stuff. Everyone else is envious, thus Lynette decided to teach the rest of us how to make the bag.

I felt good about my progress Friday night when I finished for the evening.

Jen Carlton Bailly Class

I spent the day last Saturday in a BAM class with Jen Carlton Bailly. I don’t really need to learn about curves. I have done them in the Sampler class and I have just finished the MetroScape top, which had about a million curves. Still, I wanted to be in a class with JCB and I love the vibe of BAM, so the more time I can spend with those ladies the better.

Jen is friendly and energetic as well as a good and patient teacher. She seemed to be everywhere in the class. She was also cheerful and smiling the whole time. I found her to be approachable and not standoff-ish.

The crux of JCB’s class was the template set she sells. She uses these to create a variety of different looks with curves. Of course, I bought the whole set and I am glad I did. The variety of different things one can accomplish with this set is fantastic. By looking at the patterns JCB sells and the quilts she has made, you can see the definition of a series.

Turbine Blocks, January 2019

At the time I bought the template set (when I signed up for the class), she was giving a discount to class participants, so I also bought the Turbine quilt pattern. In the class, I started in on this pattern, which is not difficult, once you have mastered JCB’s method for creating circles.

She tries to alleviate fears with her patterns and techniques while making interesting designs. I am not afraid of curves, though they can be frustrating at times. I am also not afraid of cutting into a block I have already made.

Jen Carlton Bailly's Rings
Jen Carlton Bailly’s Rings

I made two of the turbine blocks with my own twist. I decided, after making the two, that I will make one more and create a tablerunner instead of making a quilt. I like the pattern and like the technique, but don’t want to spend the time on something like that. I am more interested in the designs that look like more of a ring.

This sort of design has been on my mind since I saw Sue Arnold’s version done in Pointillist Palette fabrics about 1,000 years ago. This is really interesting to me and if I do a quilt, it will be using more of the templates to cut out more of the blocks.

JCB's Lantern pattern blocks
JCB’s Lantern pattern blocks

Gerre decided to work on the Lantern pattern, which uses the same technique, but different placement of the fabrics and different orientation of the blocks.

I can see making something small using this pattern as well. The opportunity for scrapiness is fantastic. A pillow cover, perhaps.

All in all it was a good day. I was pleased to meet JCB, pleased to be sewing and be with my BAM pals.

Boxy Bag Class

Boxy Bag - closed
Boxy Bag – closed

I took a class on Saturday at Sew Day. We don’t usually have classes during Sew Day, but we had this one. People were still allowed to come to Sew Day if they weren’t taking the class. They could listen in, but I didn’t see any of them trying to horn in on the class. We just aren’t that kind of group.

I did some of the home work during the week. I pulled the two fabrics off my ironing board and the pattern called for pieces almost the size of the fat quarters. This means I won’t have slivers of them in my FOTY 2018 quilt. 🙁 C’est la vie!

Boxy Bag - open
Boxy Bag – open

Lynette taught the class and she is a great teacher. Here handouts were stellar. Her teaching was really clear. The project wasn’t complicated, but a little tricky in places. She did a great job explaining  the tricky parts even when two sets of students diverged when a group went and had lunch while the other group kept working.

I like the way this project came out. It is fully lined and very nicely finished. I immediately wanted to make a bunch of them. I think I’ll finish the aprons first.

Sisters Retreat-Class Day Three

Wednesday – Day Three of the Rosalie Dace class

Who Am I? with grid
Who Am I? with grid

I started out the day with the ribbons applied.

Construction again. I drew out some letters and started cutting them out of fabric on fusible.

I am pretty happy with the letters. I started out with a ‘J’ I found on the web. I wanted all of the letters of my name to be beautiful. I didn’t have an entire alphabet, so I extrapolated out from that one ‘J’. I used the slant and thickness of the letters to make up the other letters. I also used the stem of the ‘J’ to make one stem of the A. I don’t know if they are beautiful, but I think they are beautiful.

I wanted some, not all, of the letters on the overall piece to be beautiful.

I started working on the letters. And also the placement. The last day was much slower than the other two days. I made good progress, but the pieces were smaller and more detailed. I worked on the placement of the Jaye and the Anne. I thought my names would be the first two lines, then I realized that I was my mother’s daughter before I was anyone else’s anything.

I used fusible, ribbon and some zig zaggy trim for the various letters. Each group of letters required at least one ‘rewrite’.

Sisters Retreat-Class Day Two

Tuesday – Day Two of the Rosalie Dace class

Who Am I? background

I got the background done pretty sharpish when I got to class Tuesday.

Yes, this is the background. It is the essence of who I am. I guess. I am not exactly sure why this is the background.

The biggest problem with art quilts is construction. To achieve the design goal, the construction can be challenging. the background you see was pretty basic piecing except for the spot where the top of the M comes together at an angle.

For the moment, I am leaving the -v- for later. Rosalie said that she couldn’t see it, so I decided not to worry about it right at the moment.

Who Am I? grid in process

The next step was to get the ‘ladder’/grid motif appliqued on. I tried strips of fabric, but eventually landed on some ribbon that I have been saving for …something. This is the something. I laid out the ribbon where I thought they should go and looked. I moved them around and looked some more.

Again construction was an issue. The first piece, a piece of thick ribbon that looked like mosaic tile, went on like a dream. The next piece, which was much thinner would not go on. It bunched up, slid around and was generally a pain. I finally put batting on the back and sewed through the ribbon, the background and the batting. This is not ideal, because I have to worry about when to put a backing on and how to quilt it all again. Still, I was in class and had to make do.

Who Am I? grid
Who Am I? grid

The grid, which is kind of like a second background, came out ok. The ribbons aren’t perfect, but they fit with my design.

I got back to my schedule and finished the ribbons by the end of day two. Next up: letters.

Sisters Retreat-Class

Sisters High School / Quilt Class Retreat Center

Monday started in bright and early with class. Julie, Kathleen and I all took the Rosalie Dace class. I signed up when Kathleen and Julie did because I was OBE. I really had no expectations.

This was a three day class with the title “Word for Word.” I brought some text fabrics and threw in some greys and a large piece of a dot print as well as some embellishments, ribbon and some fancy sewing machine feet.

This was one of the best classes I have ever taken.

Rosalie teaching
Rosalie teaching

First, we talked. Rosalie showed us slides of art that included words. There were quilts (think about the Temperance movement), graffiti, one piece that depicted the words escaping a box and many others. She talked about creating and design. The talk went on for awhile, but the most helpful thing to me for my design was when the students introduced themselves. We had to say why we were in the class in one sentence. People talked about their names as well, but I can’t remember if that was part of the question or just evolved. One fellow student talked about how she had many names – nicknames, names she called herself or wanted to be called, names others called her. She has a long and girly name, so the permutations are endless.

Who Am I? piece
Who Am I? piece

This got me to thinking about my name. My name has no nicknames. None. That made me think about my roles. Even if I have no nicknames, I have roles. I decided to use my roles as a basis for my piece.

This idea gelled into place so quickly that it was frightening. Because of the speed, i was really unsure of the whole concept. I talked with Rosalie about it and she loved the idea, so I went for it. Every staged gelled, so I just kept working.

I don’t agonize over my pieces constantly. Yes, I do agonize a bit , but in this case, I kept asking for a bit of feedback from Rosalie and moving forward.

I got the background almost done on Monday. My goal was to get the background done On Monday. I know that if I get a lot done I can continue when the class is over. I needed momentum.

I had only two more seams to go on Tuesday to finish the background.


Sisters Retreat

Packing for Sisters
Packing for Sisters

Last Saturday Friend Julie and I packed my car and headed off towards Oregon. We made a quick stop at Colleen’s to drop off three quilts, as mentioned and then settled in for a long drive.

We made stops at Granzella’s in Williams (mob scene with a great taco salad) and Dunsmuir (yummy lemonade), ending up in Klamath Falls for the night. We saw haze, but other than that we weren’t affected by the fires raging throughout California. If we had  left a day earlier, we would have been stopped at the border by a fire that jumped the freeway after a girl with firecrackers started it. DH encouraged me to drive the entire way in one one long day, but that is too much sitting in the car for both of us.

We had a good night’s sleep and set off again. After a few errands, including having to wash the car (tons of ash), we got on the road. The car wash was hilarious. It was one of those U-Wash-It type places and we wash and rinsed the car with giants wands. We decided to make a detour to Crater Lake. It was on the way and we had plenty of time.

Julie had been there before, but I hadn’t as an adult. I might have been there as a kid. I don’t remember. Being summer, the place was pretty busy. We were still able to enjoy the amazing view. AMAZING.

We spent a good hour or more as t Crater Lake then stopped at a small diner in Chemult for lunch. No amazing taco salads and kind of a flare when I asked about gluten free buns.

Stitchin' Post
Stitchin’ Post

We wanted to stop at some quilt shops on Bend, but time was short so went straight to the Stitchin’ Post to checkin for classes and get our packets. We did look around the shop, which is gorgeous!

Yes, I bought some yarn, needles and some yardage of a Philip Jacob’s print. It was getting late and we were tired. Our housemates were waiting and we still had a stop to make at the grocery store, so we left with our few purchase. We plan to go back and really inspect everything later.

Kathleen had dinner ready for the whole gang when we arrived, which was fabulous. The house is great-comfy and plenty of space. It isn’t too far from town or too far from the classes. We can walk to both. I looked forward to the week.

QuiltCon Day 5 -Last Day

Well, as you read this, I will be getting back to real life.

Yesterday was class day. A lot of people were done with the conference – tired, ready to go home, out of money, etc. I was ready to sew, so a class was just what I needed.

We got up at, what felt like, the crack of dawn and hustled over to the classroom. We wanted to get there a little early because we wanted seats that we wanted. There were two different Janome machines to use. We both chose the 6700 models (I think there were letters after them, but I forget what they were.

Libs Elliott is a lovely person and a great teacher. The content was sufficient to complete in the class and she was available and supportive during the entire class. The class was Dynamic Stripes. If you want more than that, take the class. 🙂

We made stripes from solids and semi solids and then cut them up. There were several options. The strip sets I made were two of the options. One was the regular set and the other Libs called Biggie Smalls. I decided to go with the easiest options so I could get the jist of the technique.

Dynamic Stripes, first version

Once I cut up the strip sets, I was able to put the blocks on the design wall and look at them. The triangles don’t all go together, because the fabrics were slightly different. Still, I was pretty happy with my first version.

Finished Dynamic Stripes top

I moved the units around and then started sewing. I came away from the class with a small finished quilt top and I am pleased. I need to press it a lot better, but I am happy with it.

I added in the solid HSTs to fill in where I was two blocks short. I think this is an ok piece. I think the technique is interesting, but my piece is definitely a practice piece. I’d like to try the technique with actual striped fabric (smaller blocks) to see what I could make. I am not sure I will use this technique in general, but I am glad to know it and I am really glad I took the class.


MQG Creative Webinar

Periodically, I am actually able to take advantage of some of the benefits of my MQG membership. Last week, I watched a webinar with Malka Dubrawsky on using prints called Creative Webinar: Printed and Patched: Designing with Patterned Fabric with Malka Dubrawsky.

My overall first impression was that there is an assumption that modern quiltmakers don’t use prints. I see a lot of MQG people buy lots of FQ collections. Wasn’t there some crazy hullabaloo over Heather Ross and some castle/princess collection a few years? Blueberry Park is pretty popular as well.

I tried to take this weird impression and set it off to the side so I could gain some knowledge from the webinar.

Malka said that prints have graphic information. There seemed to be another assumption that we are used to using small scale prints because they read as colors. She talked about using larger scale prints as graphic messaging. Dubrawsky said that using a variety, both large and small scale prints, creates interest.

She divided the presentation up into points:

  • spaces
  • movement
  • color/color contrast
  • common print
  • random

I think that I may have missed one or two points, but I got some good information out of these, so the webinar was worth my time.

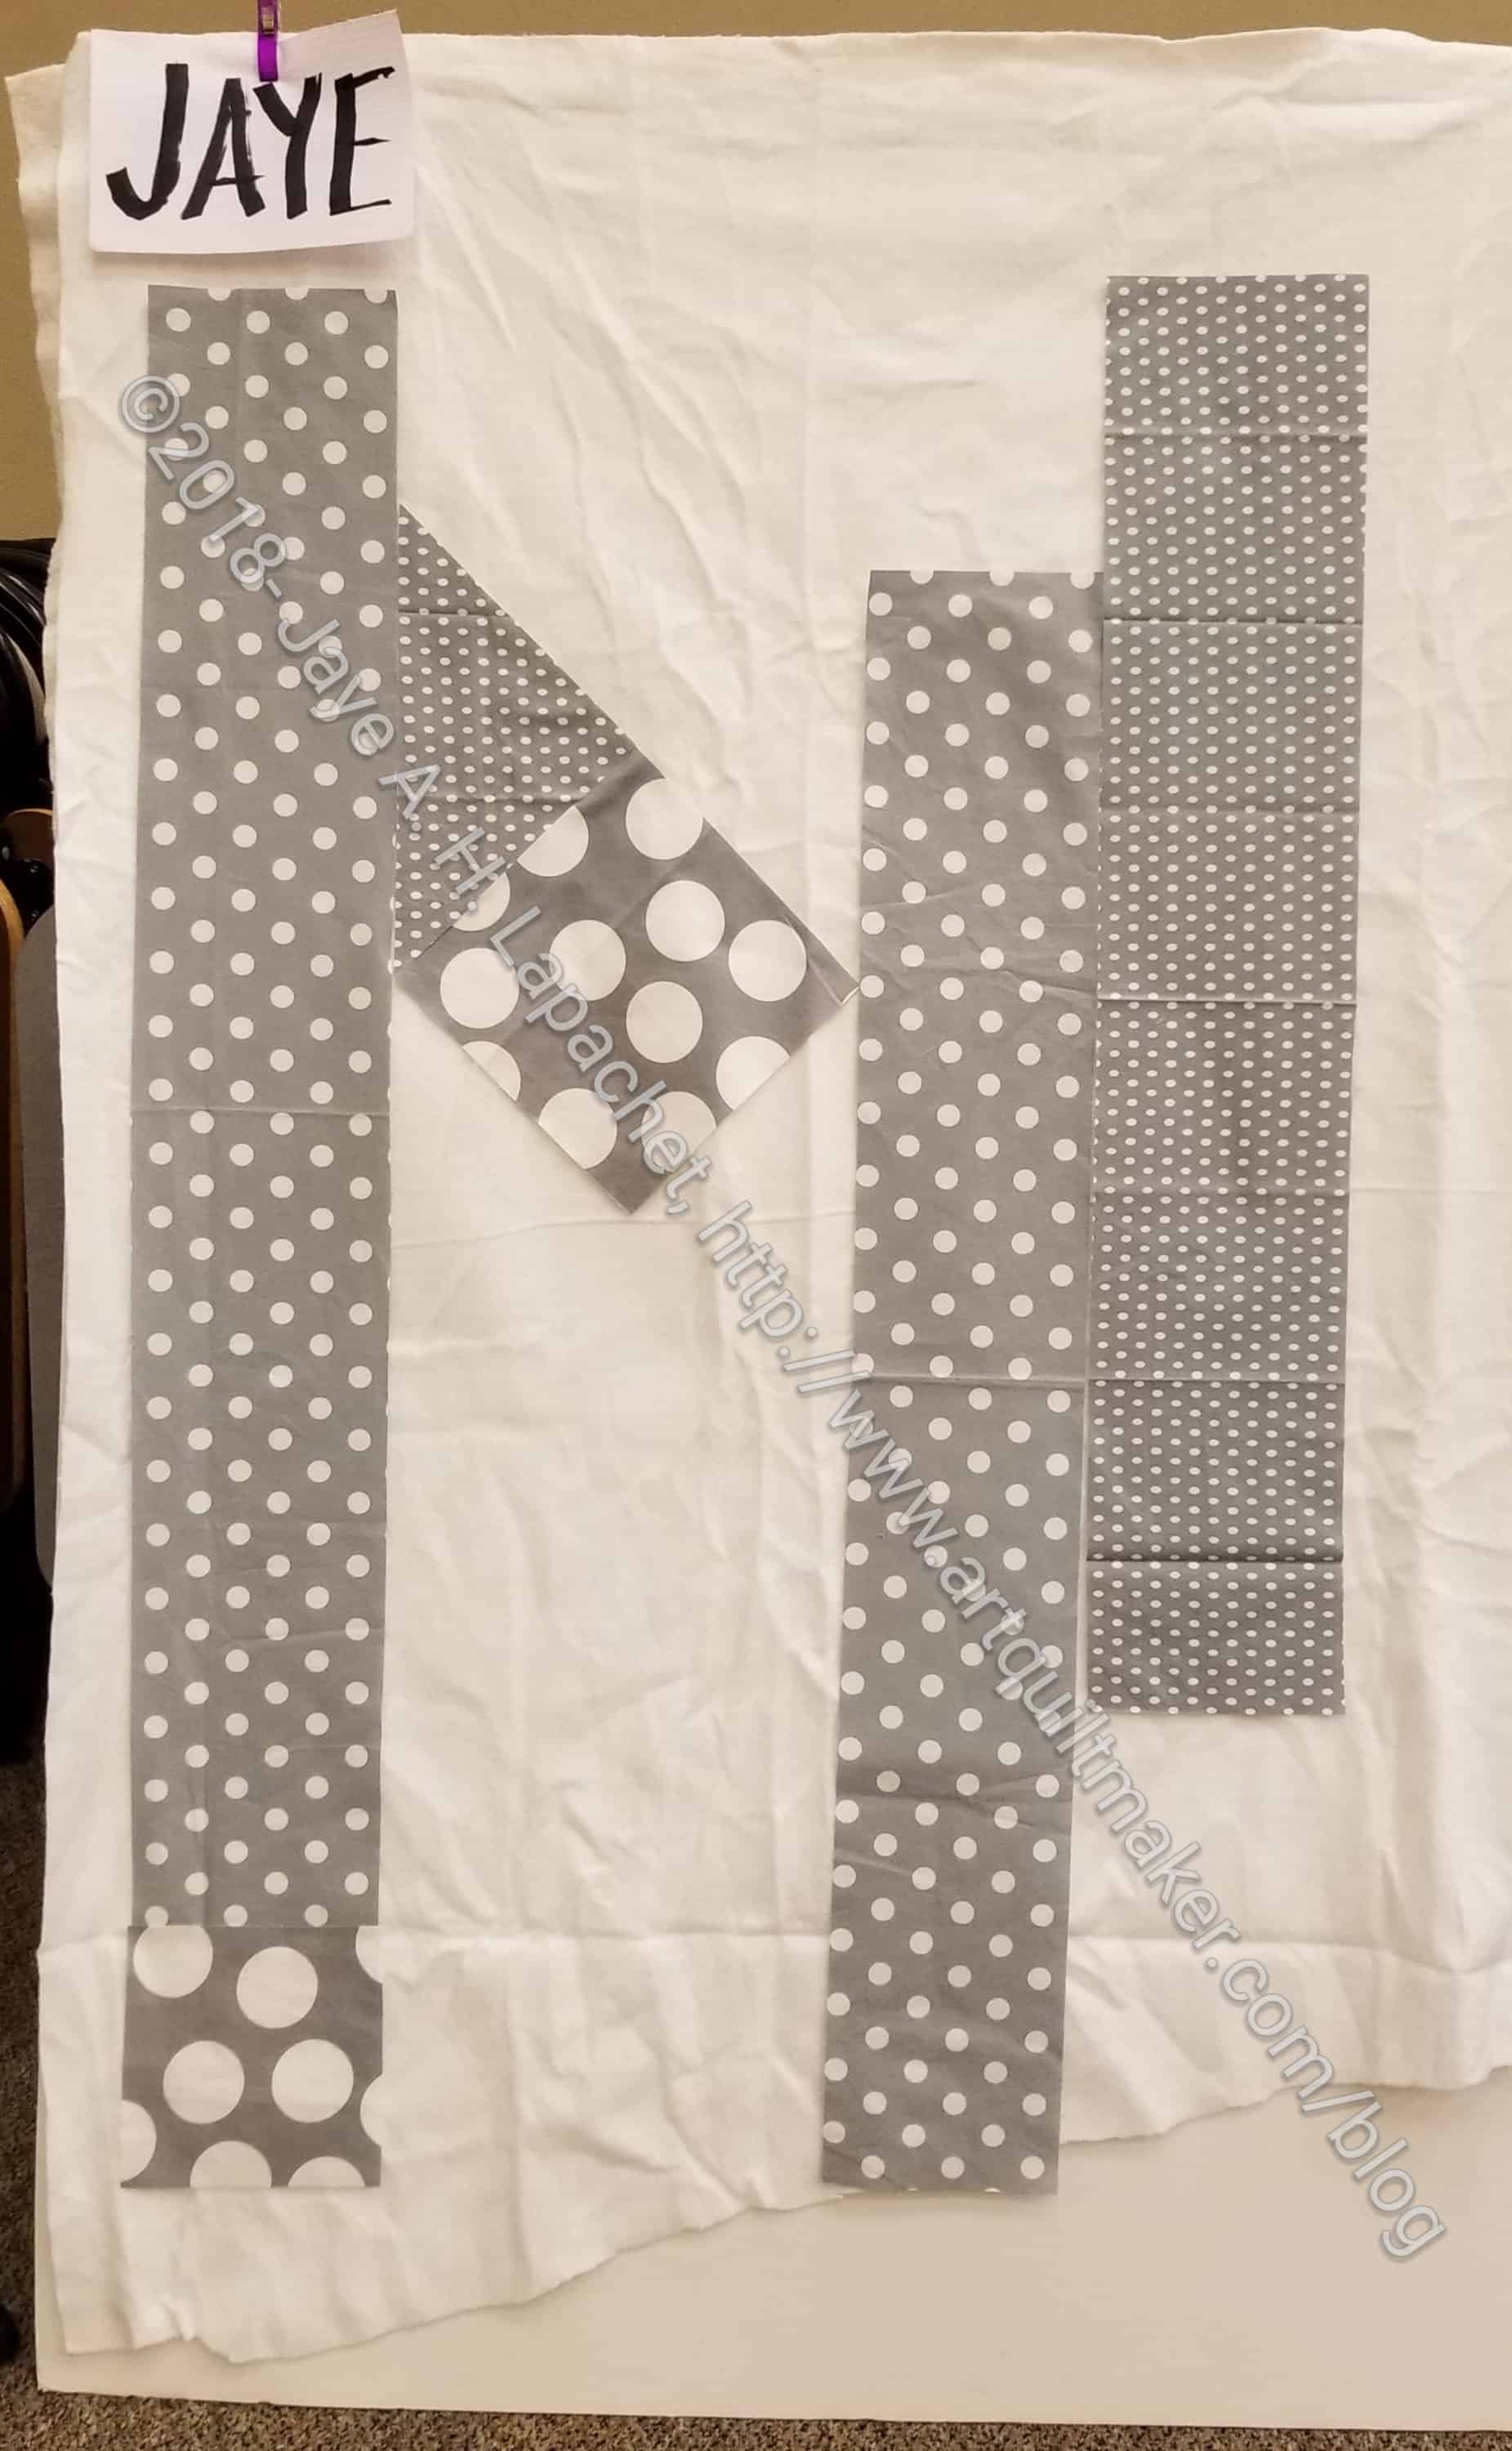
When Malka talked about spaces she was talking about dividing up the quilt’s surface into different spaces. She, then, talked about using prints in those spaces. You can also organize blocks as spaces or into spaces to use prints.

Movement went right past me.

She used Color / Color Contrast as a different type of organizing tool, which I thought was interesting. One example was dividing up a quilt into warm/cool.  Again the idea was about organizing fabrics on the surface of the quilt so you can use printed fabrics. I don’t find this to be necessary in my work, but I thought the concept was interesting and it might be worth trying.

She encouraged makers to create rules for ourselves to use prints so they make sense across the surface. I do this with my quilts in general.

I had no idea what Dubawsky meant by Common Print. She was referring to using different colorways of the same prints all together. I have always loved this concept. I often like having all the prints in all the colors. Remember my Half Moon Modern drama? Malka says that it allows for easier color and shape focus.

She said that using prints can produce ‘hidden treasures’ that don’t show up when you use solids. Prints create another point of interest, more to look at.

Random: hard to make work, but can work. This was difficult for the presenter to explain and I can understand why. She threw out:

“Simple shapes, colors go together, big spaces. Active background electrify prints rather than toning them down. Focus is on color rather than design.”

Overall message is that makers need to organize your fabrics and design so that they work on the surface. She said that design is really important and I was thrilled.

She encourages people to make their own FQ packs.

Yay! She uses batiks all the time. She calls them modern batiks – modern, bold, graphic designs. Malka also said that she doesn’t really like the older style, watercolor-y batiks. I got the impression that it was the motifs on the surface of the fabric rather than the batik process she didn’t like.

To start: Pick (buy or create) a fabric collection you really love – she buys entire FQ bundle- and then play around with different ways of organizing fabrics. Small/large prints or warm/cool colors. Use a simple geometric design. Challenge yourself. I also got the impression that she was saying to be brave.

Her new designs will be available on Feb 1 on her website as PDFs. Printed patterns will be available Feb 20. She is also doing kits.

A recording of this webinar is on the MQG site for your viewing pleasure, if you are a member.


Sarah Goer Class

Saturday I took a class through BAMQG with Sarah Goer. Sarah is a GREAT teacher and her class, Planned Improv, is fabulous. I liked it, mostly, because it was a design technique that I can use beyond the class. It is a technique that could be similar to using Electric Quilt, but sometimes I need to sit down with graph paper and scribble.

I went to class thinking that I would expand the technique and use it for one of the Niece-phews quilts, if it worked out. I had one nephew in mind, so I brought reds for the foreground and dark grey for the background. I thought I could make a pillow cover for a gift if i was not willing to commit to making a quilt using the technique.

The technique is great. Mary C asked me where this technique had been all her life and I wondered the same thing. Another thing I liked about this technique is that it isn’t quite improv, but it is not a buttoned up pattern either.

Planned Improv Class Block

I am pleased with the way the block came out. I think it has potential for becoming a quilt.

The block is 25×24, so I don’t have to make many of them to have a large lap quilt. I have some squares cut, so I can make another block soon.