I thought I would write much more about the Flying Geese swap than I actually have. The last time I posted was back in January. My lack of reporting is not an indication of lack of interest.
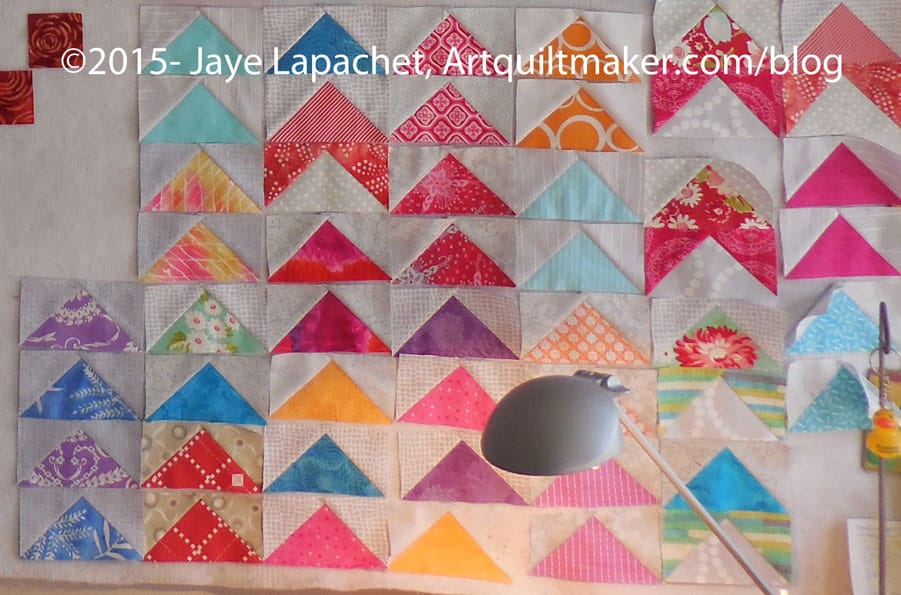
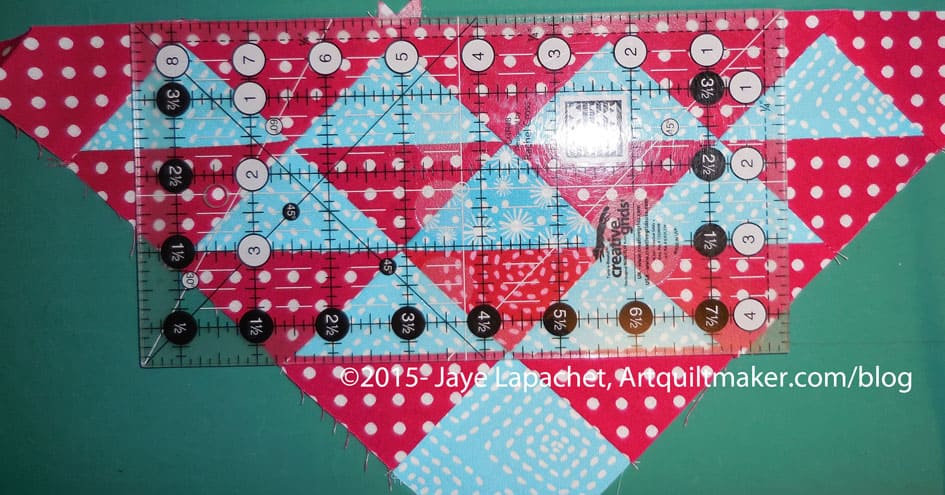
Flying Geese, Early April 2015
This is a great exchange and I am really enjoying it. First, the FGs are easy to make. Next, they have a good impact. Third, there is a lot of bang for my buck. I take 5 squares and come up with 4 Flying Geese. Also, they are like potato chips. I can’t make just one set at a time. Once I get started, I want to make bunches of them. Finally, though I am sure there are other positives, all the colors I try work well.
So, the photo at right is the sum total of the Flying Geese I have made and received until last week. Not, it’s not a great picture, but, as you saw on my last Design Wall Monday, my design wall is backed to the gills and there is no space. I’ll get a better picture at some point, but for now you’ll have to be happy with this one.
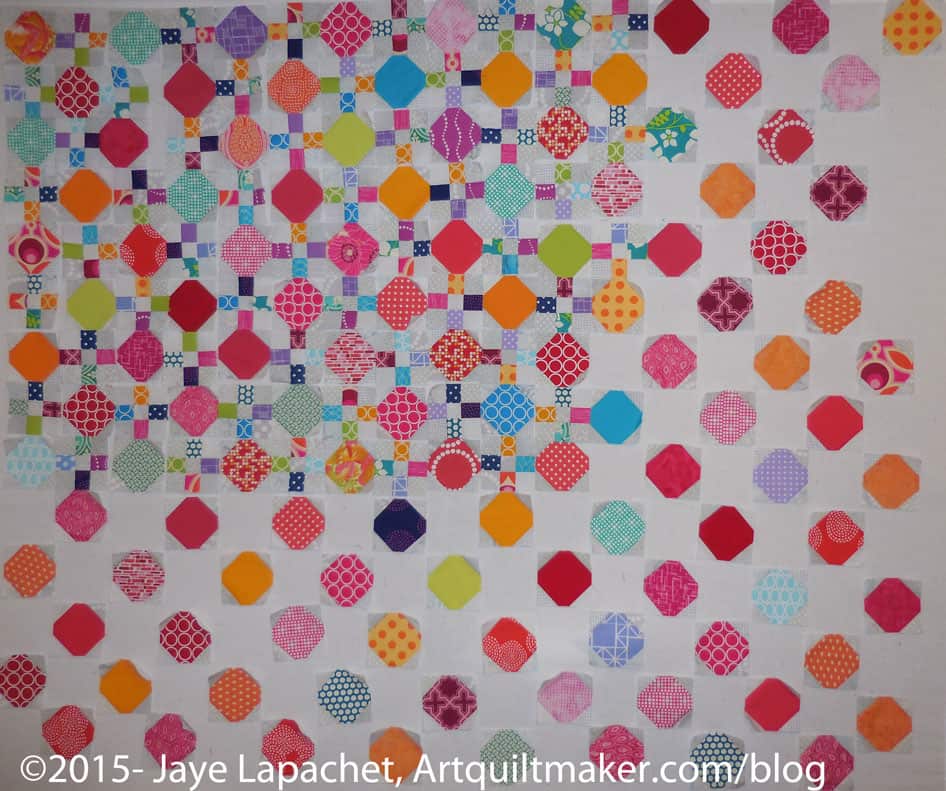
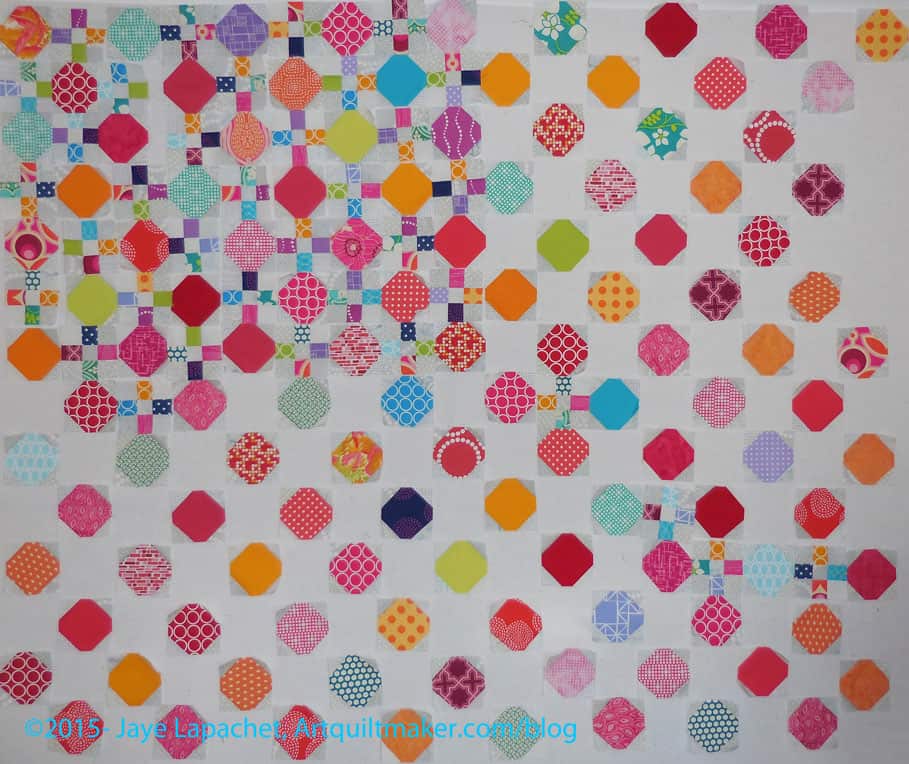
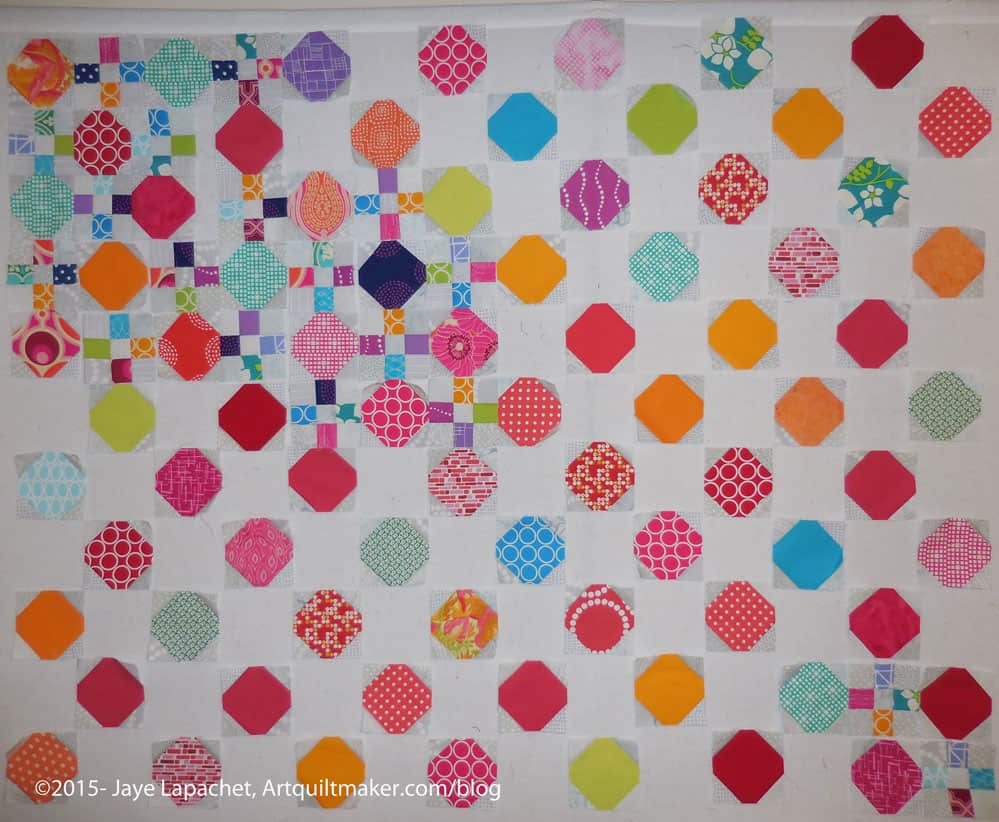
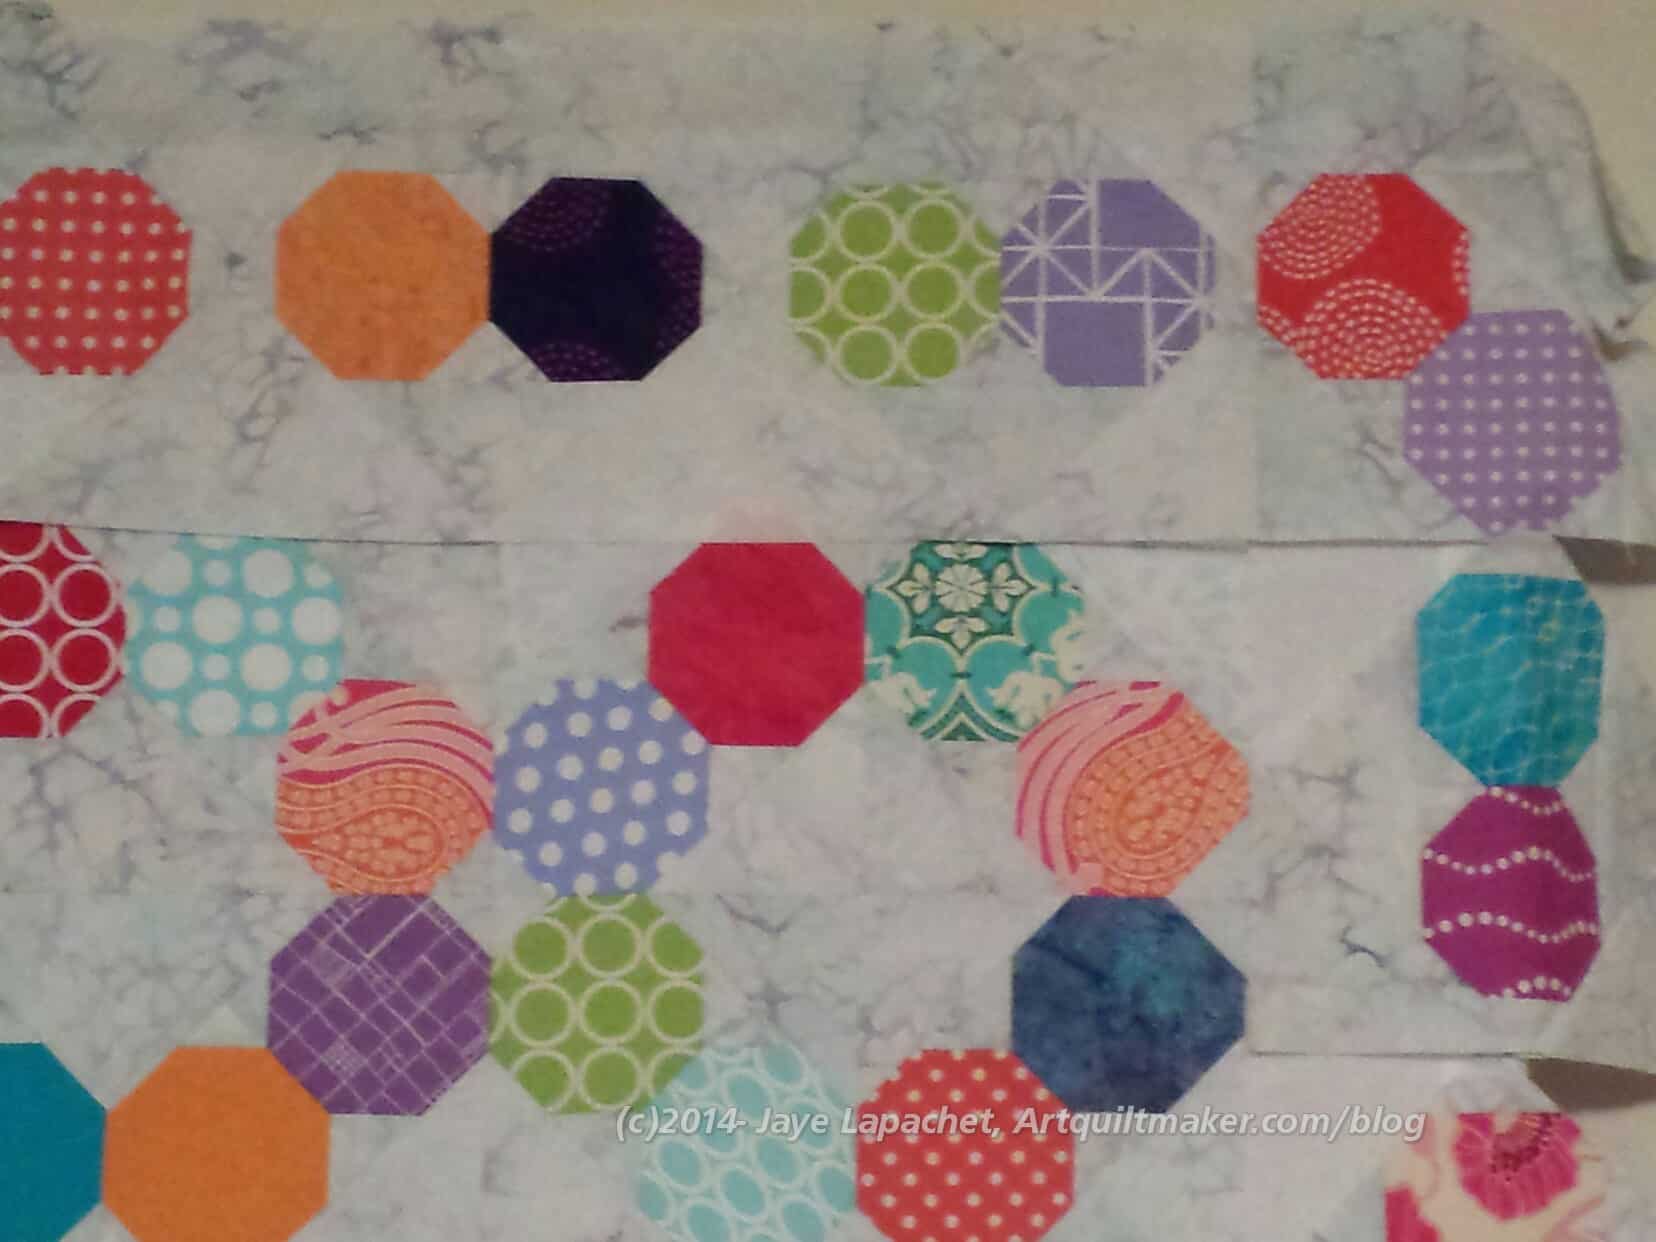
More progress on the Octagon 9 Patch. It seems slow, but I see the progress. Compare from last time and let me know what you think.
The 9 patches are not in their final locations. I started to arrange them as I made them, but it was hard to judge progress so now I just put each nine patch in the next open space. I’ll arrange them later.
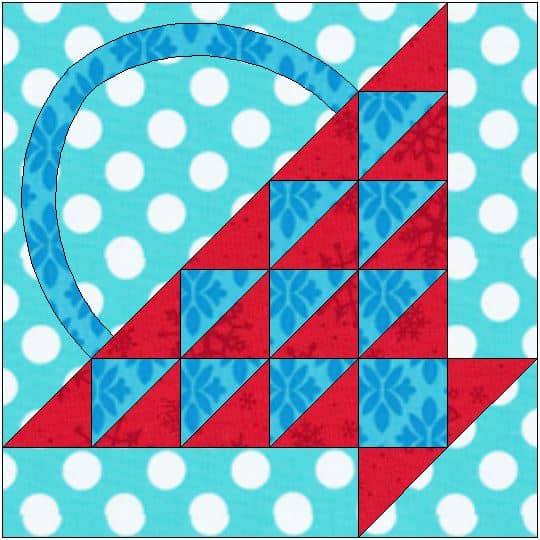
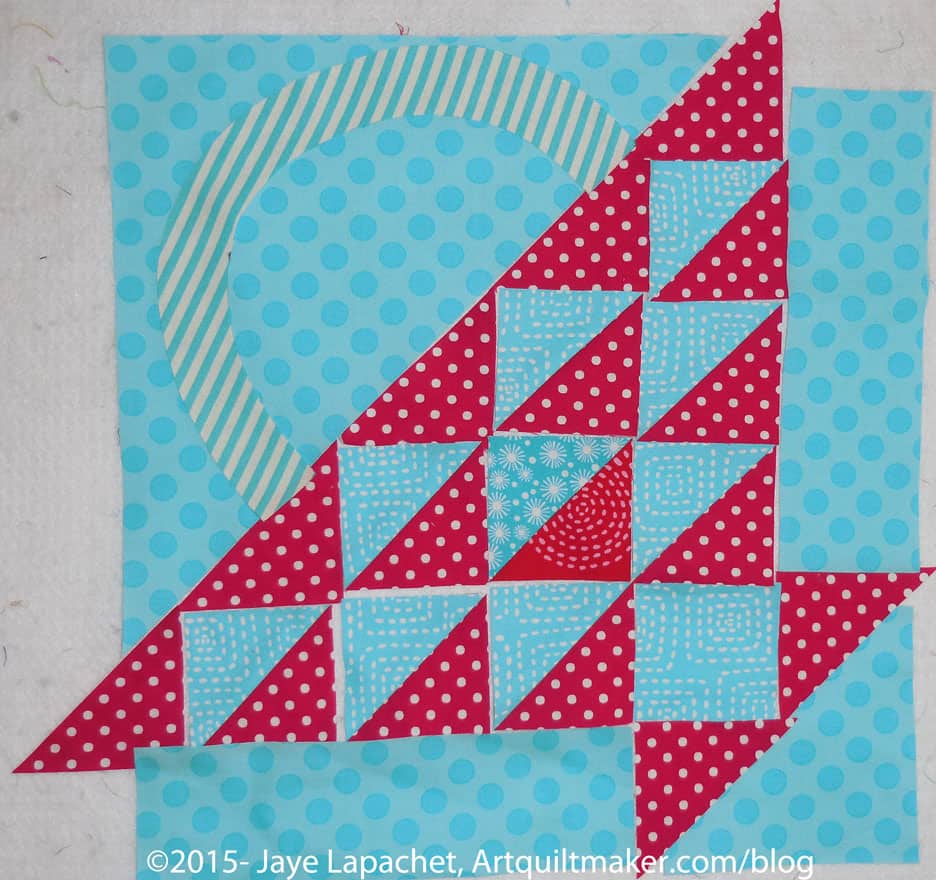
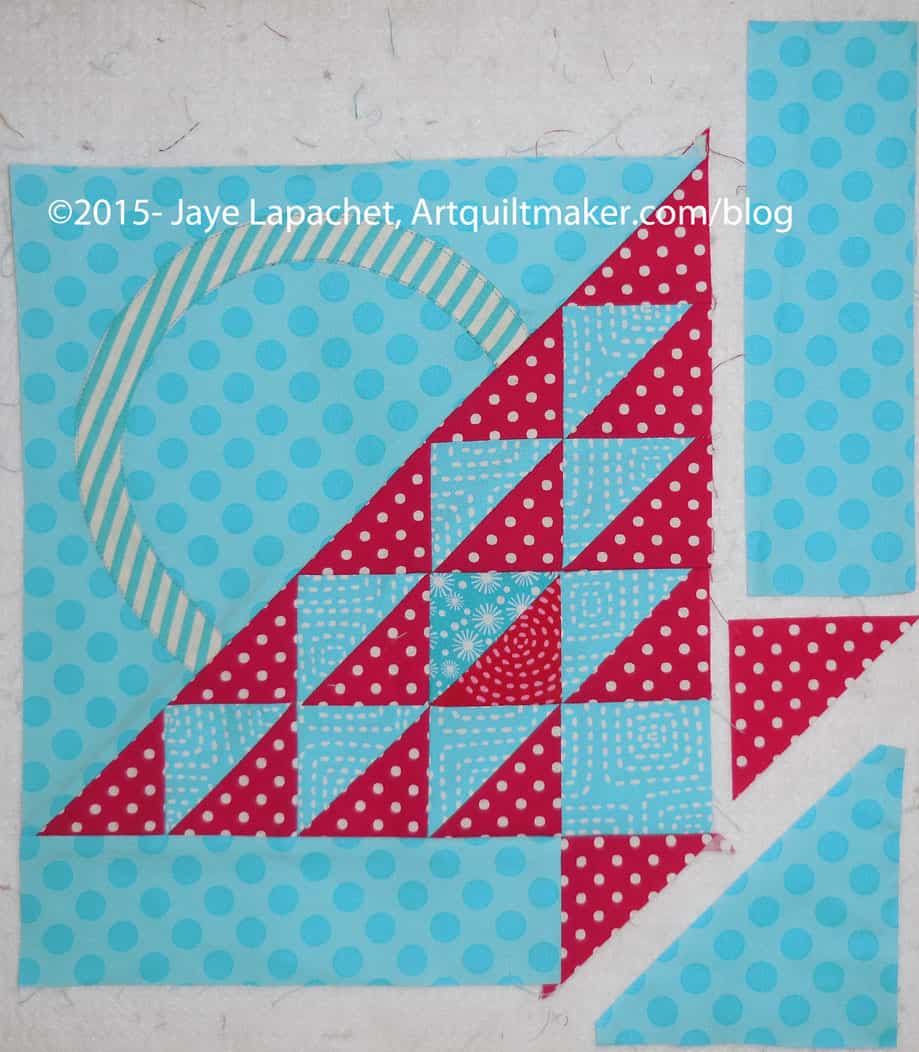
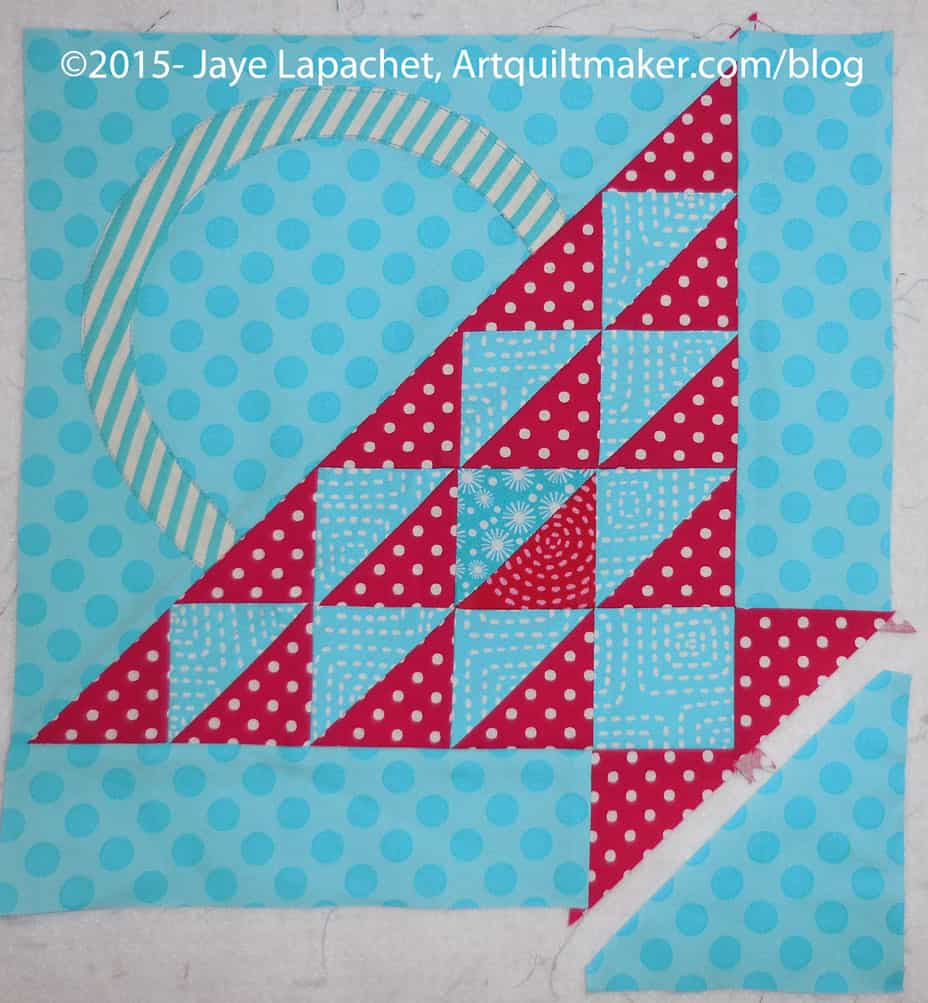
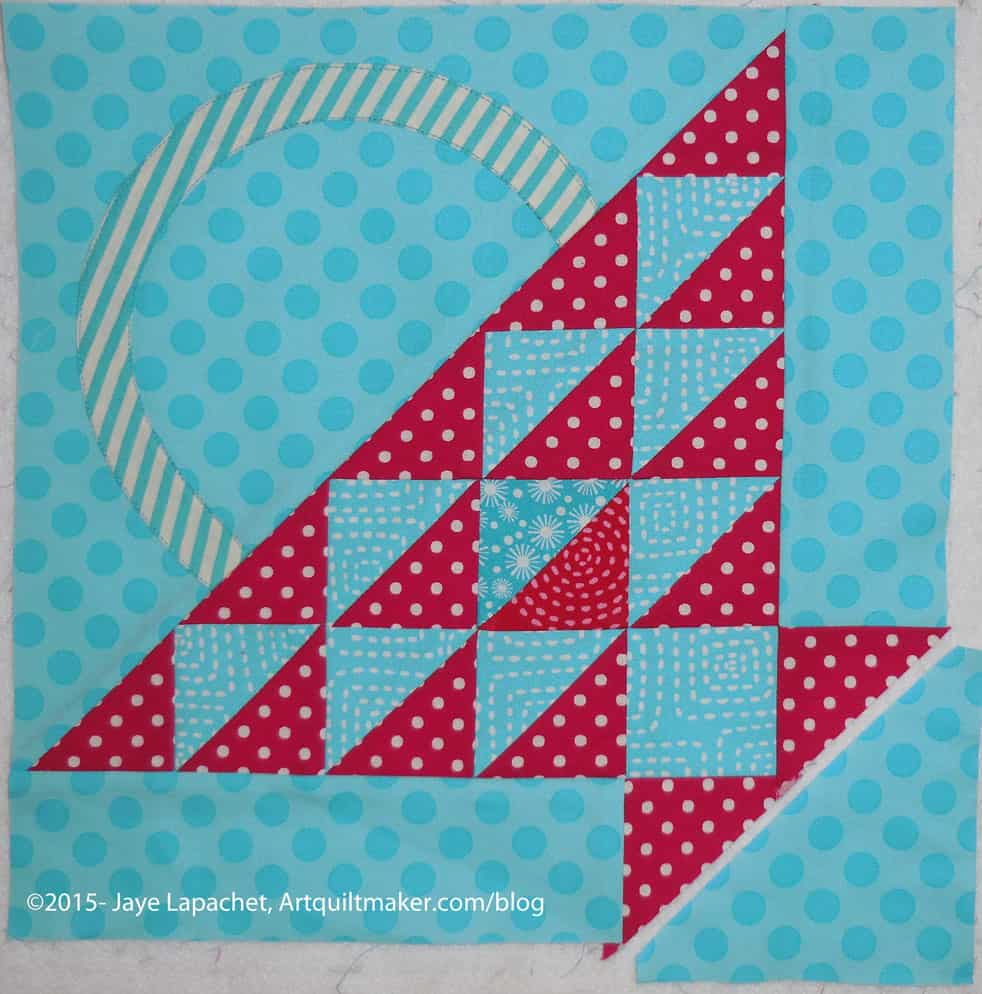
As mentioned in part 1, above is the current block in our Sampler Quilt Class. These directions are for machine sewing your Flower Basket and include a little applique’. The applique’ can be done by machine or hand.
Are you playing along? If you are just starting, below is the complete supply list. You won’t need everything for this step, but you will need to start with part 1 and that part requires more supplies. Also, note, there are a LOT of photos in this tutorial.
These directions use a quarter inch seam allowance. Check your seam allowance before you begin. If you don’t know how to do that, there are resources available, including one from Connecting Threads and Craftsy. You can search the web for others if you don’t like these tutorials.
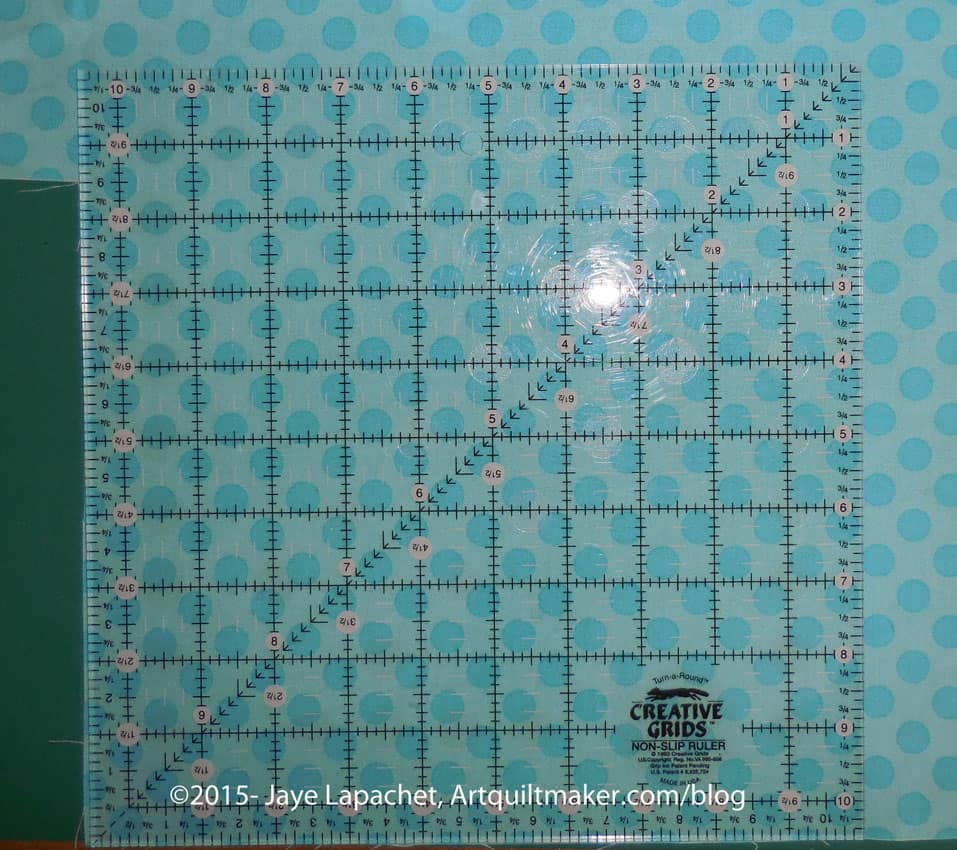
You will be directed to use the Triangle Technique. Make sure you have the chart as well as the instructions handy.
Respect the bias.
After working through part 1, you have already chosen your fabrics, made your templates and cut your pieces. You are ready to sew.
Sewing
Carefully stitch along the hypotenuse of the large background triangle, about 1/8″ from the edge, to stabilize it. This stitching will be covered up when you stitch the handle part of the block to the basket part of the block.
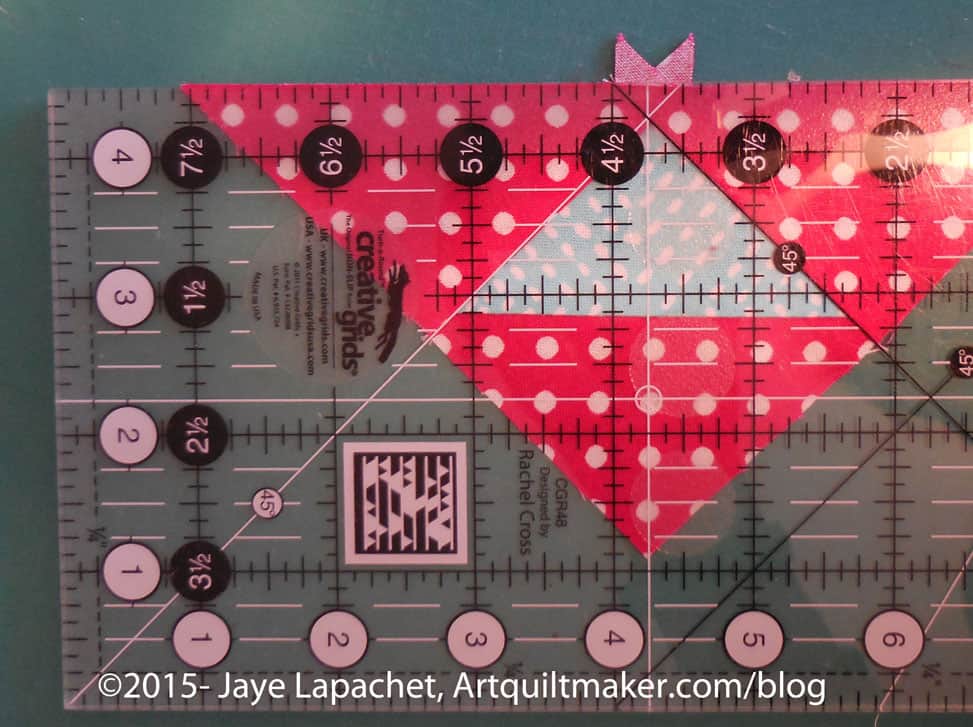
Triangle Technique
Use the Triangle Technique to make your half square triangles. Make sure you have the chart available to confirm sizes. A brief overview is:
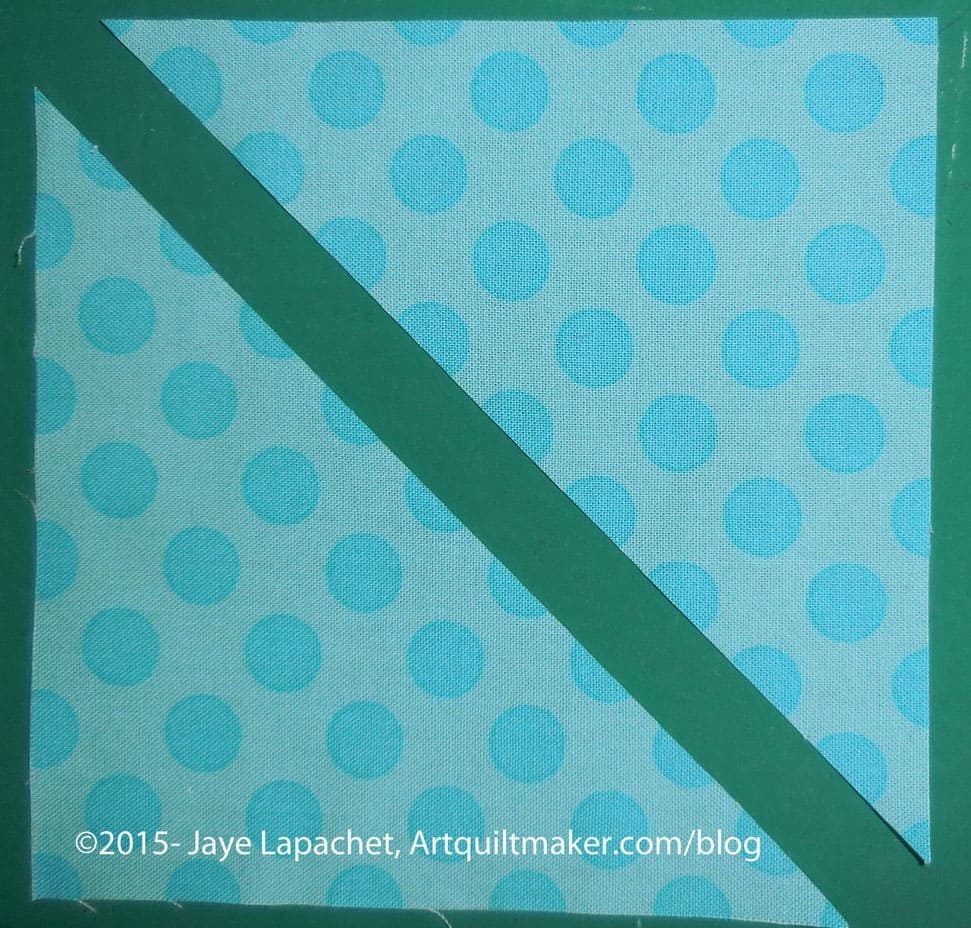
Draw an X from corner to corner diagonally on the wrong side of each of your 6.25″ x 6.25″ squares.
Place them right sides together and sew 1/4″ on each side of the diagonal lines.
Nota bene: If I had wanted to pin I would have pinned far away from any of the diagonal lines.
Now you have a piece with four seams forming an X.
Next cut the ‘Plus’ of your sewn piece. This means that you are cutting horizontally down the middle and vertically down the middle.
Line up your ruler with the edge of the fabric and the point in the middle where the two lines forming the X come together.
Cut vertically.
Do NOT move your fabric.
Reposition your ruler and then cut the piece horizontally.
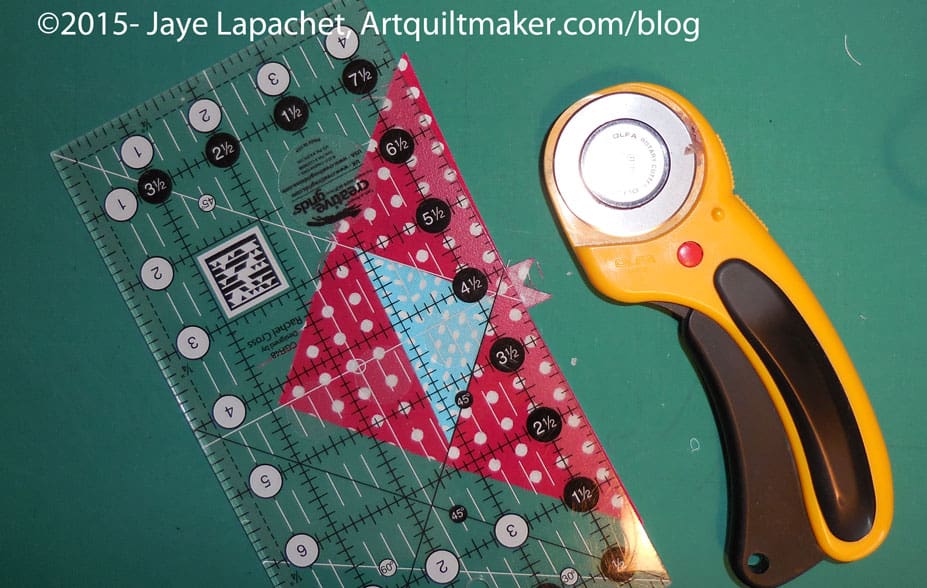
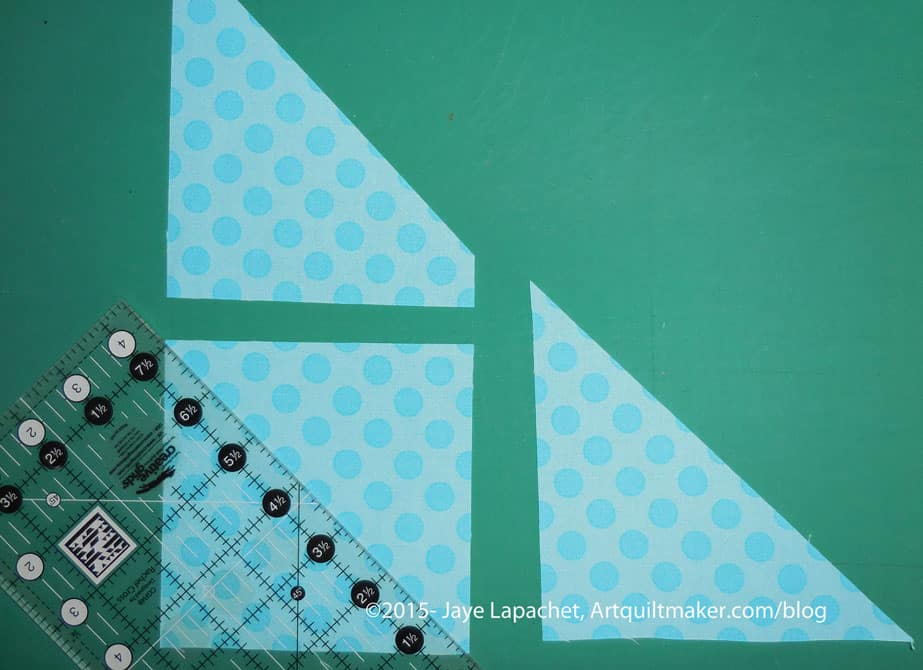
The result is 8-2.5″ half square triangles. The above are actually a thread or two larger than 2.5″, which leaves the perfect opportunity for trimming to make them an absolutely perfect 2.5″.
Trim your HSTs to an absolutely perfect 2.5″.
Now you have 8 beautiful HSTs.
Of course, you can use whatever technique you like to make the half square triangles.
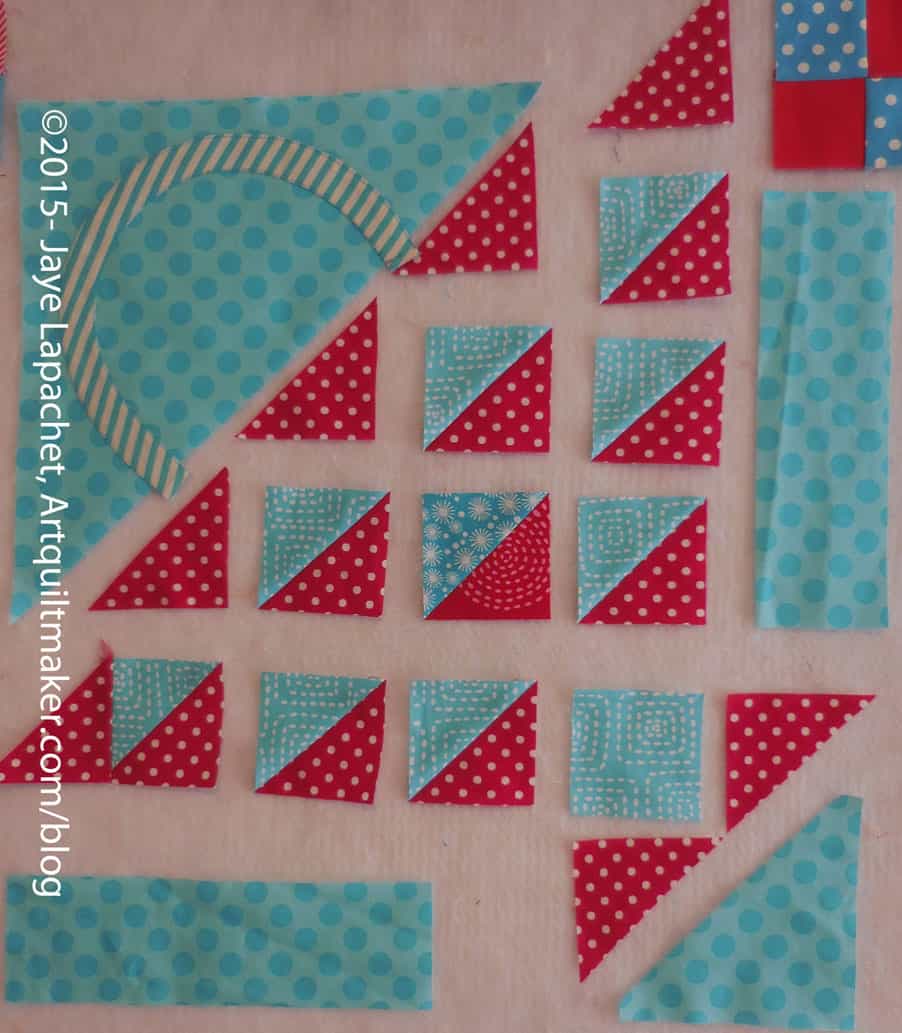
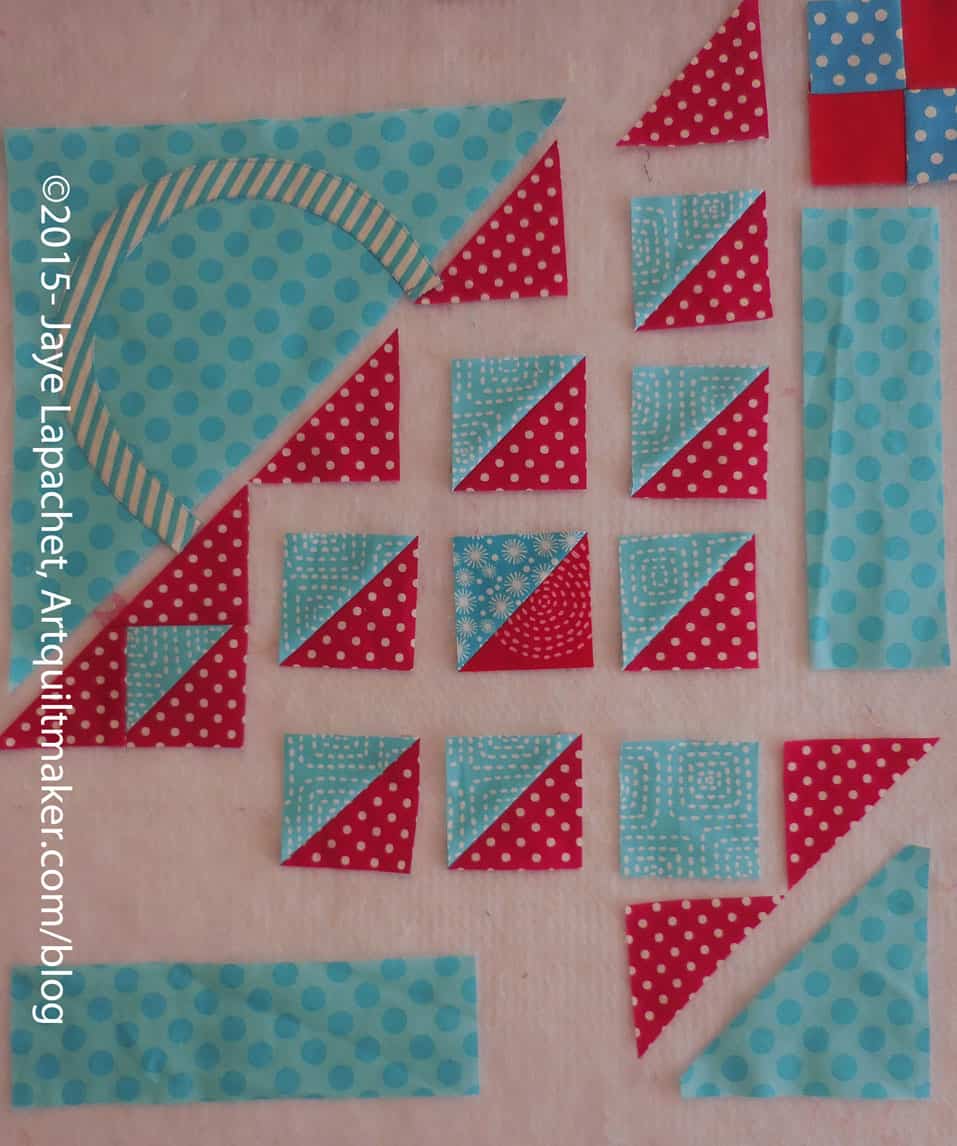
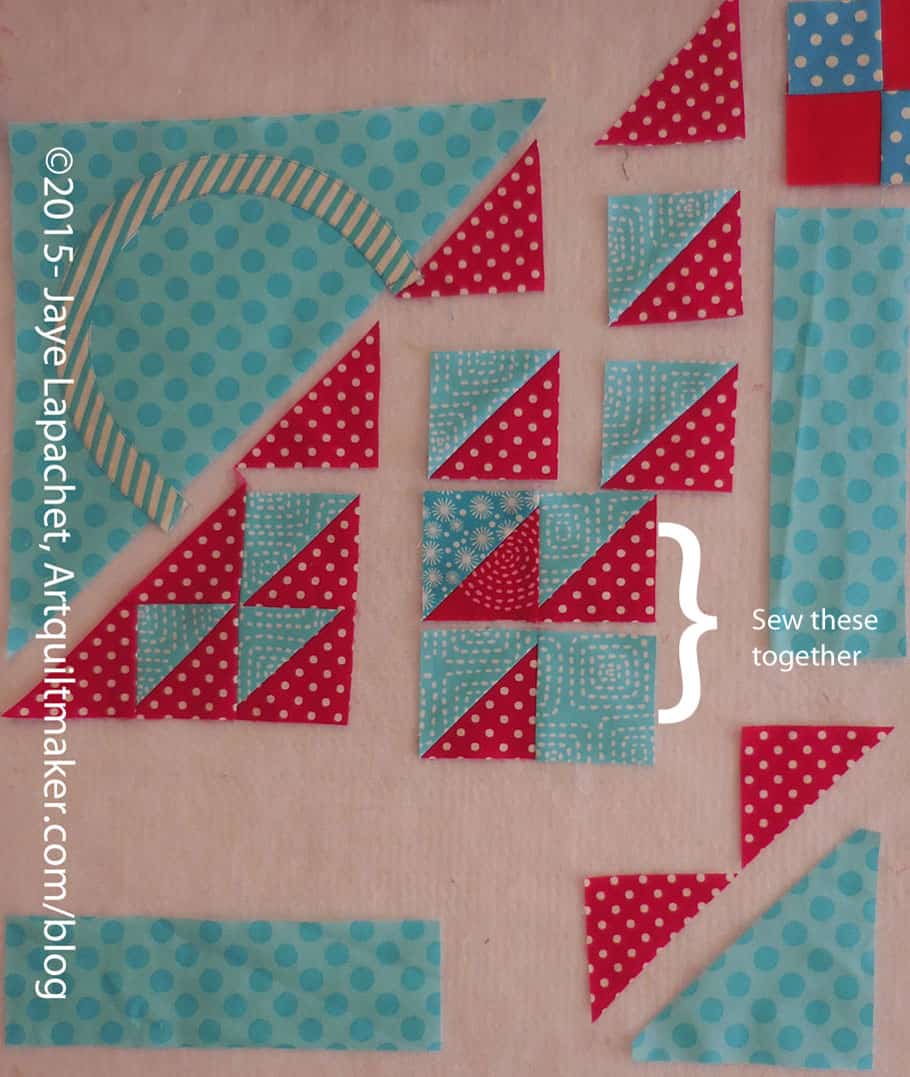
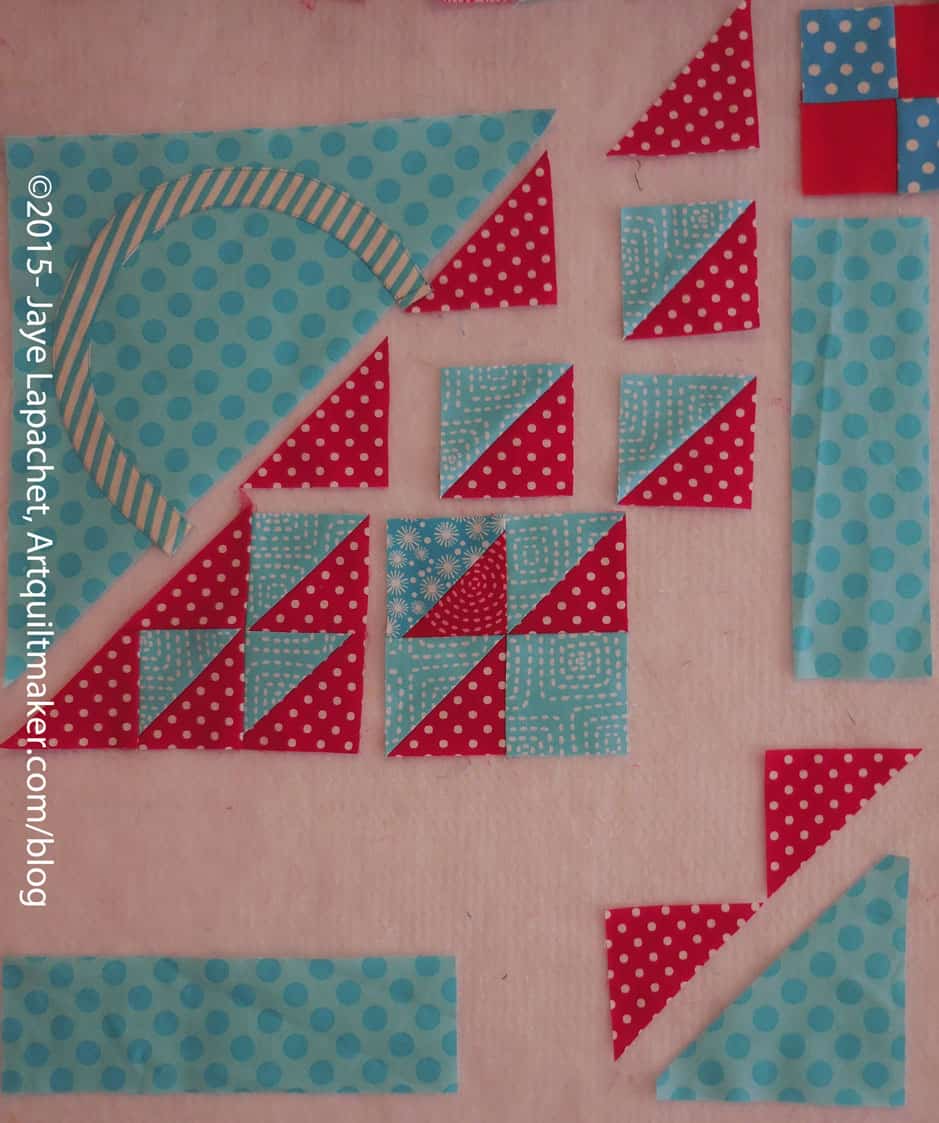
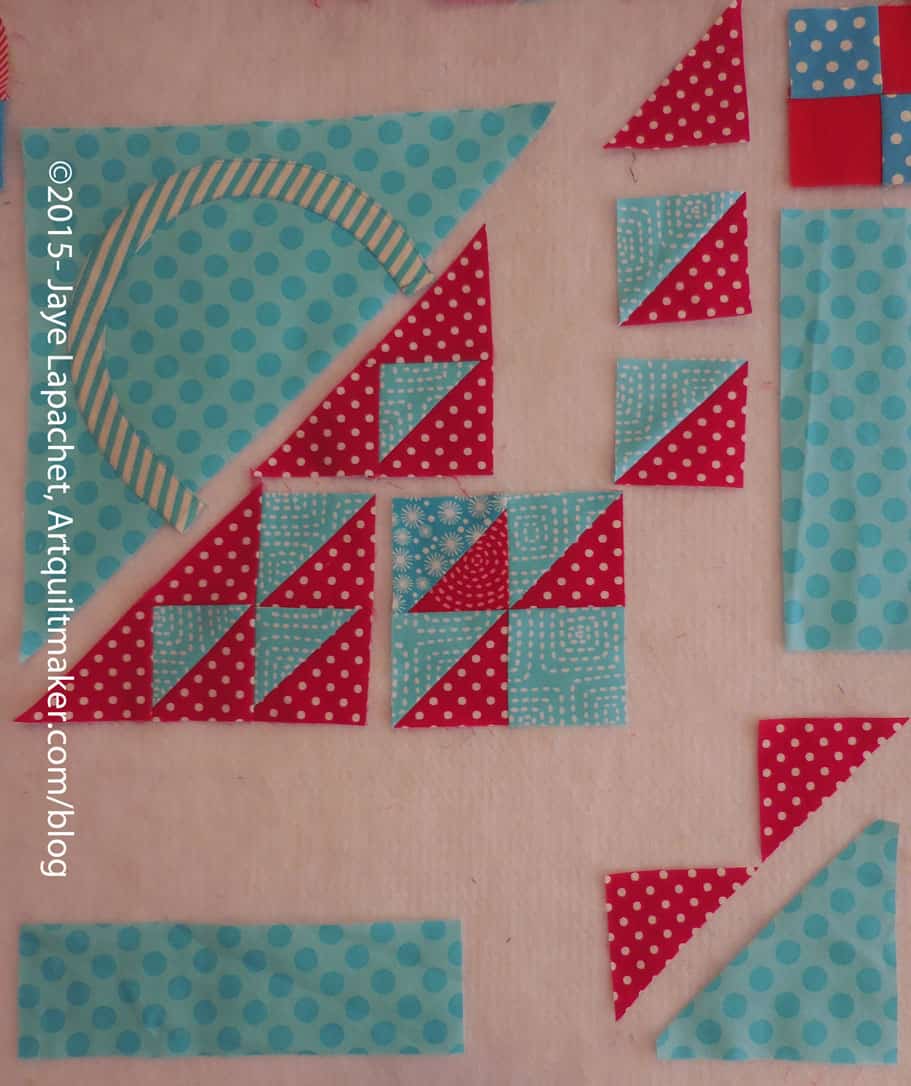
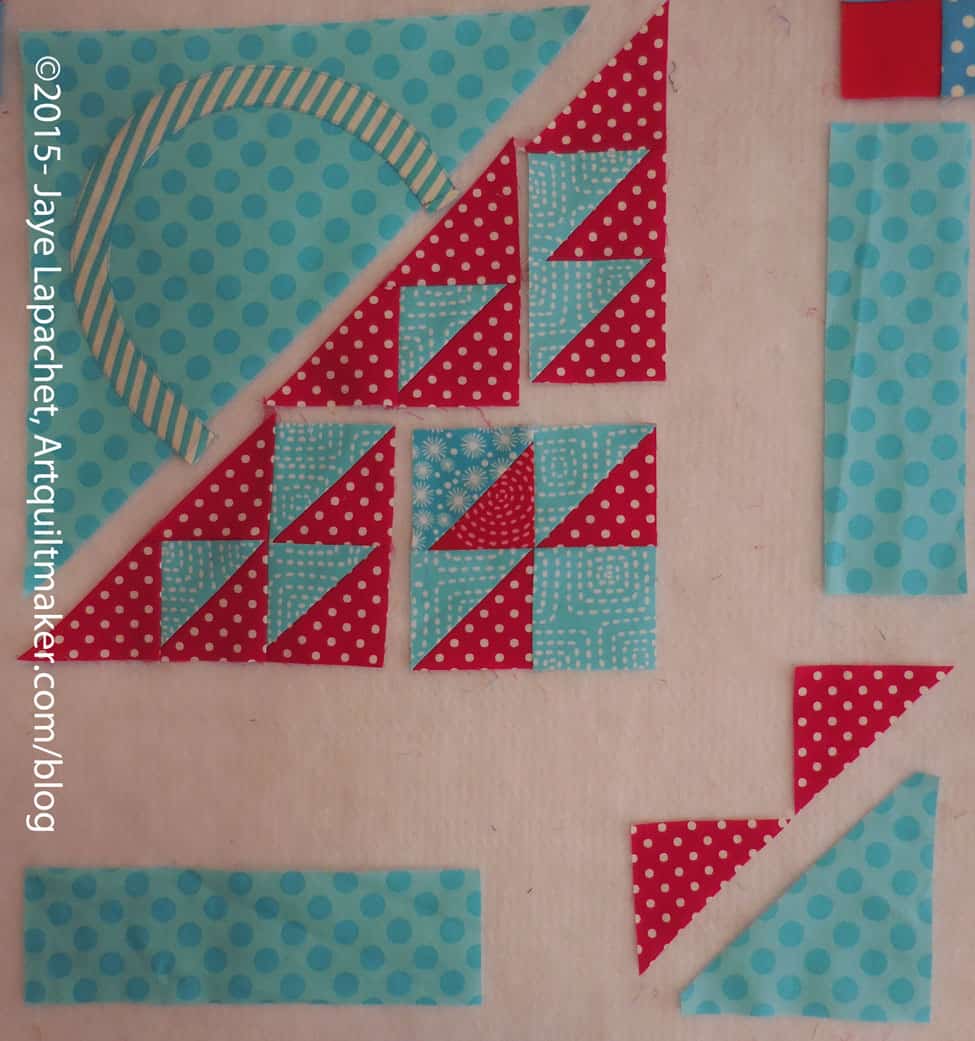
Layout and Assembly
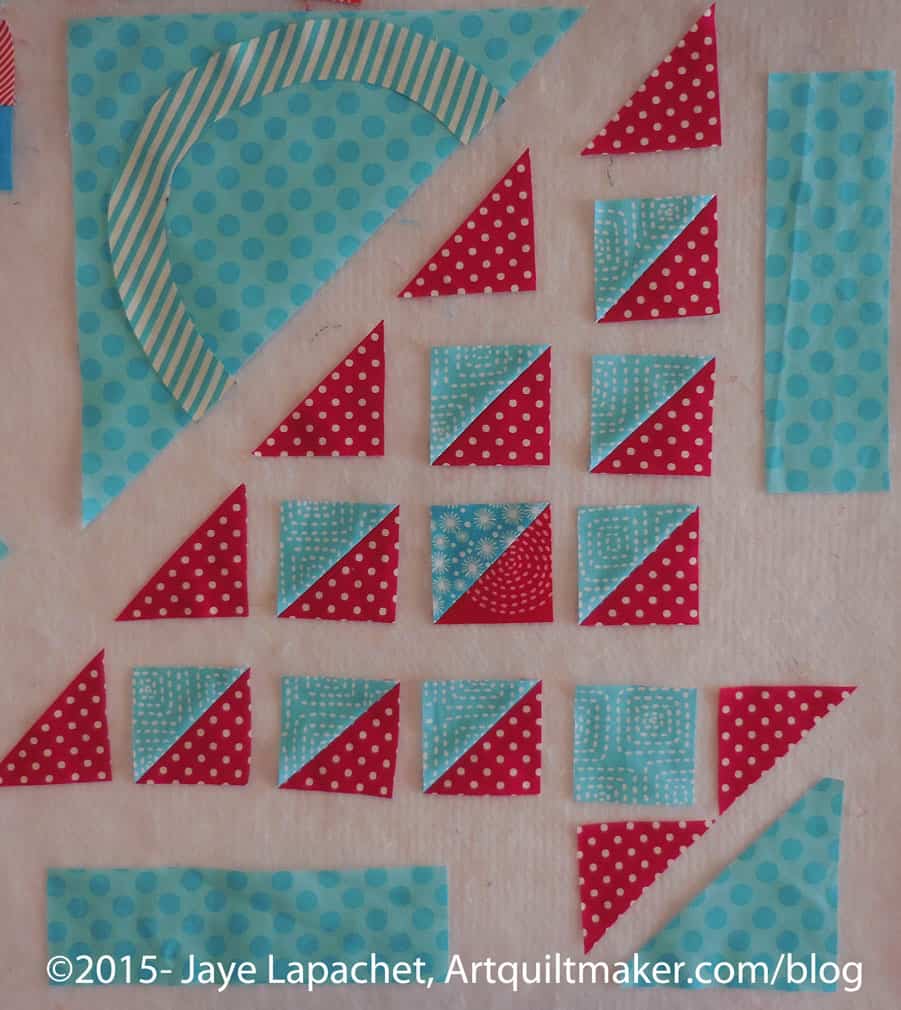
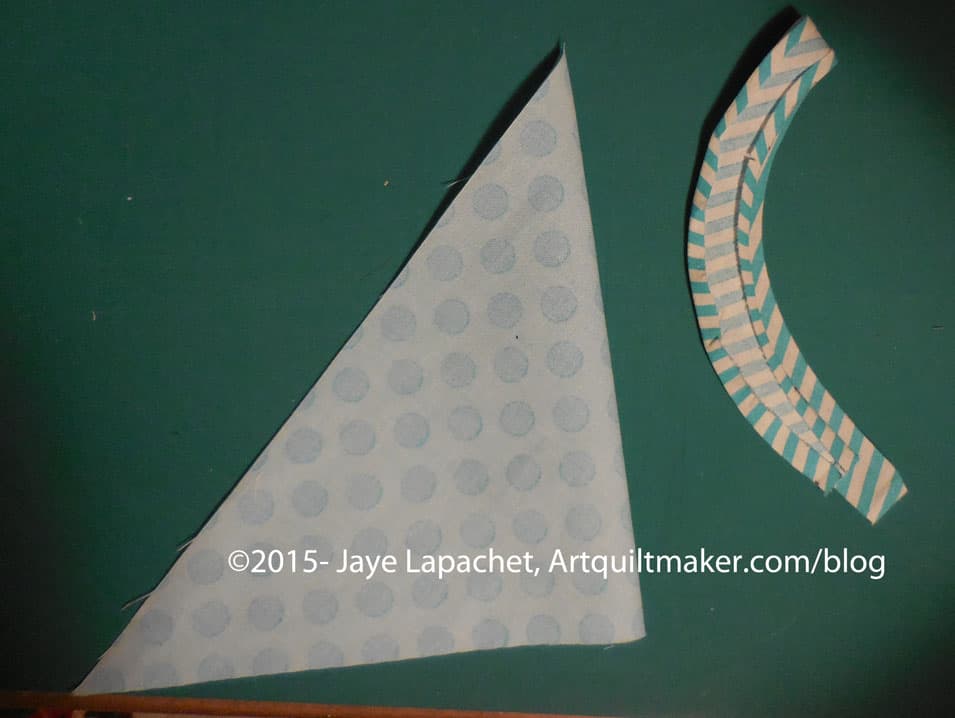
Pieces cut and ready to sew
Now that you have cut all of your pieces, lay them out on your sandpaper board, or put them up on your design wall. It is great to be able to see where all the pieces belong and adjust any pieces that need adjusting before you sew.
Sew Handle to Background
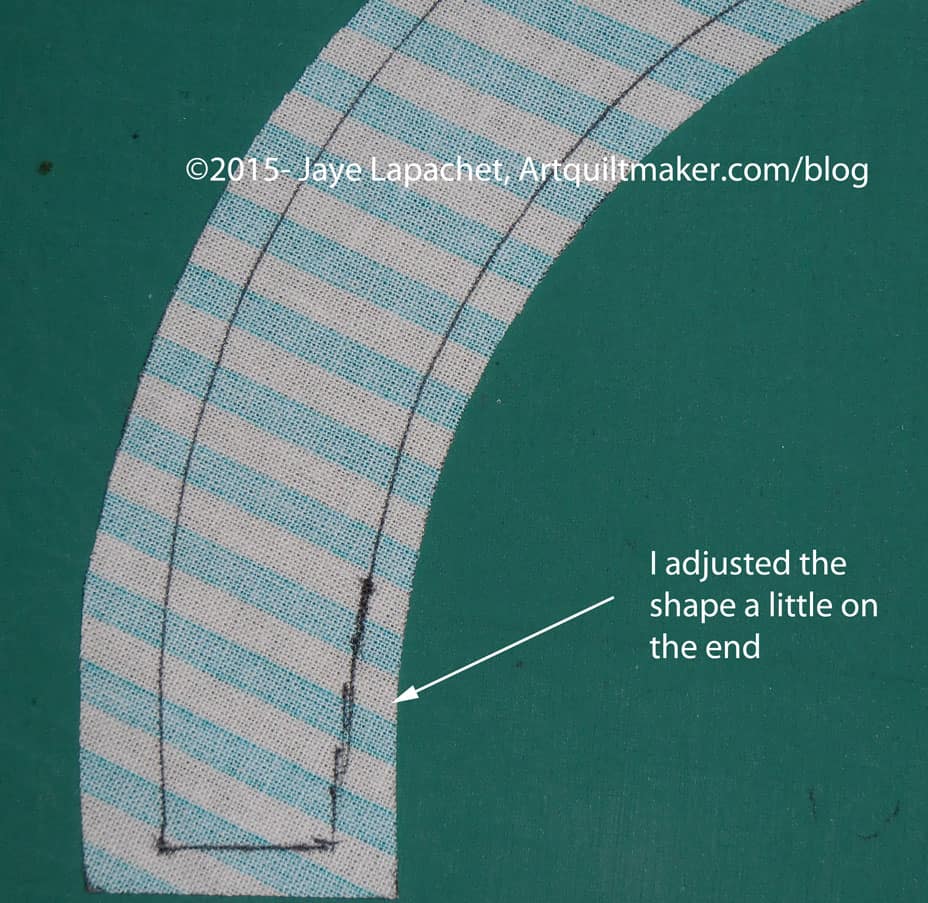
Template on Handle, ready to traceTraced & Adjusted
Because I decided to use the method described below, I made another handle template with NO seam allowance. I placed it on the handle I had cut from the striped fabric carefully so there was an even seam allowance on all sides. Then I traced around it with my thin black pen. I thought the template was a little wide at the end so I adjusted the line a bit to make the seam allowance larger.
Handle & Background Triangle Cut, Laid OutPieces Laid Out
My pieces looked a little weird-not the right size, etc when I laid them out. Have no fear! They will improve.
Press seam allowance underPress with hot iron
I was using my stiletto to adjust the seam allowance, but it was impossible to hold the stiletto, the camera and the iron all at once. Press carefully, so as not to distort your pieces.
Watch out for corners
Pay attention to the corners. The layers of fabric will want to pooch in weird directions. This is where one of those mini irons might come in handy. I used my regular iron and a stiletto, so I know those tools work.
Press seam allowance on handle under
Take your handle and press the the seam allowance under on both sides of the piece. Press so that the drawn line is on the inside of the handle and is covered by the piece once the handle is sewn.
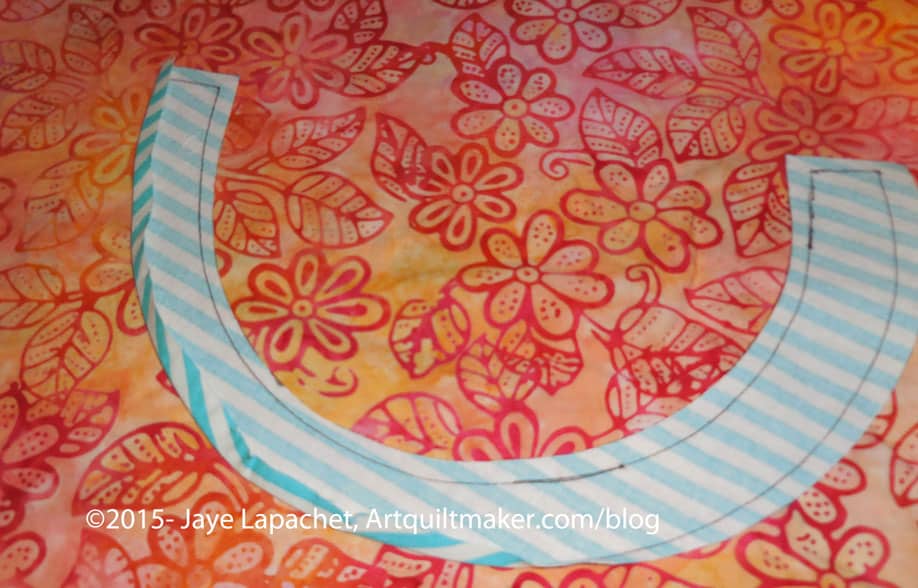
<Nota bene: the orange fabric was selected for good contrast so that the steps would show up well>
Finger press patches in half
Fold the handle in half with wrong sides together and finger press on the midpoint. Unfold.
Fold your large triangle in half with right sides together and finger press. Unfold and layout.
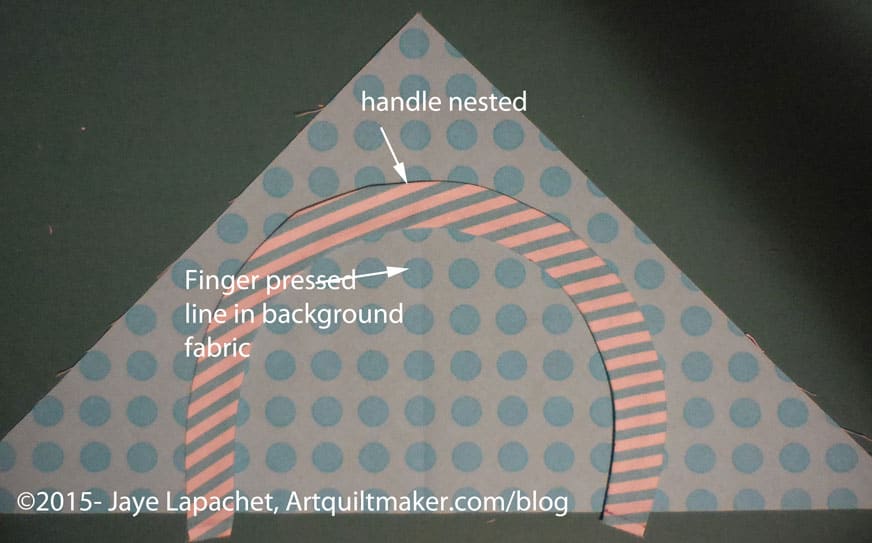
Nesting handle & background
Nest the handle into the triangle with the right sides up.
Line up the bottom edges of the handle with the hypotenuse of the background triangle. If the handle ends are a little over, it will be fine. You can trim them later.
Eyeball your piece to make sure everything looks good and even.
Pin the handle to the background down the center of the handle. Remove the pins as you sew. Try not to sew over them.
Using a lot of pins will help keep the handle in place as you sew
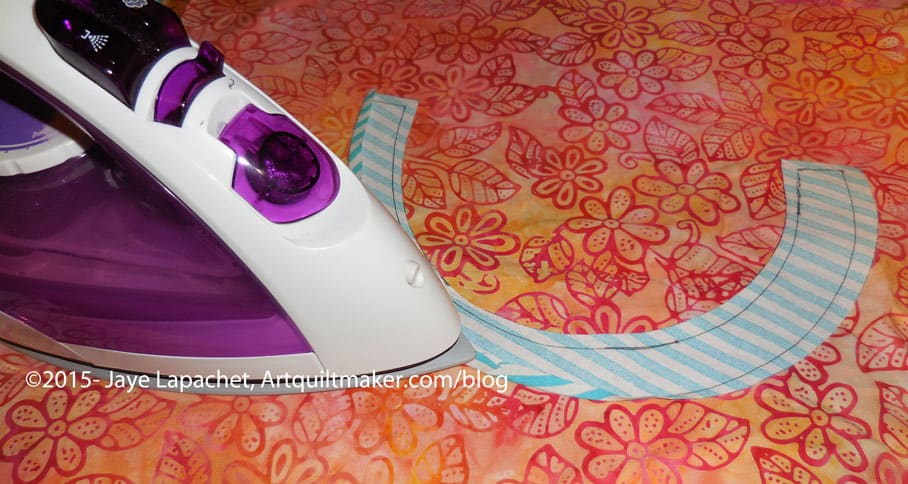
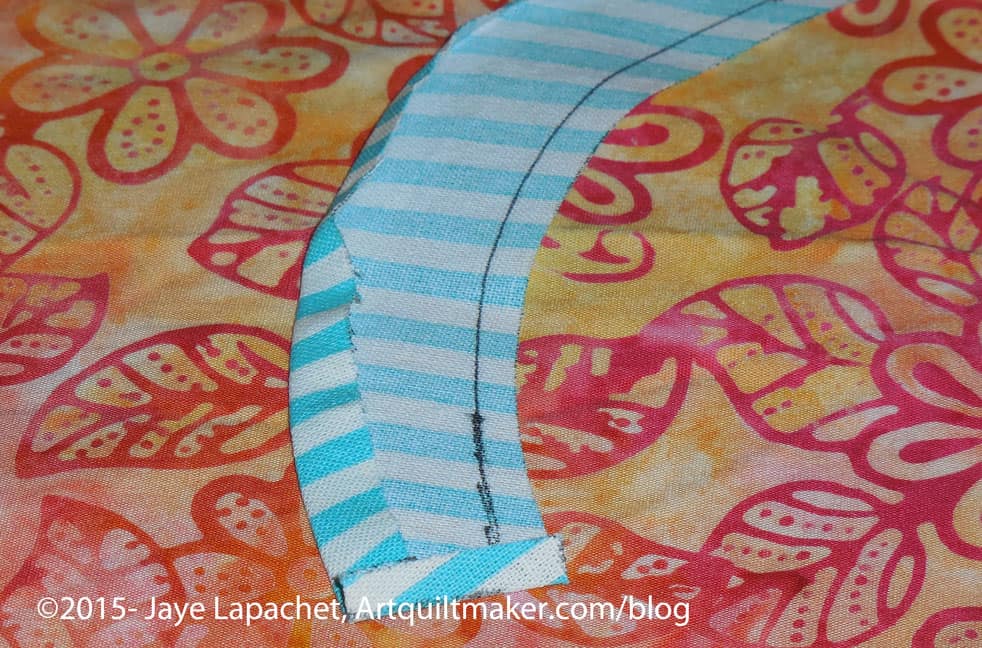
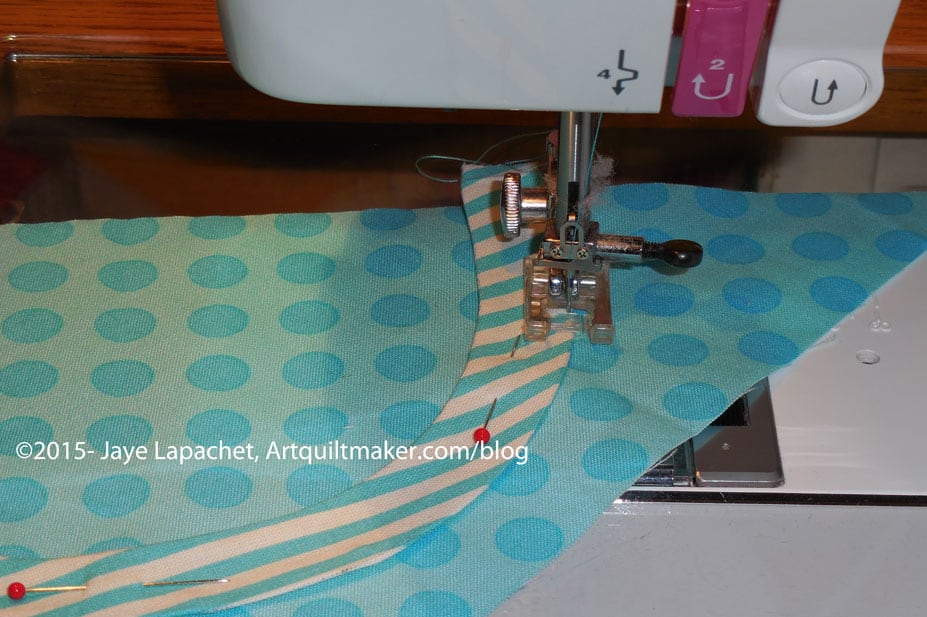
Sew carefully
Sew slowly and carefully along the drawn line around the curve. I chose a matching thread, an applique’ foot and a topstitch/sharp needle.
You will either need to hand applique’ the other side down or using a machine stitch that suits you.
You could sew both sides down with a straight stitch, like I did. There are many options.
Optional: You can satin stitch (see the Machine Applique’ tutorial) or blanket stitch or use some other decorative stitch to machine sew the handle to the background triangle piece. If you use one of these stitches, you may need some tearaway stabilizer
Optional 2: you can hand applique’ the handle to the background triangle.
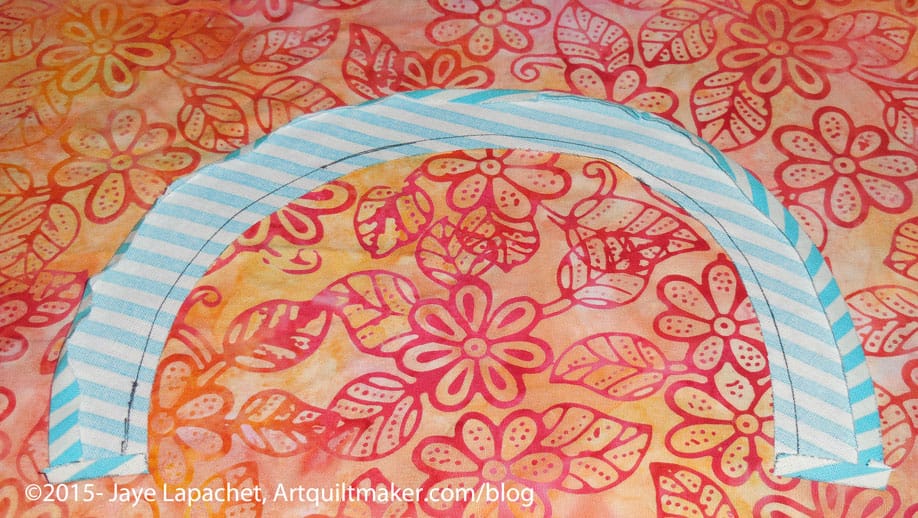
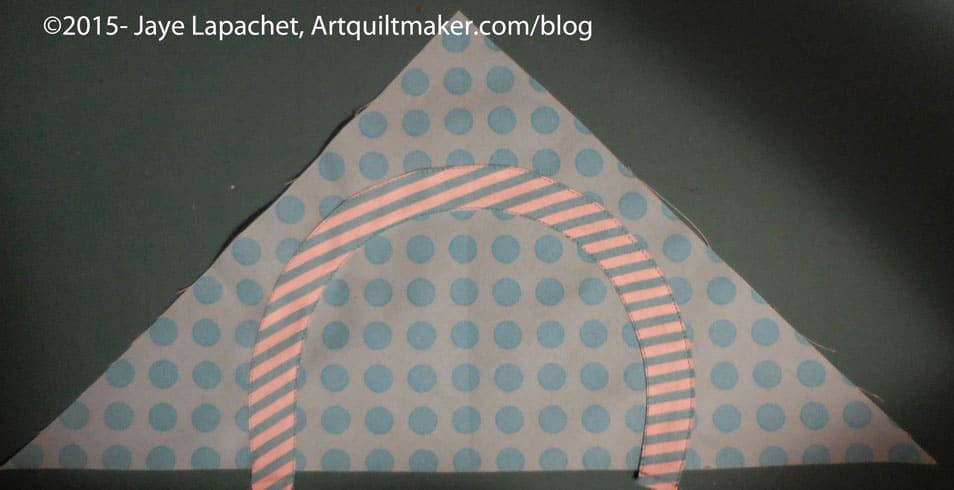
Handle sewn to background with straight seam
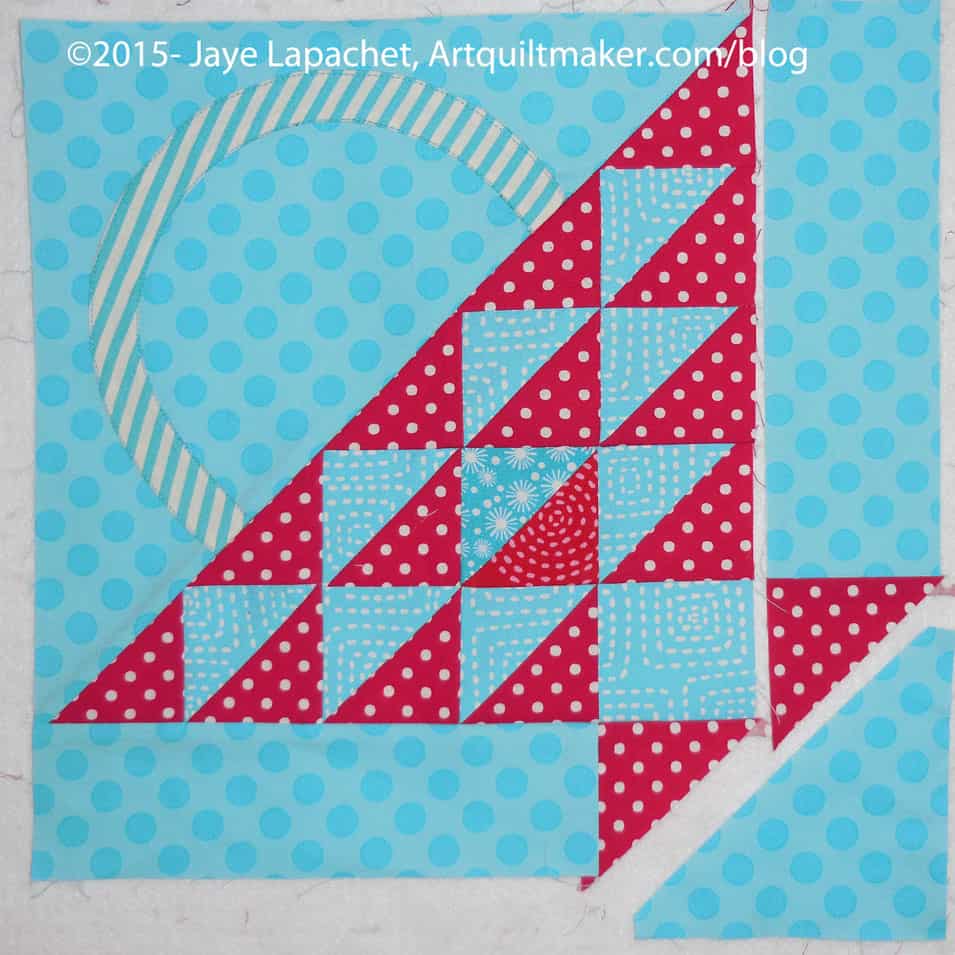
Once the handle is sewn you are ready to move to the woven part of the basket.
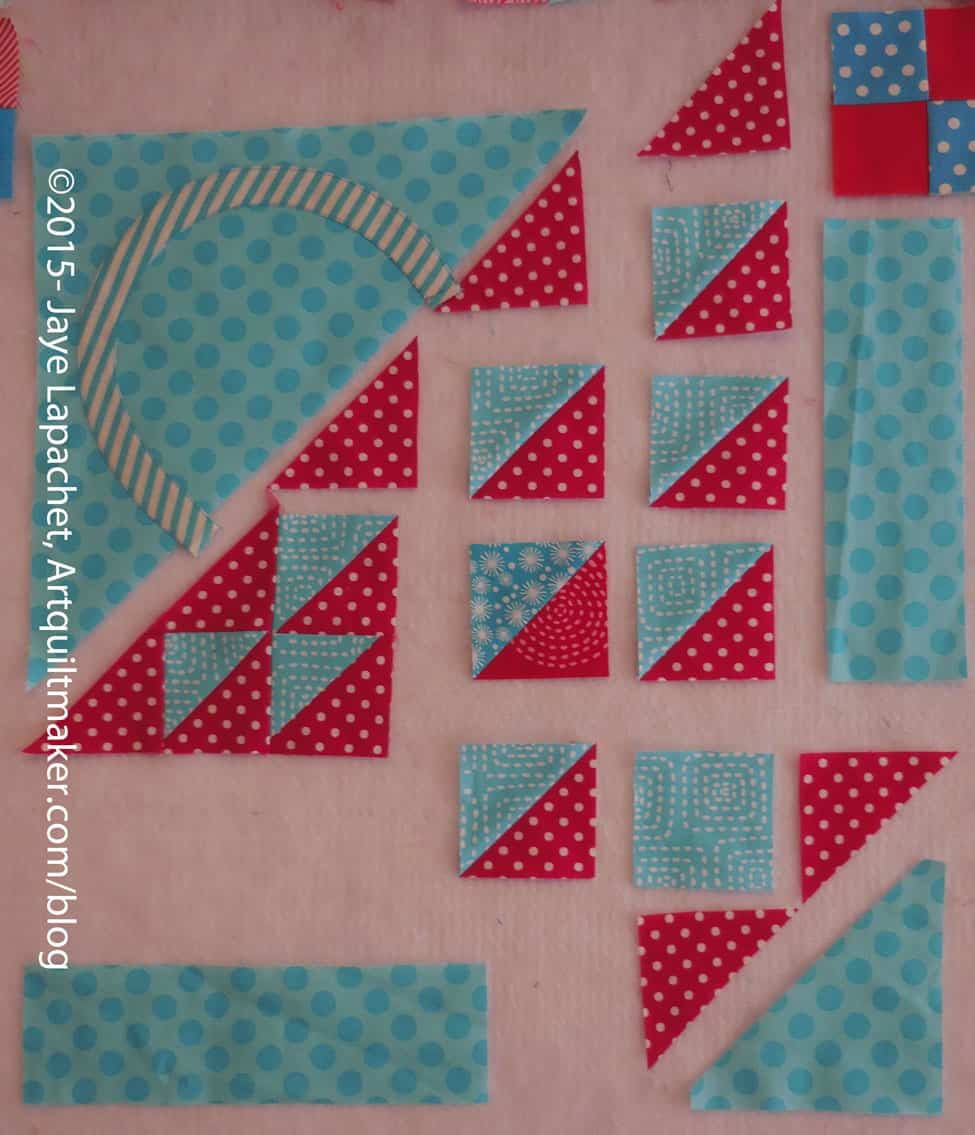
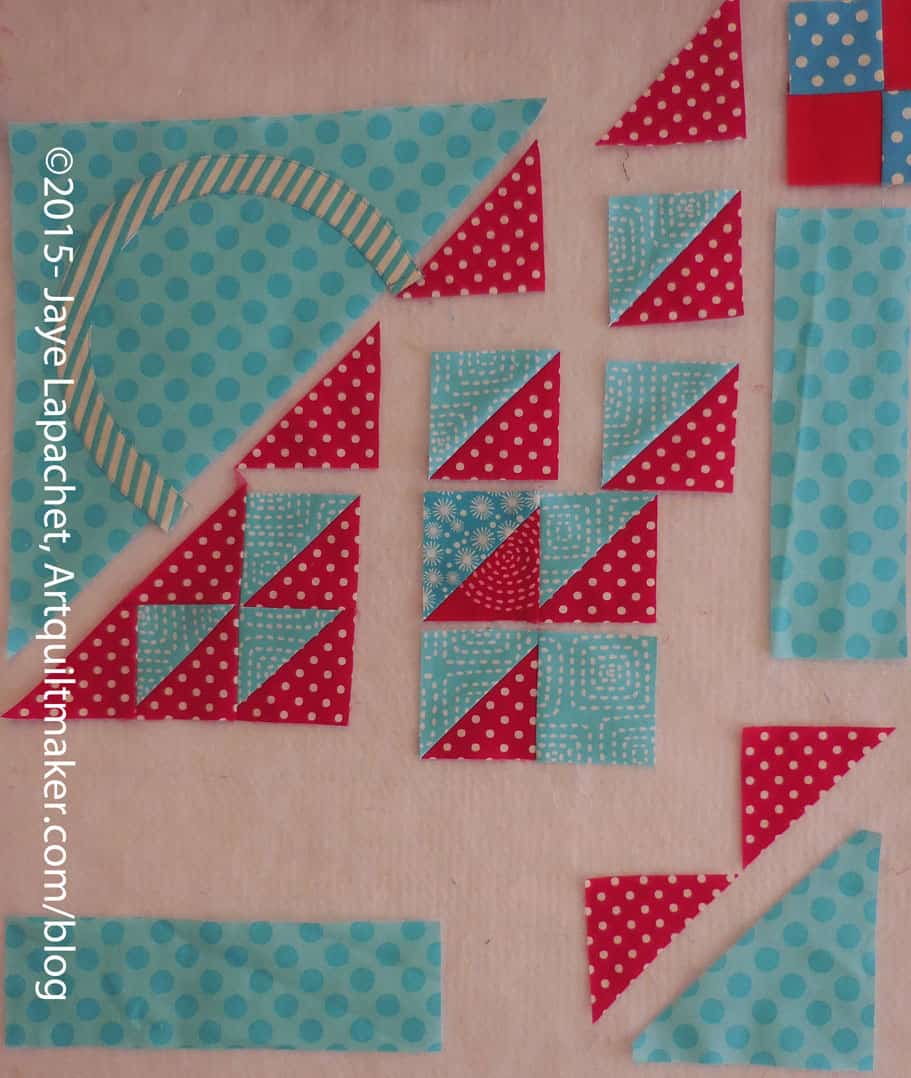
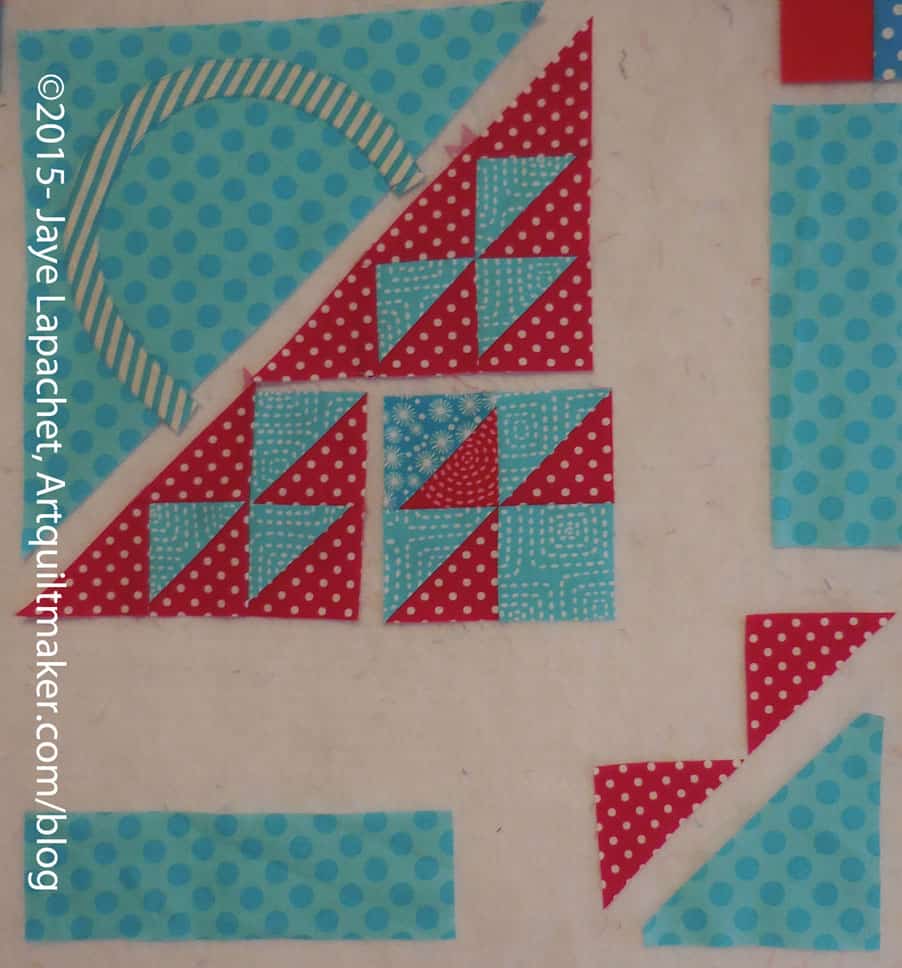
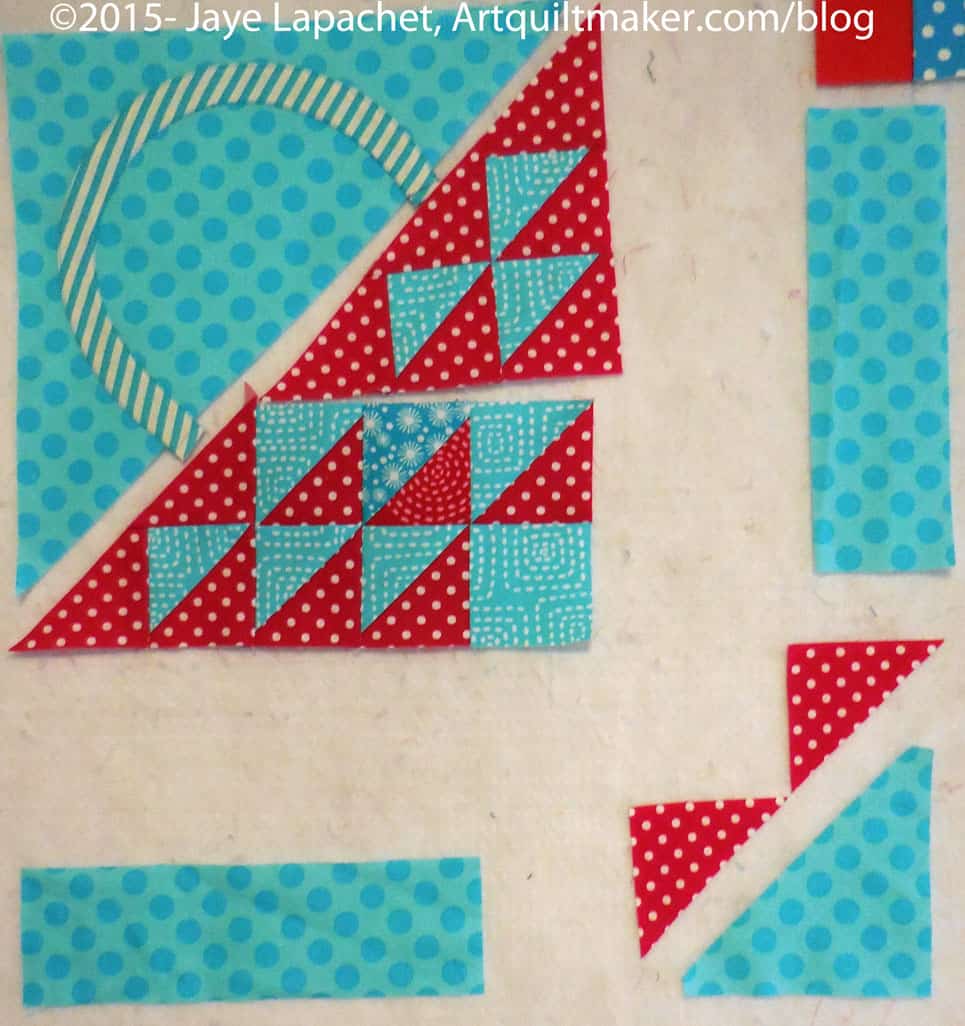
Basket Sewing Layout
Sew Basket Together
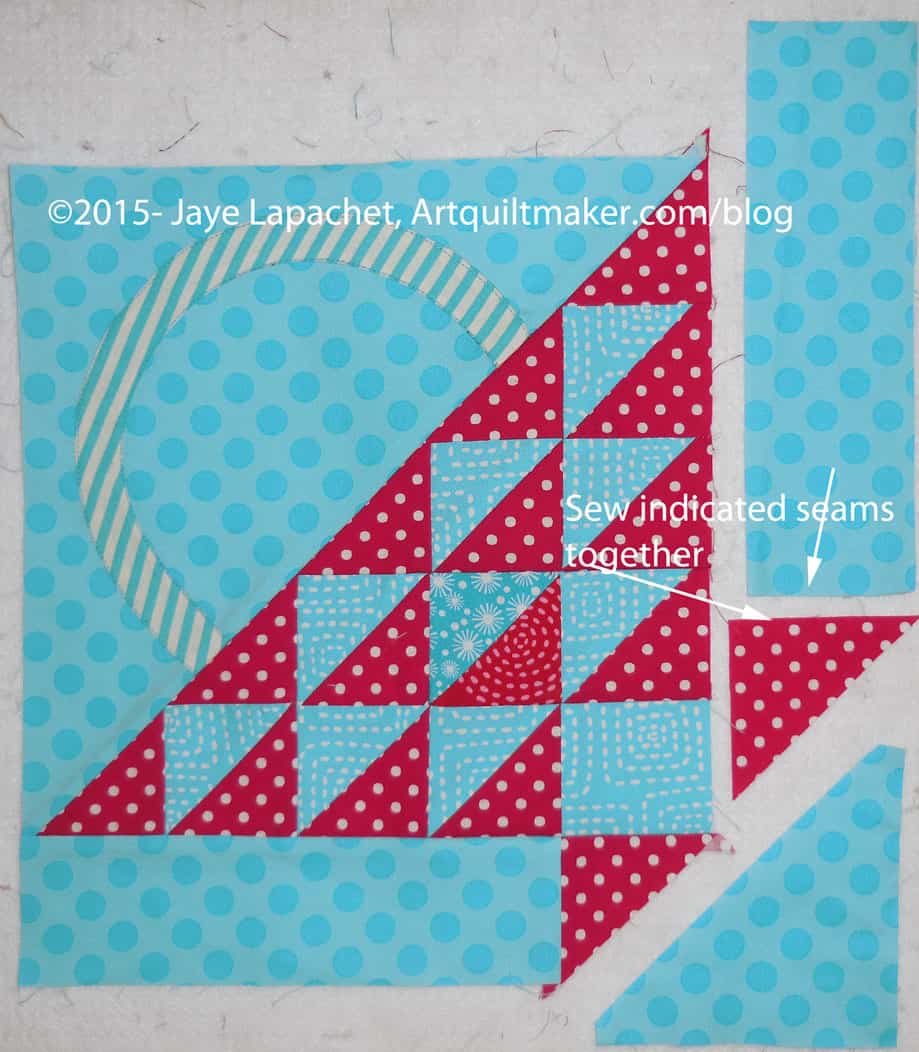
The block can be broken down into two pieces: the top half with the handle and the bottom half with the basket.
The two colored HSTs are supposed to give the illusion of a woven basket.
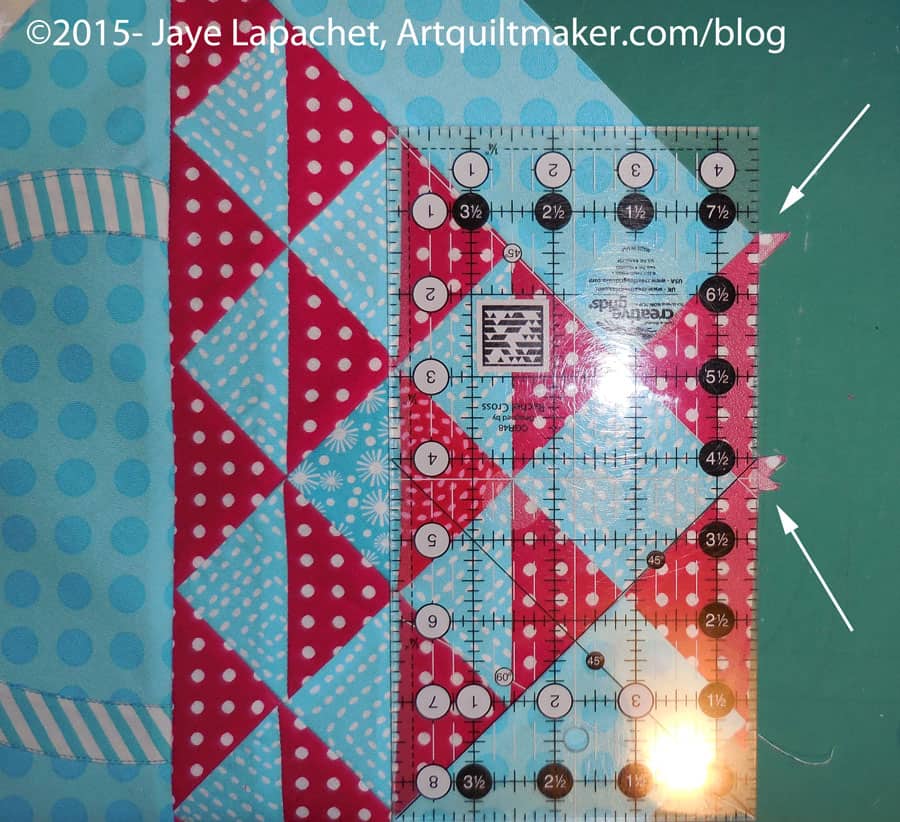
Trim off dog ears
Trim off dog ears from the A,B-HST/1 combo.
Sew Basket parts together
Sew HST/2 to HST/5. Press towards HST/5.
Using the diagram above to confirm placement, sew your A,B-HST/1 combo to your HST/2-HST/5 combo. Press towards the red.
Sew basket parts together
Sew HST/8 to Square 10. Press towards the Square 10.
Sew HST/6 to HST/9. Press towards the red part of the HST.
Sew 2 sets of woven basket parts togetherSew basket parts together
Using the diagram above to confirm placement, sew your HST/6-HST/9 combo to your HST/8-Square/10 combo. Press towards the HST/6-HST/9 combo.
Sew Triangle to HSTs
Using the diagram above to confirm placement, sew C to HST/3. Press towards the red.
Sew triangle D to C-HST/3 combo
Using the diagram above to confirm placement, sew D to your C-HST/3 combo. Press towards D.
Trim your dog ears
Trim your dog ears.
Sew HST/4 to HST/7. Press towards HST/7, making sure your seams will nest with the seams you have already pressed.
Sew parts of the basket together
Sew HST/4-HST/7 together and then sew the HST/4-HST/7 combo to E. Press towards E.
Four sections of the Basket
Using the diagram above for placement, sew your HST/4-HST/7-E combo to your C-D-HST/3 combo. Press.
Trim dog ears.
Sew 2 Sections together
Sew your A,B-HST/1-HST/2 segment to the HST/6-HST/9 segment.
Trim Your Dog Ears
Trim your dog ears!
Sew last two segments
Sew the last two segments of the basket part together. You may have to re-press some seams.
I didn’t move the borders the whole time I worked on the quilt See how much the basket part shrank? That is seam allowances for you!
Trim the dog ears
Trim the dog ears, if you haven’t already.
Sew 2 halves together
Now you have two halves of the basket. Sew the woven part to the handle part by placing the woven part on top of the handle part, lining them up and then sewing carefully. You can fold the two sections in half, bisecting the handle, to match them up if you think that you need to trim the handle portion later.
Ready to sew last borders
Now you are ready to sew on the borders.
Sew triangle to borderSew triangle to border with words
Sew the B2-G background section by placing the red triangle (G) face down on top of background piece B2 and sew the short end of the background to the triangle, as shown in the picture.
Sew on background B2/Triangle-G
Take the basket piece that you sewed together above and place the B2-G background section on top of the basket section. Line up the red triangle’s seam from the B2-G background section with the HST/8-Square 10 section. You want the seams to match, so pin. Press towards background piece B2.
Only one more border to go.
Take the basket piece that you sewed together above and place the B1-F background section on top of the basket section. Line up the red triangle’s seam from the B1-F background section with the HST/9-Square 10 section. You want the seams to match, so pin. Press towards background piece B1.
Sew on Final Triangle
Now you are ready to sew the last piece.
Trim dog ears
Trim dog ears.
Basket almost complete
Your basket is almost complete.
Line up triangle with borders
Complete your basket half by sewing background piece B3 to the basket. You have already snipped off the corners so you just have to line up the triangle piece with the borders already sewn to the block. Press towards the background piece B3.
Your half is complete.
Take the top half of the basket, the piece with the handle, and carefully sew it to the basket half.
I had to go deposit some checks the other day. Since I was walking I stopped by the library and borrowed the One Block Wonders book. I started reading it before I went to bed the other night and I am less sure about the project.
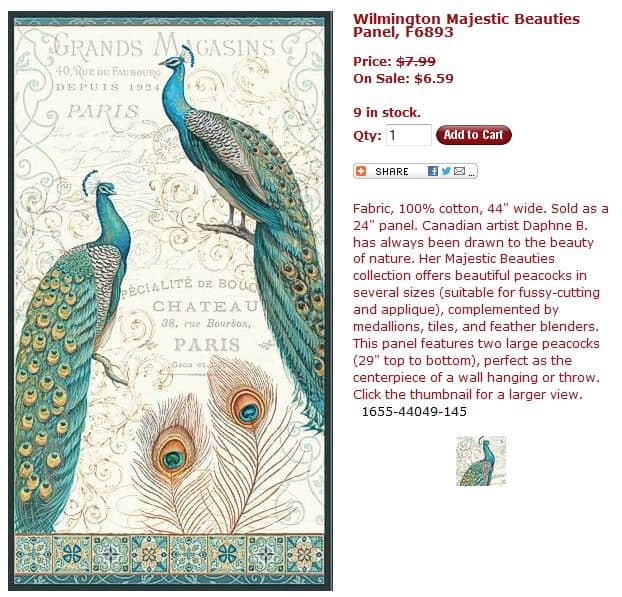
Majestic Beauties Peacocks Panel
First, the original panel I was thinking of using probably won’t work, because it has too much white in the background. I found the fabric on the site called Melinda’s Fabric Shop. I never used that shop before and they have quite a bit of variety as well as a good layout on their pages.
Since the site had related prints right on the screen showing the panels, I looked through the other prints in the line and there are some others that might work for this project. I like the squares print that looks like tile (Wilmington Majestic Beauties Tiles, #F6898), but that print, according to the book might also not work because there is not enough variety in the colors and shapes.
Peacocks fabric
I kept looking and found another print with the peacocks that has more variety in the design and not as much white in the background. It also incorporates some single feathers and the tile. The heads of the birds are a smaller part of the design, which is also kind of a relief, because I really don’t want heads in many, if any, quilts that I make.
The concern I have with this print is the size of the repeat. I can’t tell from the website so I sent them a message. The book says that there will be too many duplicates if the repeat is too small.
I still haven’t looked through my large pieces of Philip Jacobs fabric, but need to do that before I go out and buy more fabric.
I was pretty excited seeing Pam’s version, but as I read the book, I am less excited. I am not thrilled about sewing more hexagons together either. Been there done that. The whole project just seems a lot less interesting after reading the book. Perhaps that is what I felt when the book first came out.
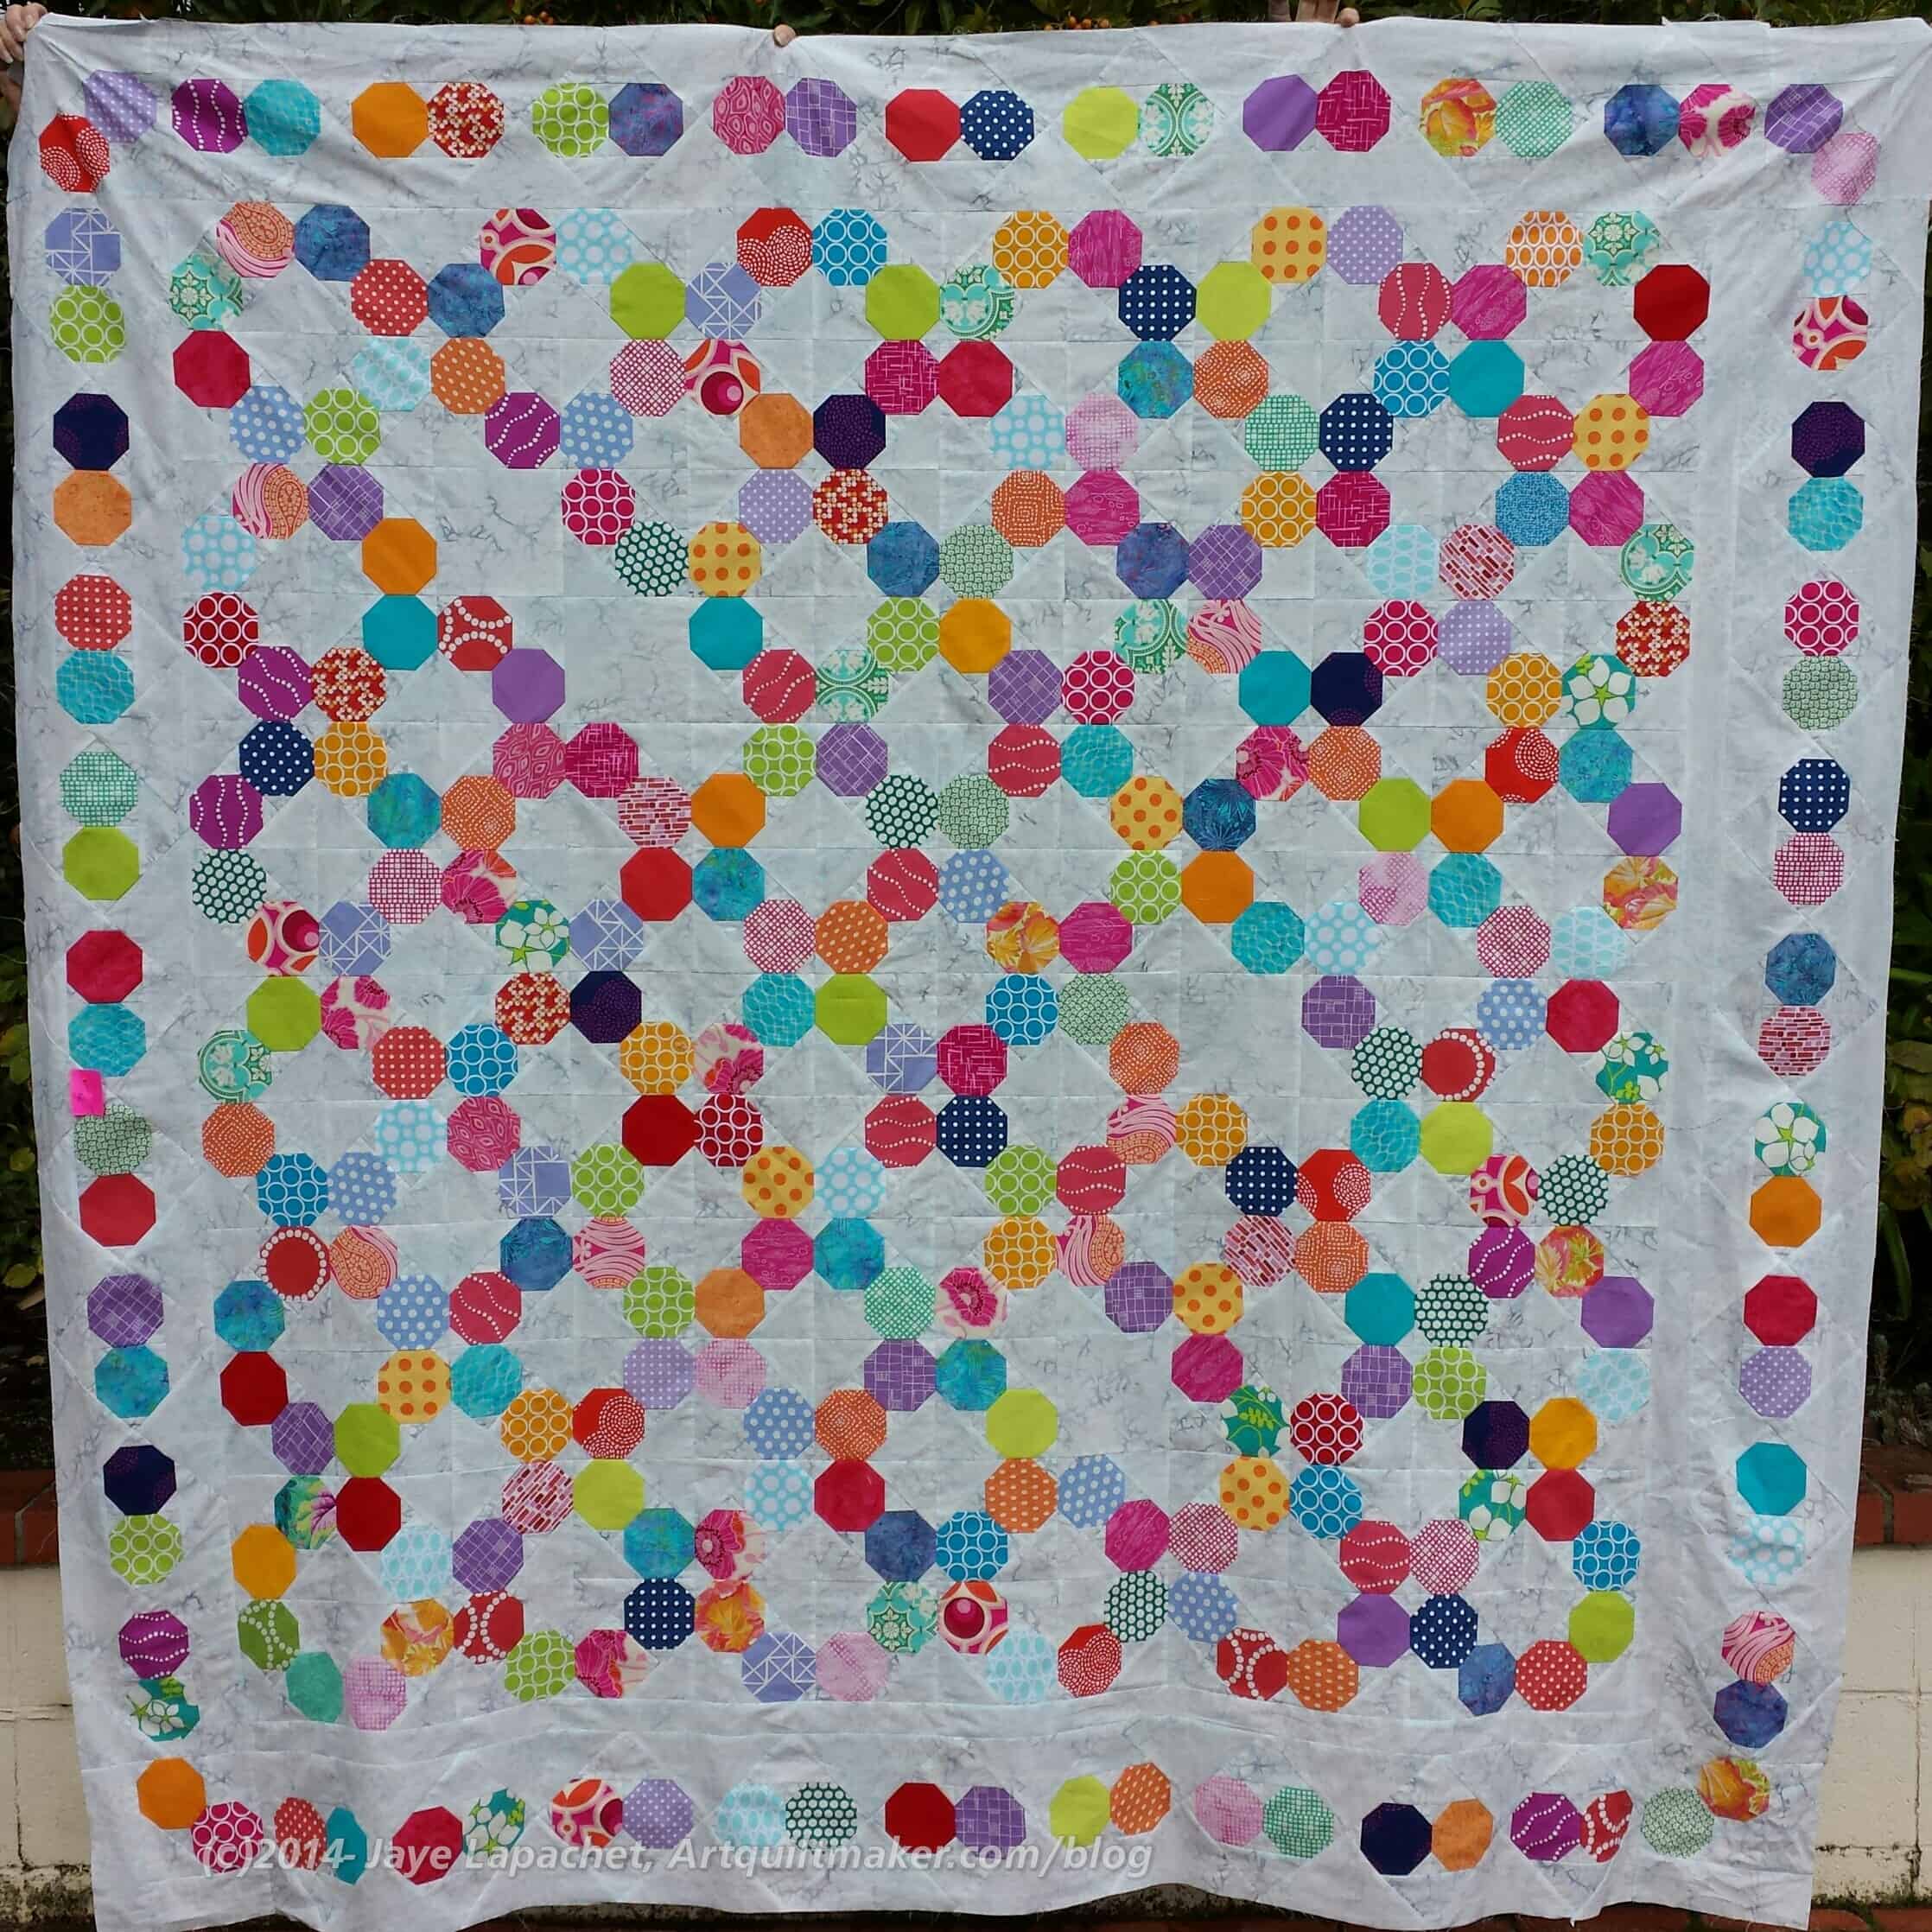
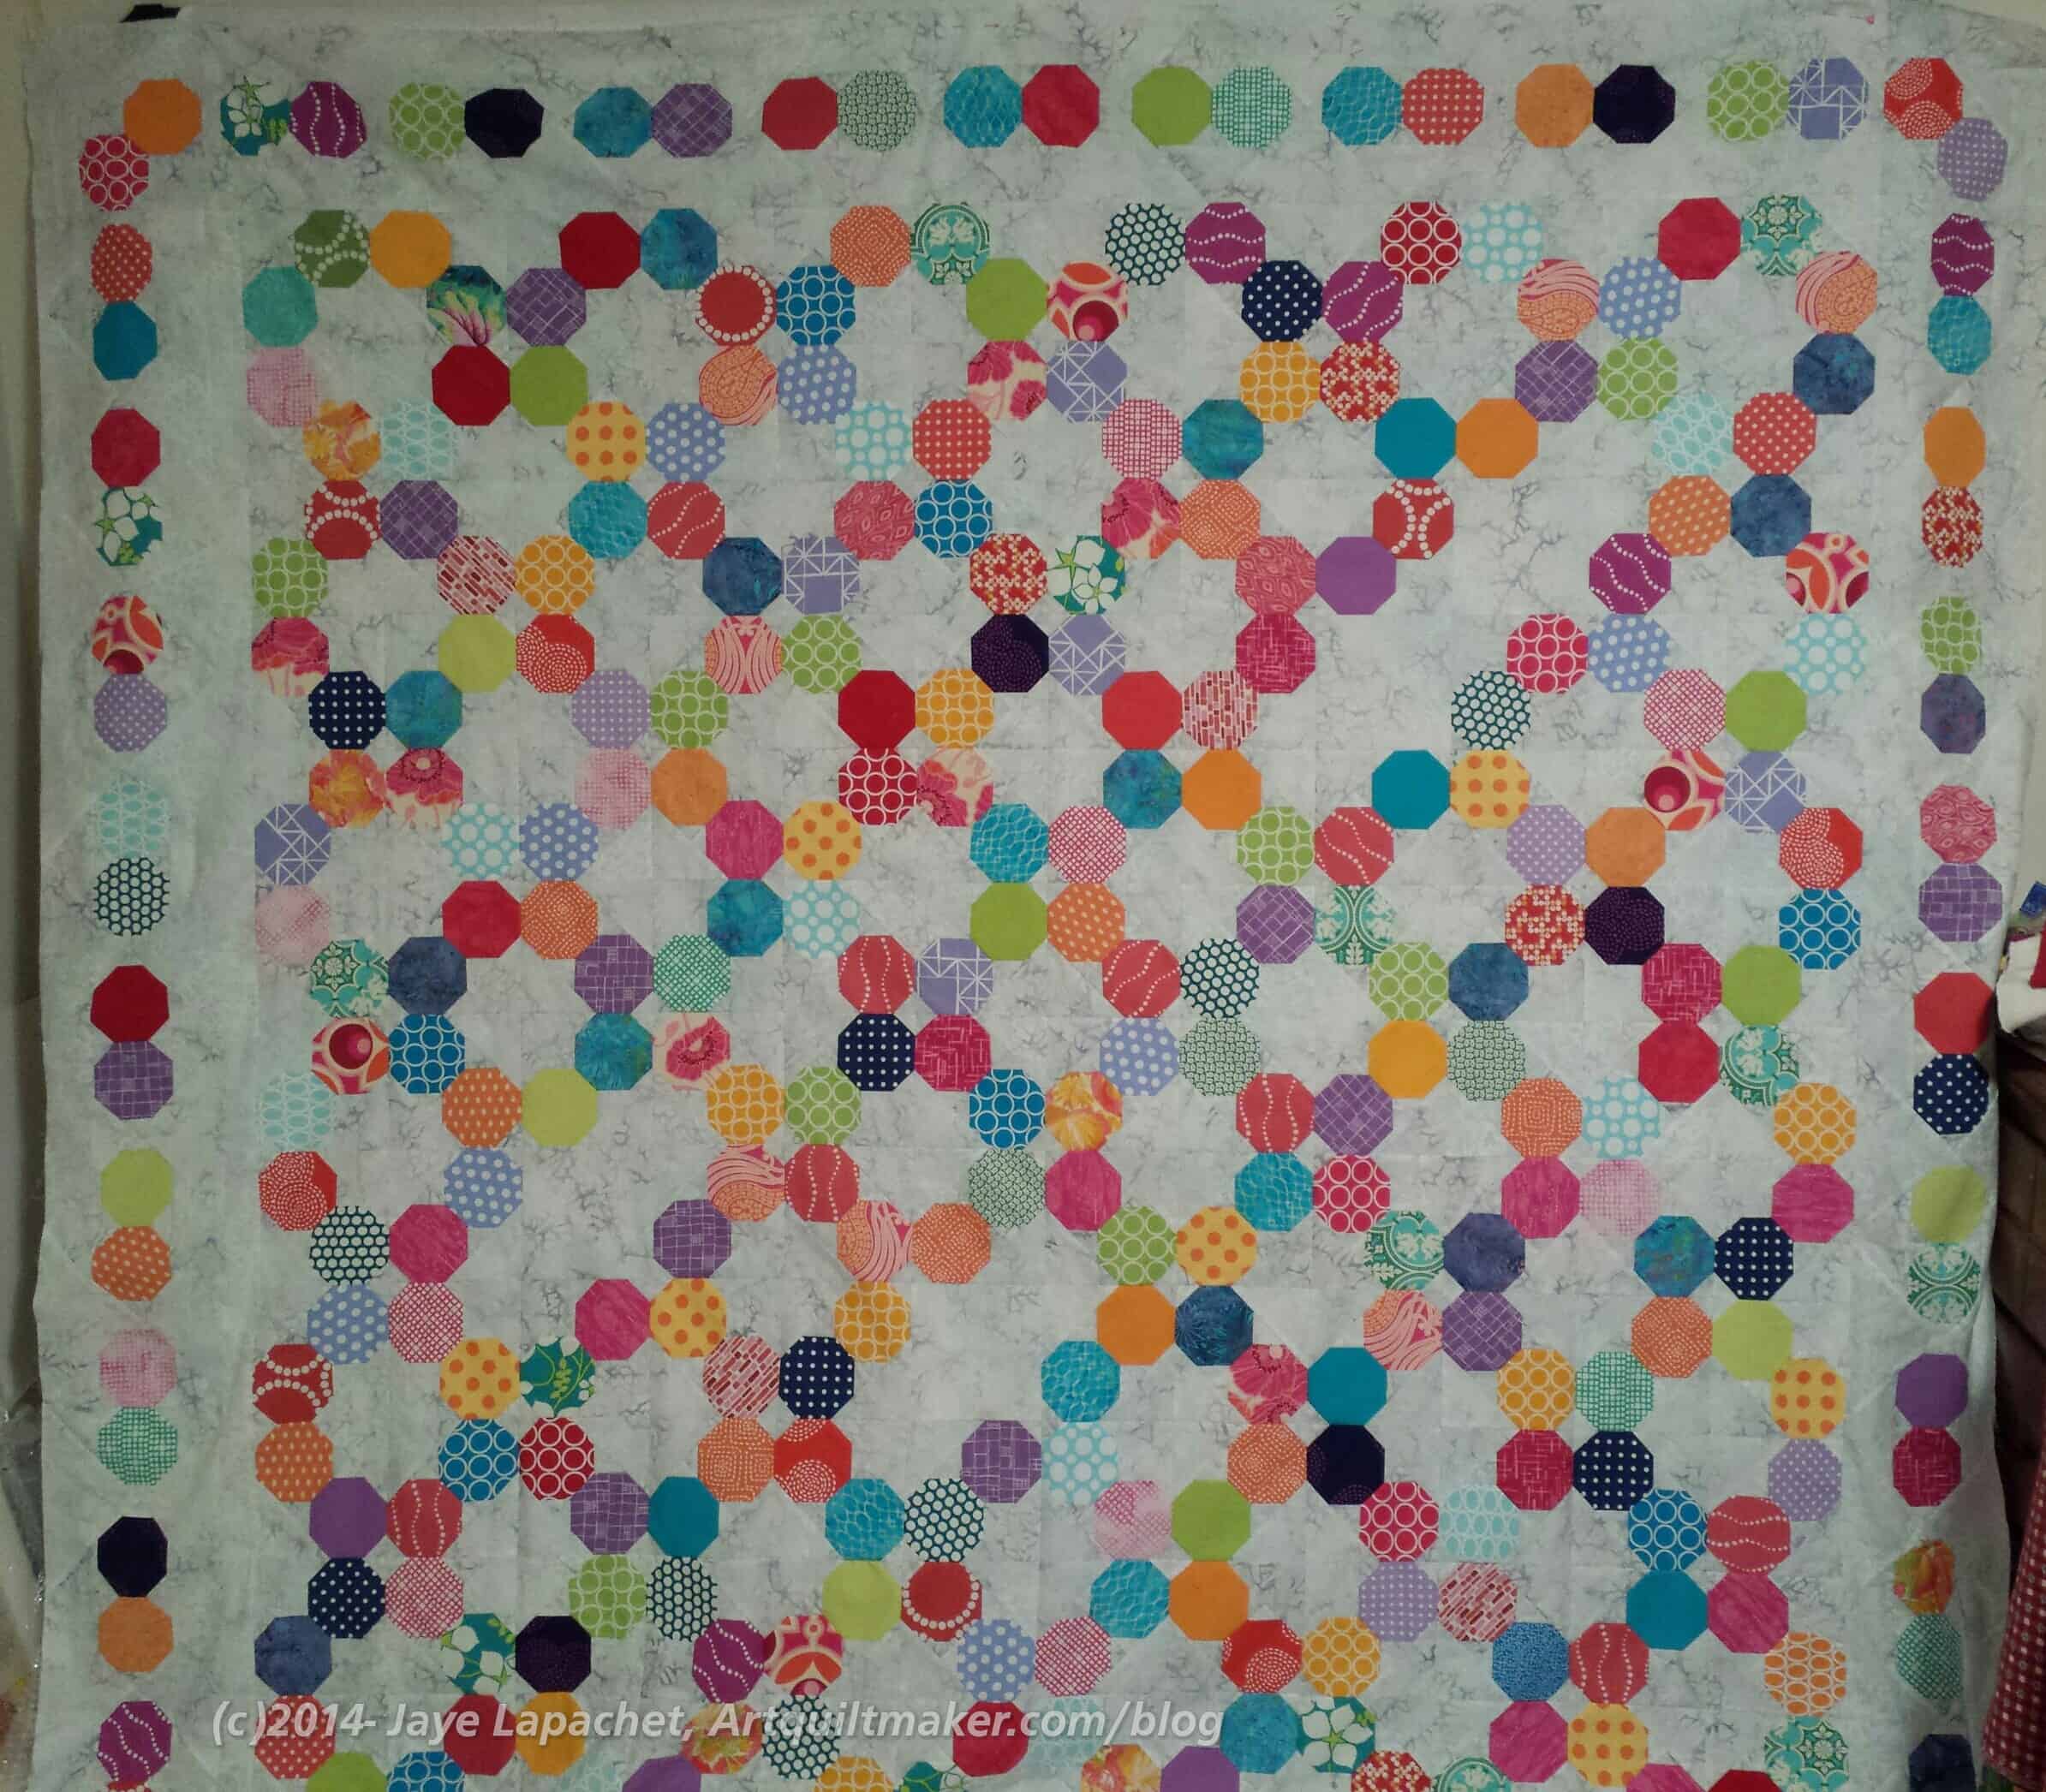
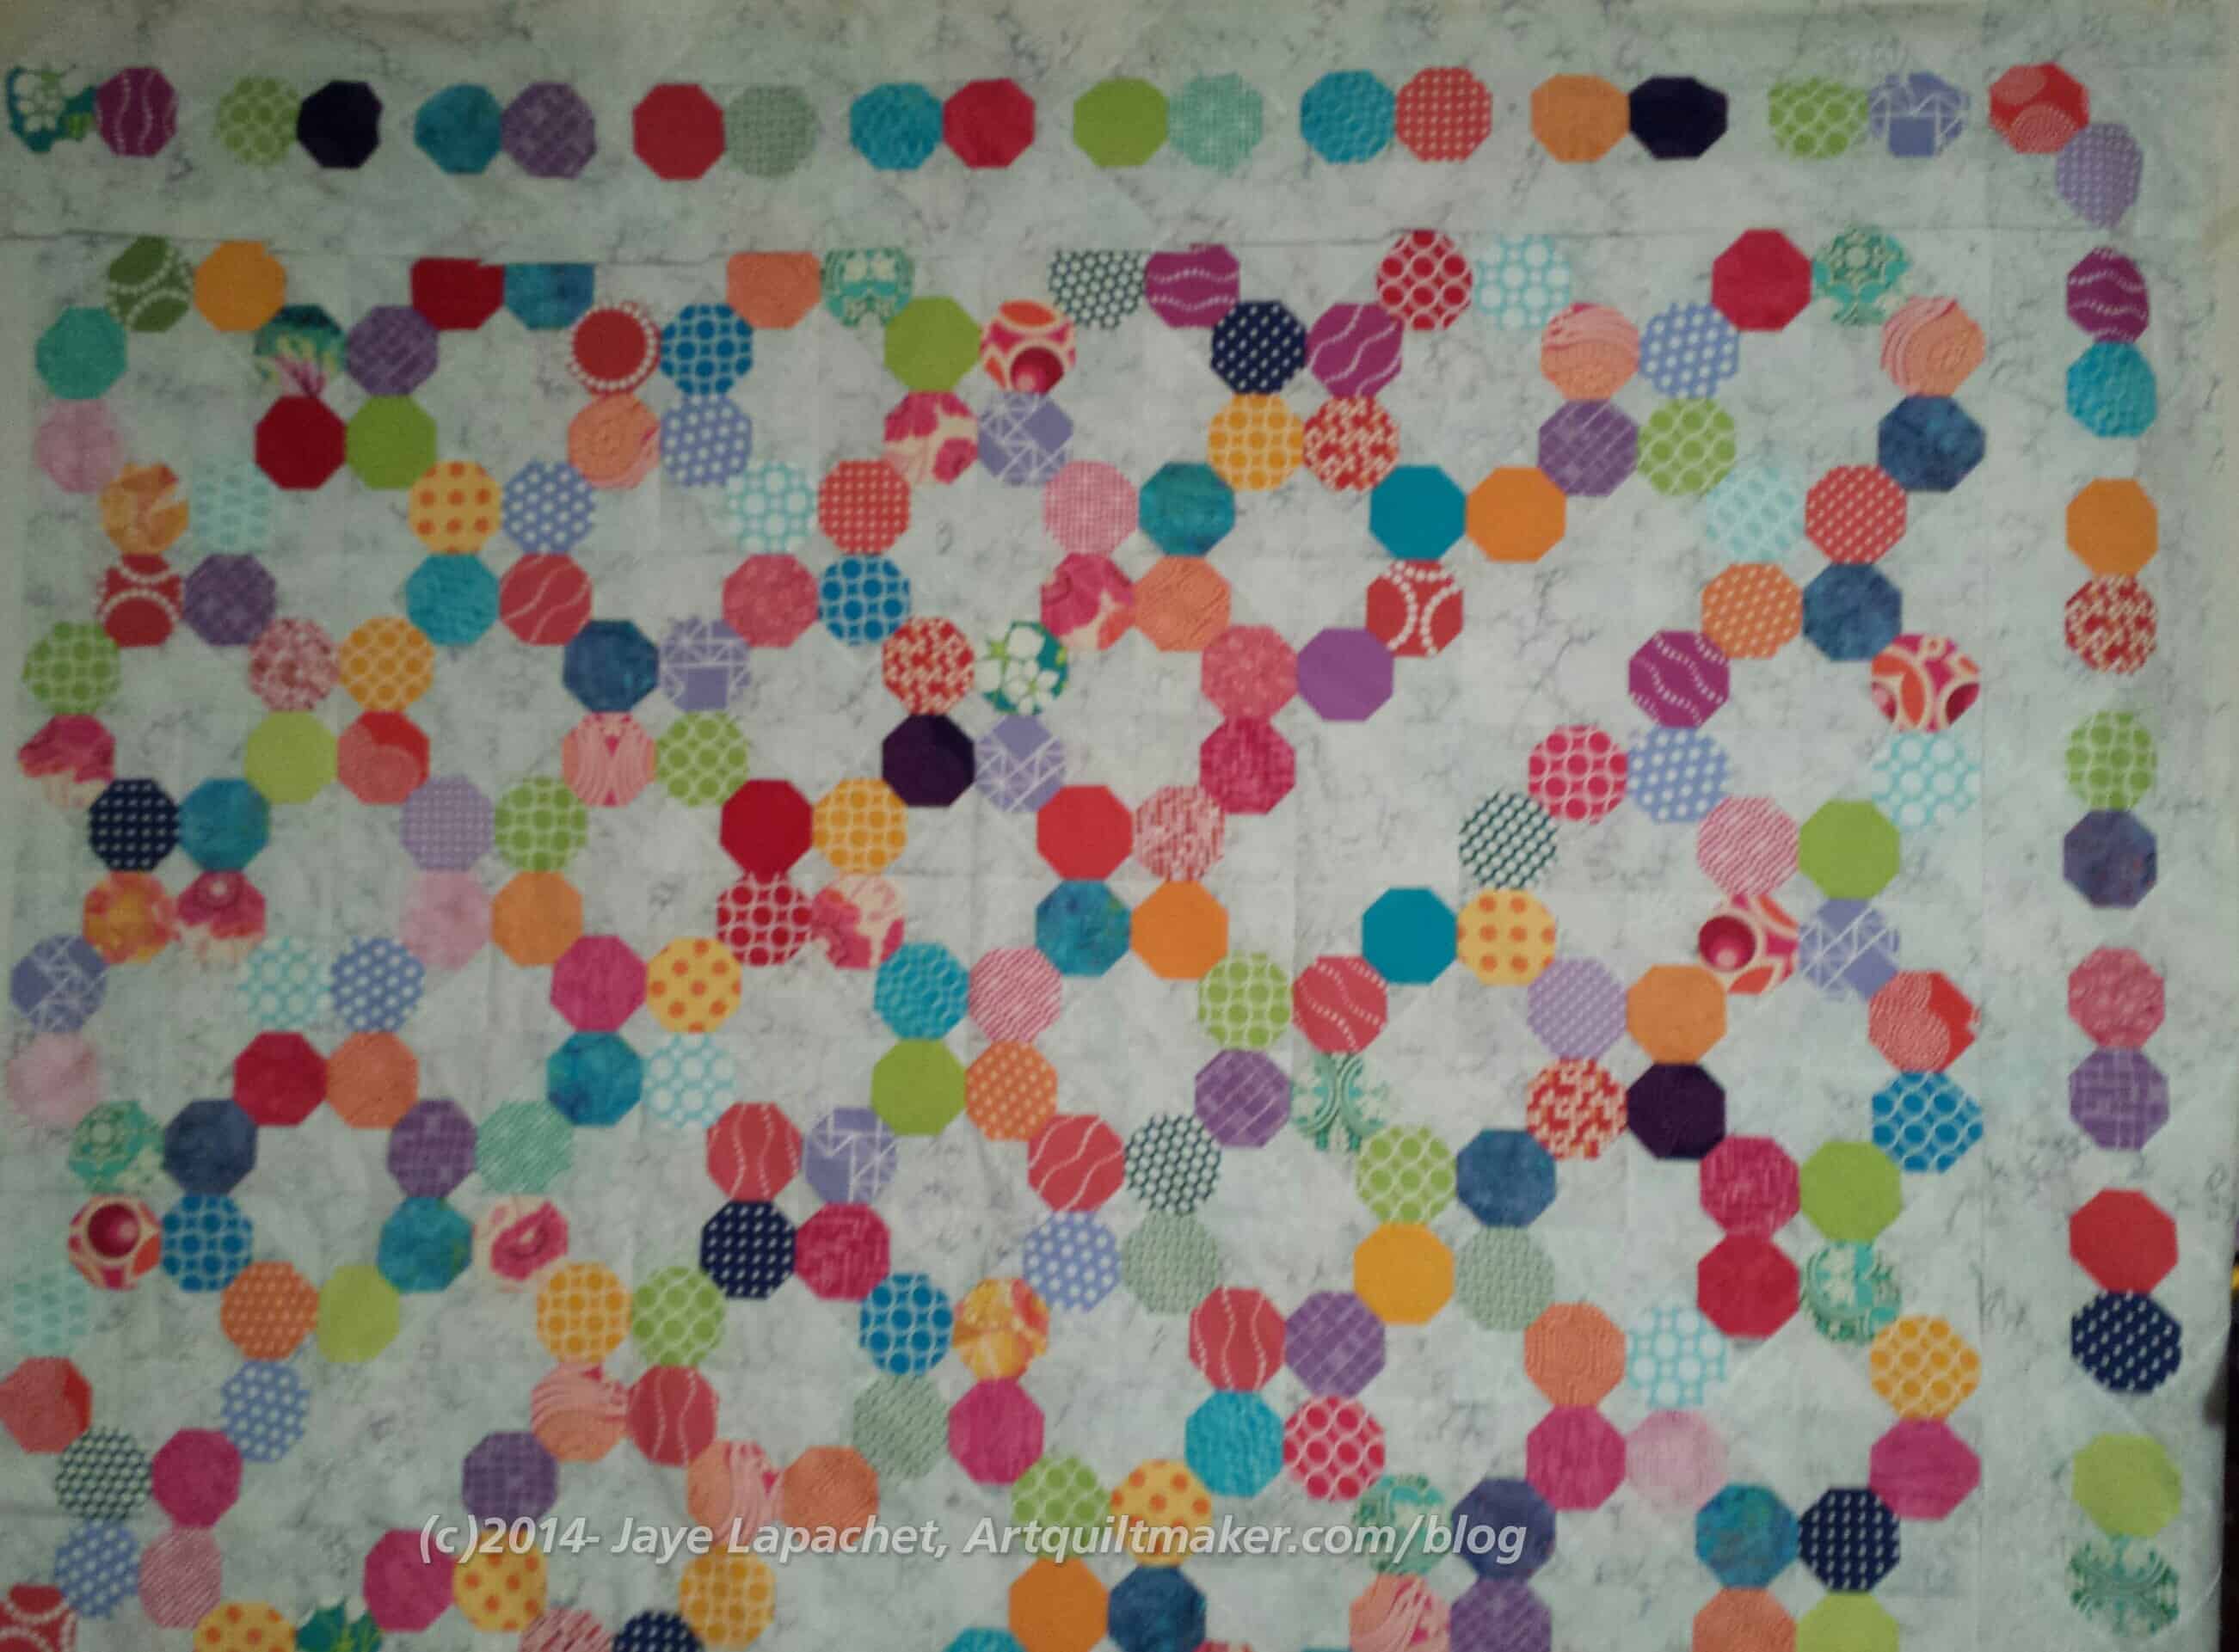
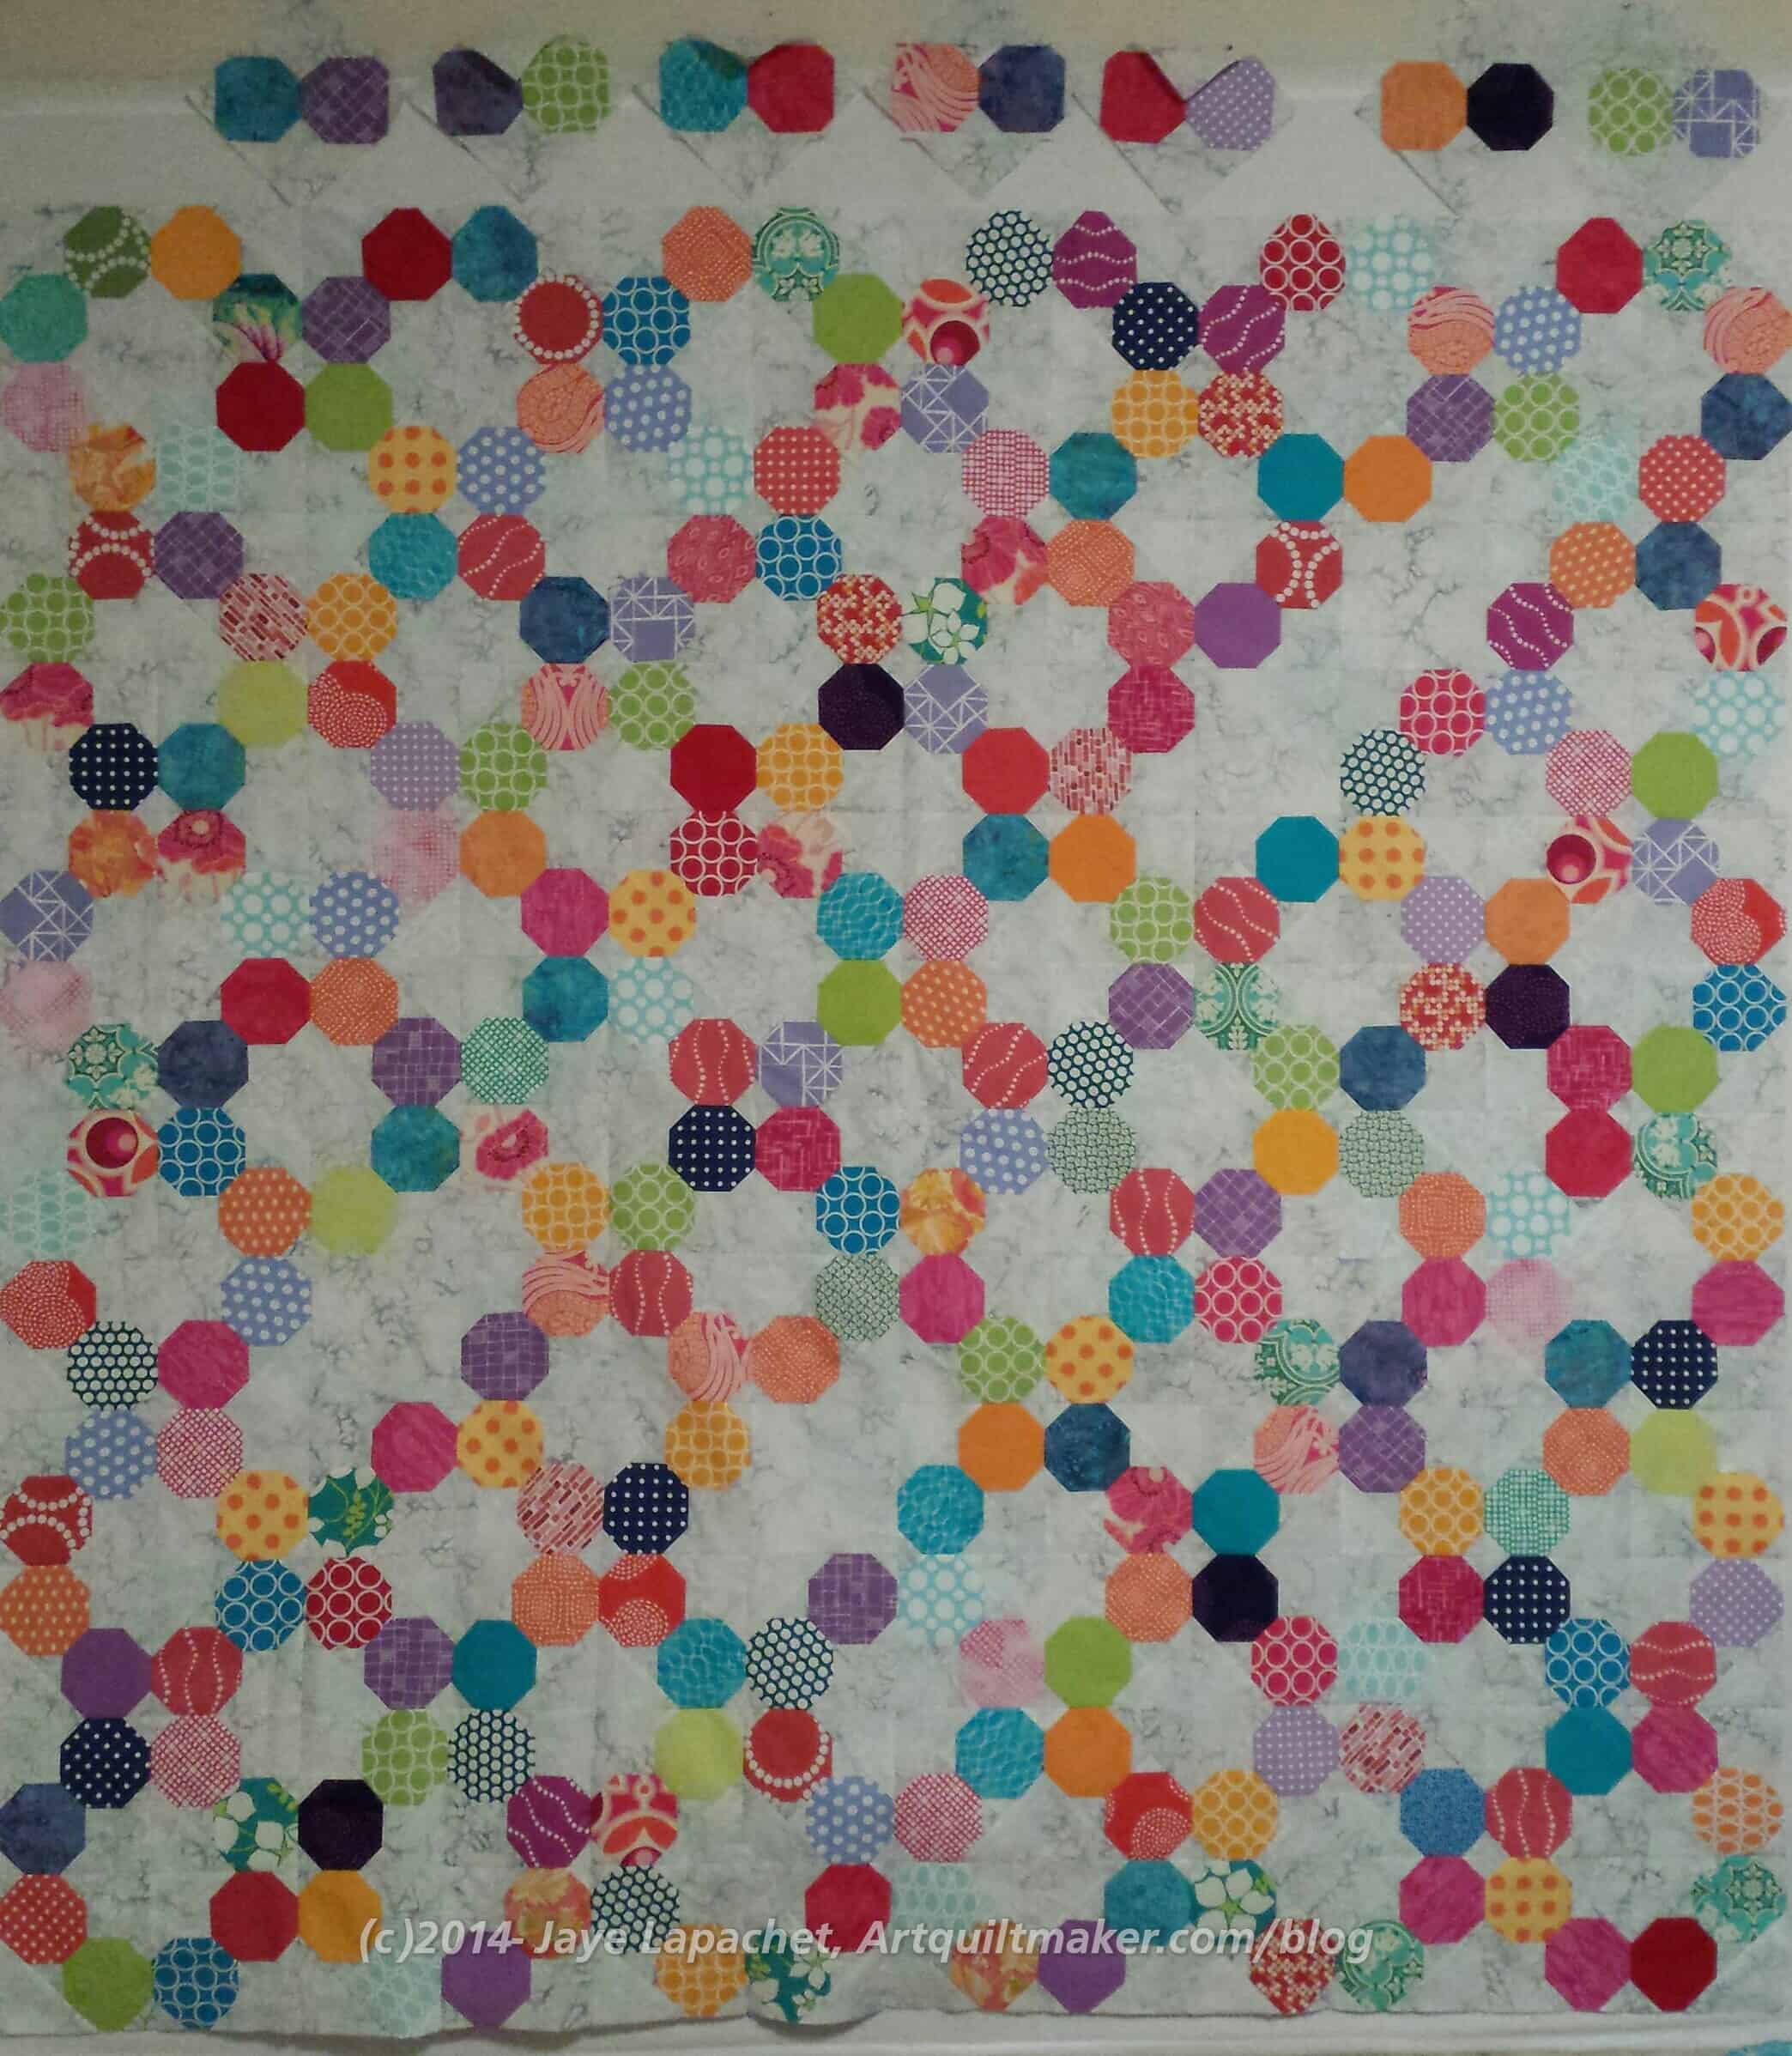
I don’t think I have made much progress but I am making some progress. I finished all of the extra octagons so the piece is much bigger. I have to make a few more just to complete one side. I also still have a lot of nine patches to make.
I am now out of grey squares and have to make a concentrated effort to cut a bunch more. It isn’t a big deal; I just have to do it.
One of the things that makes me feel really good is when someone tells me that a project I made inspired them.
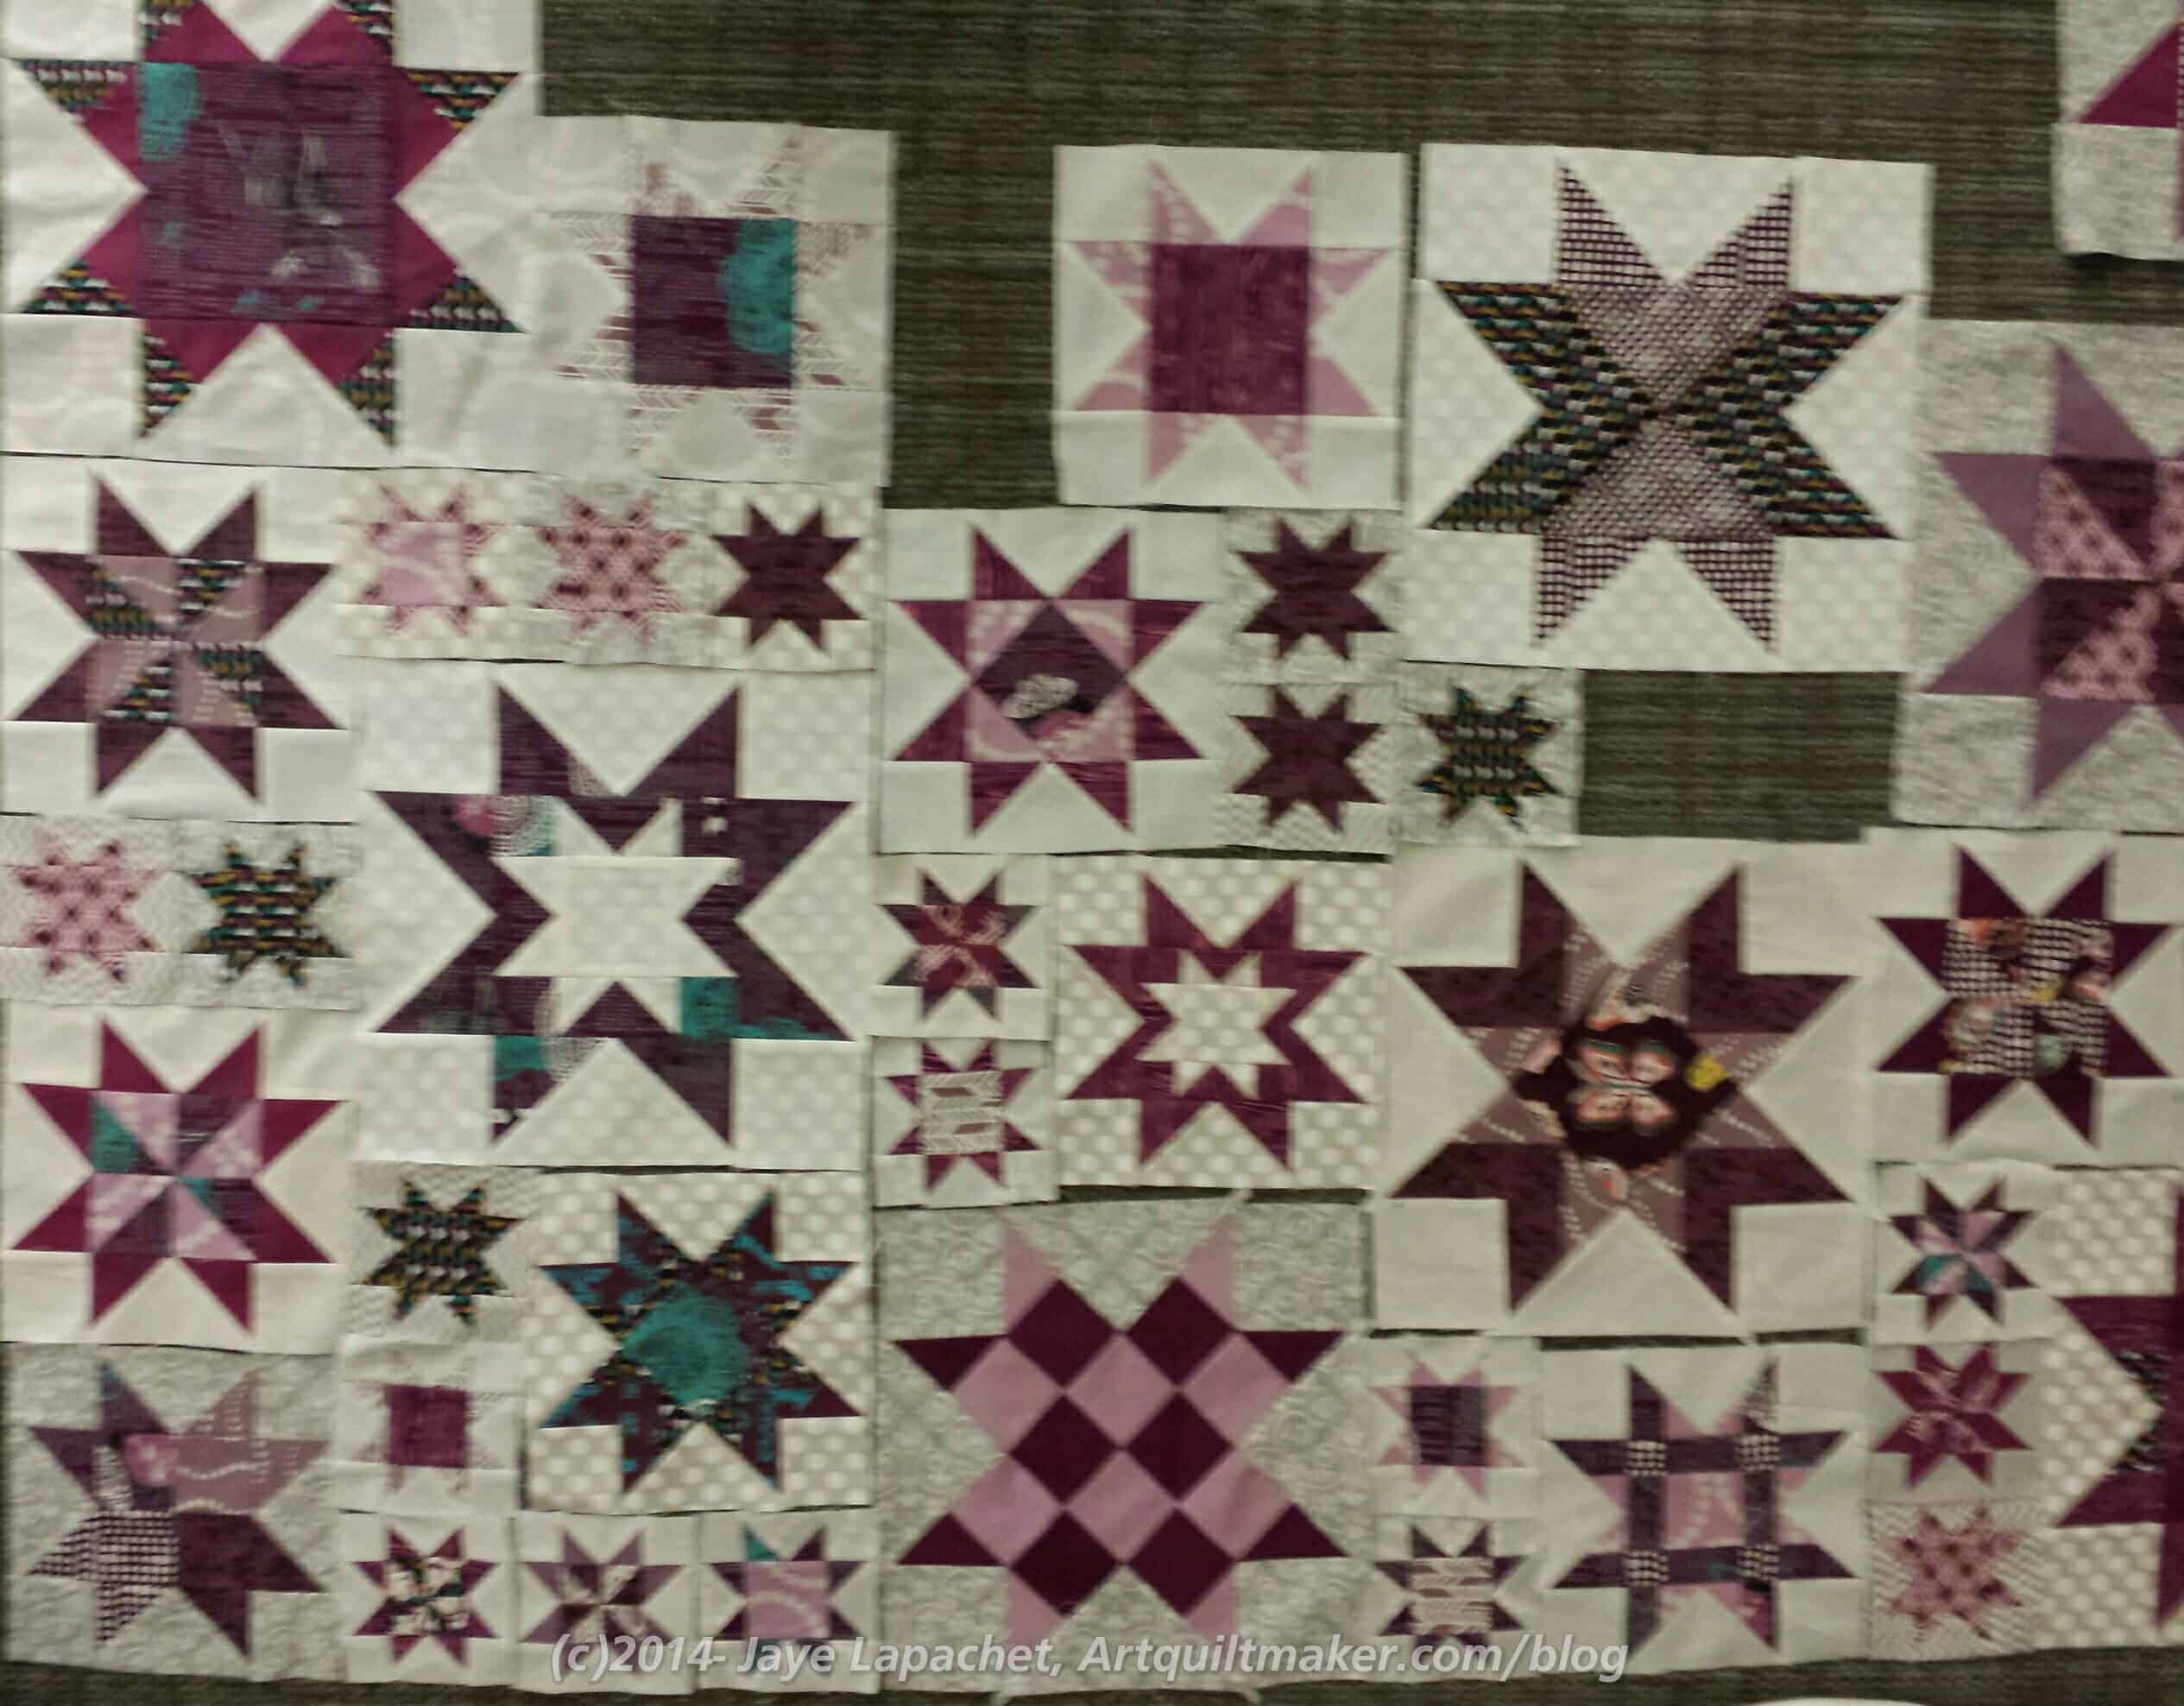
Lynnette’s Star Sampler
At a recent Sew Day, Lynnette was laying out star blocks that looked suspiciously like my Star Sampler, but in really awesome colors. She told me that my Star Sampler had inspired her.
Ooooh! I inspired someone. That feeling is awesome.
I know the colors are hard to see, but it is in shades of white, plum and grey. It will be a gift. That told me that Lynnette is a better person than I am. I am just thrilled to see another version IRL of the Star Sampler.
It looks so little. You know I make big quilts so this one just looks weird.
I could cut more octagons and make it bigger, but the pieces are really small and piecing the blocks takes forever.
I have a few more octagons that are in the process of being sewn into Snowballs, so the piece will be a bit bigger, but it won’t be bed sized.
I can add a border and I do have an idea for that already, so that will also enlarge it.
I could also just be okay with the size that it is.
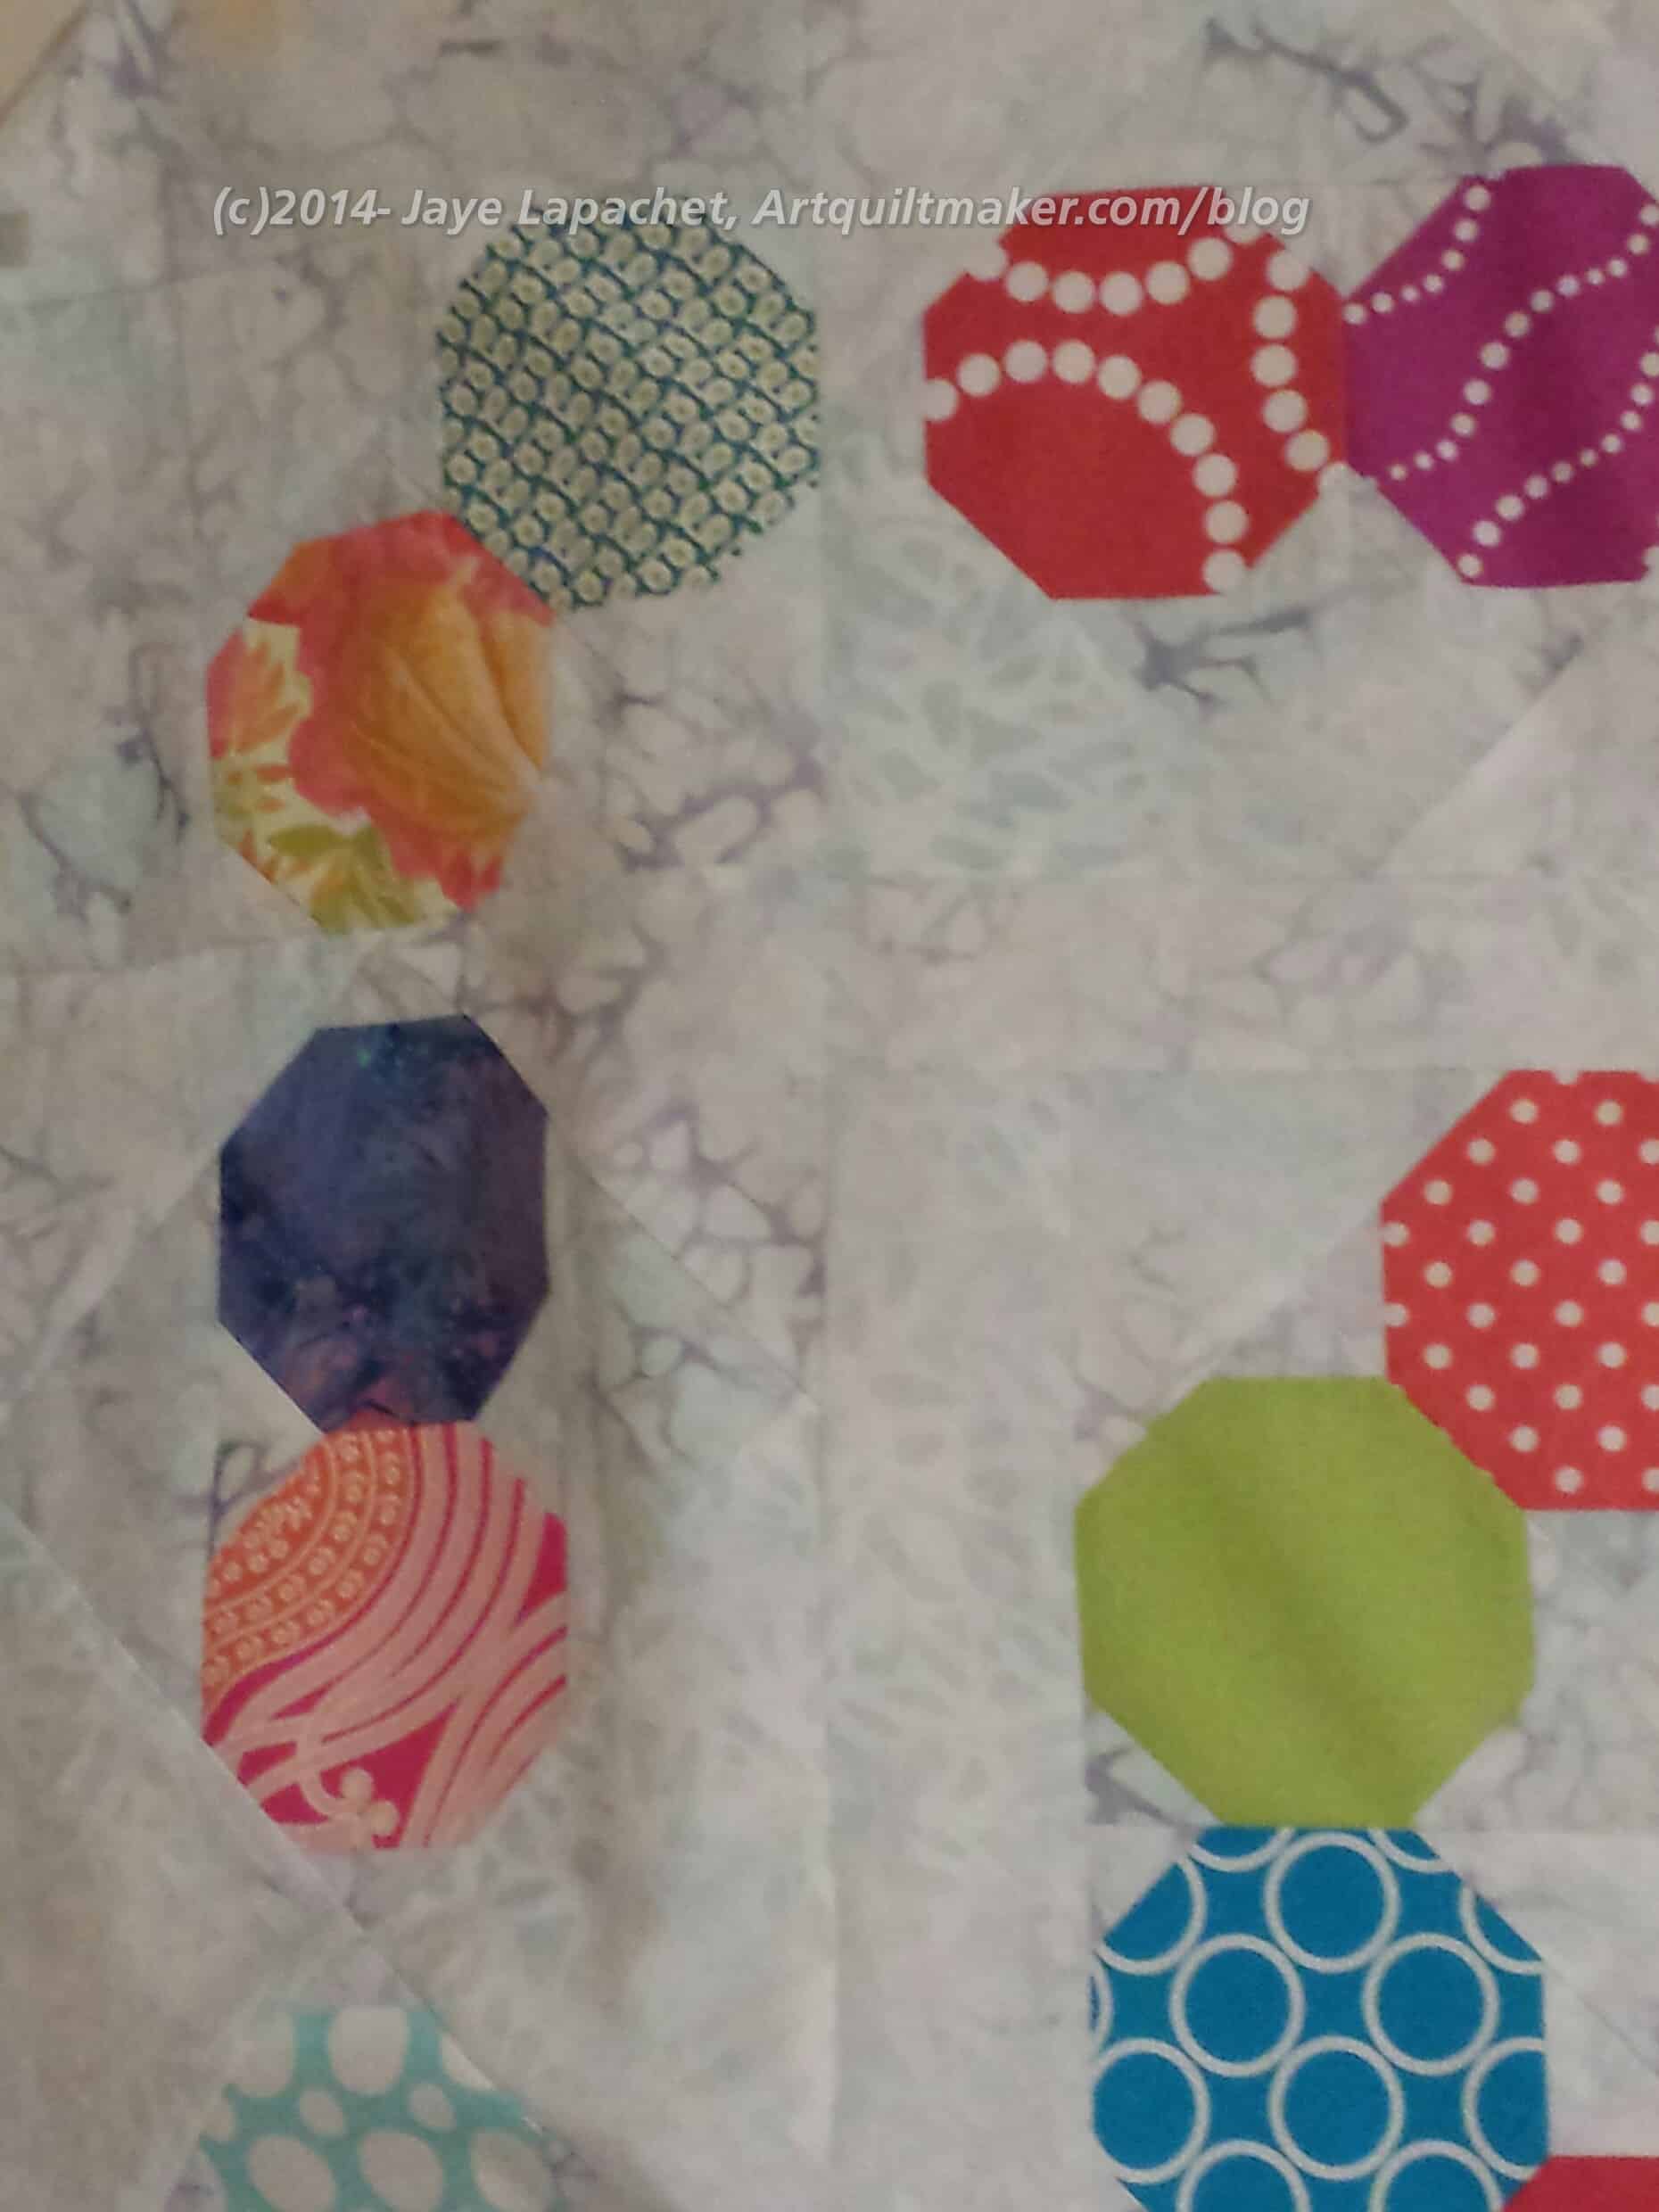
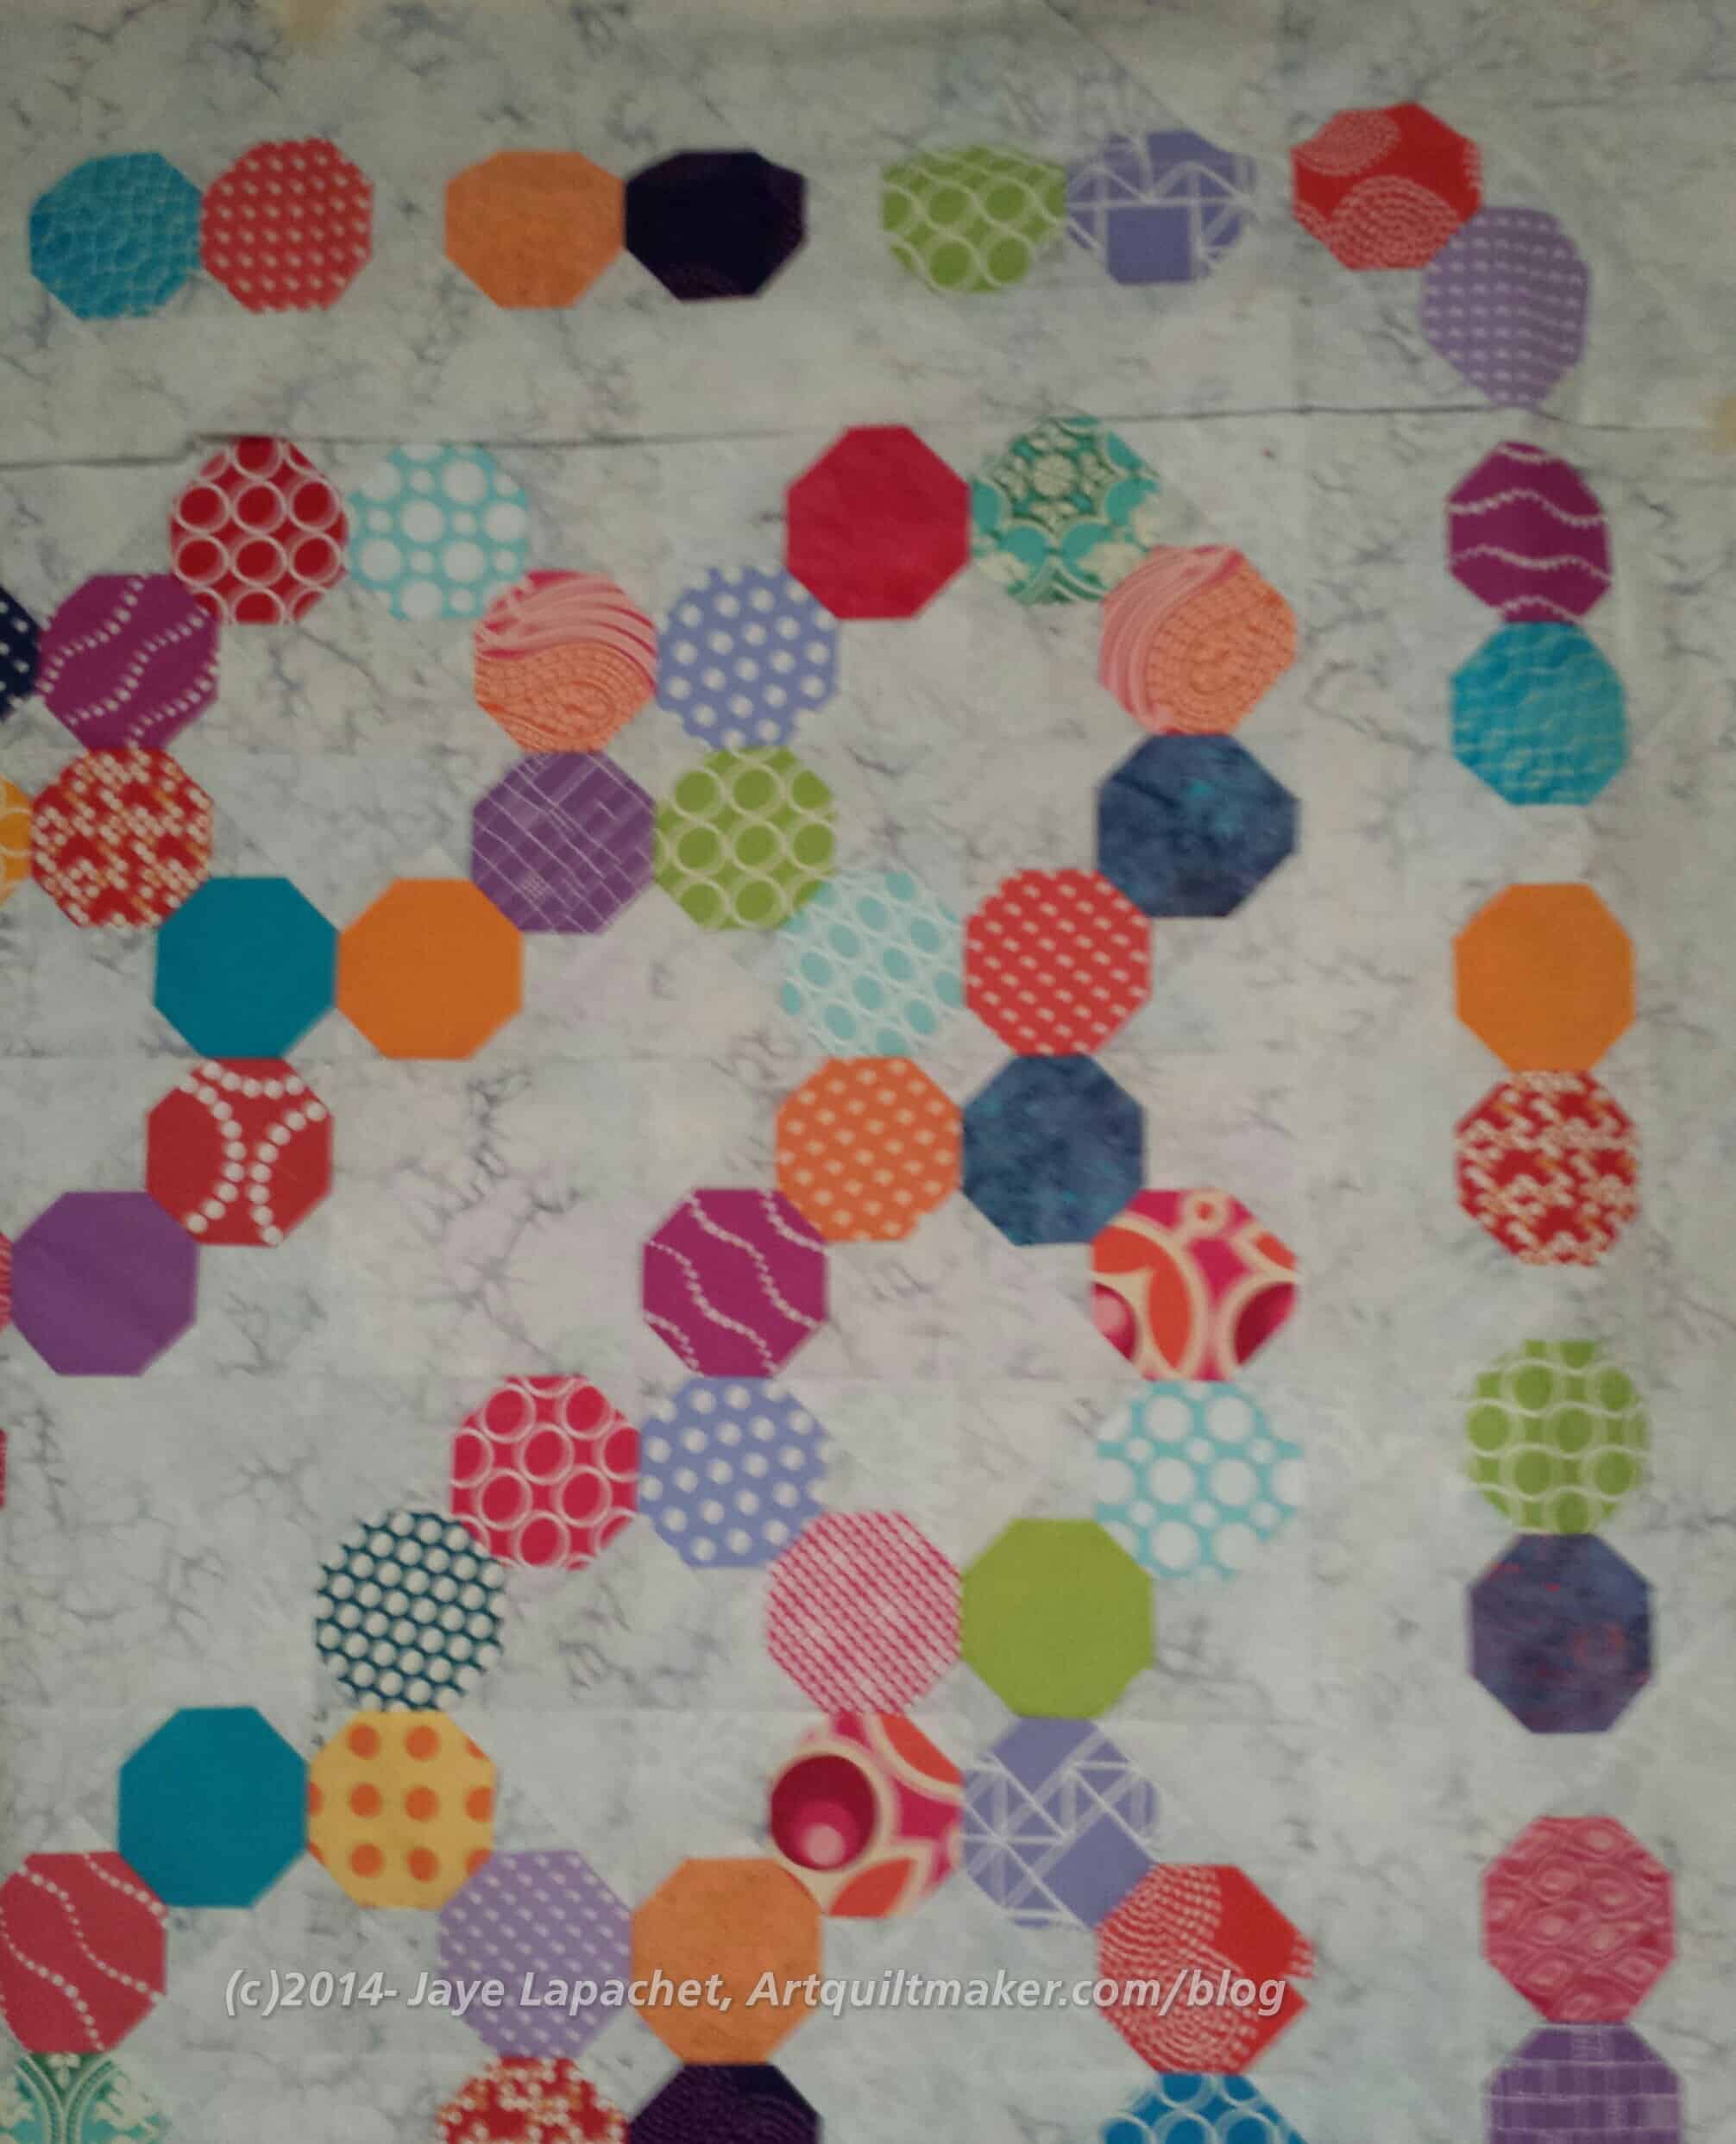
Octagon 9 Patch – March 2015 detail
There are a lot of warm colors and I may need to cut a few octagons from cool colors, but I am not going to decide until I have more 9 patches completed and all the octagons are made into Snowballs.
Frances finally let me know she was ready to move on with her sampler quilt. We decided to make the Flower Basket Block, so I sent her the pattern, promised the tutorial and did nothing.
These directions use a quarter inch seam allowance. Check your seam allowance before you begin. If you don’t know how to do that, there are resources available, including one from Connecting Threads and another from Craftsy. You can search the web for others if you don’t like these.
You will be directed to use the Triangle Technique. Make sure you have the chart as well as the instructions handy.
Respect the bias.
Templates
You really only a need a template for the basket handle. If you are using templates for all of your pieces, then prepare all the templates for pieces in the patterns as directed below.
Prepare pattern for your basket handle template by printing two copies of the pattern. I am telling you to do this first so when you get into the throes of sewing you won’t have to stop and fiddle around with templates.
You will eventually place one copy of the pattern in your binder, but keep it handy so you can use it as reference.
Nota bene: You probably know how to make templates. However, I am including a quick refresher. Look for a comprehensive tutorial soon. (I’ll update this post and link it from here)
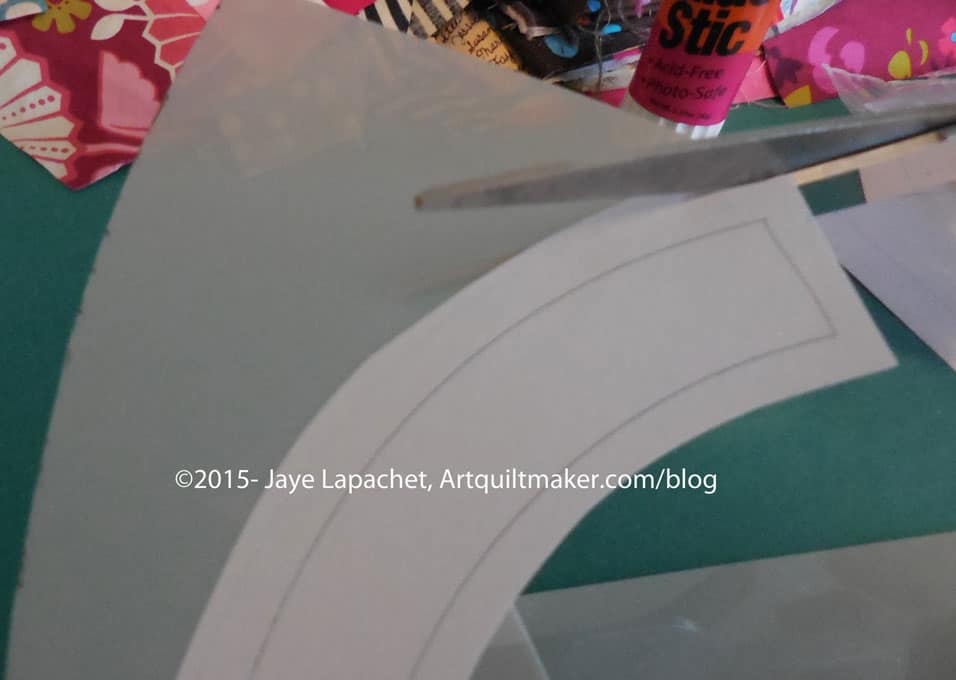
Rough cut* the handle pattern out of the second printout.
Rough Cut Pattern
Glue the paper pattern (with seam allowances) using the glue stick (or other suitable adhesive) to the template plastic.
Ok to use scraps of template plastic
It is okay to use scraps of template plastic. Put a piece of tape on seam lines to keep the joins stiff.
Fine cut templates
Fine cut** the paper pattern and template plastic you have adhered so you have an accurate template, cutting off any seam allowance that may have printed.
If you plan to machine sew the handle at all, you will want to prepare another basket handle template, in the same manner, without seam allowance.
Fabric
Gather your fabric and press it all. You can rough cut some pieces and press it with Mary Ellen’s Best Press to help deal with the bias. Consider this step for the large background triangle and the basket handle.
Cutting
Flower Basket
Basket Handle
In my example basket, above (same as at the beginning of the post), this fabric is the medium blue.
Lay out template piece
Draw around the template with your black fine tip marker. Rough cut a piece of fabric large enough for your basket handle.
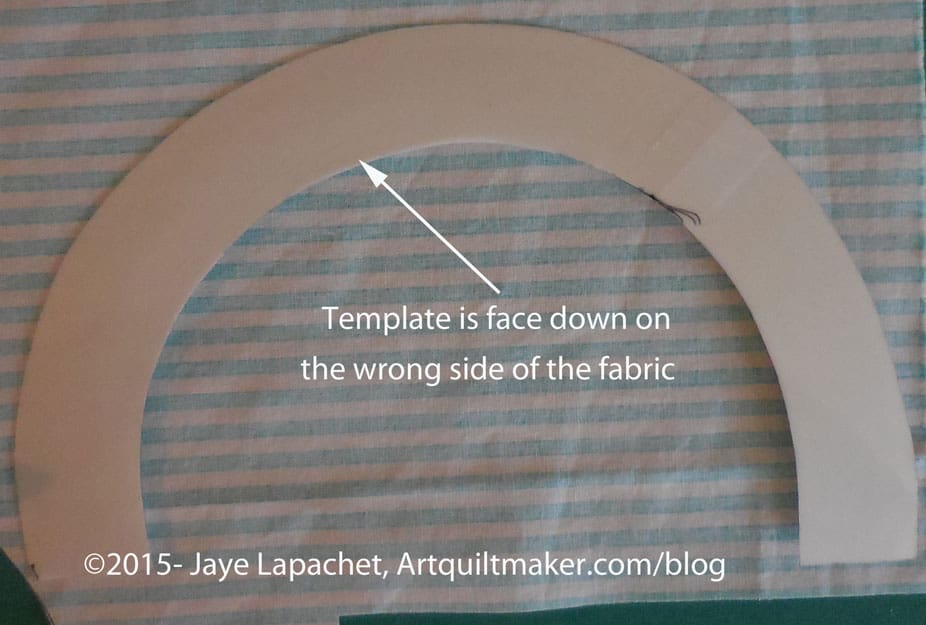
Place template face down on fabric
Place your handle template right side down on the wrong side of the fabric. Trace around the template carefully with your Pigma pen. Trace carefully without pulling or tugging at the fabric. You will be dealing with some bias on the curves. You will need to carefully move your hand along the template to keep it in place while you trace. Use the Pigma pen with a light touch.
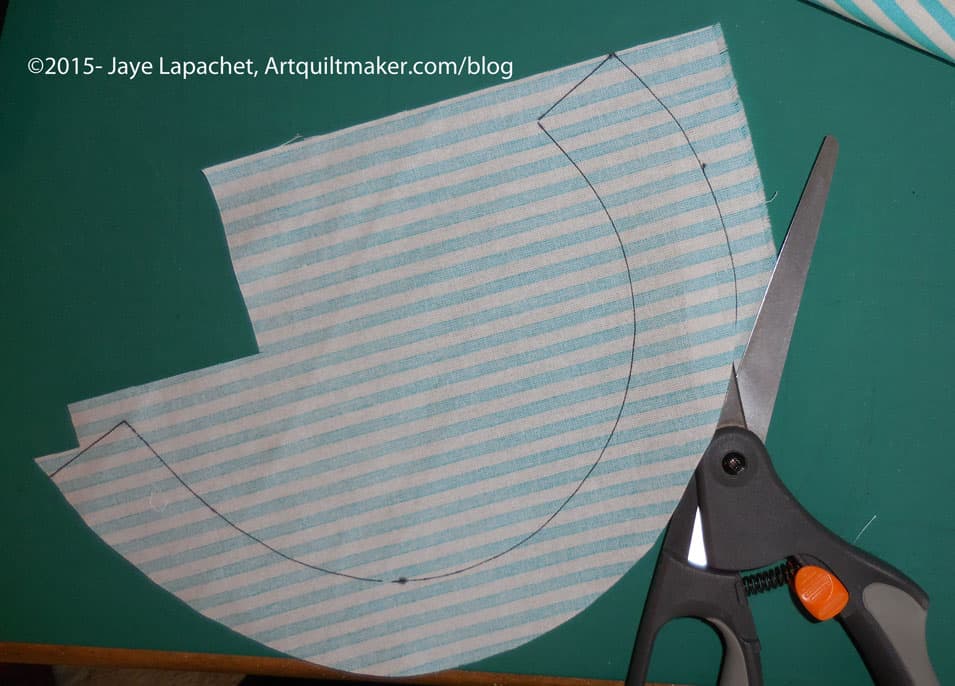
Cut out handle
Using your fabric scissors, cut around the traced image, cutting the drawn line off. If you are using a template with no seam allowance, leave approximately a quarter inch seam allowance on all sides.
Background:
In my example, above, this fabric is the blue Michael Miller Ta Dot with white dots.
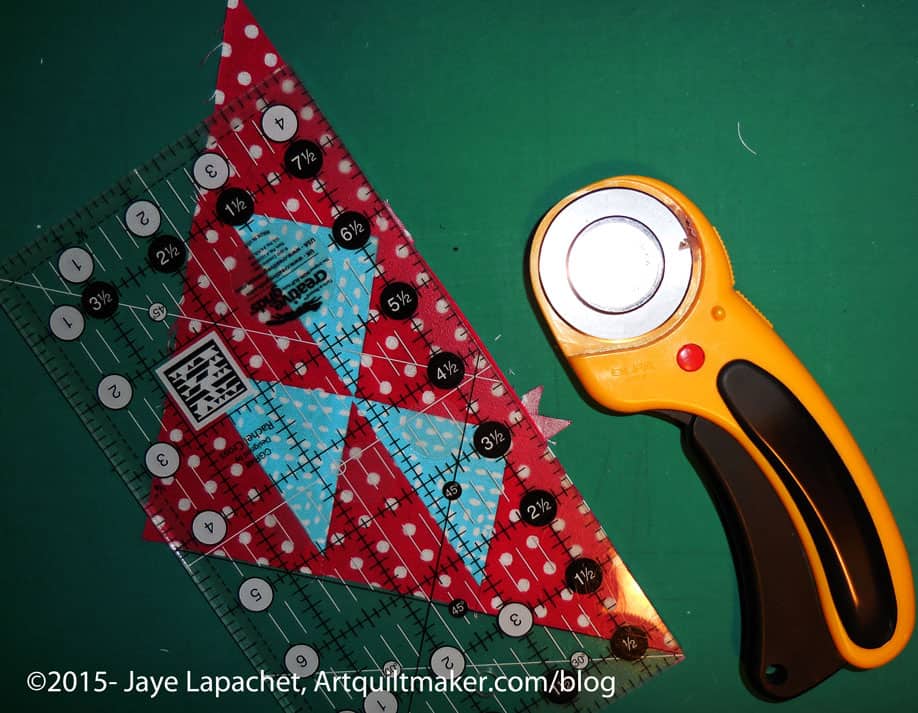
Measure background
Measure the template for the large triangle of background fabric. It should be 10″ on each of the outside edges WITH seam allowance. Cut a square 10.5″ x 10.5″. You can trim it later. Better safe than sorry. Press the square with Mary Ellen’s Best Press.
Cut square on diagonal
Cut the square in half along the diagonal.
Cut the following additional pieces according to the measurements given:
Background fabric:
2 patches: 2.5″x8.5″
Nip off Bunny Ears
1 patch: square 4 7/8″x 4 7/8″. Cut in half. Nip off the bunny ears with the Judy Martin Point Trimmer
1 square: 5″ x 5″. Cut in half on the diagonal and set your second triangle aside
Remember: you have already cut the large background triangle
Cut some pieces from extra background triangle
You can cut some of the background pieces out of the leftover triangle.
Foreground fabric:
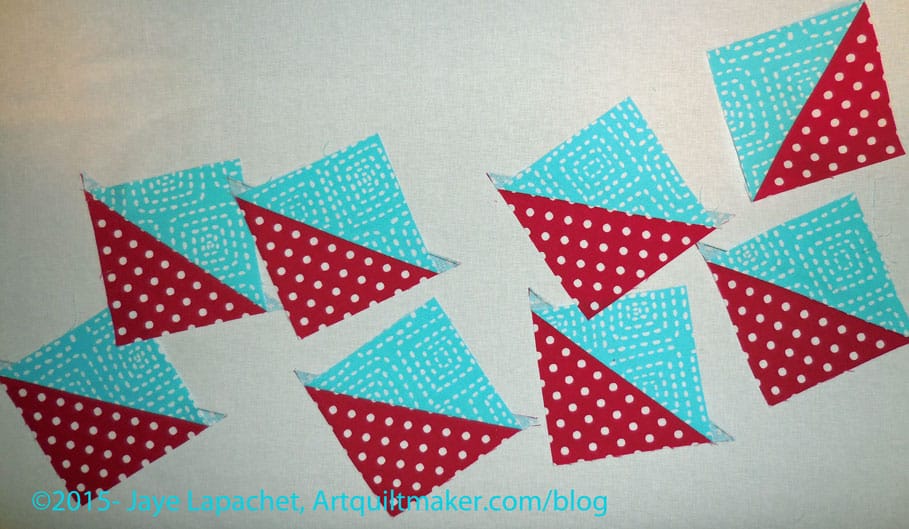
The foreground fabric is used for the basket. You will need at least two fabrics for this part. In my example I am using a scarlet red and a medium blue. See picture above for placement of foreground fabrics.
1 square: 2.5″ square
For the HSTs, you will need 2 squares, according to the Triangle Technique Chart, 6.25″ x 6.25″. Each square should be from a different foreground fabric. See the picture above.
Nota bene: The above Triangle Technique only yields 8 HSTs. You can make another set using the Triangle Technique directions and have some extras, or you can cut the triangles themselves
1 square 2.5″ x 2.5″
Cut trianglesCut squares in half
Cut 4 squares 2 7/8 in by 2 7/8 in the second background fabric (red in my project). Cut in half. These are the base and top line of your flower basket.
Cut Pieces
You should now have all of your pieces cut. Look for the next part of the tutorial on sewing the block together.
* Rough cut means that you cut around the outside line and a little away from it, leaving some extra paper. This helps to position the template properly and eventually cut it accurately.
** Fine cut means that you cut the template out very exactly and carefully getting rid of any extra paper and template material used when you rough cut. This is the shape you will use to cut your fabric so prepare this step with care.
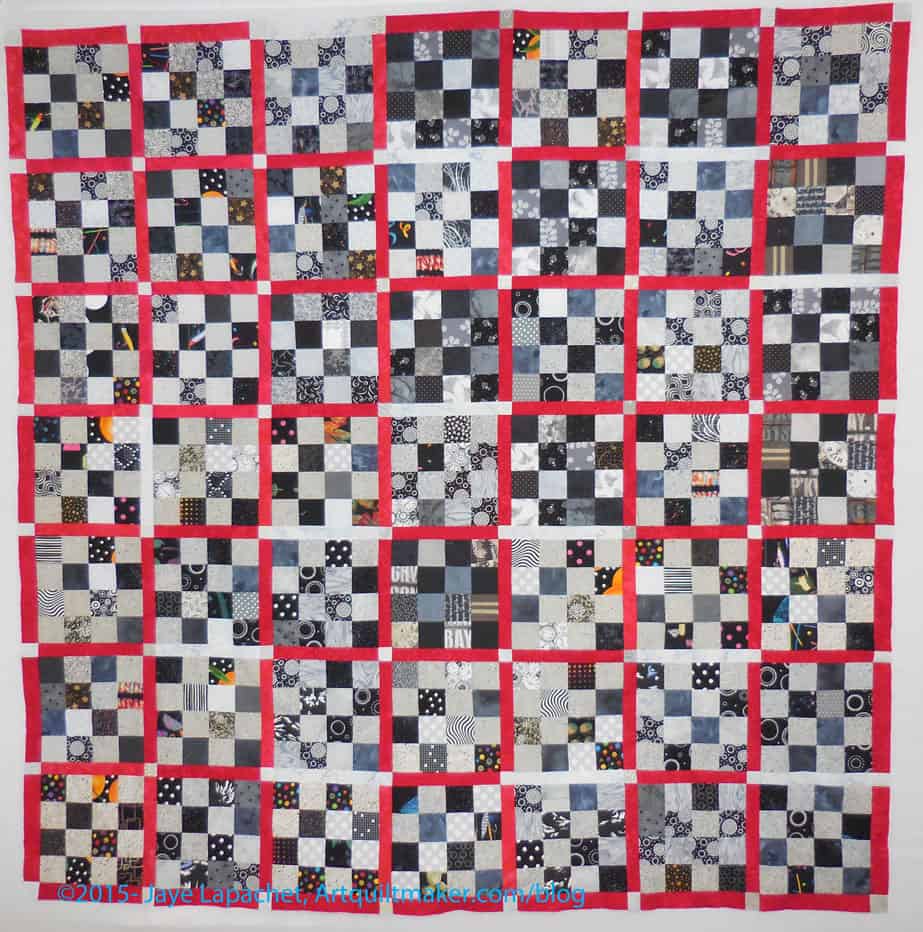
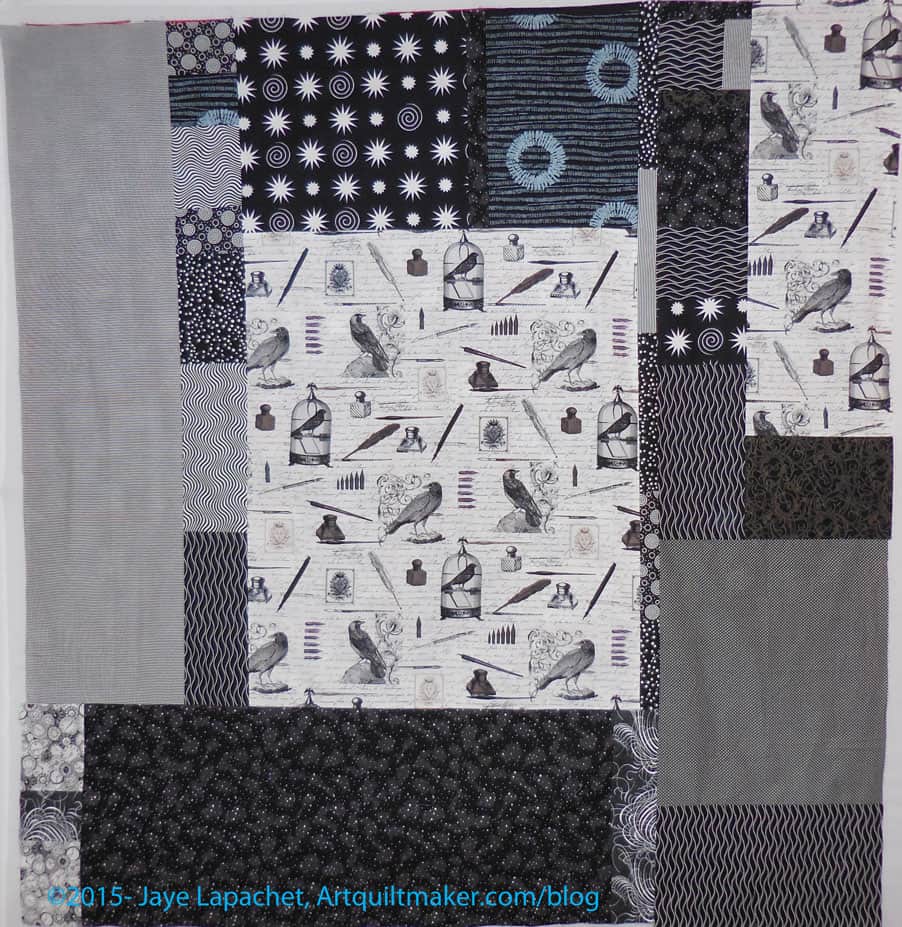
I finally finished the top and back of the Black & Grey Teenaged Boy Donation Quilt. Whew! I am very pleased and while I was anxious to get it done I never got to the point where I disliked the piece. I am glad, because I want all of my donation quilts to have good energy in them not “get this done, stupid quilt!” energy. I don’t know if it makes a difference, but better safe than sorry.
I checked back and the first post about this quilt was back in January of last year. I know I started making it using these colors, because I was grieving for my grandmother. I think I became anxious to get it finished, because the grief, while not gone, is much better. I think she would be pleased to know that I did something good with the grief. Perhaps not as she didn’t think too deeply about feelings, but I like to think it.
The quilt is approximately 65.5″ square.
Black & Grey Donation Back Complete
I also made the back, which I think came out pretty well. Sort of symmetrical, which is different for me. It is a touch small, so I may have to add something to the side, but I am hoping the quilter can deal with it.
I am not sure how I am going to convince someone to quilt it for the guild. I am nervous because there were a lot of quilts waiting to be quilted at the last meeting.
I still have to make the binding, but I picked some fabric to use and will get that done soon.
I haven’t fully committed to this quilt by not really sewing on it very regulary. Part of my ambivalence was that I hadn’t looked at it on the design wall, because I wasn’t really able to find a spare spot on the design wall for it. The other thing I have to admit to is not liking the colors very much. I don’t hate them and they look much better all together than one at a time. I have to admit that I succumbed to a whim and the result was some fabrics whose colors I don’t like much. I am not saying I don’t plan on NOT committing; I just haven’t done it yet.
As part of the process, I put it up on the design wall once I took the Russian Rubix off . I had a nice blank space to put something on, so I split it between the Zipper and the Teenaged Boy Black & Grey Donation Quilt. I had some space leftover so I put up the Zipper to see what I had.Clearly this piece needs some room to breath, so I will do it as a kind of Chinese Coins layout and make sure I put something in between. Perhaps the Goldenrod (gold/sunshiney yellow) I bought with the Sangria.
The other thing that worries me is that I sewed a bunch of pieces and now I don’t know where they are. They could be included in the pieces I have in the photo, but it seems like so much more I’ll have to look around.
I was making a trip to see my quilter yesterday so all week I made a huge effort to get the piece done. I had to put on the last border, make a binding, and make the back. I slowly made may way through all the steps a few seams at a time and was able to get the quilt to a place where it was ready to quilt.
Final Corner, Final Border
The first thing I accomplished was the final border. I am pretty proud of these borders. I did have put a spacer in on two sides to make two sides fit, but I really feel like, as April Rosenthal said, I have mad math skills. Really, I don’t but it was nice of her to say and it is a nice thought to consider since nobody who knows me would say math is a strong point for me. 😉
In the process of the last border, I did have to make more blocks. I forgot to make the last two corner blocks when I was making the last border blocks last weekend (I think??). I think I was distracted by the Black Friday Sew-in Google Hangout. I was trying to do something rather rote so I could pay attention to what the others were doing, but apparently I can’t count, sew and Hang Out all at once.
Russian Rubix Top Finished
The back and top are too large for me to photograph on my design wall, so Friend Julie and Colleen were kind enough to hold both up when we brought it over to Colleen’s to be quilted.
I was really pleased with the photo (despite being taken on my phone), but also with the way the quilt came out. The spacers don’t really show up much and I think the top looks really great.
We talked a lot about the quilting. It will be quilted in Signature Thread in the Cotton Candy colorway, which is a variegated that gets used on my quilts a lot, because it blends with my fabric color palette pretty well. I also chose bamboo batting this time, because Colleen said regardless of the density of the quilting, the quilt will still be drapable. This might be a bed quilt, so drapability is good. Also, I have been wanting to try bamboo.
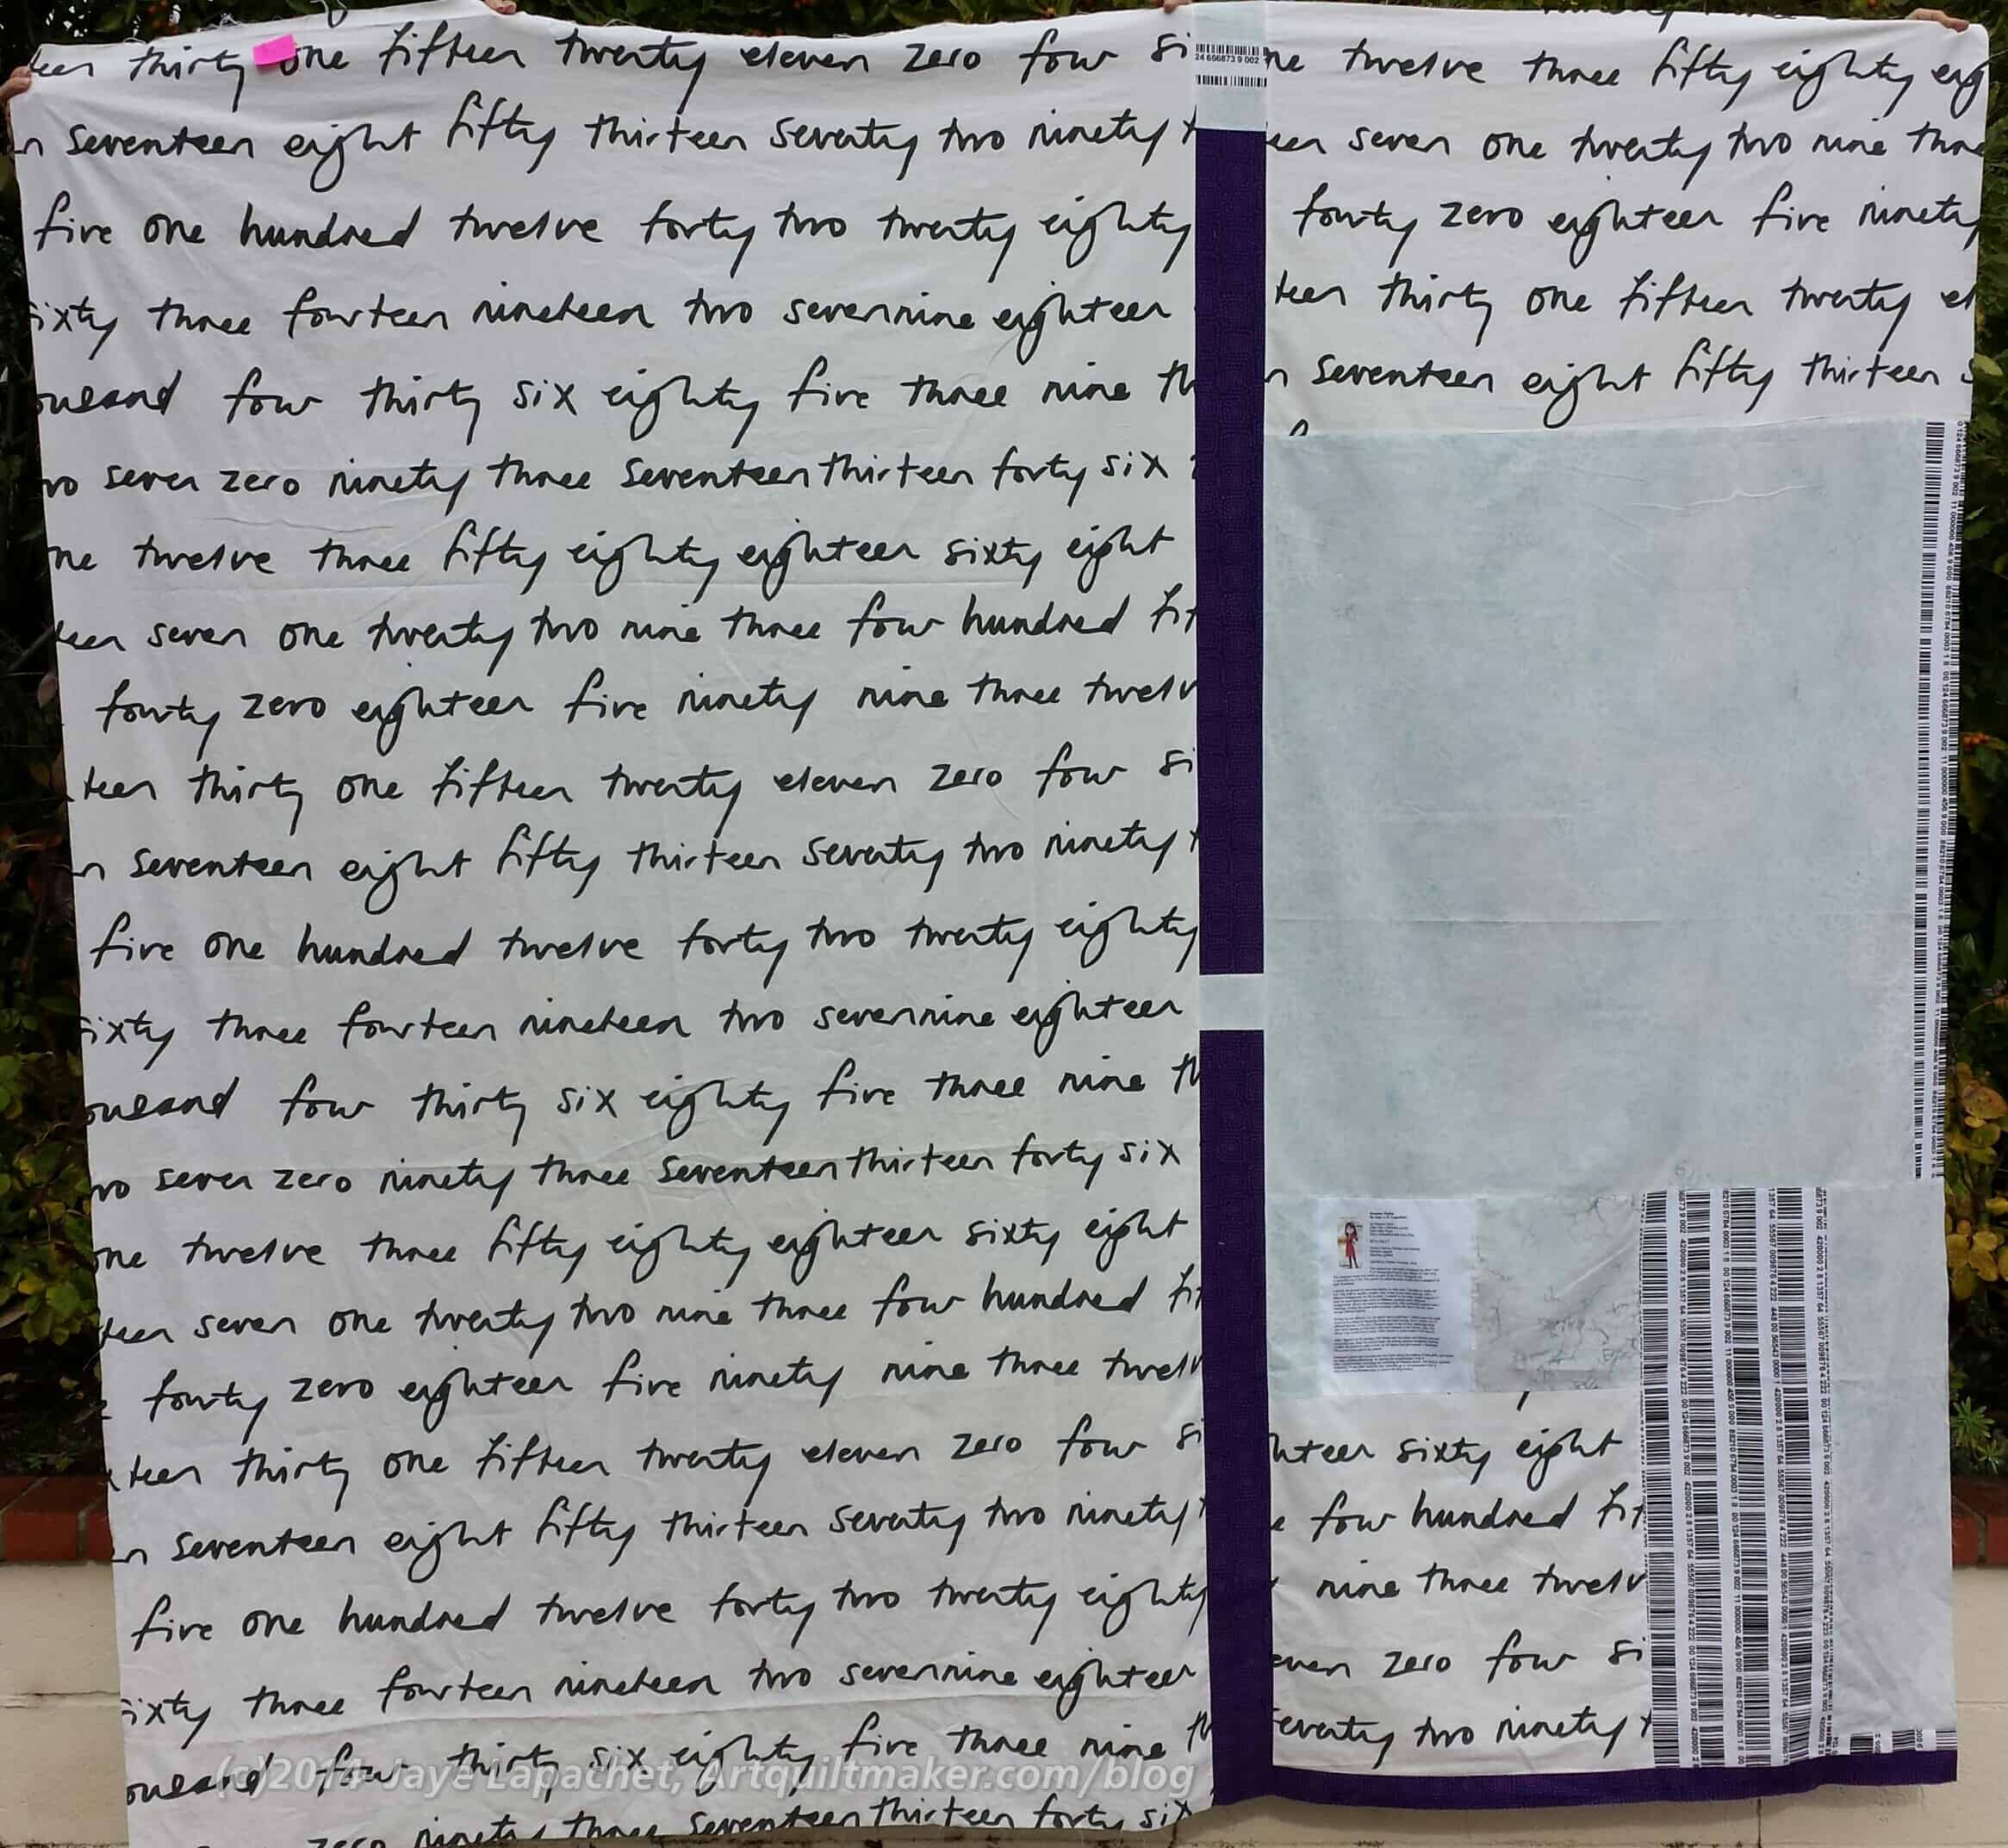
Russian Rubix Back Finished
The back went really well. I used a big piece of IKEA fabric that Kelly got for me. I thought I had 6 yards, but think I ended up with three, thus the piecing of the other part of the back. I used up the background fabric and most of a half yard of the barcode fabric, plus the stitch purple to add a little width and provide some distinction between the two halves of the quilt.
The stitch purple is a bit of a precious fabric and I was reluctant to use it lest I need it for a ‘better’ project, but I decided I didn’t want to use ‘bad’ or ‘ugly’ fabrics for the back because I still have to look at the back and I want the back to be nice, too. And, of course, there is always more fabric.
This is a big project and it is finally finished. WHEW!
Friday was the Black Friday Sew-in. I didn’t do anything in terms of giveaways or prizes. No time this year and no prizes. I don’t seem to be a reviewer for Lark any more since they closed their NC office and my contact was laid off. C’est la vie.
Russian Rubix with 3 Borders
I worked on the Russian Rubix for the amount of time I had to sew. I wasn’t able to sew all day on Friday, but I am pleased with the progress I made. My progress:
I finished all but two blocks for the borders. I thought I made all the blocks I needed, but realized, after putting the last border together, that I had forgotten about the corners.
I sewed another border on. Before I actually sewed the border and kept it there, I sewed it on, ripped it off and sewed it on again, but there are now three borders on the RR quilt.
As you can see from above, the top is starting to look like something other than a floppy mess. I am thinking of using Kelly’s letter fabric as the back. I have fabric I may as well use it. I have a nice large chunk and that might make the back easier than piecing a back. Right now I need some easy.
Did you read the UFO post? I was really thinking about this project when I wrote it. This project is becoming painful. However, I refuse to let it beat me. After talking with Friend Julie a week or so ago, I was ready to dive back in. It is often easier to move on with a project after getting someone’s perspective.
Corner Detail
I made the top border including the corners, which fit over the side borders. This was not helpful, as they had nothing on which to rest since I hadn’t made the side borders yet. Thus, I decided I needed to make the side borders as I thought it would be easier to put on the top and bottom borders which had the corners if there was enough fabric on the sides to accommodate the corners.
I decided I want this design for the border on this quilt. This decision means that I have to be ok with the idea that two of the borders may have to have a spacer to make them fit. I am not 100% sure the sizing won’t work, but it looks like it won’t. We’ll see as I make more parts of the border, sew bits together, trim other bits and the seam allowances are taken up.
Russian Rubix with borders in process
I had a few hours on Sunday and spent the time making a side border. It was really nice to just be sewing. I feel like I haven’t had much time to sew lately, so that was part of the reason I enjoyed it so much.
I have a bit left to do, but essentially I finished the side border.
P.S. The piece, as usual, is too large for my design wall, so I had to use tape to keep the border up on the wall. that is the first time I have done that, but I doubt it will be the last because of the size of the pieces I seem to make.
TFQ said the nicest thing to me on Sunday. It went something like “you should sew. I will press for you” And we did. I worked on the Russian Rubix border and finished the Church Ladies Apron that was making me crazy. More on that later.
Russian Rubix Top Border
I tried to get the whole top border pieced, but couldn’t quite make it. I made good progress and am pleased.
I was worried that the math wouldn’t work out, but I think it will. I wish I had made the sides first so I could sew one on and make sure that it worked. Instead I have to wait until I make both sides and sew them on. Oh well. I’ll plan better next time.
No, I probably won’t. 😉
Corner detail
Regardless, I think that it will work and it will take some time for me to get the border made. In the meantime, it looks nice and I am pleased.
I made some progress over the weekend and it felt good. The whole top is sewn together and I have started work on the border. I didn’t have enough time to do as much I as I would have liked, but I have to be happy with what I was able to do. I really wanted to keep working on the border and will again this weekend or next.
Upper Right Hand Corner, Russian Rubix
I am not the sort of person who measures out every little piece, so I can just hope that the border works out. I will know when I get to the end of the top row. I know all you math people are screaming about how crazy that would make you, but that is the way I work. It could be that I am making trouble for myself to allow myself the opportunity to fix it. I don’t think so, but you never know.