No, my birthday is not in February, but I didn’t have a chance to show off my gifts until now. I am not trying to make anyone jealous.
It was a pretty big quilty birthday, which is not always the case. I got a new cutting mat. I have smaller cutting mats that go with me when I travel or participate in Sew Day. The mat I use in my workroom, however, is the one I got when I started making quilts more than 30 years ago! It was time for an upgrade and I am using and loving the new one. It does make a difference.
I received some new Tula dots. I’ll have to figure out something fabulous to make with them.
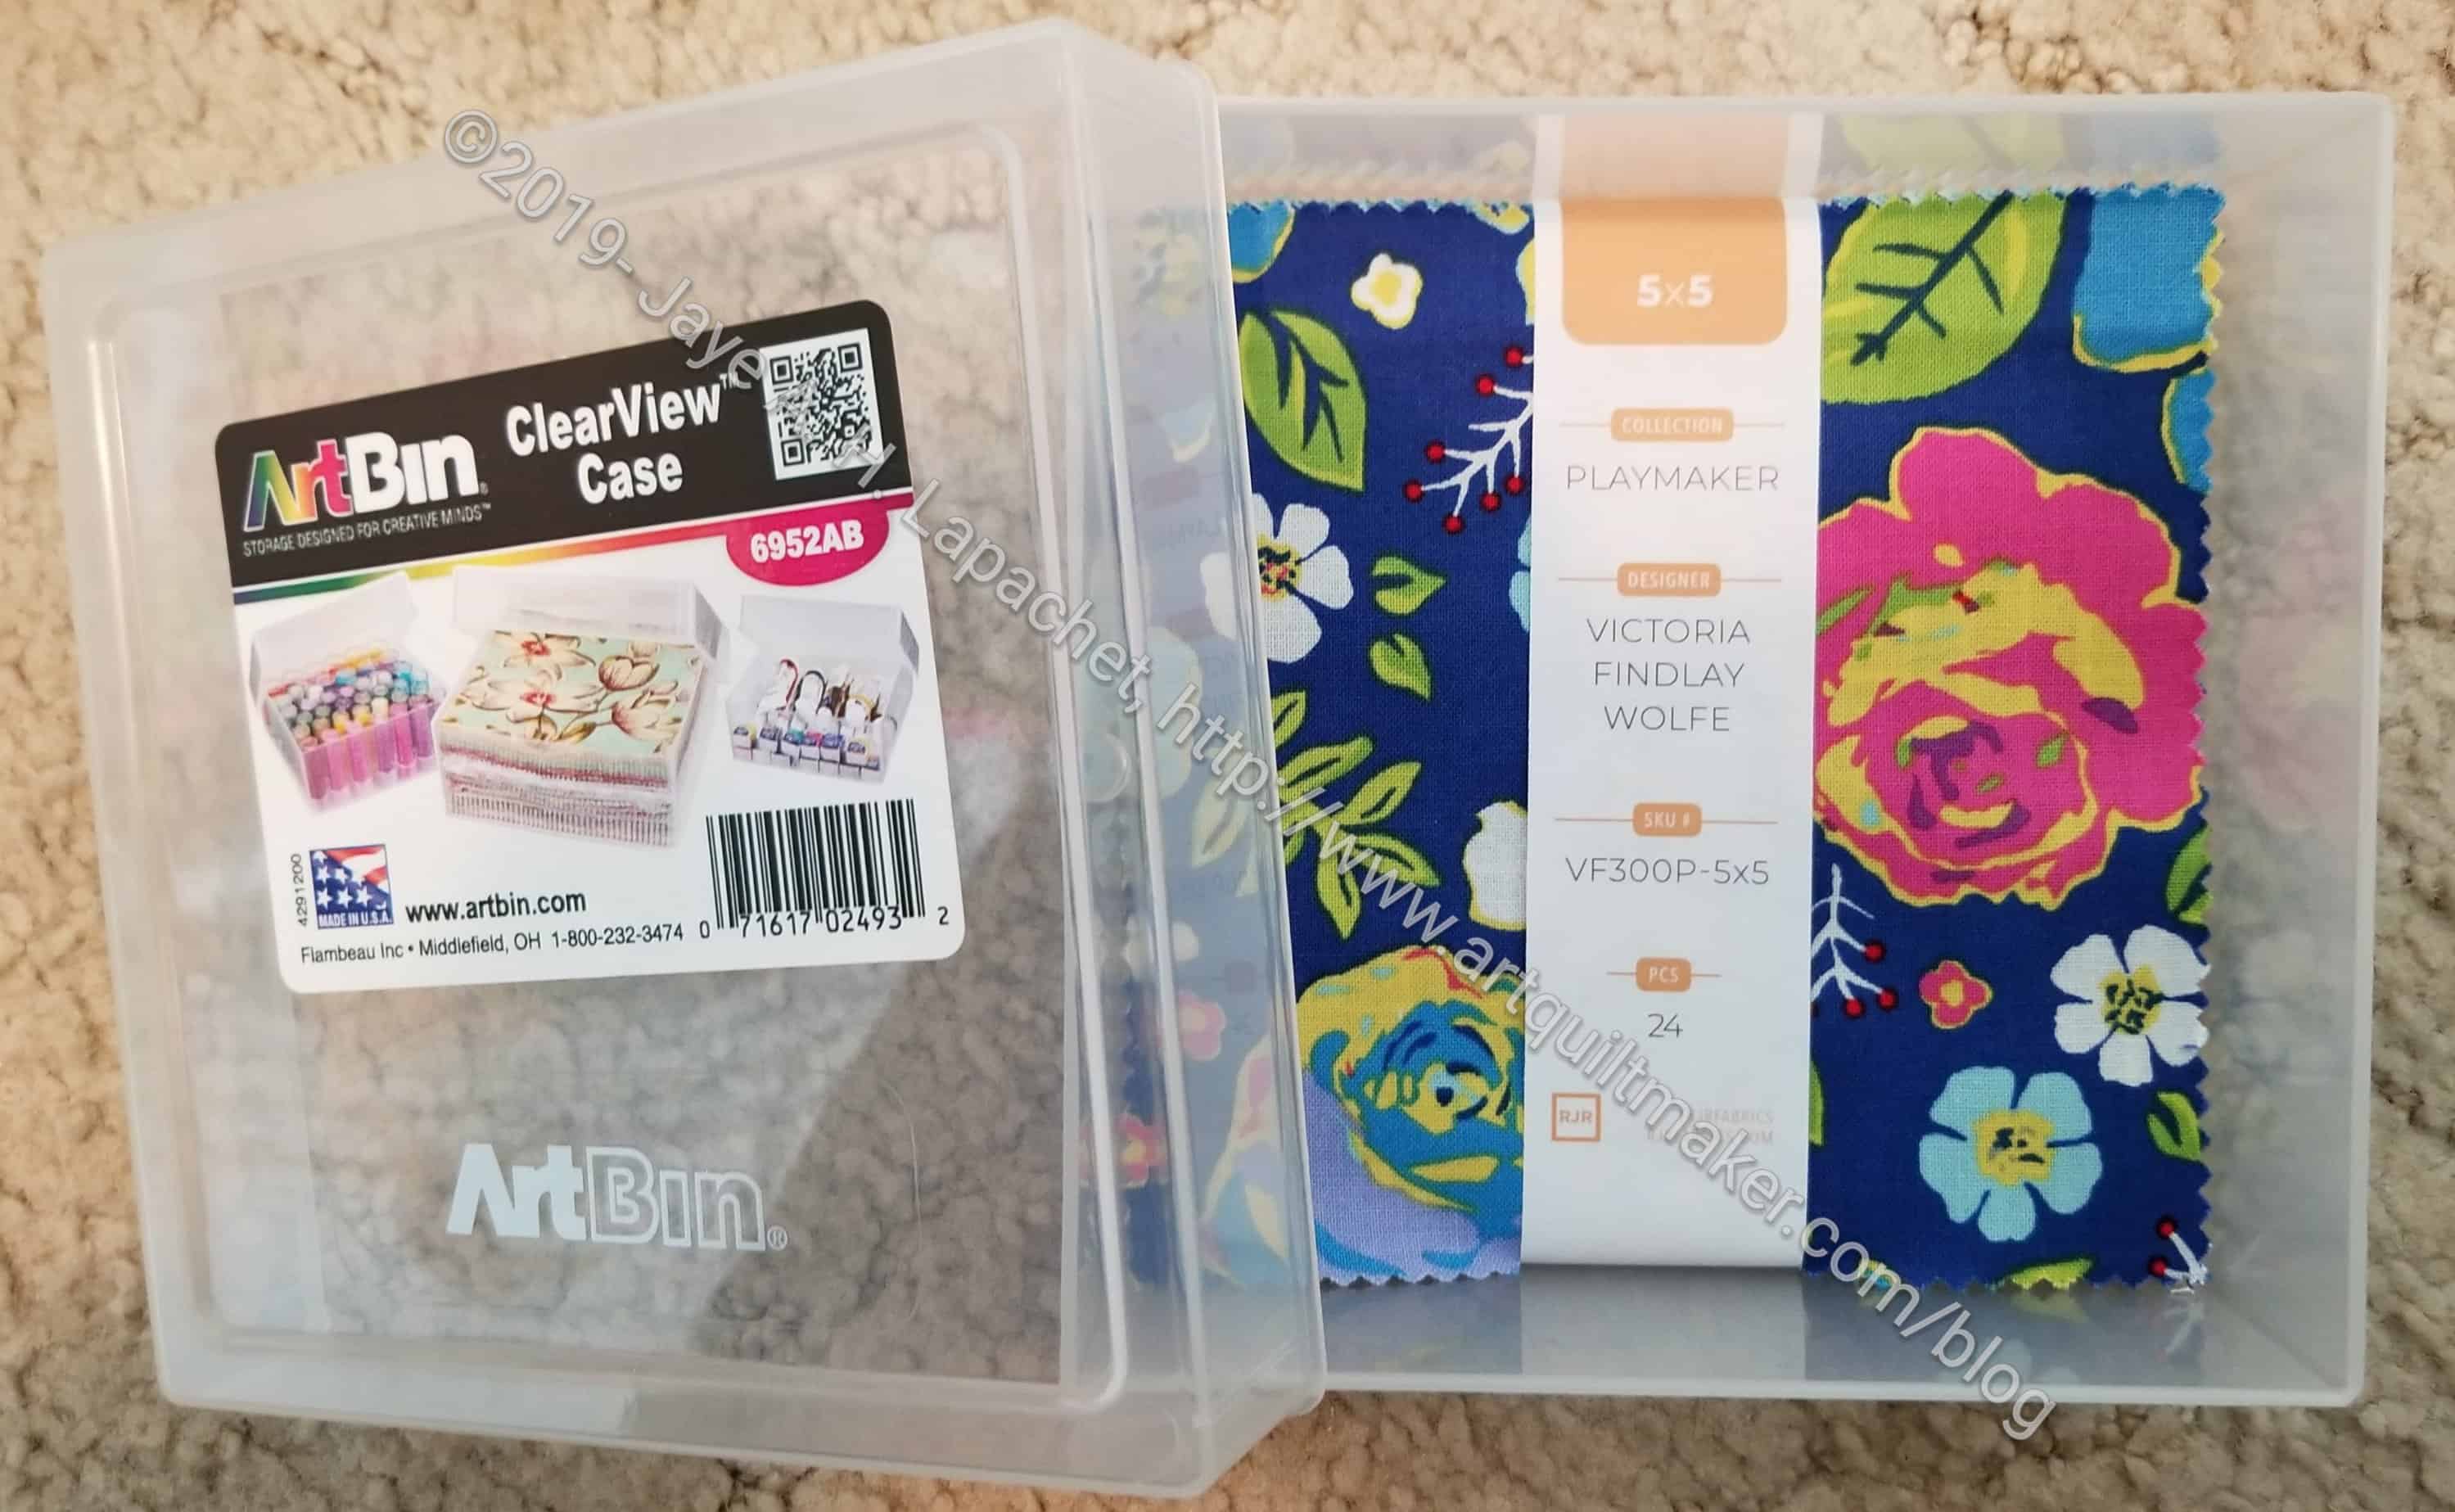
Charm square project tote
I also got a number of new project totes, which is great! I really like putting my projects in totes and keeping everything together. This little tote (right) fits charm squares. Not sure how I will use it, but will figure something out.
I haven’t tried everything out, but am slowly working my way through all the new stuff. I am so fortunate to have such great friends. It was so nice get things related to my passion.
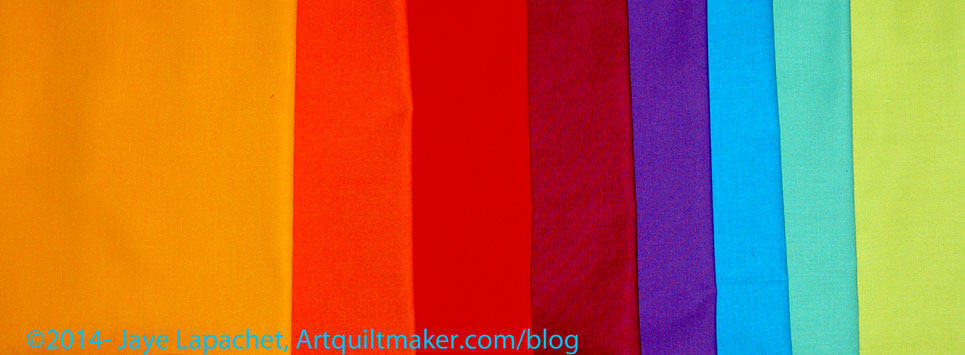
On a whim, I pre-ordered some Chroma FQs from Hawthorne Threads. I wanted to use some of the pieces for the Triple Star and I had some time to cut at the end of June.
They were expected at the end of June, which was perfect timing. Sadly, the fabric didn’t arrive until nearly the end of July.
Poor Hawthorne Threads. They were beside themselves and incredibly apologetic. Good thing I had plenty to do.
Some of the colors are great, but I don’t like that mustard yellow or the super icky green. I am an icky green girl, but that is a little too icky for me. the blues are the nicest followed by some of the pinks and lavenders. I already started cutting and the fabric is batik-esque and VERY thin.
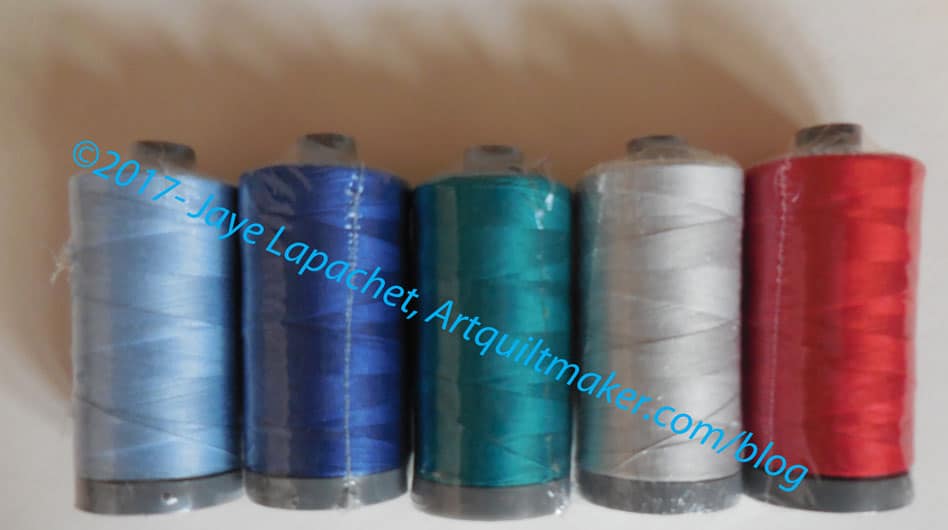
Aurifil 28 wt.
I also started machine quilting with the 28 weight Aurifil thread. I liked it and decided to use it for the art quilt. I bought a few spools in colors I needed from Red Rock Threads*. What a great place! I ordered the thread in the evening one day and two days later it was on my dining room table. I didn’t even pay for expedited shipping. Their site isn’t super fancy, but it works well, is easy to understand and they ship fast. I can’t ask for more than that.
I probably shouldn’t have gone to BAMaQG on Saturday because I was still hacking up a lung. After Grand Parlor, however, I needed to see my peeps and get reconnected with some quiltmaking. Despite leaving my lungs everywhere, I enjoyed myself and was pleased to be able to talk to people I care about. This is Kelly’s last meeting before she moves, so I was especially glad to see her. It also got me back in the mood to sew and I sewed a lot on Sunday.
As usual, the group has a door prize drawing. Right before they announced the name, I thought “I am going to win”. Then Gerre announced my name. I couldn’t believe it. I am really not psychic and I am very distrustful of my intuition*, so it was very strange.
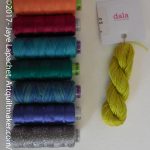
May BAMaQG Door Prize
The prizes included fabric. Yay Fabric! Ugh Fabric! I only say UGH Fabric because I am keeping track of my usage and I am in the hole.
Still, it is fun to win a prize.
May BAMaQG Door Prize
The fabric colors aren’t really ‘my’ colors (except the lime), but the little packet of peaches is kind of growing on me. I can definitely use them for this month’s Color My Quilt. I also have the idea to make something small out of them. A small bag or journal cover or another gift grouping. I’d love to find a pattern that used the exact amount of fabric I have.
* After being certain I was having a girl and getting the YM, my intuition has been suspect.
I am a sucker for embroidery threads. Not really the floss that comes in hanks, but the Perl Cotton balls, the Aurifloss and, now, Sue Spargo embroidery threads.
I admire Sue Spargo’s work, because of the cheerfulness and liveliness of the designs. Her book, Stitches to Savor: A Celebration of Designs, is a favorite. I admire her work with the simple shape of the cups and want to do something similar with cakes. Can you imagine how fabulous a cake quilt would look with embroidery designs applied to it to simulate frosting and cake decorations?
Sue Spargo Threads from Stitch
Sue Spargo Threads from Thistle Dew
Of course, given the colors I bought, the cakes would be cheerful, and, possibly, unappetizing. 😉
You may noticed that I have mentioned Sue Spargo embroidery threads a few times recently. After visiting Thistle Dew and Stitch quilt shops, I was hooked. Both shops had these threads and it was the first time I had seen them. I have a lot of Perl cotton, etc, but couldn’t help indulging in a few spools. I want them all.
I have used them on Under the Sea and they were great to use. I need to get inspired by Gerre and use them more.
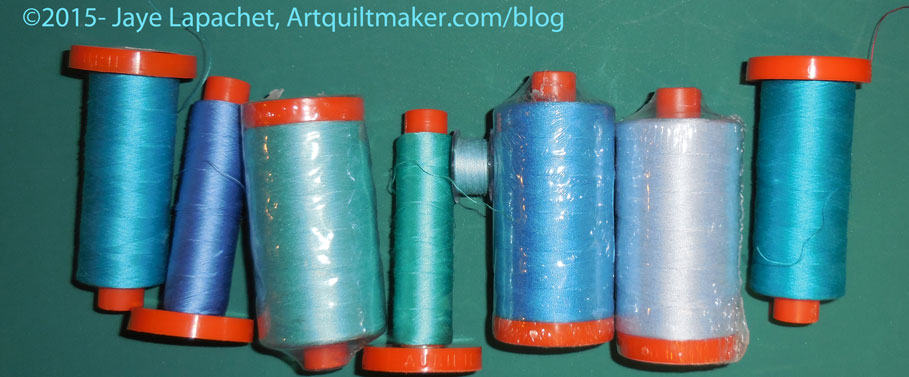
The other day I wrote about the Fine Spring Day journal cover. The day I made it was a day of changing thread colors and that project was no different. I wanted to find a certain blue.
I store my Aurifil in a plastic zipper bag. I know. I know. Not elegant. I am going to get a candy jar soon. I just haven’t done it yet. At some point I separated out the bobbins and put them in a cool box, but the spools are still in the in the plastic bag.
I pulled out the bobbin I wanted and then looked for the spool.
And looked.
And looked.
No joy
The Blues
I finally pulled out almost all of my blues (sans navies and dark blues) and still couldn’t’ find it.
I couldn’t find it. It never showed up. How is it possible to have a bobbin and no spool. I don’t understand it. I guess it could be with some project.
I visited Britex a few weeks ago to check out their purse and bag hardware. Definitely awesome and definitely expensive. I bought a couple of things, but not much and still spent a small fortune.
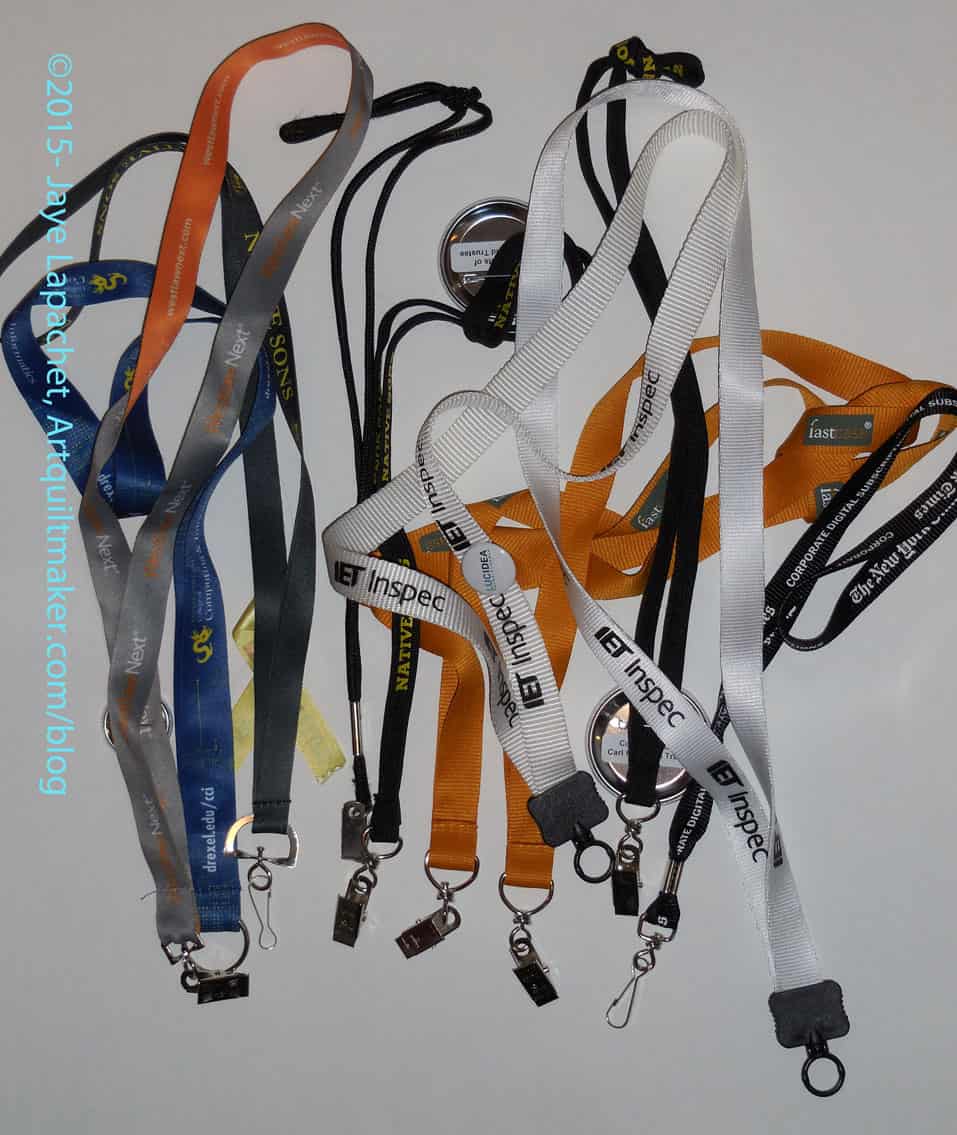
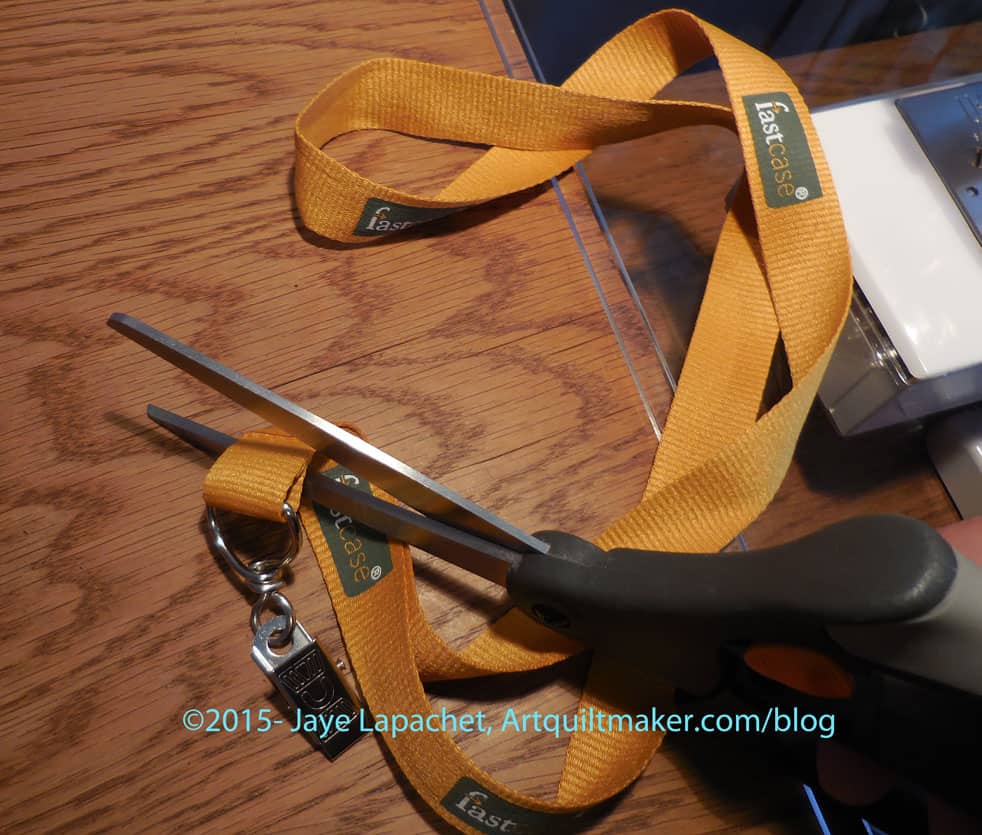
Time passes. Conference and annual meetings happen. I come home and hang my lanyards on the back of my closet door “until I figure out what to do with them.” At the meeting I attended last week, I saw some lanyards laying on the table of a vendor hospitality booth. My closet door flashed in my mind and I had a brainwave. I scooped up as many of the lanyards as I felt comfortable taking and put them in my bag.
When I returned, I took all of them off of the door, removed the nametag portion and set to work.
Conference LanyardsCut off lanyards
I only wanted to keep the metal hardware, so I cut off the ribbons, because I didn’t want to sew over them, I wanted to use my own fabric. I felt like a scavenger, but I was just going to toss them anyway, so I fought down the feeling.
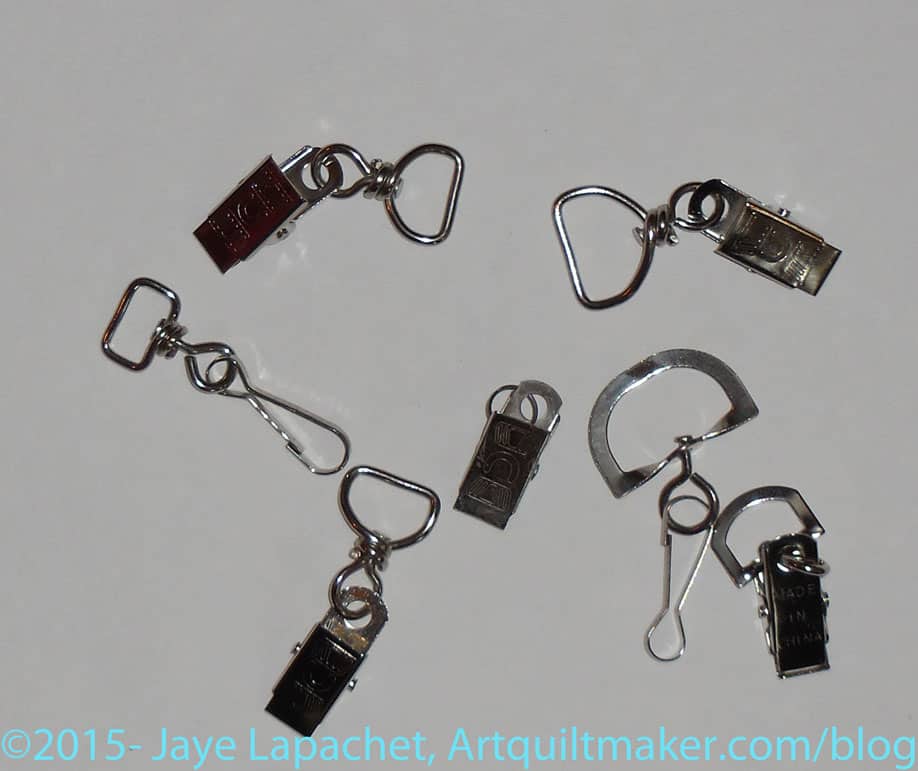
Salvaged Parts
I wasn’t able to salvage everything, but I salvaged several parts and pieces.
Notice the different shapes and sizes used for the D Ring (or equivalent) parts.
These aren’t the greatest pieces since sliced bread, but for lanyards, they will work fine, I think.
I also was able to save some circle rings, which are not shown and will be useful, I am sure.
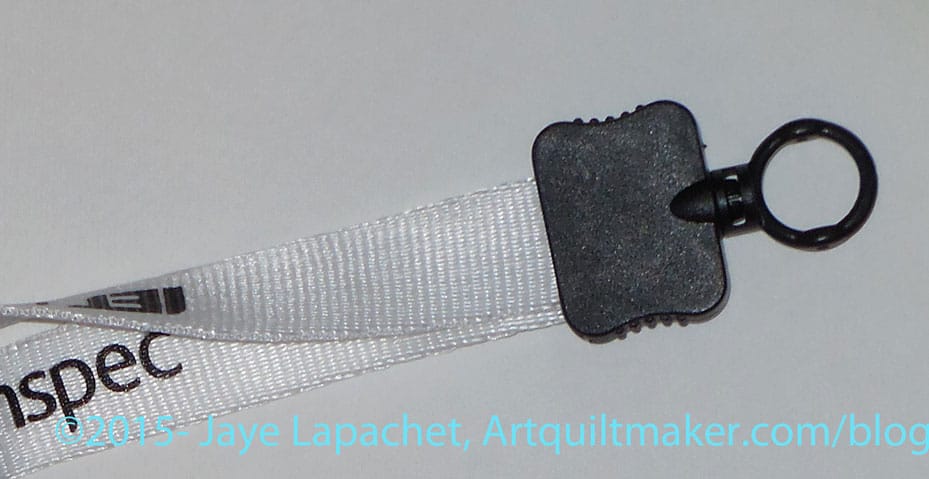
Plastic ring
I was not able to save the plastic loops. I didn’t want to toss them, thinking I might have another brainwave and figure out how to use them, such as covering the existing fabric with better fabric and quilting over it.
Next I set aside what I wanted and put the rest of the hardware into the tin I use to store all of my hardware. I set to work making a test lanyard. I am pleased with how the lanyard came out, especially since I didn’t buy hardware. I am not sure it is perfect for me and I may make another, which makes me even happier than I used salvaged hardware.
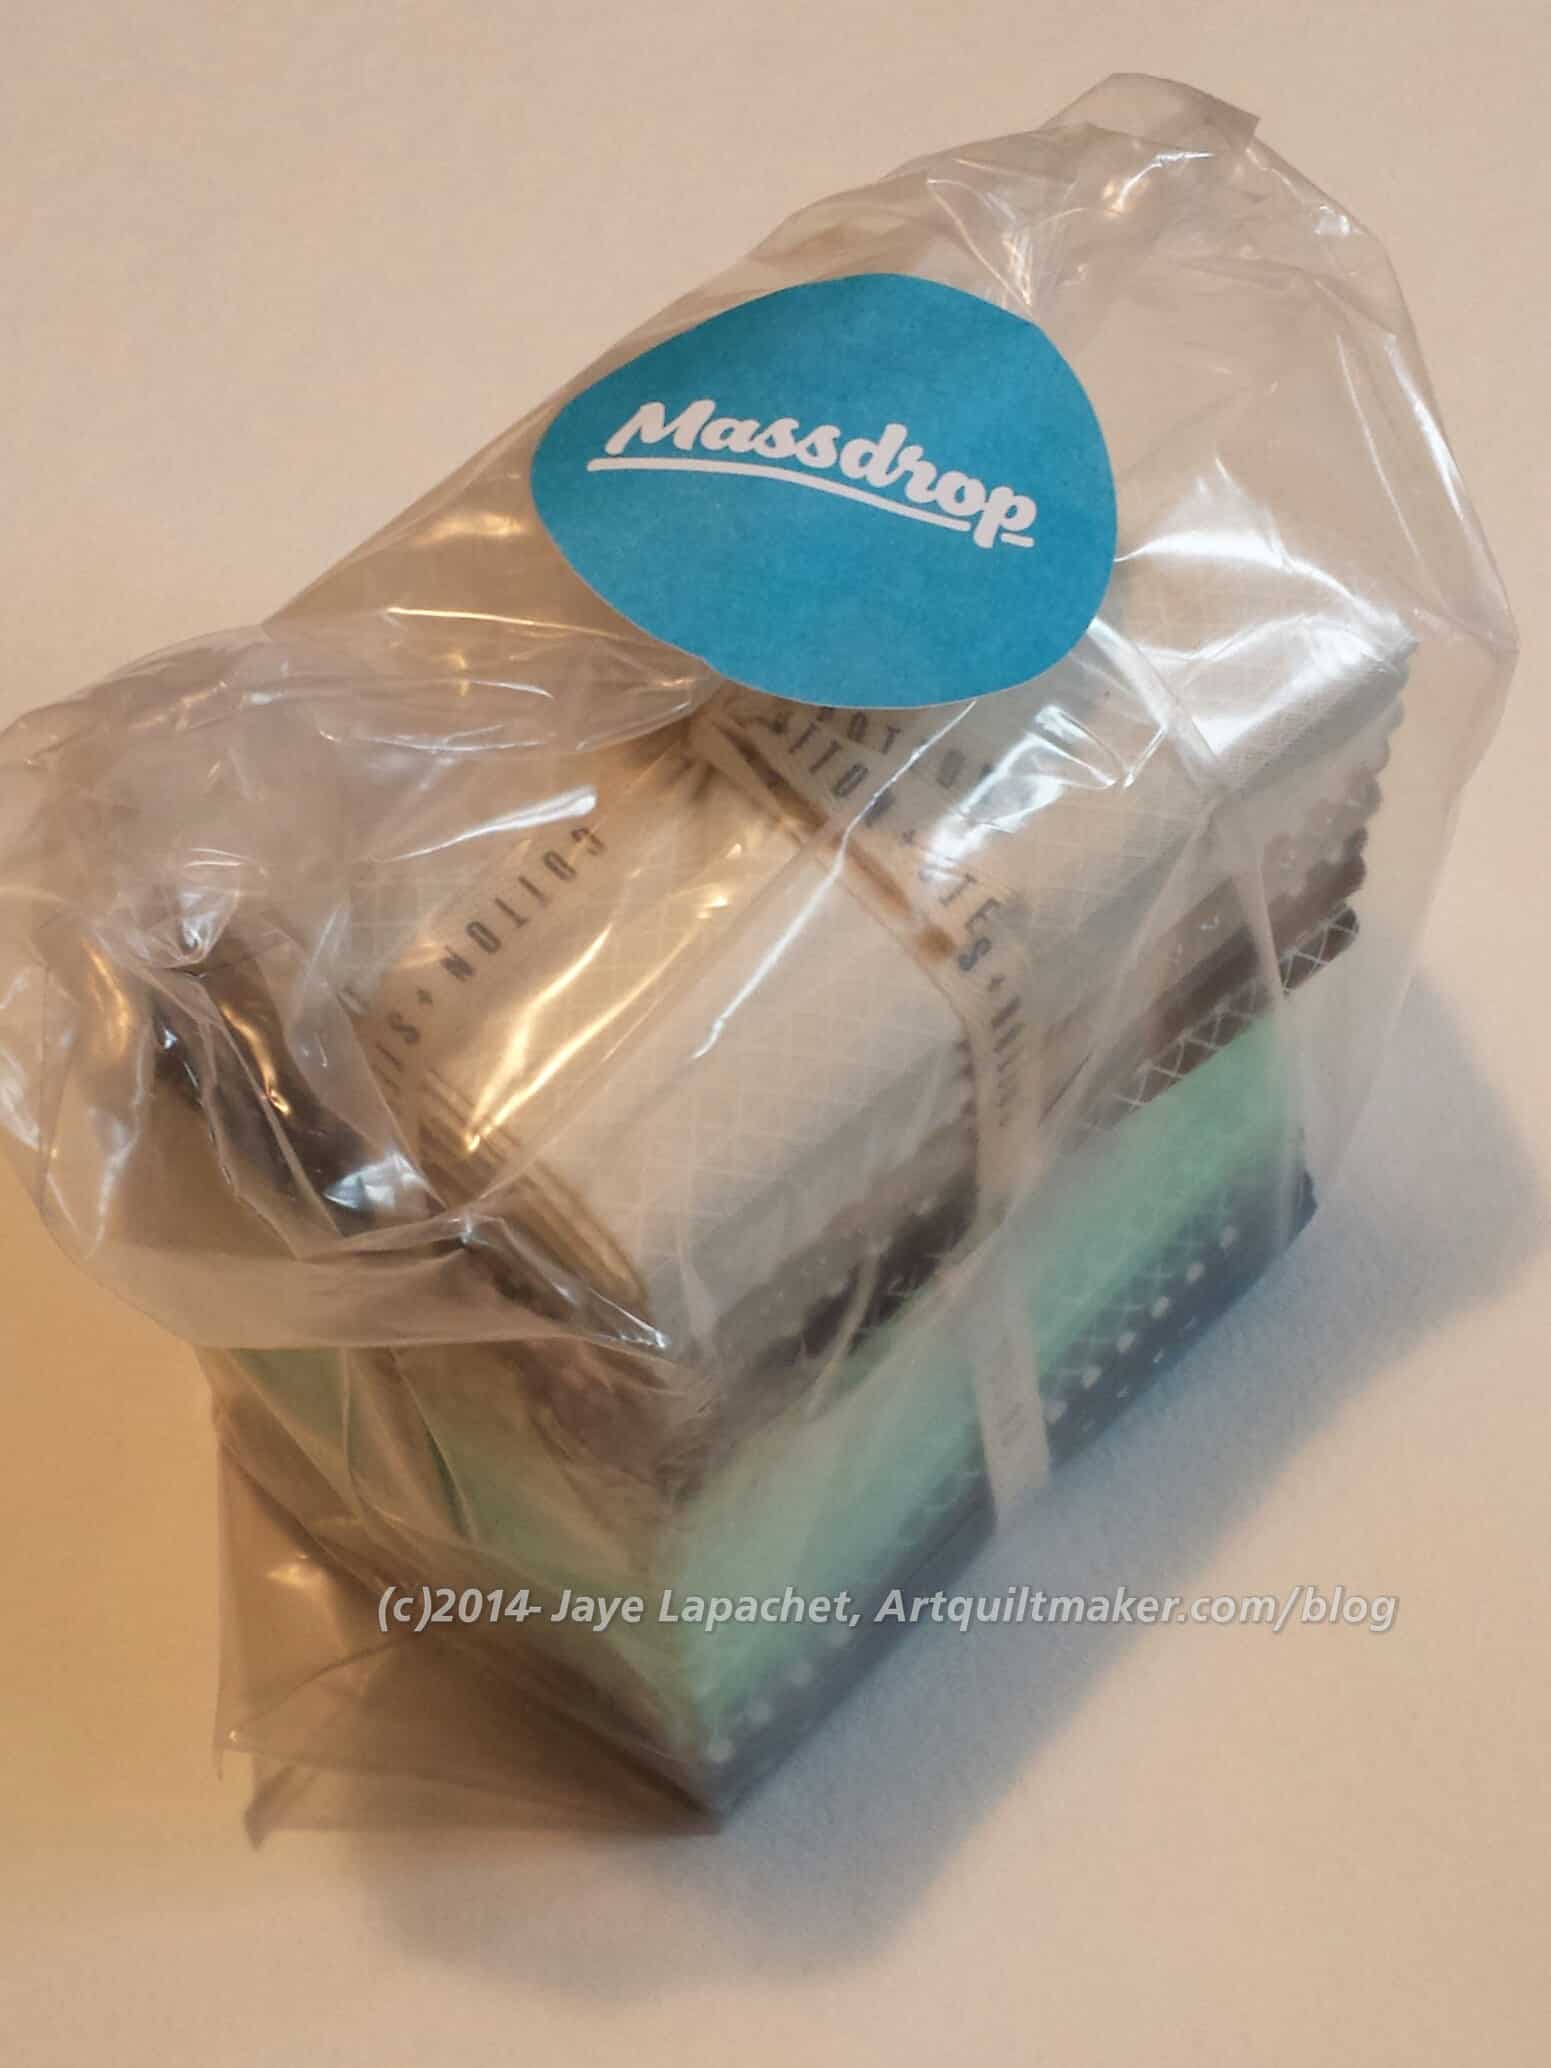
I have been a little off fabric buying for the past couple of months, but that seems to have abated. Despite not feeling the love for any new fabrics, I kept looking at Cotton & Steel. Who couldn’t with all the hype?
I am not that fond of the fussy-cuttable prints, but liked the tone-on-tones. I hadn’t yet gotten myself together to go and seek out the prints I wanted when I saw that MassDrop had an interesting offer. Interested parties were allowed to choose two FQ bundles of the tone-on-tone color groups of their choice. Note that this drop is closed now, but you can request that it be opened again.
MassDrop order arrives
Right before I left for Houston, I received the bundles. I didn’t really have a chance to open it as a lot was going on the few days before I left. I was excited about the cute little packets of fabric, though.
Went to Houston, came home and had a lot of stuff to do around the house, related to work, etc. Finally, I dragged my cutting table out of the closet (I store in the Fabric Closet when not in use or when we have guests or when someone is vacuuming) and began unearthing the rotary cutting mat. What a mess! I have a lot of projects in process, as you know, and it just creates chaos. I am in creative chaos stage right now.
One of the things I unearthed was the package above. Of course, I opened it.
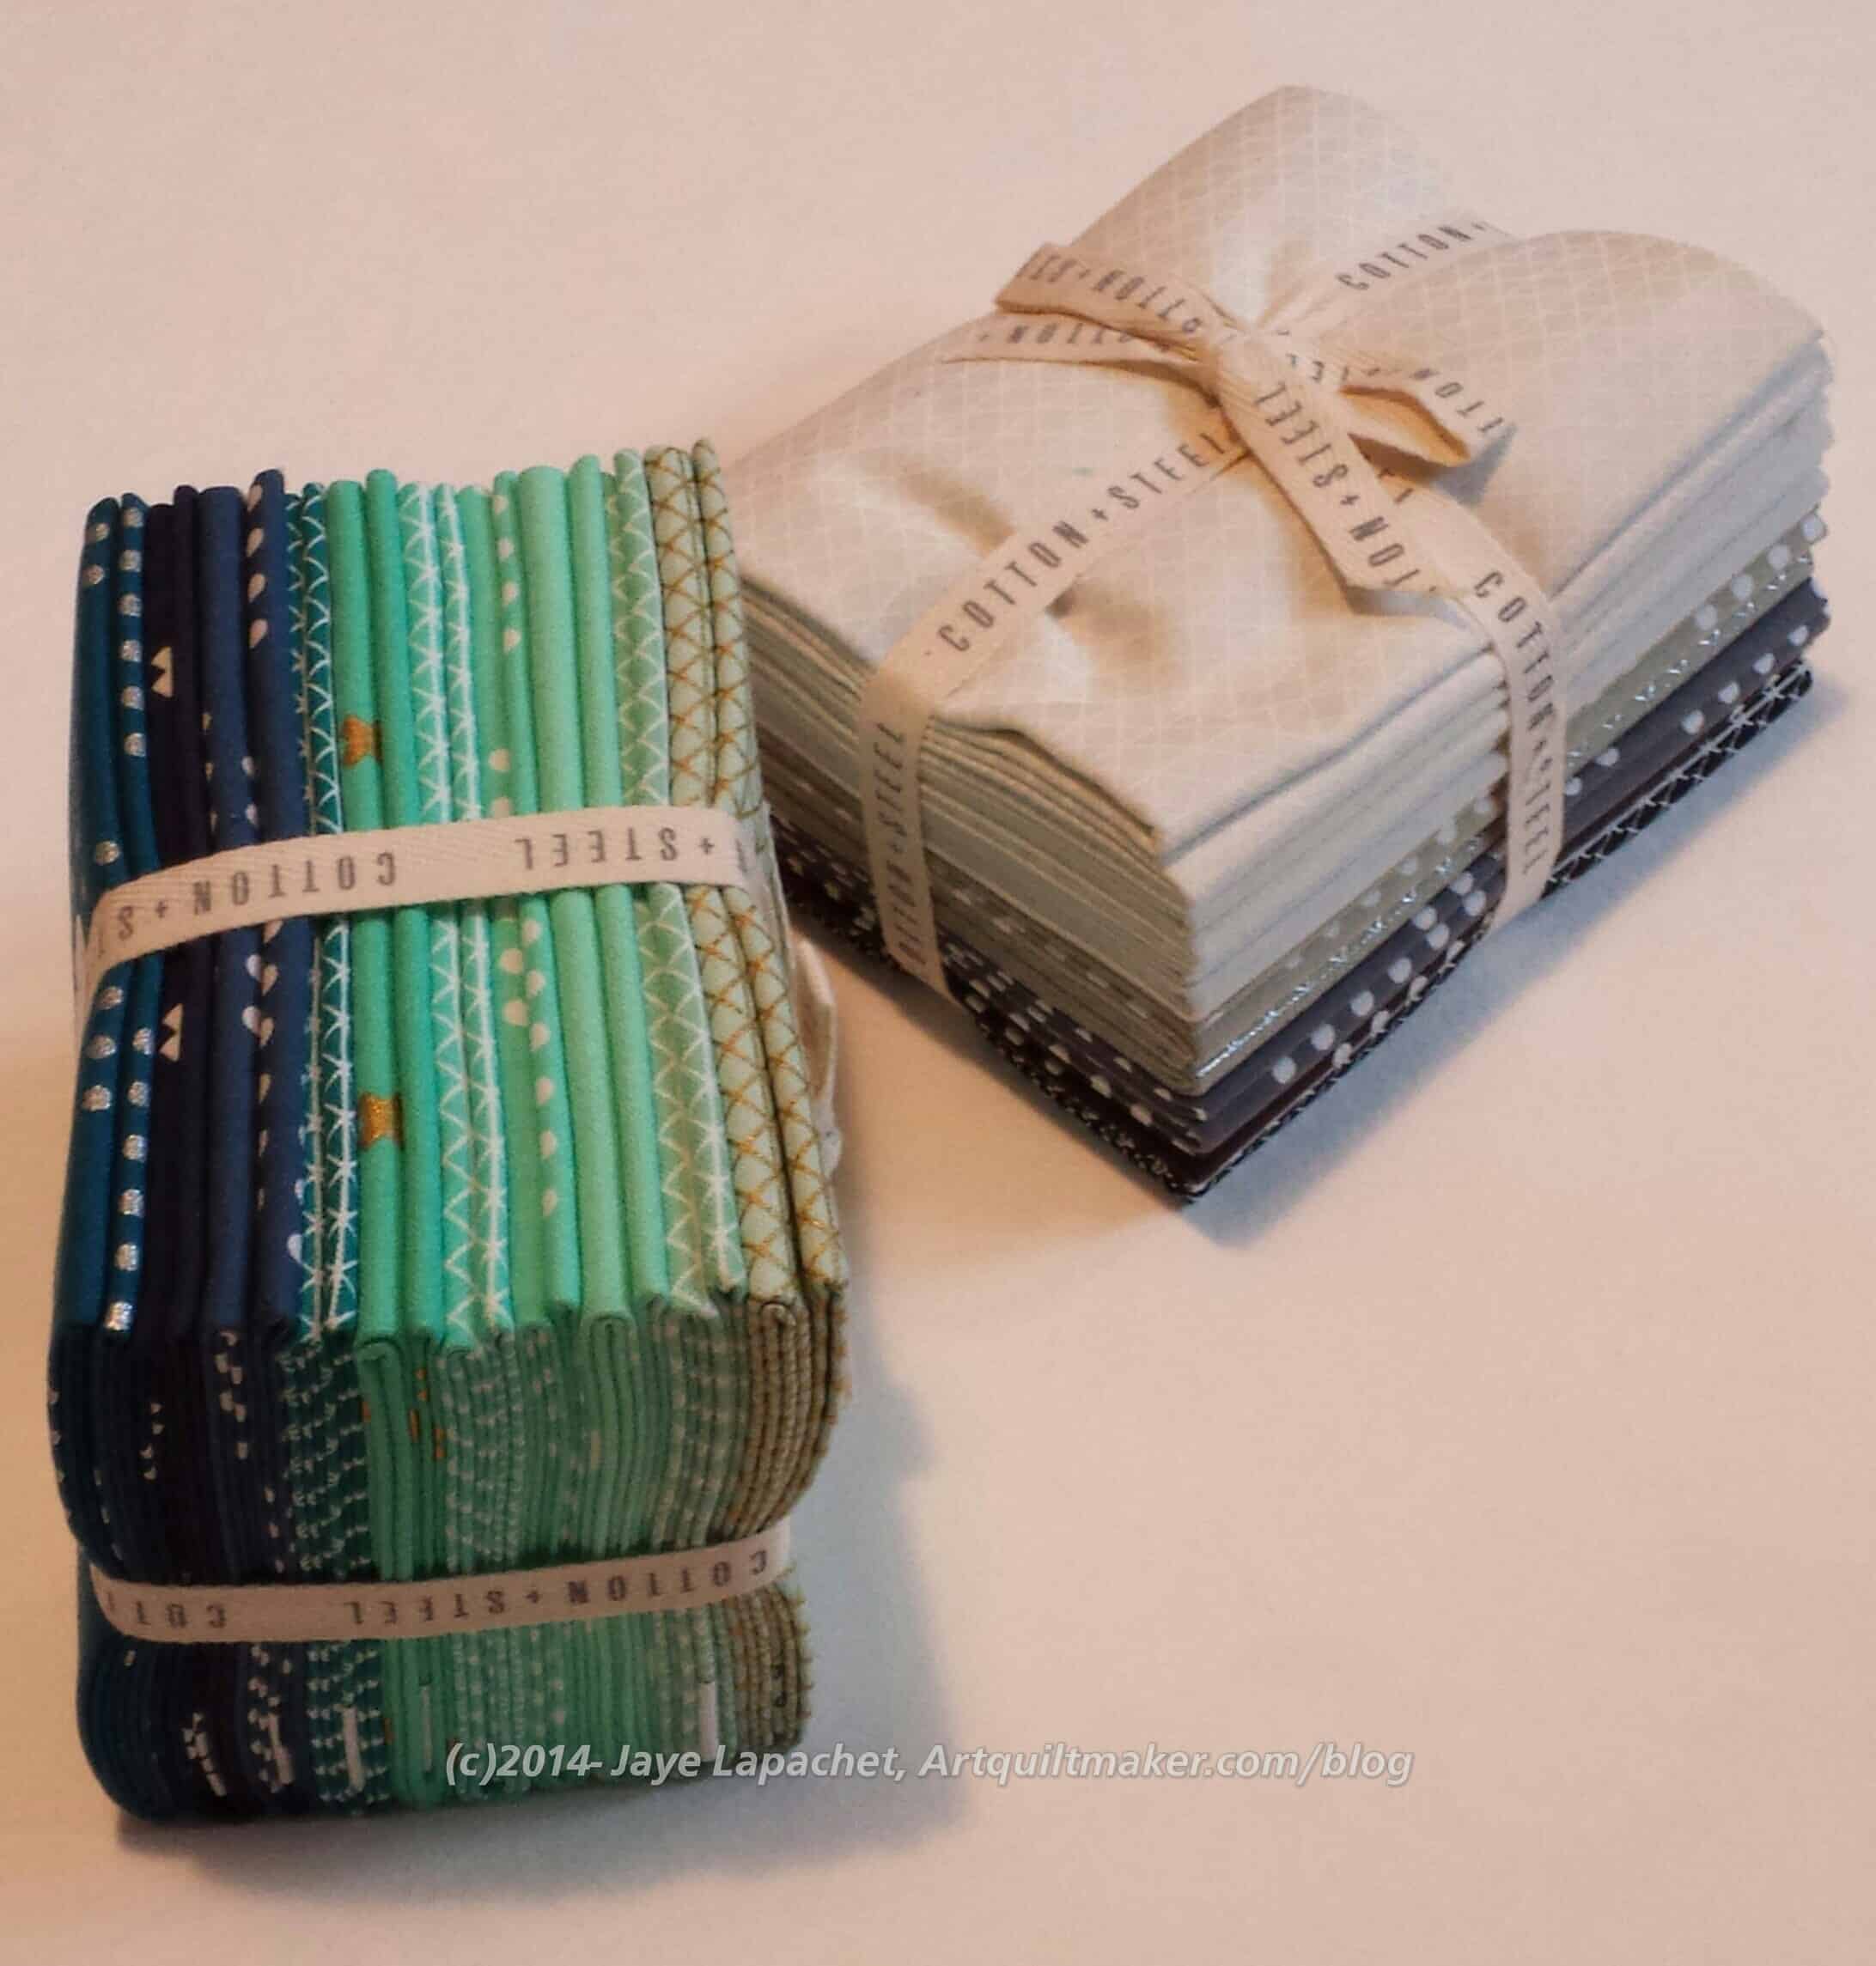
Cotton+Steel Open
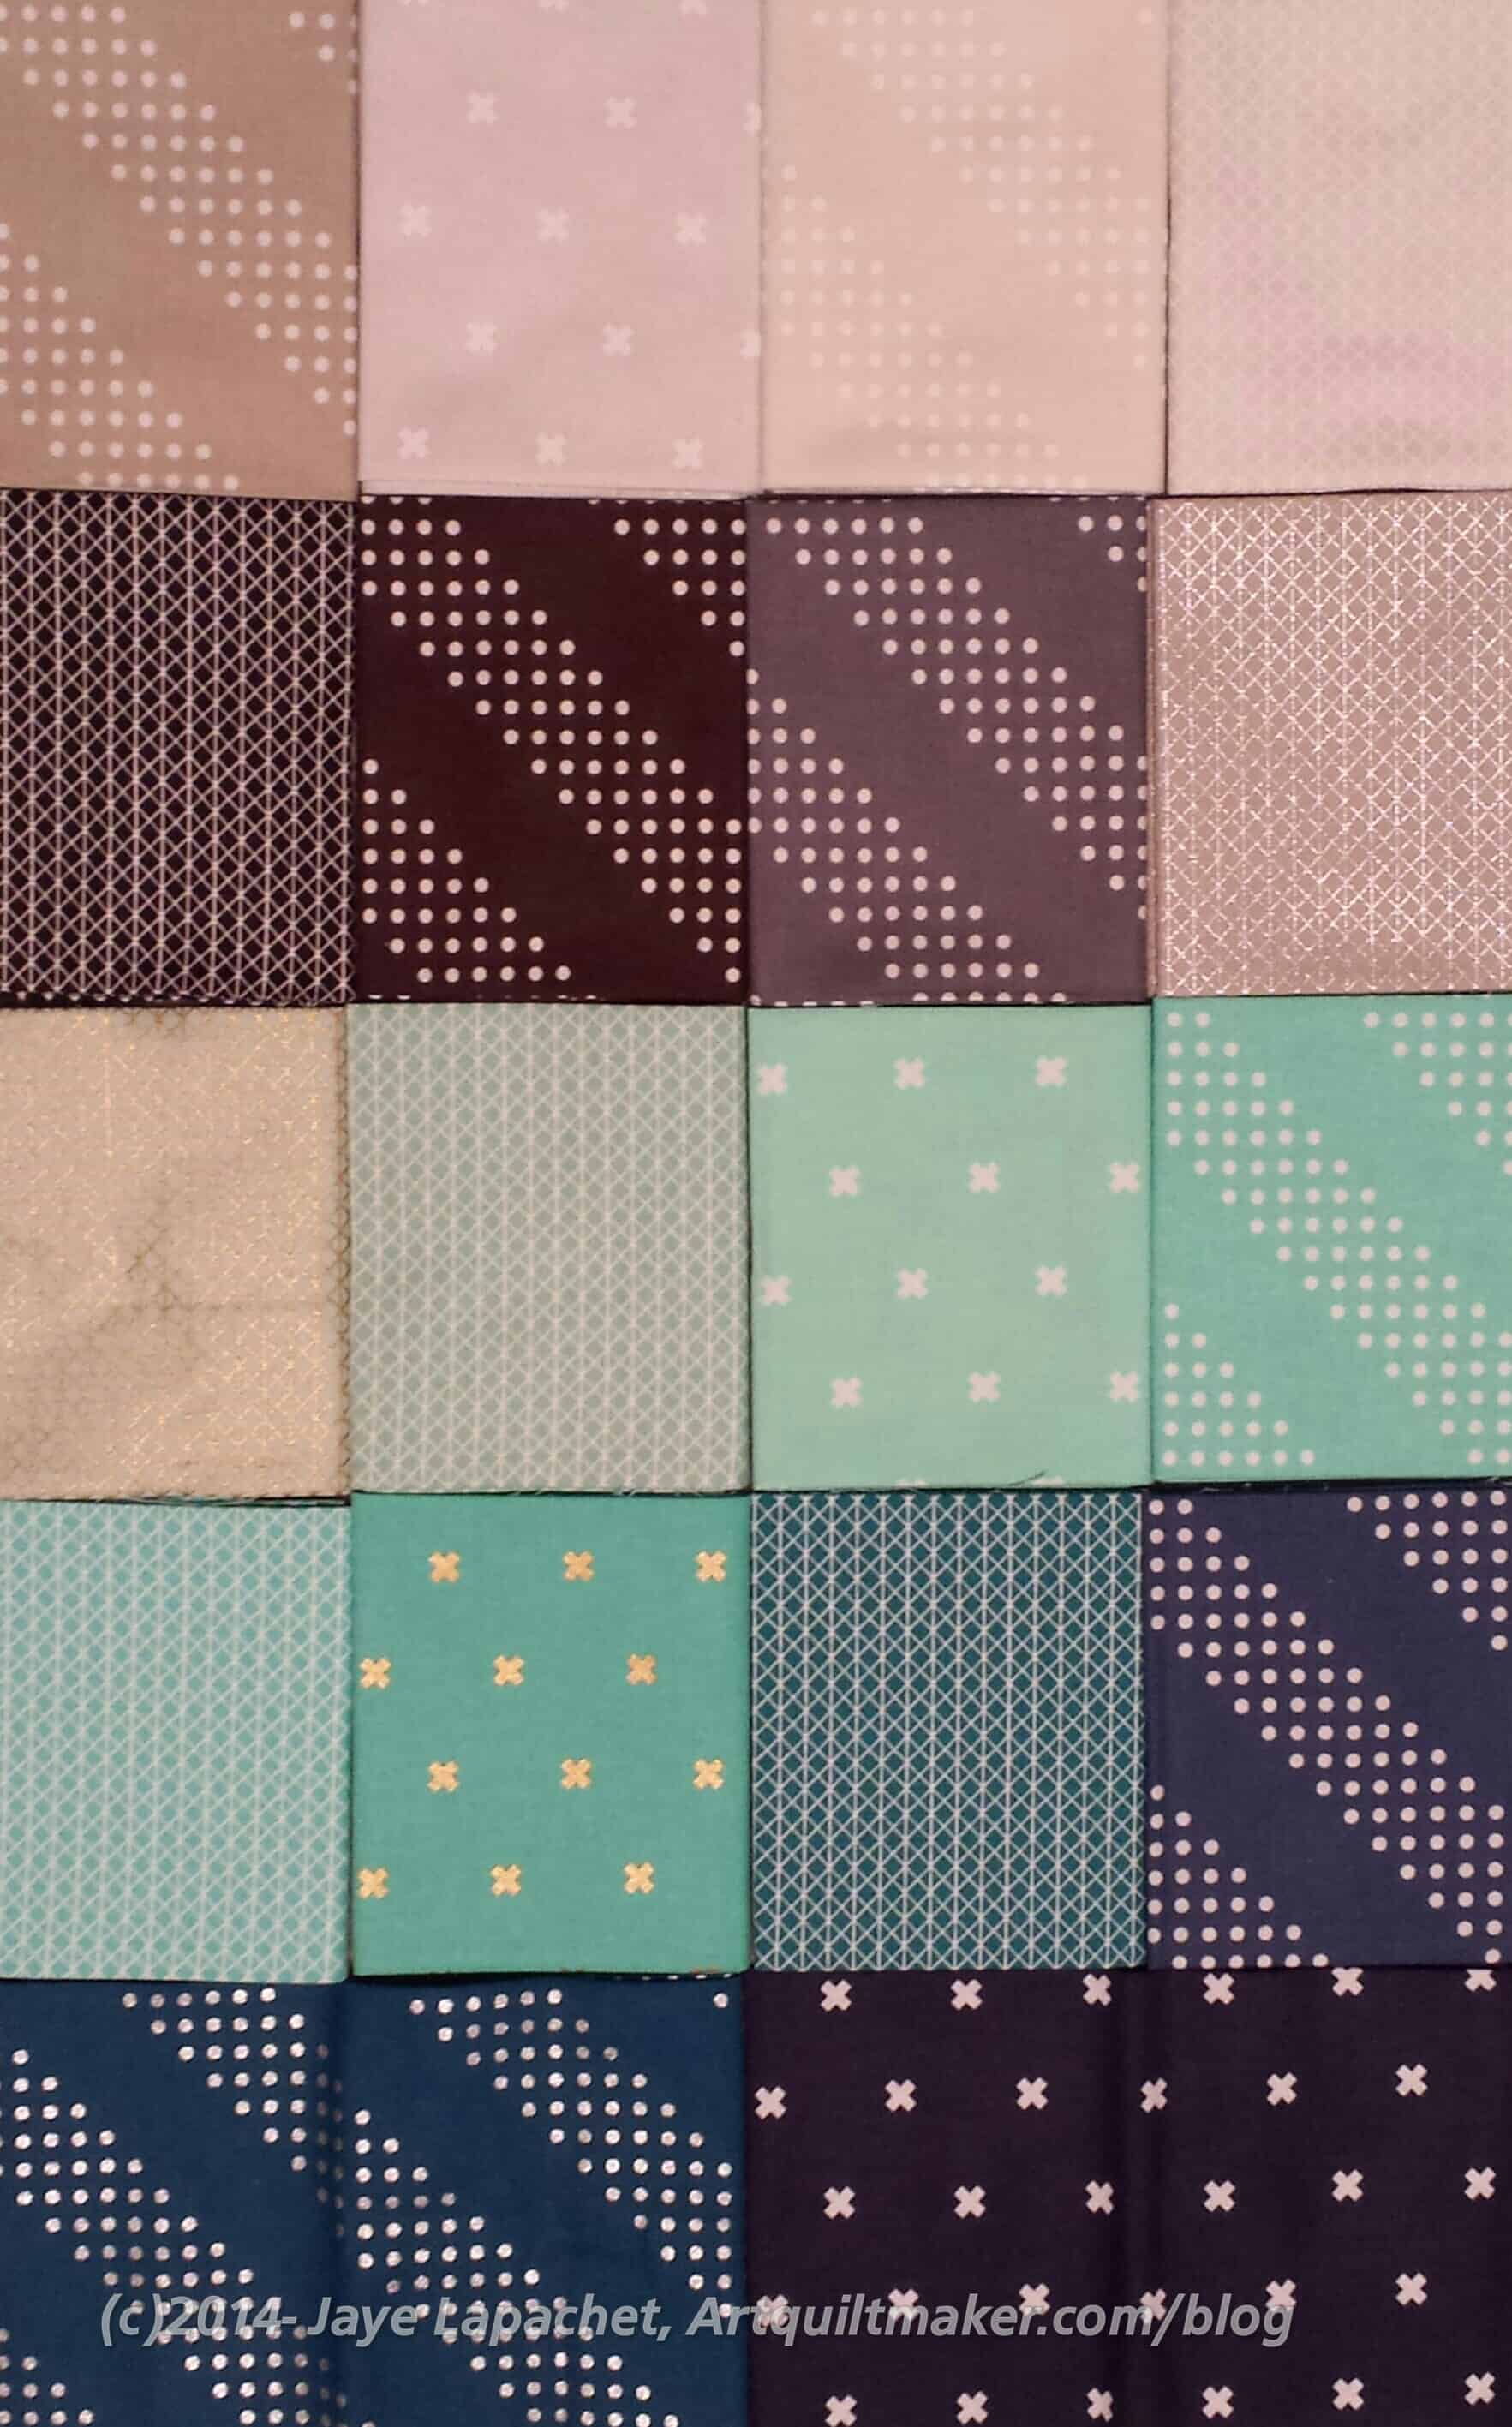
Inside were two FQ bundles. Normally, I buy larger cuts of fabric, because you never know when you will need to make a border. Considering that I have plenty of fabric, especially in the blue range, I think fat quarters are plenty. I also have a project in mind for the neutrals.
There are a couple of kind of ugly greens (the ones on the end-right), but they look ok with the others.
Now I can I can say I am in the ‘in’ crowd and not just trying to be in the ‘in’ crowd. 😉
I do have to say that once I got them out of the MassDrop packaging, I didn’t want to take the FQ packs apart. They were just so compact and adorable. I gritted my teeth and did it, though.
All Cotton+Steel
The fabrics all go together pretty nicely and as soon as I was the blue and green pack, I will add them to my pile for Tale of Two Cities.
I have a weird image of myself wearing a lanyard to a guild meeting with a lot of tools, at my fingertips and never lost under fabric or pattern pieces, hanging off of it. Like a chatelaine that the mistress of an English or French great house or castle would wear, only more quilty.
This is probably a stupid vision, because I would get a neck ache carrying around all this stuff and it would look a bit geeky as well. I did warn you that it was strange, and I just never know what images will pop into my head and inspire me.
A good reason to go to a guild meeting, probably the best reason, is to see what others are making. At a recent BAMQG meeting, Susan brought scissor sheaths she was making for the ladies at a retreat in which she participates. These scissor sheaths stuck in my head and I looked up a couple of YouTube videos with directions. They are very easy to make.
I took the best of both videos to try and make my own.
Supplies
Template (cardboard or rotary version)
Interfacing to give the piece a little body. Batting would do as well.
First, I went looking for templates. I didn’t have a heart shaped die for the Accuquilt, so I looked for fan or Dresden Plate rotary templates. I knew I had some and thought those would work.
I had a few different ones and tried the rounded Dresden petal template first. the first one I made turned out ok. I needed to reinforce the stitching in several places and I didn’t like cutting around the rounded bottom (thinner end) of the template.
Despite my annoyance, any of the above templates, as well as the Accuquilt heart shaped die (not really covered in this tutorial) will do.
Directions:
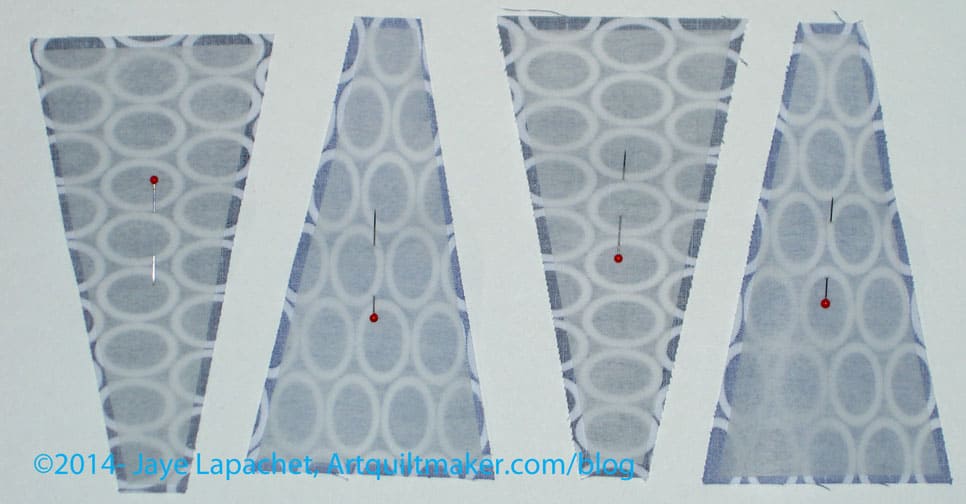
Cut
Cut Fabrics
4 pieces of fabric from your template (this tutorial does not cover the modifications needs if you are using the Accuquilt Heart shaped die)
Pin Interfacing to Fabric
2 pieces of interfacing or batting slightly smaller than your template
Note
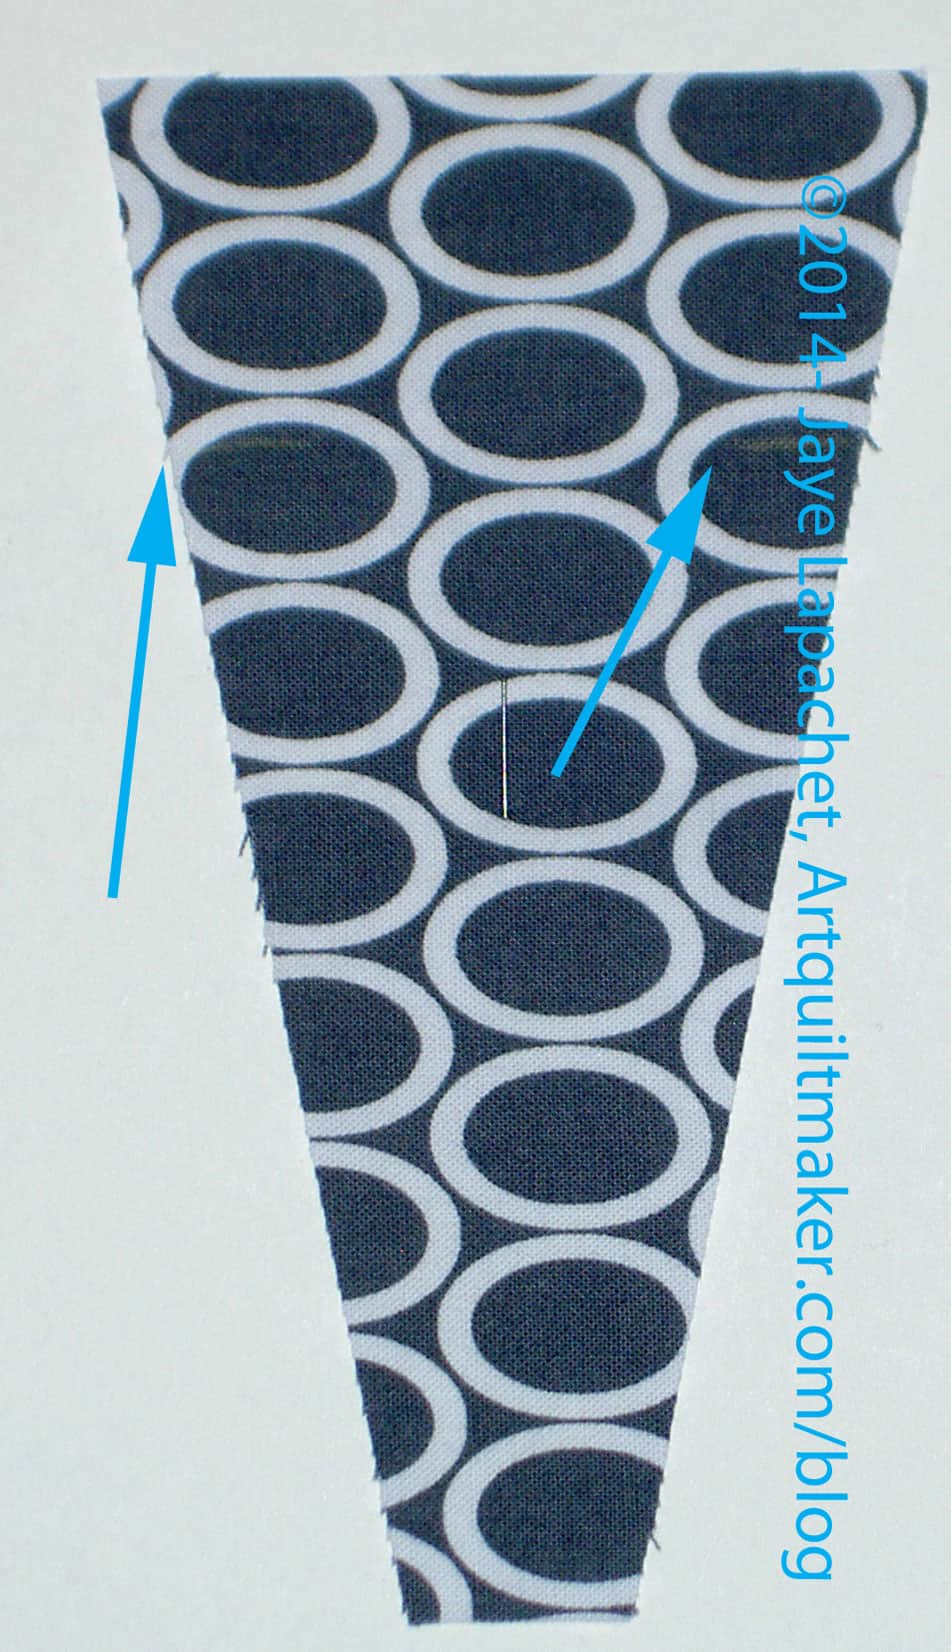
Mark notches
Make notches or markings where you want the top fold to be – about 1-5/8″down from the top. 1″ works well for some fabric looks.
Pin the interfacing, if it is not fusible, to keep in in place while you sew until after you turn it. ShapeFlex will work if you have some.
Pin Interfacing to fabric
Sew
Two right sides together, leaving a small space to turn,using a scant 1/4″
Try to catch the interfacing (if it isn’t fusible)
Clip and Turn
Optional: Clip curves, if you are using a Dresden Plate template that has a curved edge.
Turn pieces right sides out
Trim, Poke and Press
Trim the corners if you are not using a rounded Dresden template.
Poke out corners and curves carefully so the outer edge is smooth
Press so the pieces look nice
Sew
Put two main parts together (4 Dresden fan pieces that you have sewn and turned)
Sew from notches/markings
Sew around bottom 2-3 times staying on the line to reinforce the bottom
Finish
Trim the bottom corners
Turn whole piece right sides out
Fold down front petal
Press
Optional: stitch folded petal down using hand-stitching needle and thread or you could add a button or bead as an embellishment.
Scissor Sheath, finished
Final Thoughts
Now I am thinking of sets of Pincushions, needlecases and scissor sheaths. Watch out world! 😉 However, these are kind of a pain to make, so I don’t know how many I will make.
You could add a tab with some hardware so you can attach it to your quilt club lanyard.
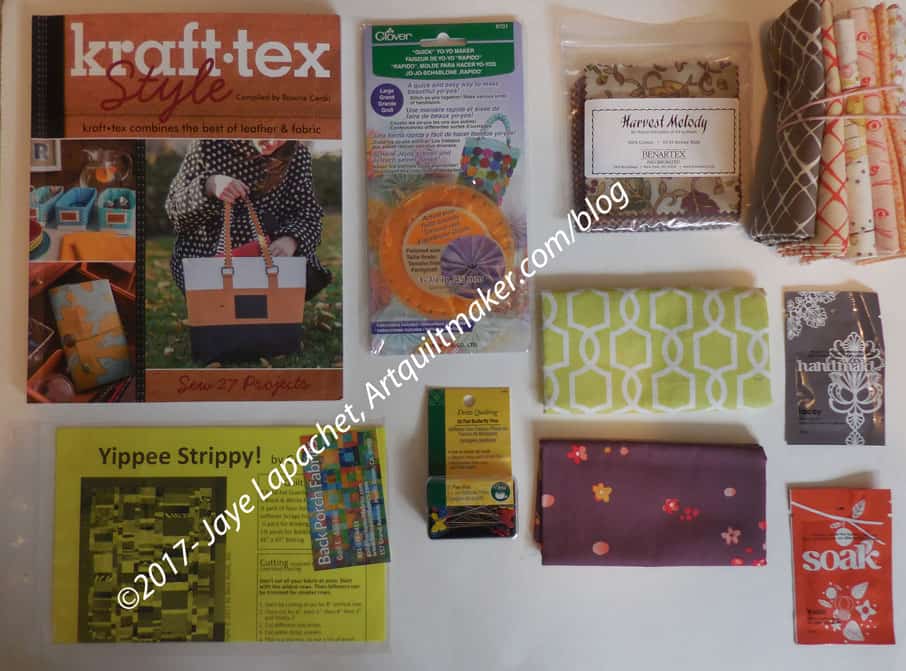
Recently I bought some stuff. Quiltmaking stuff, of course.
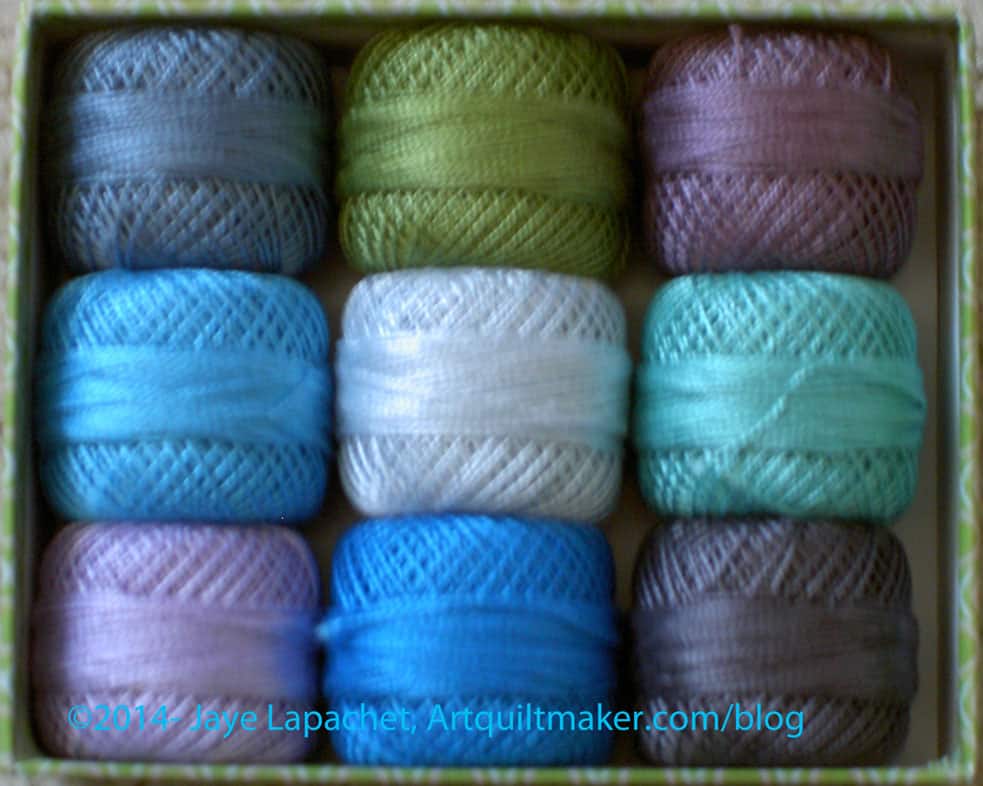
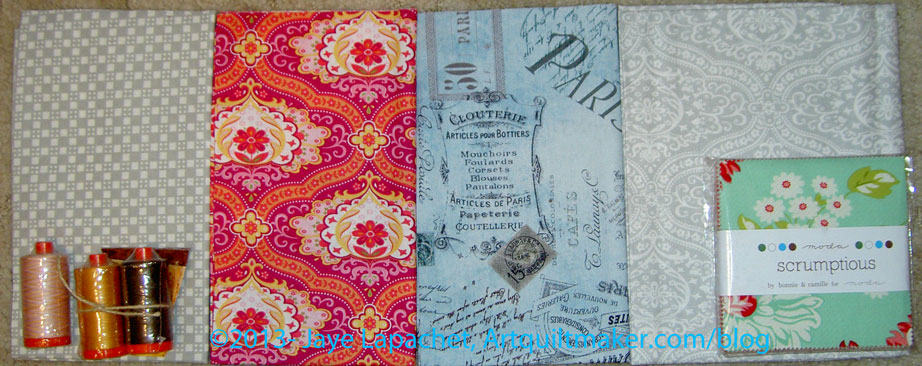
Pink Chalk Solids
Pink Chalk had a special on these Indian Summer by Jenelle Clark solid grouping and they were kind enough to cut half yards for me. I will use the blues and greens for the Tale of Two Cities piece, but I do like looking at the gradation.
Reflecting Pool Perl Cotton by Anna Maria Horner
Yes, I am easily led by color. I have been looking at the Anna Maria Horner Perl Cottons in the Reflecting Pool colors for awhile and finally decided to bite the bullet. Fortunately for me they were on sale in her shop when I went to buy them. When received, I found that they are prettier than I imagined. Again I like the gradation. I am thinking about the Big Stitch for quilting as well as embellishing in the style of my Pamela Allen quilts. Perhaps the Serendipity Lady will get some embellishing?
Sashiko Thread
I had hand stitching on my mind at the EBHQ Show. When I saw this Sashiko thread, I had to buy some. Pink and Turquoise! What could be better?
The pink will work well for the Serendipity Lady as will the cream. I could use the turquoise for the flowers and the green for the leaves, unless I decide to make the leaves a different color. I do need to get back to that project.
I have the FOTY 2012 and the Fresh Fruit to bind as well as the EPP stars all as hand projects. Clearly, I am in need of some embroidery on which to work. Either I need to get going on the Serendipity Lady, so she is at a point where I can bead and embellish or I *shock*horror* need to get another Pamela Allen style quilt going. Perhaps I could embellish See? I’ll think about that as I do recoil a little bit when I think of starting a new project.
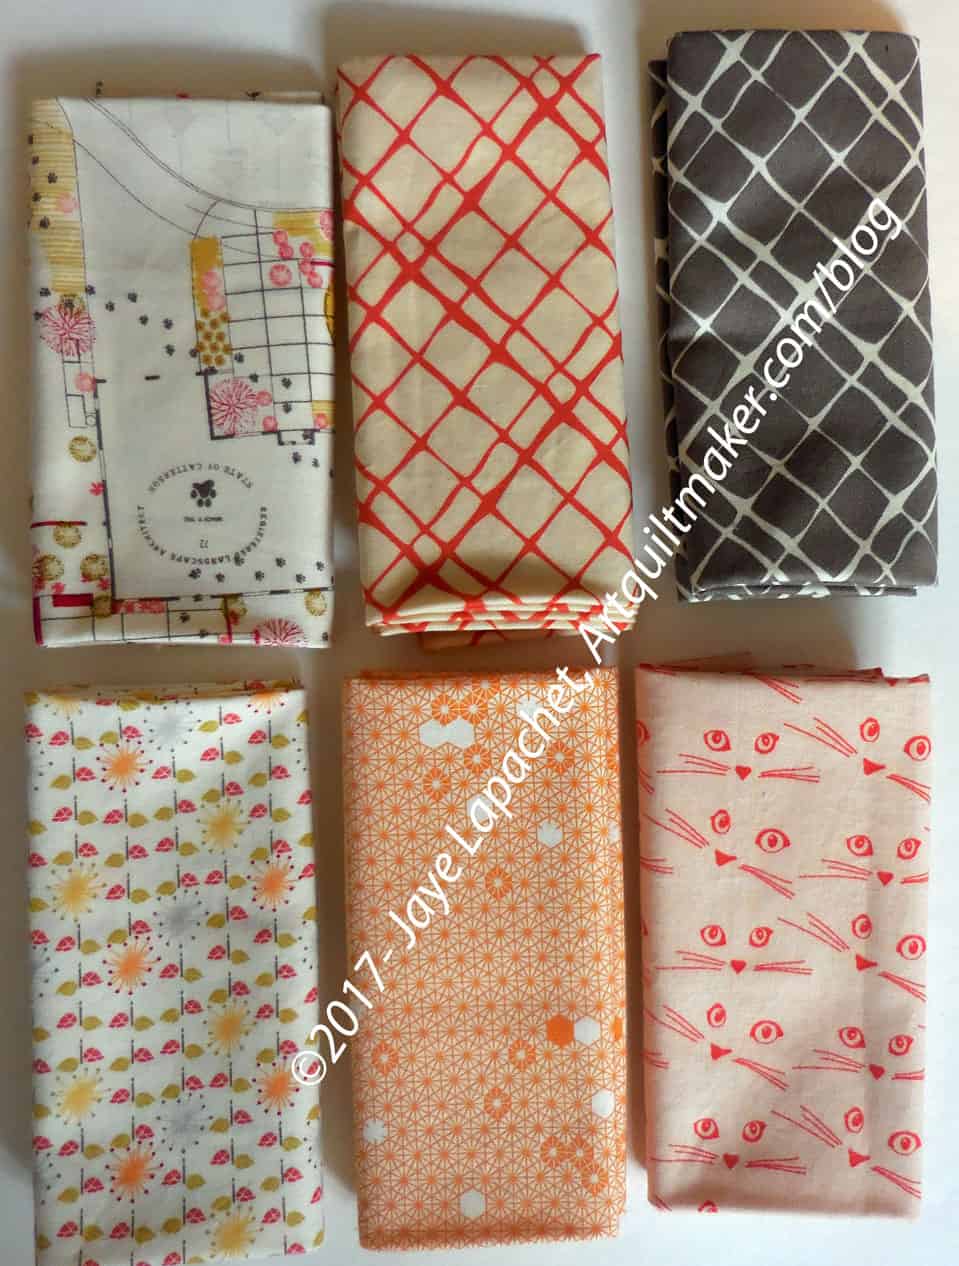
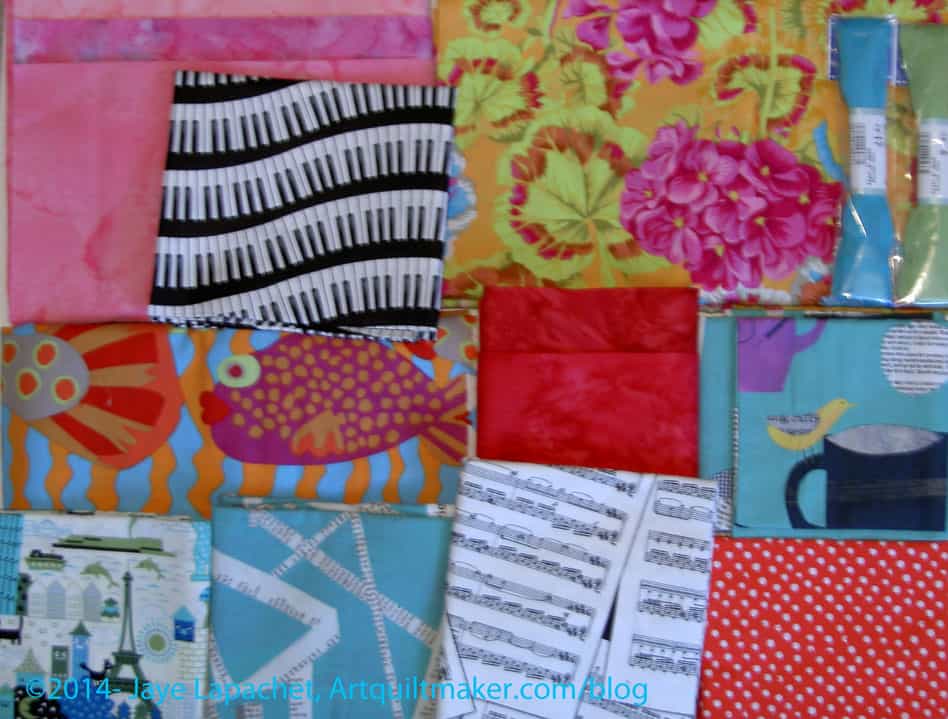
EBHQ Show Pretties
Finally, here is what I bought at the EBHQ show. Shockingly, I have some ideas for some of it. The fish fabric in the middle left is the most exciting. I have an idea that I will make a top of strips running vertically in warm colors, especially reds and pinks. Then I will cut out those fish and applique them along the bottom. I do feel excited about that piece. Some of the pinks and reds shown would go into it.
The Young Man told me he now wants a music quilt. I saw some fabrics in the Keepsake Quilting catalog and confirmed that he liked them, but saw these at the show and picked them up. I don’t have an idea for the layout or anything yet, but I will eventually. I am guessing that will be his graduation quilt. We’ll see.
The other fabrics were just fun. I hope to get them into something soon. The two turquoise pieces (cups and text) may end up in the Tale of Two Cites.
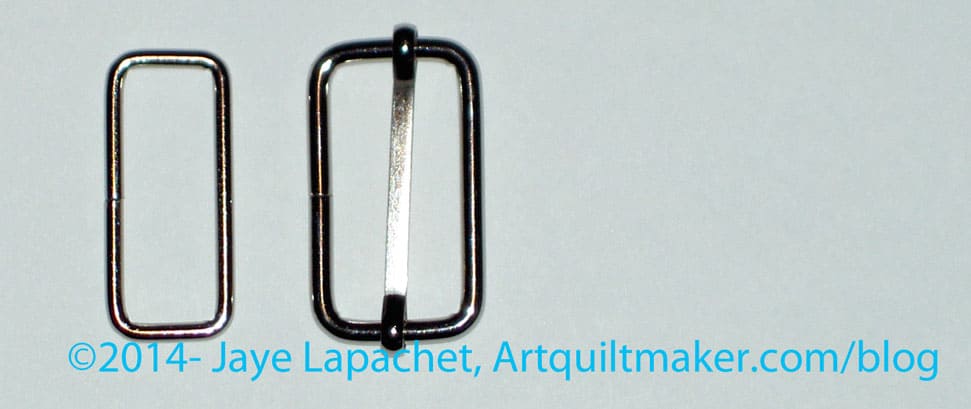
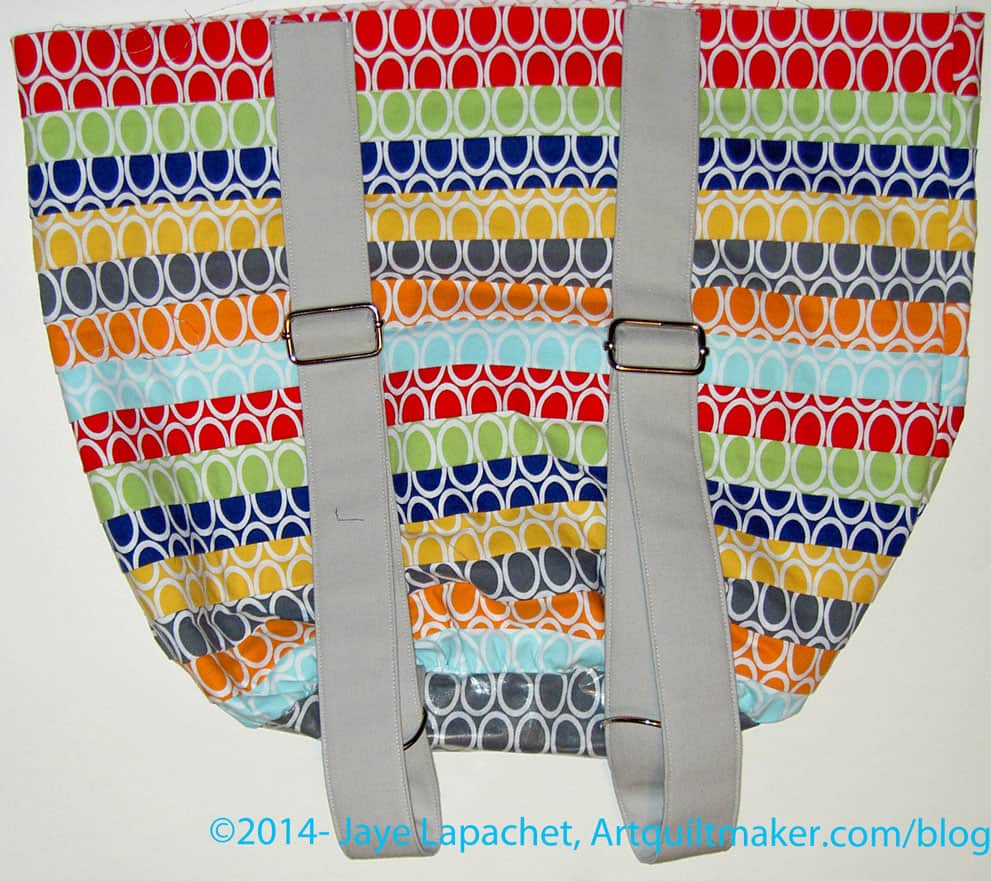
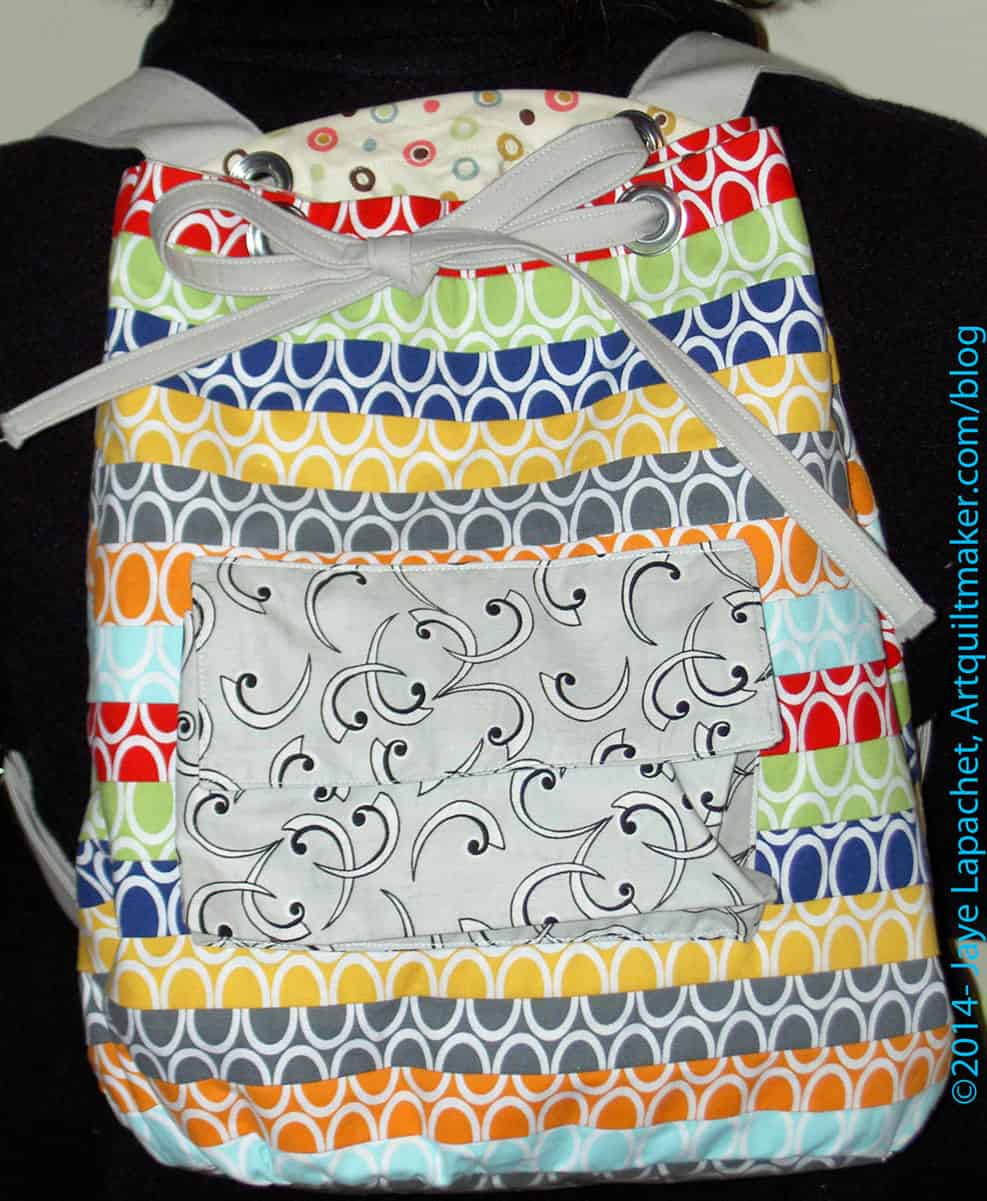
Shockingly, I had no idea what these were when the Scrap Lab Backpack pattern called for them. I sort of knew what they were because every purse I own has them, but I didn’t know what they were called.
I wish the kit I bought had included them, because, as I mentioned, I had a devil of a time finding them despite the fact that they are quite common. My work bag has them, my handbag has them, the purse of the woman at Britex who helped me had them. Still, I couldn’t find anywhere to buy them (in the US) until I ended up a Britex.
Triglides and slider buckles work together to allow straps to be adjusted, which is why so many commercially made bags have them.
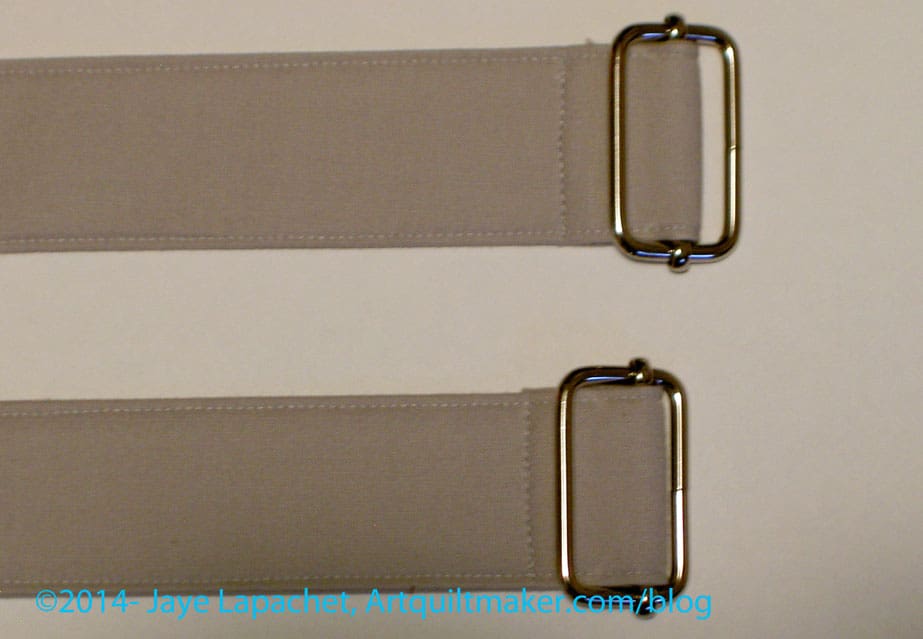
Sew Triglides to Straps
First, you sew the triglides on to the straps.
As an aside, I am pretty proud of the straps I made. they really look professional – or as professional as I can get with a home machine. they are smooth, stiff and lay nicely. Of course, we will see what wear does to them, but for now, I feel proud and will enjoy that feeling.
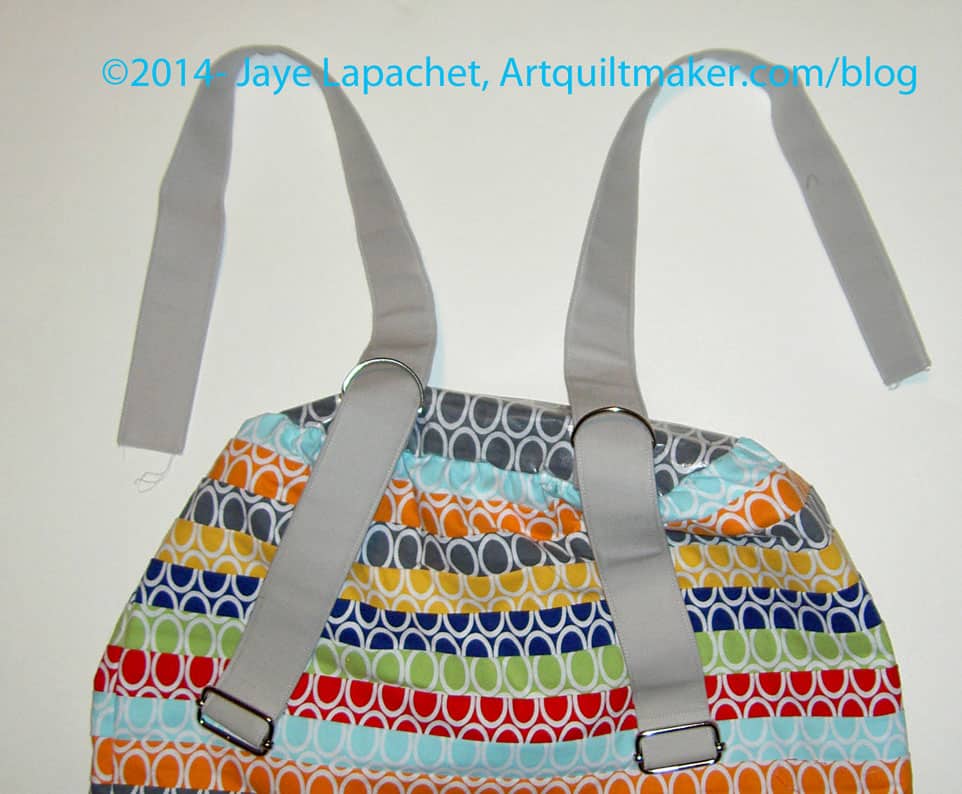
Loop the straps through the D Rings
Next, loop the straps through the D Rings (or other type of ring), which have already been sewn to the bottom of the bag. This will start the process of attaching the straps to the bag. You have not done any sewing yet. The straps are not yet really attached to the bag, except very loosely because part of the strap went through a D Ring.
I have to say that this part of the process is kind of cool and I did learn about using triglides and slider buckles.
Bring the straps back over the D Rings (so the D Ring metal is in between two layers of the sewn straps) and head towards the triglides.. The D Ring will be like the peanut butter and jelly of a sandwich where the straps are the bread.
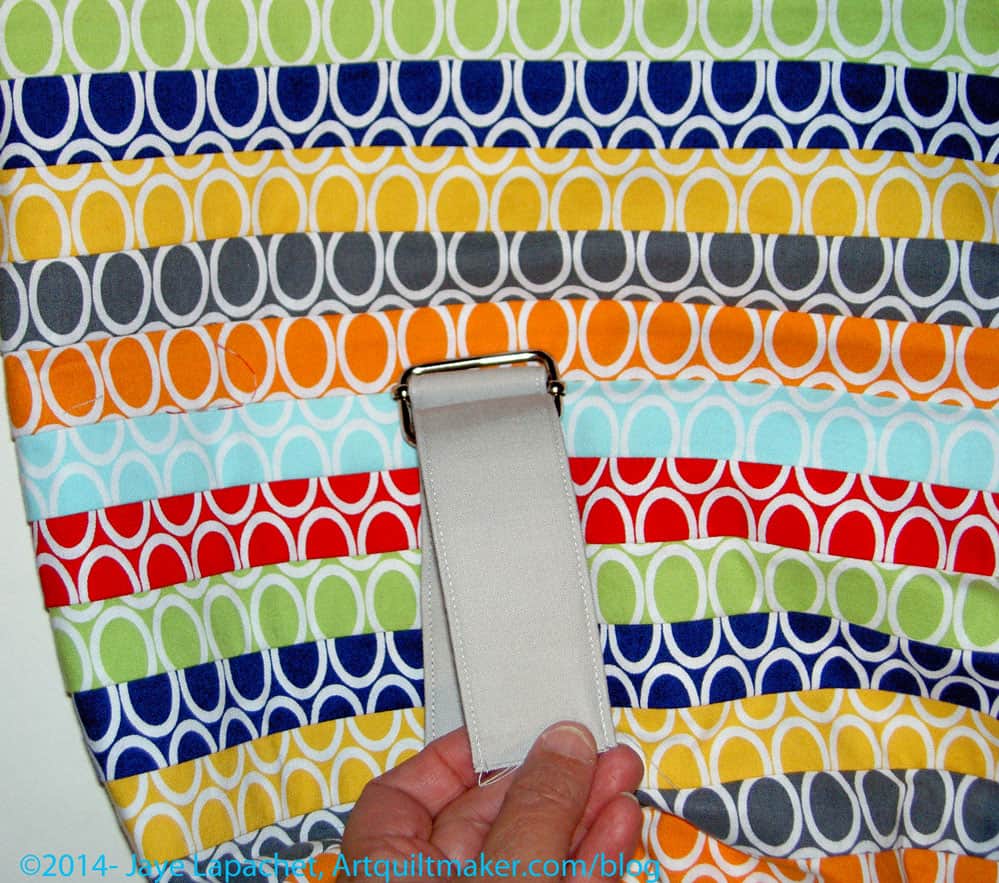
Thread Strap through Triglide
Thread the strap through the first part of the triglide.
There are now a number of layers of the strap fighting for space in the triglide. This means that you have make sure you have the correct size of triglide.
At this point adjustments for comfort on your back don’t really matter. I kept the triglides around the middle of the outer bag, then adjusted them later to wear.
Straps looped & ready to be sewn
Thread the strap over the middle of the triglide and under the other [stationery] side of the triglide. You are now ready to sew the inner and outer bag together. Once sewn, the straps will be fully adjustable.
Resources for Triglides and Slide Buckles
This is not a complete list. This is a list of available triglides and slider buckles that were recommended to me or that I could find on the web. As I said, Beverly’s and Joann didn’t have the size, or color, I needed. If you make this backpack, plan ahead.
Jet Pack Hardware Kit on Betz White’s Etsy Shop – this includes a triglide, but also has other hardware pieces as it is designed as a kit for one of Betz White’s patterns
Last November Bonnie Hunter’s Mystery Quilt was Easy Street. I liked the idea, but wasn’t that excited about the mystery part of the quilt. I kind of like to have an idea of what the quilt will look like.
Thanks to Pam and many others, I know, basically, what the piece looks like and I am still interested.
Fat Quarter Shop Fabrics
While I am not anywhere near cutting and sewing, I have been thinking about fabrics. I want to use grey for the background for some reason that I can’t fathom. To that end I have bought a few pieces of grey lately.
I have been disappointed in the greys I have purchased recently. They are too beige The perfect grey, which I may have mentioned, was the Happy Go Lucky grey by P&B Textiles, which I used to bring the block sup to size in the A-B-C Challenge (I definitely mentioned this). You can see the perfect grey on page 2 of the fabric card. All the Happy Go Lucky now is by Bonnie and Camille and definitely does not include the grey I want.
There is a lot of “starting new projects” in my head. I need to be mindful and judicious of ruining the progress I have made on my UFOs. I am also not ready to give up the small projects project.
I recently decided to try my hand at a whole cloth quilt project. Yes, I know it means diverging from my single-minded attempt to complete or make progress on many of the projects on the 26 Projects list. In order not to completely lose my mind and have fun, I diverged on to this project, because it requires me to engage in the entire process of quiltmaking from idea through design to stitching and finishing.
One of the challenges I came upon very soon after starting was transferring my design on to the fabric. This is always a problem for me as I am pretty lazy when it comes to quilting and I have never found a completely satisfactory way to transfer original quilting designs. I didn’t have a quilting stencil, because this was my own design. I didn’t want to do a free hand drawing on the fabric and I have never been comfortable with the wash away pens, so I was at a loss.
Saral Transfer Paper
Quickly, though, a vague memory of Saral Transfer Paper leaped into my head. I think I learned about in the dark ages of my quilting career.
Saral Transfer Paper is described on the company products page as: “Saral® Transfer Paper is wax free transfer paper (also known as graphite paper or tracing paper) made for general and specialized use, which allows you to transfer your design from a sketch, pattern, template or free hand to any surface. It makes clean, crisp tracings that can be erased and painted over. It’s great for tole painting, fabric painting, fine arts and watercolor painting, quilting, dress making, commercial and graphic arts, architecture, wood working, ceramics, stained glass, metal working and it’s acid-free for scrapbooking.”
The website goes on to describe the advantages and different uses: “ Saral Transfer Paper is wax free so it gives the advantage of erasing like pencil with no smear or smudge. It can be inked or painted over with no skipping or bleeding. The transfer lines can be sponged, washed out or brushed off of fabric, and a hot iron will not set them as will other tracing or transfer papers made for fabrics. Saral is economical and can be used again and again.
Saral Comes In 5 Colors
Graphite: The all-purpose tracing medium. Excellent for illustration board and all drawing papers, wood, fabrics, canvas and metal.
Red: Excellent for ceramics and china painting. The lines will fire out. Shows up equally well on light or dark surfaces and mixtures of the two, such as photographs and photostats. May be used on acetate overlays, plastics and enamel.
Blue: Non-photographic. It’s not necessary to clean off Saral blue when work goes before the platemaking camera. Ideal for key lines, mechanicals, paste-ups. For Tole Painters, it leaves a bright, easy to see transfer line.
Yellow and White: For tracings on dark surfaces. Excellent on dark fabrics, dark wood, metal, as well as dark painting surfaces. Tole painters find white especially useful. Yellow is best for work on clear or stained glass.
Saral is Certified Non-Toxic All Saral transfer papers conform to ASTMD-4236 and are certified by The Art & Creative Materials Institute as non-toxic, so they are suitable for use by children, as well as adults.”
I have used it before, so I went in hunt for it and was fortunate to find a flat pack of 5 8.5″x11″ sheets at Joann. I also ordered a roll, as is shown in the image, from Amazon. It is an old fashioned feeling product, but it works amazingly well.
My pattern is about 2.5″x3″ feet, so I stood at my cutting table and drew over my pattern through the Saral Yellow onto my fabric. I can easily sew over the lines and they brush off when I don’t need them any more. I use a Sewline pencil to darken any lines that may have gotten too light. I am really pleased with how this product works, because I was able to trace right over the original lines of my pattern.
Also, I only used one 8.5″x11″ sheet to transfer the entire pattern., so the website’s claims of economy seem to hold up to scrutiny.
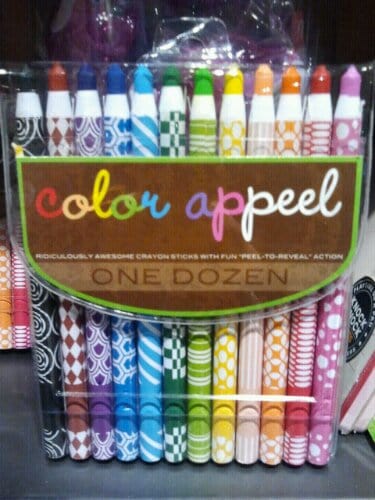
I saw these in a shop today and they made me smile. Of course, they were in the kids section. Kids get all the fun stuff. If I ever have that sort of shop, I’ll designate a section labeled “creative people”. Could be fabulous or a disaster. Would you be more creative if you had these crayons? I might be tempted to just look at them and not use rhem. Note to self: get over that!!! 🙂
In addition to the group of gifts I already received, Julie and I had our annual parking lot exchange of Christmas gifts after CQFA last weekend. I gave her the partially done Purple Journal, which seems a bit pathetic after I saw what she gave me!) and she gave me this plethora of quilty goodness.
I want to use the Mary Engelbreit panels to make journal covers. A little Mary Engelbreit in the morning is always a good way to start the day, in my opinion. She also bought me a desk needle threader. Yes, it is getting harder for me to thread my needles. I blame it on poor lighting in my living and work rooms. I am constantly breaking the wire hand held ones, so this will come in handy. The ruler allows the quiltmaker to make wonky 9 patches. Julie and I have started to cut patches for each other. She cut Eye Spy patches for me. I cut Eye Spy patches for her. Now we are cutting Windmill patches for each other.
The final cool thing is a little package of Timtex. Who doesn’t need Timtex? I want to try making a journal using Timtex instead of a manilla folder. We’ll see if it works.
Half Moon Street from TFQ
I am a lucky girl to have a friend who gives me gift certificates for fabric.I think we should all have a friend like that. 😉 I bought this bundle using the Intrepid Thread gift certificate from TFQ. I love receiving gift certificates for fabric. I don’t feel guilty about buying it when I use the gift certificate.
I feel very fortunate to have such nice friends. Still, I can’t help, but look forward to my birthday. 😉