I bought Doug Leko’s Folded Corners Ruler** awhile ago but didn’t have a reason to use it until Saturday. I started working on the X Quilt last week. I was really struggling with the way the pattern was written. After reading a Bonnie Hunter post about Valentine’s Day where she mentioned this ruler**, I dug it out. I watched a video, started using it which resulted in the X quilt process moving along. I also felt happier.
Folded corners are often referred to as “flippy corners”. This ruler makes them easy. I was amazed to find that they sew up perfectly. I watched the Fat Quarter Shop video demo to get me started.
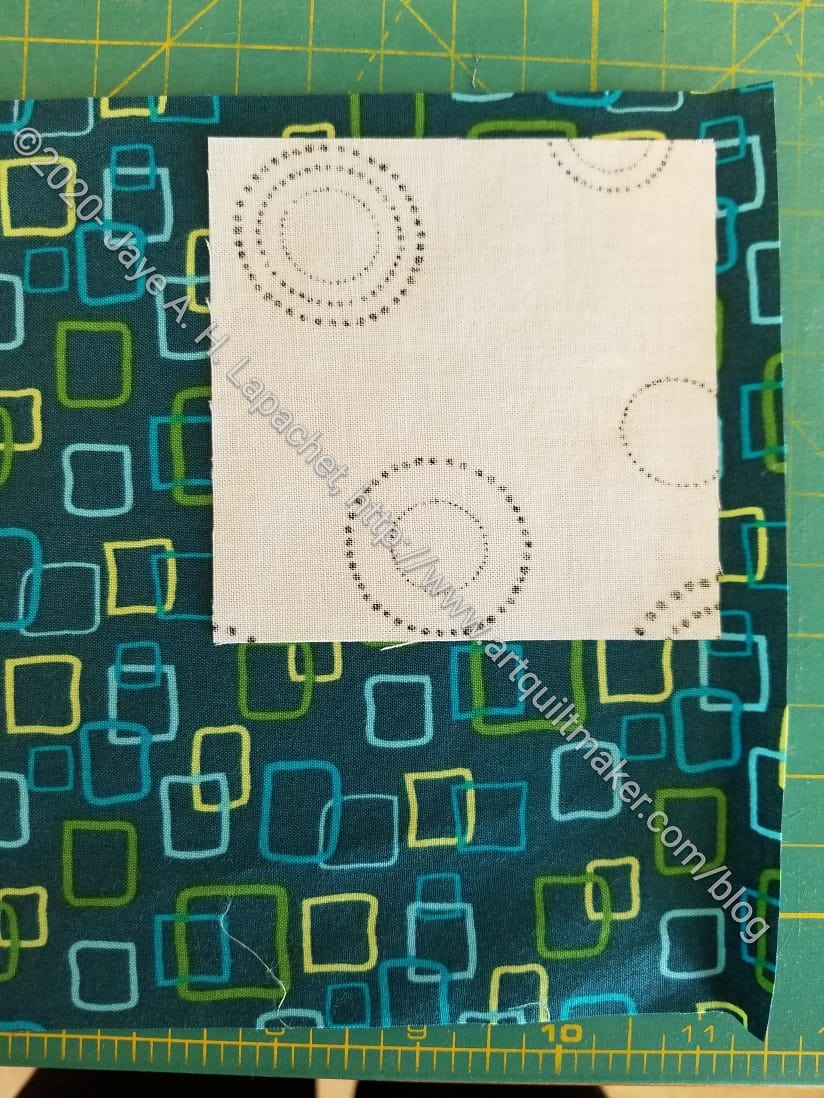
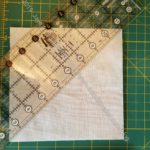
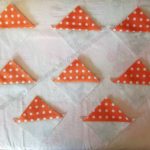
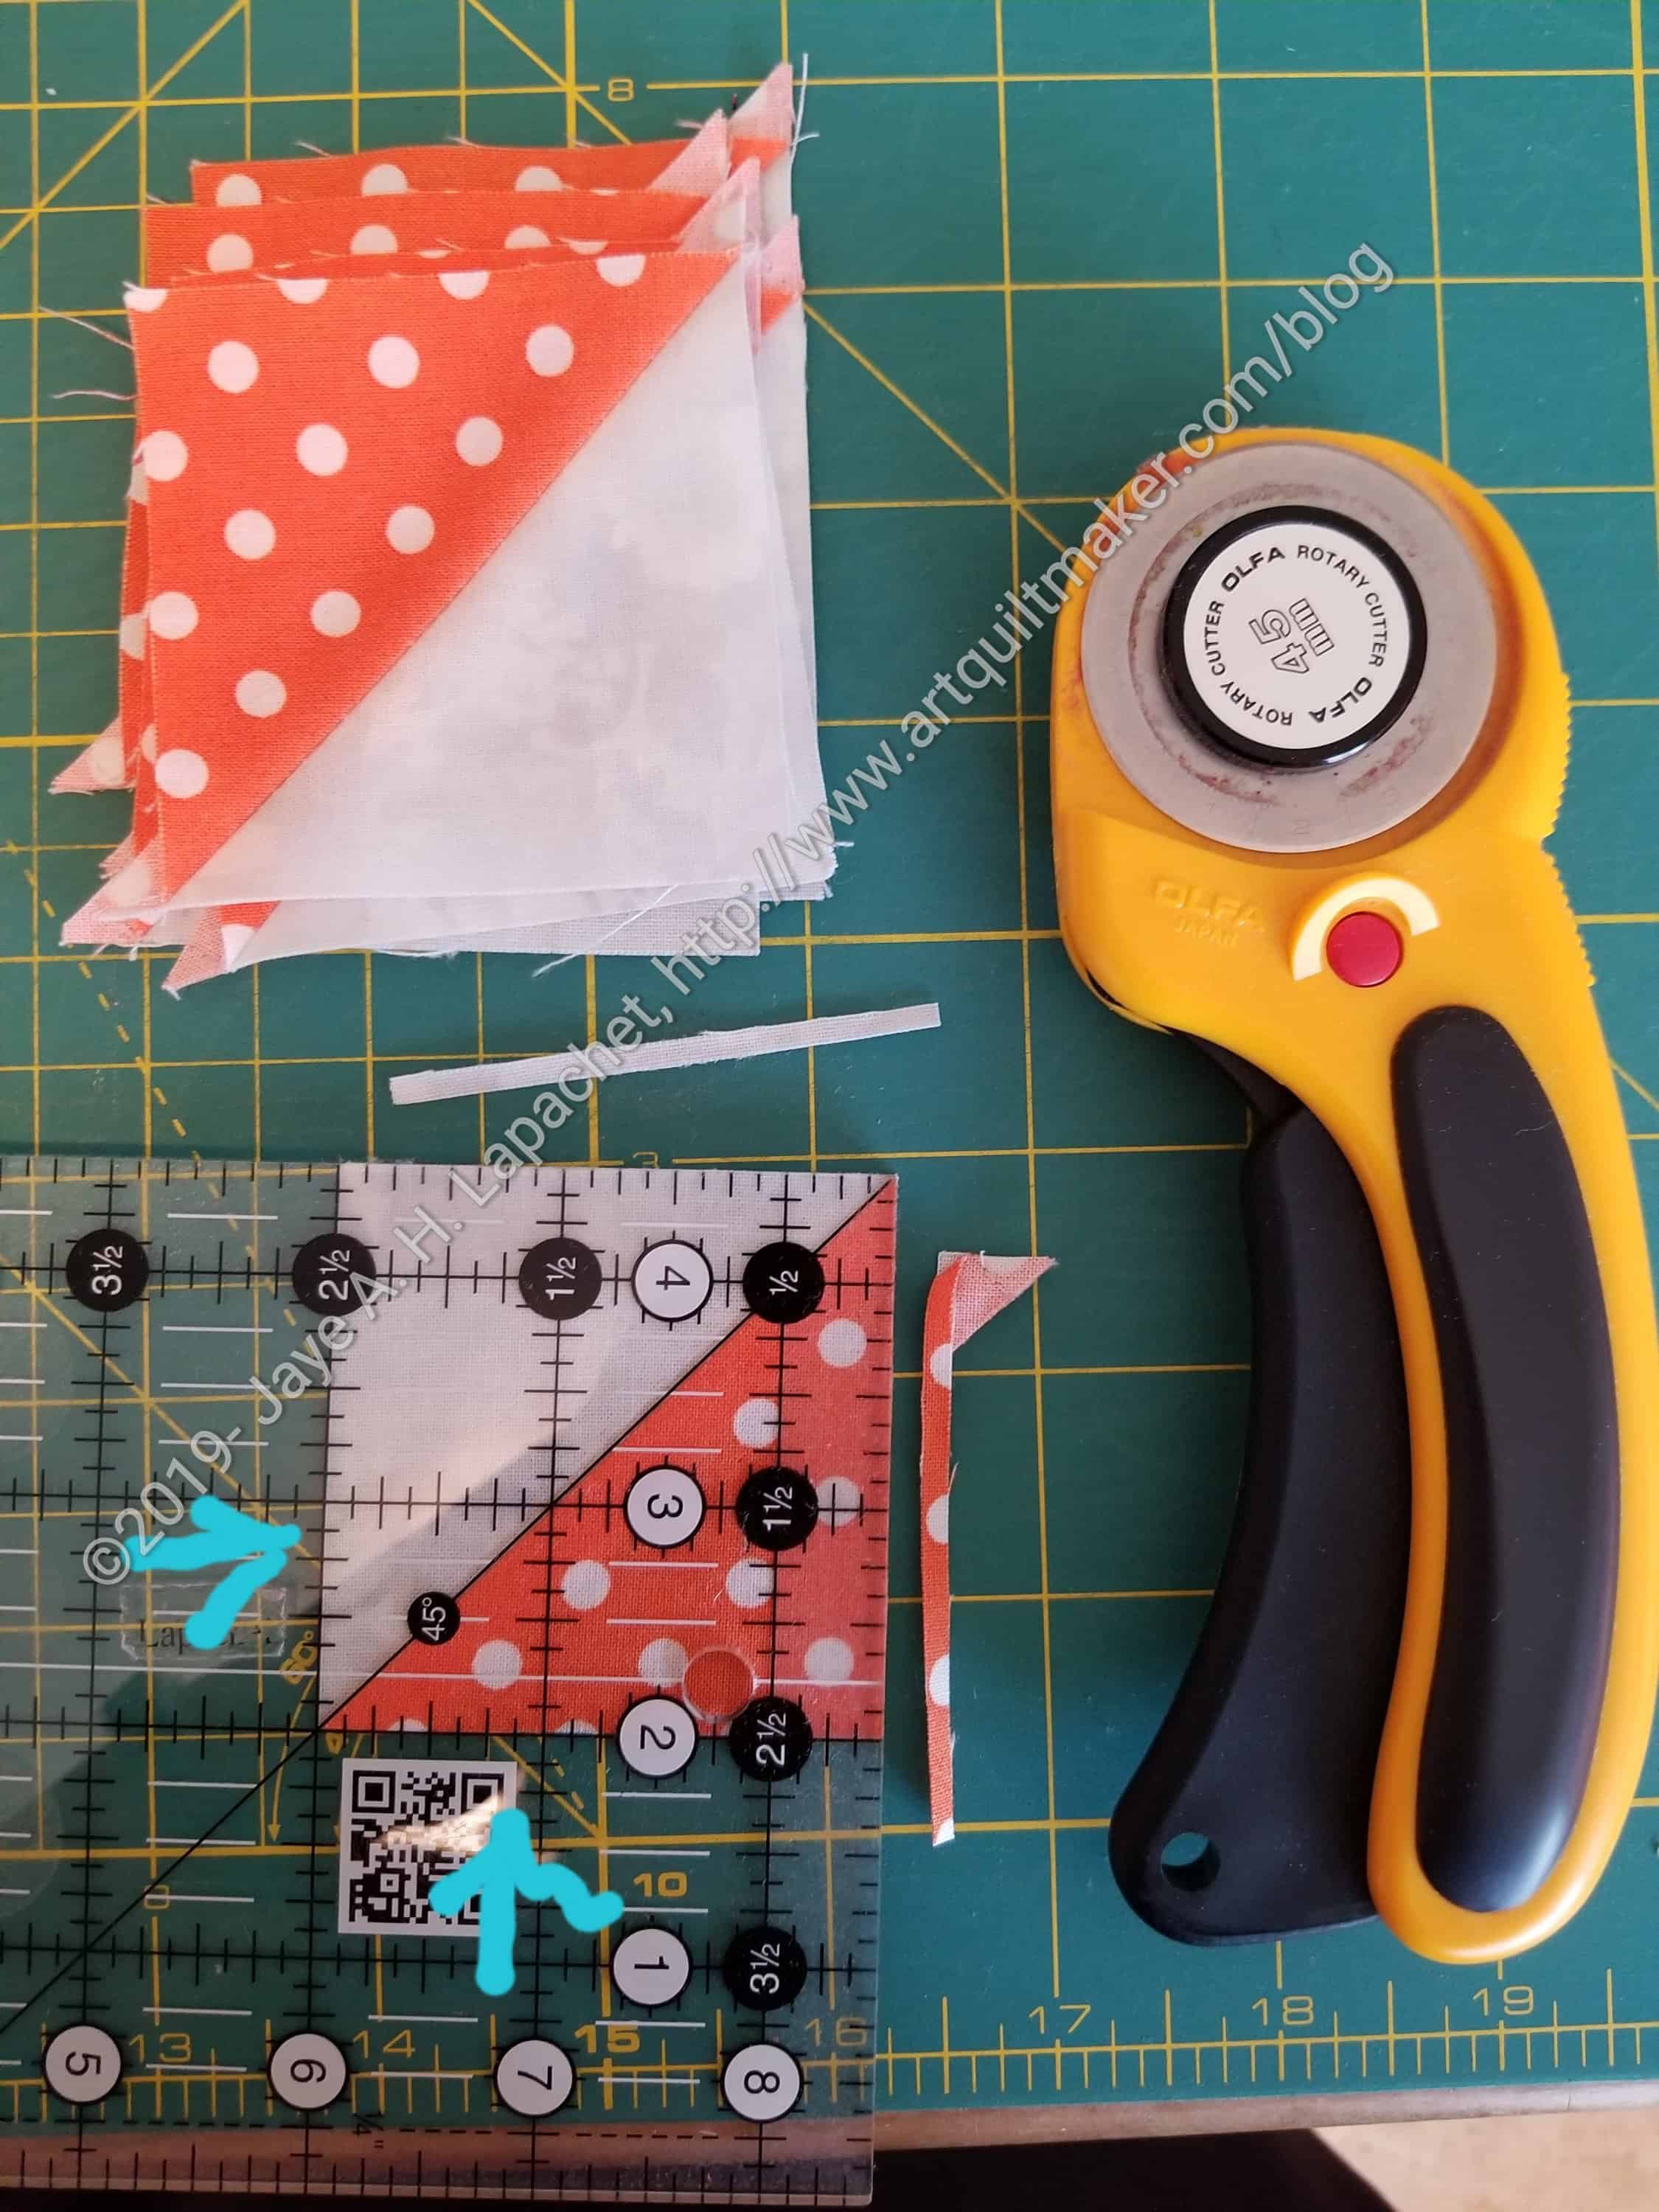
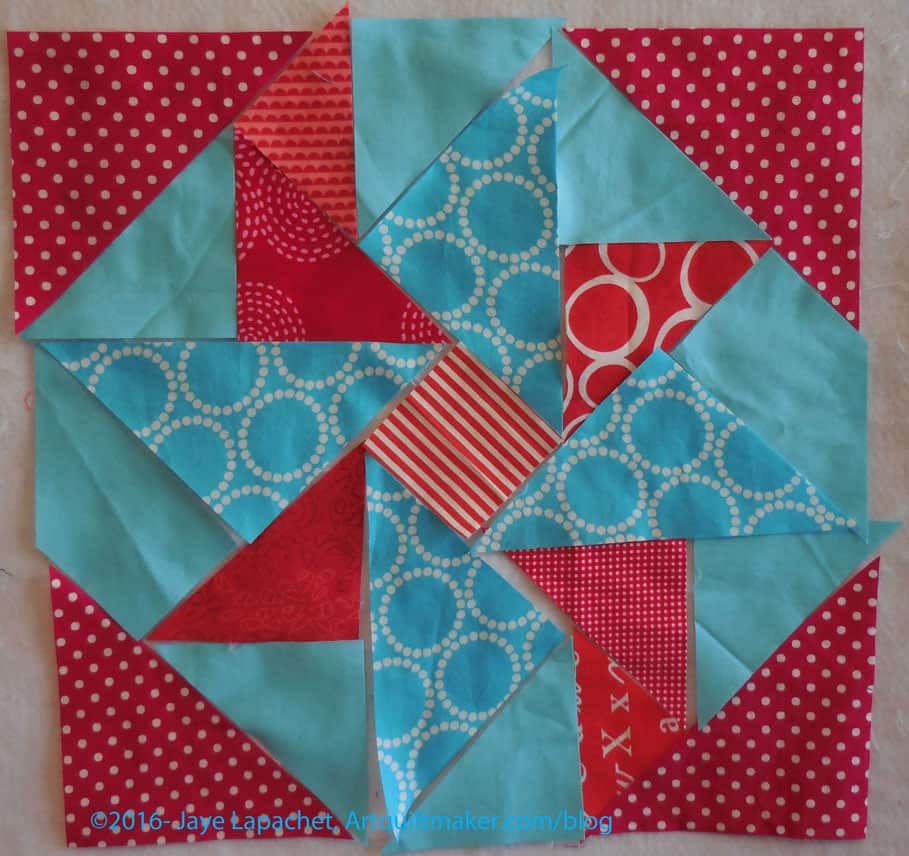
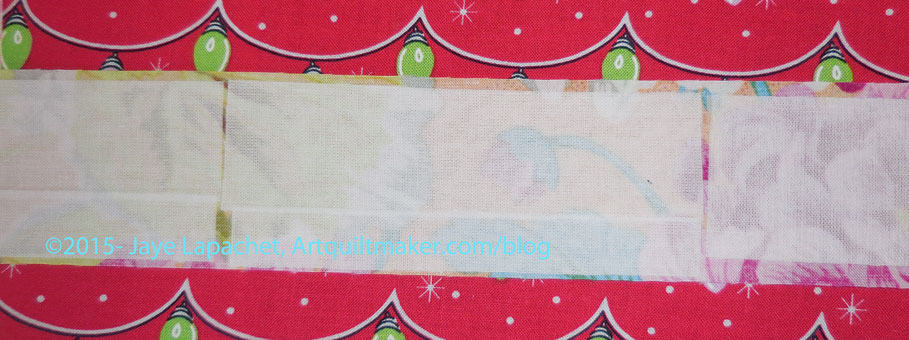
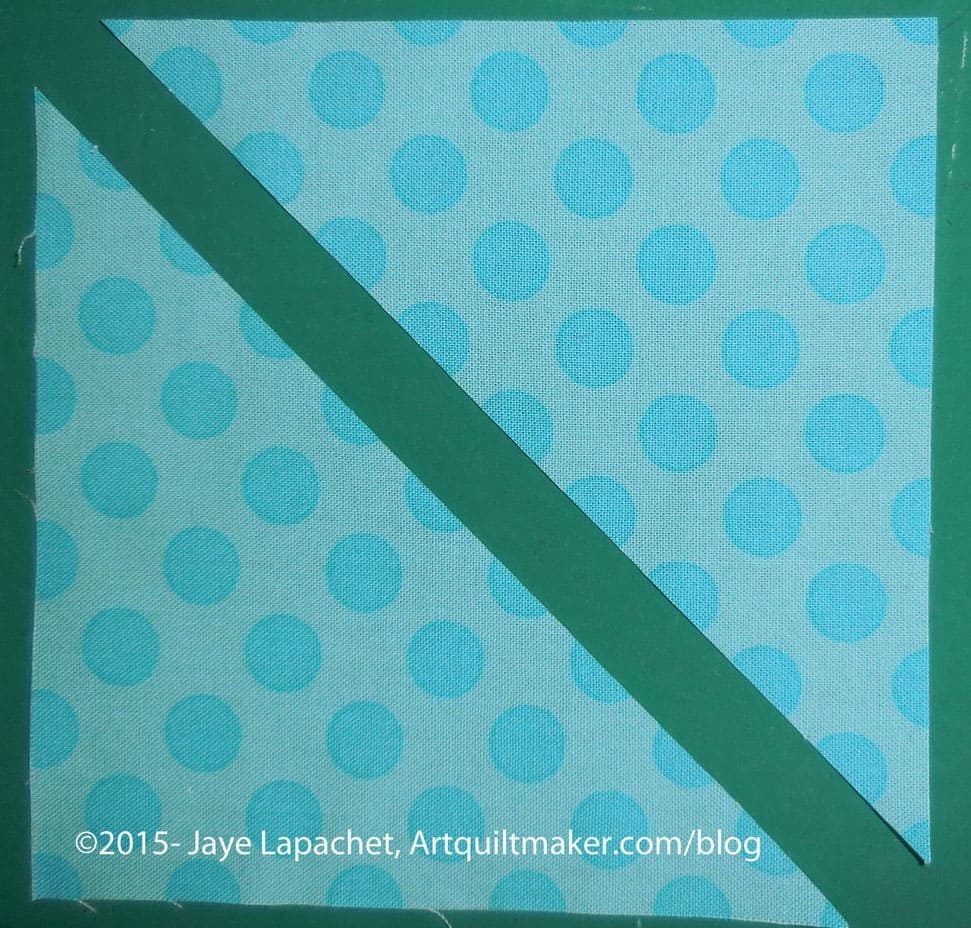
Two squares to join
First you need the two squares indicated in your pattern. I used a 6.5 inch square and a 3.5 inch square. These sizes came straight from the pattern. These sizes were one of three pairs of sizes I needed to make the quilt. I used the same process on all the sizes and it worked perfectly regardless of size.
My smallest sizes were 3.5 inch square and 1.5 inch square (for the corner). I was concerned that the 1.5 incher would be too small, but it worked just as well as the others. N.B. I did have to make sure that the small pieces did not get caught in my machine, but it was made easier because there were no dog ears. Doug Leko does have a mini version of the ruler** I mentioned, but I don’t have it and didn’t’ investigate the differences. I also noticed that Creative Grids has a ruler that purports to do the same thing**.
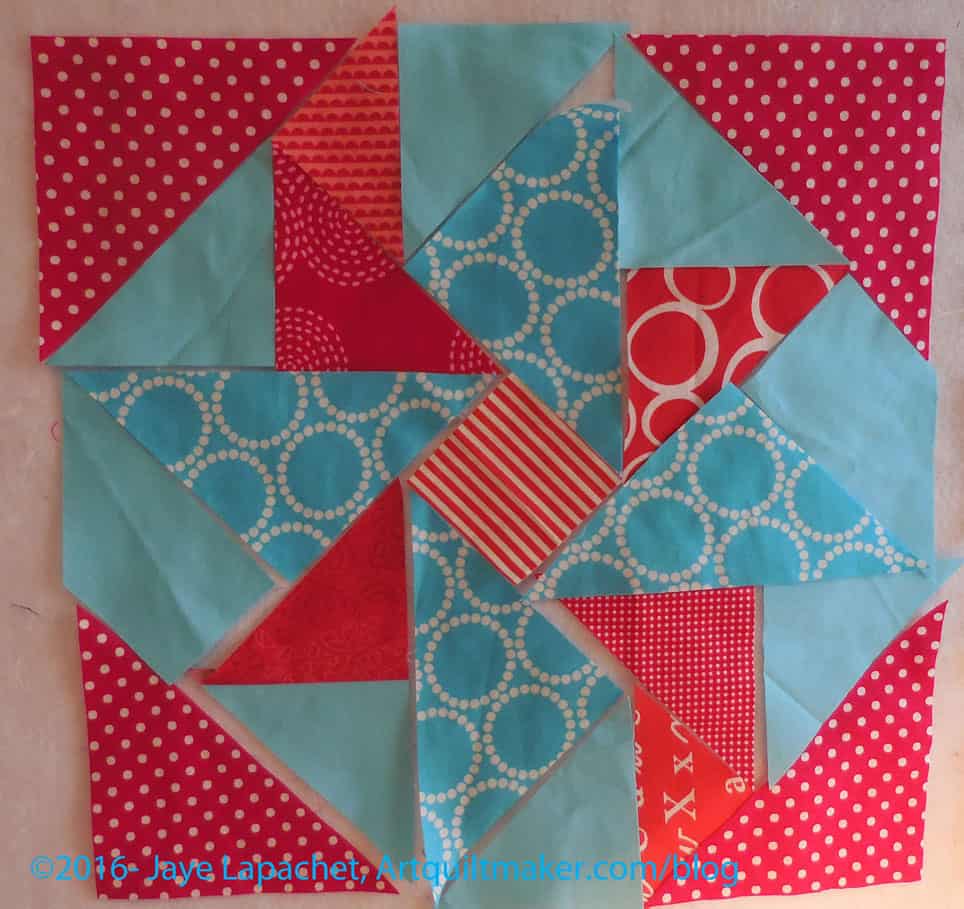
Line up two squares
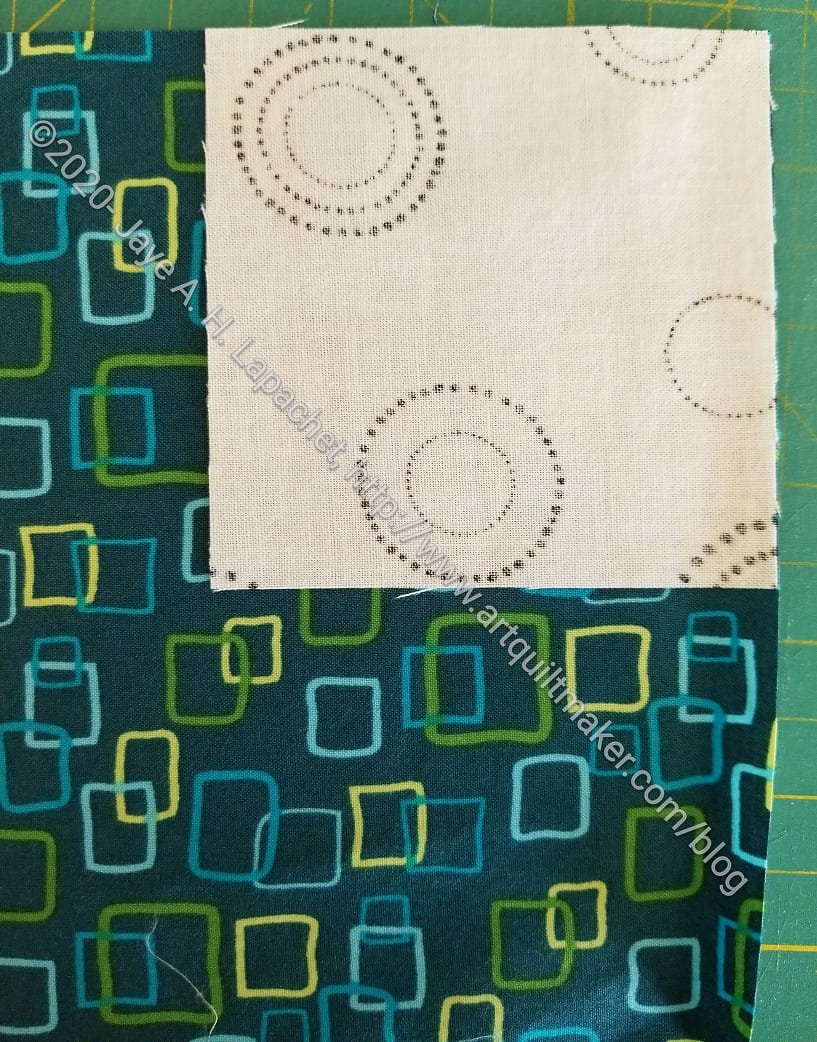
Make sure right sides are together. Line up your squares so the corners are straight. You do not want to see the bottom square on the top or right when the pieces are lined up.
The above step requires fairly accurate cutting. By that I mean your square should be square.
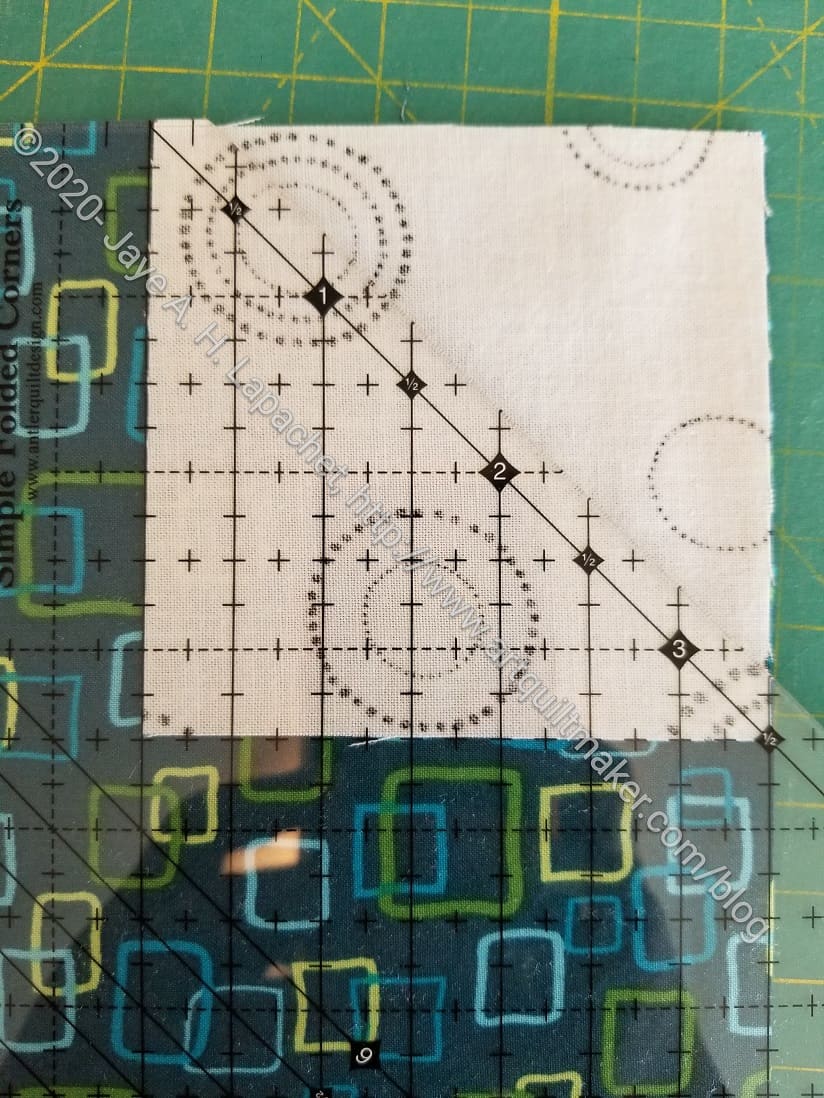
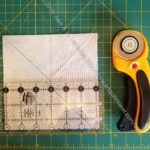
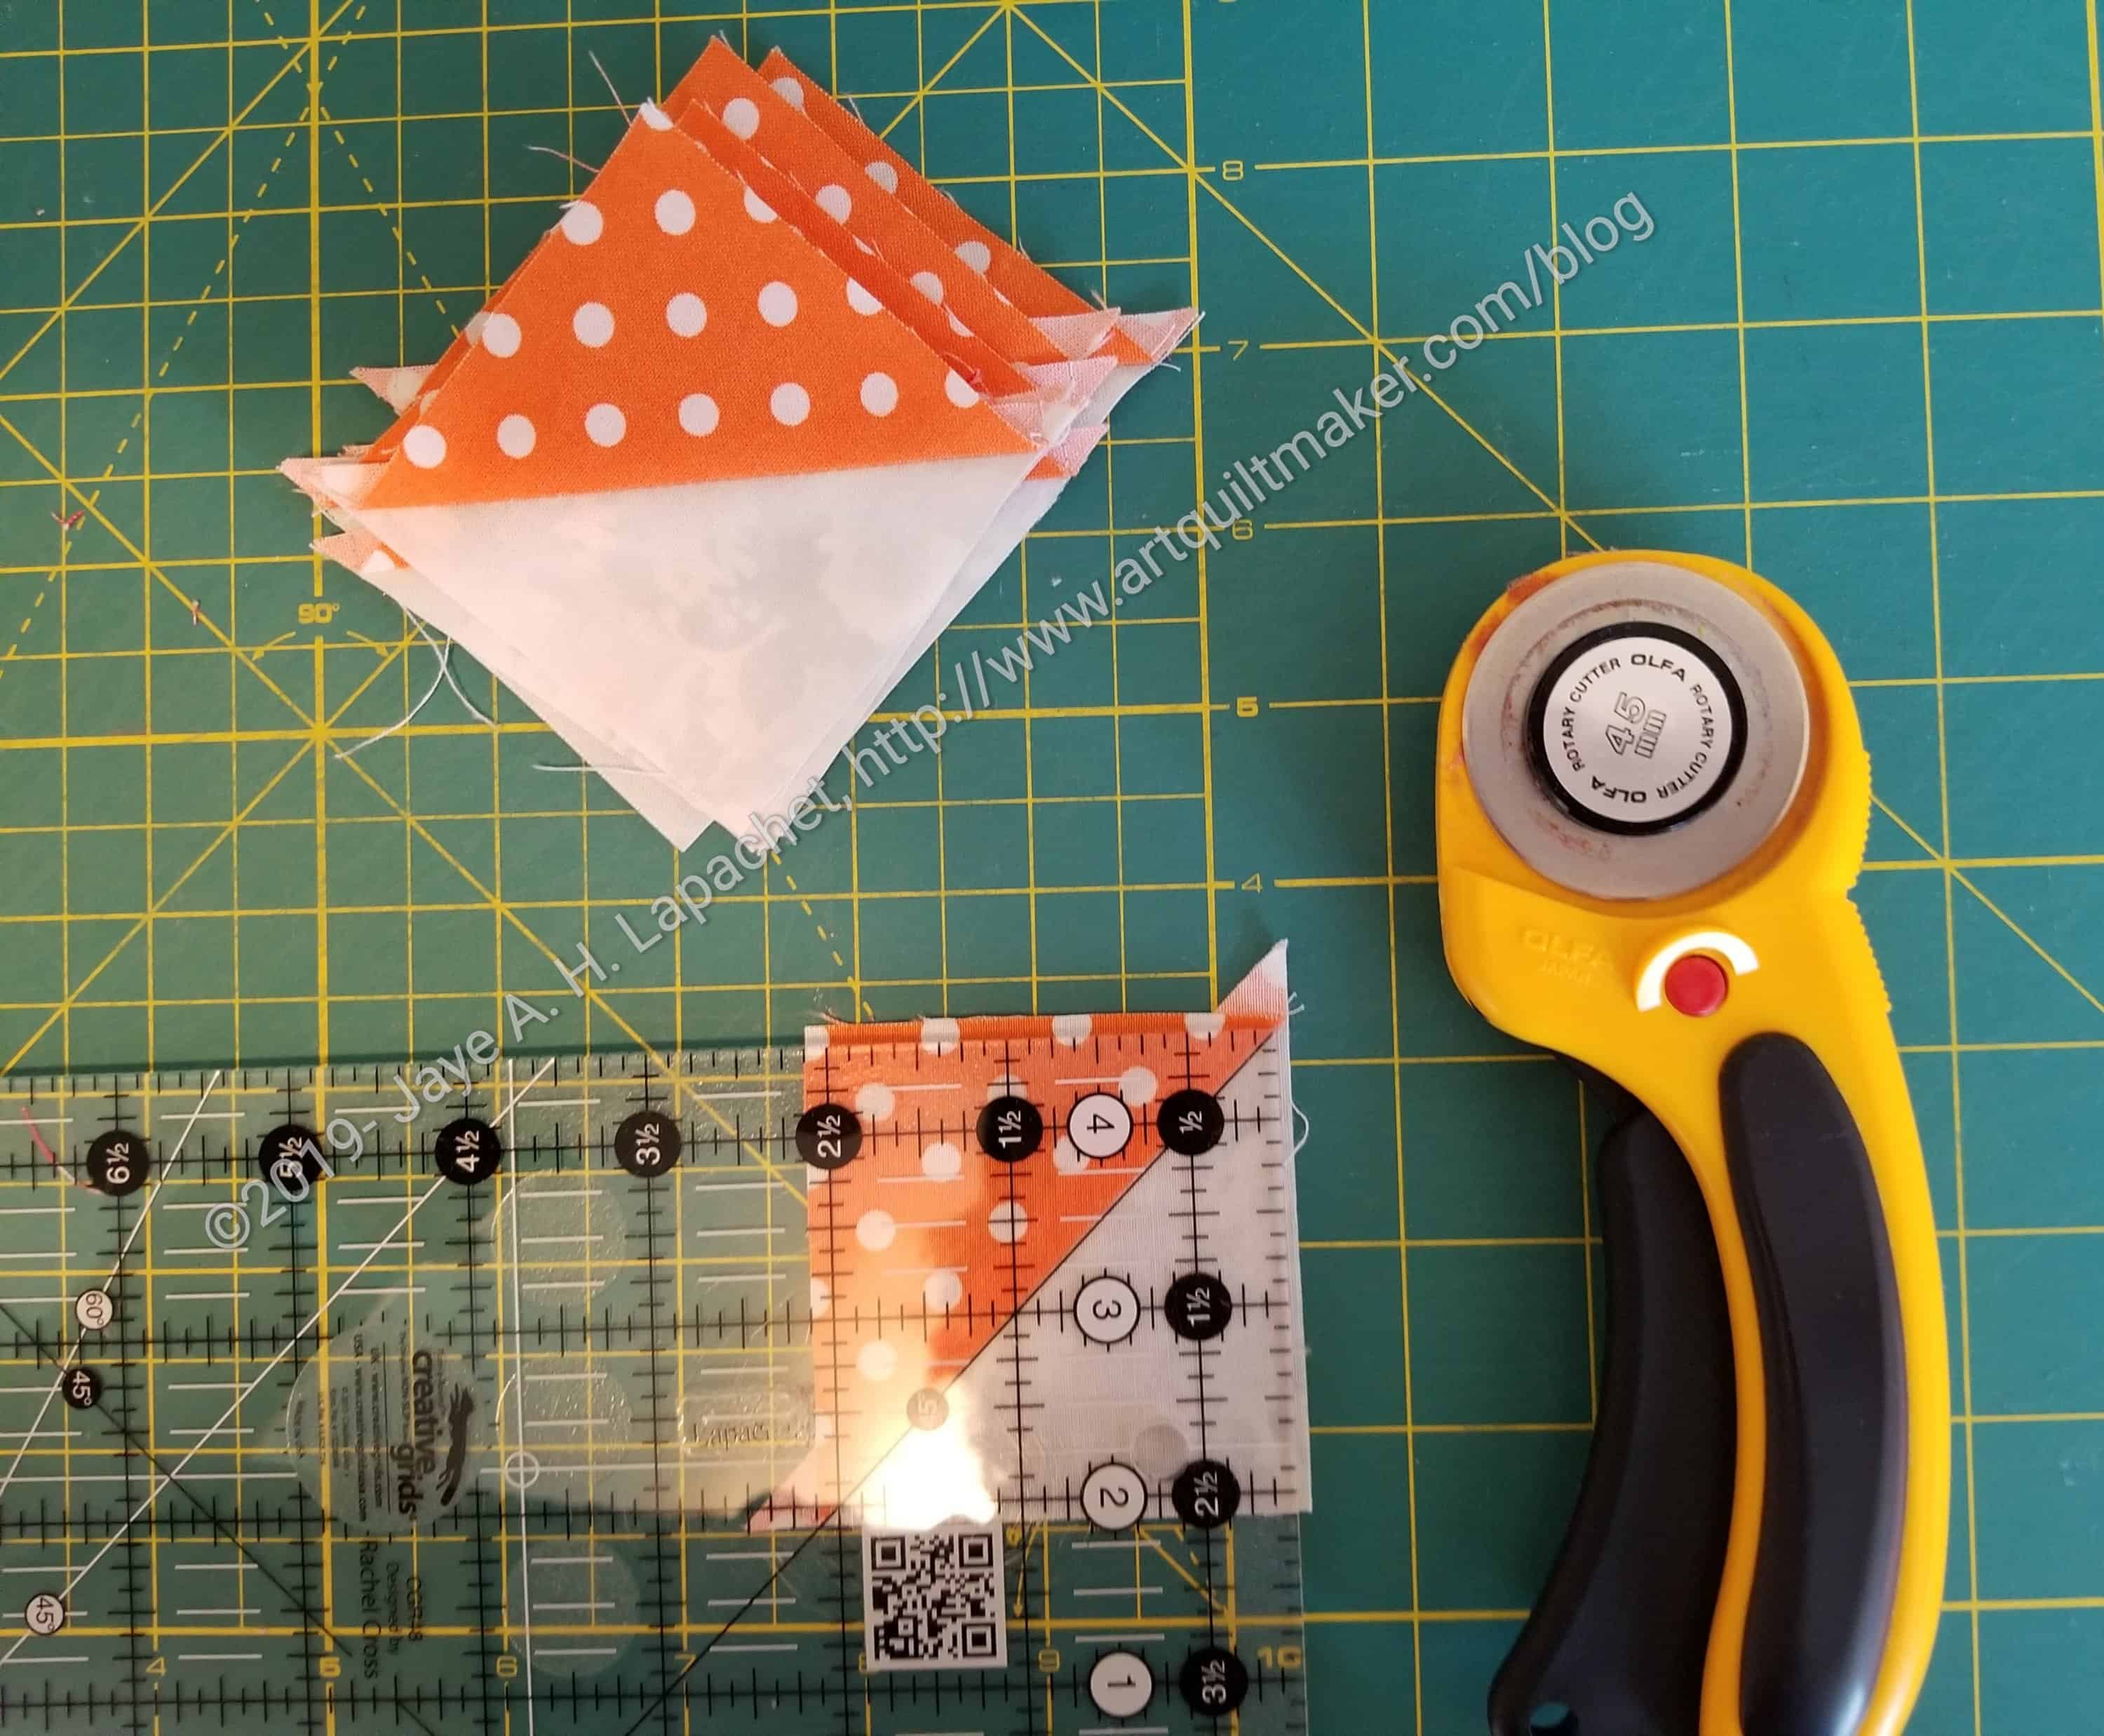
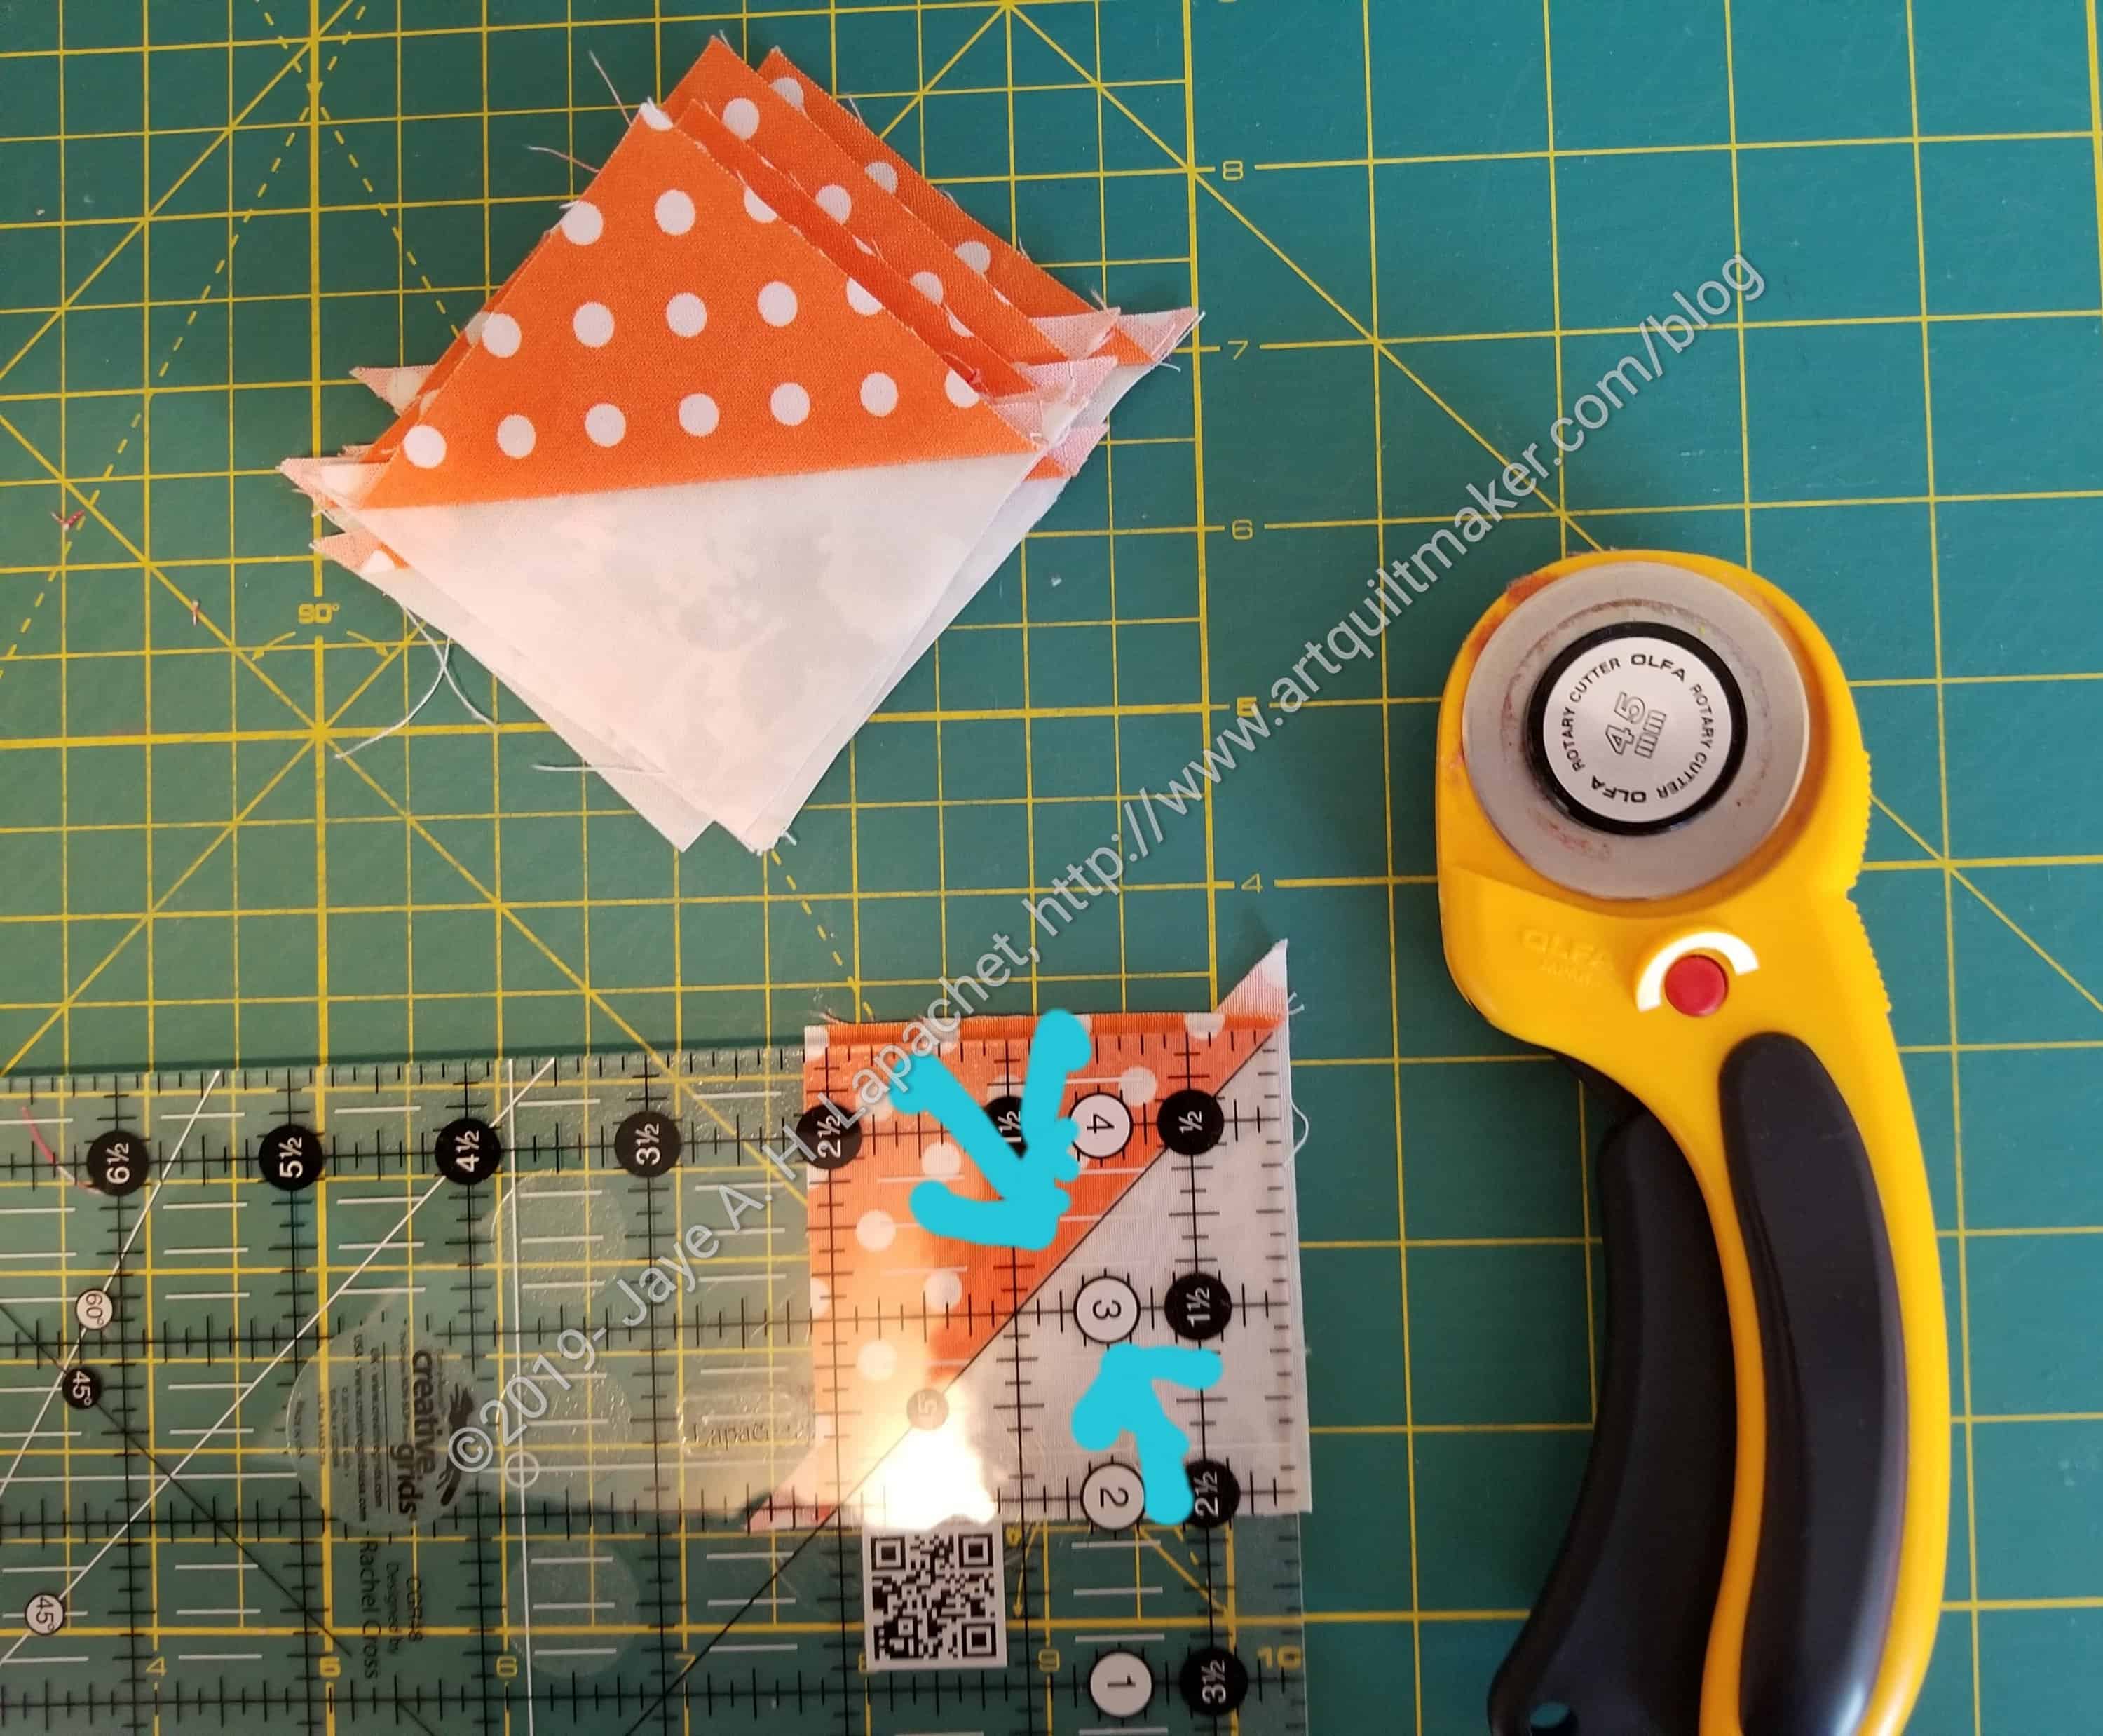
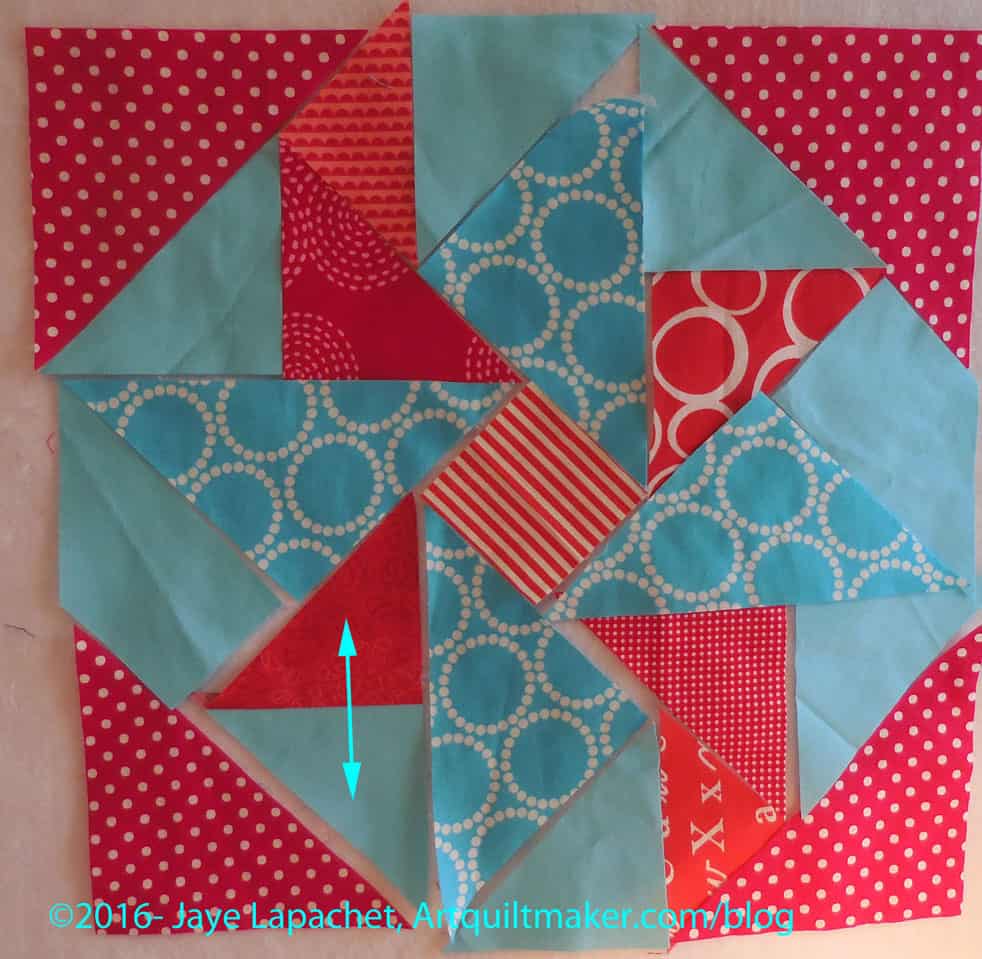
Line up ruler
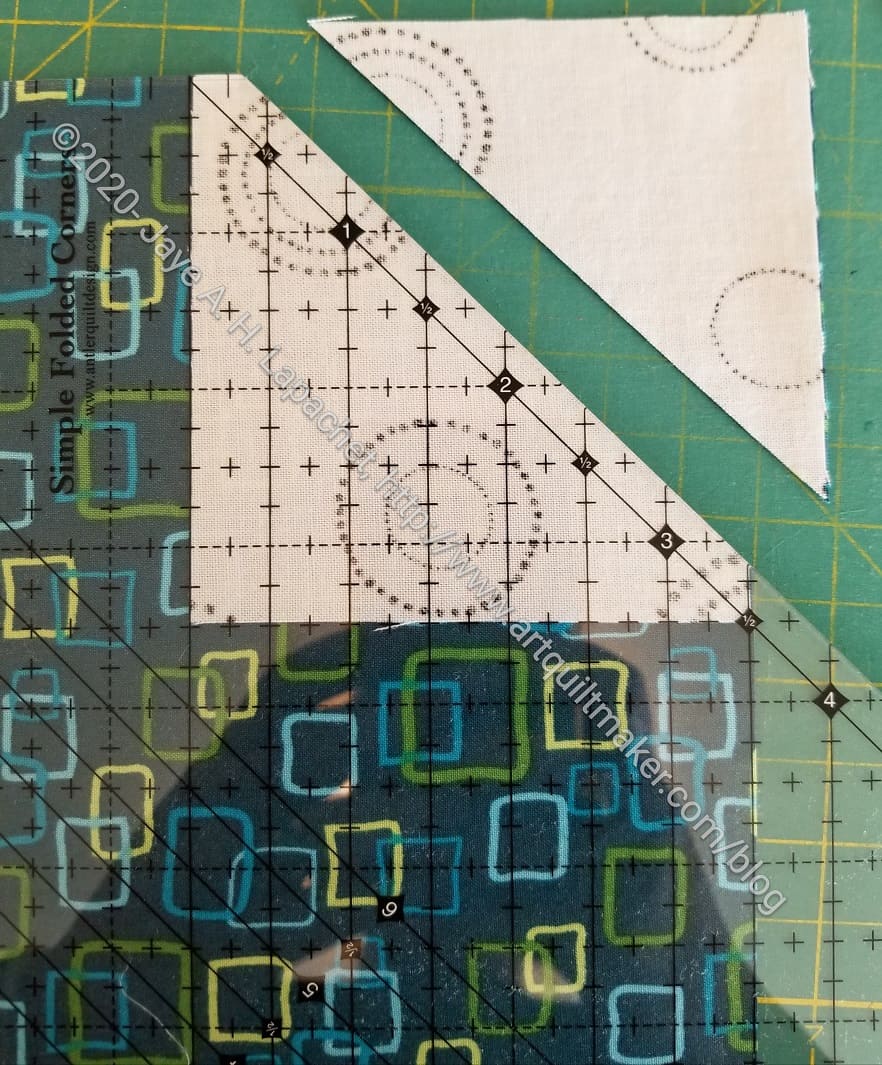
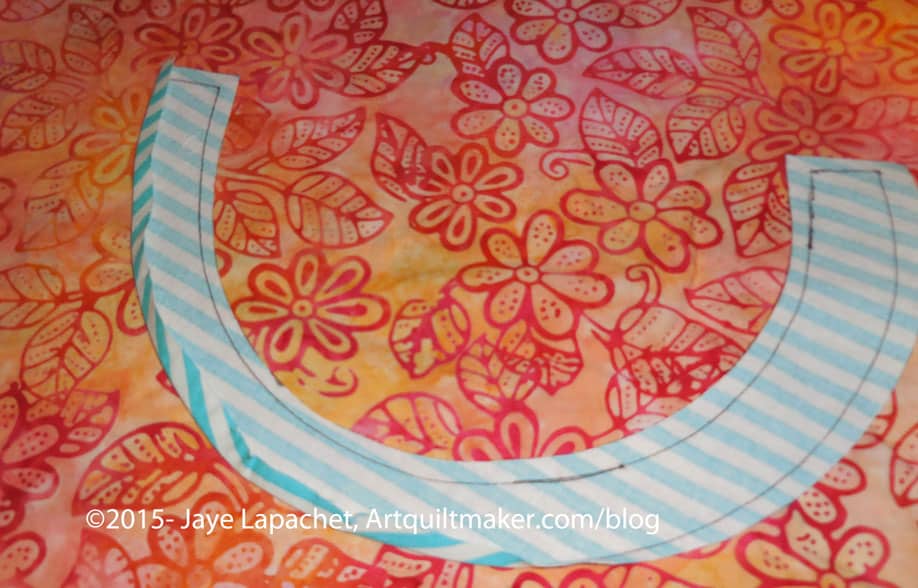
Place the ruler** on the two squares. Line up the solid line on the left and the XX line on the bottom with your top square.
Lines to use
When you line up the ruler, there is a solid line on the left. It is the first solid line on the left and connects with the diagonal line. This is the line you place on the left side of the smaller square. The diagonal line should be corner to corner.
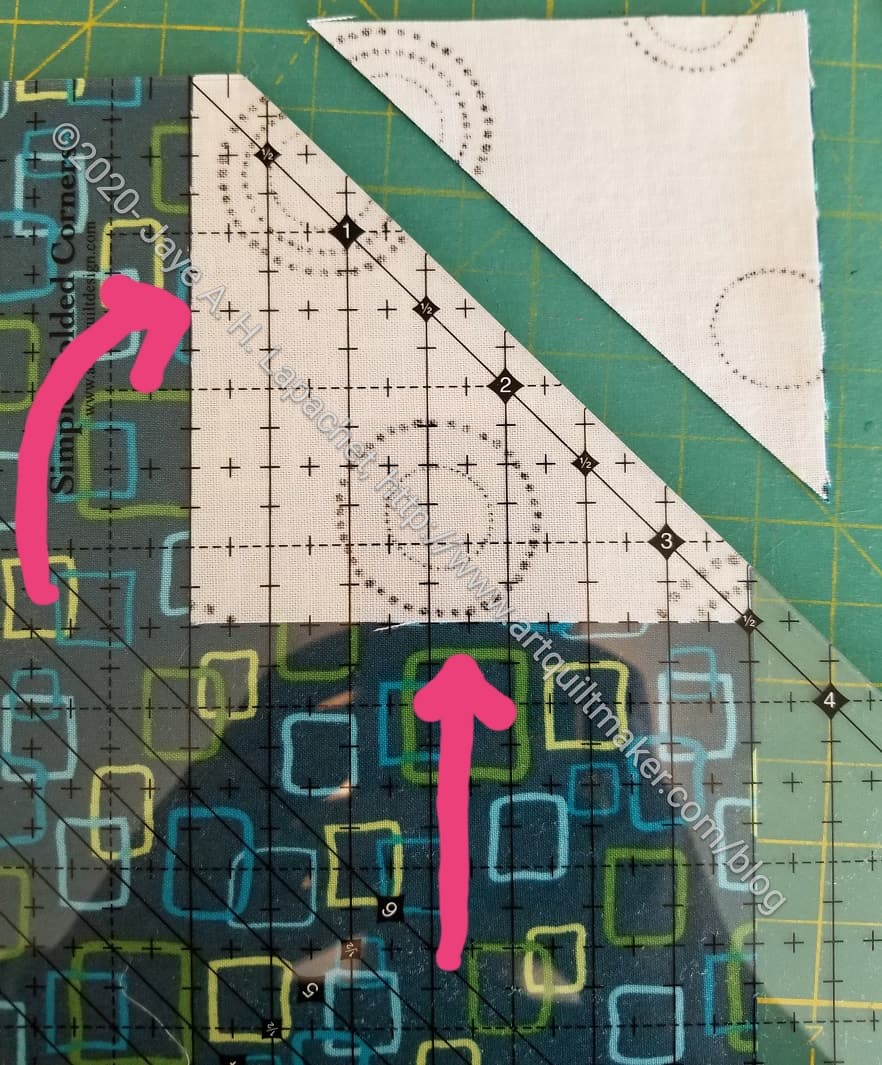
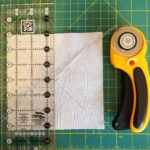
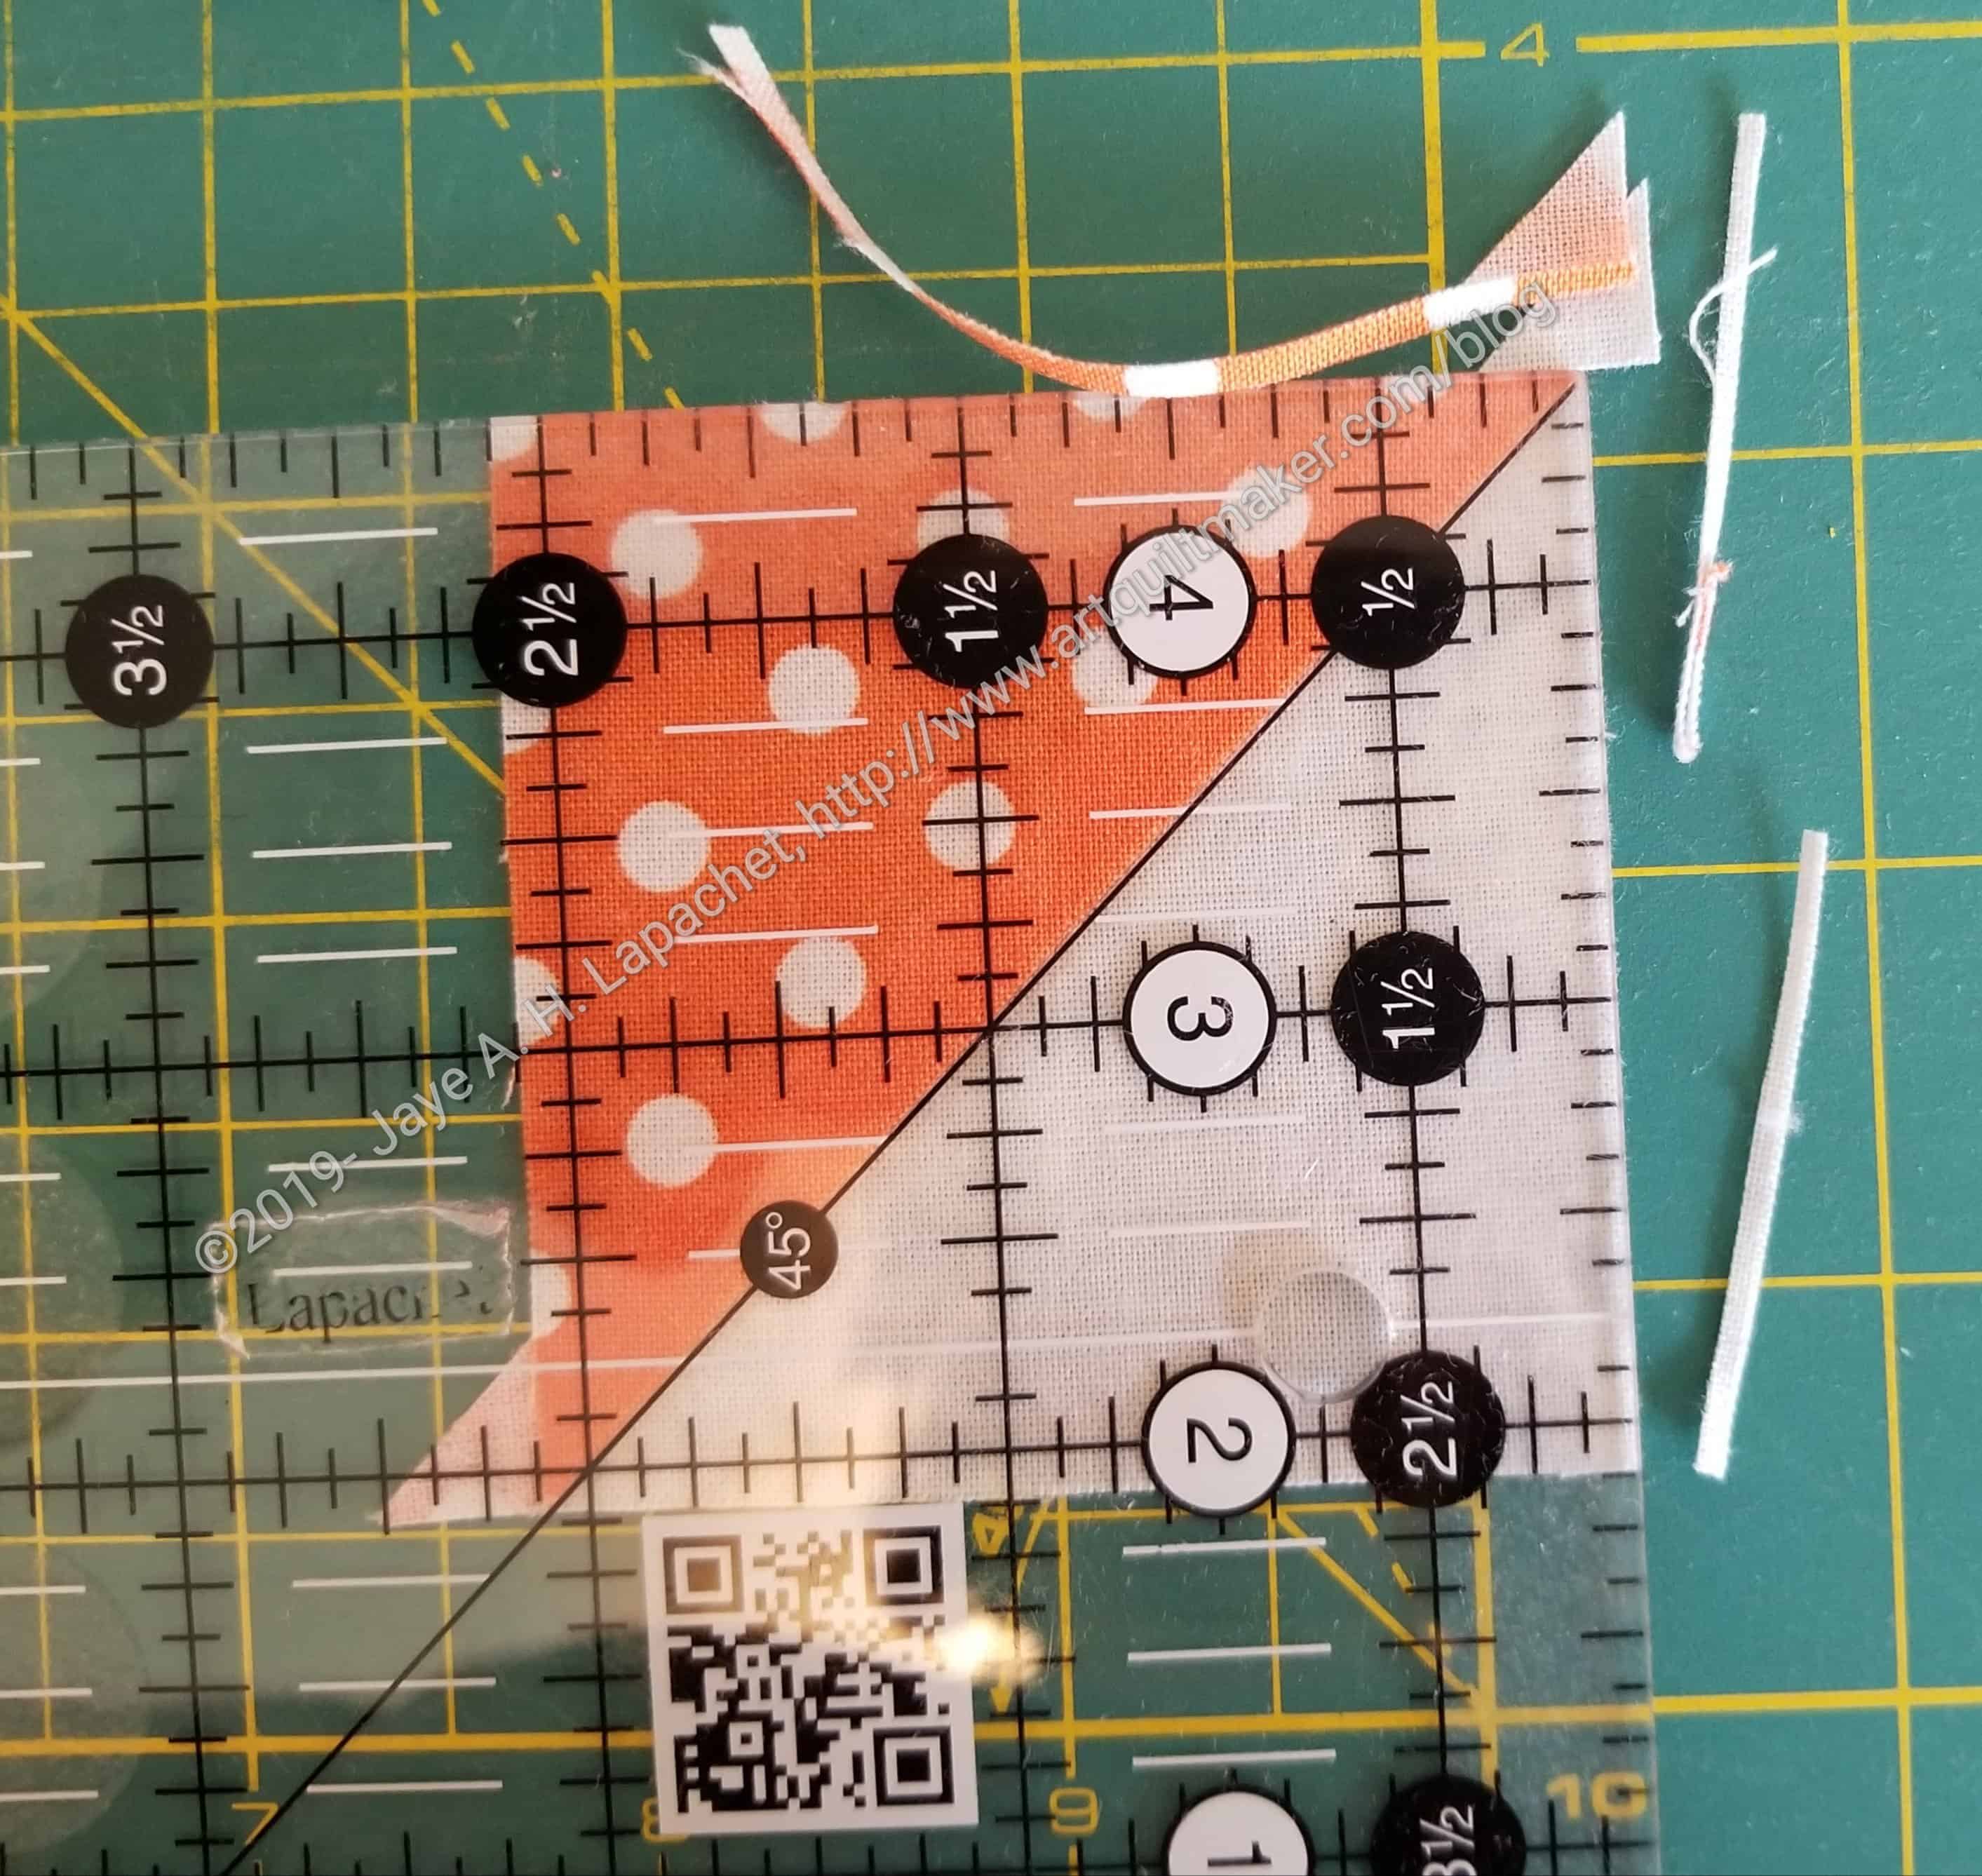
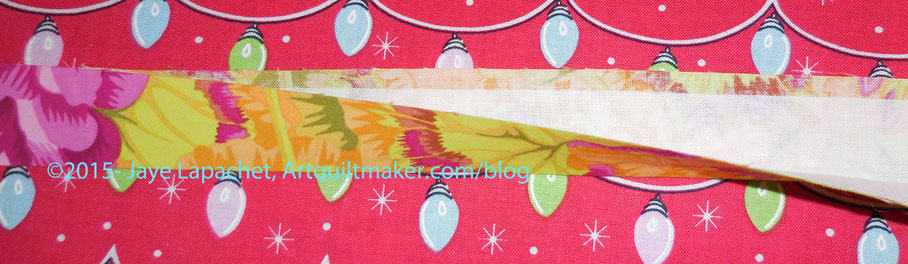
Cut on the diagonal
Cut on the diagonal. The ruler includes the diagonal seam allowance. This is a great feature of the ruler so you don’t have to guess where to sew like you do when drawing a diagonal line. Also! No drawing of diagonal lines. I have a lot of corners to add for the X quilt so this is a bonus. It saves me a little time.
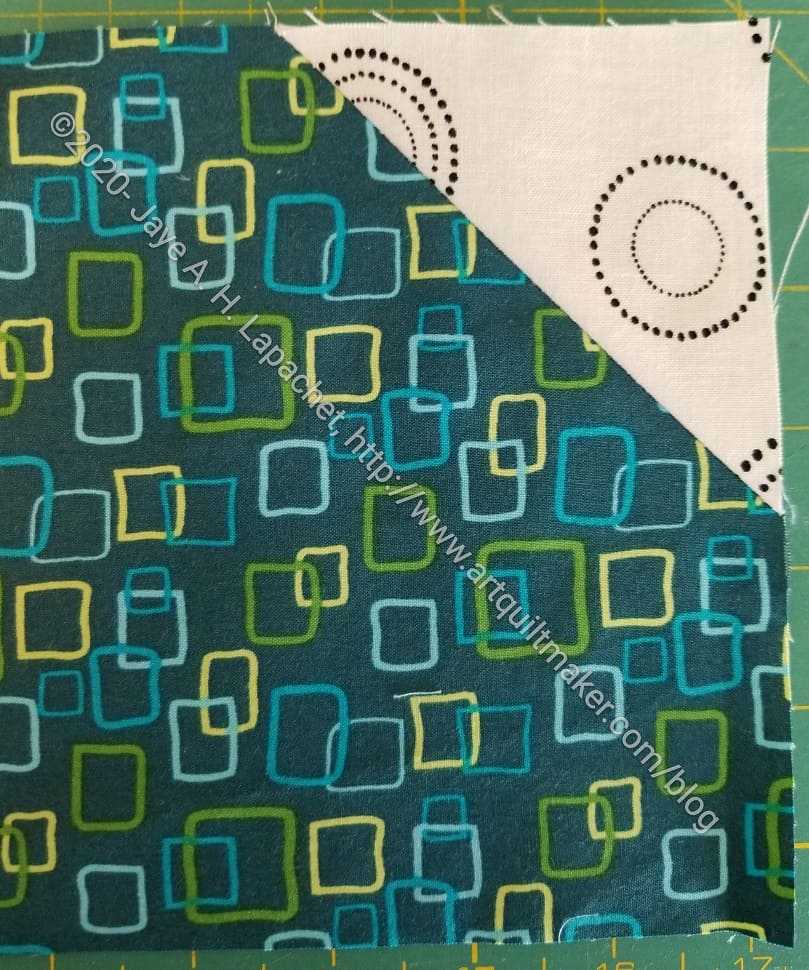
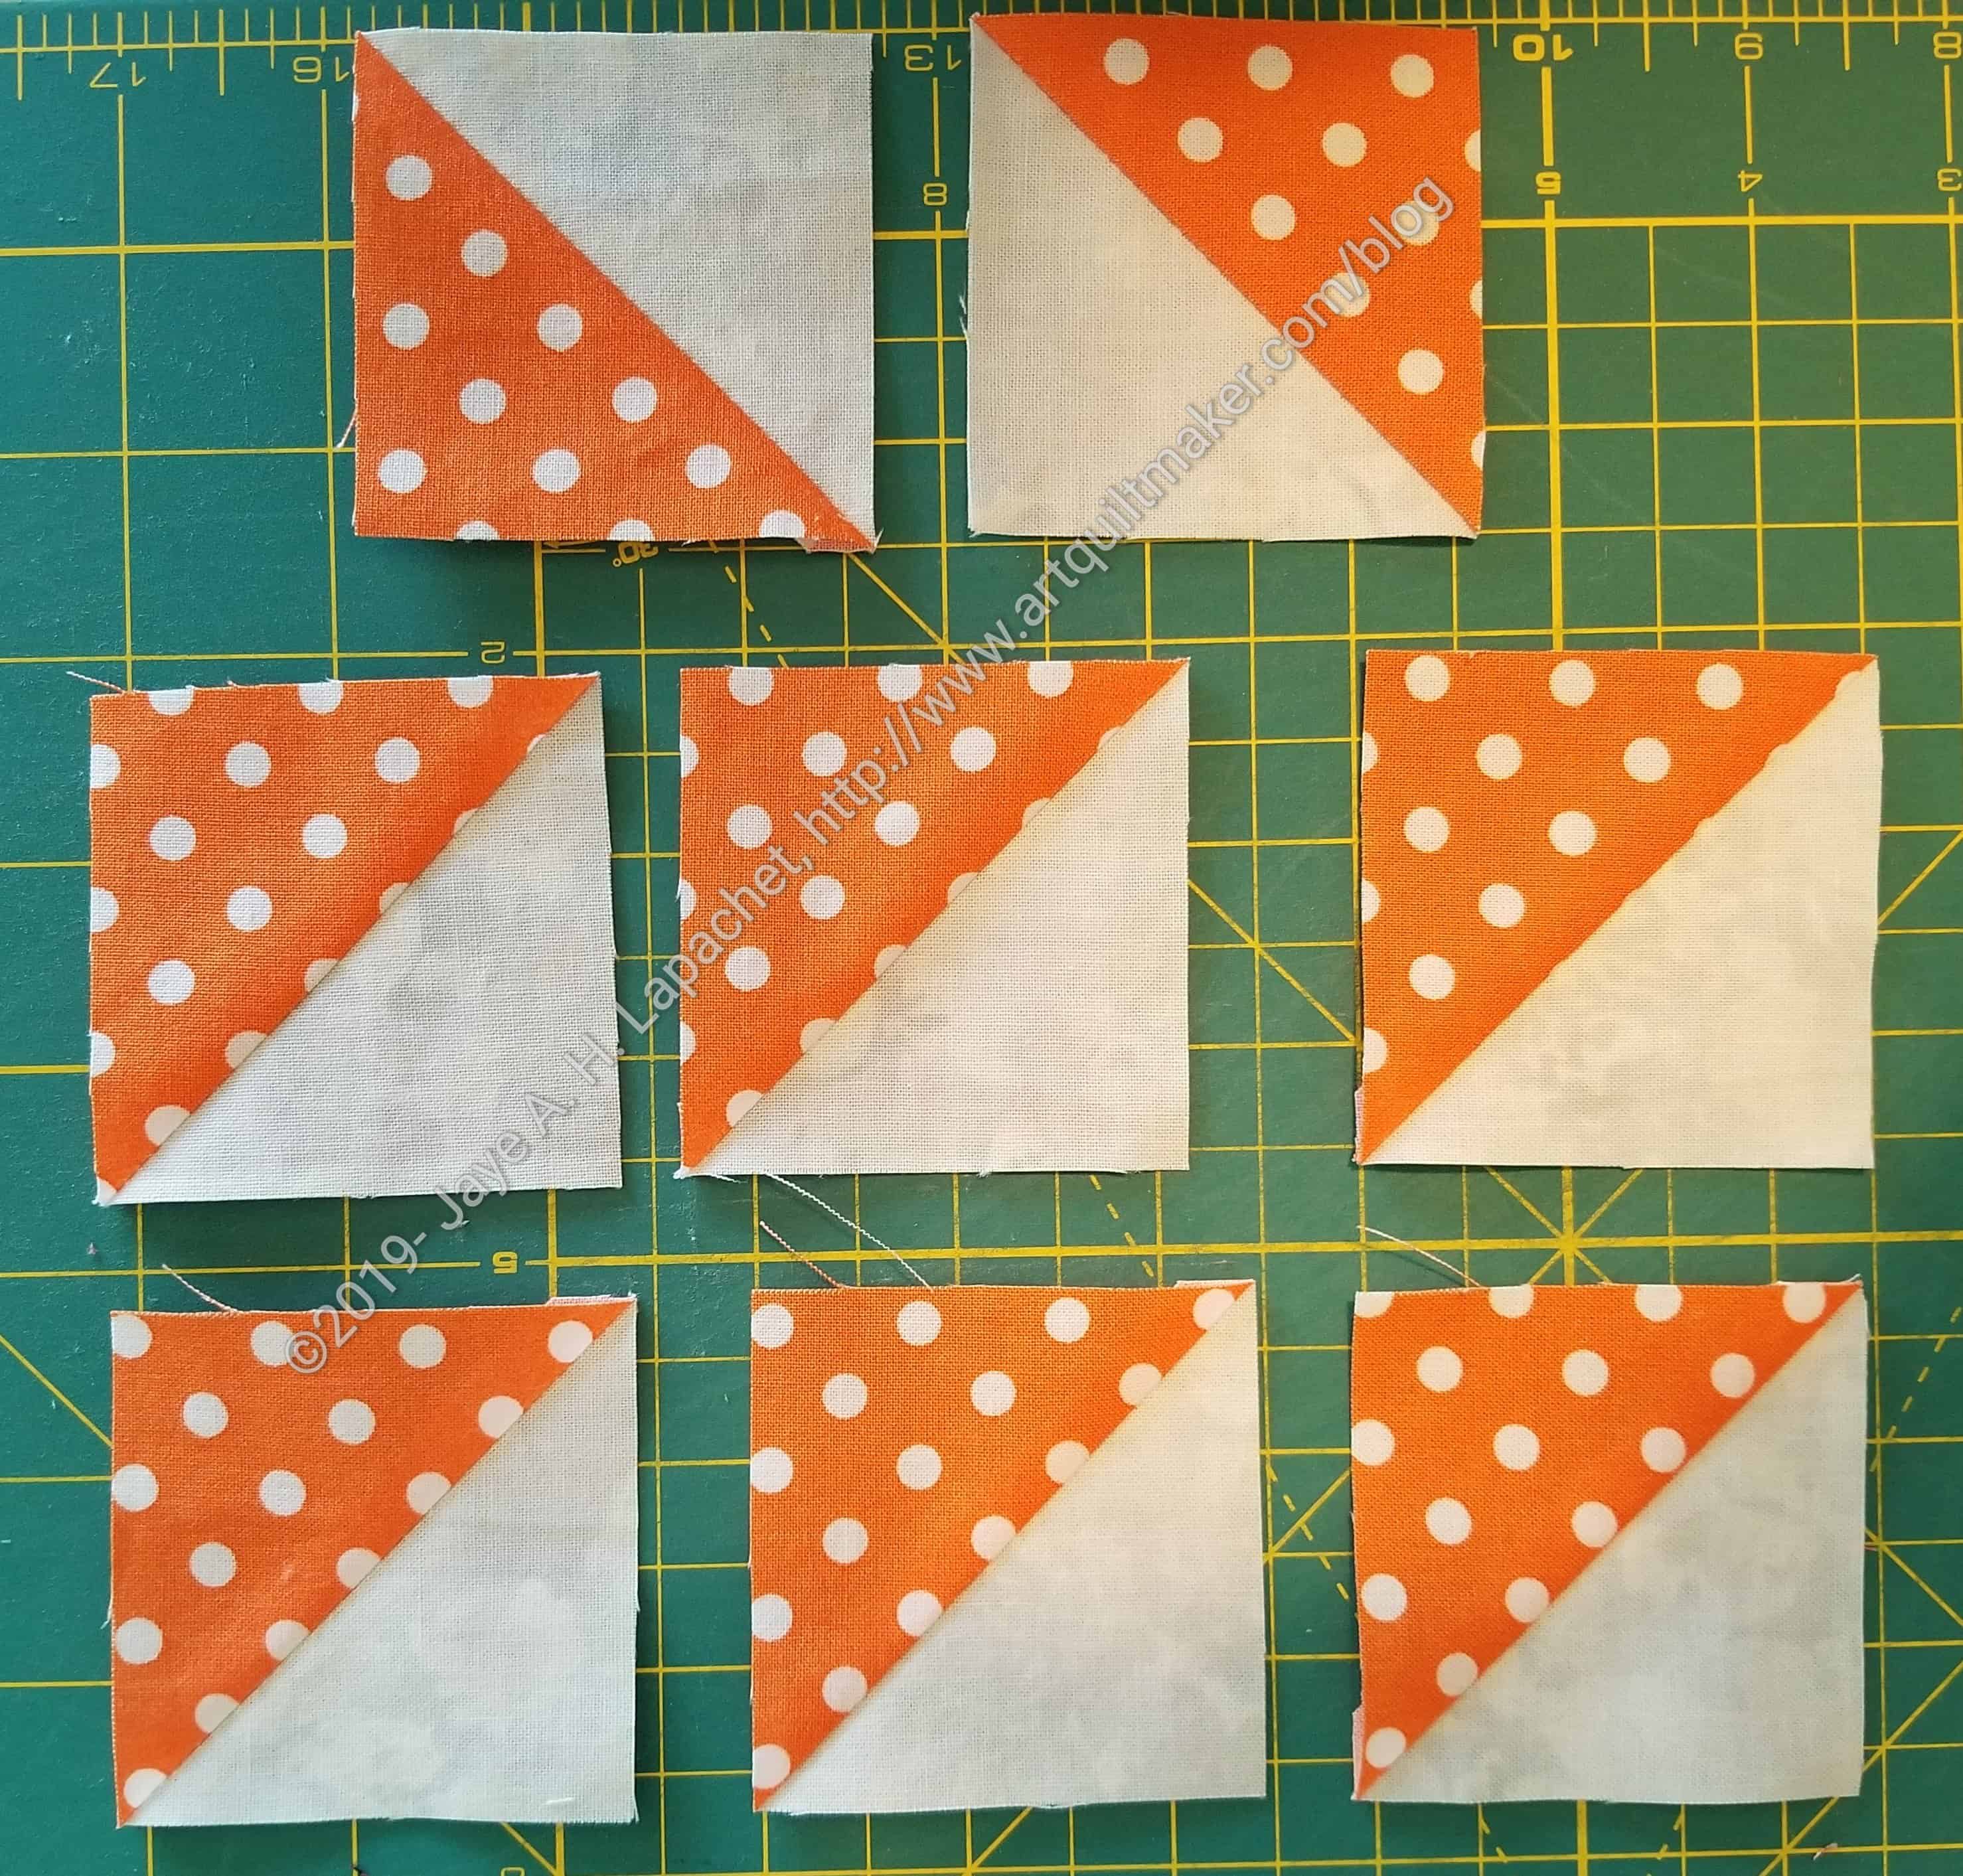
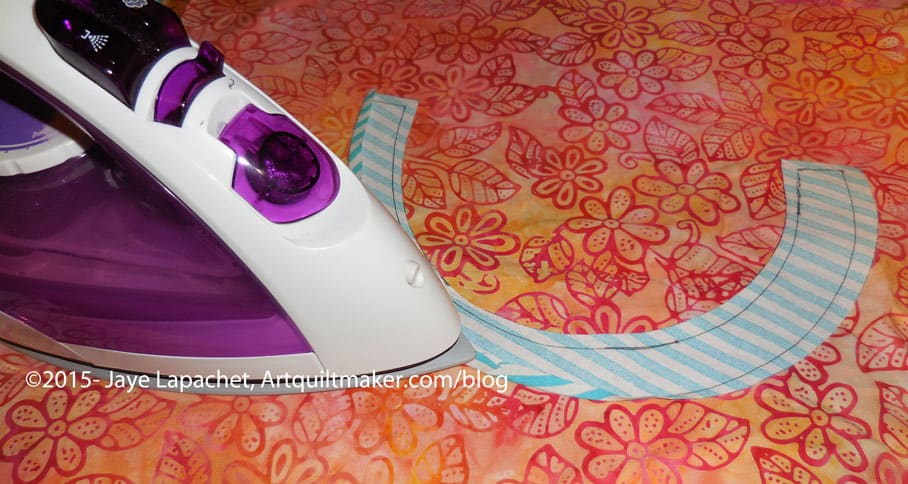
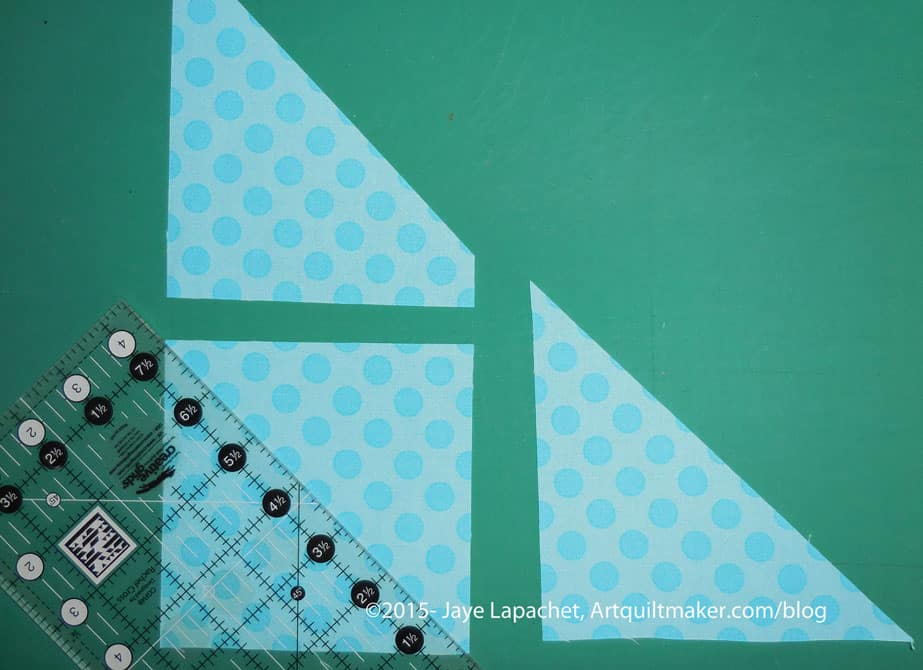
Pin then sew
I like to pin, then I sewed along the diagonal.
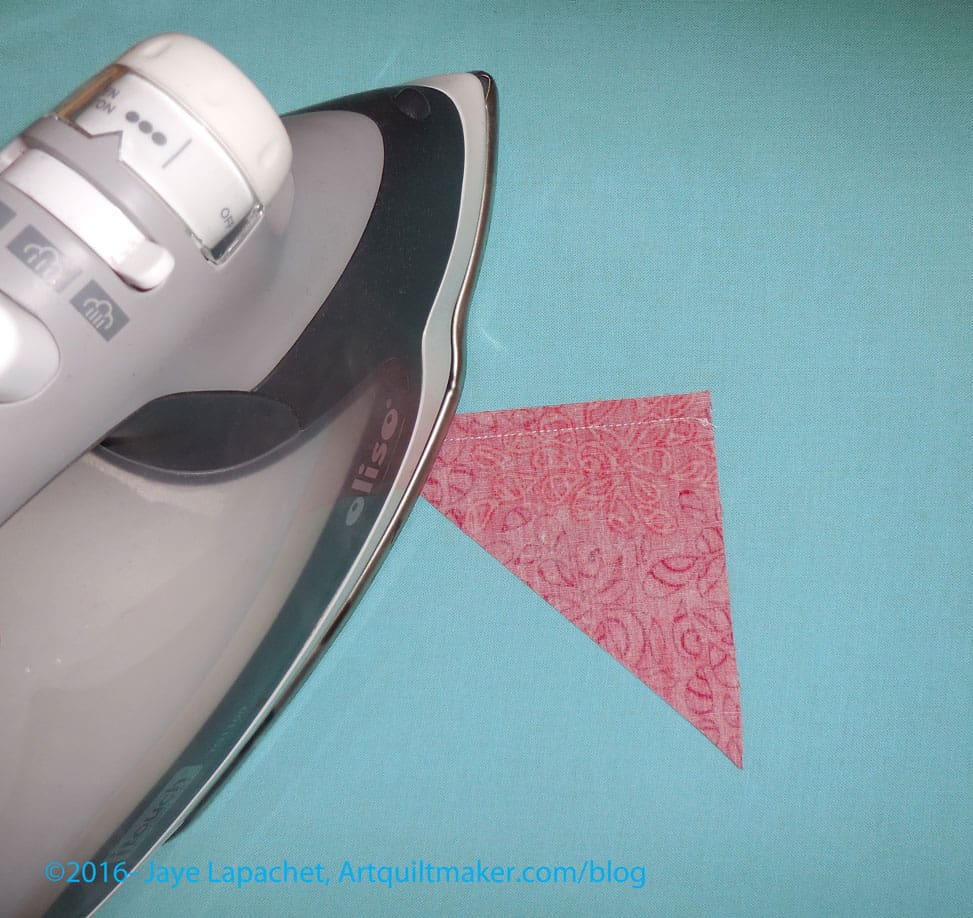
Press.
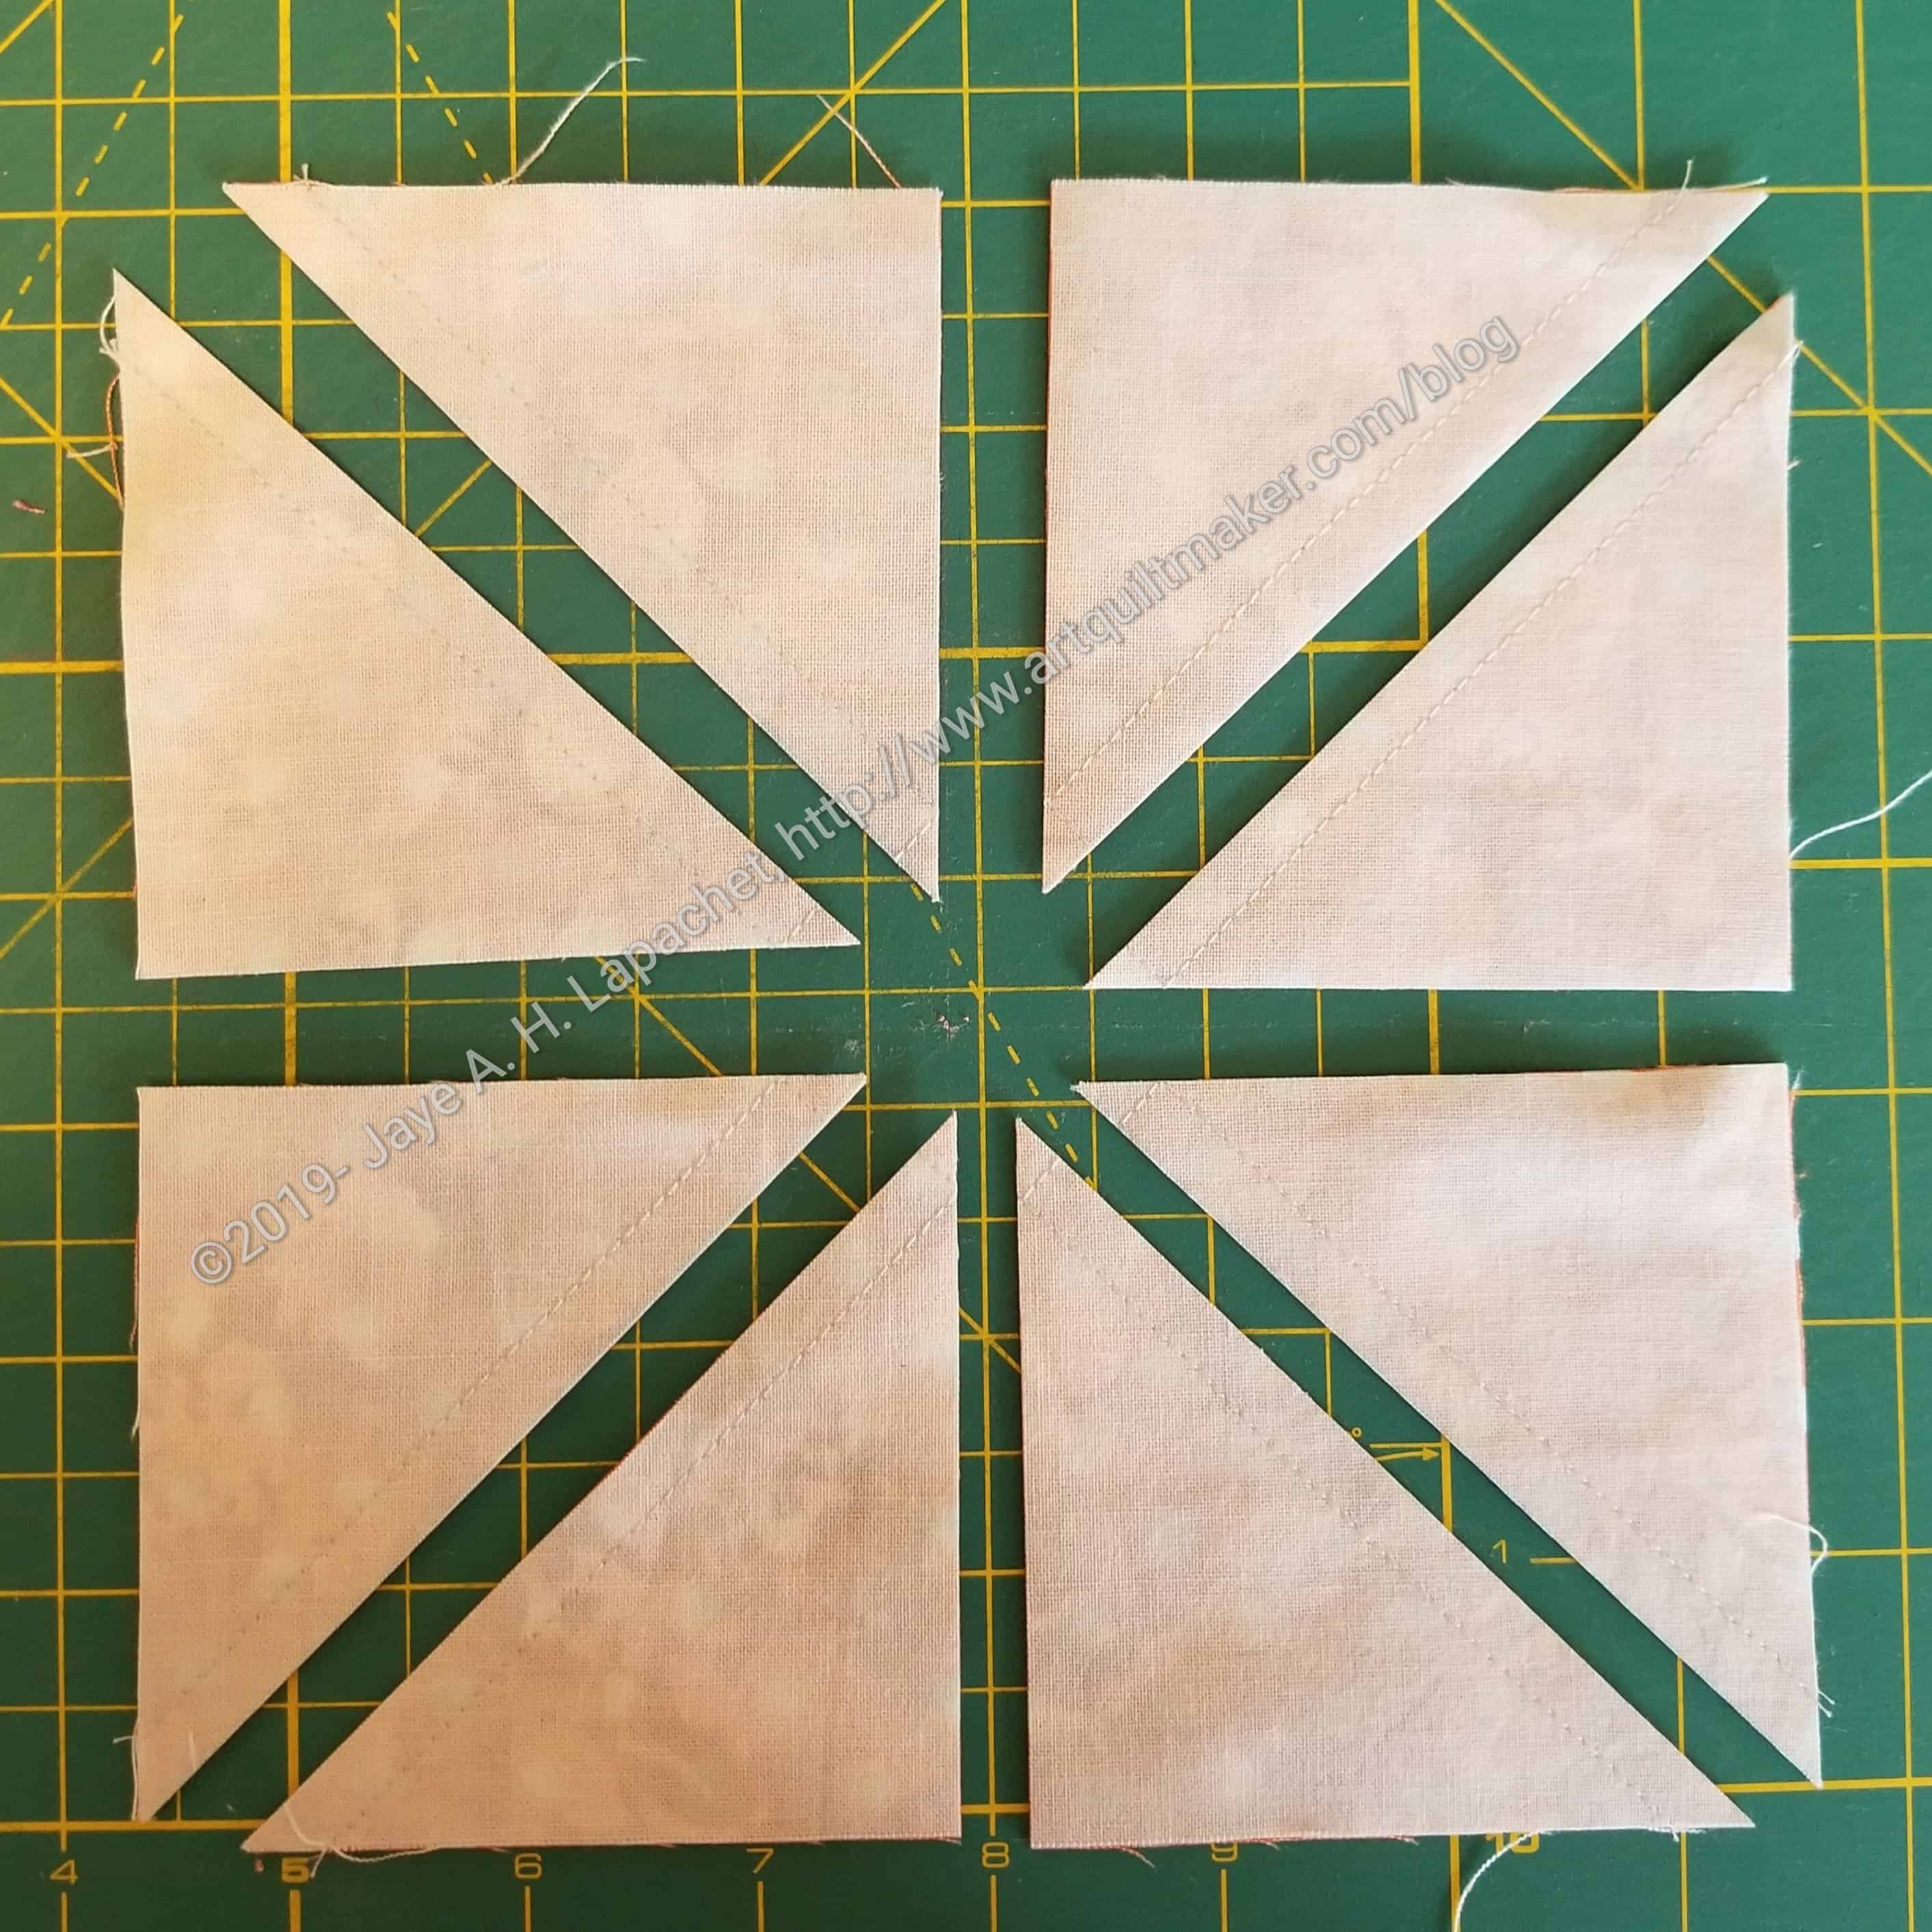
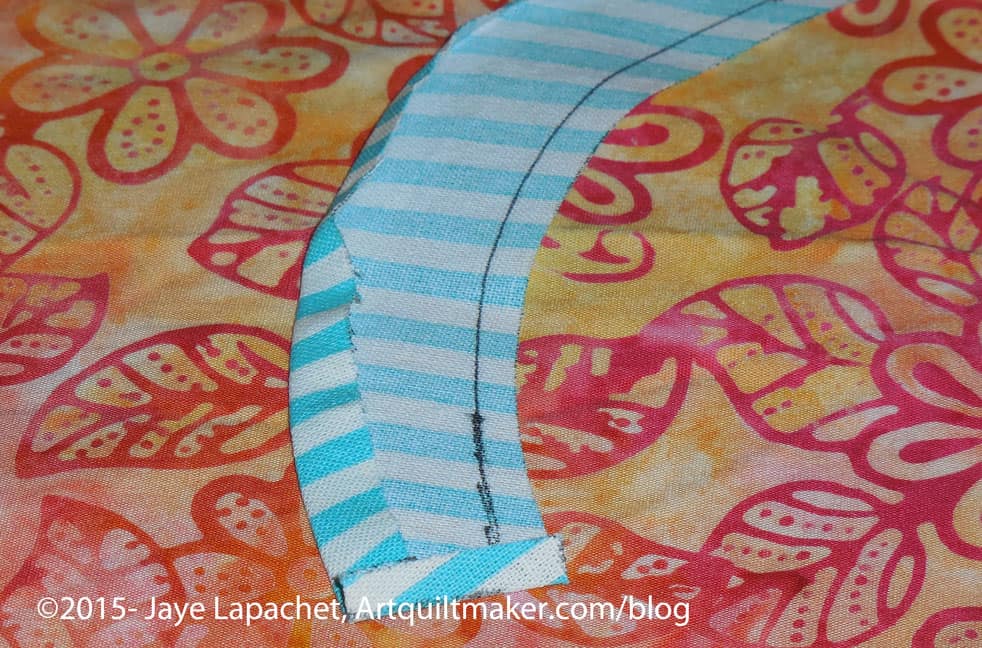
Perfect corner!
Perfect! You might think that I picked the most perfect one, but I didn’t. First, I didn’t know what was going to happen when I started taking photos for the tutorial. With very few exceptions all the corners came out lined up perfectly. Where they didn’t (1 or 2 only), I think it was because I didn’t press the fabric properly or didn’t cut accurately.
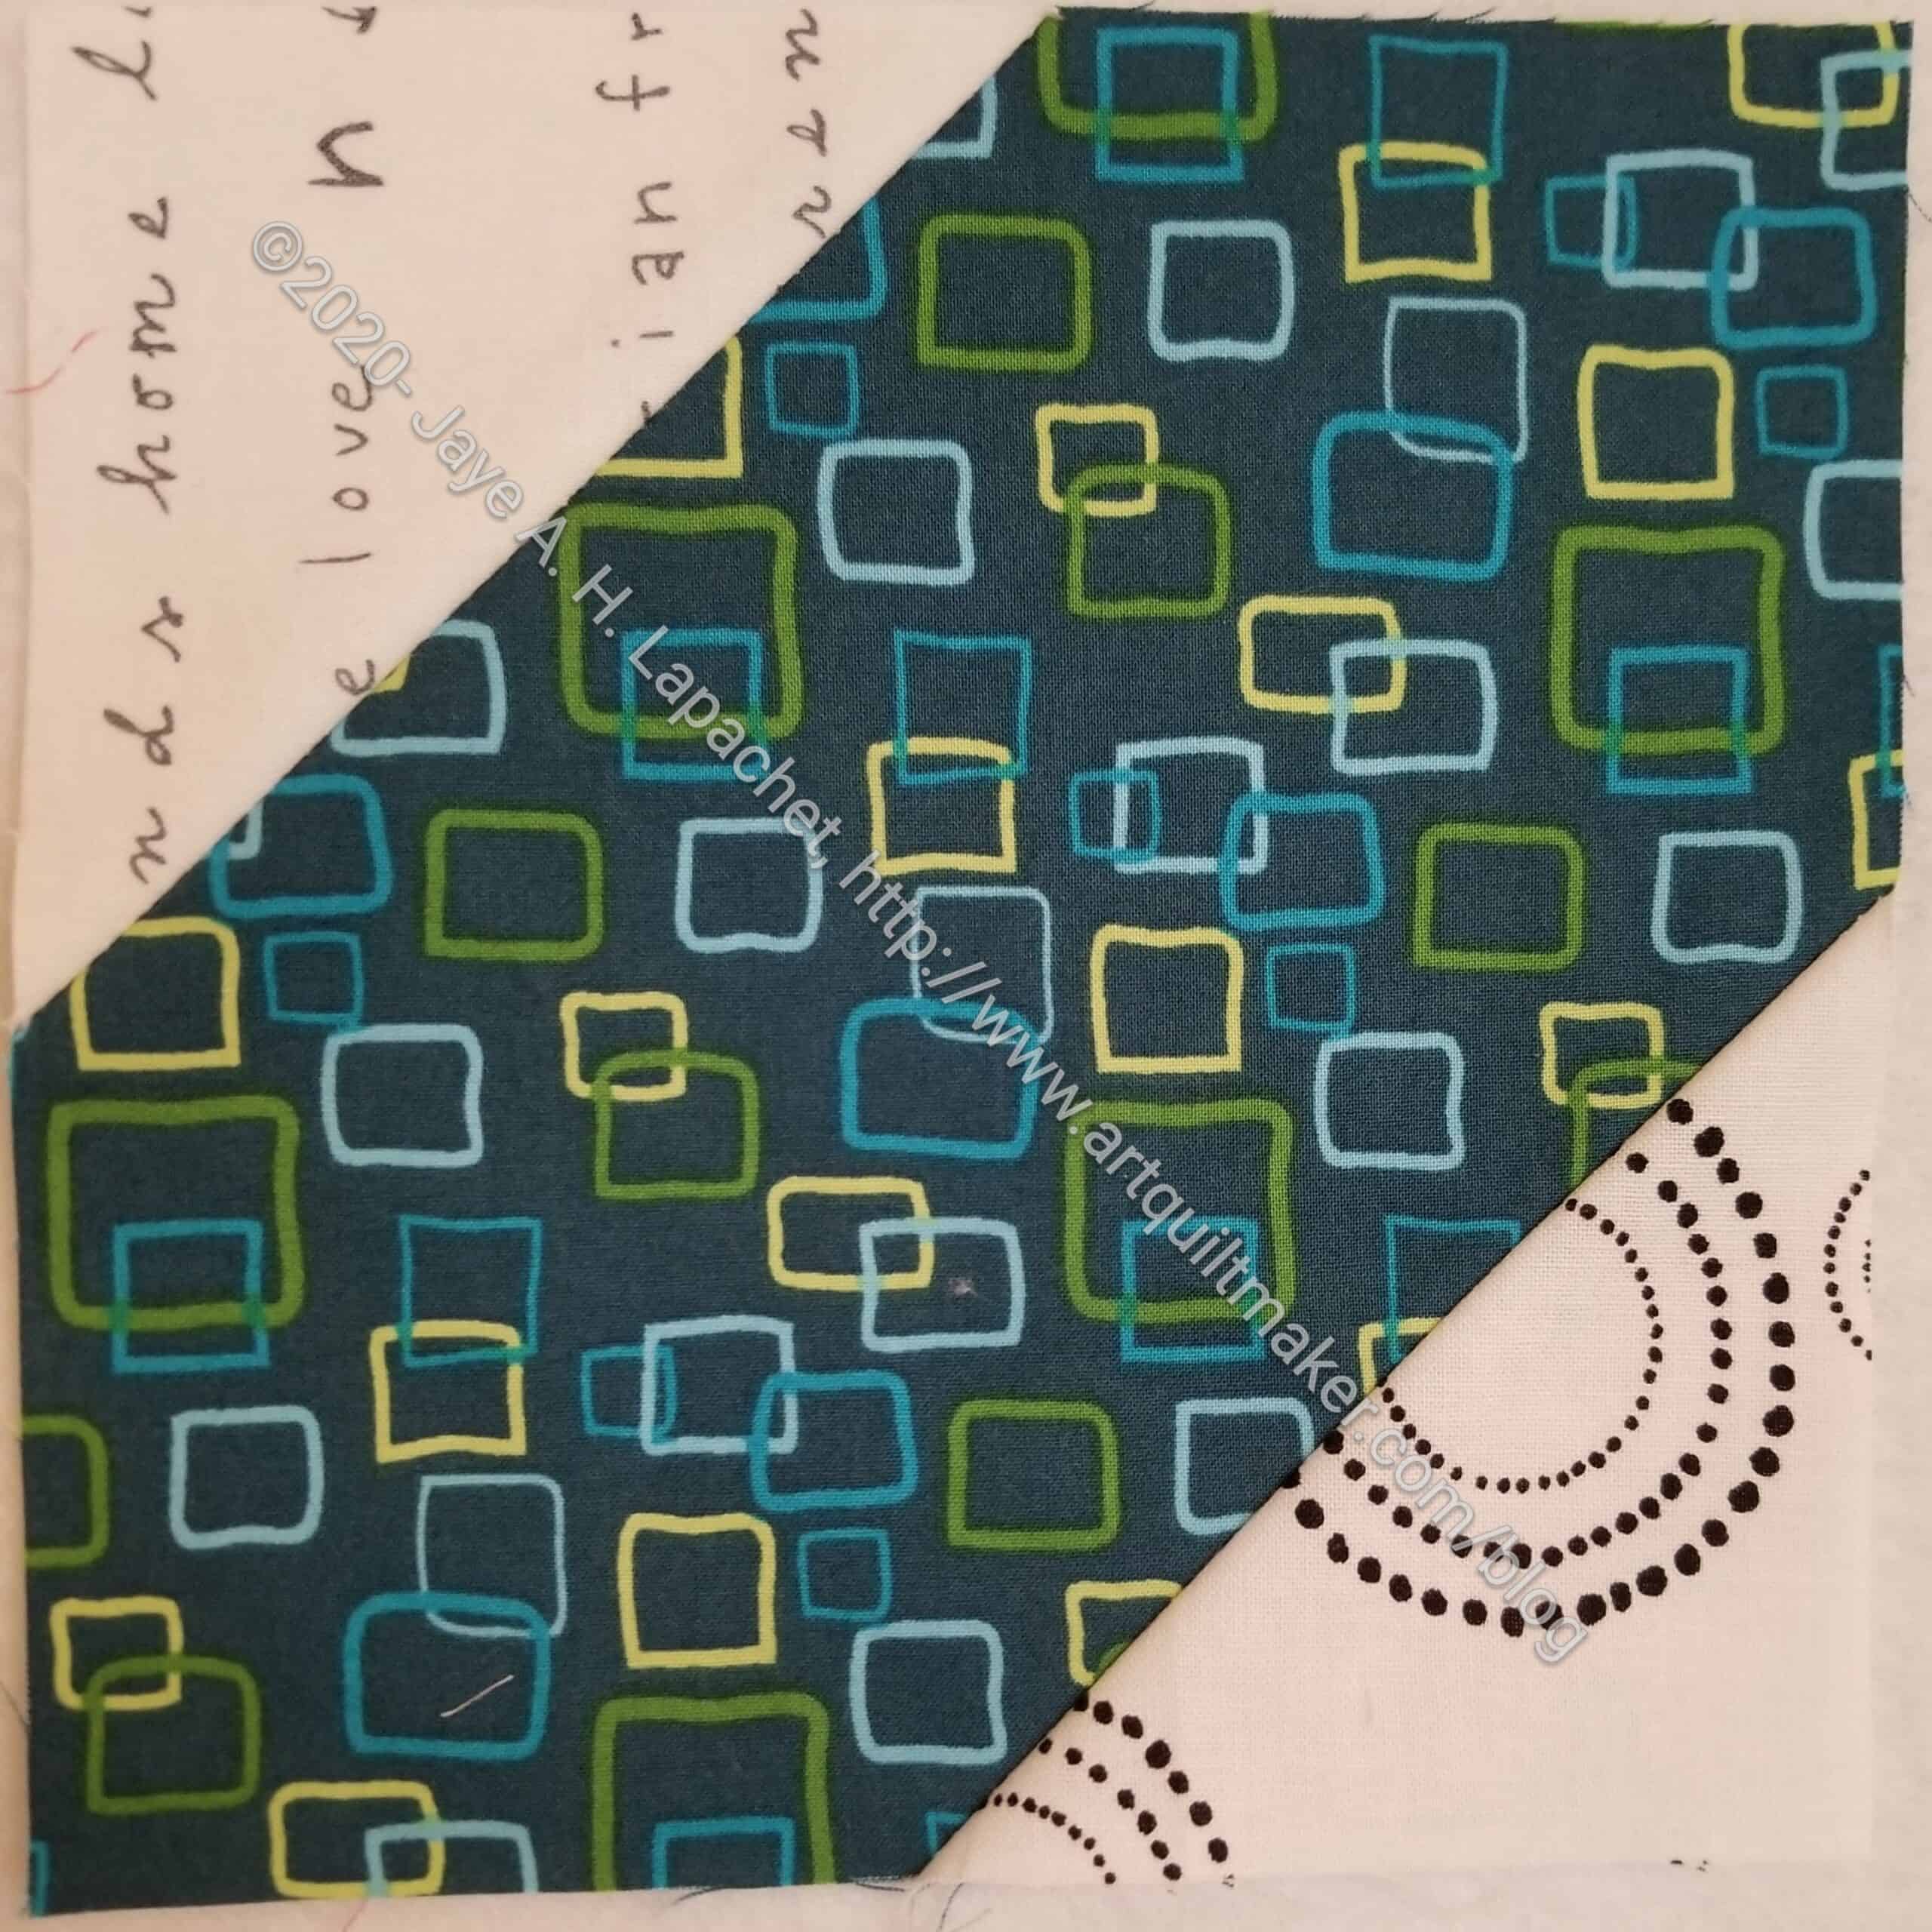
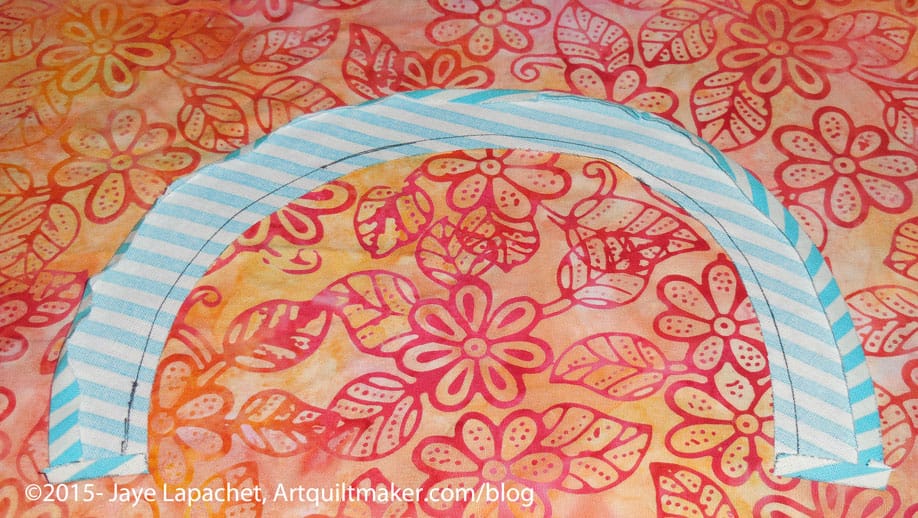
Whole Lozenge Block
The whole block came out really well, too.
I love the idea of specialty rulers. I often buy them with hope and don’t take the time to learn to use them. Or they turn out to be not as promised- not as helpful, hard to use, etc. This ruler works really well. I am super pleased not to have to draw 2 zillion diagonal lines!
**I use affiliate links and may be paid for your purchase of an item
when you click on an item link in my post. There is no additional cost
to you for clicking or purchasing items I recommend. I appreciate your
clicks and purchases as it helps support this blog.
I am using a different quilt for this tutorial, but I have faith that that won’t make a difference to all of you intelligent readers and students who have been following along with my various sampler class tutorials.
Supply List:
blocks
fabric for sashing
fabric cornerstones (I used scraps, but my cornerstones were only 1.5 inches square)
Please note that we are only talking about sashing in this tutorial. We are not talking about borders. I will do a separate tutorial for borders in the future.
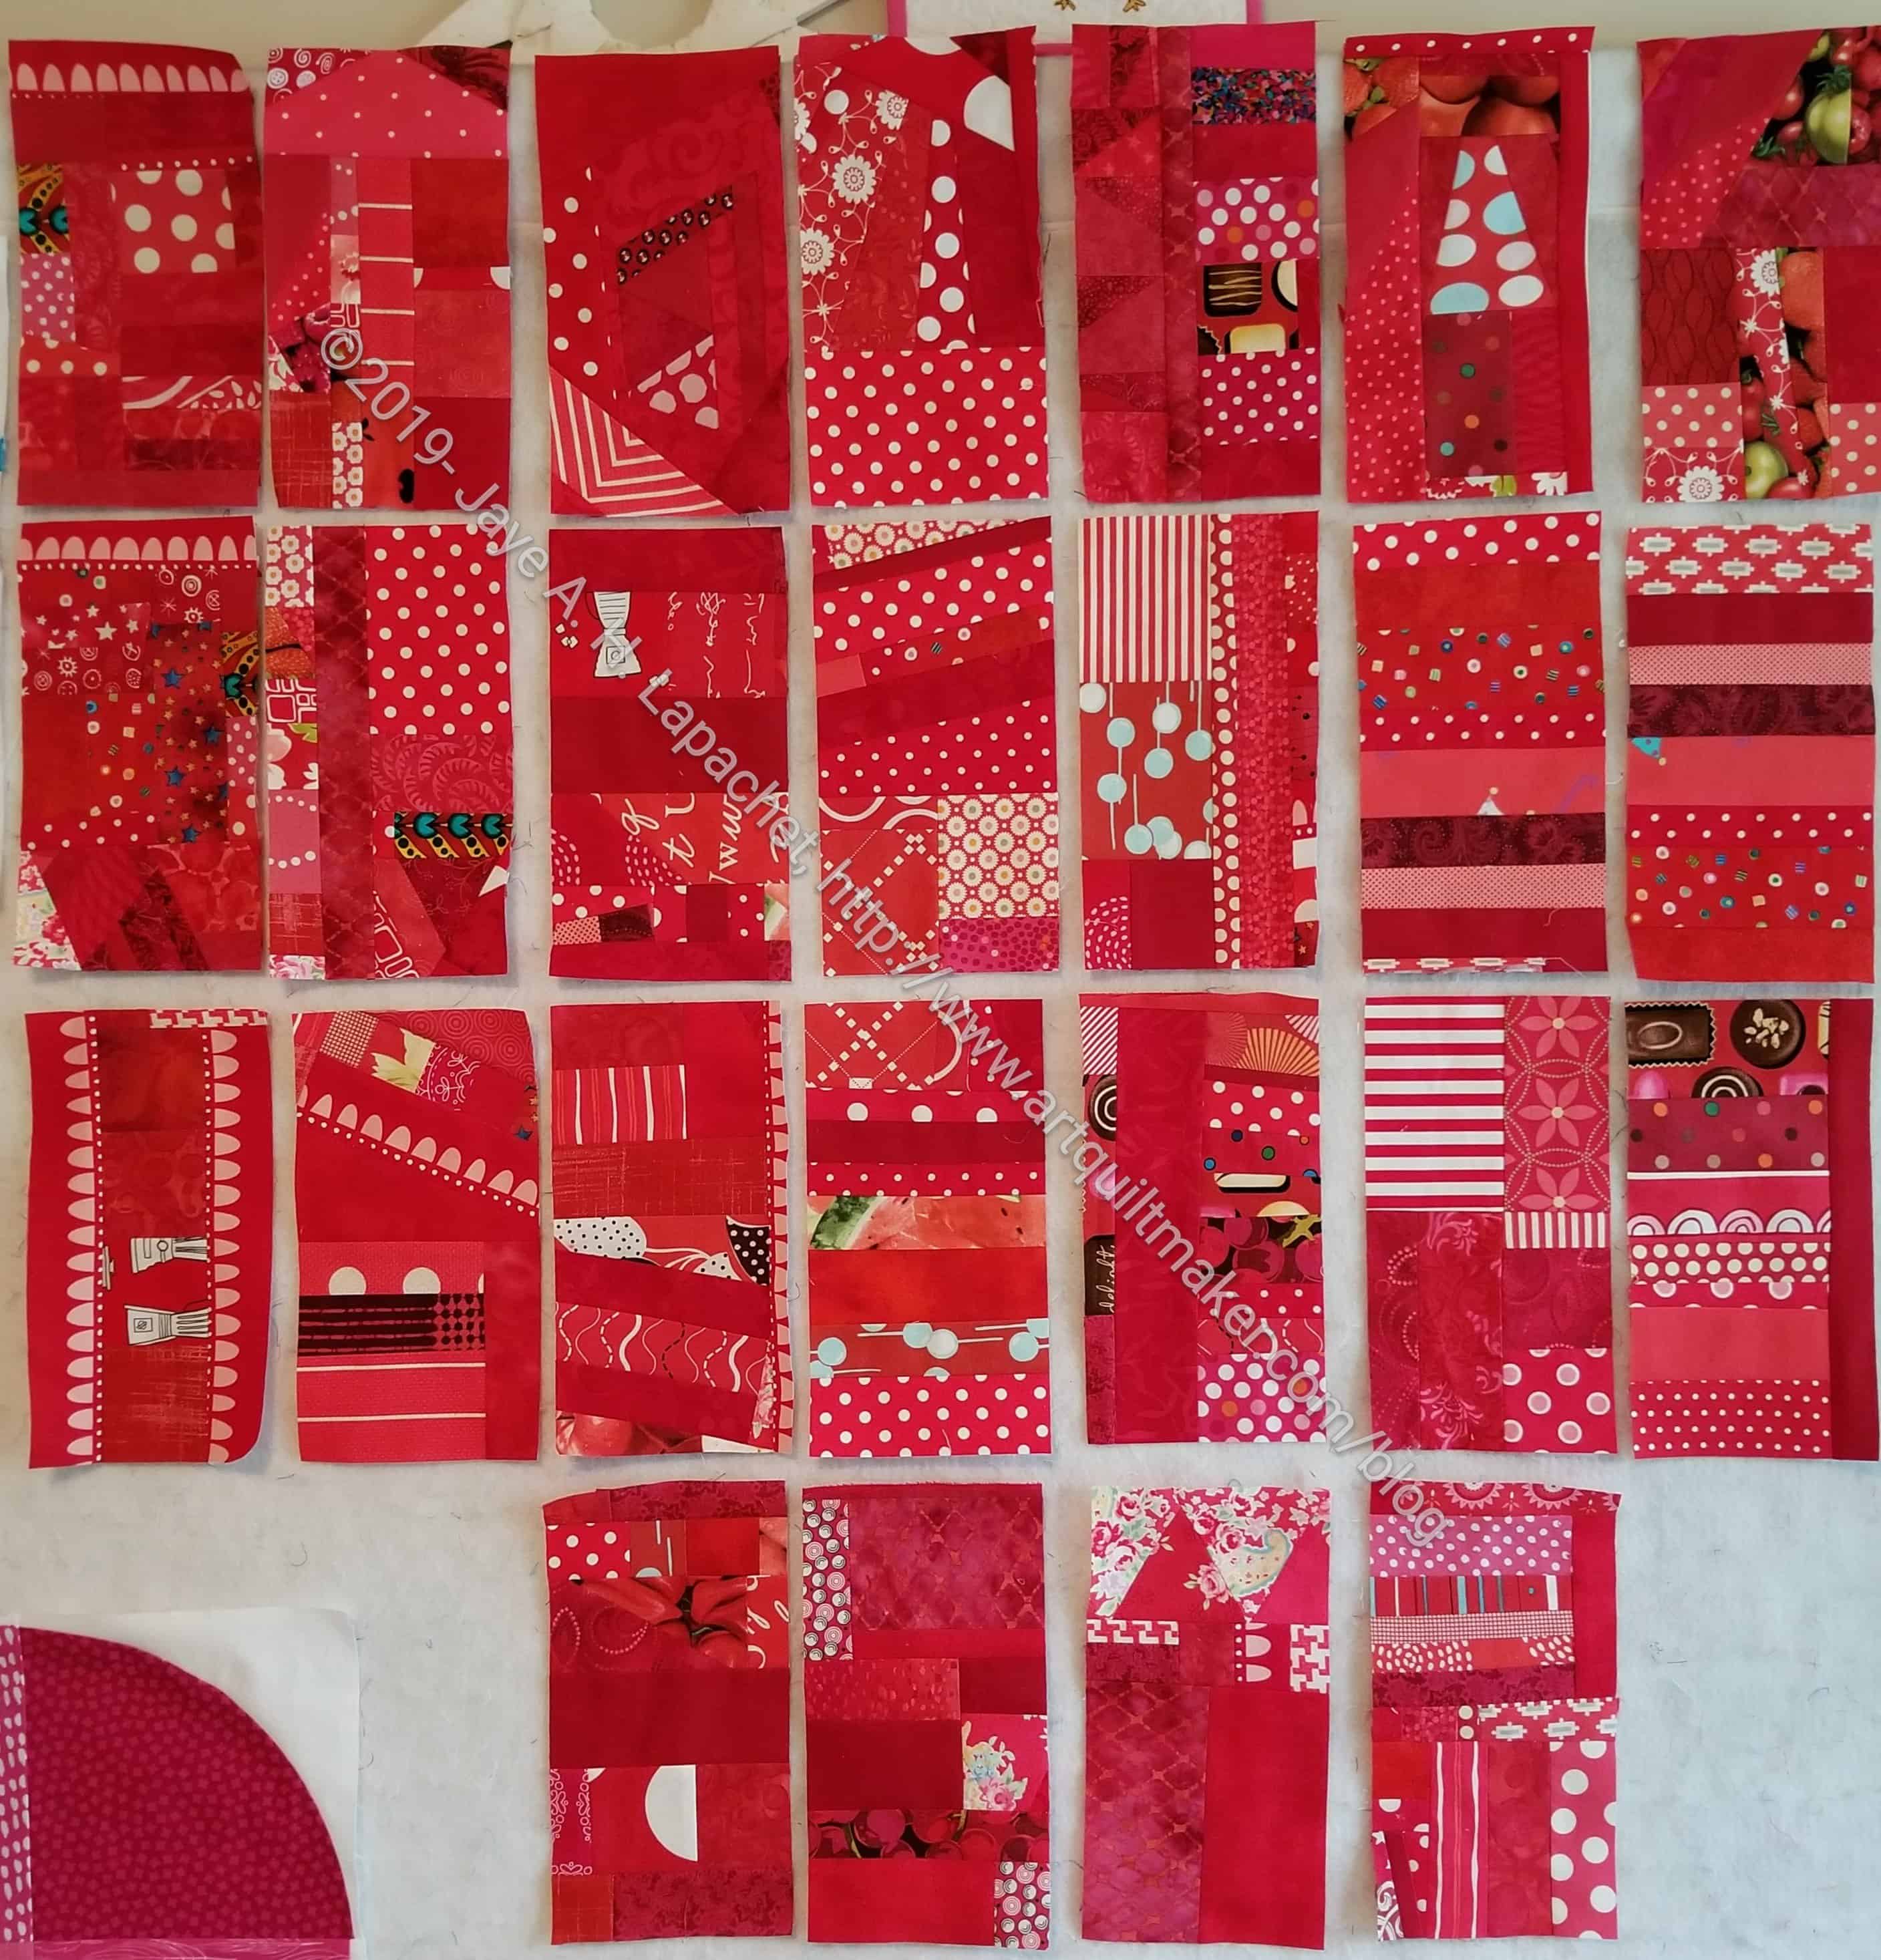
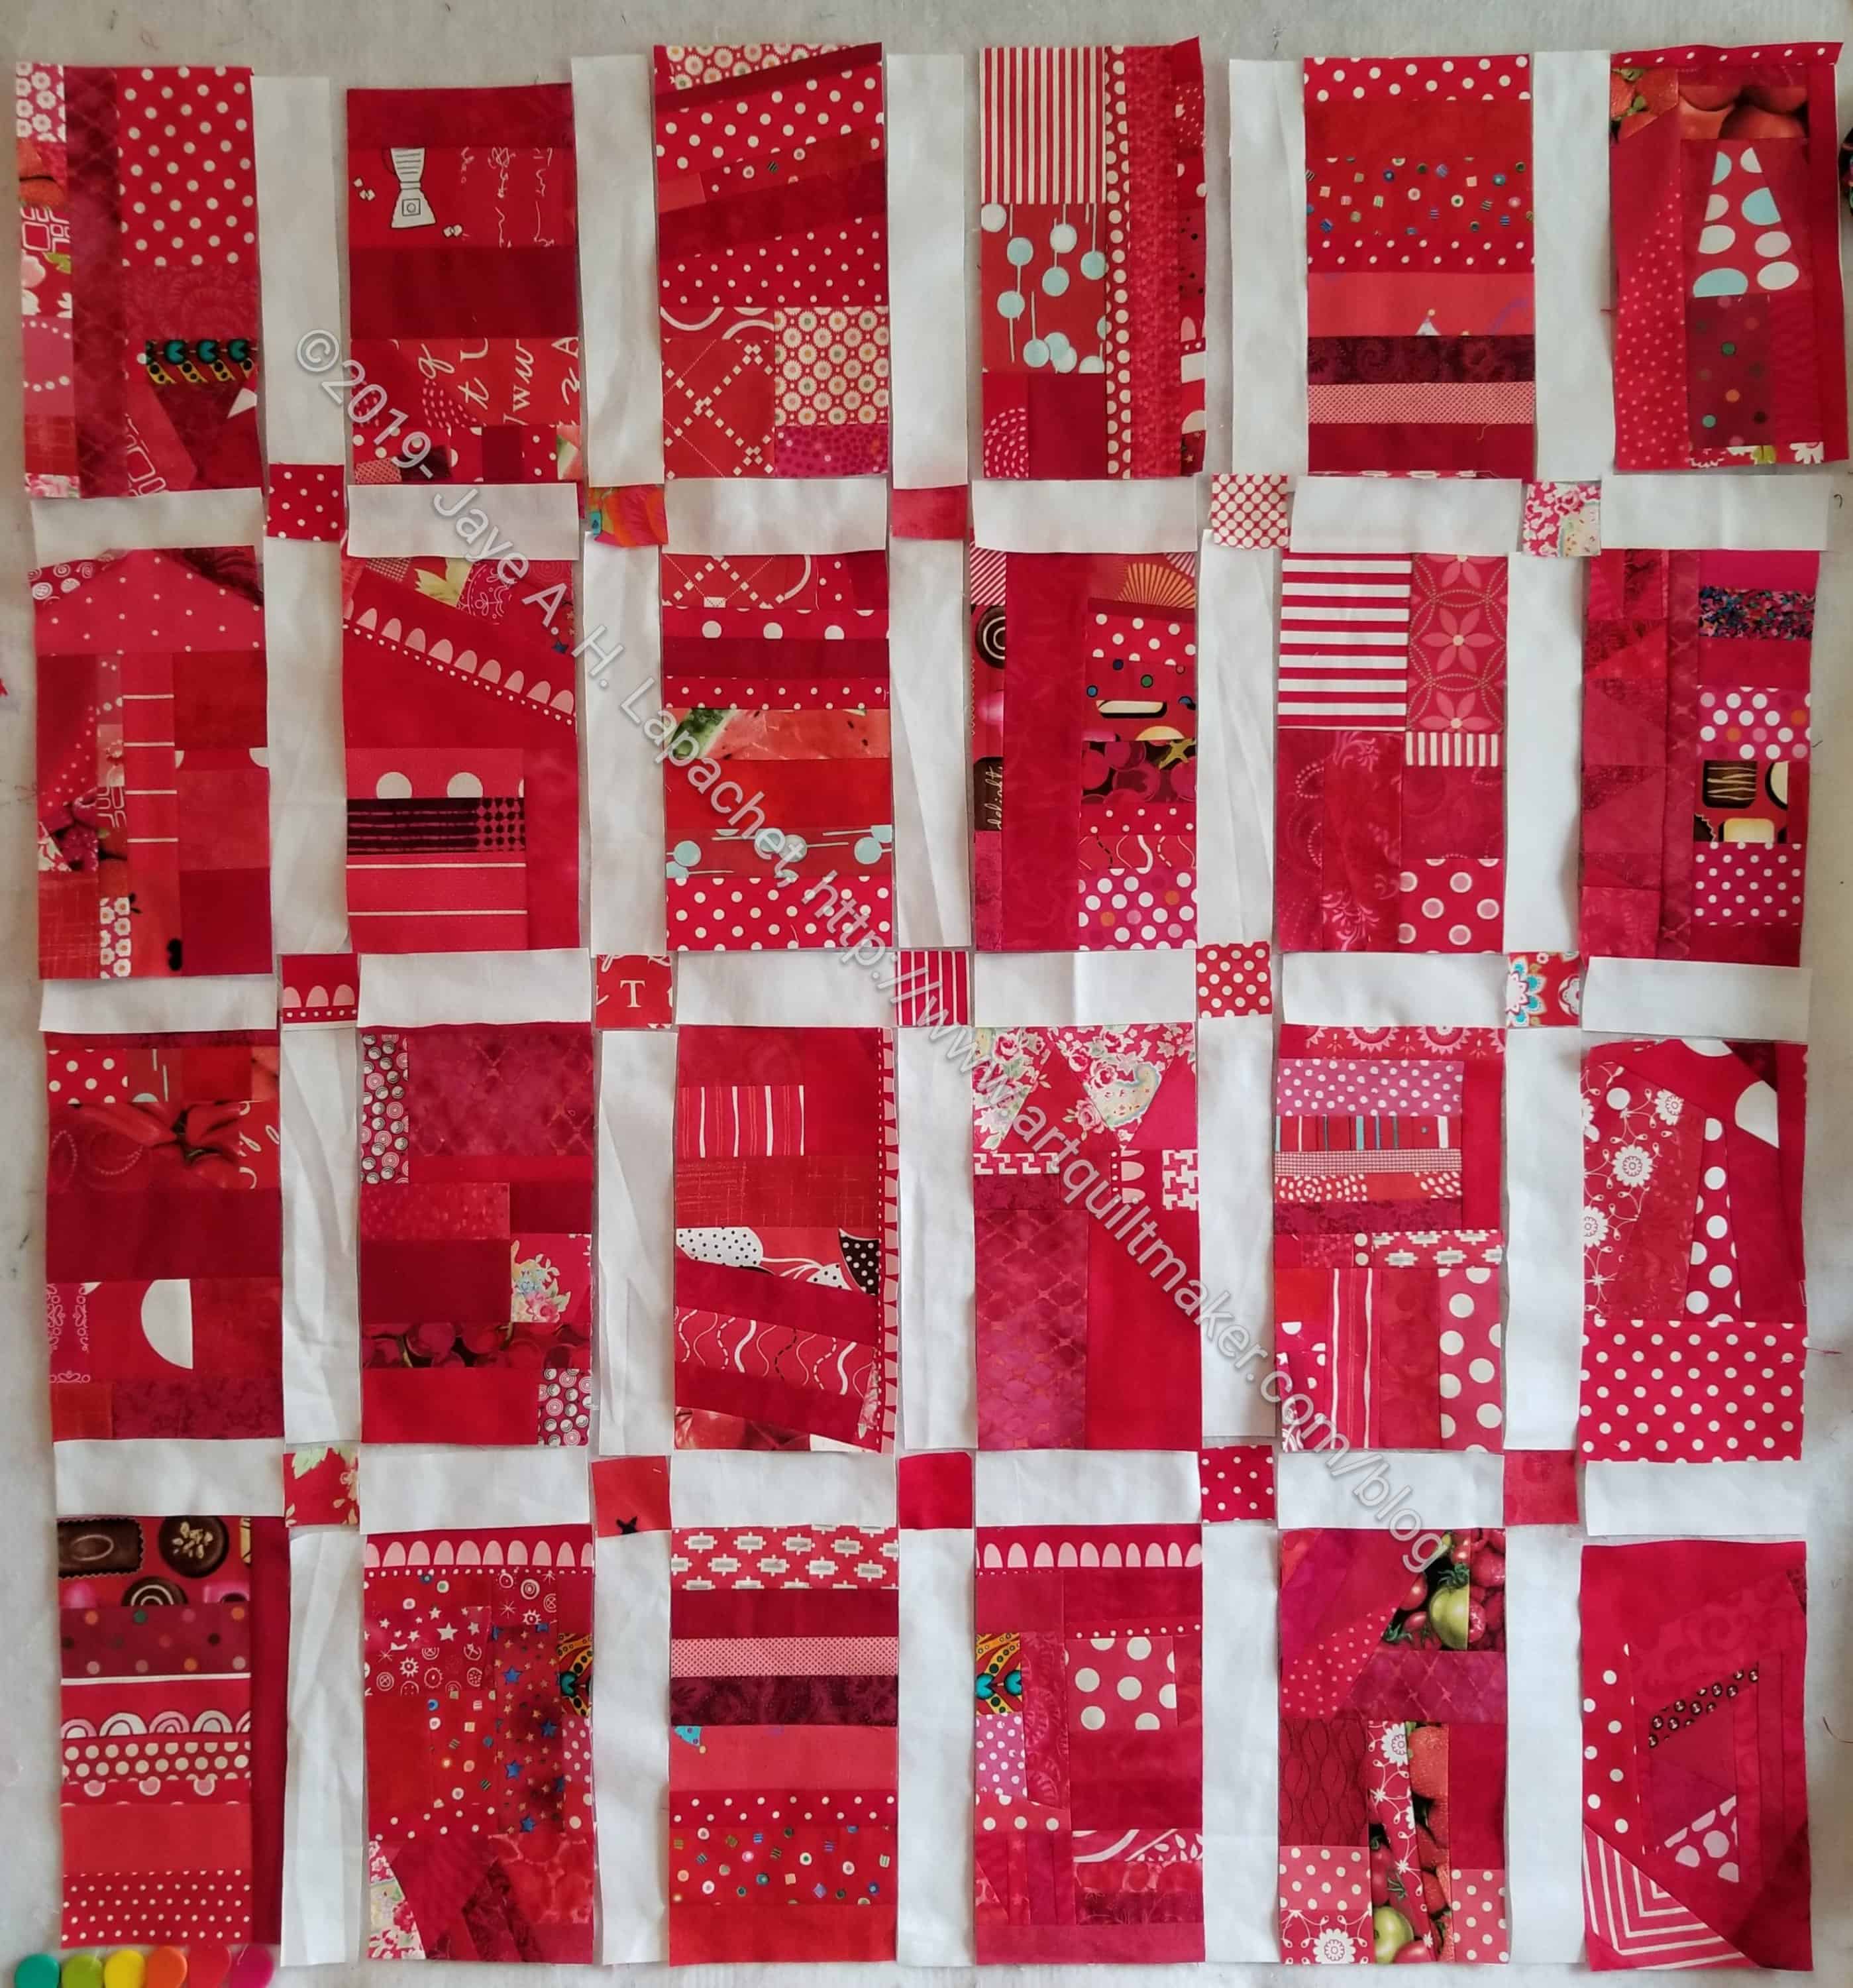
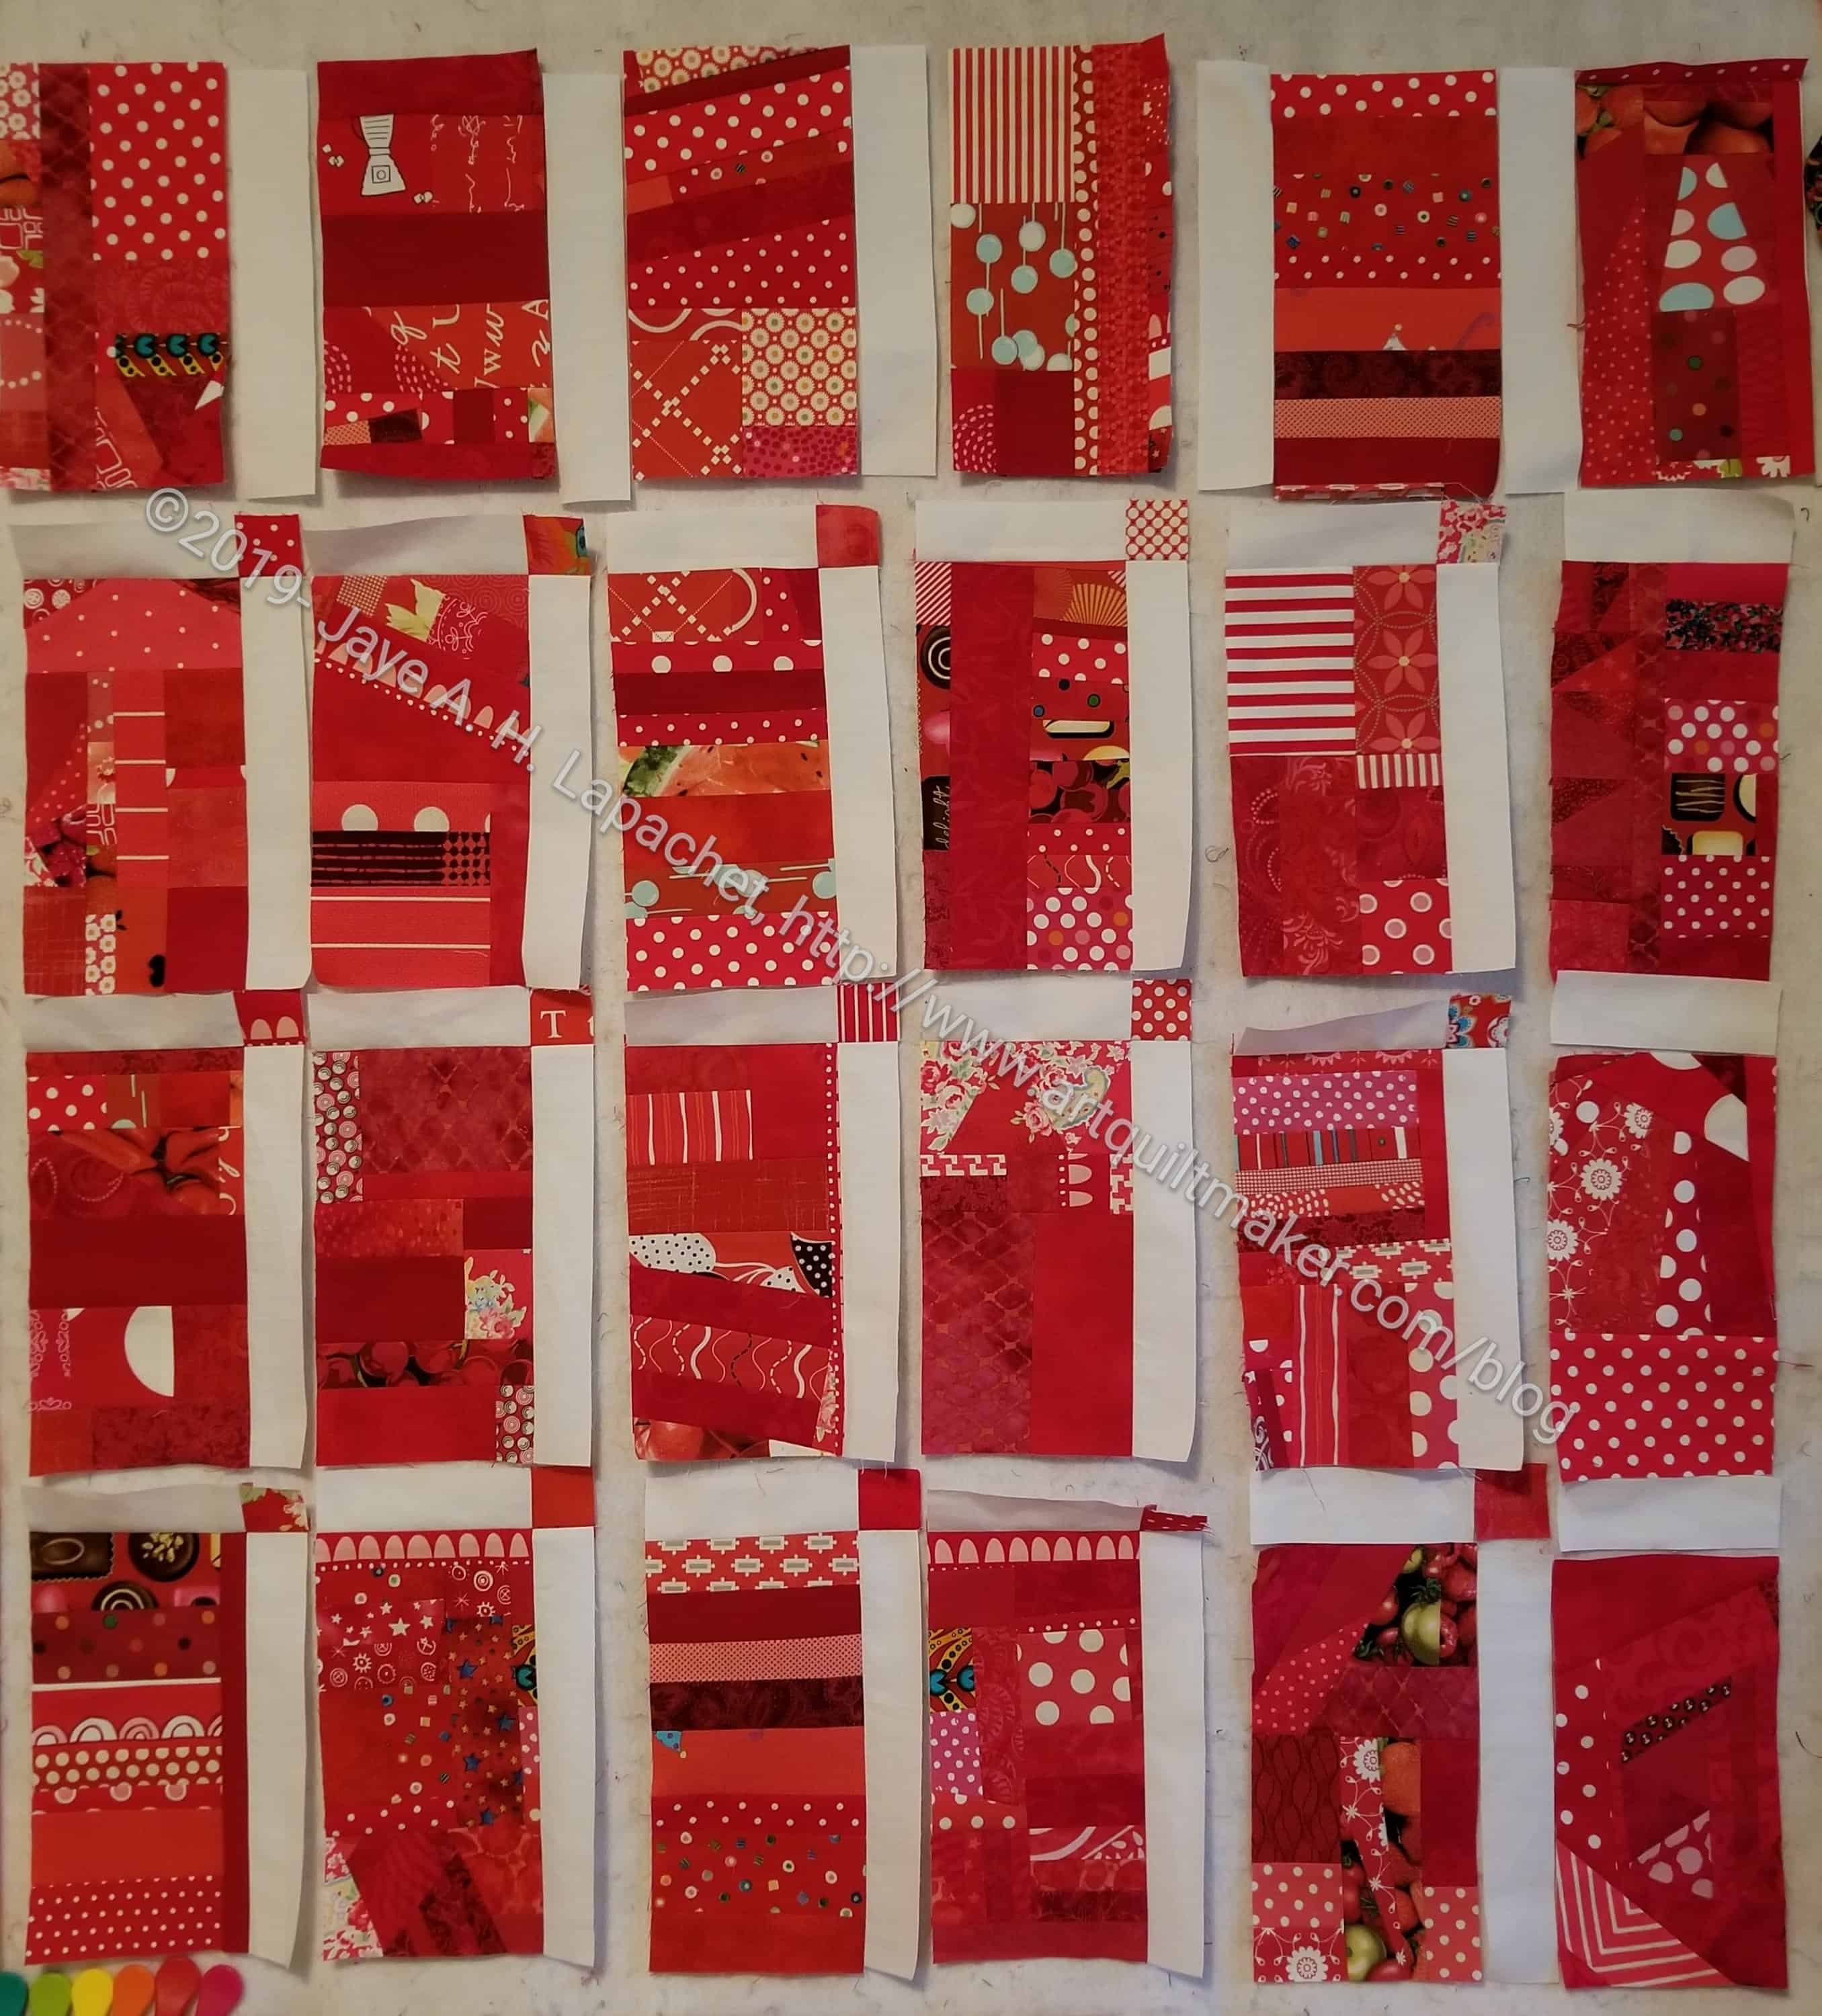
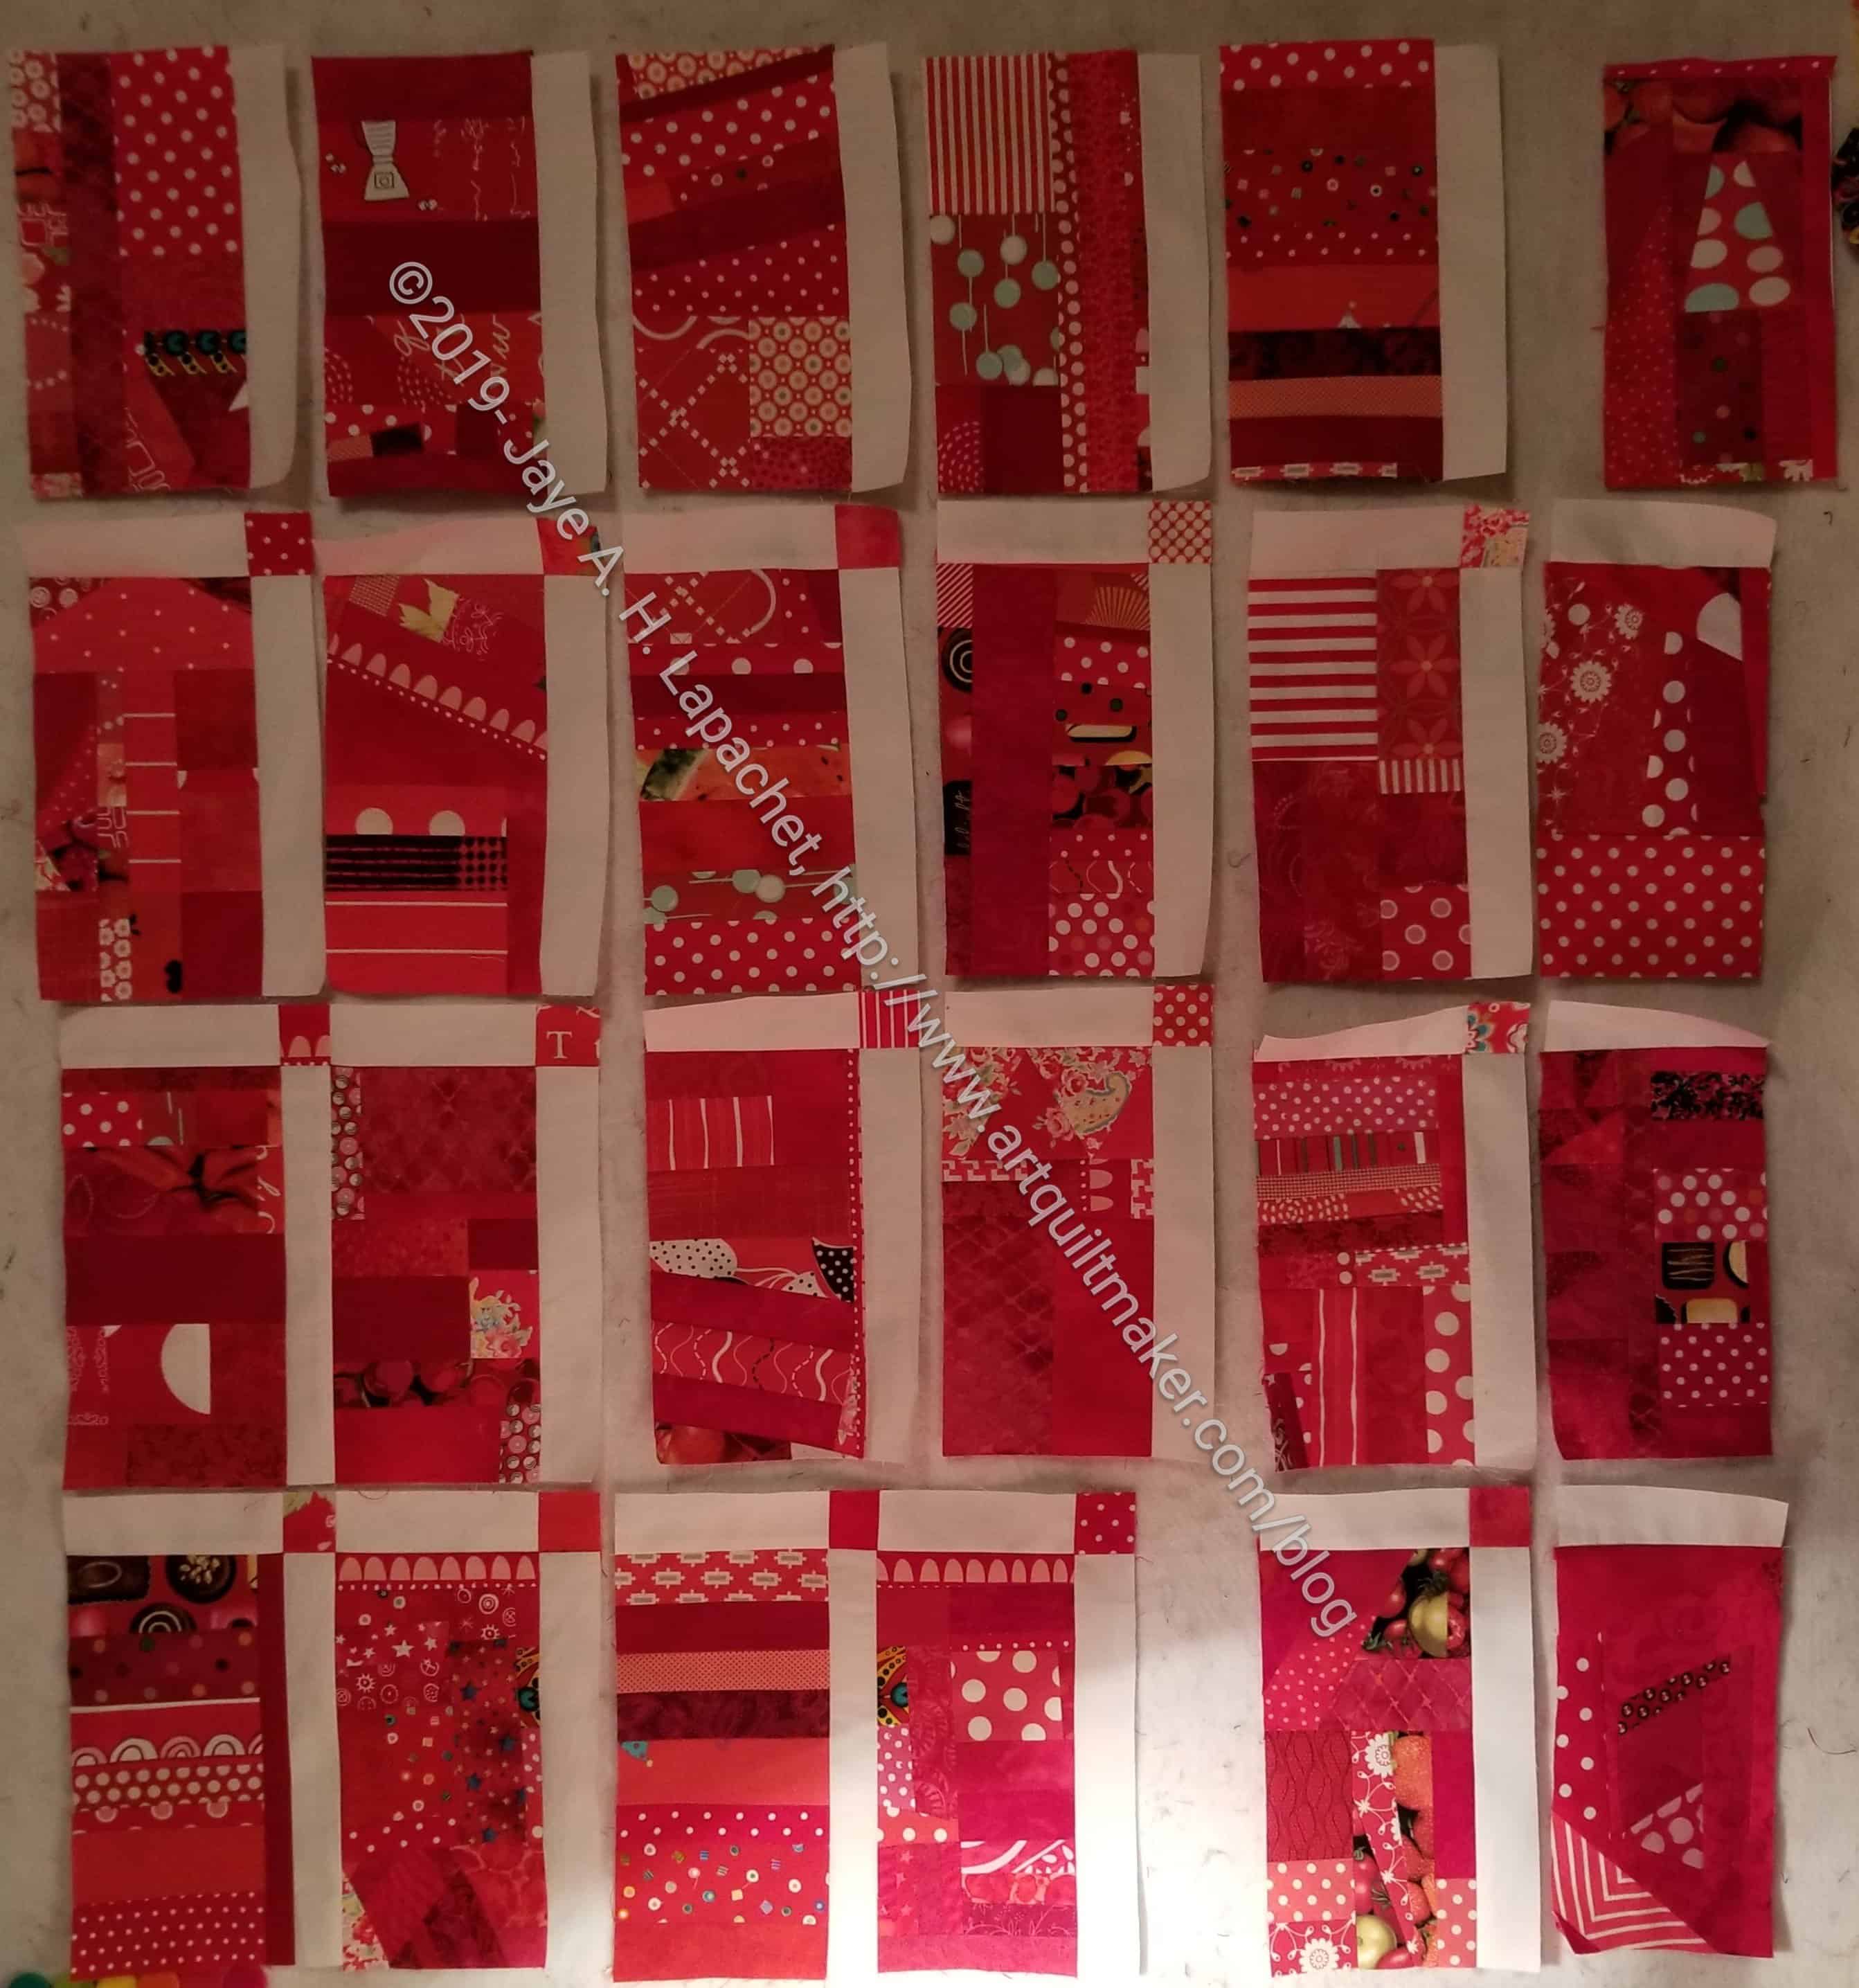
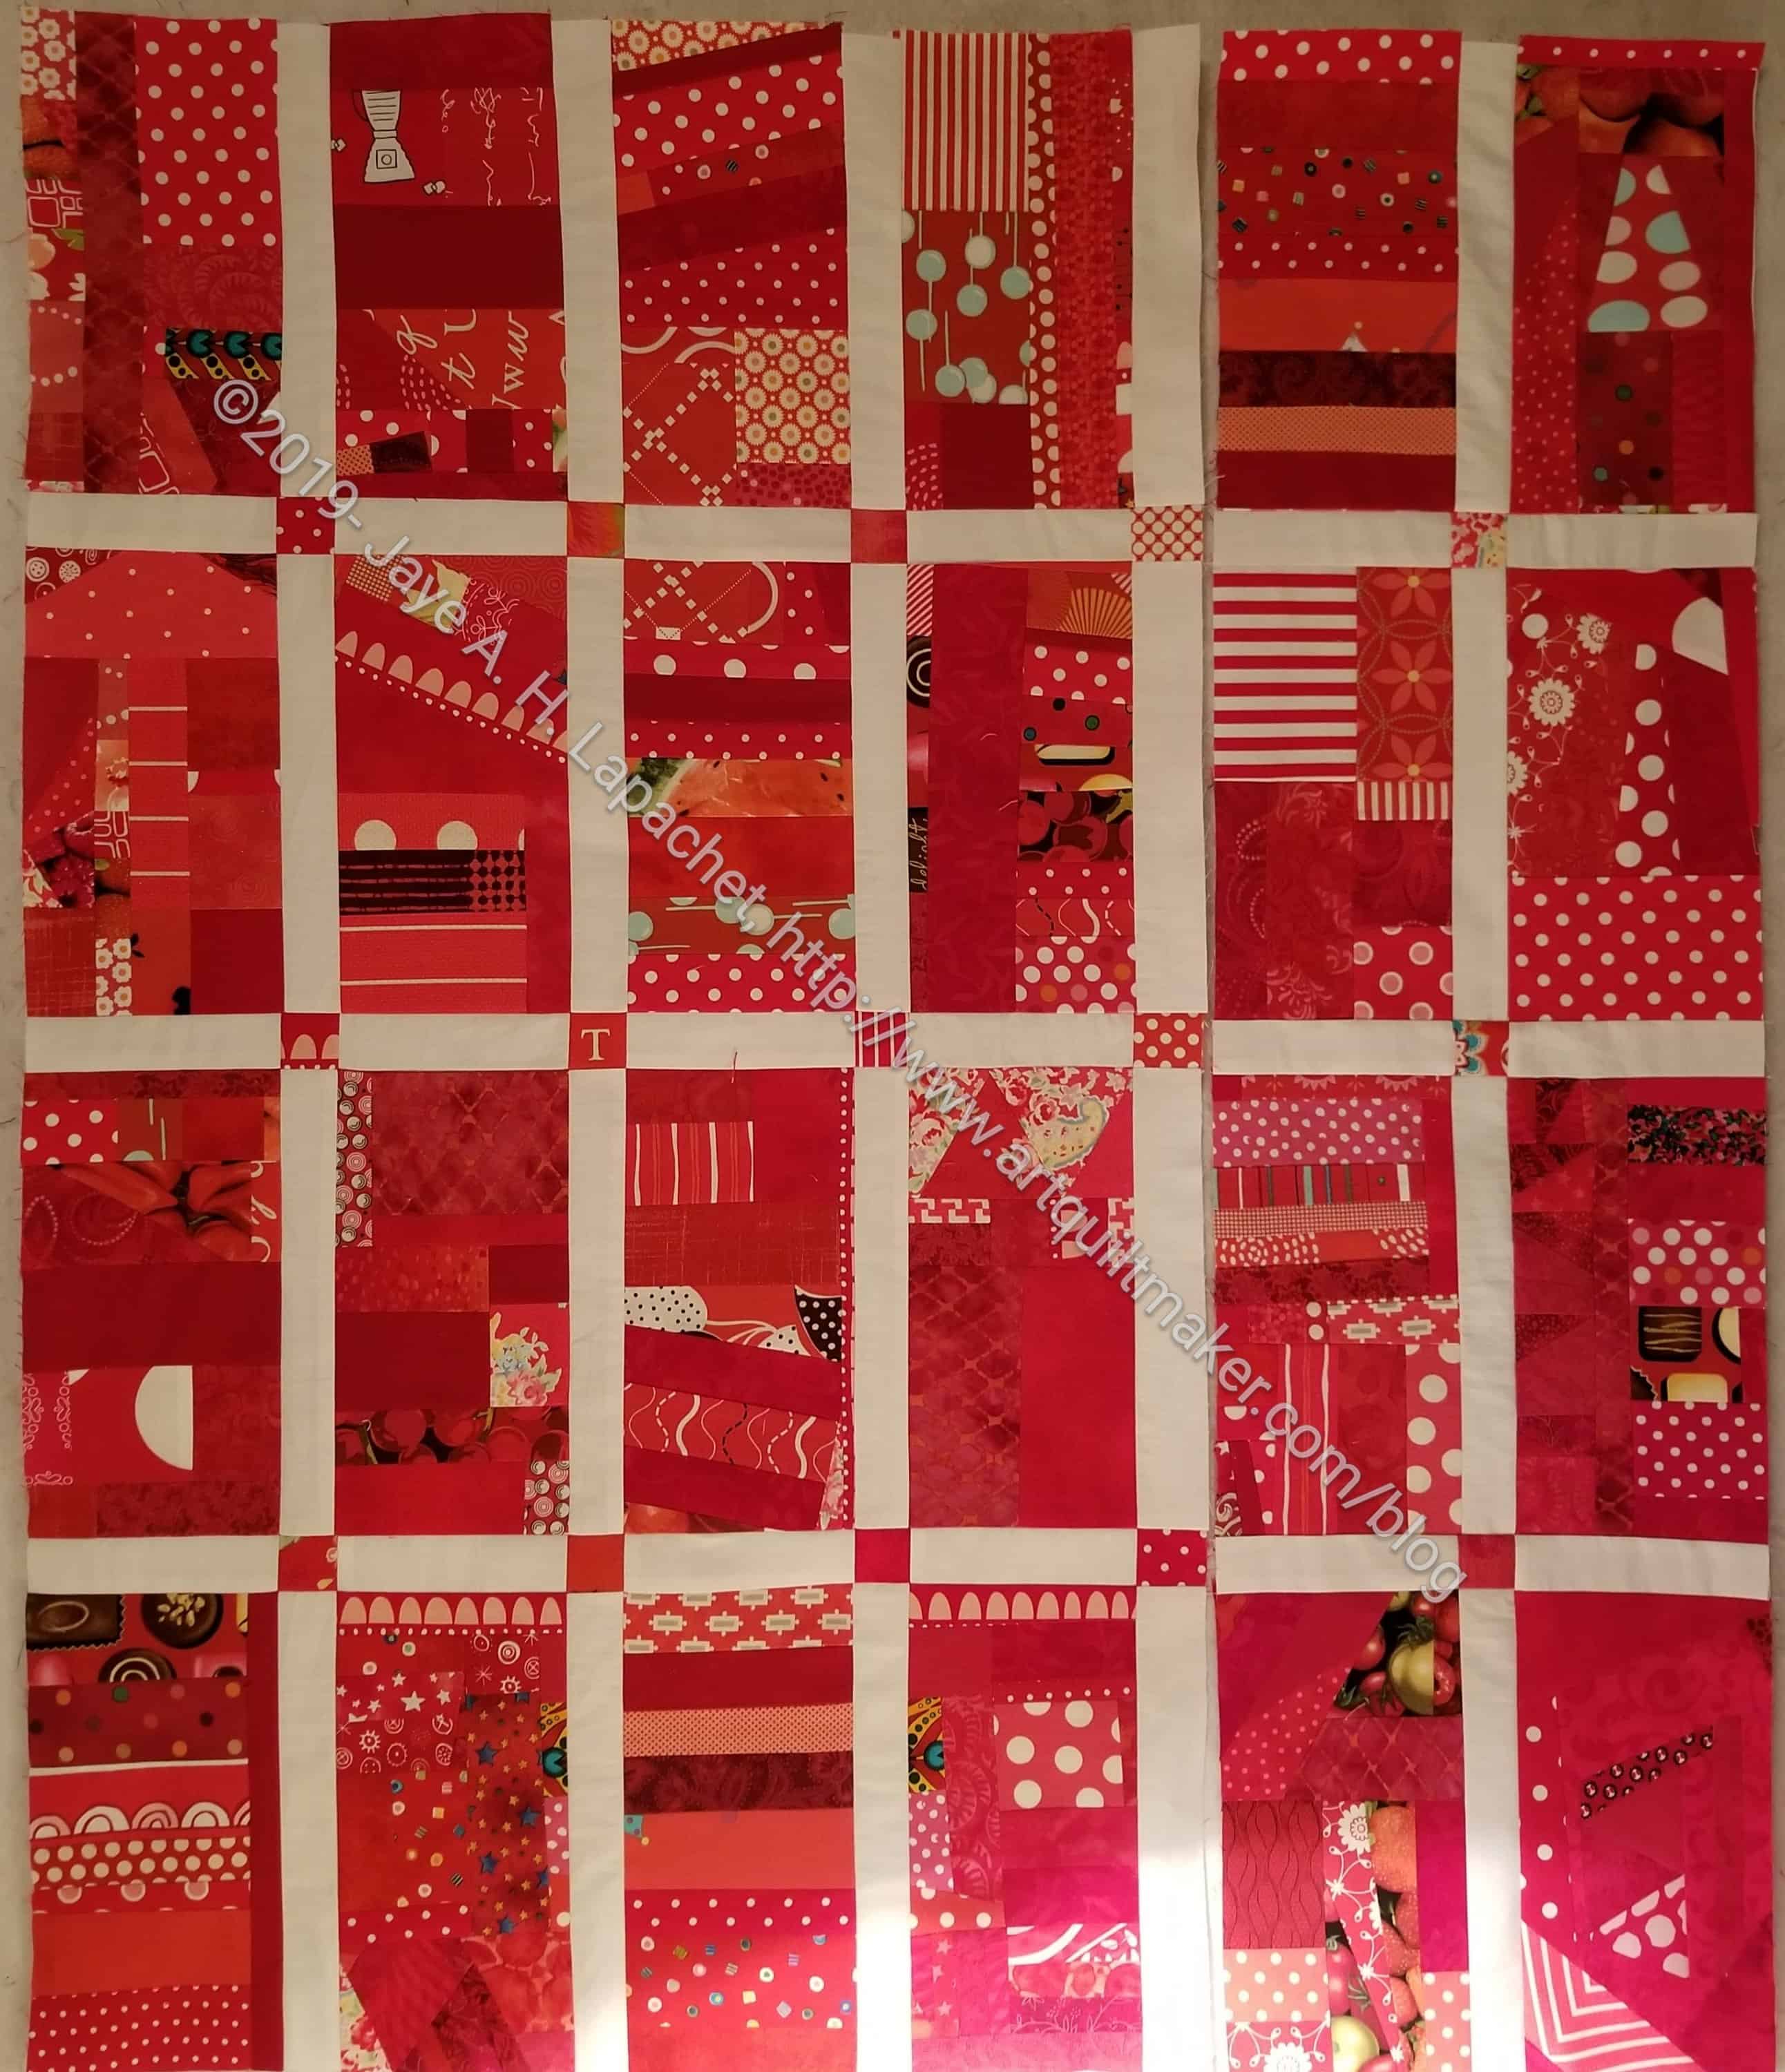
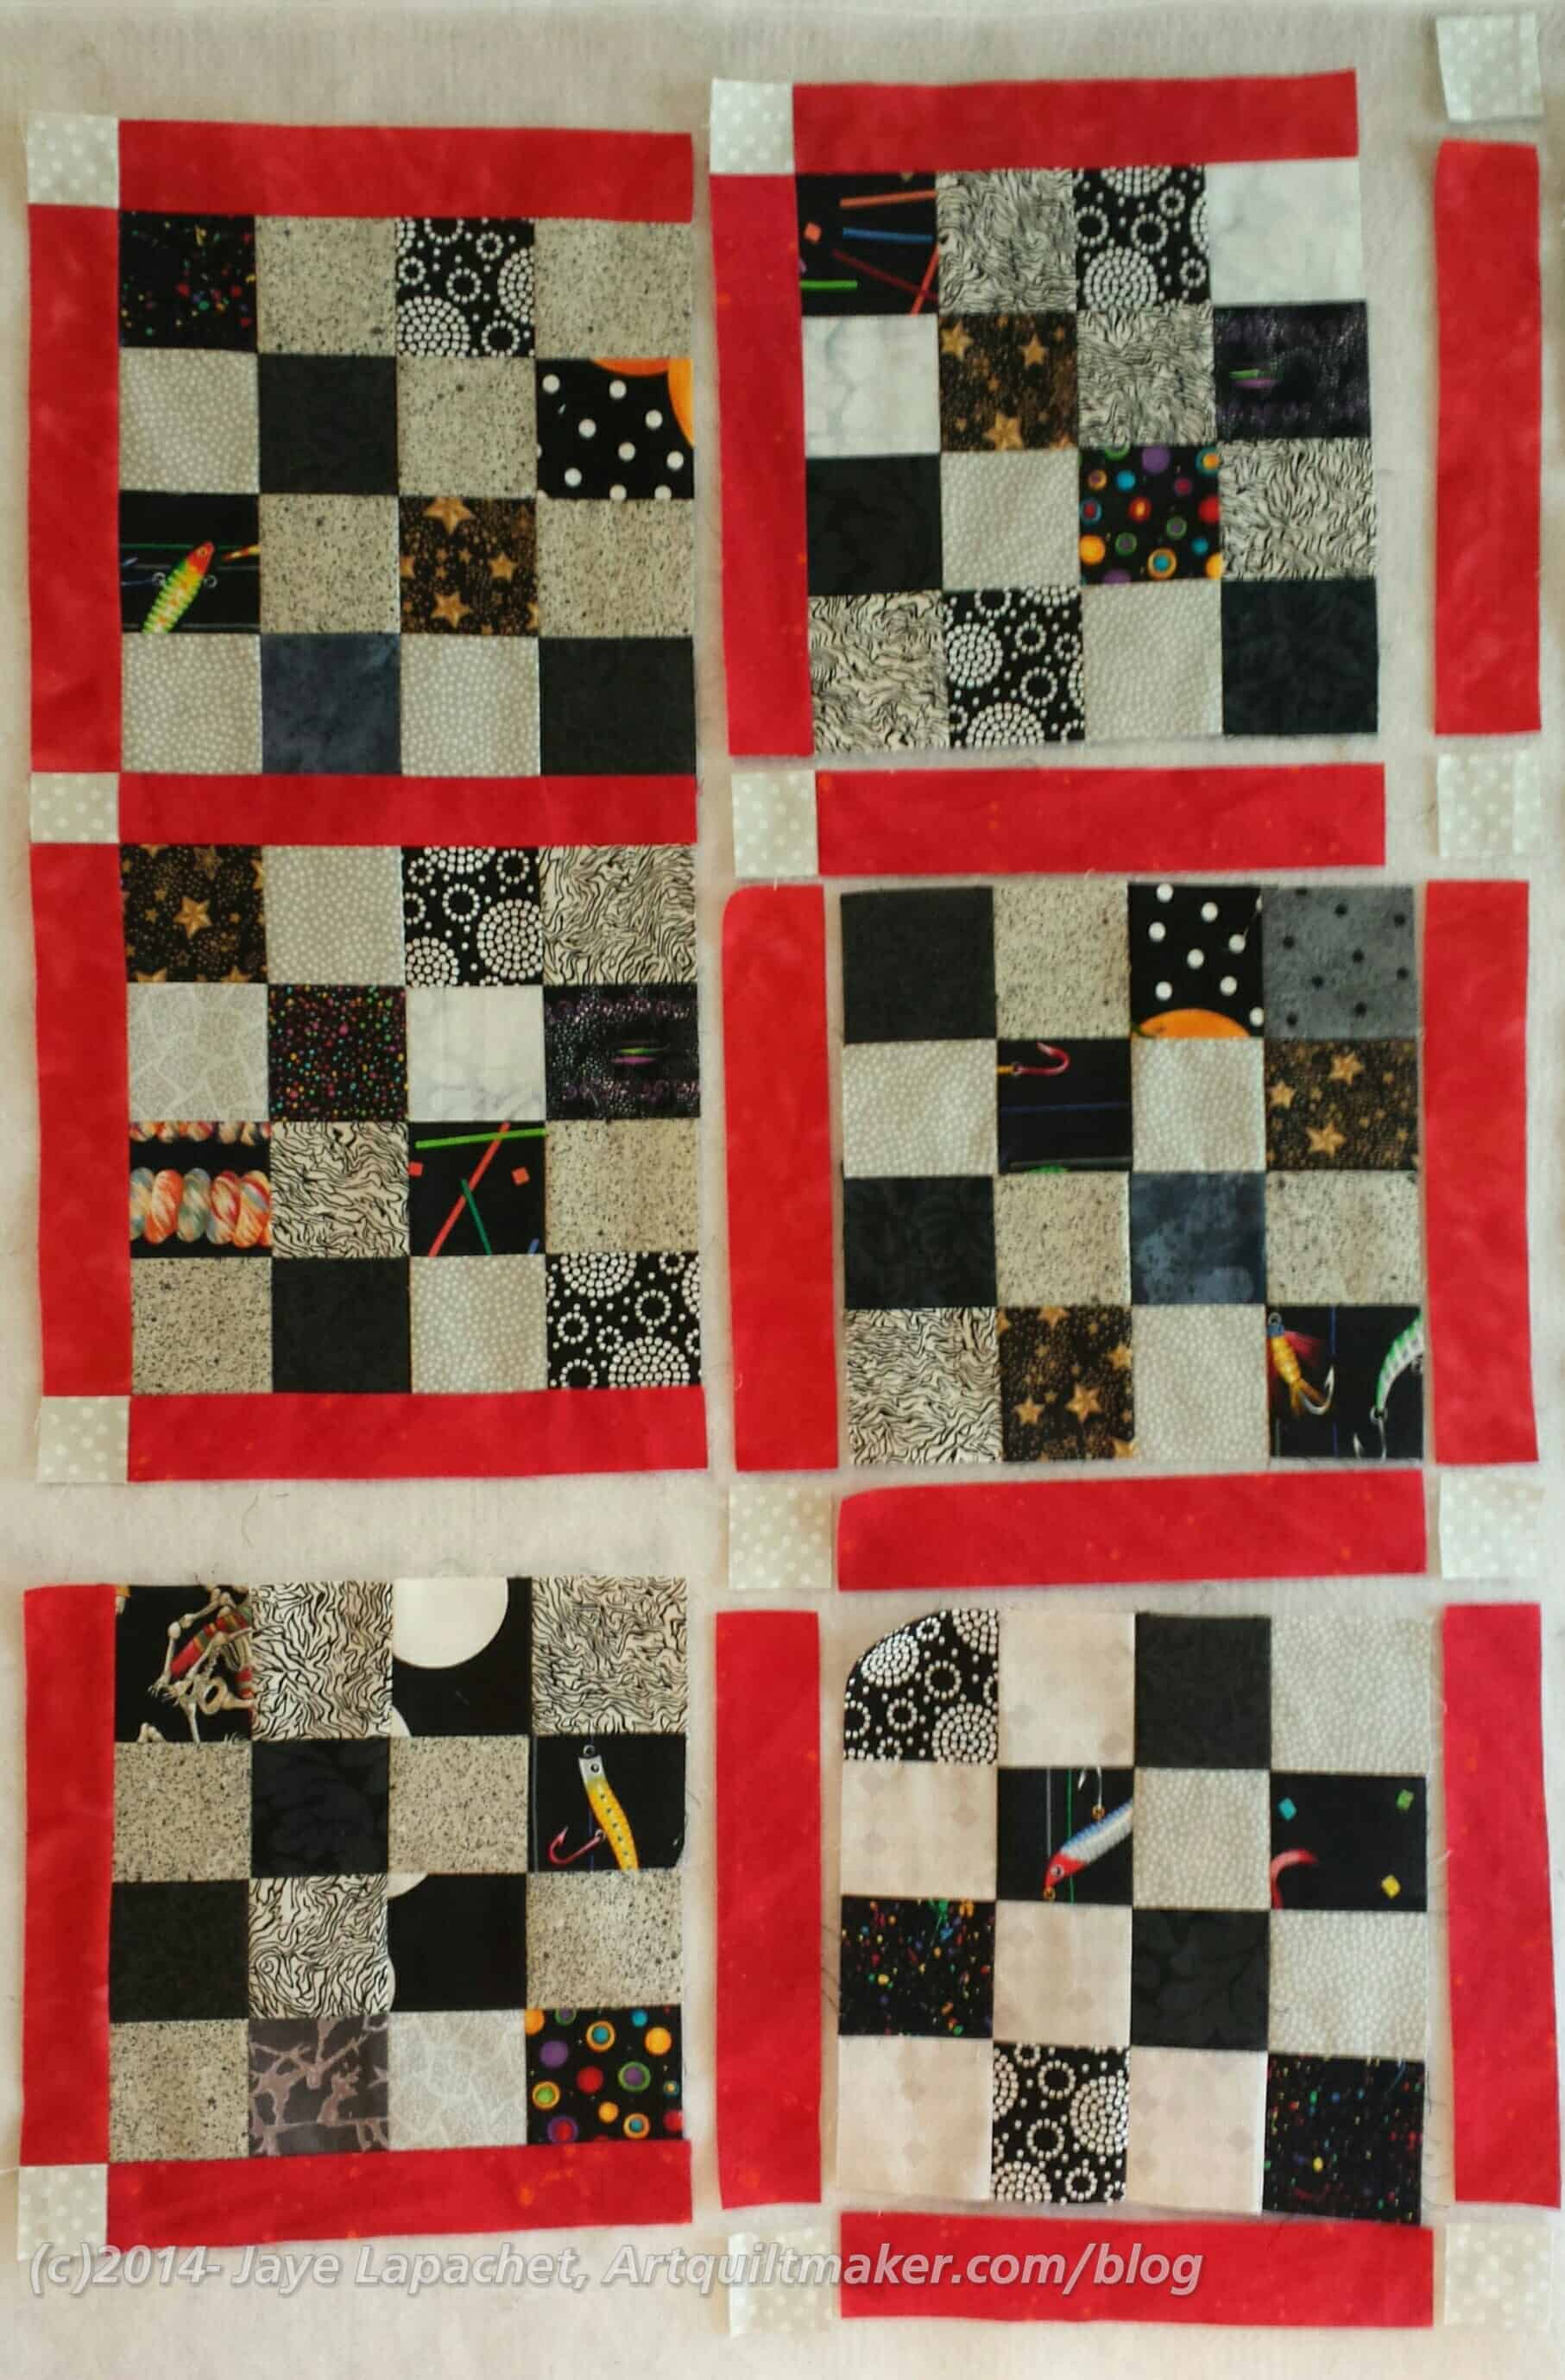
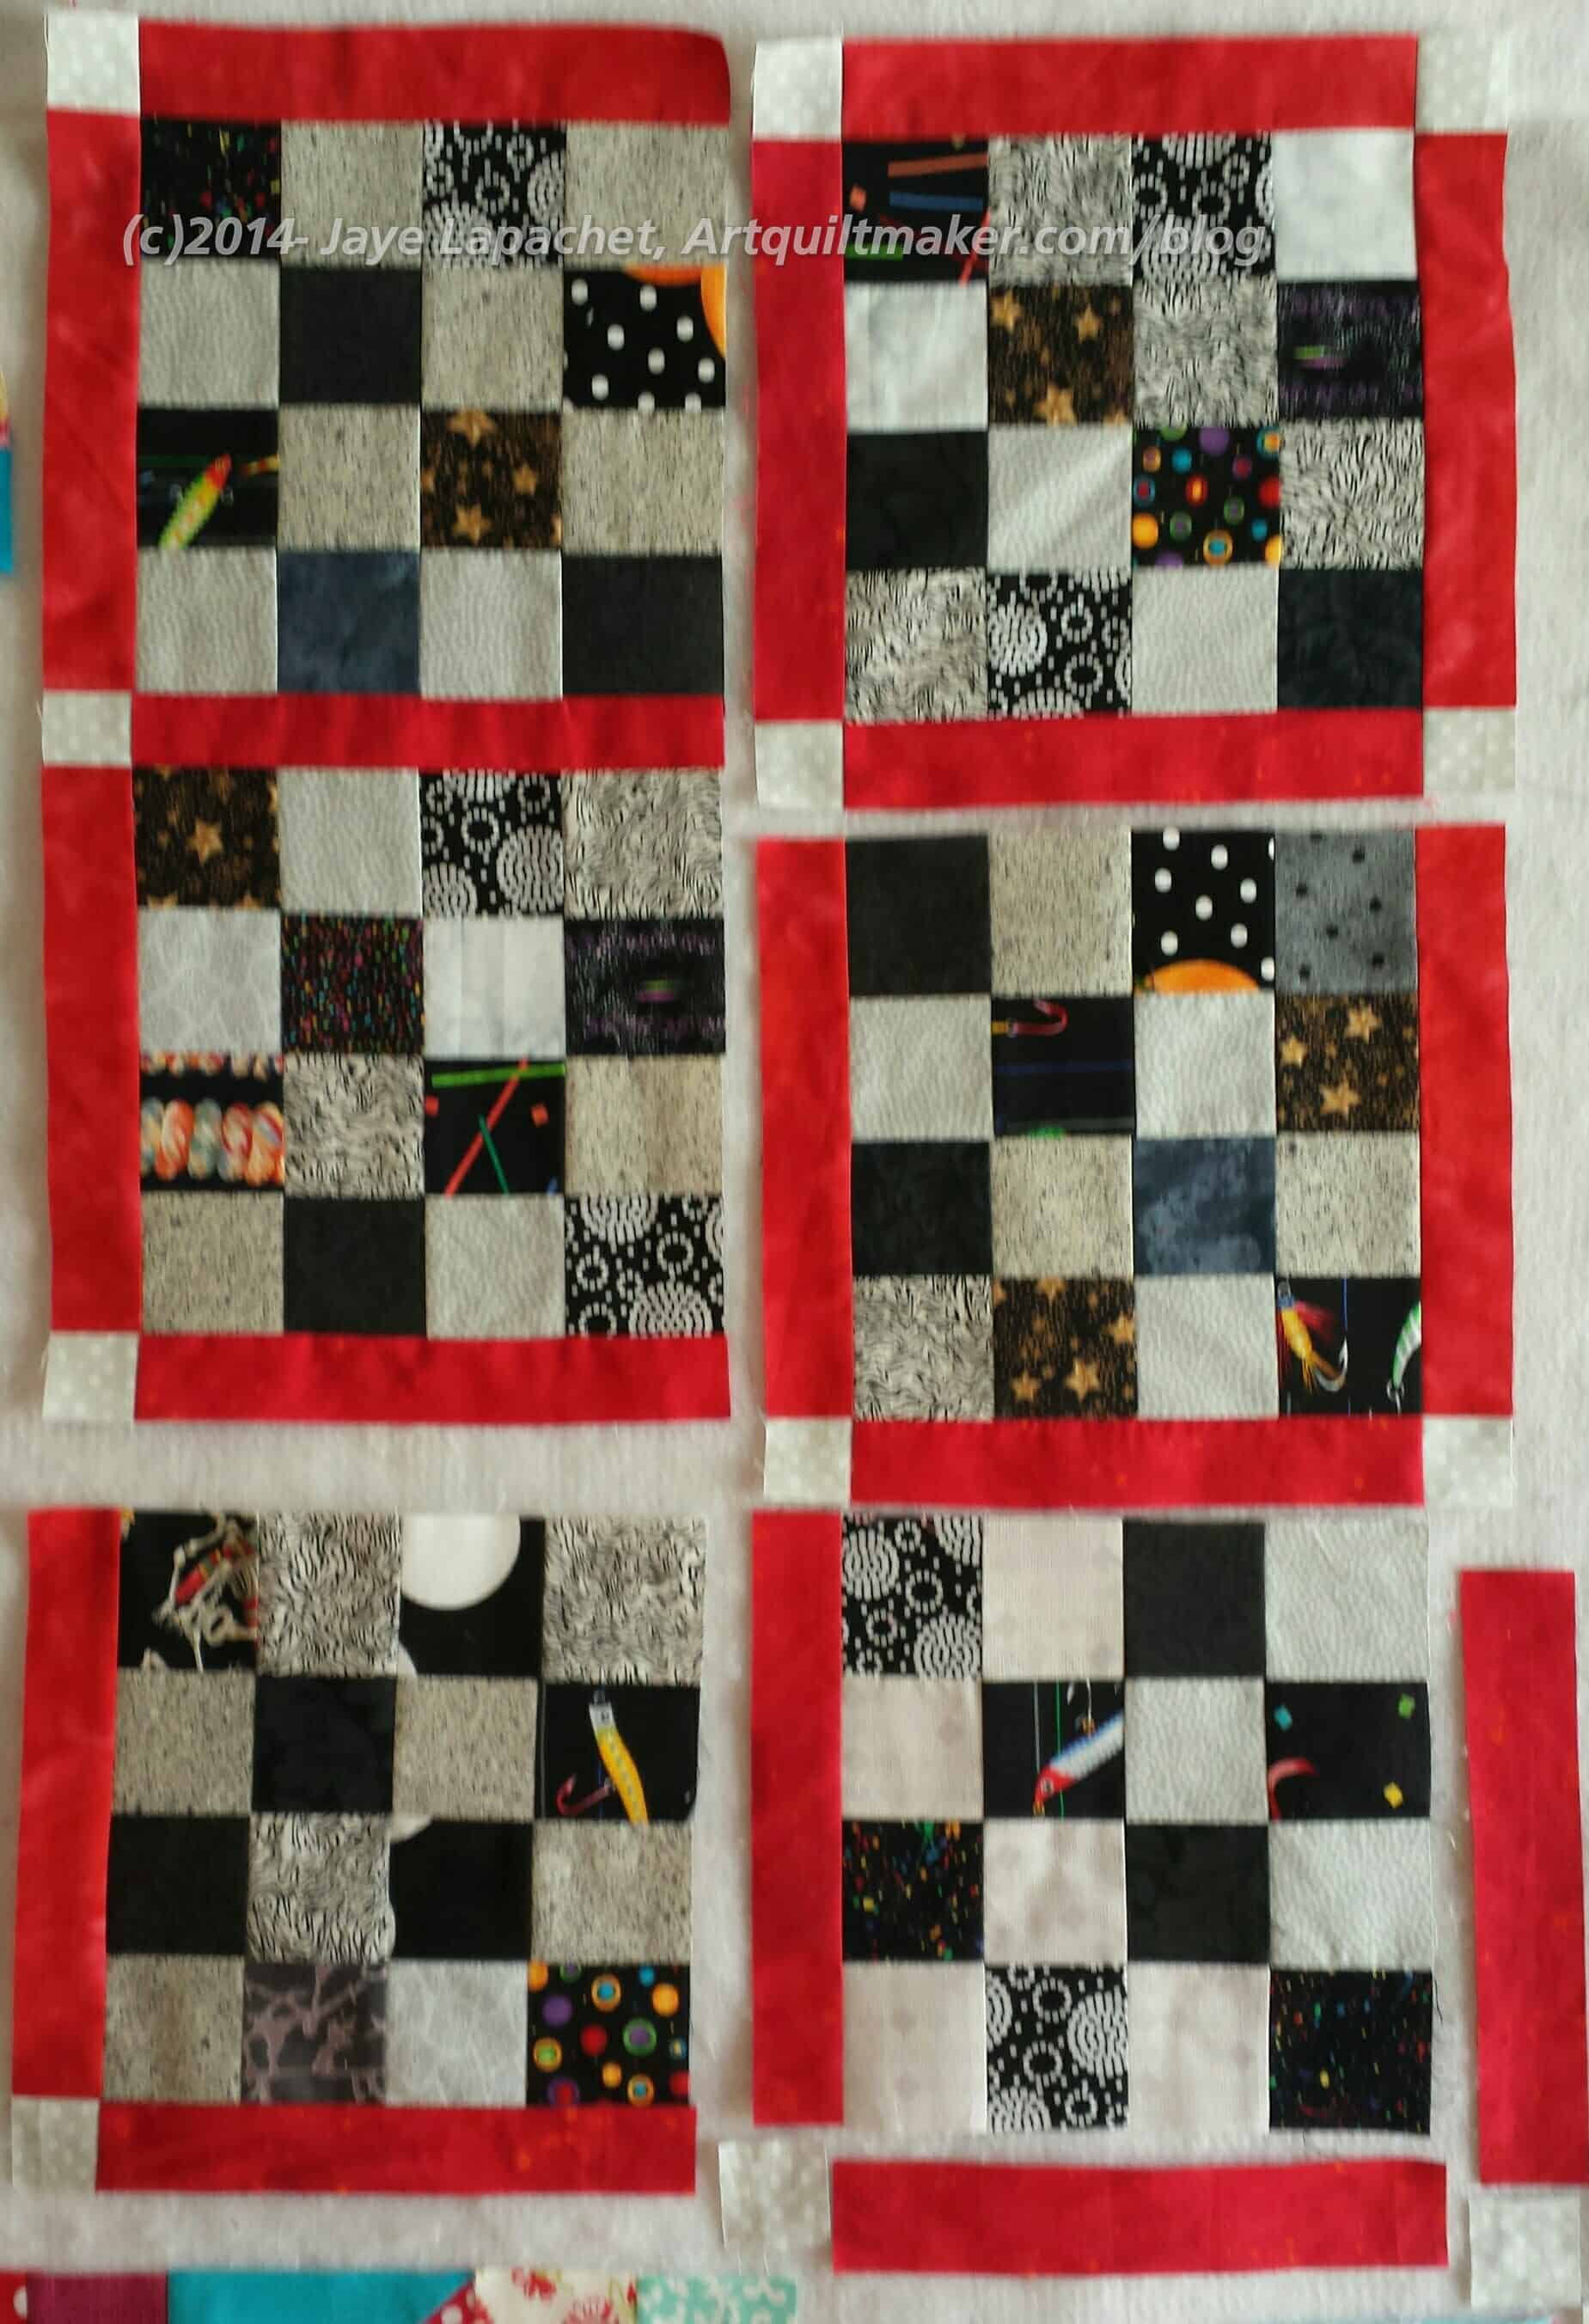
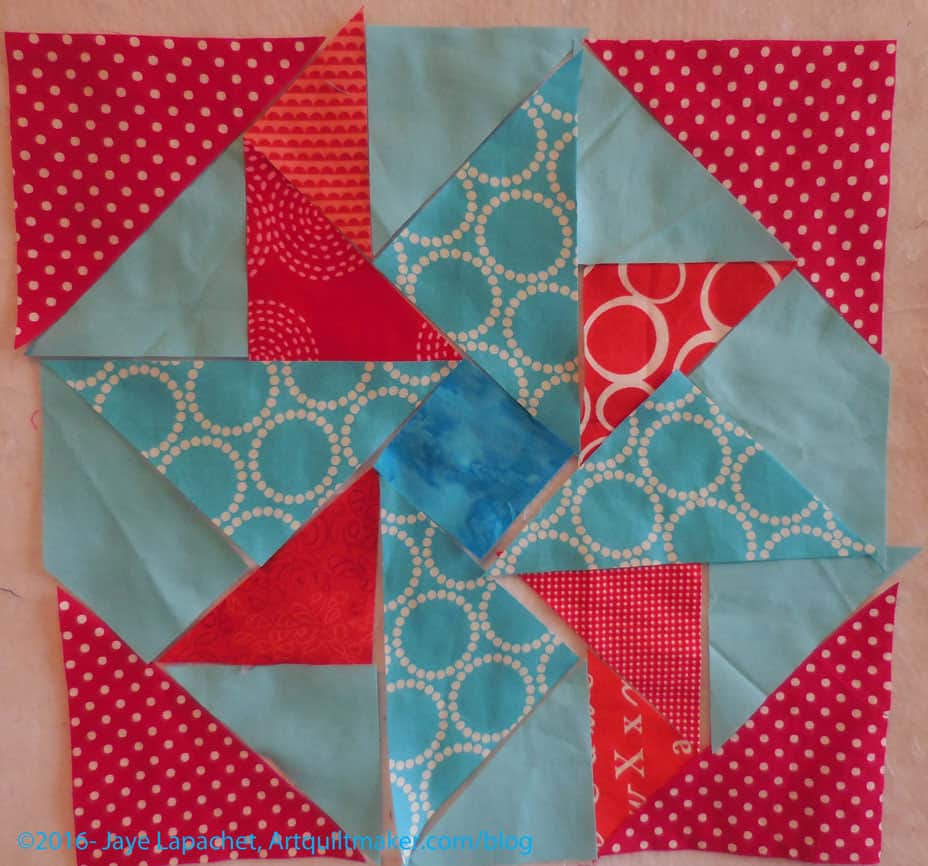
Red Strip Donation Blocks
I started out with the above group of donation blocks. I have been setting these with plain blocks of the same size. I decided that I wanted to do something different with these blocks. Sashing is the answer. Having something between these blocks prevents the seams from getting too thick and hard to sew. Also, it allows each block to shine a little bit rather than being part of a mass. Adding sashing or plain borders or nothing is a design choice. For any quilt, it is important to decide on the look and feel you want.
Even if you put the same sized plain blocks between these blocks, the method I will show you works the same way.
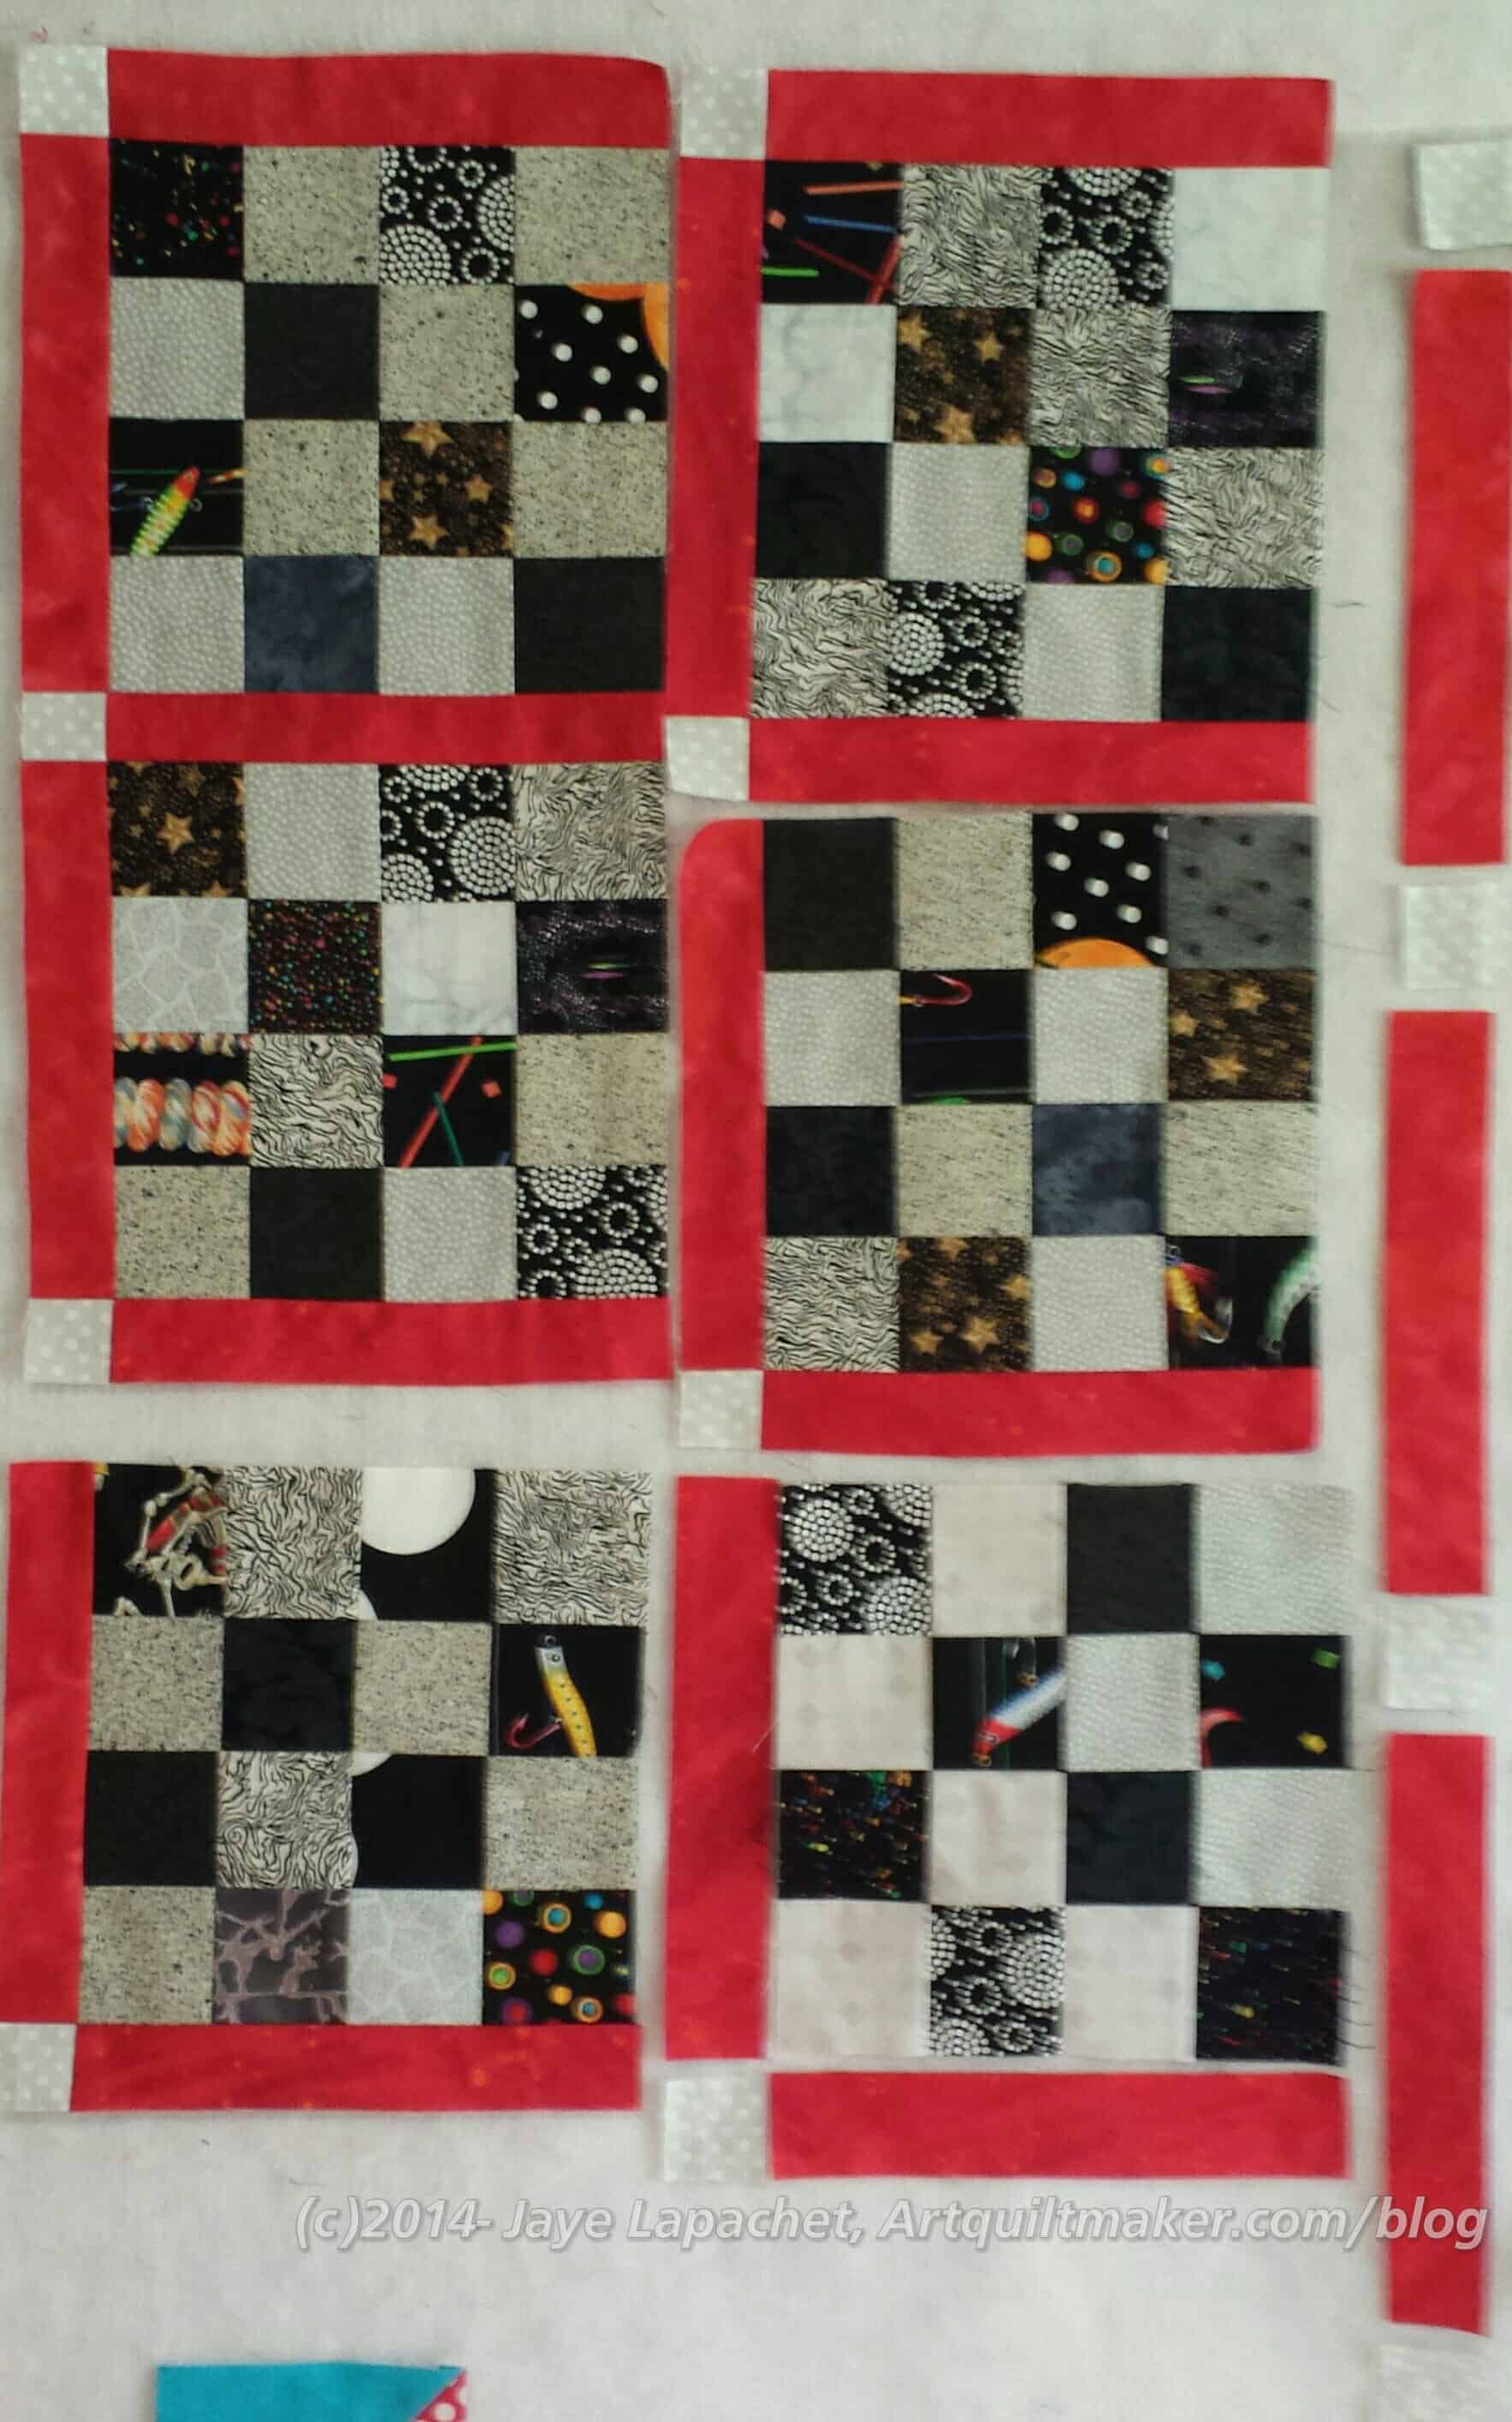
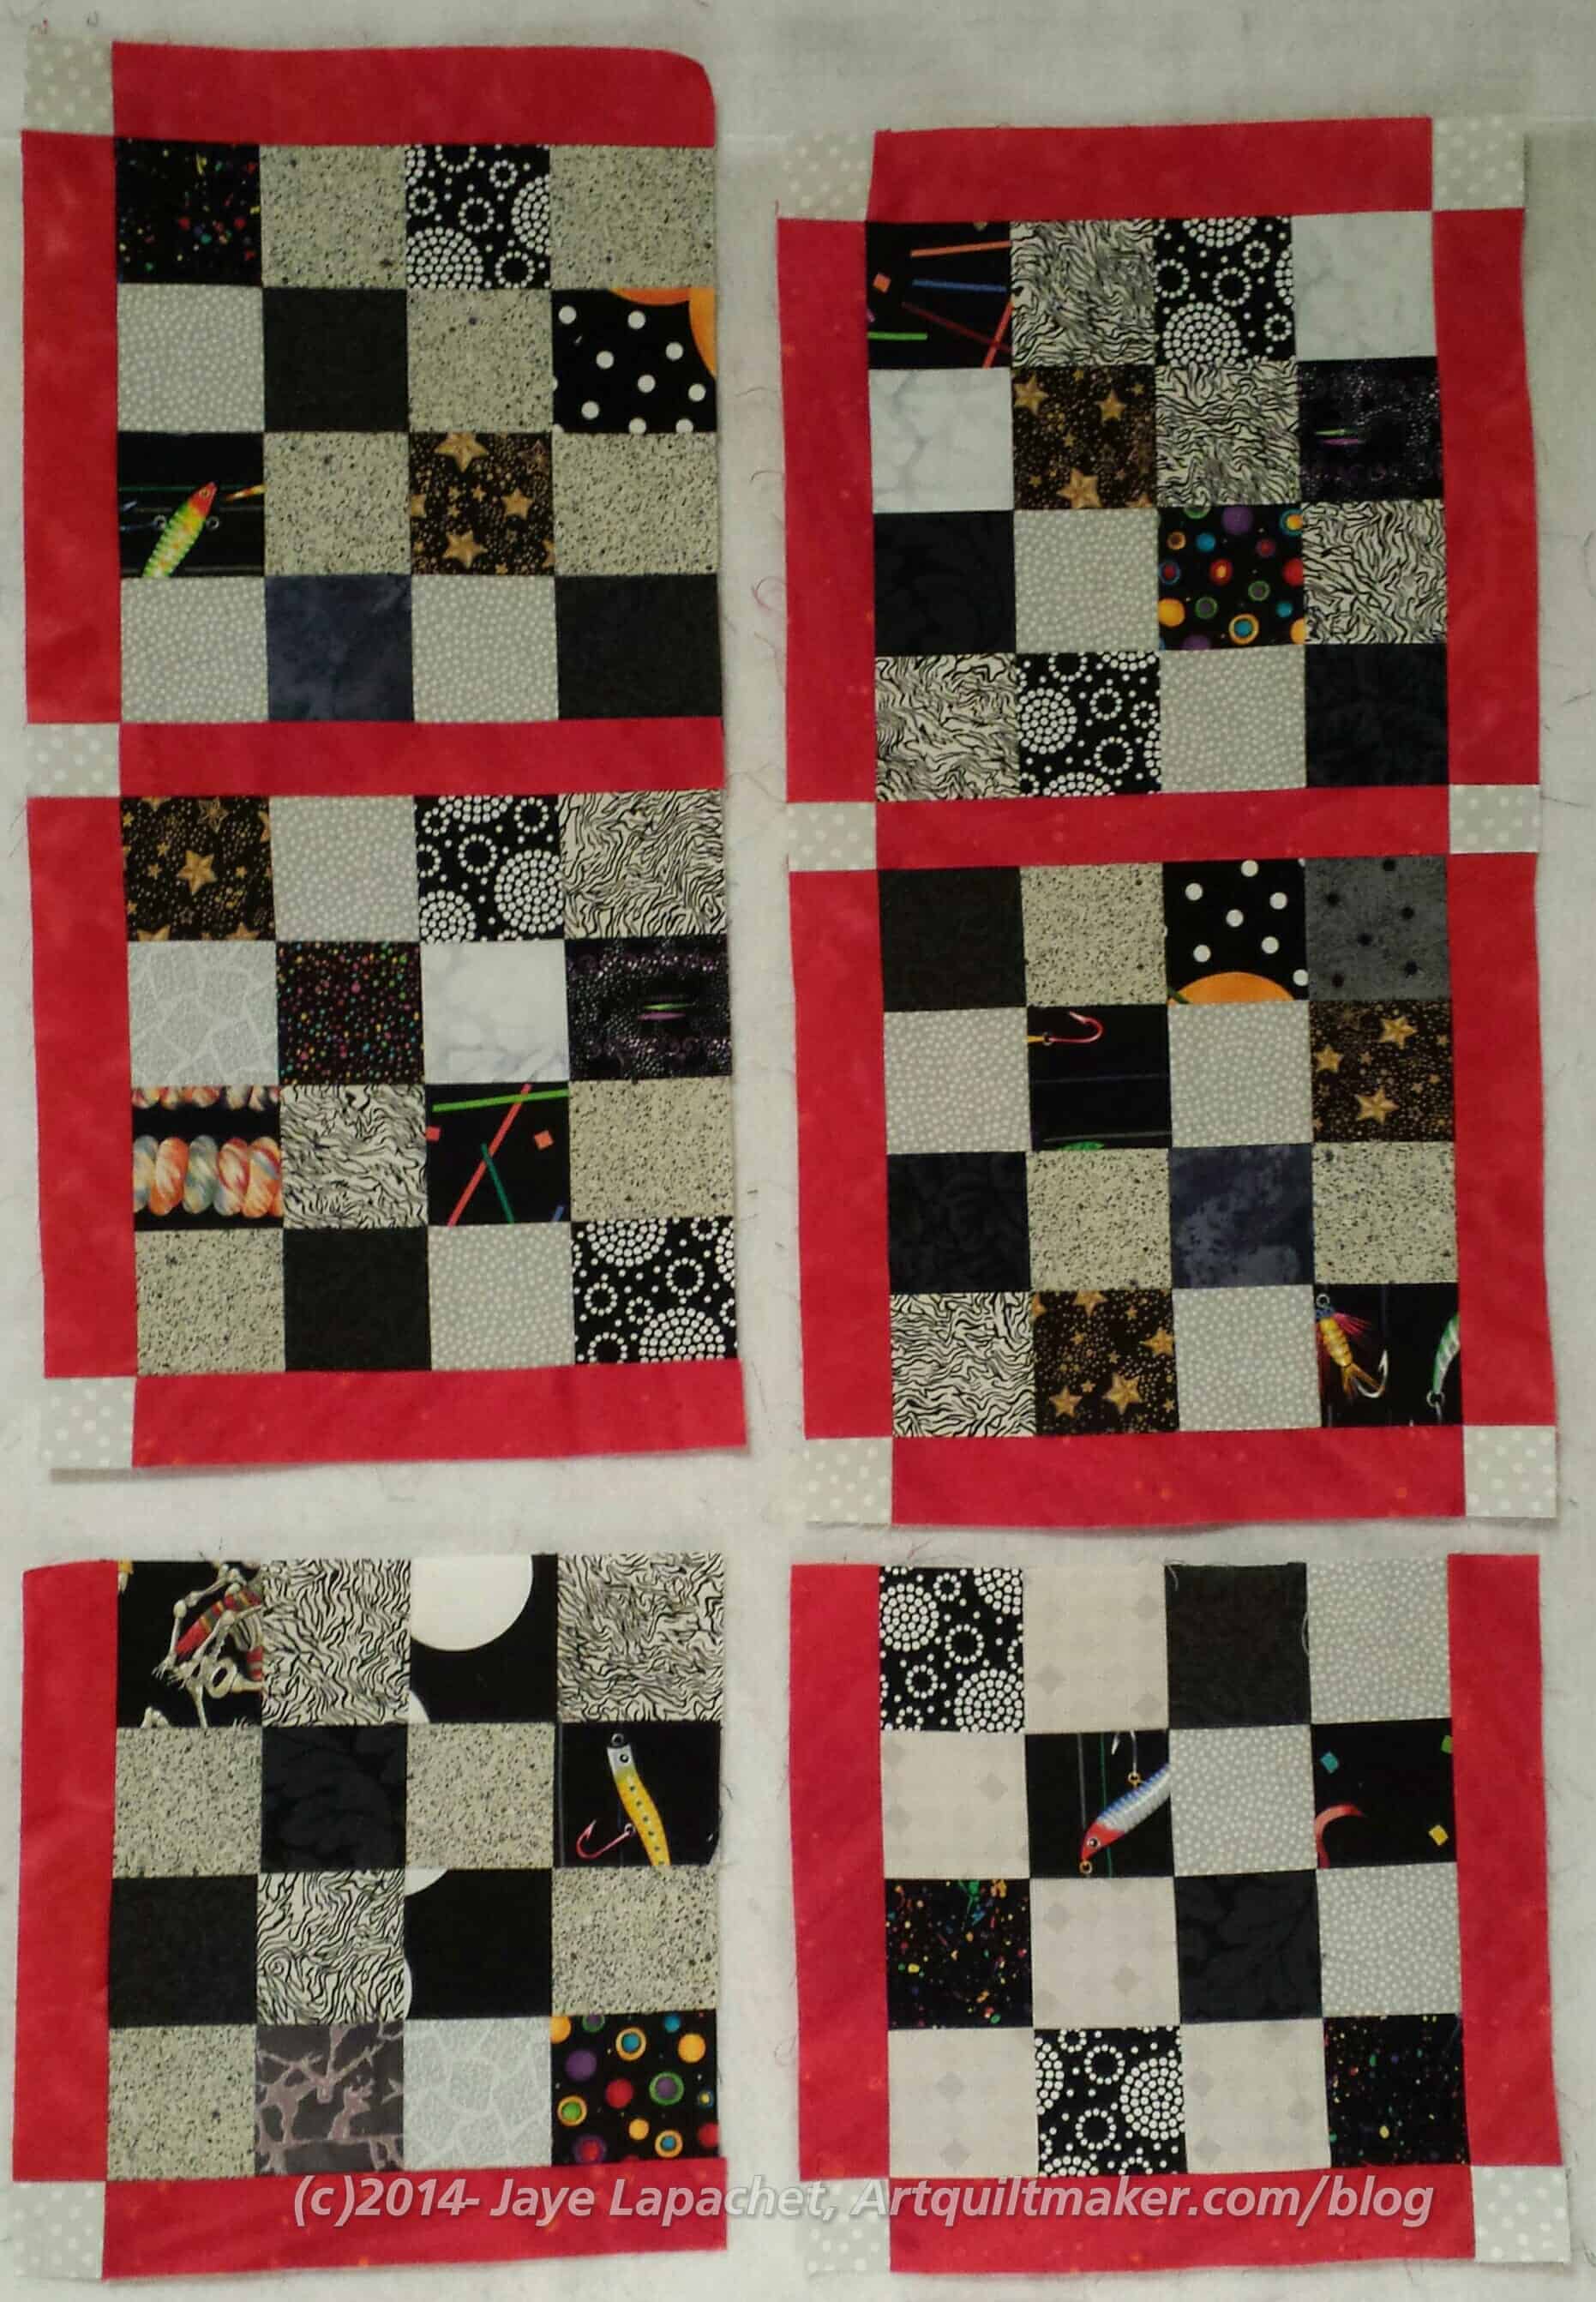
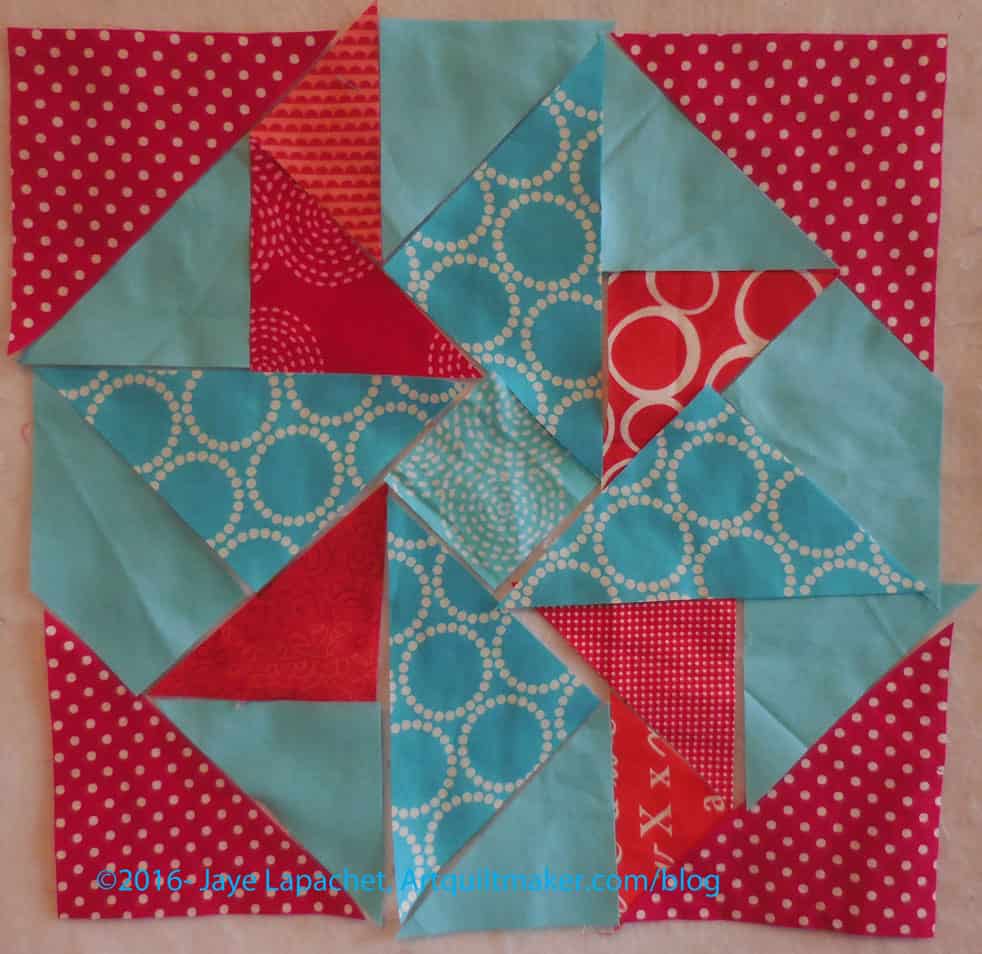
Blocks with Sashing & Cornerstones
The first step is to cut sashing and cornerstones. The photo above shows all the sashing and cornerstones cut and laid out on my design wall.
If you don’t want cornerstones, cut your top sashing the same size as your block + side sashing – 1/2 inch seam allowance (1/4 inch + 1/4 inch = half inch). The formula is:
Block size + vertical sashing – 1/2 inch seam allowance = finished size of top sashing without cornerstones
I can’t tell you the exact size, because I don’t have your blocks in front of me. Use a calculator. I do.
Also, notice that my top and side rows are different. I plan to put a straight strip of fabric across the top and sides as a border, which means I don’t need sashing for the top or sides.
Once you have all of your sashing and cornerstones cut, it is time to sew. I like to start in the bottom left hand corner. I start there because it is closer to my sewing machine when all the blocks are on my design wall. As I sew, the blocks shrink (because of the taken up seam allowance) and get closer to where I am sitting.
Sew vertical sashing to right side of block
First, sew one vertical sashing piece to the right side of your block.
Press to the red.
Sew top sashing to cornerstone
Next, sew one piece of the top sashing to a cornerstone. In the above photo the sashing is white and the cornerstone is a red flower fabric.
Take your new little sashing + cornerstone piece to the ironing board and press to the red.
Now, nest the seams and pin the top sashing/cornerstone piece to the block with vertical sashing.
The top sashing should be on the top of the block as it moves through the sewing machine. Sew the top sashing to the block.
Top sashing sewn to block with vertical sashing
Sew the side sashing and the top sashing/cornerstone to all the blocks as described above.
IMPORTANT: The top row, as mentioned above, in my quilt, is different, so just sew the vertical sashing to the blocks in the top row and the top sashing to the blocks on the right edge.
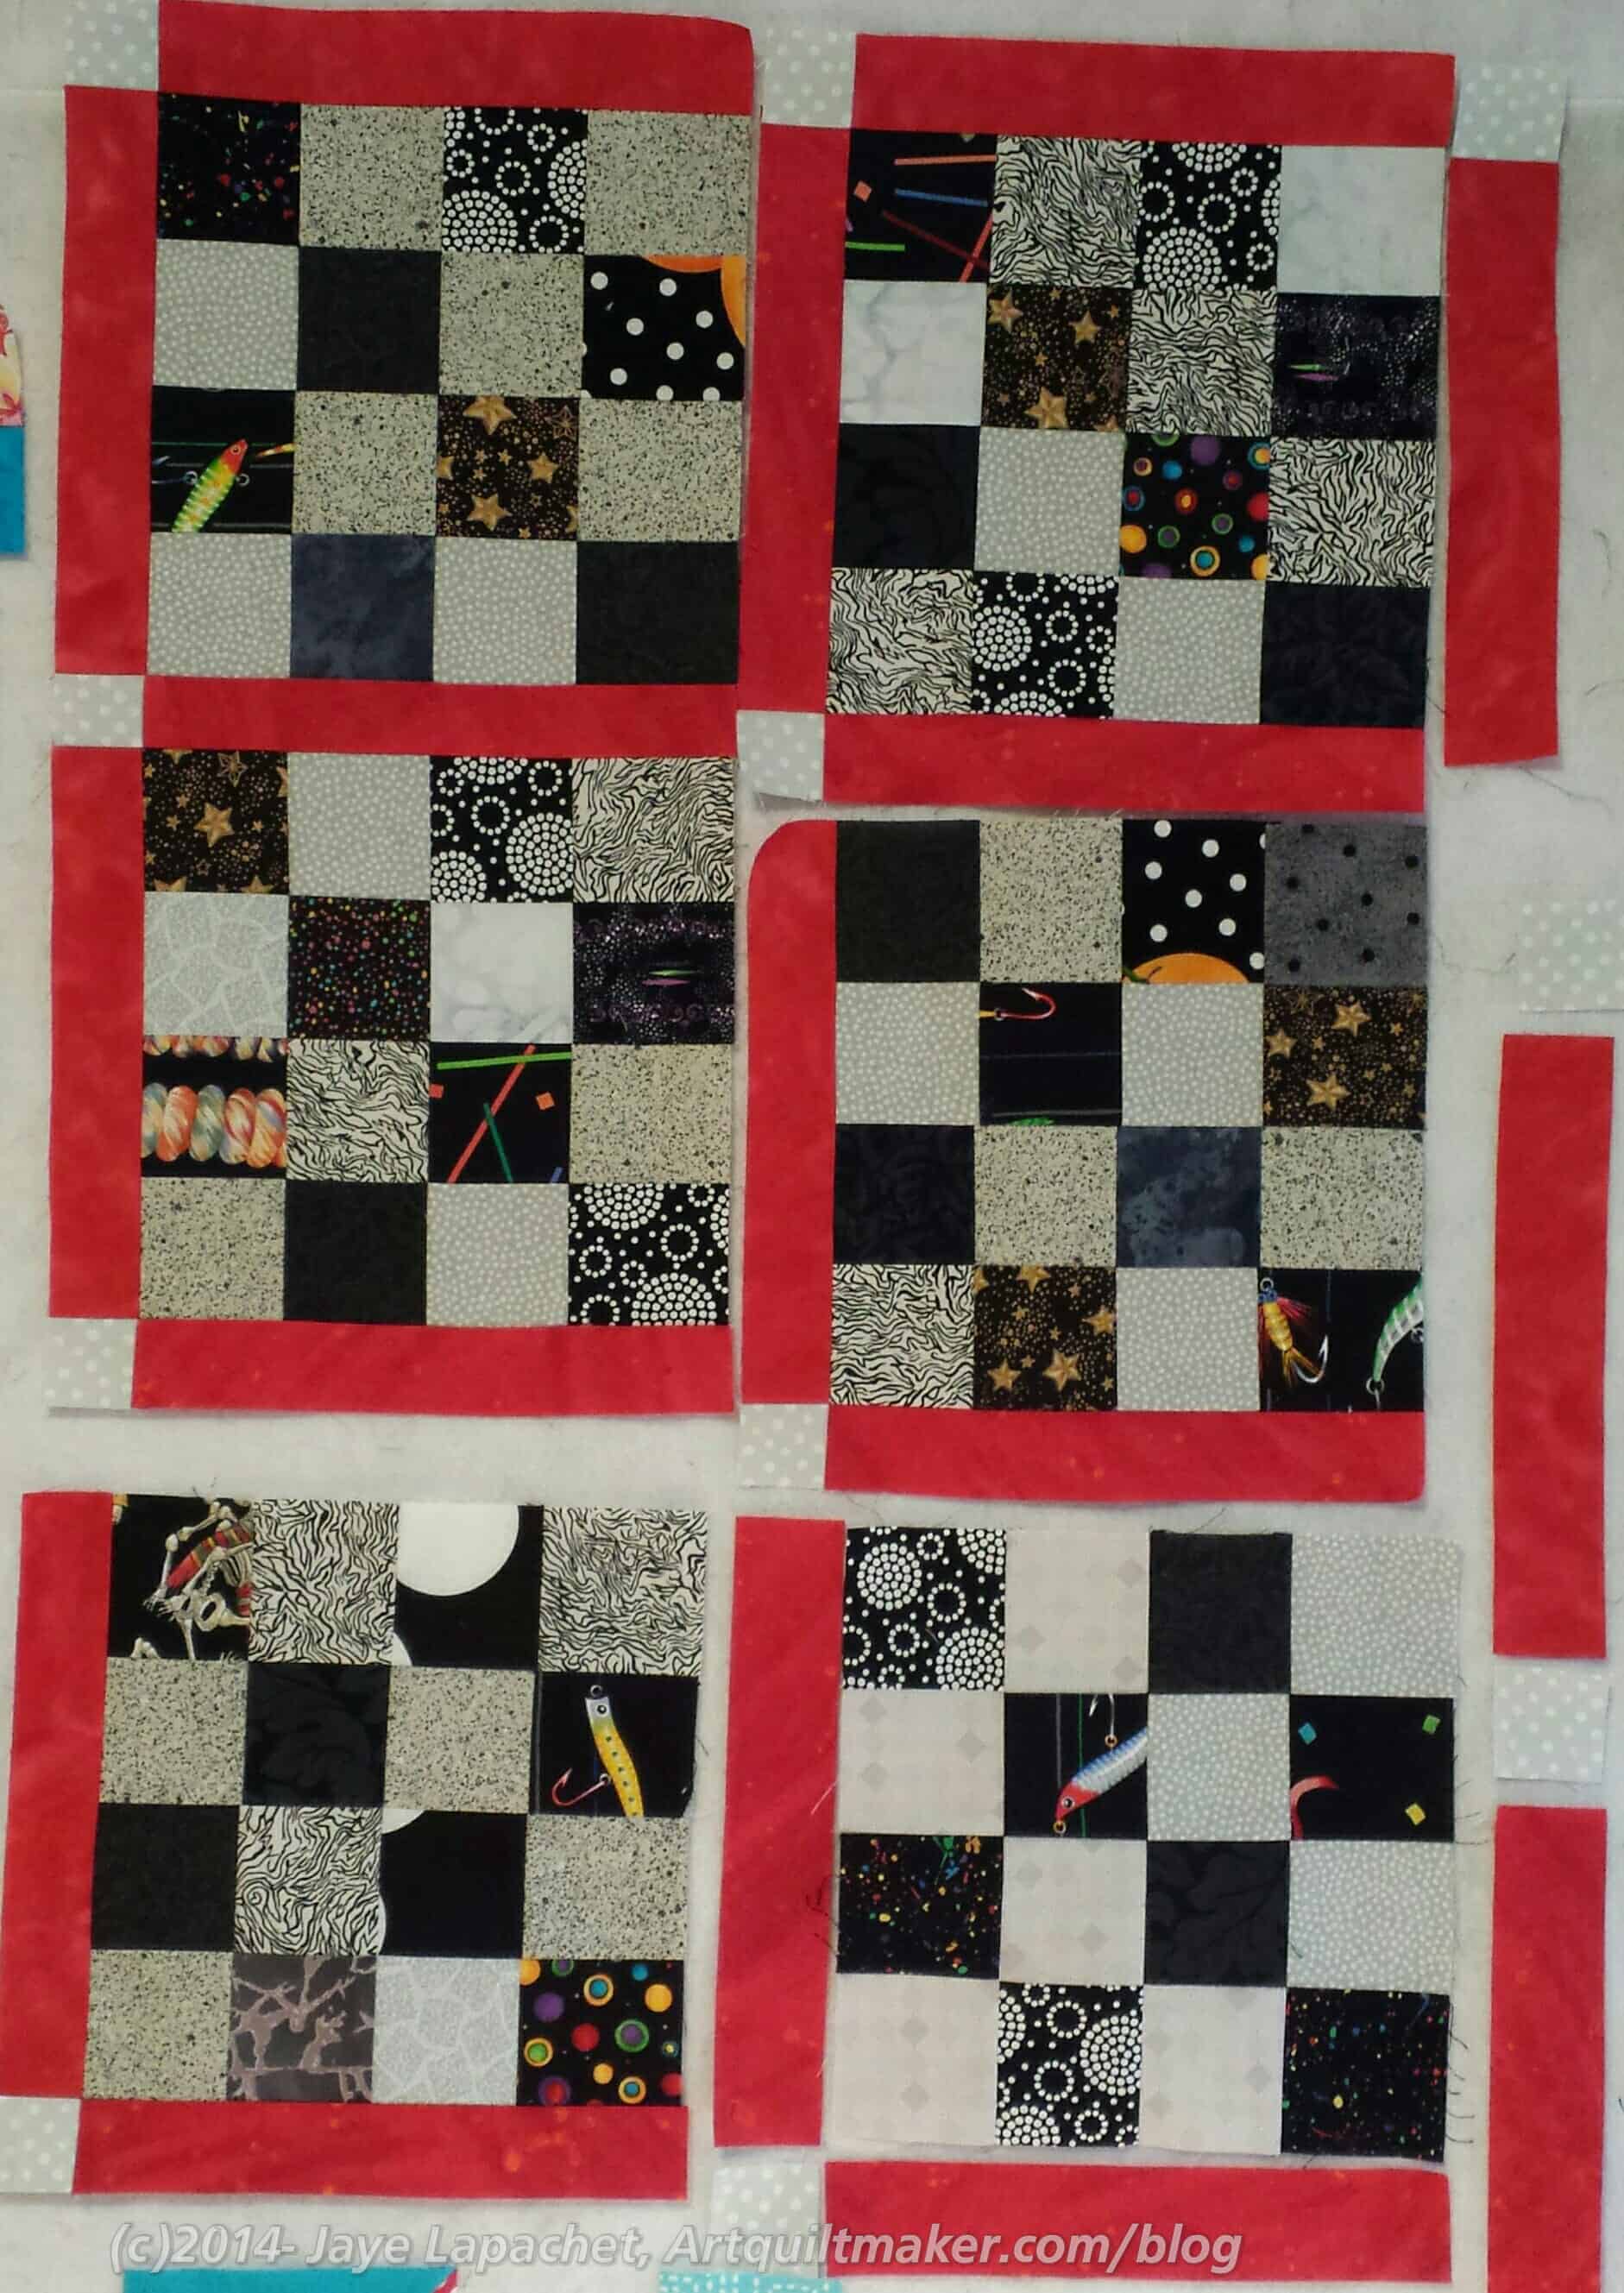
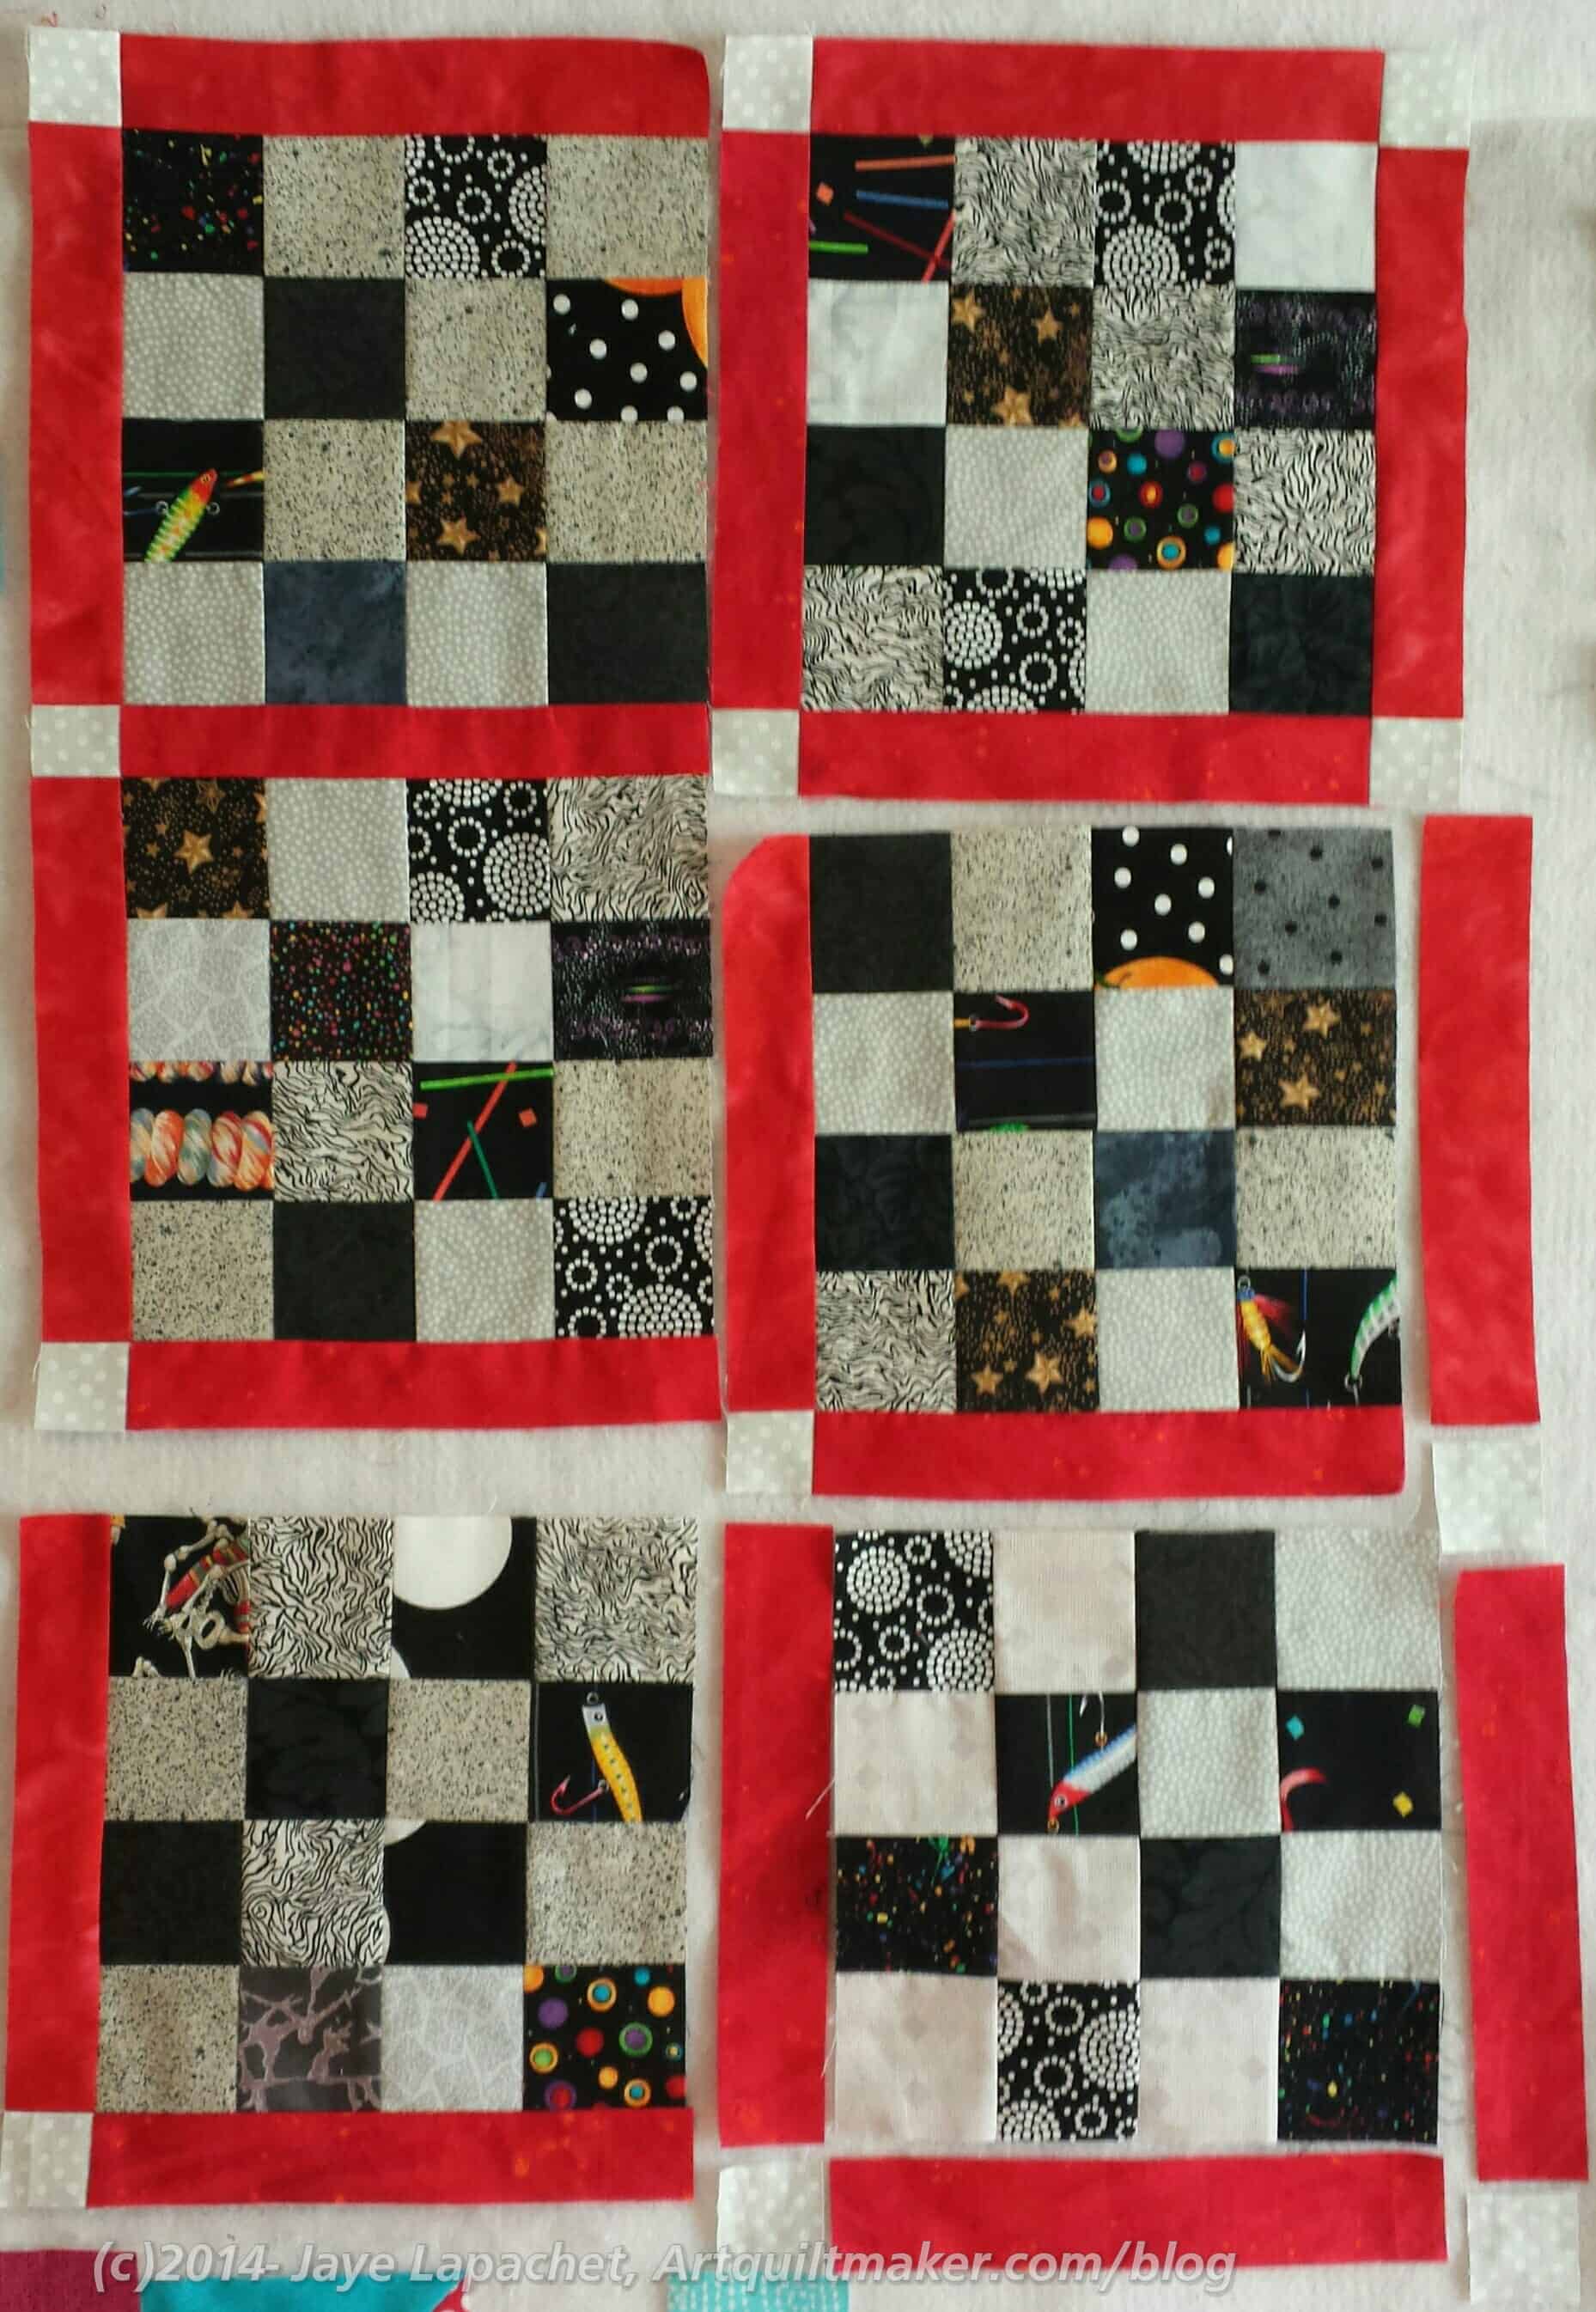
All of the blocks have sashing/cornerstones sewn to their correct side
Once you have sewn all the sashing on to the blocks, you will begin to sew the blocks together. This is chunking. I have talked about it before. I ‘chunk’ because 1) I don’t like sewing long rows together and 2) it keeps my piecing more precise.
Take two blocks with sashing & sew them togetherPin blocks together, matching seams and sew
First take the two blocks in the bottom left hand corner, pin them with matched points and nested seams. You will pin them together so that the top white sashing is sewn to the red cornerstone. The white vertical sashing will be sewn to the red block.
Sew them together. I pin in the seam allowance so that i have a better chance at the seams matching up. When I take the pins out as I am sewing, chances increase that the seams won’t match. In general, to increase my chances of perfectly matching seams, I try to sew towards the seam allowance, but that didn’t work on this quilt, because I pressed towards the red. Use a stiletto to keep the seams in place for as long as possible.
Two blocks with sashing sewn together
Now you have a block with sashing on two sides.
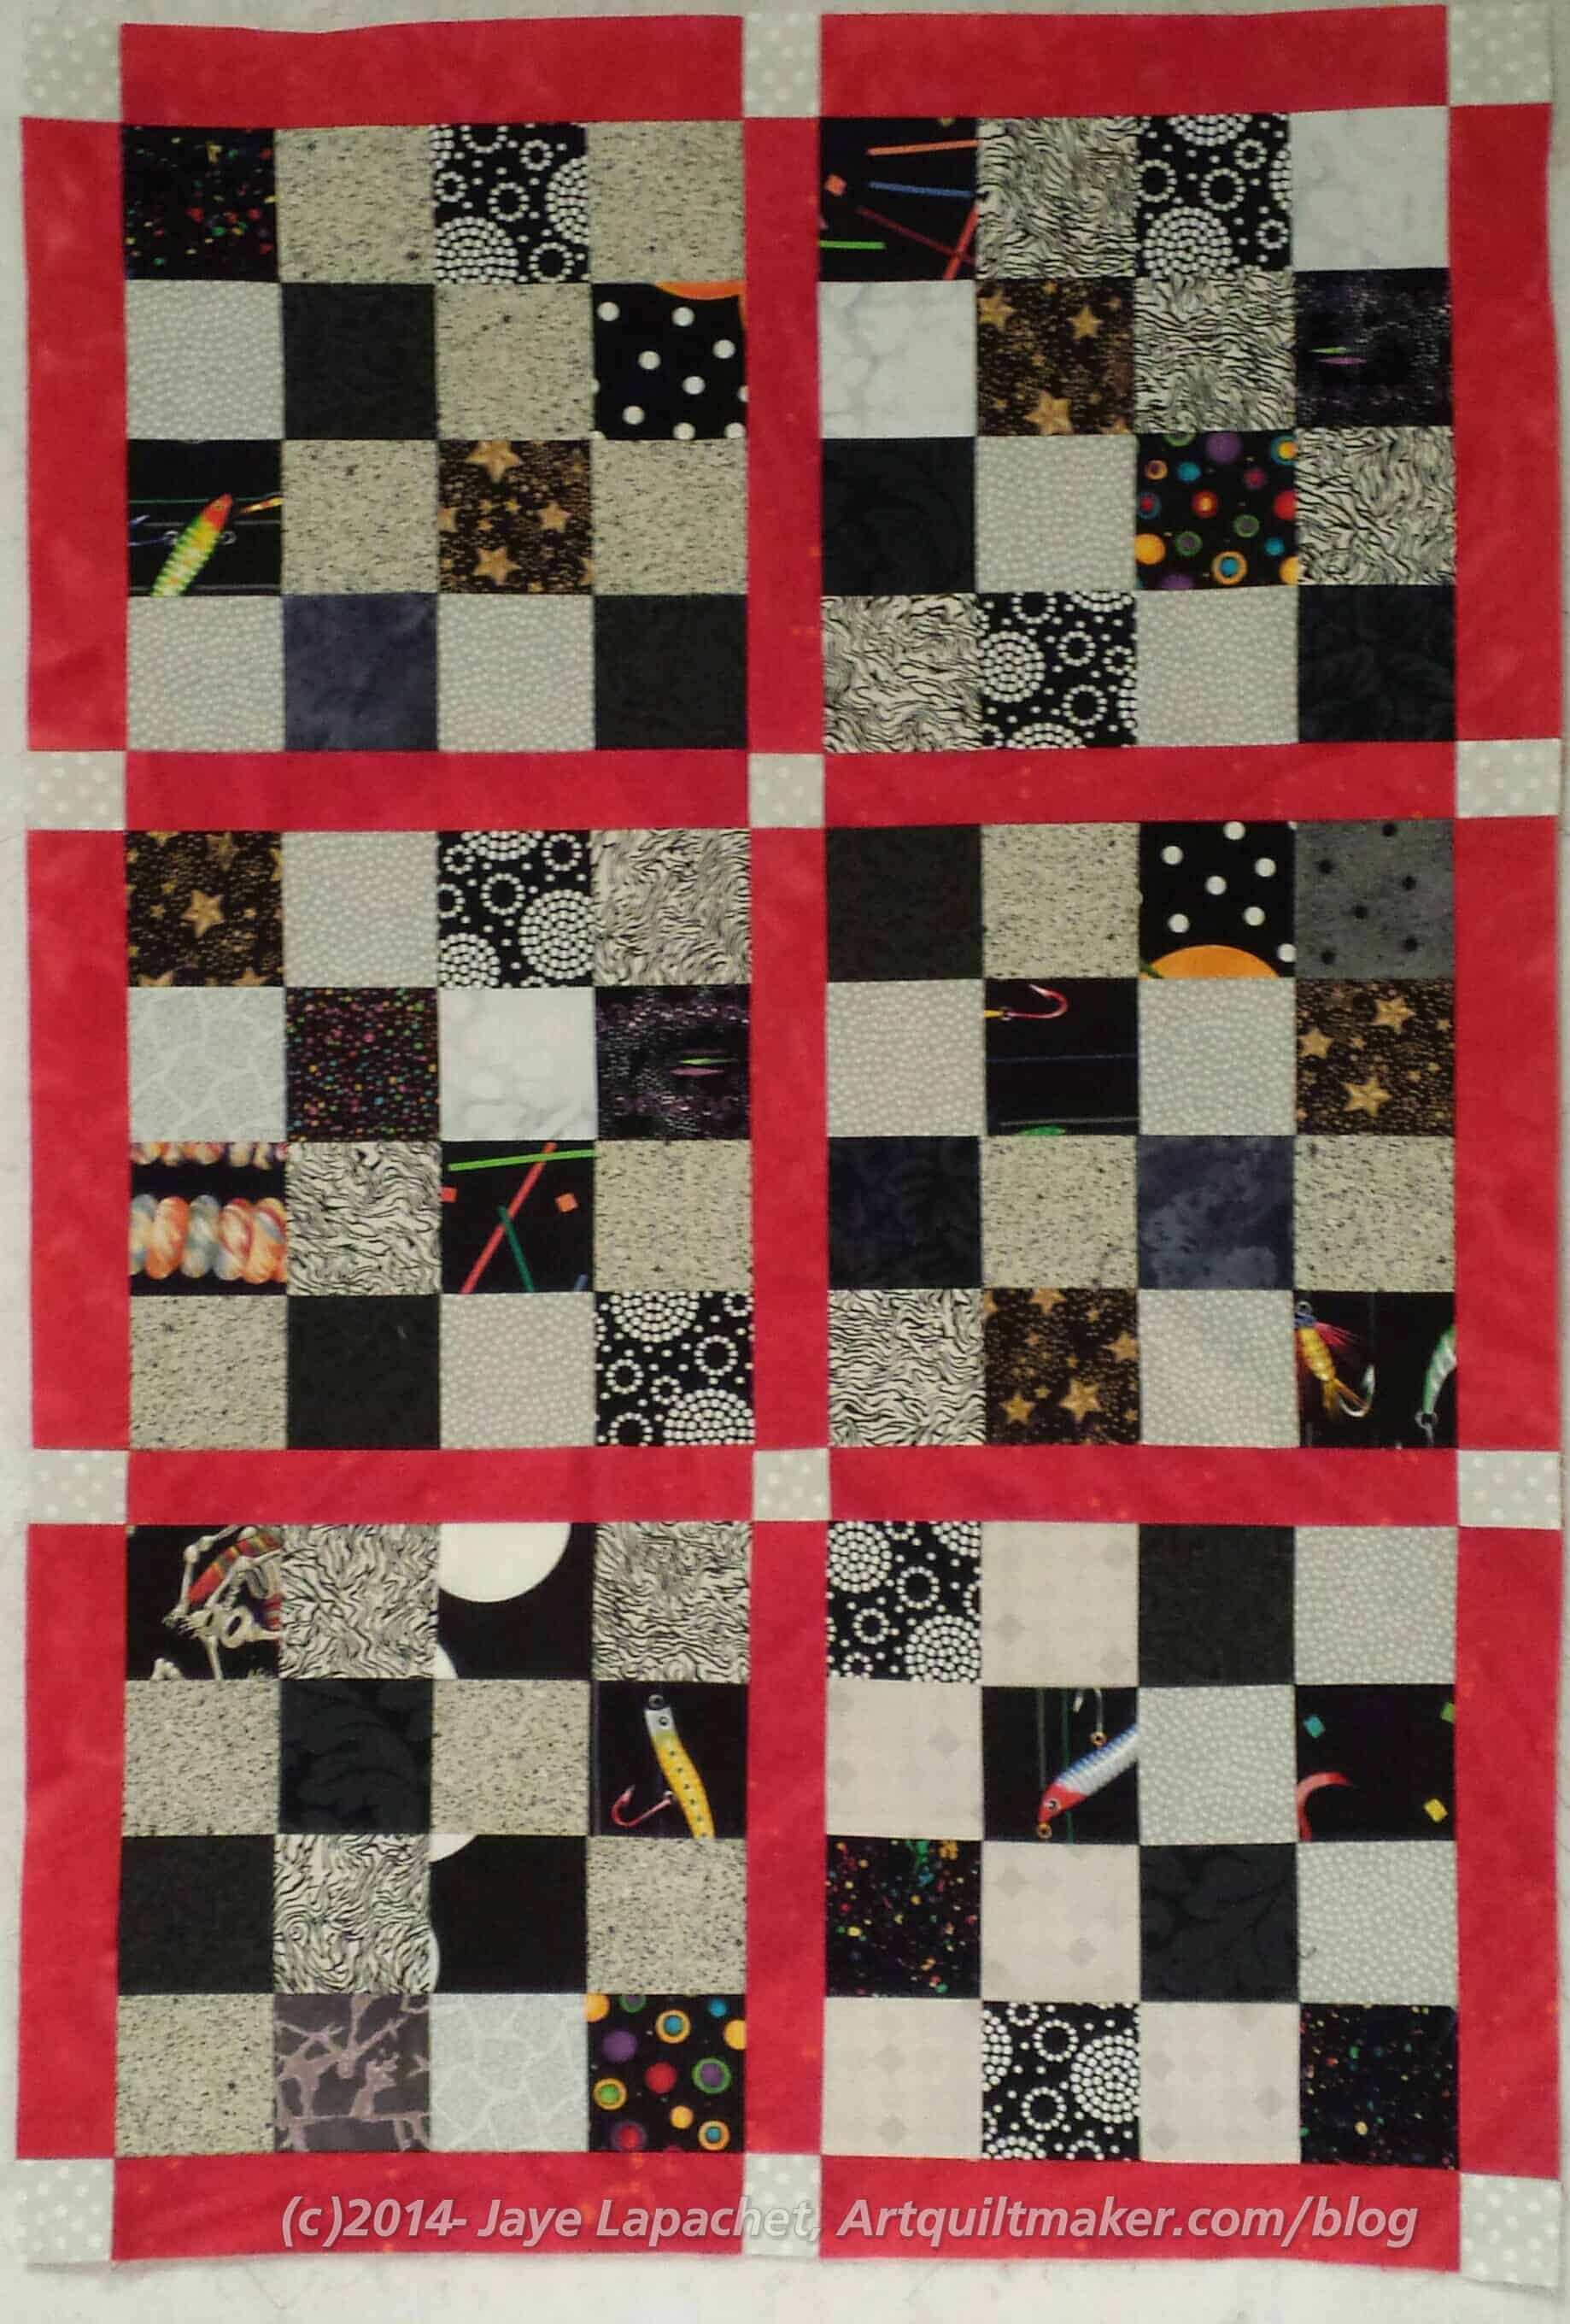
Once you have sewn all of the sashing and cornerstones to the blocks, you will have completed the first step in putting your quilt top together.
Sew sashing to top of blocks on the right edge only
On the right edge of the quilt, you will only sew the top sashing to the blocks. As mentioned before, there will be a border without cornerstones in my quilt, so I don’t need vertical sashing or cornerstones on the edges. If you want cornerstones in your border, follow the directions above for all blocks.
One long seam left
After you have sewn the various blocks together, you will have one long seam left.
Finished Center with sashing
Once you sew that seam, the center of your quilt top is done.
I know that the common way of sewing a quilt together is sewing it together in rows then sewing all the rows together. Using the row method is easier to explain than ‘chunking’, but, as I said above, my method is more precise.
**I use affiliate links and may be paid for your purchase of an item when you click on an item link in my post. There is no additional cost to you for clicking or purchasing items I recommend. I appreciate your clicks and purchases as it helps support this blog.
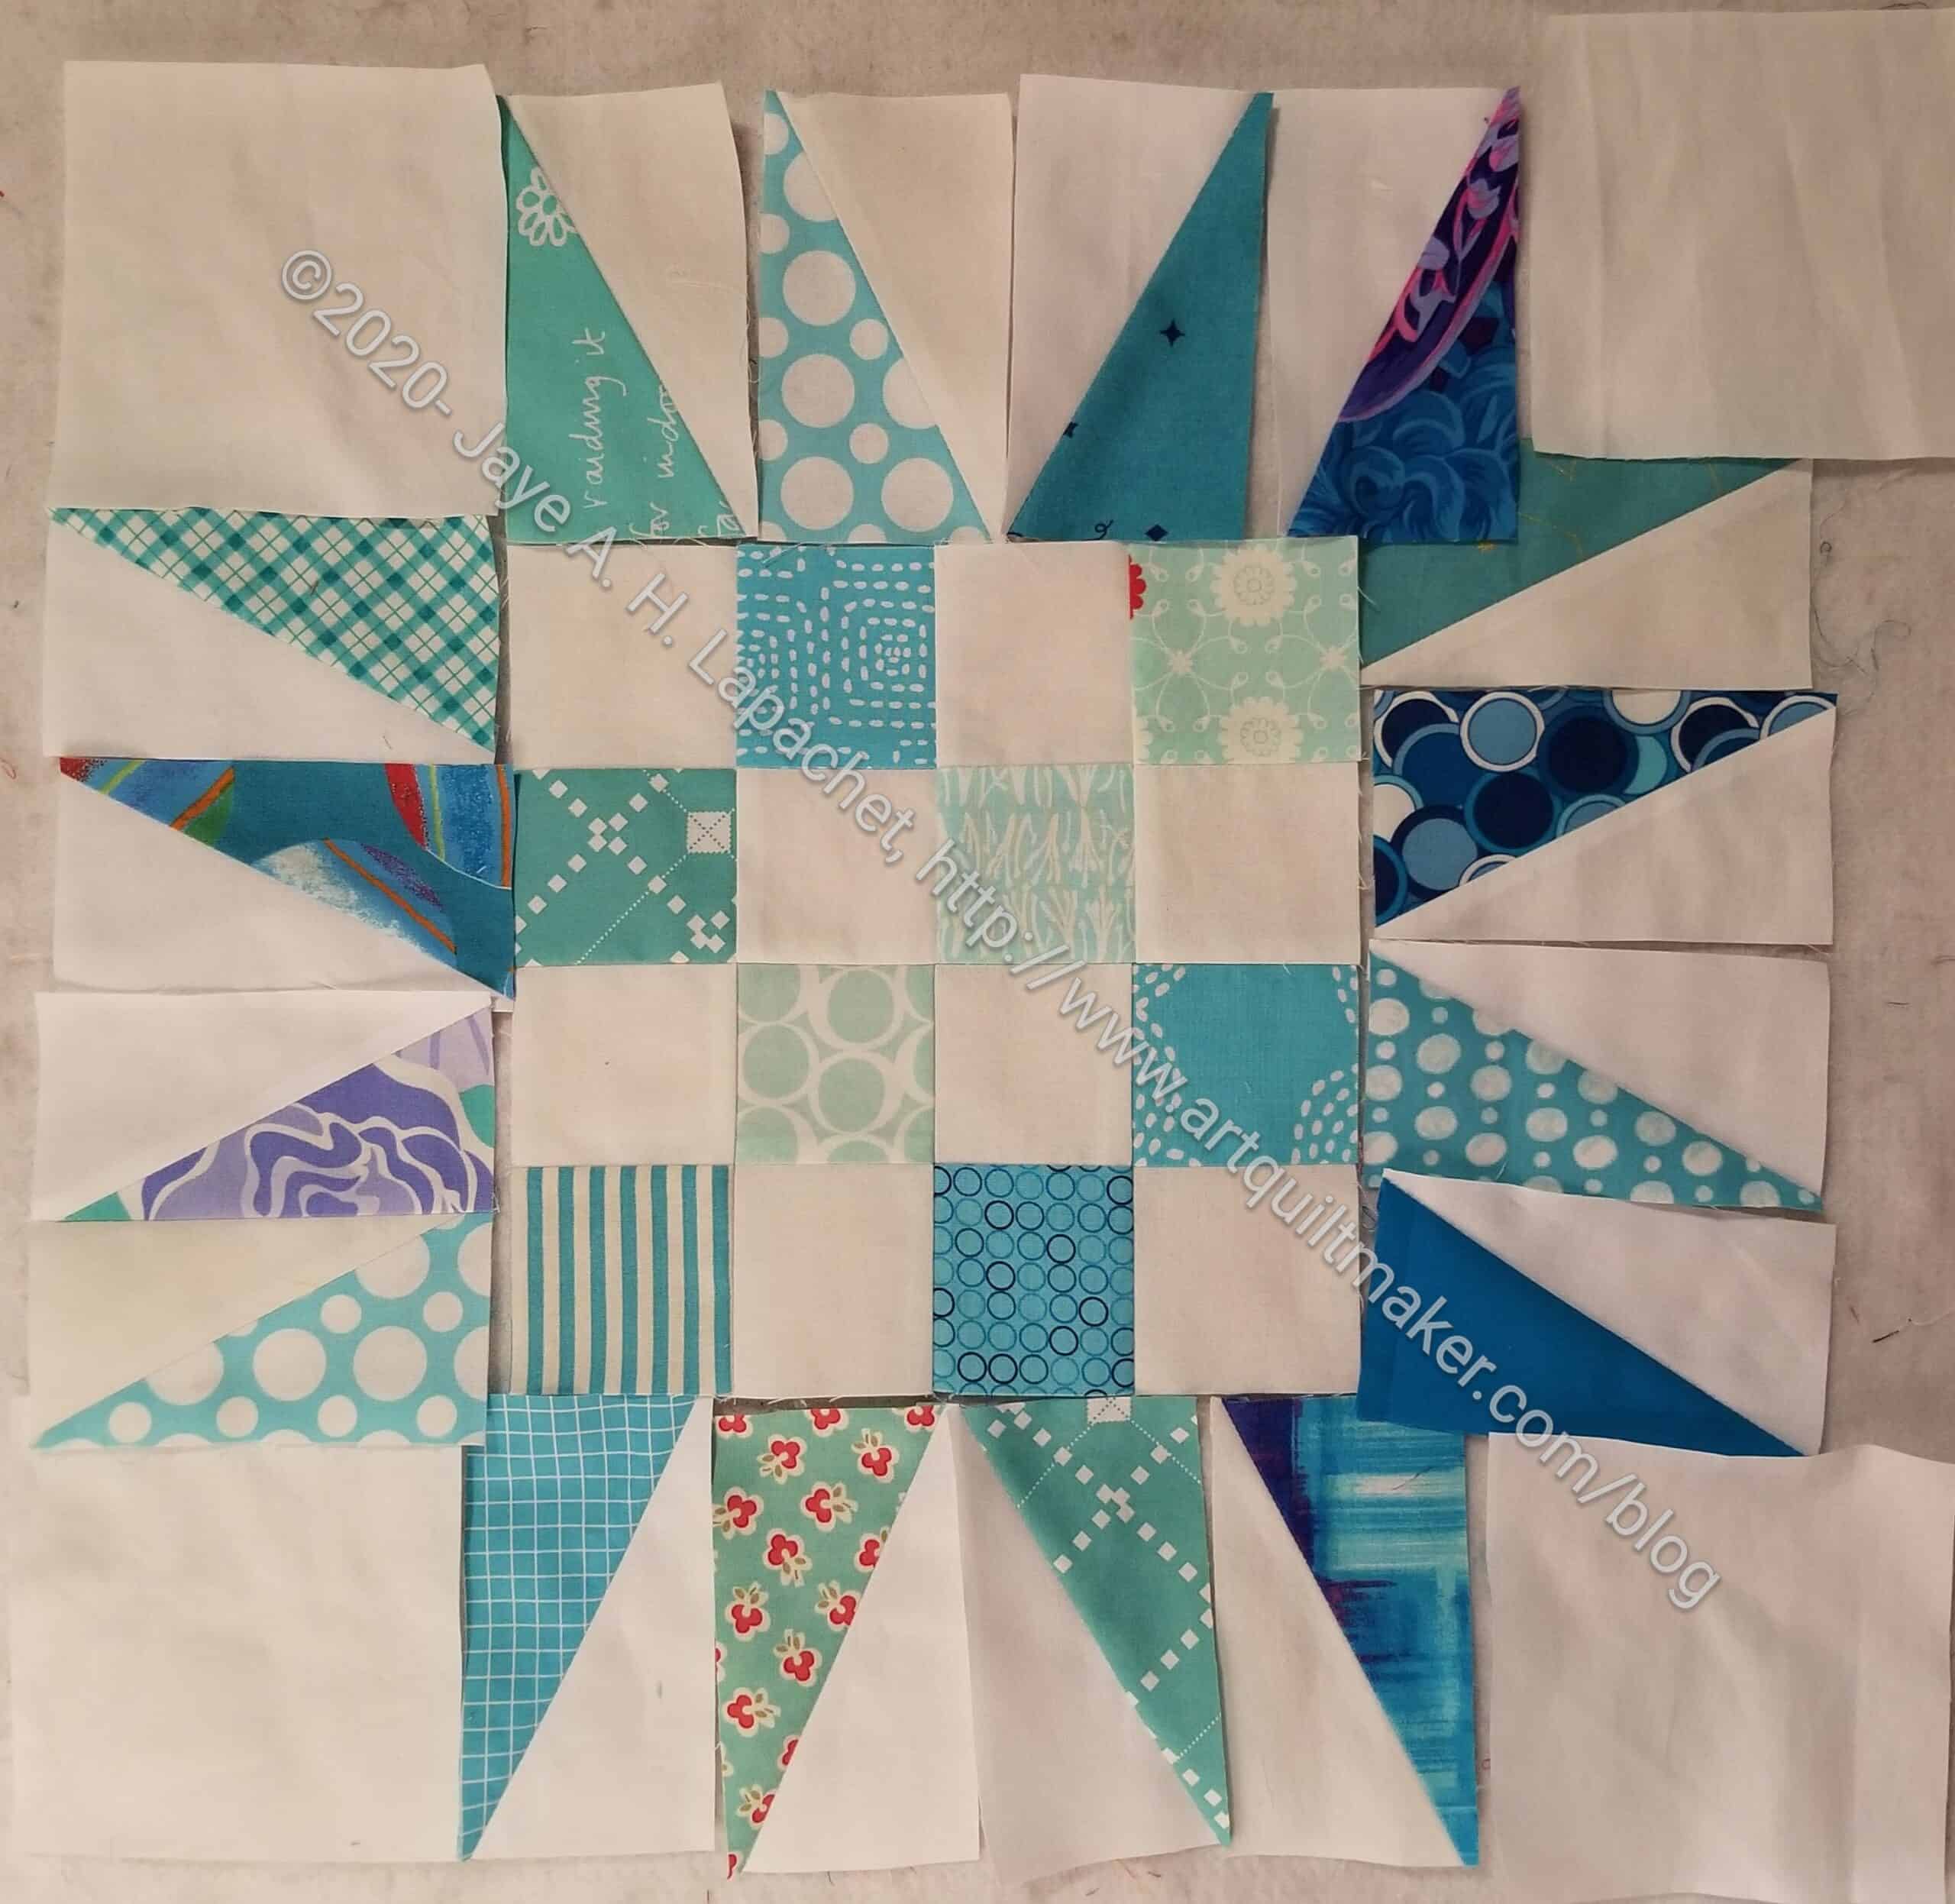
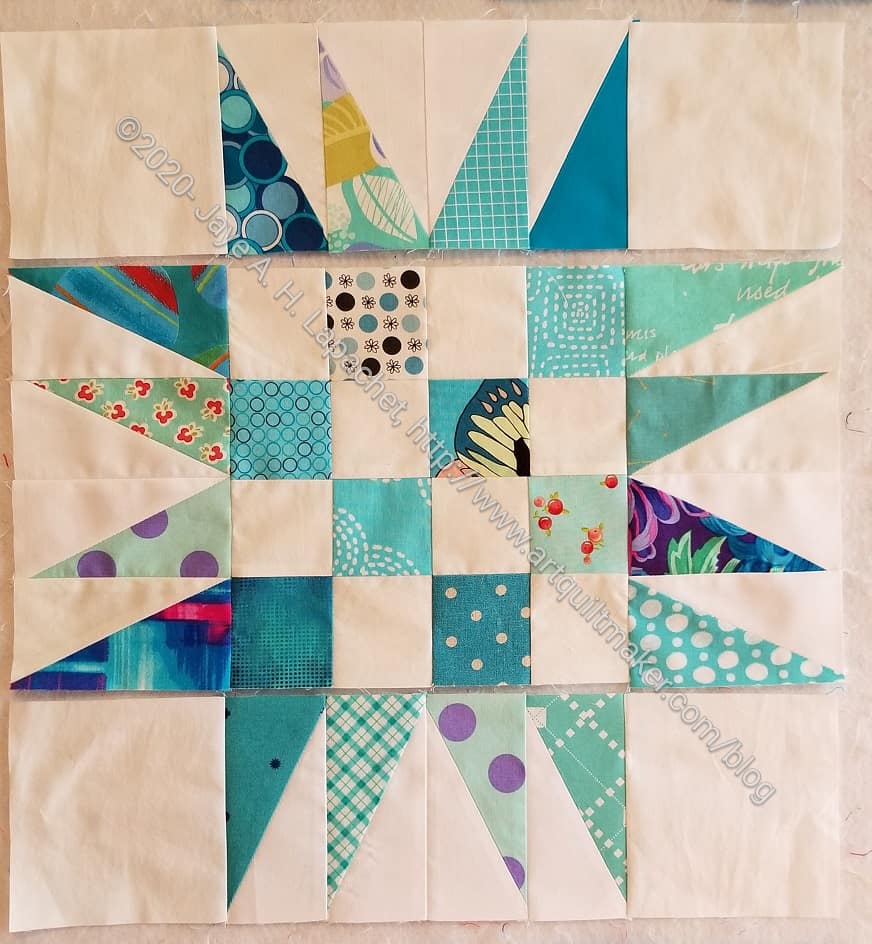
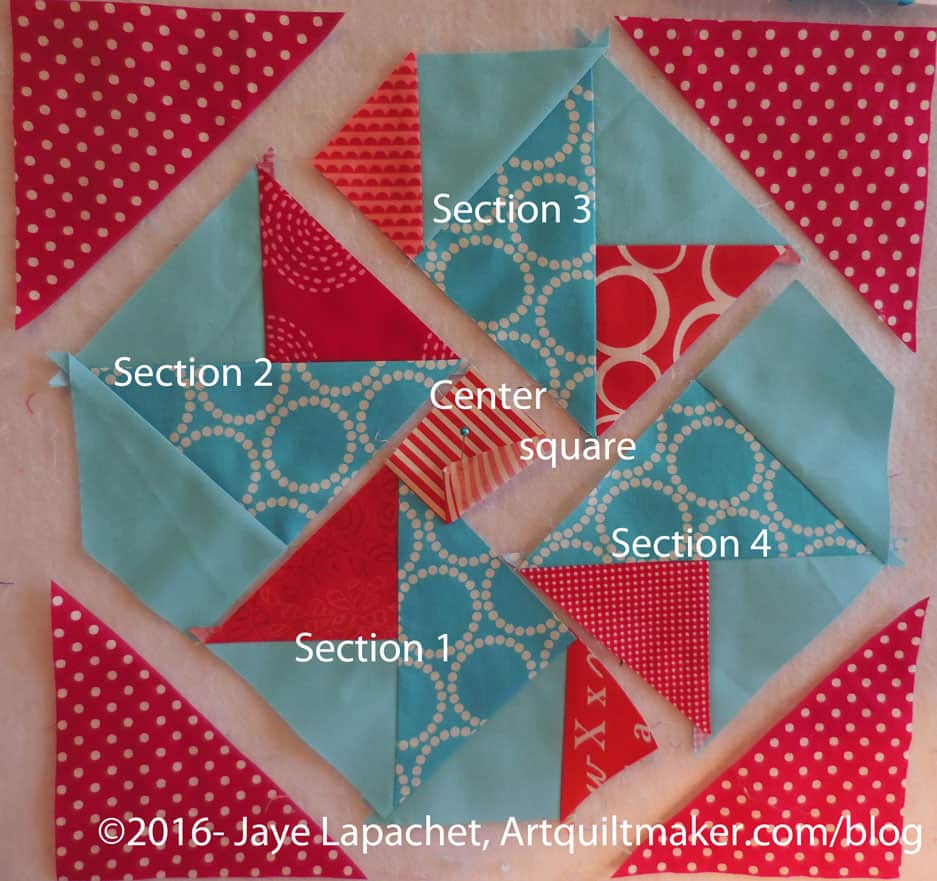
This is more of a guideline than a tutorial. It will teach you how to make the Spiky 16 Patch block in a general way. You will need to review the Studio180 video and know how to do basic piecing.
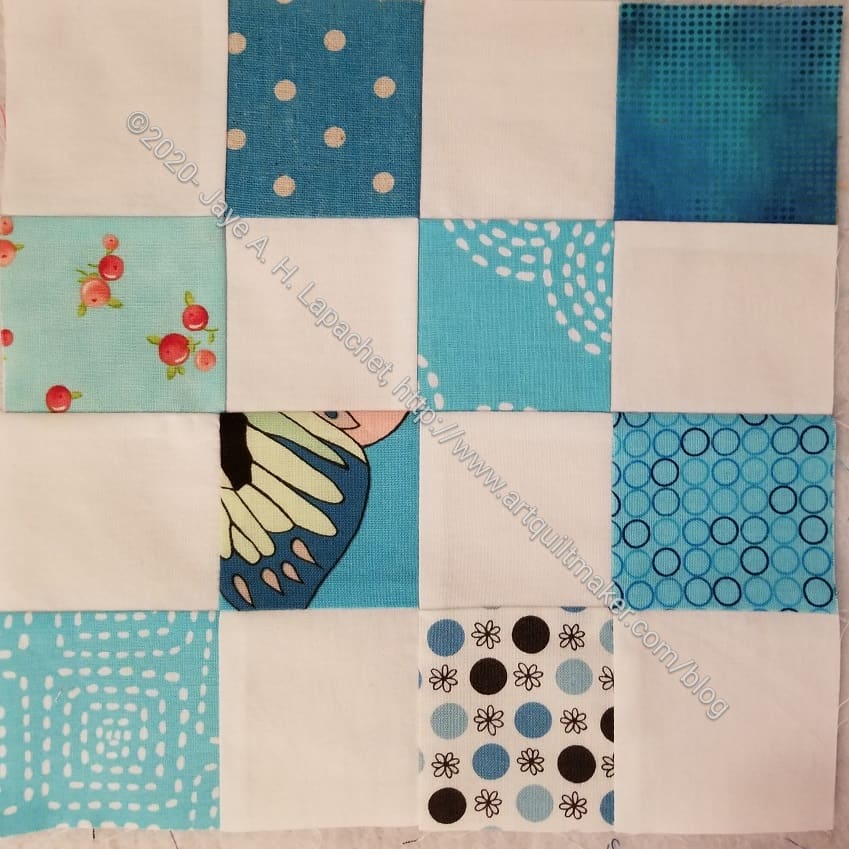
This block is my own design and uses Half Rectangle Triangles (HRTs) and 2.5 inch squares to make a 16 inch (finished) block. I have used these blocks to make a number of donation quilts.
Supplies:
Fabric:
16-2.5 inch squares
8 -2.5 inch squares for foreground
8-2.5 inch squares for background
5 inch strip of foreground – you’ll have to work through what width you need. I use scraps, so I don’t know the exact length
Computer or other device capable of viewing YouTube
Internet connection
Fabric Units Needed
This is a repeat of above, but with, perhaps, some additional information
8 – 2.5 inch squares (unfinished) from background fabrics
8 – 2.5 inch squares (unfinished) from foreground fabrics
8 – 2 inch x 4 inch (finished) left facing half rectangle triangles (half foreground and half background)
8 – 2 inch x 4 inch (finished) right facing half rectangle triangles (half foreground and half background)
4 – 4.5 inch (unfinished) squares from background fabrics
Center of block:
Take your 2.5 inch squares and sew them into 4- 4 patches
Blue Square Donation Block
Sew your 4 patches together into a 16 patch as shown above.
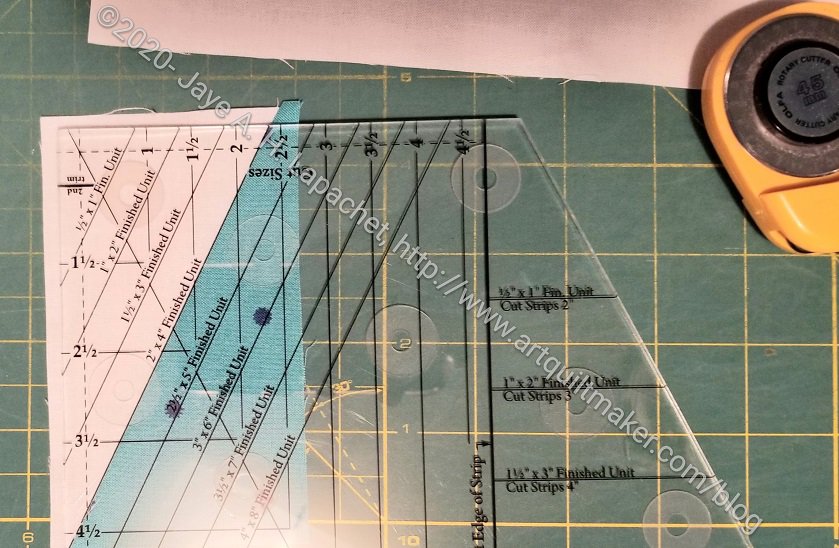
I start with 5″ strips for the 2 in x 4 in (finished) HRTs. Remember: I am using the Split Recs ruler and it uses that size strip for the HRTs. You can make your HRTs using whatever method is convenient. Make sure they end up 2 inch x 4 inch finished.
It is really important to take the time to look at the Studio180 Split Recs video. It will make your life a lot easier.
Cut and trim HRTs using Split Recs ruler
Following the directions in the video, cut, sew and trim your HRT pieces:
8 right facing triangles
8 left facing triangles
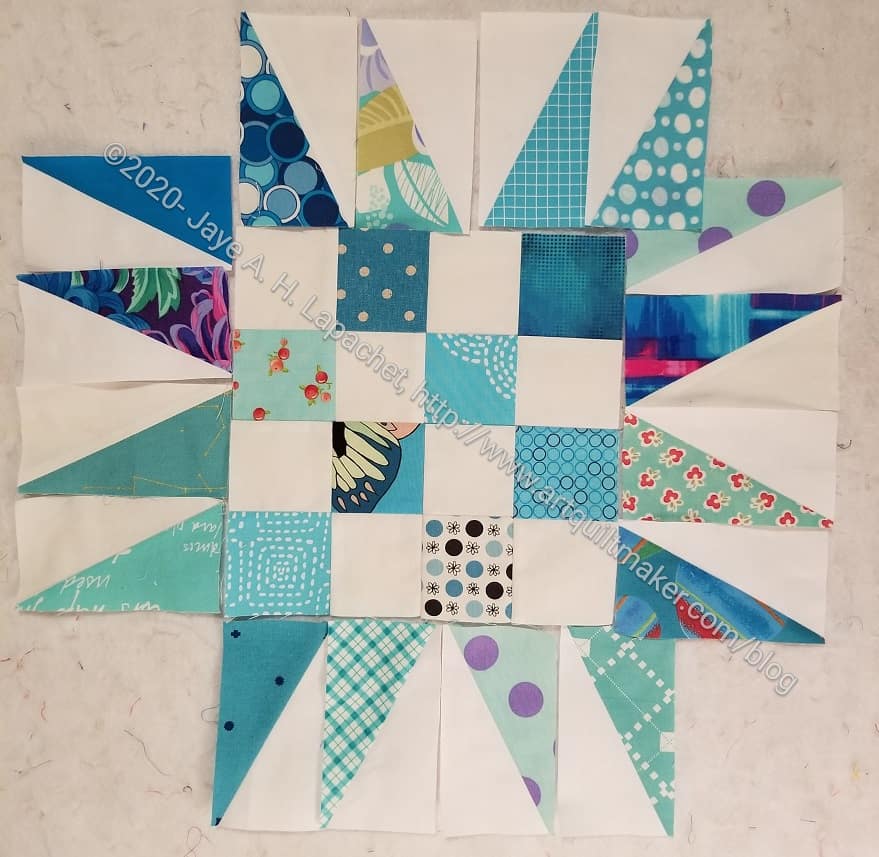
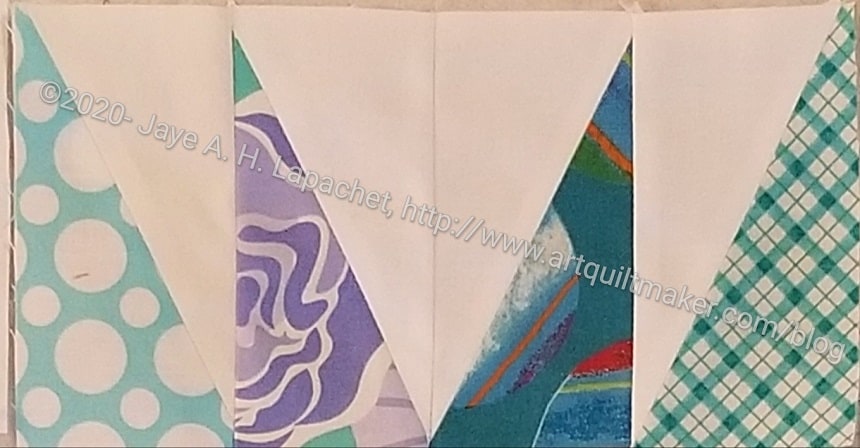
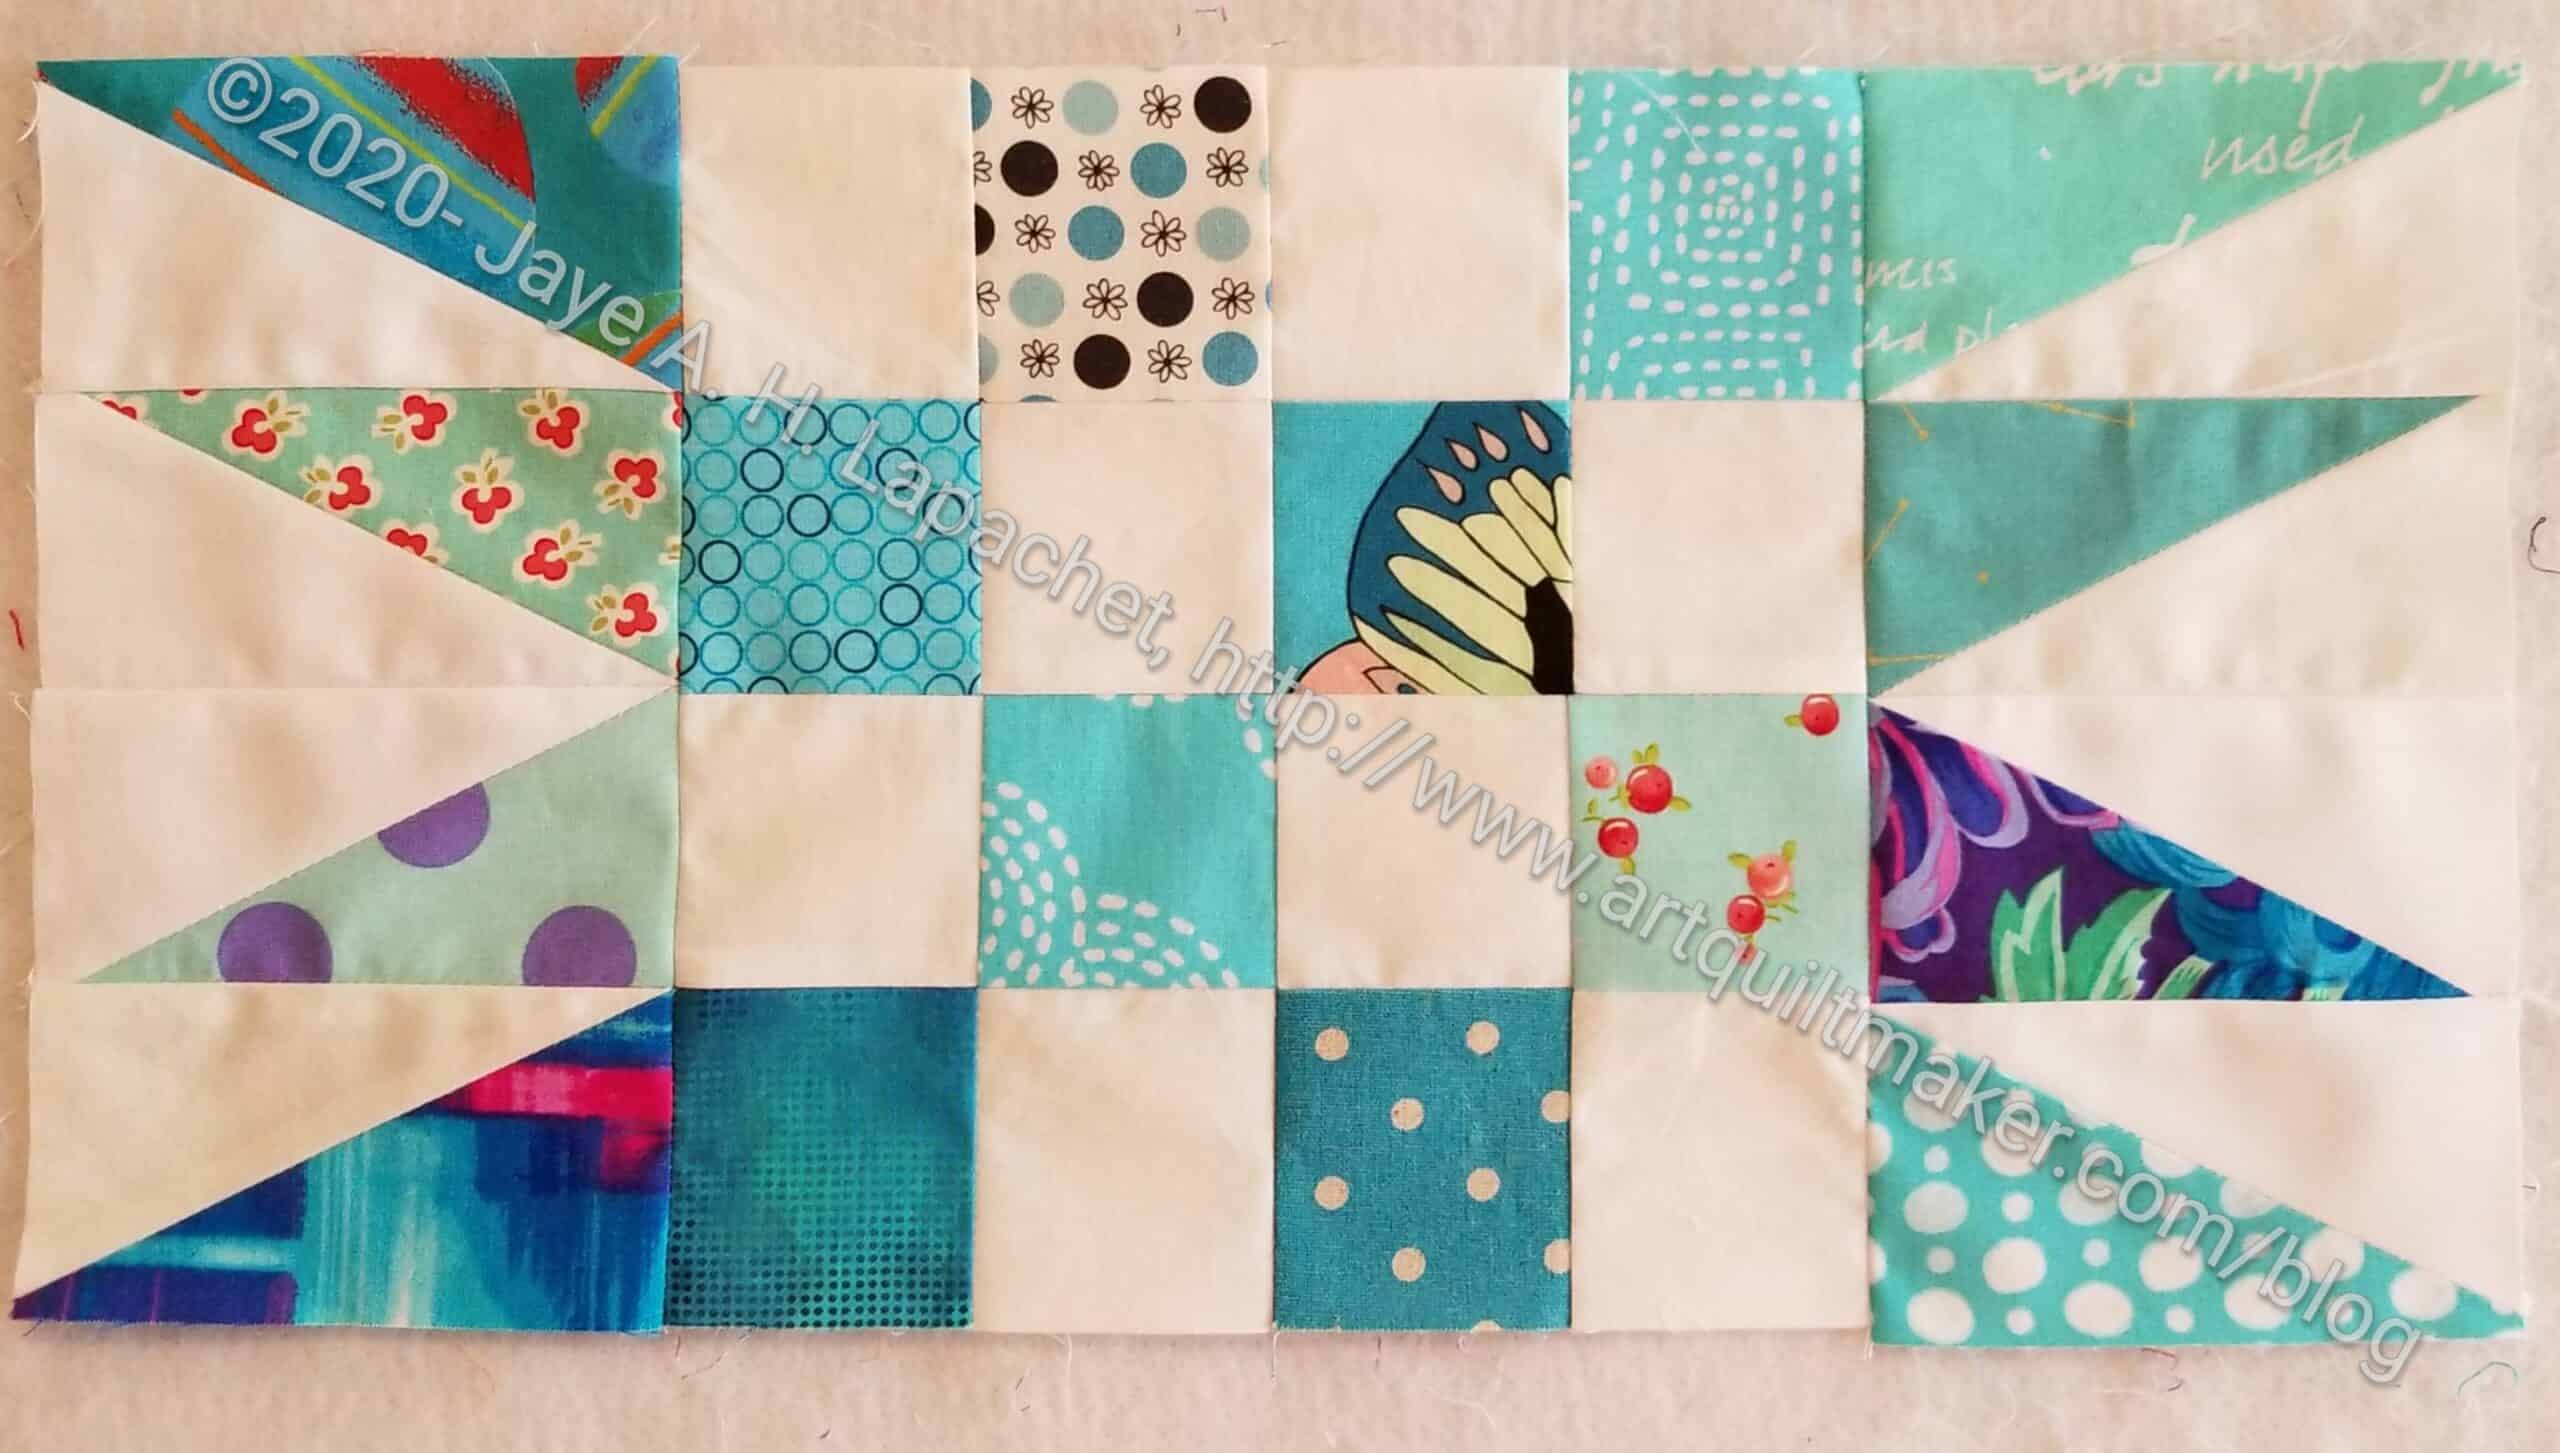
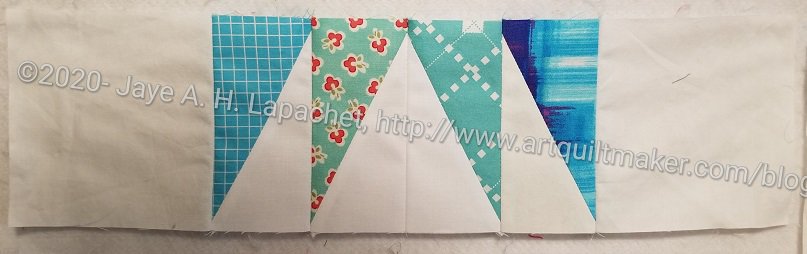
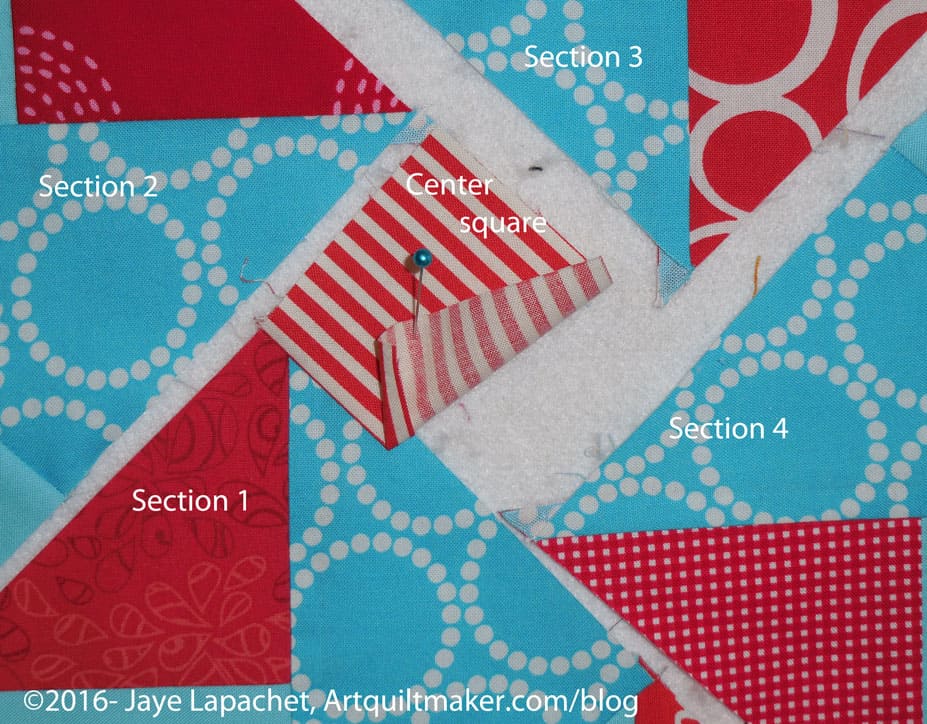
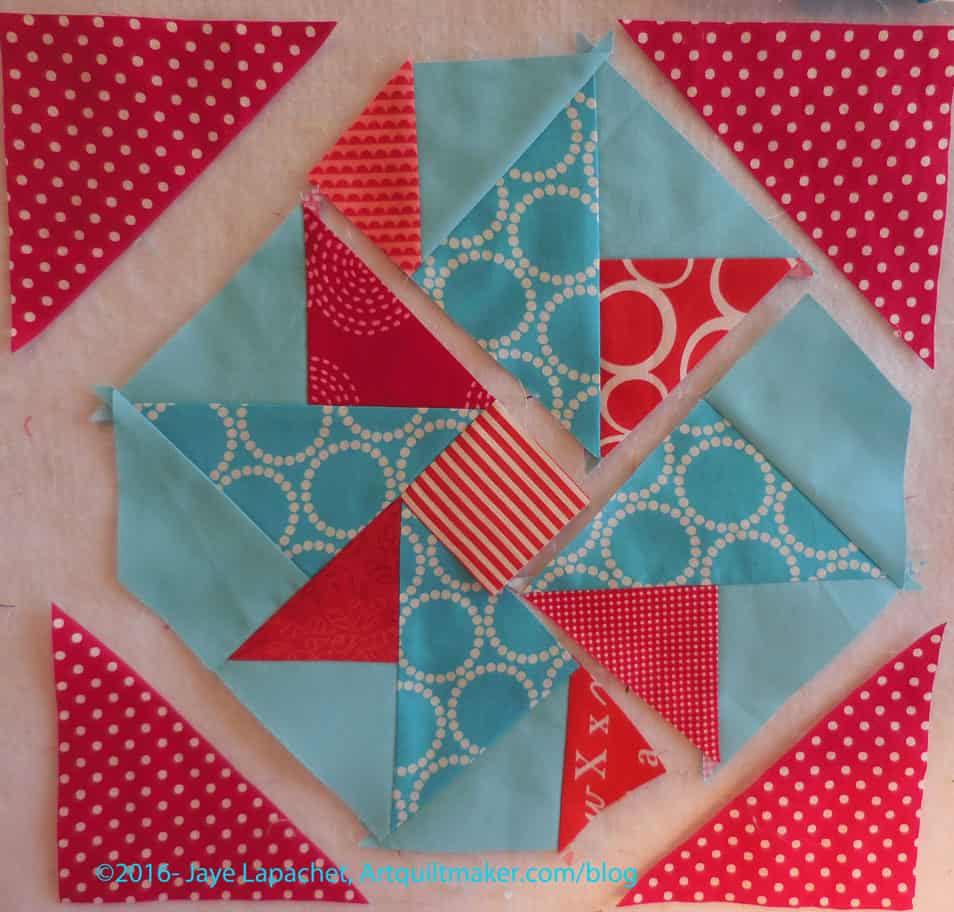
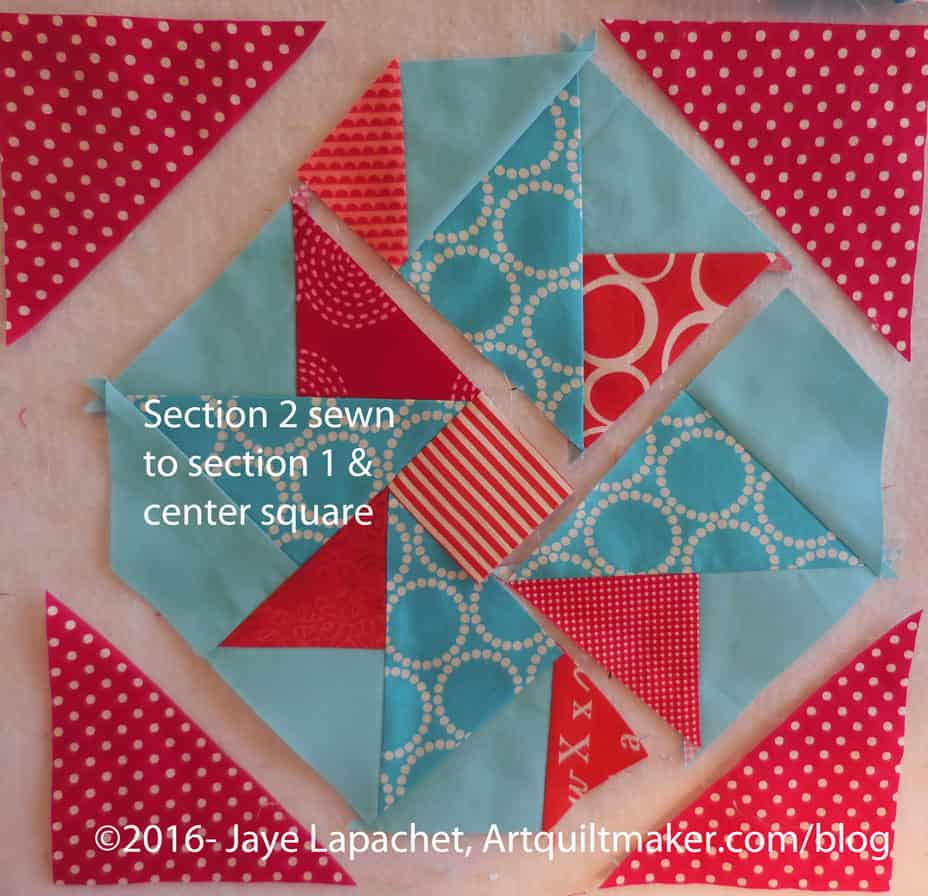
Spiky Star in progress
Once you have sewn and trimmed your HRTs place them with your 16 patch, like the photo above. Note: until you sew the HRTs together, the laid out block will look uneven as my example above shows. The bottom left hand HRTs are already sewn together and you can see how they fit nicely next to the squares in the 16 patch.
Spiky Star laid out
Cut 4 corner squares from background fabric 4.5 inches by 4.5 inches. Sometimes I use a variety of background fabrics when I am cutting from scraps. It adds interest to the block. Just make sure you have enough contrast.
Group of 4 HRTs
Start sewing your HRTs together into groups of 4.
Sew HRT units to center 16 Patch
Once I have the four HRT units, I sew one to each side, starting with the sides. Above shows the center block with two HRT groups of 4 sewn to the sides.
Group of 4 HRTs with background squares
Once part of the block is made, I start making the last two sections, the top and the bottom.
Take one HRT section and sew it to a 4.5 x 4.5 background square. Sew the second background square to the other side of the HRT section. Do this step again for the top.
Spiky Star – 3 sections
You will end up with 3 sections.
Complete Spiky Star block
Sew one HRT/background square section to the top and then sew the second section to the bottom of the center section. Once you have done this, press and your block is complete.
There are other ways to make the HRTs for this block. This is the method I use. Take a look at the Spiky 16 Patch blocks and quilts I have made using this technique.
**I use affiliate links and may be paid for your purchase of an item when you click on an item link in my post. There is no additional cost to you for clicking or purchasing items I recommend. I appreciate your clicks and purchases as it helps support this blog.
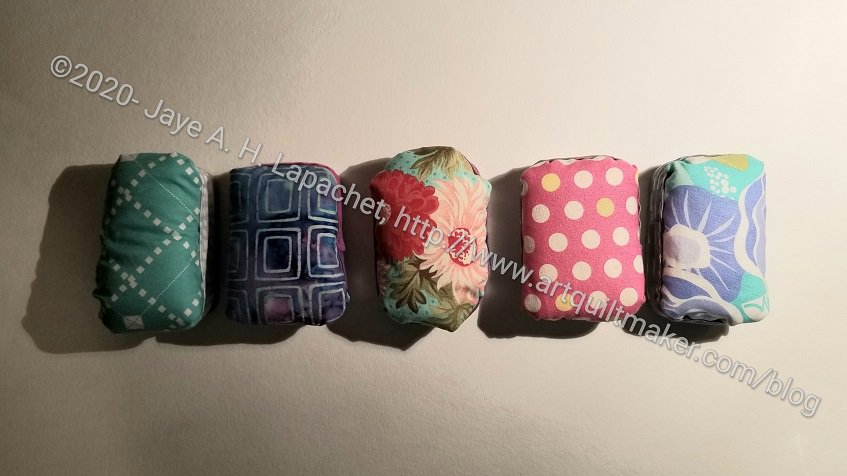
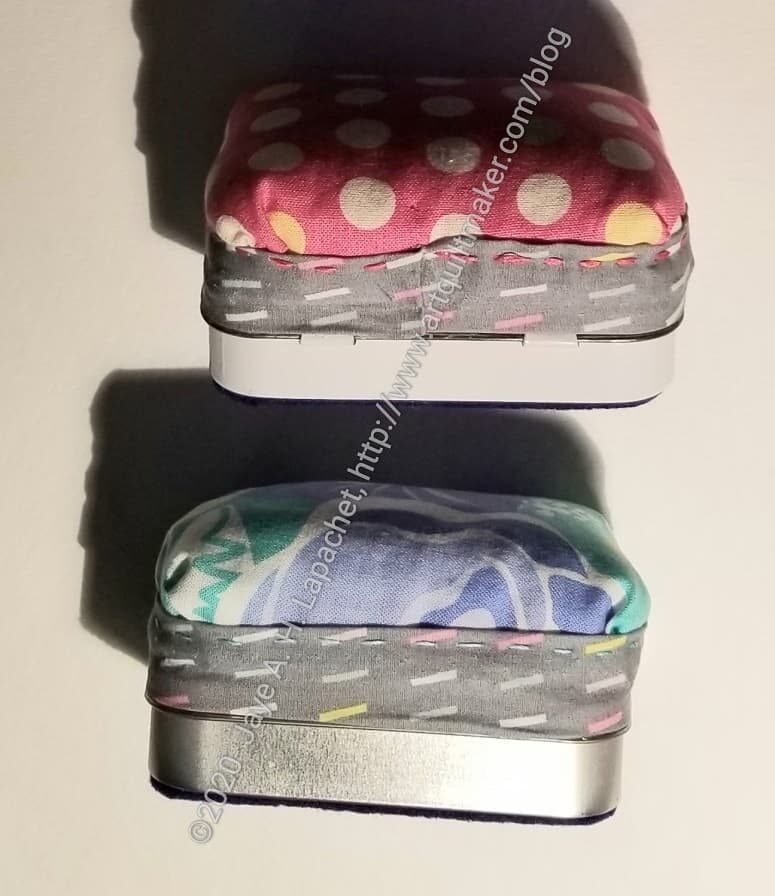
DH, apparently, has an Altoids habit. I had no idea until he came home and started to work remotely. I asked him to save me a couple of tins and suddenly I had 8 to work with. I wanted to make small sewing kits for the guild officers. I looked for tutorials. The one I liked was DIY Felt Magnet. It turned out, however, that I mostly fumbled along on my own during Craft Nights.
One key was letting everything dry thoroughly after I glued it.
Finished Altoids Sewing Kits
Supply List:
Altoids tins – you can use different tins by adjusting the size of the various pieces.
I wanted to cover all the advertising and nutritional information with fabric. I used felt so I wouldn’t have to worry about the raw edges.
First, I made a cardboard template. To make the template, I traced around the bottom of the Altoids tin. Then I cut out the template and made sure it fit in the following places:
bottom
inside bottom
inside top
I wanted full coverage in all of those places.
Next, I cut out pieces of felt for the inside top, the inside bottom and the bottom. Set aside the pieces for the inside top and
Put down some waxed paper to protect your work surface. On the waxed paper, I glued the other two pieces to the the inside bottom and the bottom.
Set the tin aside and let the pieces dry thoroughly.
Trim
Cut a strip of fabric 1-1/2 inches wide x 12 inches long. Use your bias tape maker to make some trim. This piece does not have to be on the bias.
Set aside.
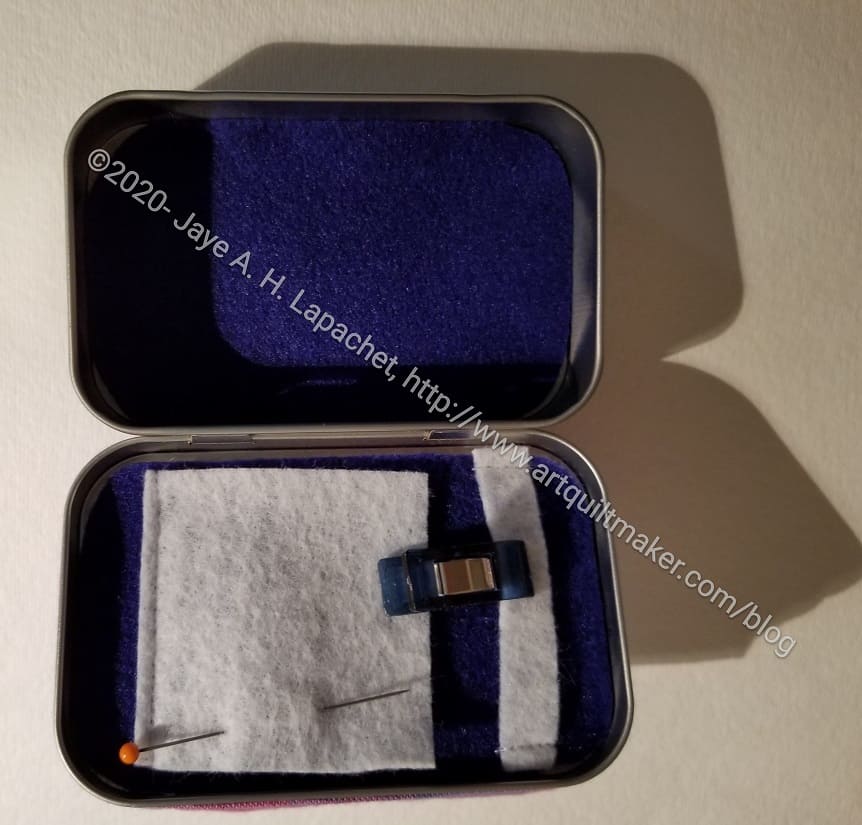
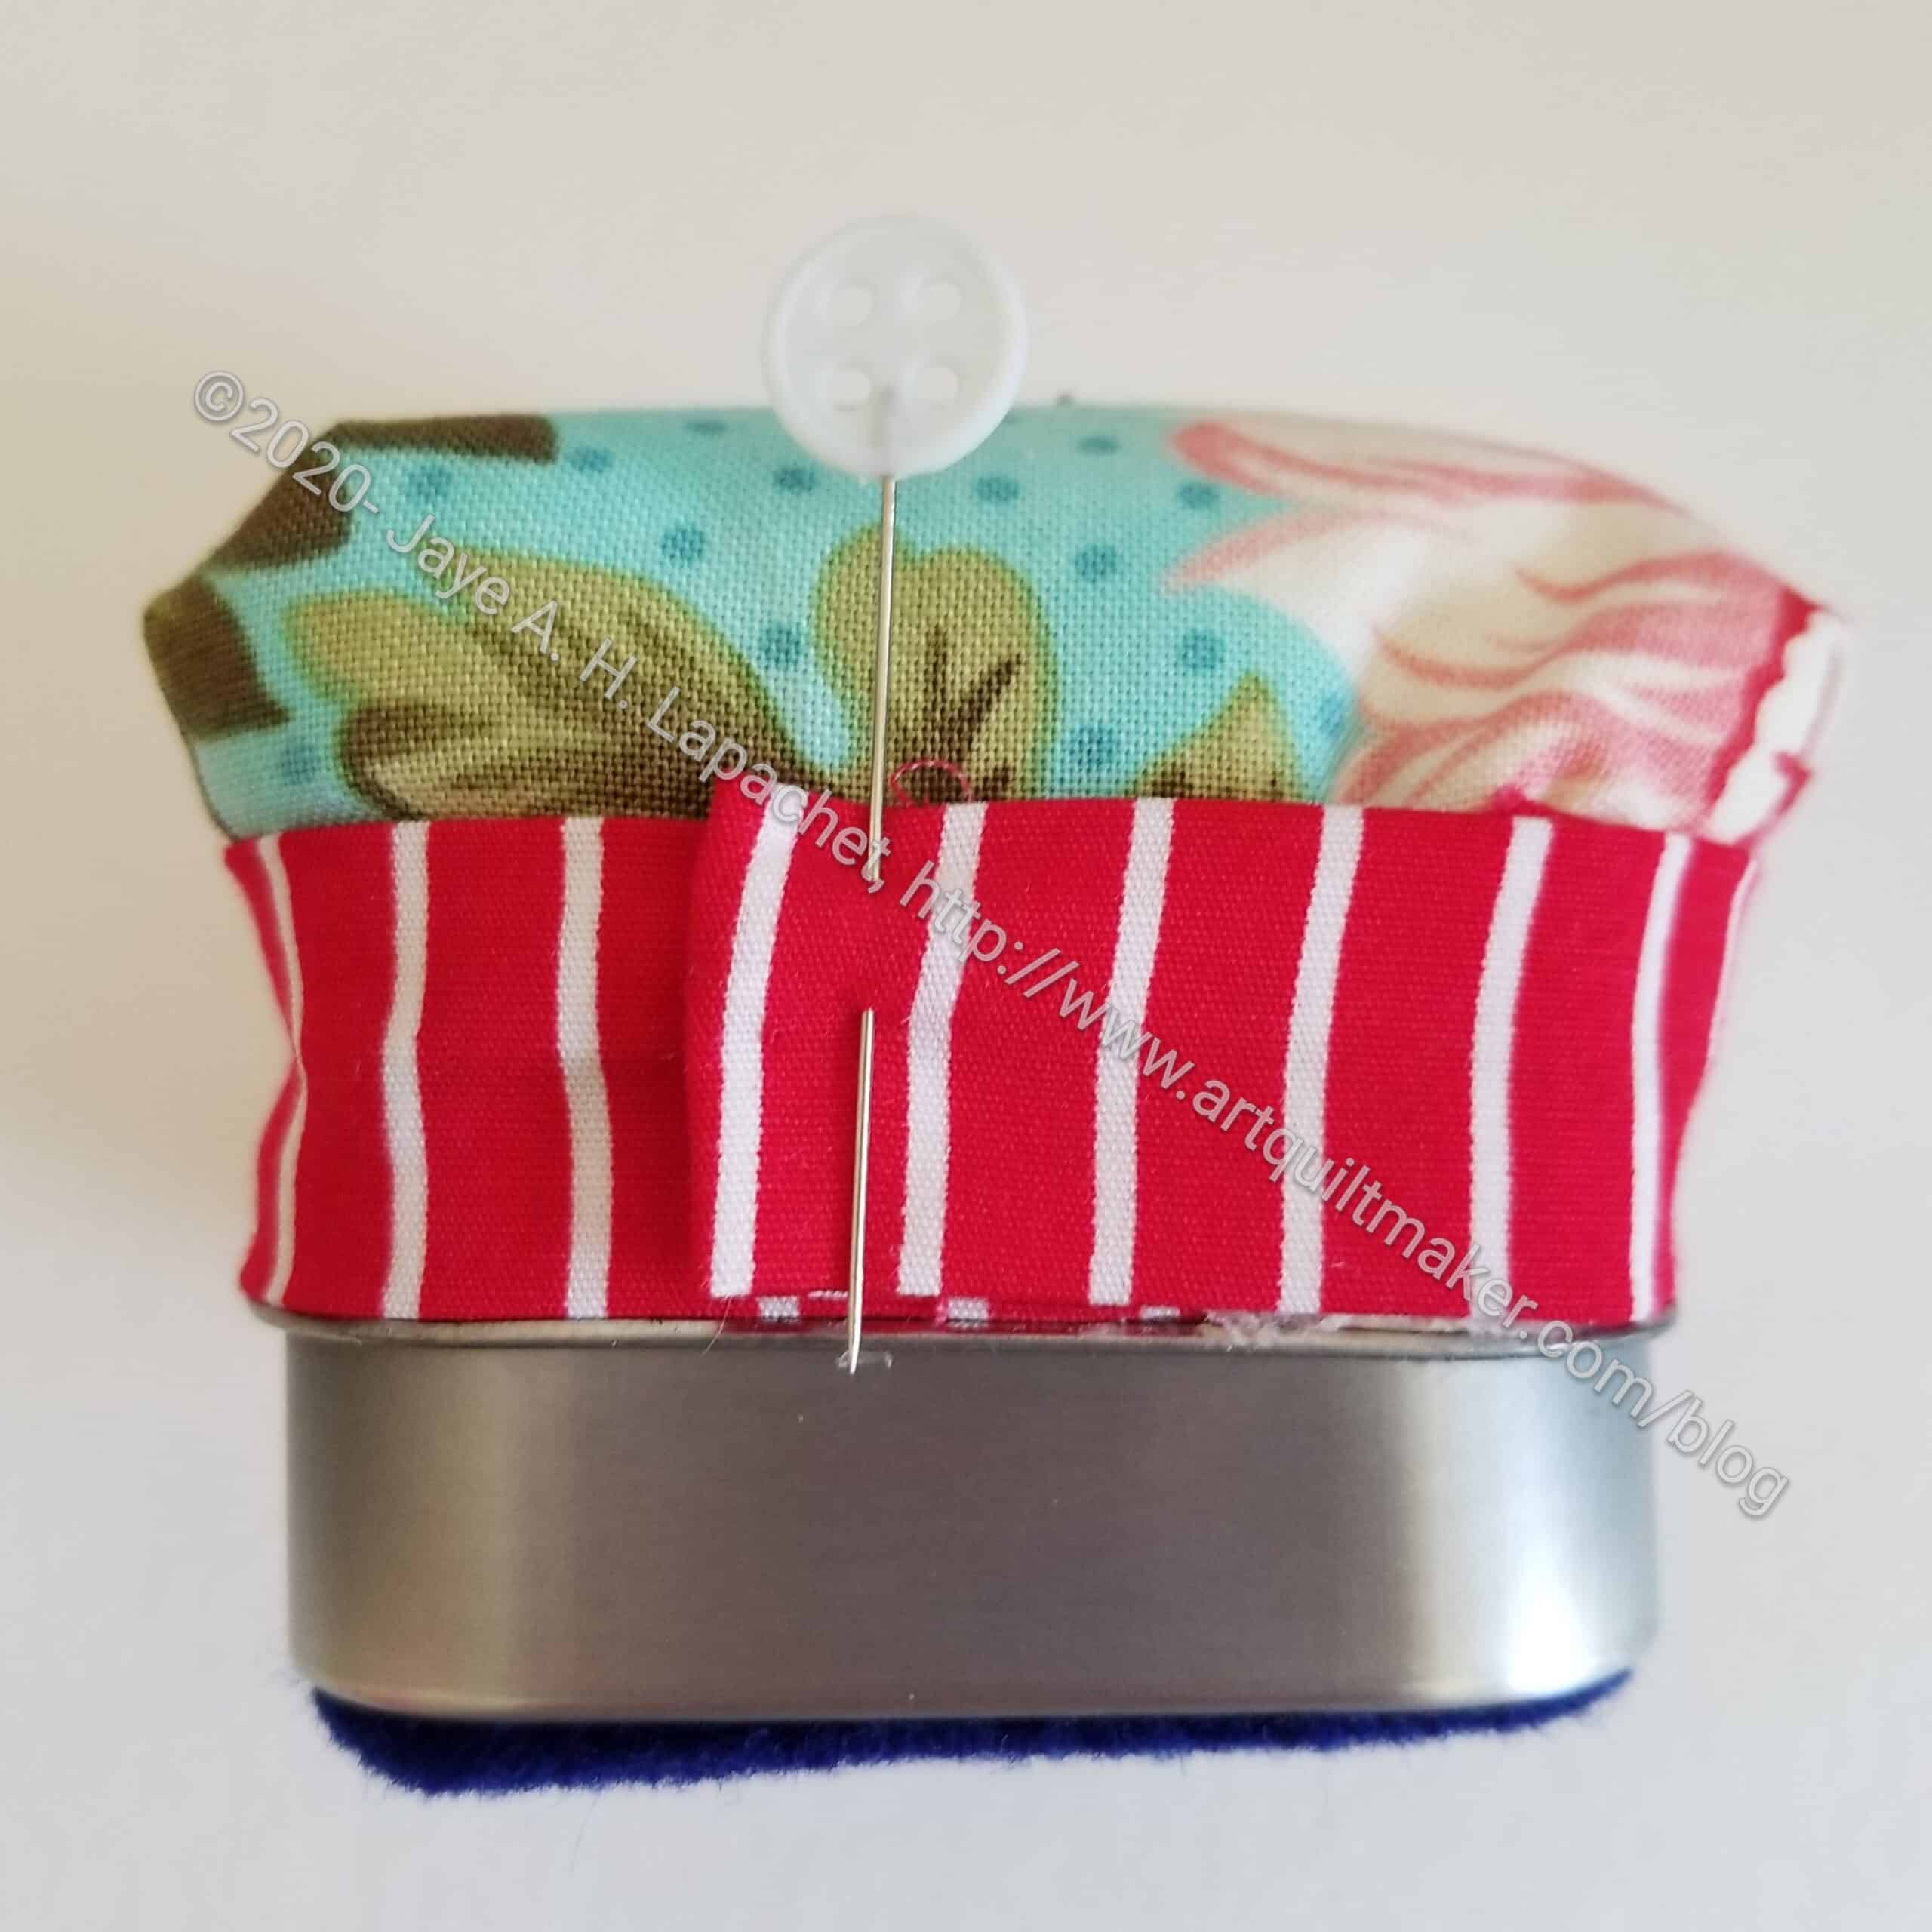
WonderClip Band and Needle Holder
Check to be sure your other pieces are glued securely to the tin and the glue is dry.
Inside of Altoids Sewing Kit
You will need the piece you cut from the template and set aside.
Third, I cut two pieces of contrasting colored felt (if you want these pieces to show). I cut a small band 3/8 inch by 2 1/4 inches (or the width of your tin) and a rectangle 2 inches x 2 inches.
Fourth, sew the band 1/2 inch up from the bottom of your set aside piece.
Fifth, center your 2×2 rectangle 3/8 inch down from the top and sew the rectangle to your set aside piece. Sew very close to the top edge of the felt rectangle. You may have to adjust it, so you don’t cover the WonderClip band.
Next, put down some waxed paper to protect your work surface. Glue your section with the WonderClip band and needle holder to the inside top of your tin.
Set the tin aside and let it dry thoroughly.
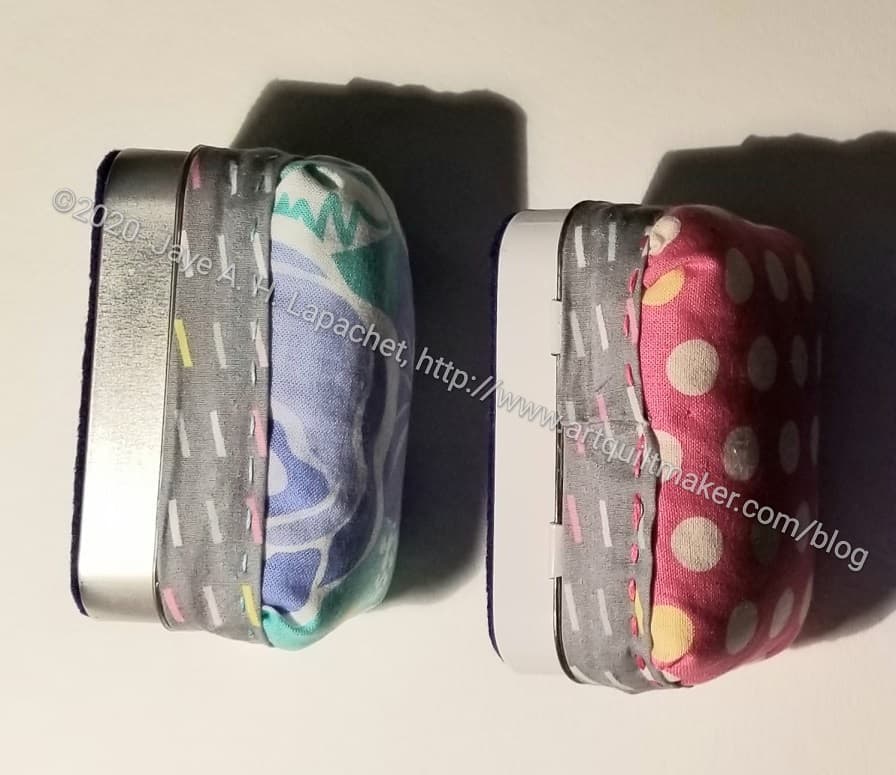
Pincushion
Seventh, take your 5.5″ x 8″ fabric rectangle and baste by hand with large stitches a shape that approximates the shape of the Altoids tin top (rectangle with round corners).
Next, tighten the basting to the approximate shape of the top of the tin.
Side view of Altoids tin Sewing Kit
Ninth, stuff the fabric with wool roving or Fiber Fill, keeping it in the shape of the top of the tin, but puffy.
Tenth, fold the excess fabric on the bottom so the wool roving stays inside. You may need to trim the fabric if it overlaps too much. Make sure the shape fits the top of the Altoids tin.
Next, put down some waxed paper to protect your work surface. Apply glue to the top of the tin and apply the pincushion. Adjust the shape to fit as needed. Press and hold for a few moments so it stays in place.
Set the tin aside and let it dry thoroughly.
Applying Trim
Check to be sure your pincushion is glued securely to the top of the tin and the glue is dry.
Put down some waxed paper to protect your work surface.
Dot glue on one short end of the tin along the bottom of the lid only. Press the bottom of the trim piece on the glue. Secure to the pincushion with a pin.
Set the tin aside and let it dry thoroughly.
After the end is dry, dot glue around the rest of the bottom of the tin and press the trim to the glue. Pull tight as you press.
End of Altoids tin
Overlap the end and cut the end of the trim strip so you have piece of the top of the trim that you can fold under to cover the raw edge of the beginning of the strip. Pin in place to allow the glue to dry.
Set the tin aside and let the glue dry thoroughly.
Finishing
Side view of Altoids tin Sewing Kit
Take your Perl Cotton and stitch along the edge of your trim. Use a basic running stitch or some kind of fancy stitch, if you want. Start away from the hem of the trim. Stitch all the way around, catching the pincushion fabric in the stitch as you sew. You may need to tuck bits of the pincushion under the trim. Finish near the hemmed section and bury the thread as you would in a quilt.
If this is a gift, put a pin and a WonderClip into the tin to show your recipient how the features work.
Enjoy!
**I use affiliate links and may be paid for your purchase of an item when you click on an item link in my post. There is no additional cost to you for clicking or purchasing items I recommend. I appreciate your clicks and purchases as it helps support this blog.
An accurate 1/4 inch seam allowance on your sewing machine (hand work is different) is imperative for most quilt projects. Still some quiltmakers struggle. Below are some tips and, even further below, are some resources.
Supplies:
sewing machine
your usual thread
Seam guide or quarter inch foot
fabric
Ruler
Optional: blue painter’s tape or masking tape
Mostly, I will provide tips and tricks. You can watch the videos below to set up and test your machine to sew an accurate quarter inch seam.
First, decide if you care. If you don’t care, move on with your life. I am not saying that flippantly. We are all busy and if sewing an accurate 1/4 inch seam allowance is something you don’t care about, then go sew something.
Second, be prepared to play around. You’ll have to do some testing. Think of it as playtime.
Janome quarter inch foot
Third, you will need some kind of seam guide. A foot included with your sewing machine (or available for purchase separately) is an option.
I use the Janome quarter inch foot and interchange the same foot with both of my machines. I have 2-3 of them, but any one of them works on both of my machines. When I had a Singer, I stacked up layers of tape to make a ‘stop’ or wall at the quarter inch mark.
Dritz has a magnetic seam guide*. I used one of these and found that, when it stayed in place, it worked.
For Juki machines, Jen Carlton Bailly recommends, a “T” gauge*. This screws into the needle plate somehow. I have seen this in use, but have not used it myself.
These are a few of the many, many products available. Check around with your friends and ask your machine dealer what they recommend.
Try different methods to see what works for you.
Using a seam guide
Tip #1: If you use a seam guide, use the seam guide
It is easy to allow your attention to wander away from what you are doing. If you are using a seam guide, keep the fabric right next to the guide.
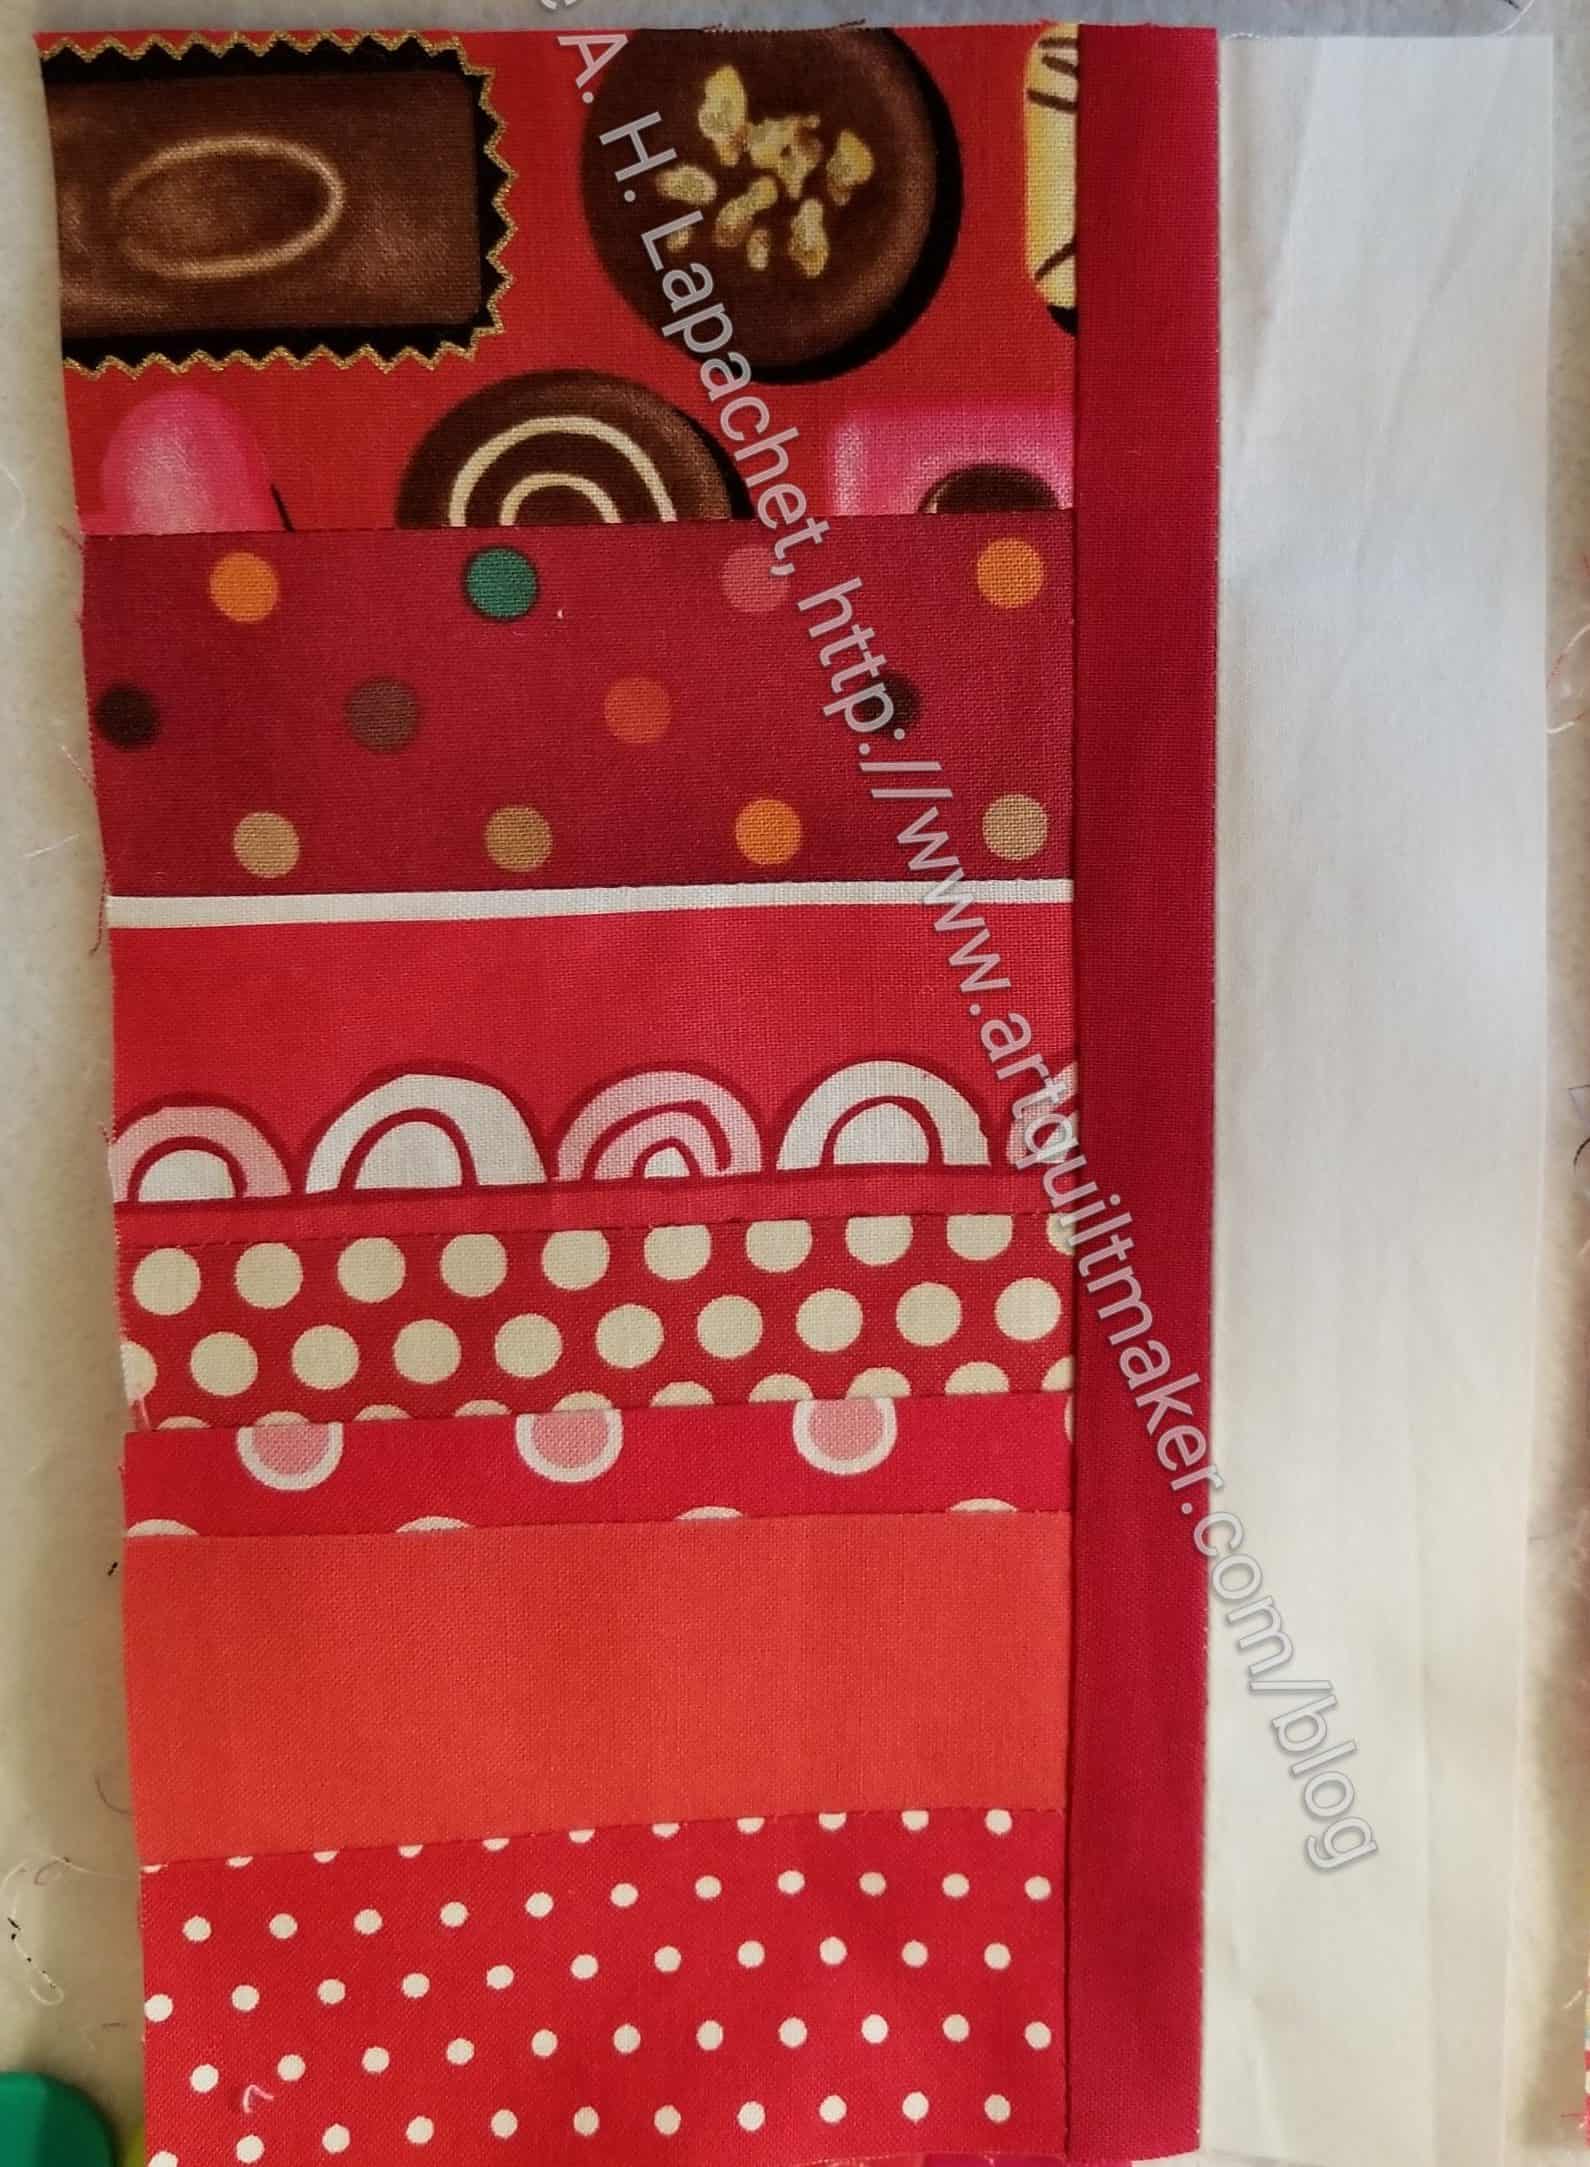
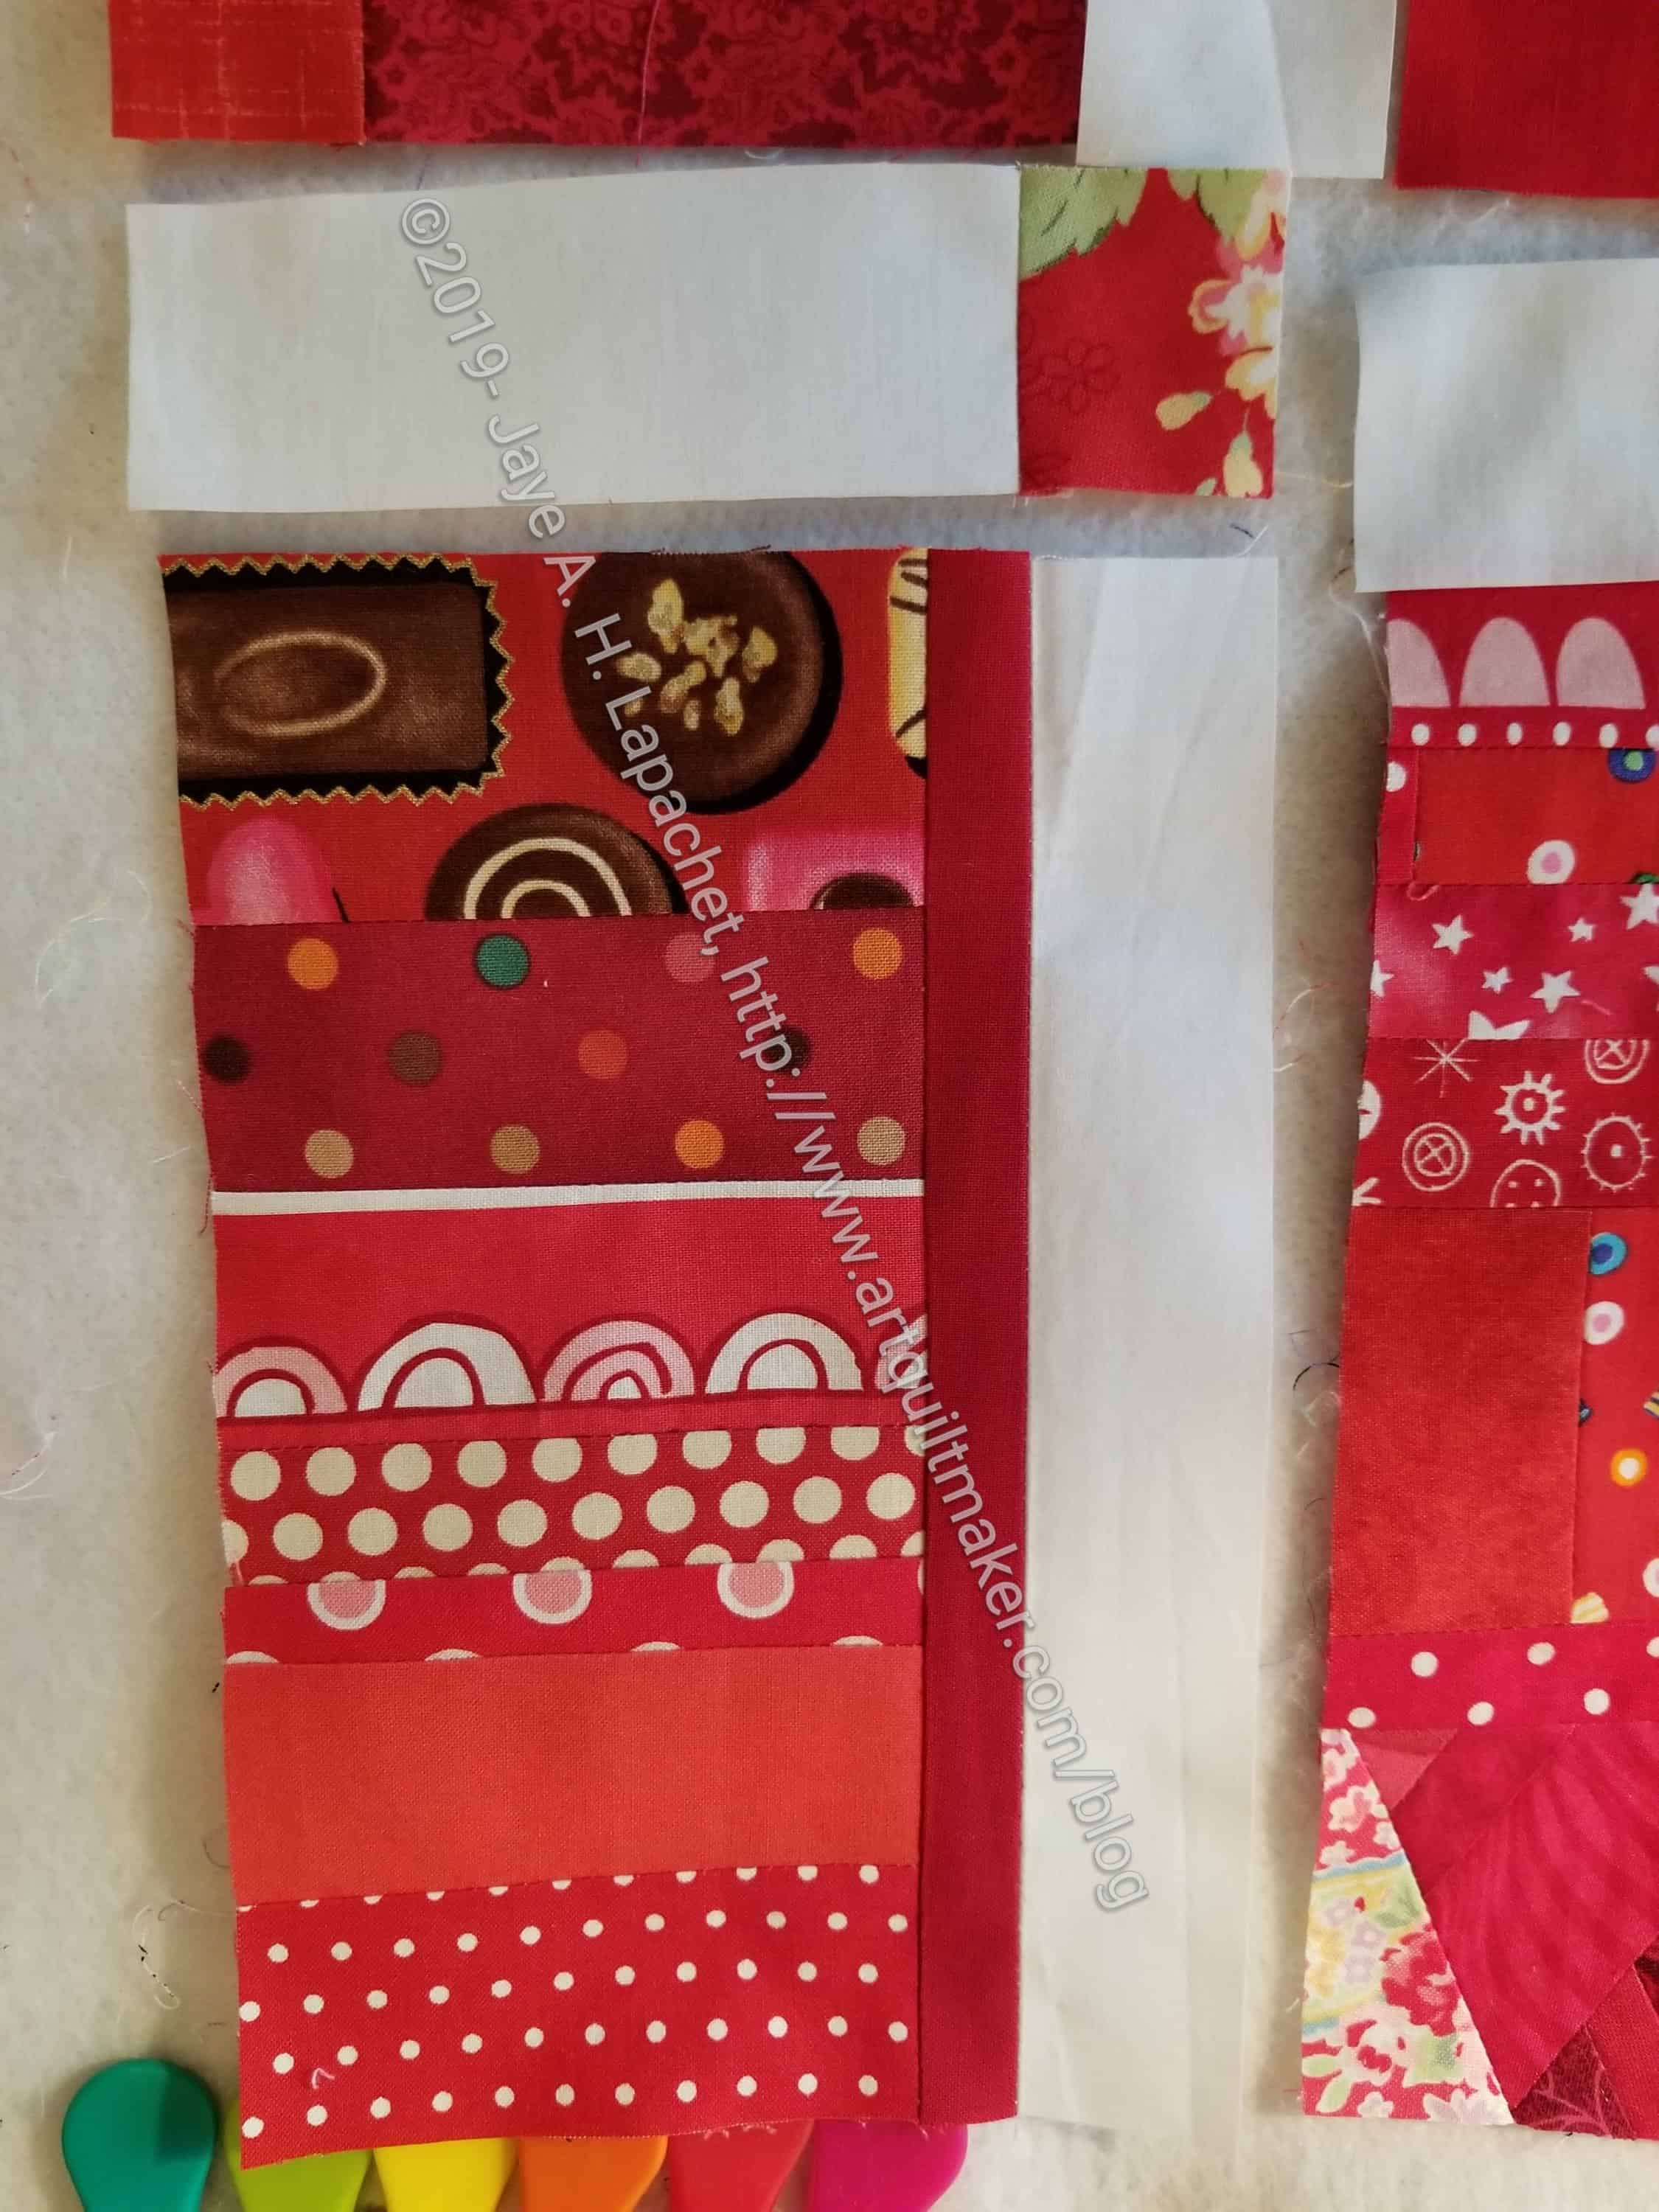
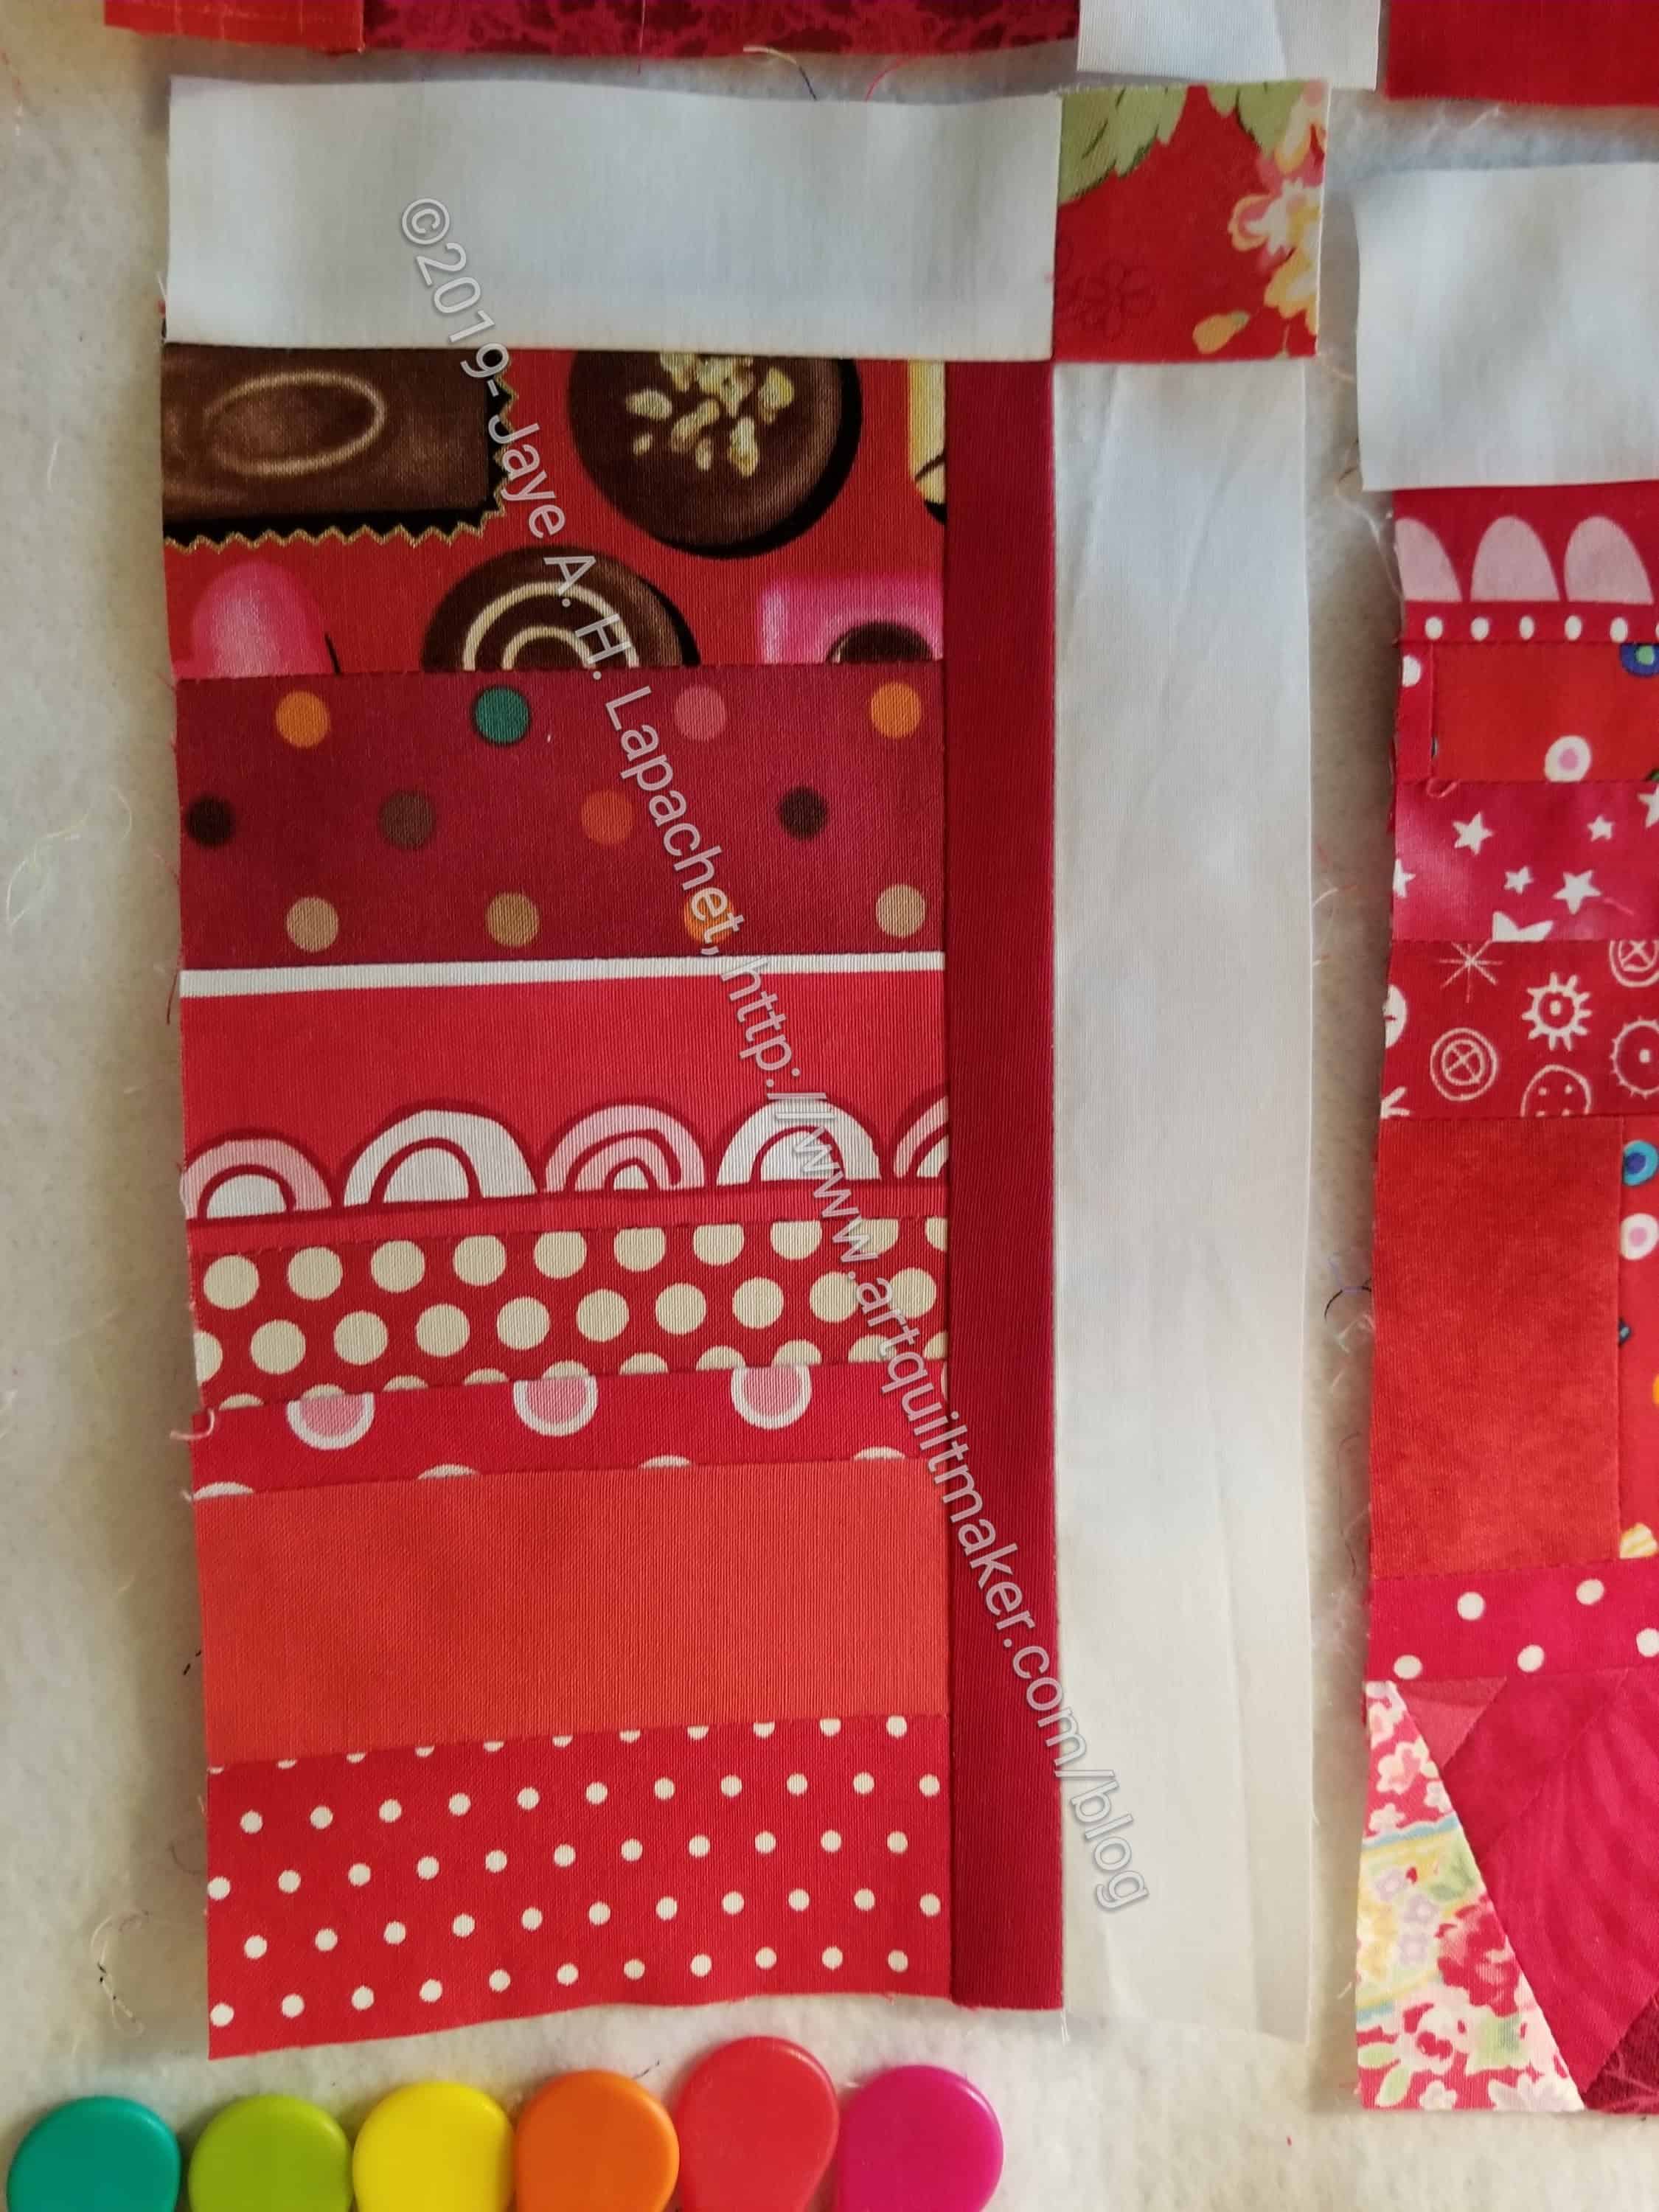
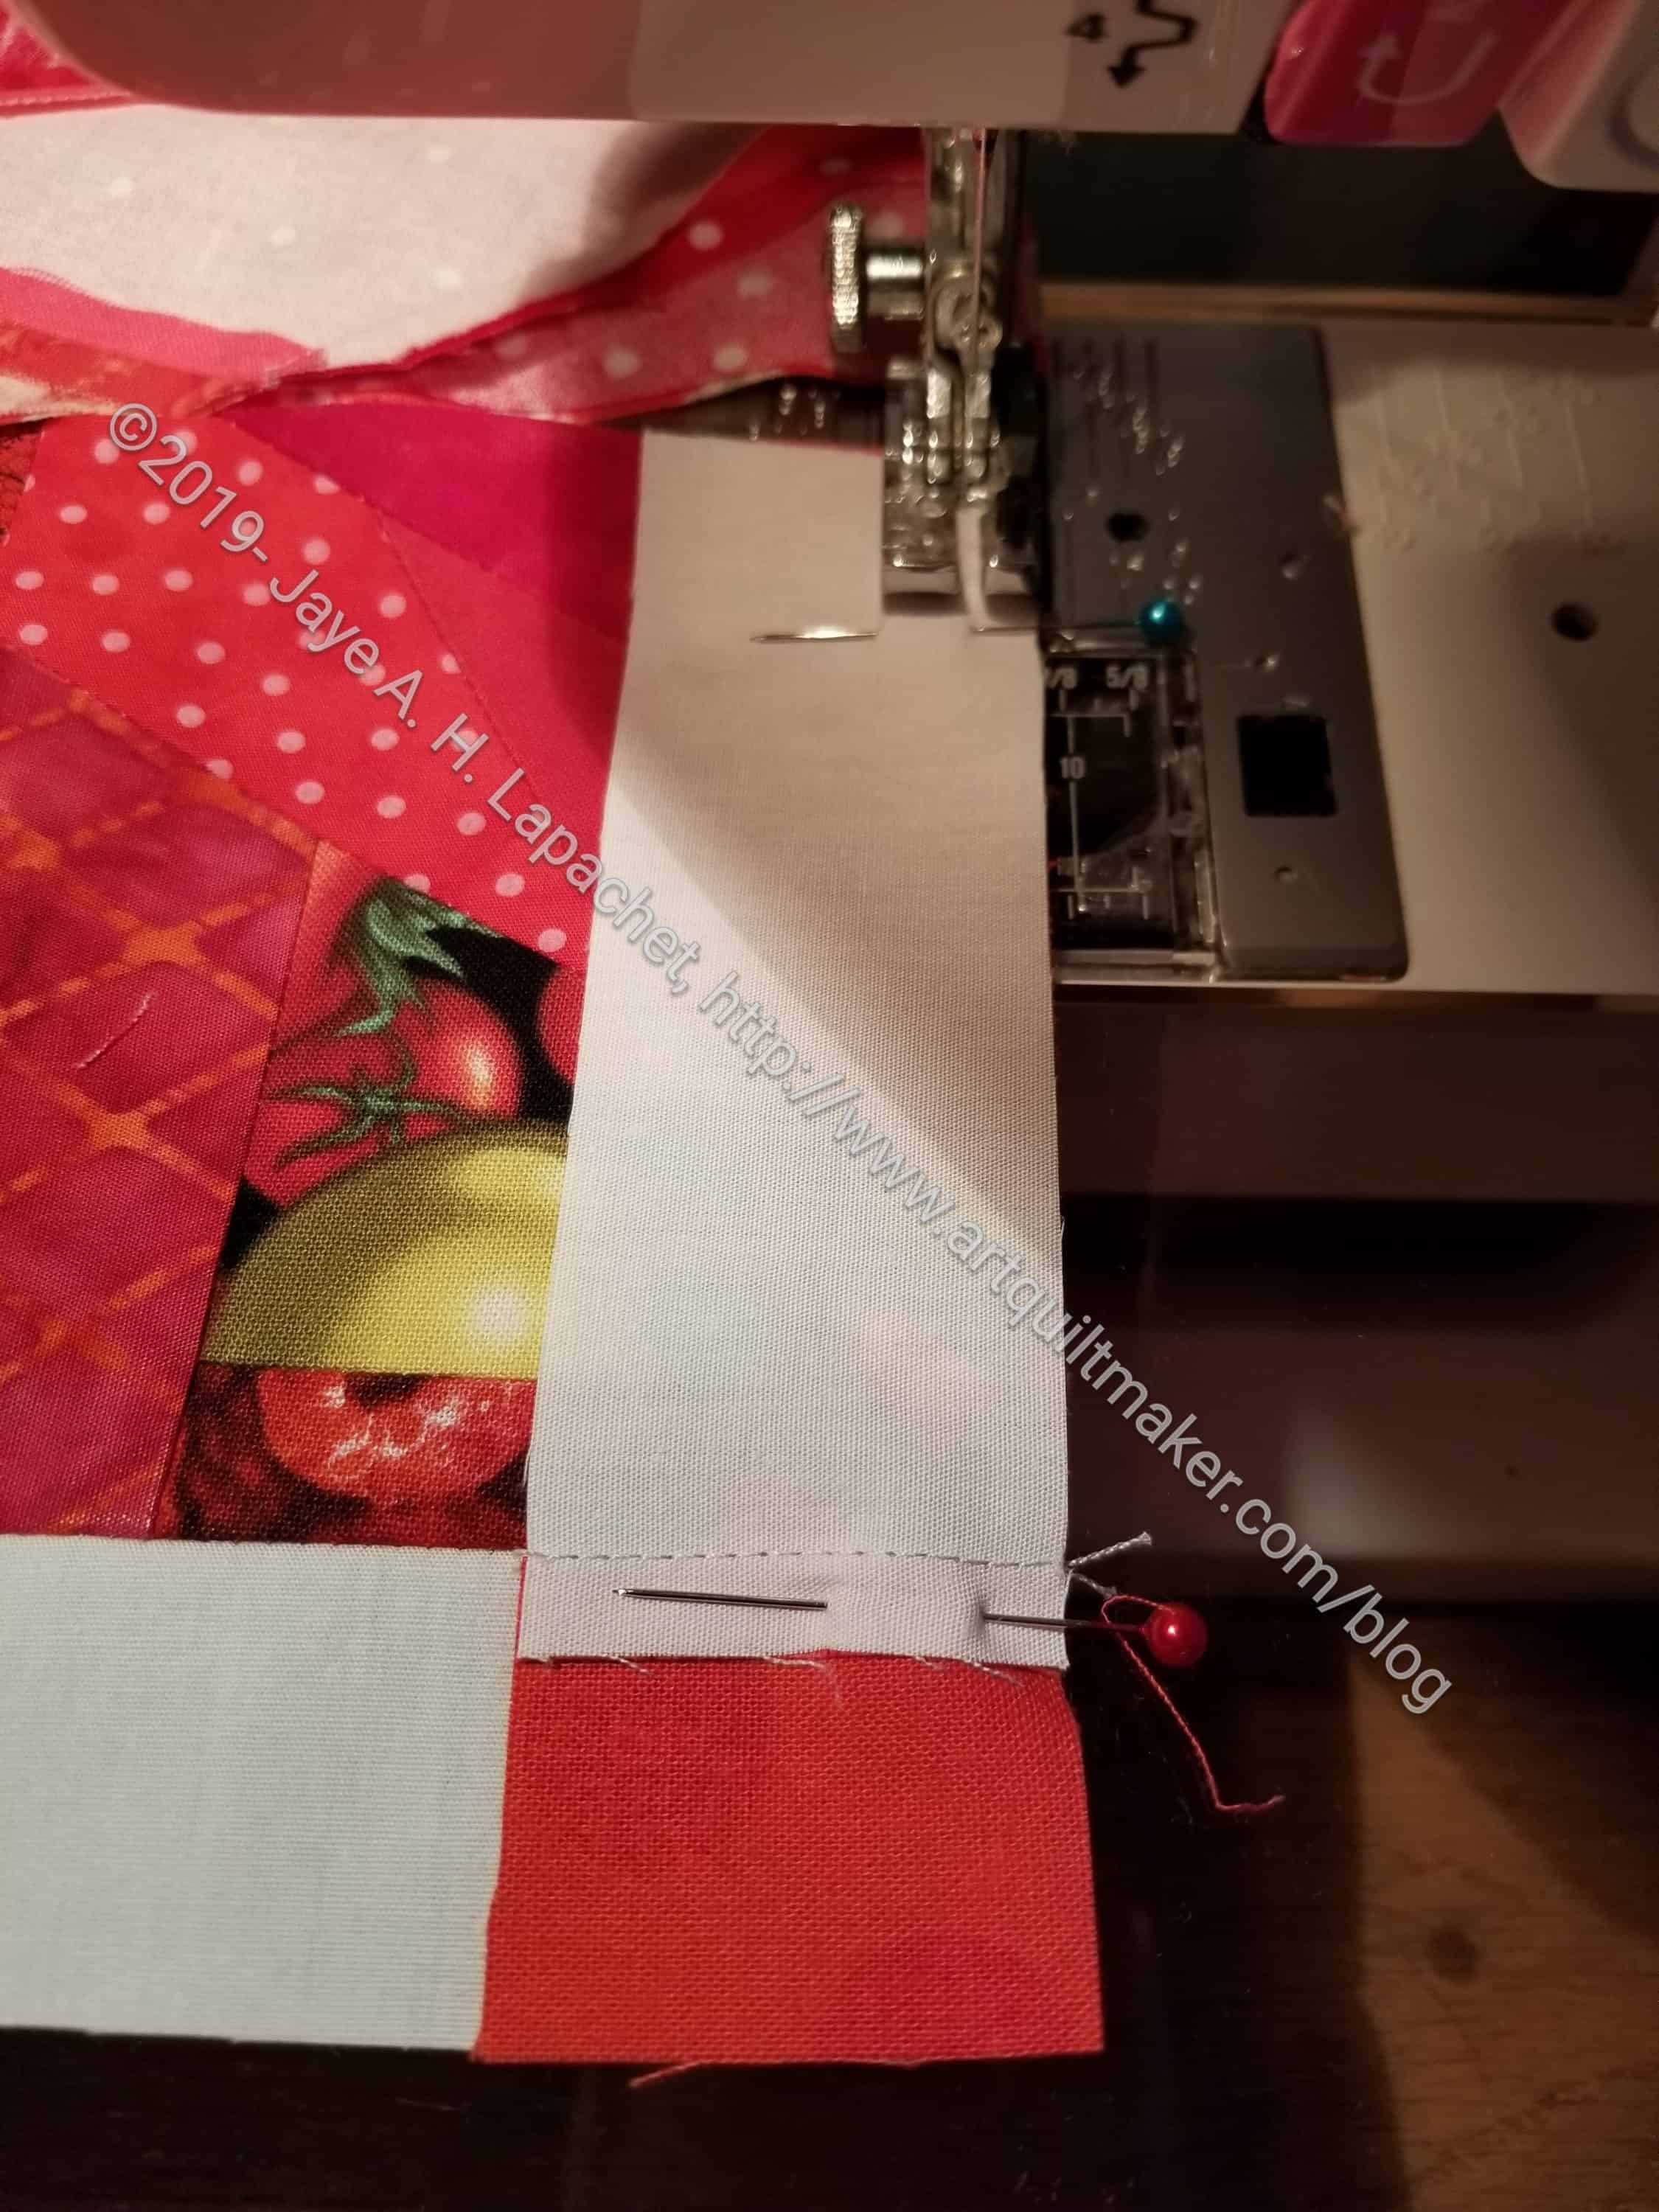
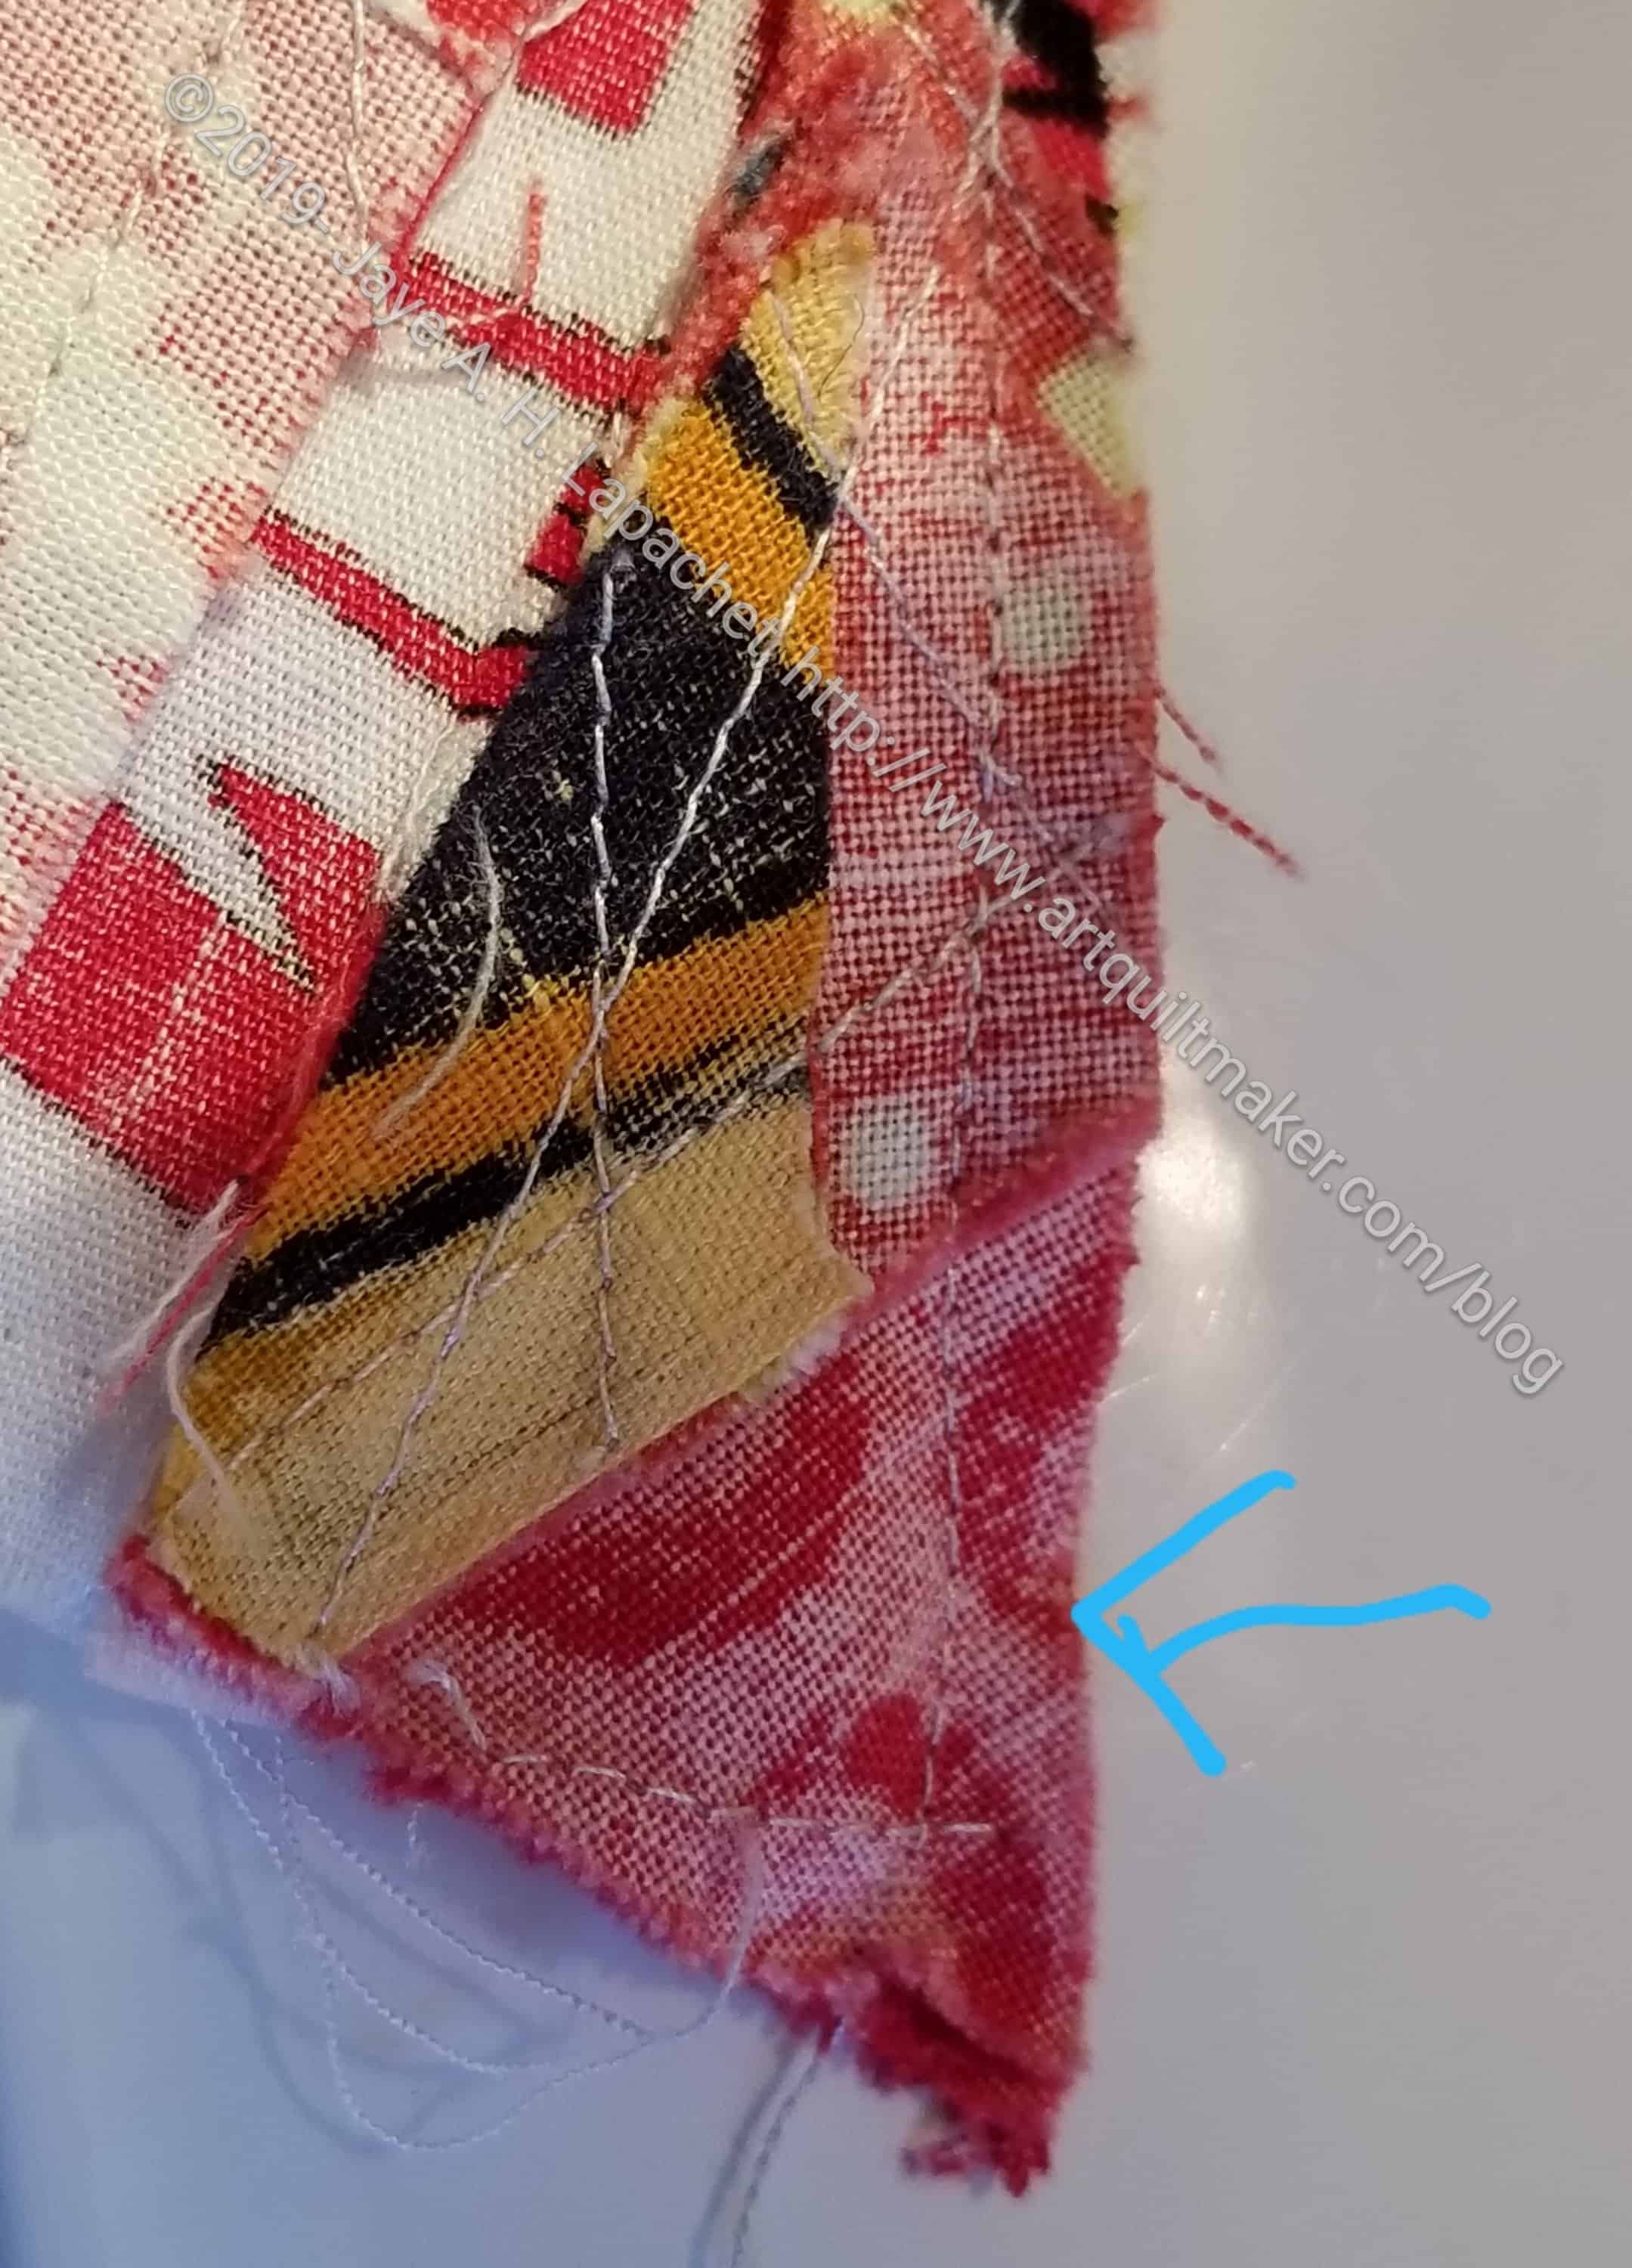
In general improv piecing is not a problem, but if you are attempting to go through many layers AND sticking to a quarter inch seam allowance, it is difficult. I ran into this when sewing the Red Strip Donation Top #2.
You can see the seam line wanders in the photo (left). When I am sewing tiny pieces together, the layers add up. This is what happens to me using my machine when I am trying to go through too many layers. This can also happen with blocks when a lot of layers come together in the center of a block.
Tip #3: Press open to reduce bulk
I don’t believe in pressing my seams open as a general rule. However, if you have a lot of bulk that is interfering with your seam allowance, pressing open can help. Have a reason to press open separate from “that’s what modern quiltmakers do.” I also press my seams open on the backs of quilts to reduce the bulk, which is the problem with accurate seam allowance and problems with longarm quilting. If you press open, you need to backstitch every seam that will not be crossed by another. That means that every improv quilt I make gets a line of stitching around the outside of the quilt. Every quilt without a border also gets a line of stitching around the outside. If you don’t, seams can unravel. On the edges both open seams and closed seams can unravel.
Tip #4: Machine markings
The measurement markings on your needle plate can help you keep your seam allowance accurate. While not a panacea, it is another aid when you are struggling to keep your piecing straight.
Tip #5: Adjust your needle
Many machine default to a 3/8ths or 5/8ths inch seam. Even pretty basic machines allow the maker to move the needle. If your machine has this feature, it is an easy way to get an accurate quarter inch seam. You just have to remember to do it when you turn on the machine!
Go through the process of testing your machine for an accurate quarter inch seam. Once you have it and have your system for sewing the accurate quarter inch seam, your patchwork will be better.
Tip #6: Use thin thread
Thread takes up space in the seam. If you are off my just a bit, then use thinner thread, like Aurifil 50 wt. Bottomline is a thin thread as well.
Resources:
All People Quilt: video on accurate quarter inch seam
*I use affiliate links and may be paid for your purchase of an item you click on. There is no additional cost to you for clicking or purchasing items I recommend. I appreciate your clicks and purchases as it helps support this blog.
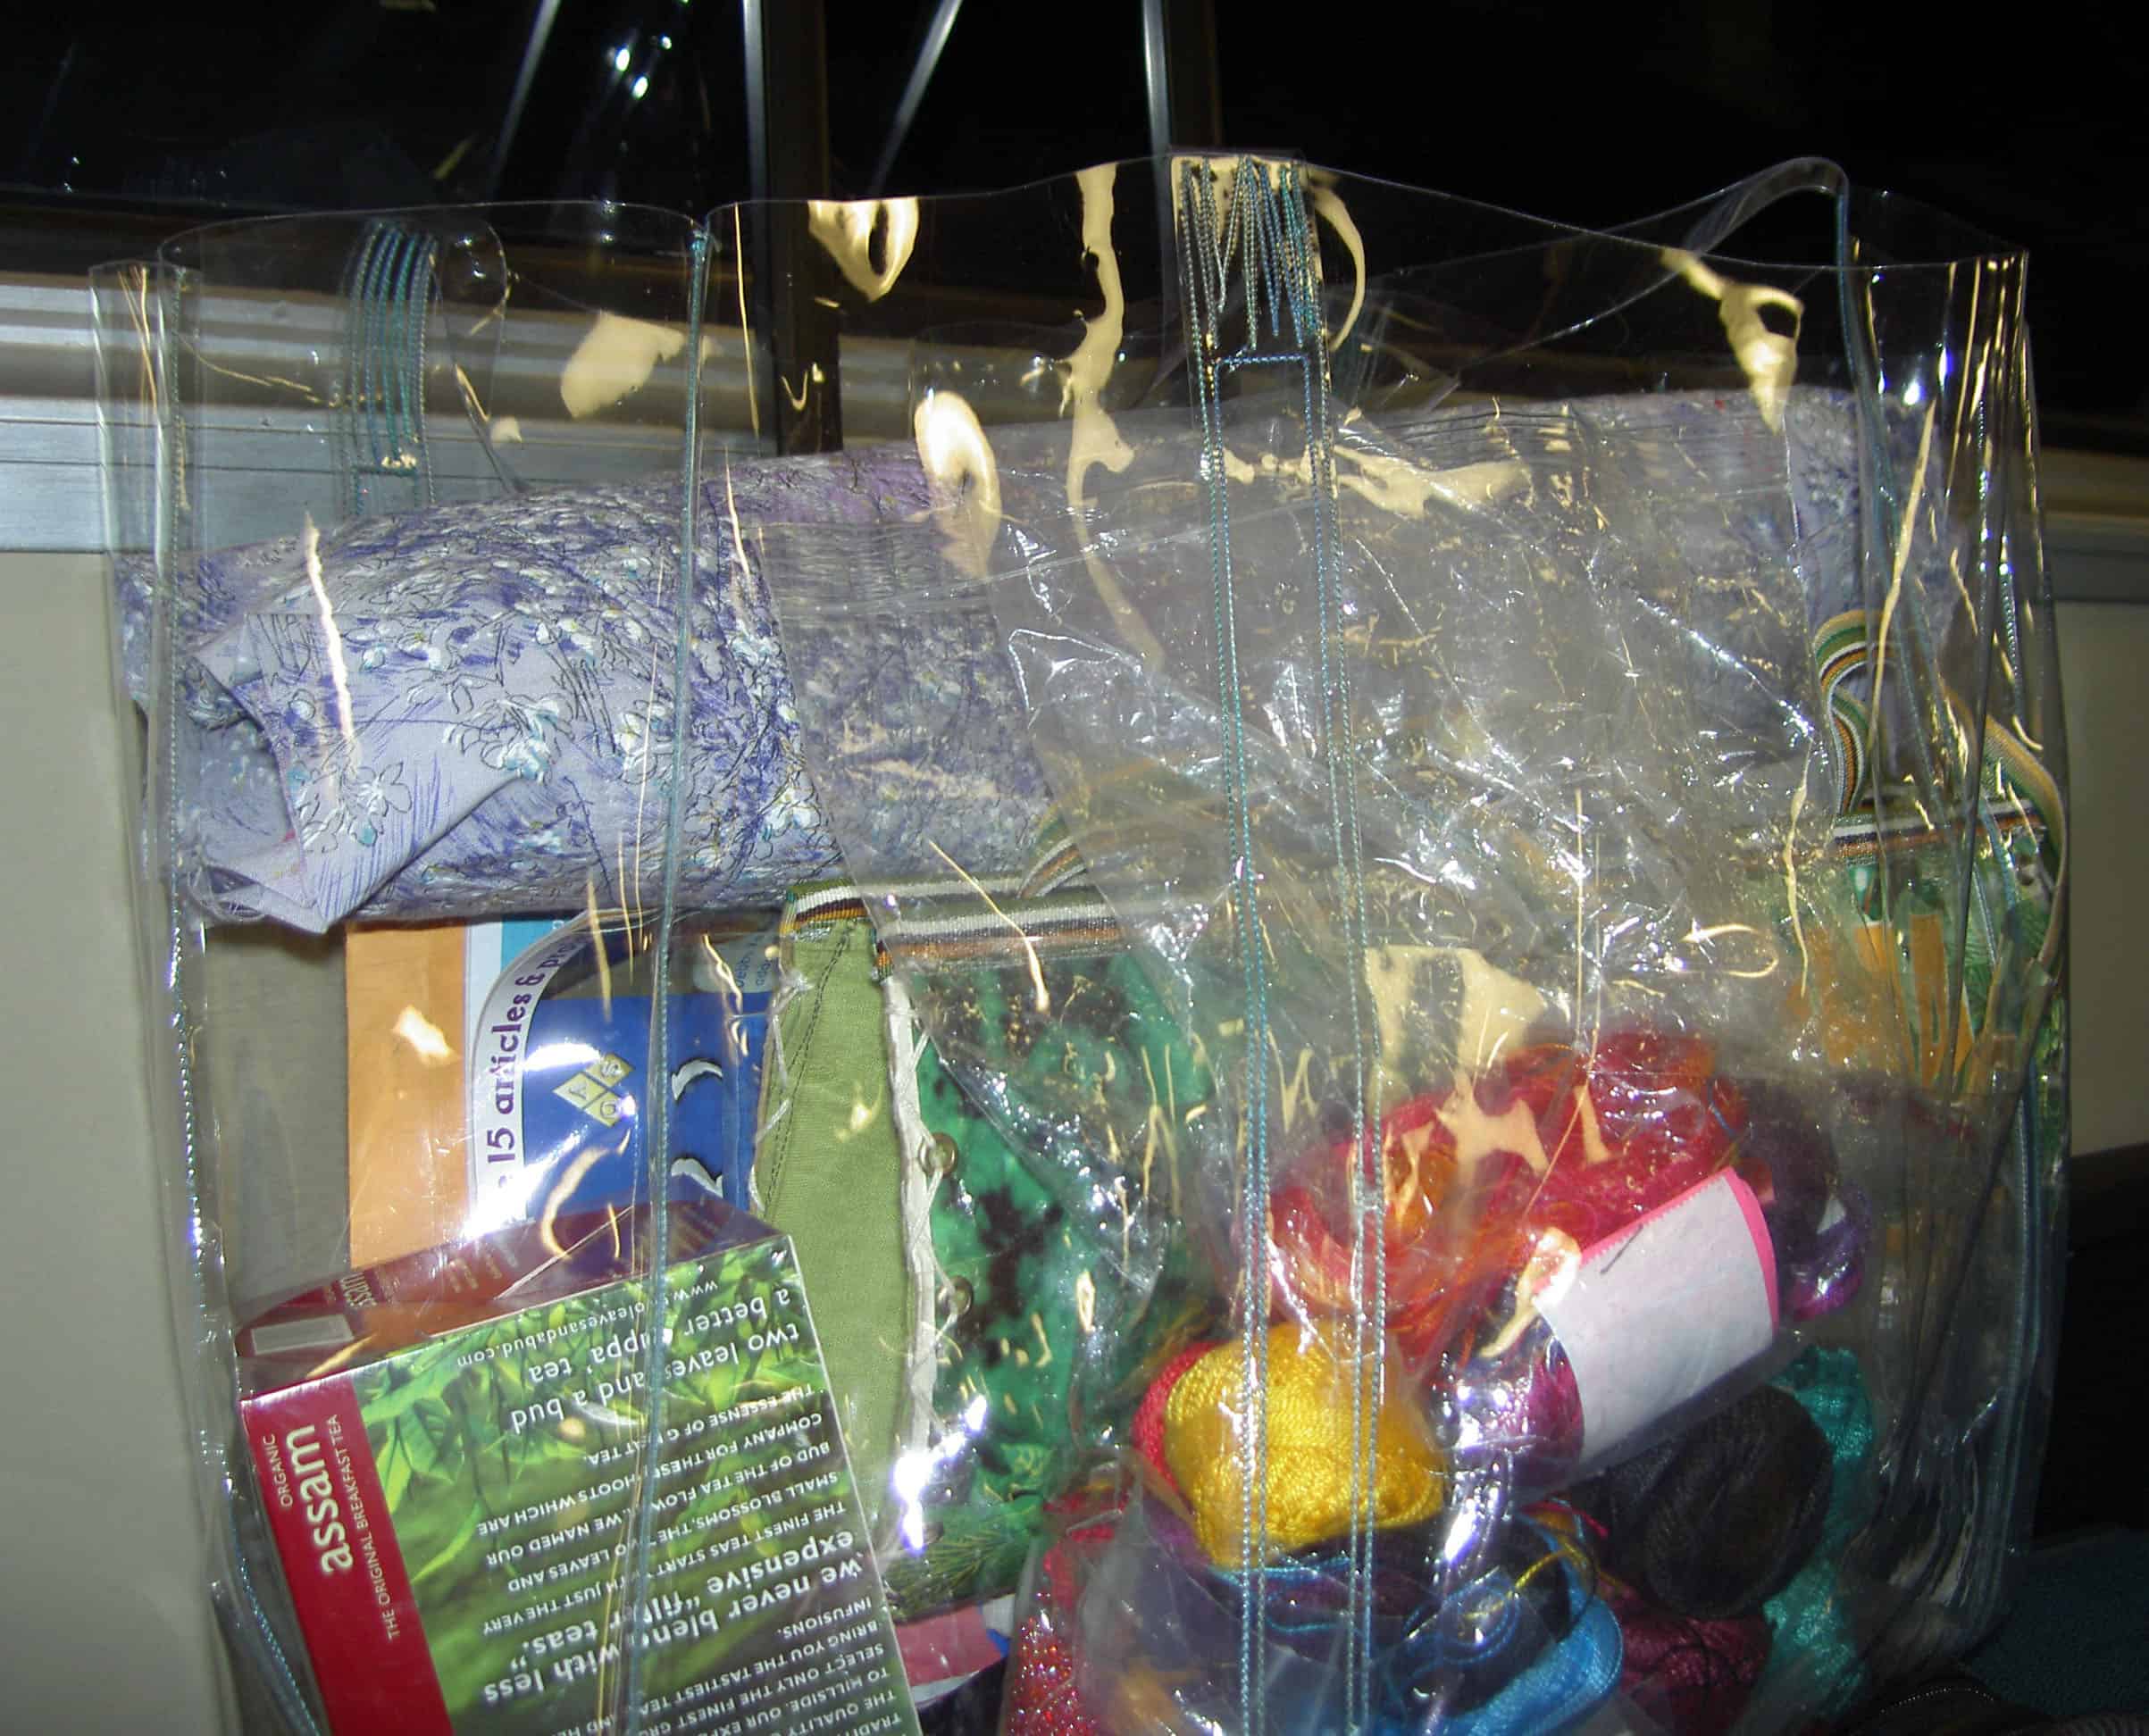
Vinyl is often used in bagmaking. I have talked about it in general a number of times, including last week when I talked about marking vinyl for sewing. I thought I would gather some of what I have written before into one post for your convenience.
Supplies to use for sewing with vinyl:
SewTites – both dots and rectangle shapes are available. These act like pins without poking holes in your project
Tissue paper
Blue tape
Scissors: I don’t use my good Ginghers, but I also don’t use paper scissors. I use middle of the road Fiskars
Thread: I used my regular thread. It shows up, though, so make sure you use a color you don’t mind looking at.
Optional: Teflon foot
Optional: Roller foot – see post about using the roller foot
Do:
Use fabric for making handles, if you are making a bag. You can combine fabric and vinyl with no problem and the handles will be much more comfortable make out of fabric.
Use quilting thread, if you want, to sew vinyl bags together. It is a little thicker than regular Aurifil 50 wt. It gave me a little more of a feeling of security when I made the clear vinyl bag.
Use a blowdryer to get folds or wrinkles out. Test on a low heat farther away from the vinyl and gradually increase the heat. Move the blowdryer closer and closer until you find the sweet spot.
Sew in creases. Pressing them (see below) doesn’t work, so sewing an 1/8th of an inch from the edge puts in a nice, permanent crease.
Don’t:
Press. Pressing is not an option. The vinyl will melt all over your iron, your ironing board, everything and make a huge mess. You can use a blowdryer if there are folds.
Don’t use pins. Once you prick vinyl, the hole does not ‘heal’ like it does with cotton quilting fabric
No ripping. Jack-the-Ripper is not your friend with this material. Again, the holes do not heal, so if you need to rip, you will need to re-cut the piece or sew in exactly the same holes.
Add a vinyl pocket to a bag in a location that might be near a heat source, e.g. an integrated pressing mat.
The big thing is to use tissue on top and bottom of the vinyl so that the vinyl is not in contact with your sewing machine bed or presser foot. The vinyl will stick to the bed of the machine and the foot. The tissue paper buffers both from the vinyl and allows you to sew.
Clear Tote in Transit
Pen leaks, water spills and other messes are easy to clean up with paper towel and some Simply Green or a cleaning wipe. Sometimes, I can’t avoid putting the vinyl bag I made down in something that someone else has spilled simply because I didn’t see the mess. The vinyl also protects my stuff quite well in the rain.
Some of the things that I like about this bag are also disadvantages. It is great for me to be able to see inside the bag, but I don’t want other people to see my phone, tablet or digital camera. I definitely cannot use this bag to hold a table at a cafe’.
Using vinyl as a bag in hot weather is iffy. The vinyl becomes very soft and pliable. I think the handles might stretch if the weather becomes hot enough.
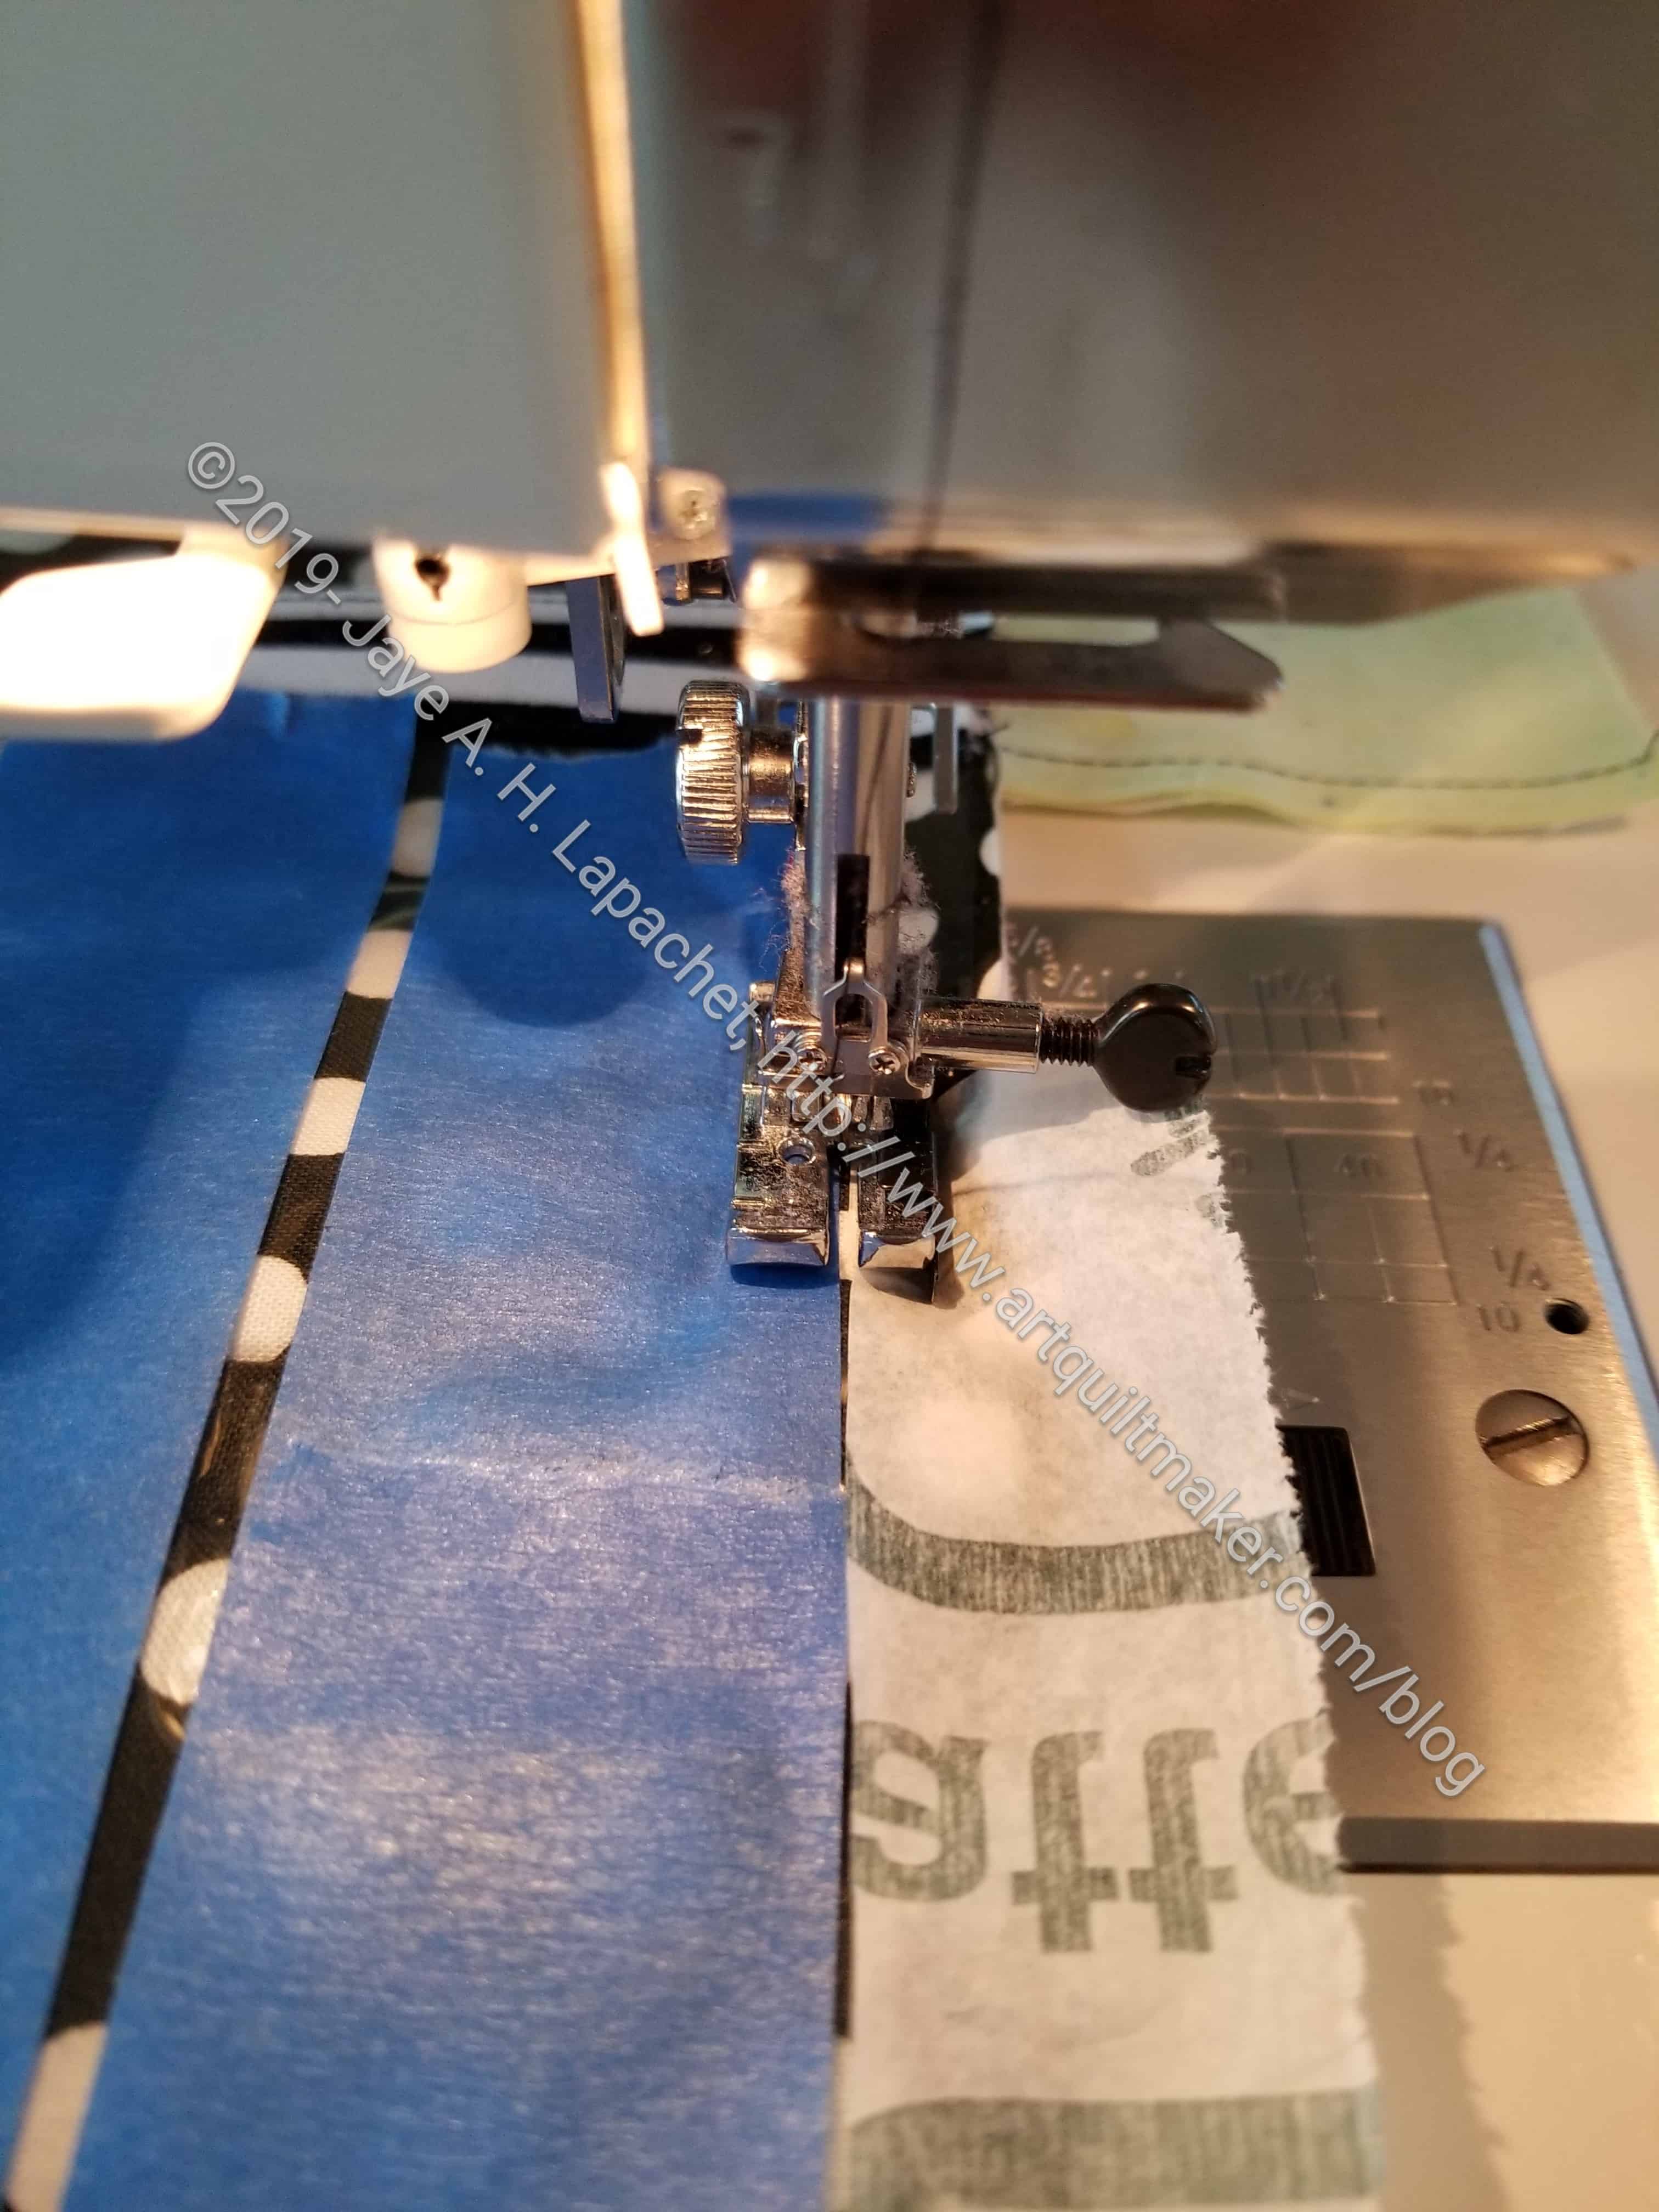
Marking vinyl
While working on my project, I had to develop some tips/tricks of my own.
The Running with Scissors pattern, in general, is really good. It says, however, in the vinyl pocket part of the pattern, to mark the vinyl to make smaller pockets. The pattern didn’t say how to mark the vinyl. I didn’t have access to the video at the time, which may have some tips. I didn’t want to use a Micron pen, though I know that ink can be washed off of vinyl pretty easily. I also don’t have one of those wash away pens, so I decided to use blue tape. I used tape to mark the lines I needed to sew along.
Sew along the tape
I sewed right next to the tape. I didn’t want to sew through it, because that would create a mess. I knew my needle would cake with the adhesive. This was a tricky operation, because I also needed to sew with the vinyl covered by tissue. I didn’t bring specific tissue, so I used the wrapper from the vinyl. You don’t need much, but you do need longish strips. The only issue was that there was a little residue left on the vinyl from the tape. I’ll clean it off later.
Periodically I like to updated and post this tutorial. Check out the previous tutorial.
I was taught this method of putting quilts together and have found it to be more accurate that putting rows together. I use it for block-based and similar quilts. Very occasionally I’ll sew on a long border after the center of the quilt is complete, but otherwise I try to avoid the long seams required to put quilts together in rows.
Using this method, usually I have only one really long seam to sew at the very end and 1-2 mid sized seams.
This technique improves accuracy when you have sashing and cornerstones, but also improves accuracy with sashing and blocks or just blocks. If you have no sashing, then the pieces are much easier to handle.
Occasionally you will have a quilt where chunking is not appropriate for one reason or another, which is why it is good to know many techniques. Knowing a variety of techniques enables you to choose the best method for achieving your creative vision.
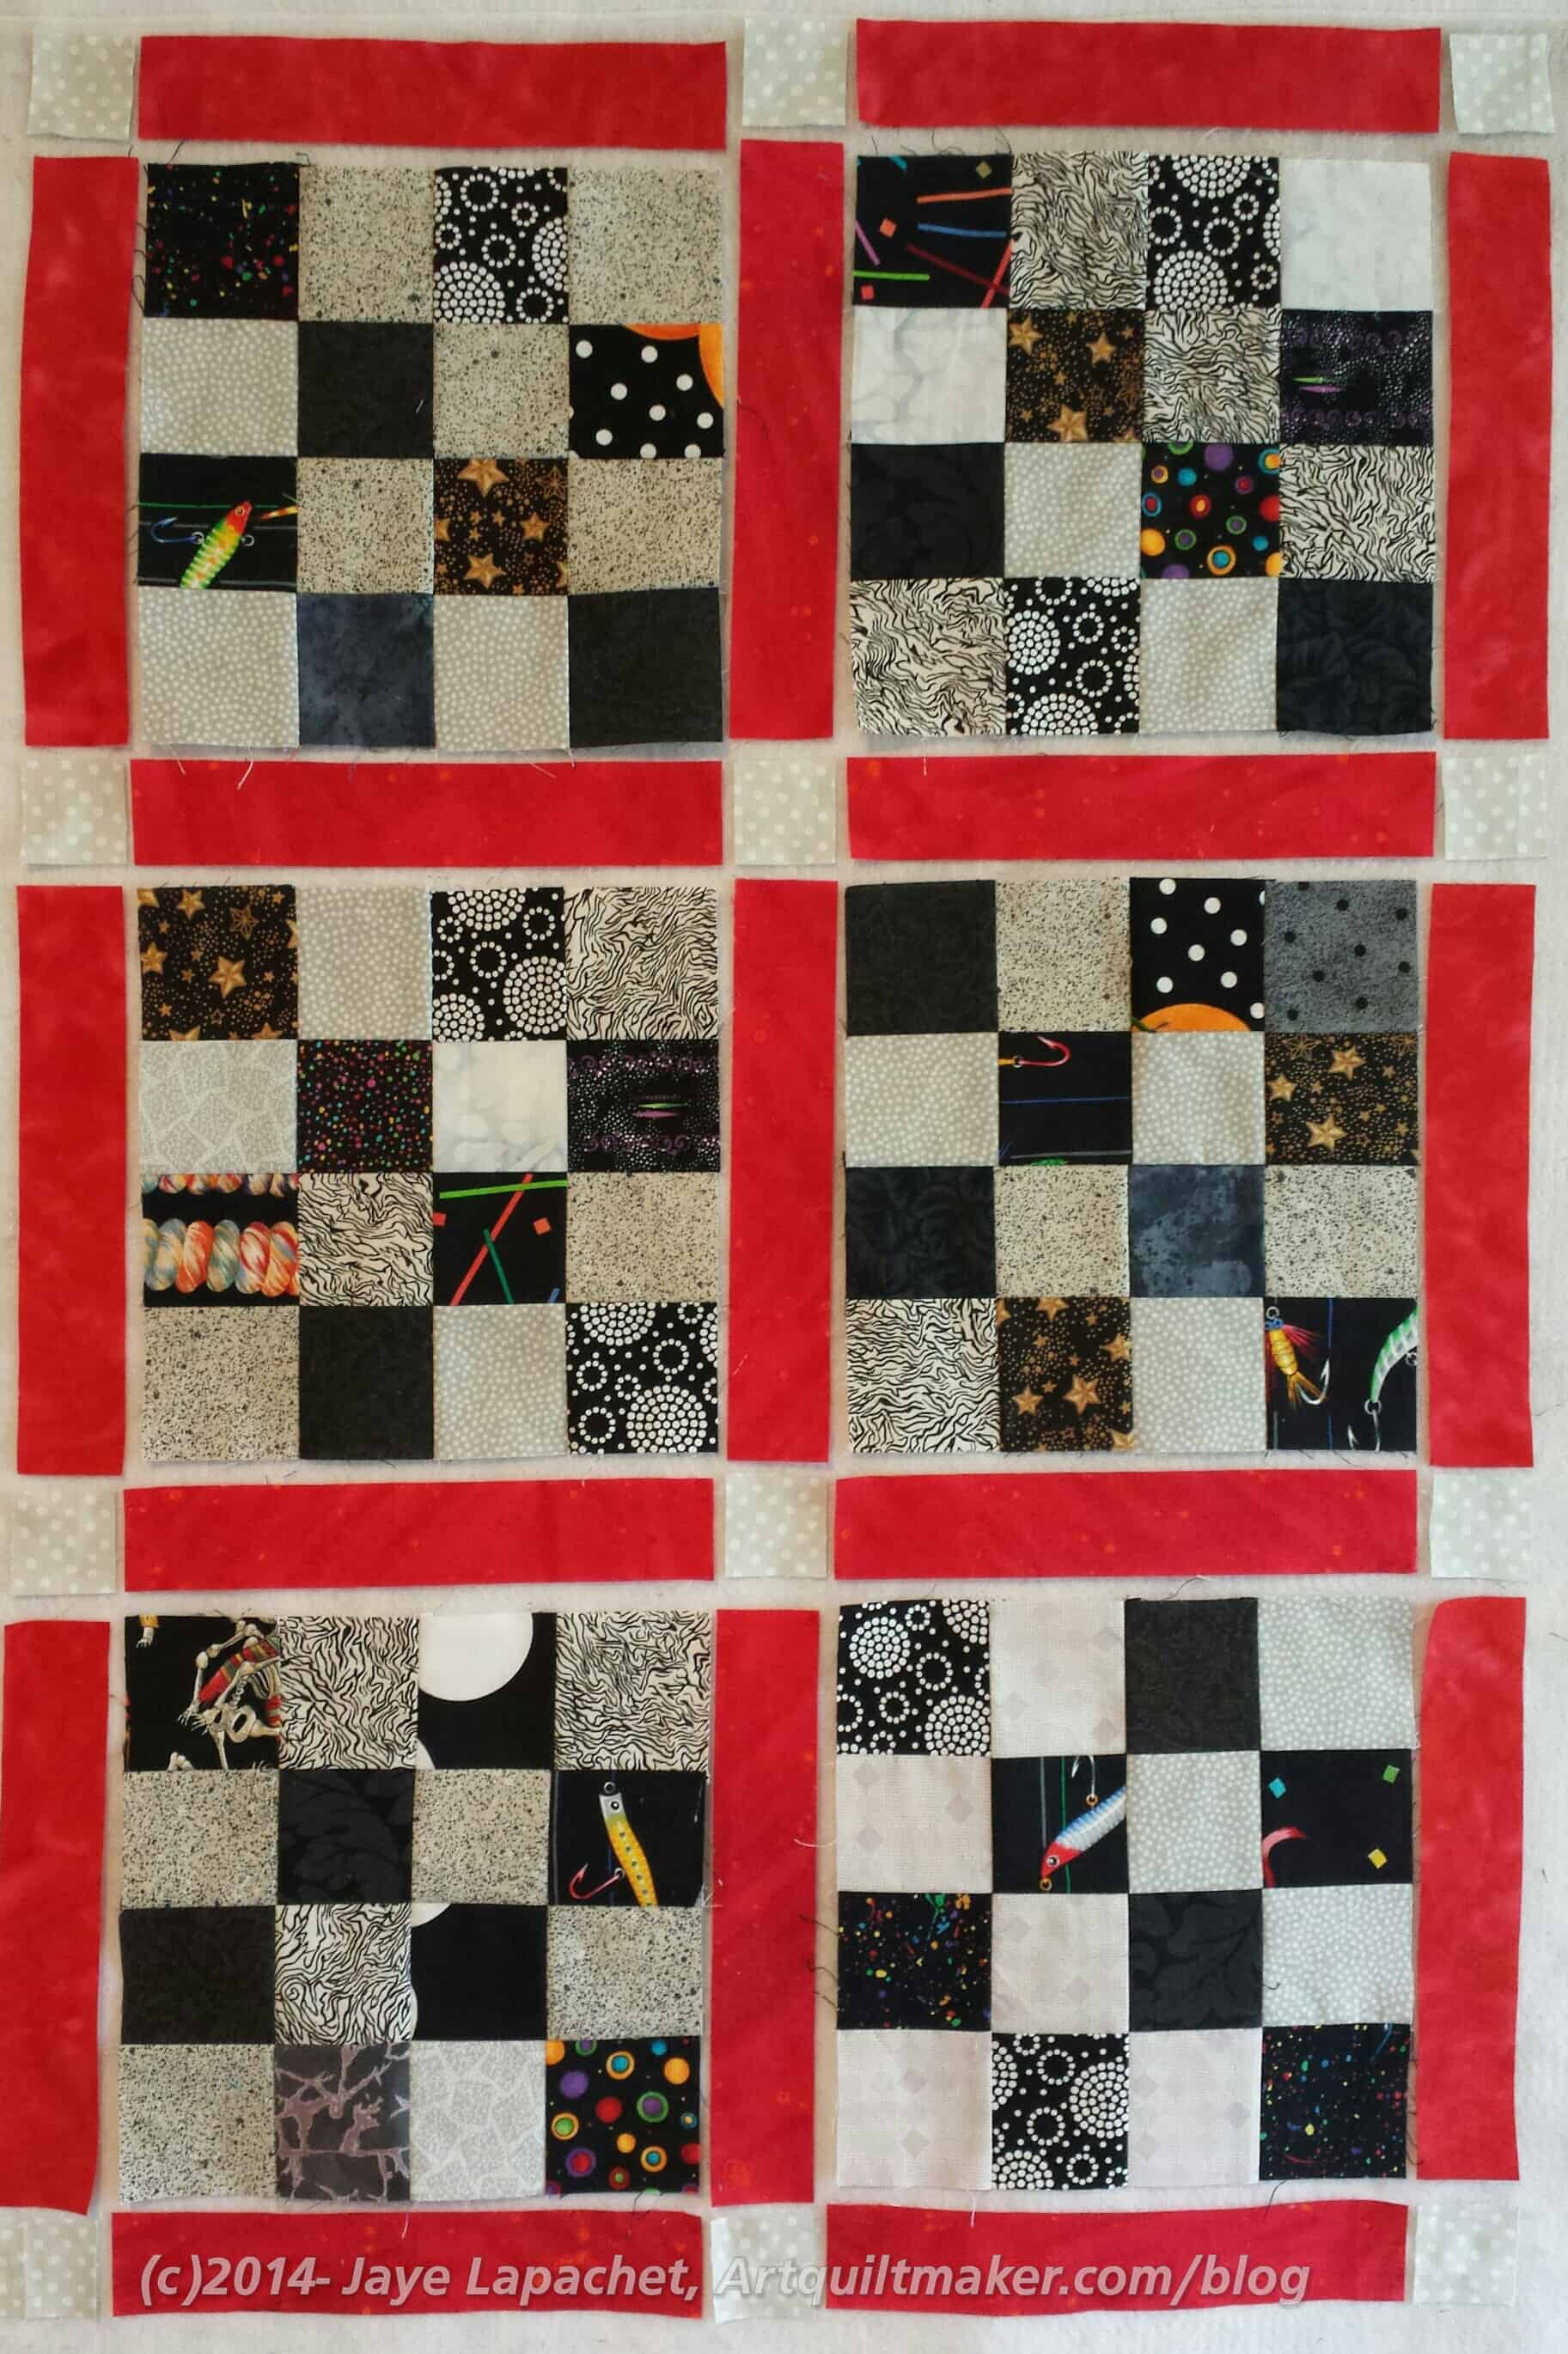
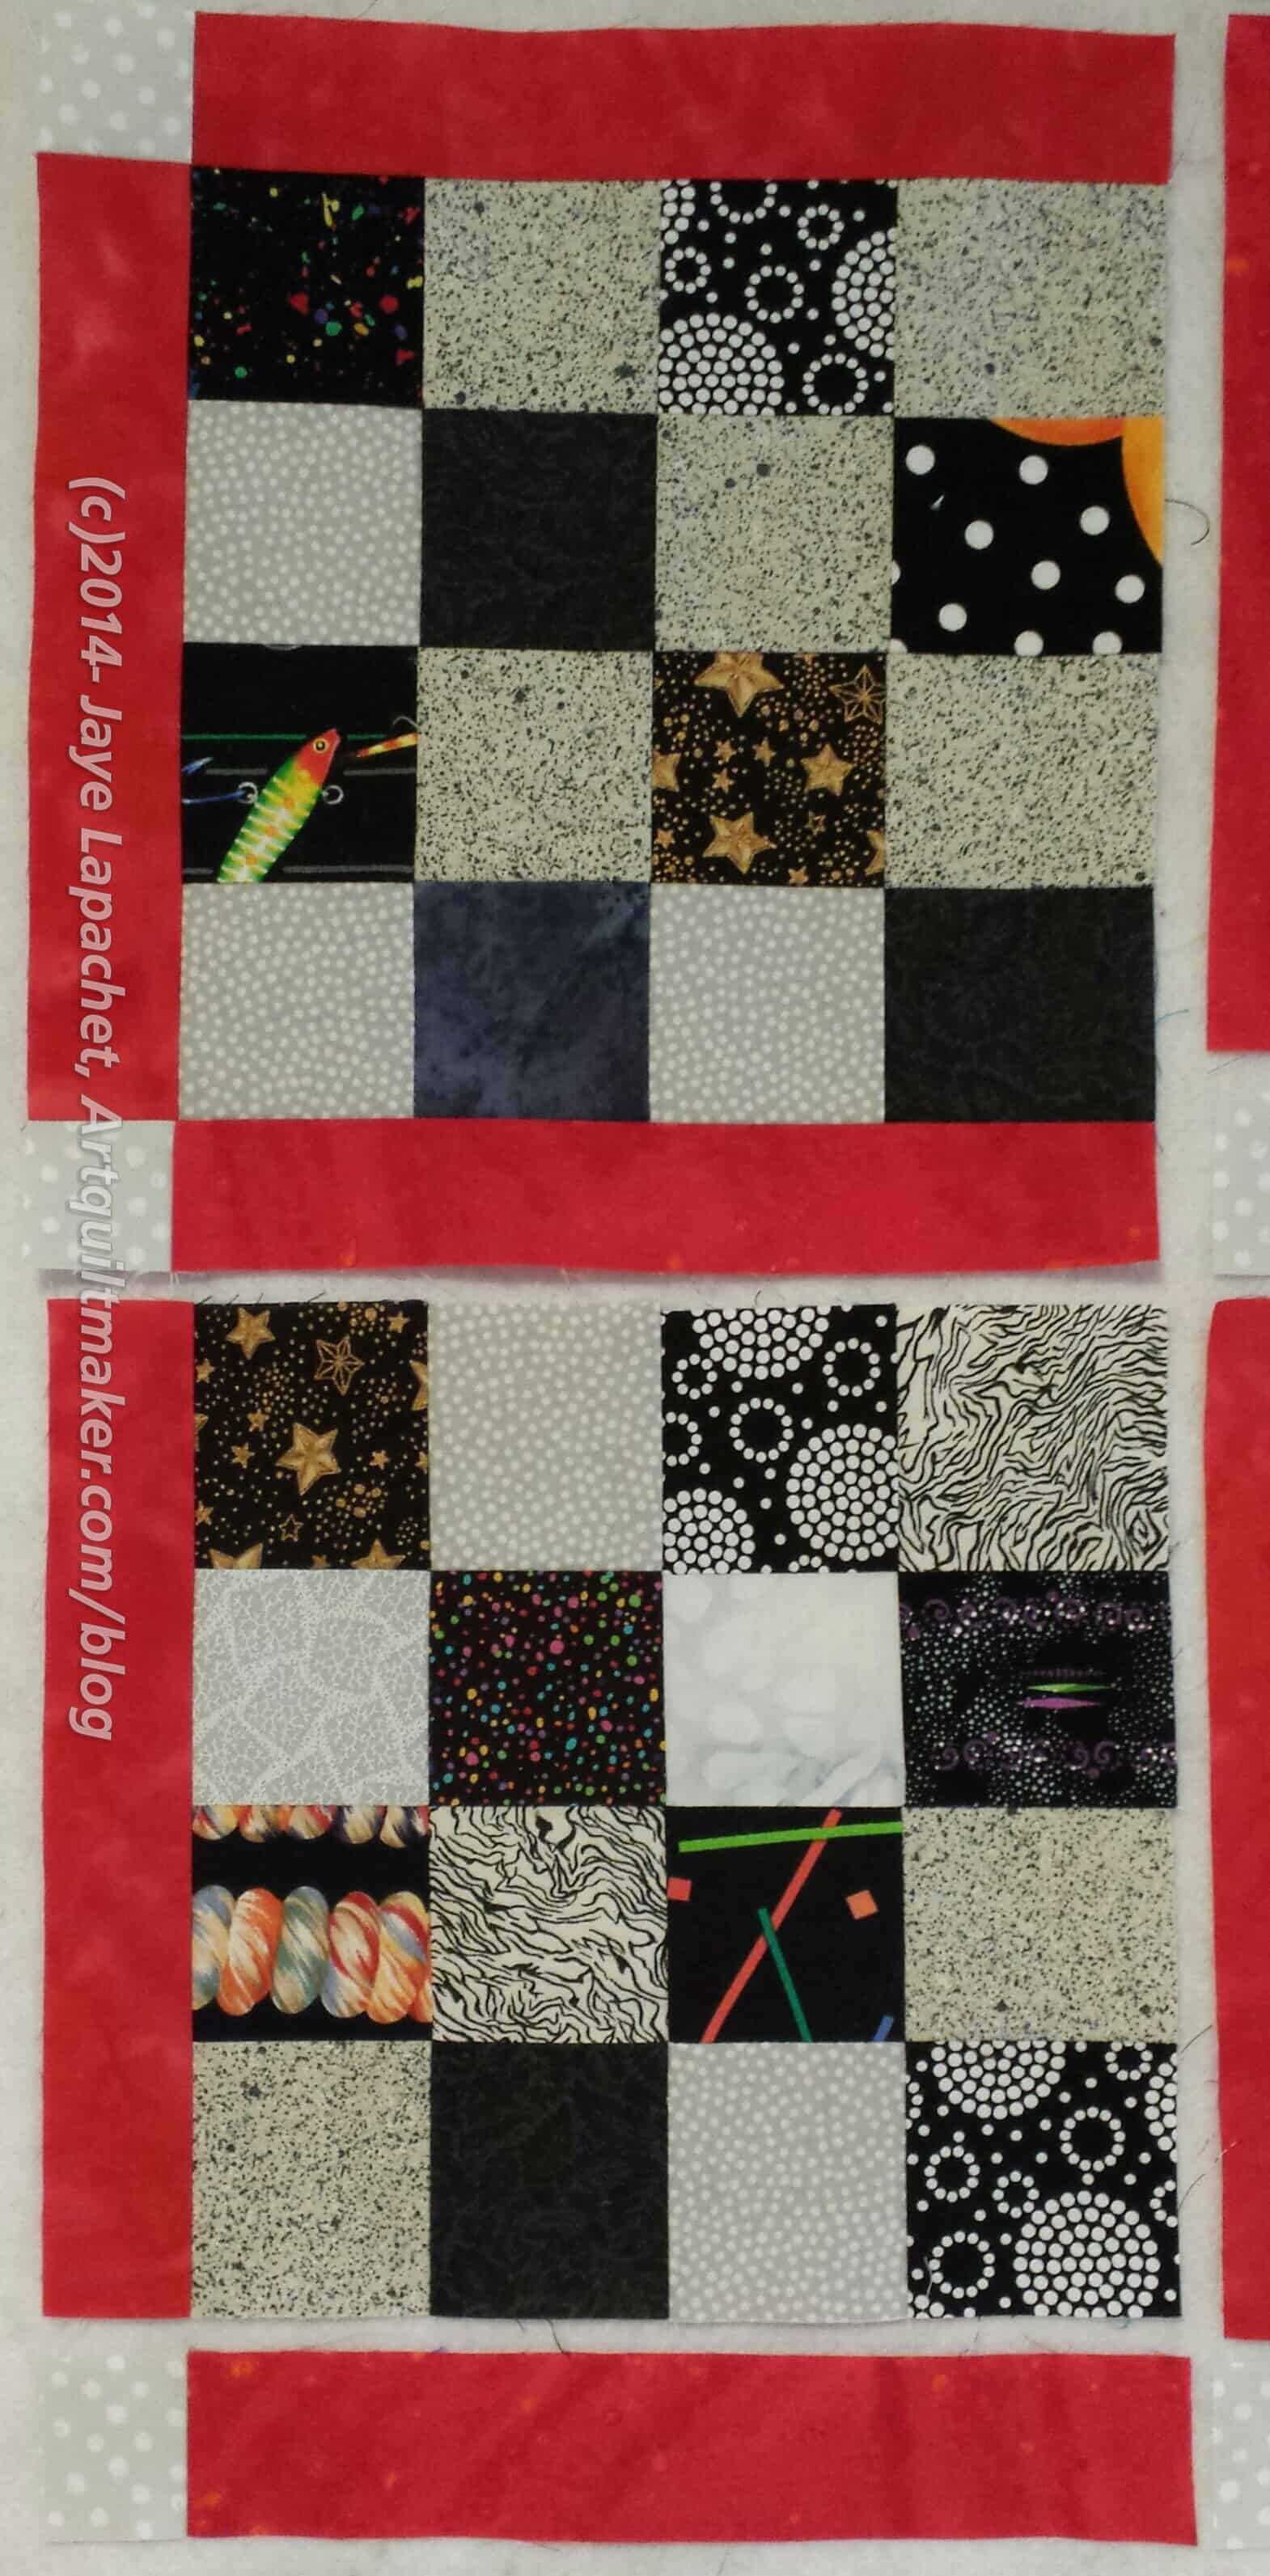
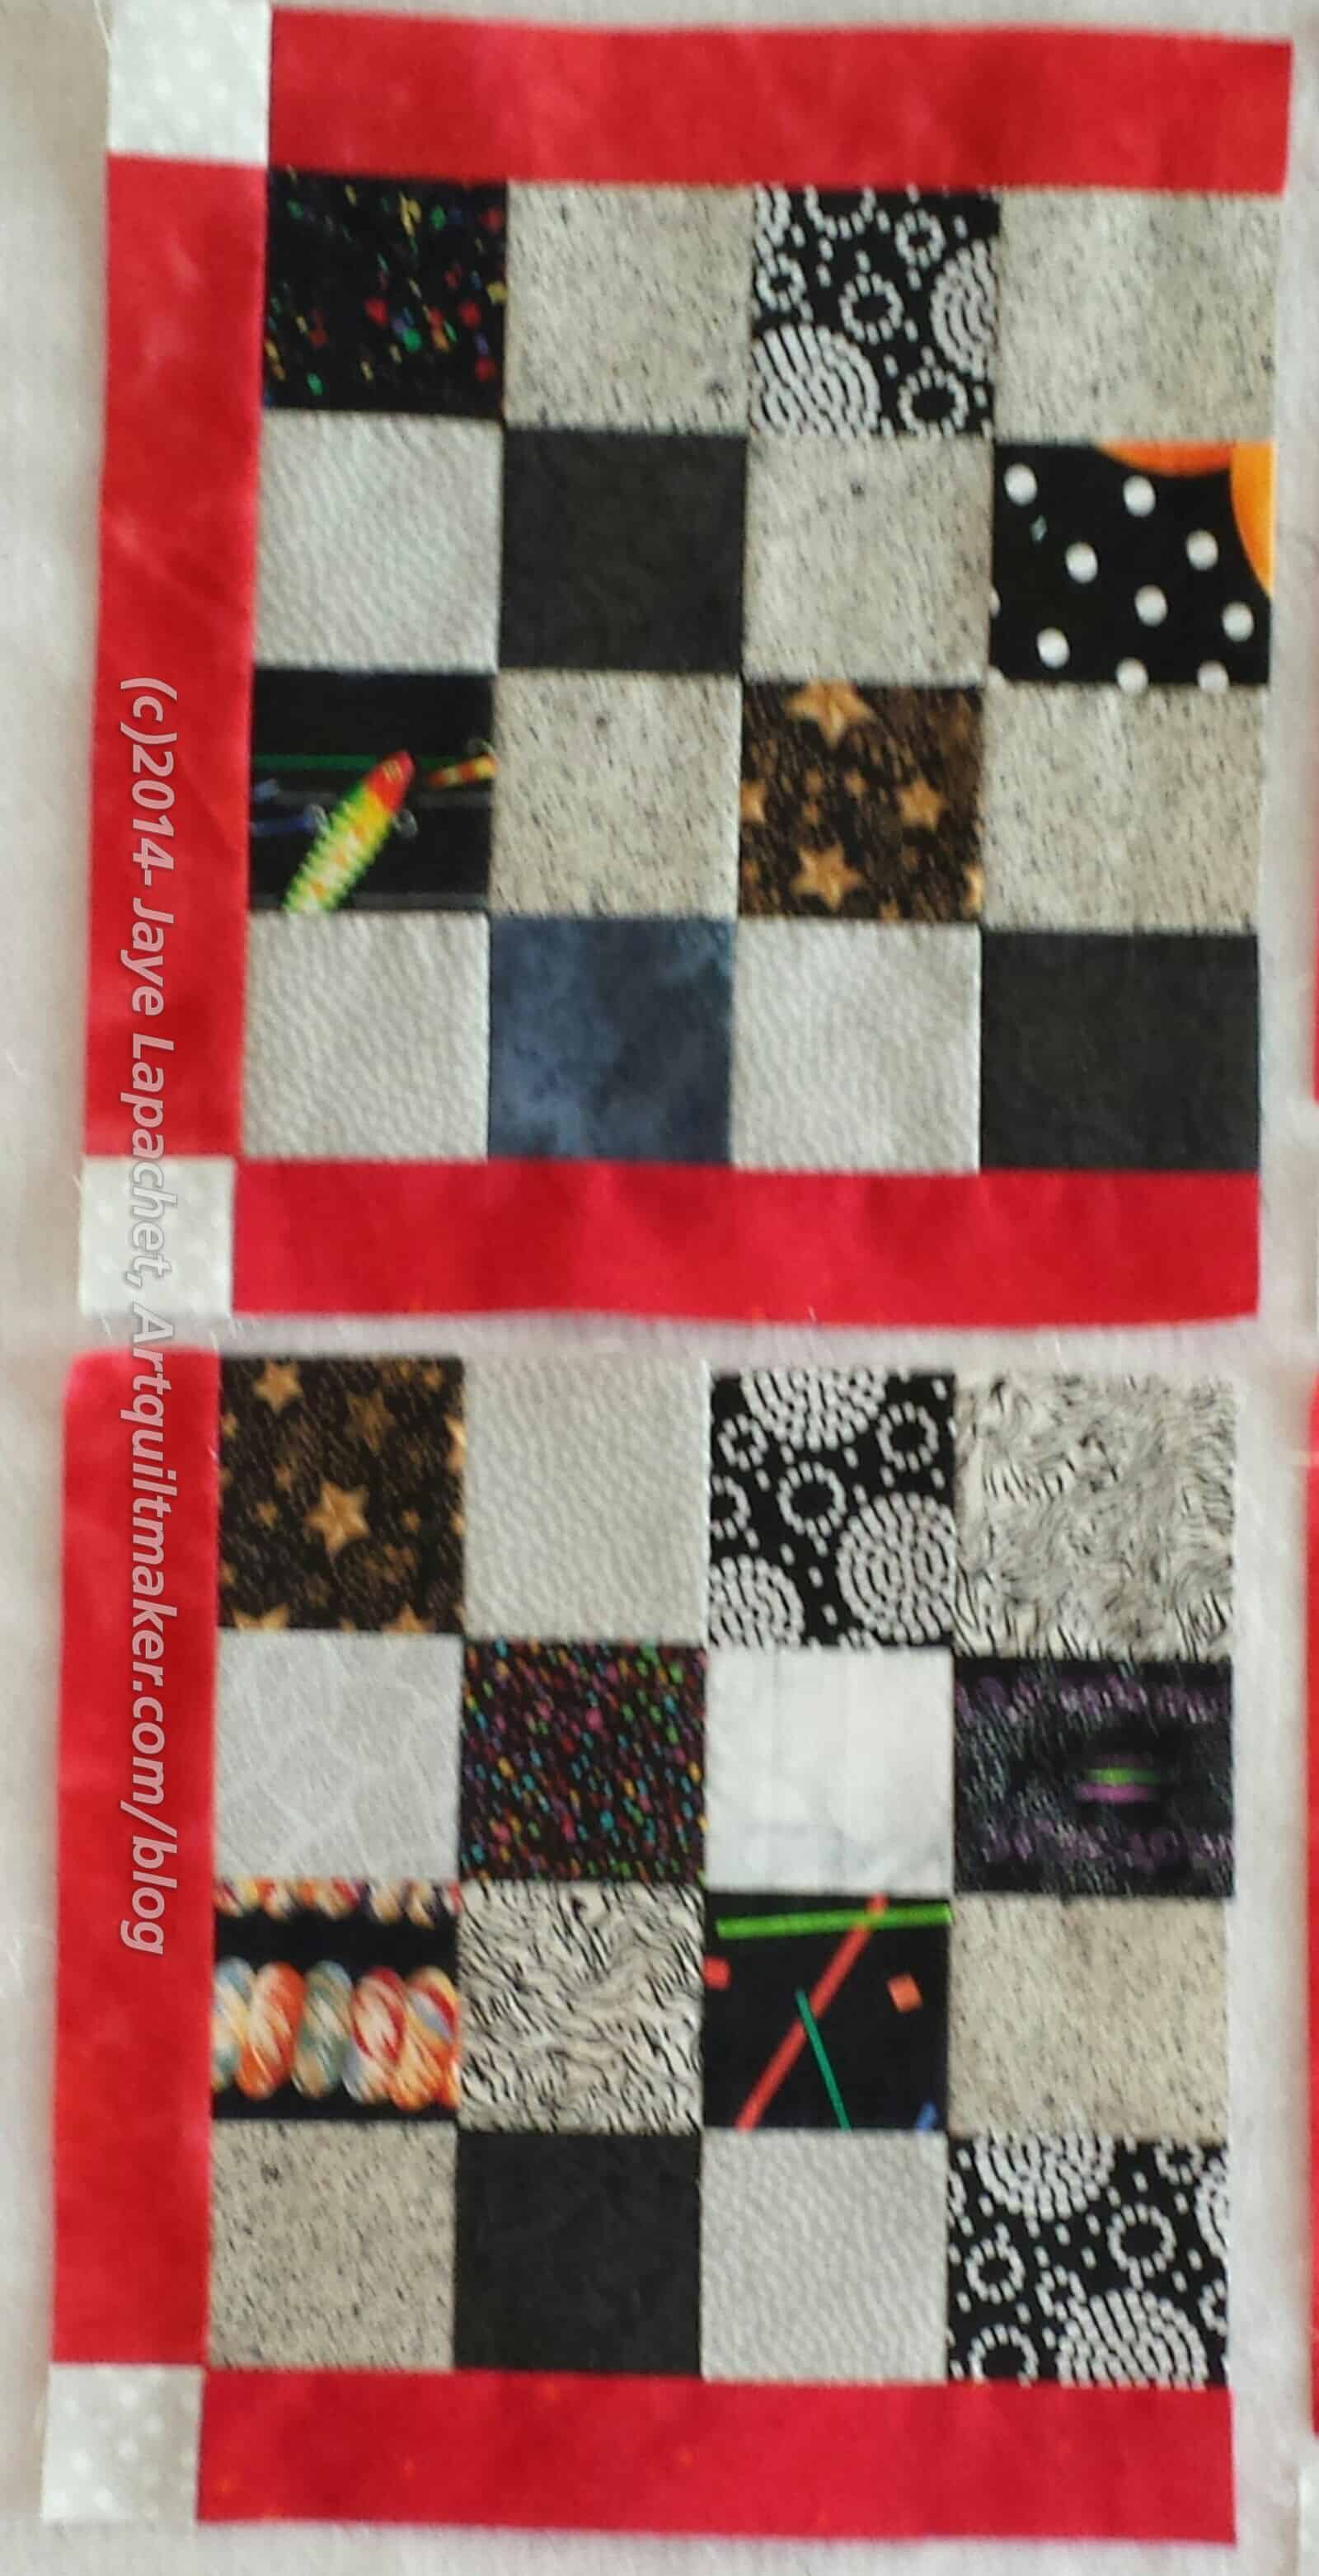
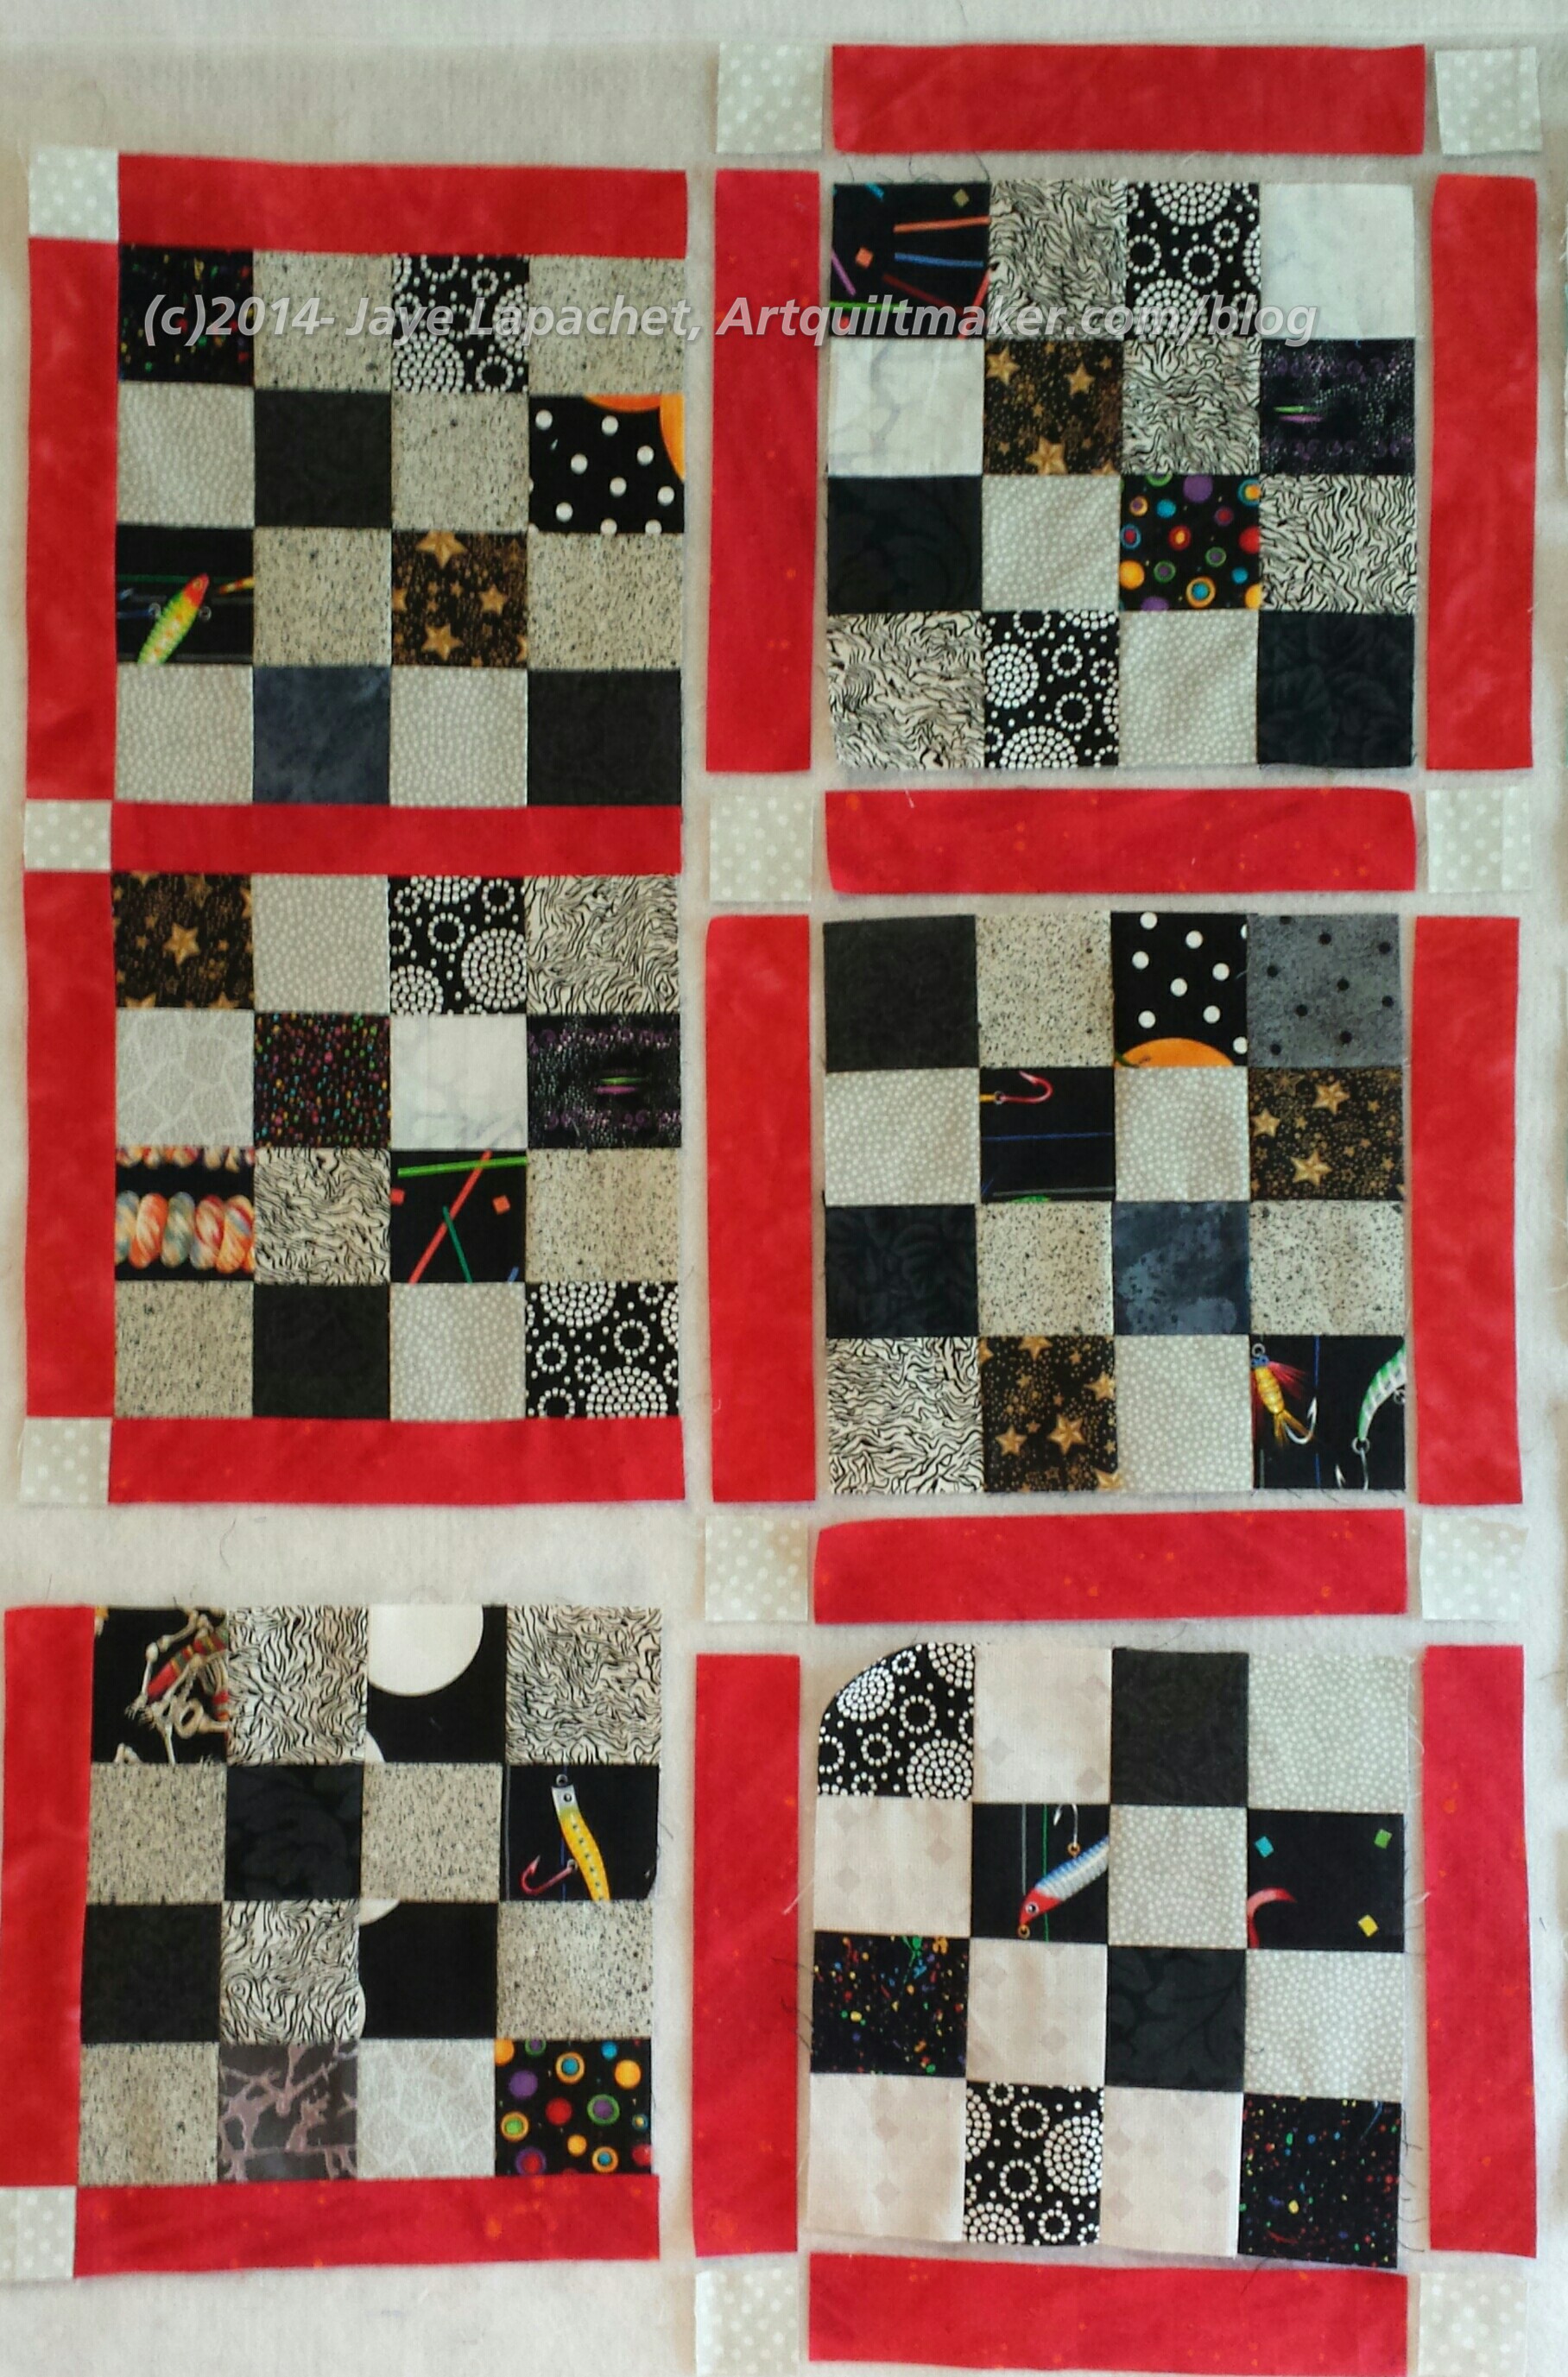
First, lay out your blocks and pieces on a design wall (or design floor) so you can see what you have to work with and the order in which you want them to end up.
Blocks Laid Out Waiting to be Put Together
The quilt starts out as a bunch of pieces waiting to be put together. In the example above:
Blocks: grey and black Sashing: red Cornerstones: grey
The basic idea is to put the quilt top together as you would a block: sew smaller patches together to create larger sections. I avoid sewing the quilt together in rows as chunking keeps the quilt is more square. Also, my intersections line up much more accurately.
In the example above, the border is incorporated into the construction of the quilt top. If you sew it as you sew the rest of the top you won’t need to put it on at the end. Putting the border on as you put the whole top together will also help line up the cornerstones with the sashing more accurately.
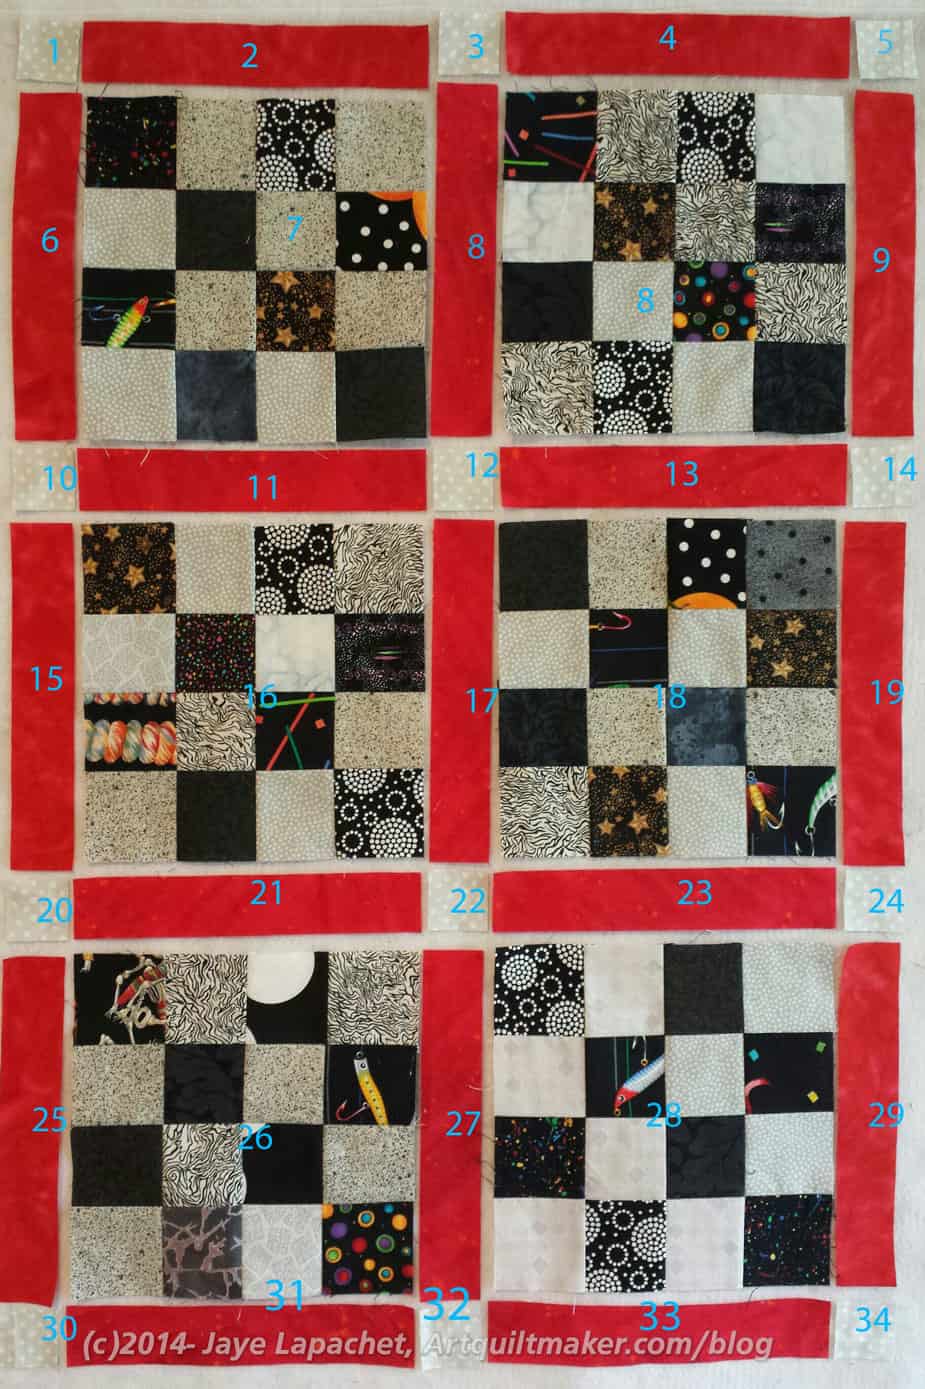
Nota bene: The picture below is numbered, so it will be easier for you to follow the tutorial. You may need to click on the image to enlarge the picture to see the numbers.
Numbered PhotoSew patch 2 to 7
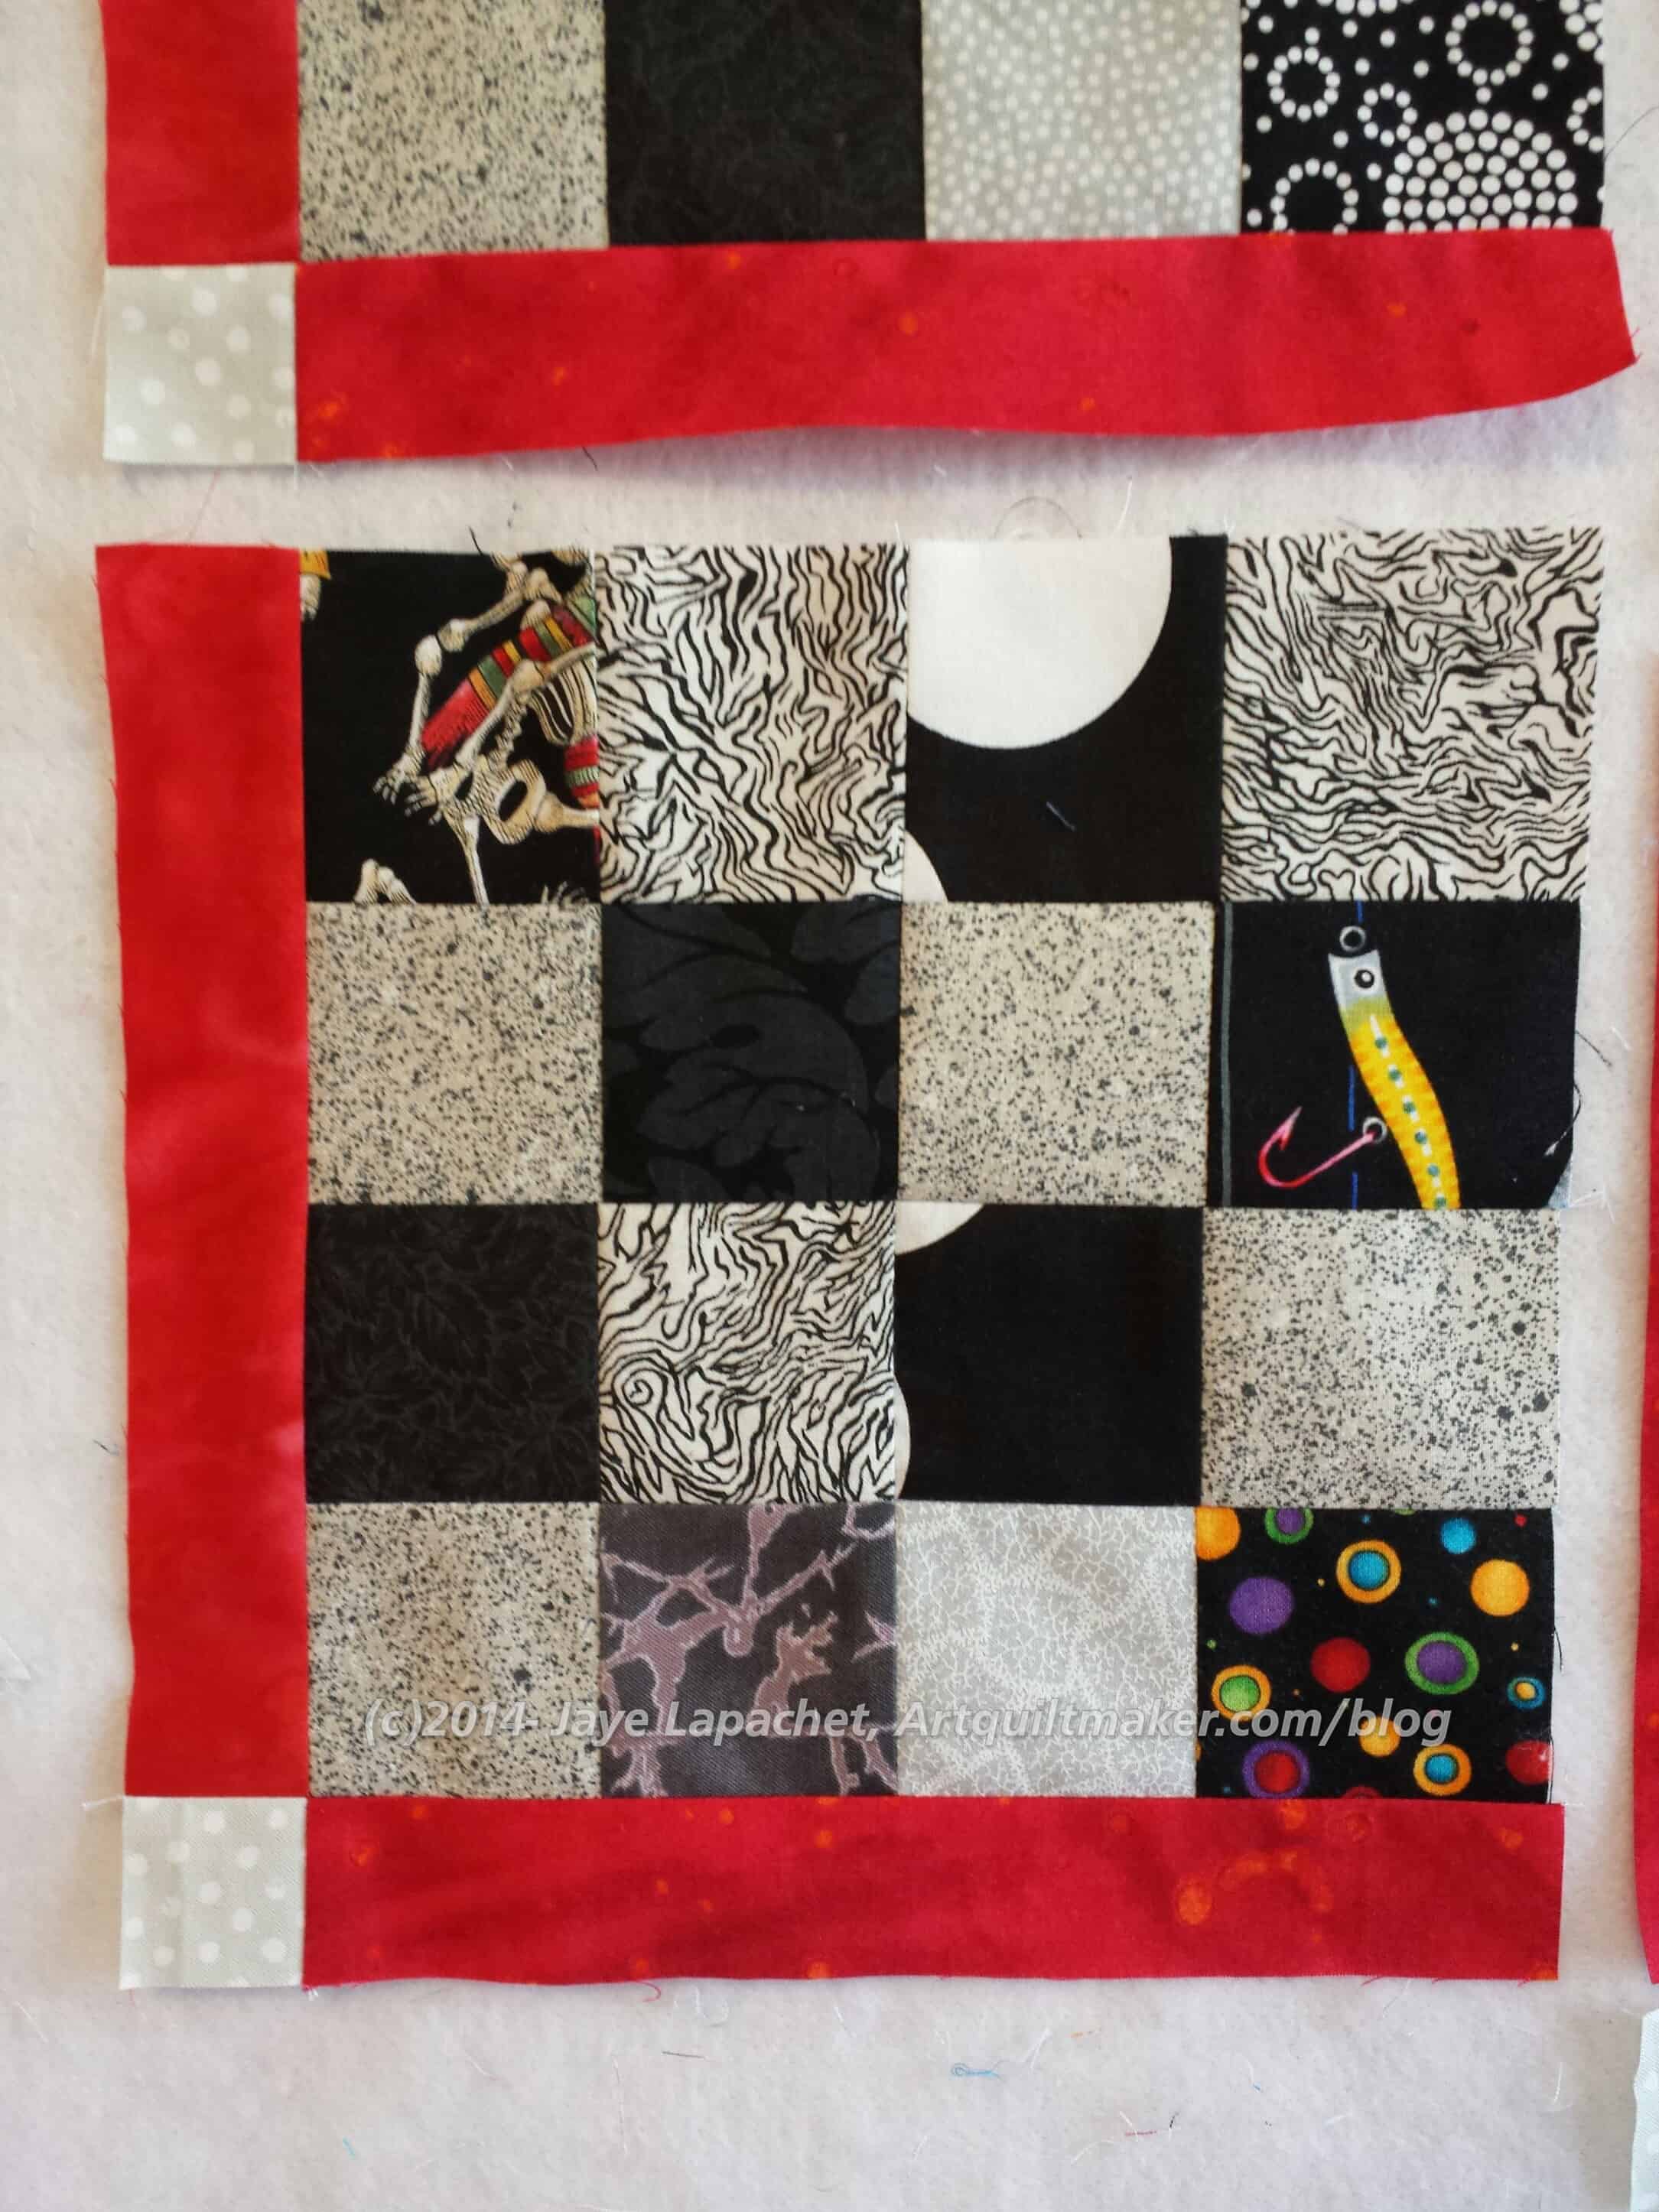
First, sew #2 to #7, the top piece of sashing to the first left hand block. Press to the red piece of sashing. I press to the red, because there are fewer seams to get in the way.
Sew patch 1 to 6
Next, sew #1 to #6, the first grey cornerstone (upper left hand corner) to the first side piece of red sashing.
Sew first 2 sections together
Now you have two sections which you should sew together. This is how you sew the border on. If you had a second border, you could also incorporate that into the piece, but this technique works best when the border is broken up into pieces (e.g. sashing and cornerstone). You can always put additional long borders on later.
First two sections sewn together
You now have your first ‘chunk’! Hooray!
Sew bottom cornerstone and sashing to block chunk
Now sew patch #10 to #11, the bottom cornerstone to the bottom piece of sashing. Then sew that 10-11 cornerstone-sashing bottom pieces combination to the first chunk.
Almost fully bordered block
Voila! You have a chunk fully sashed!
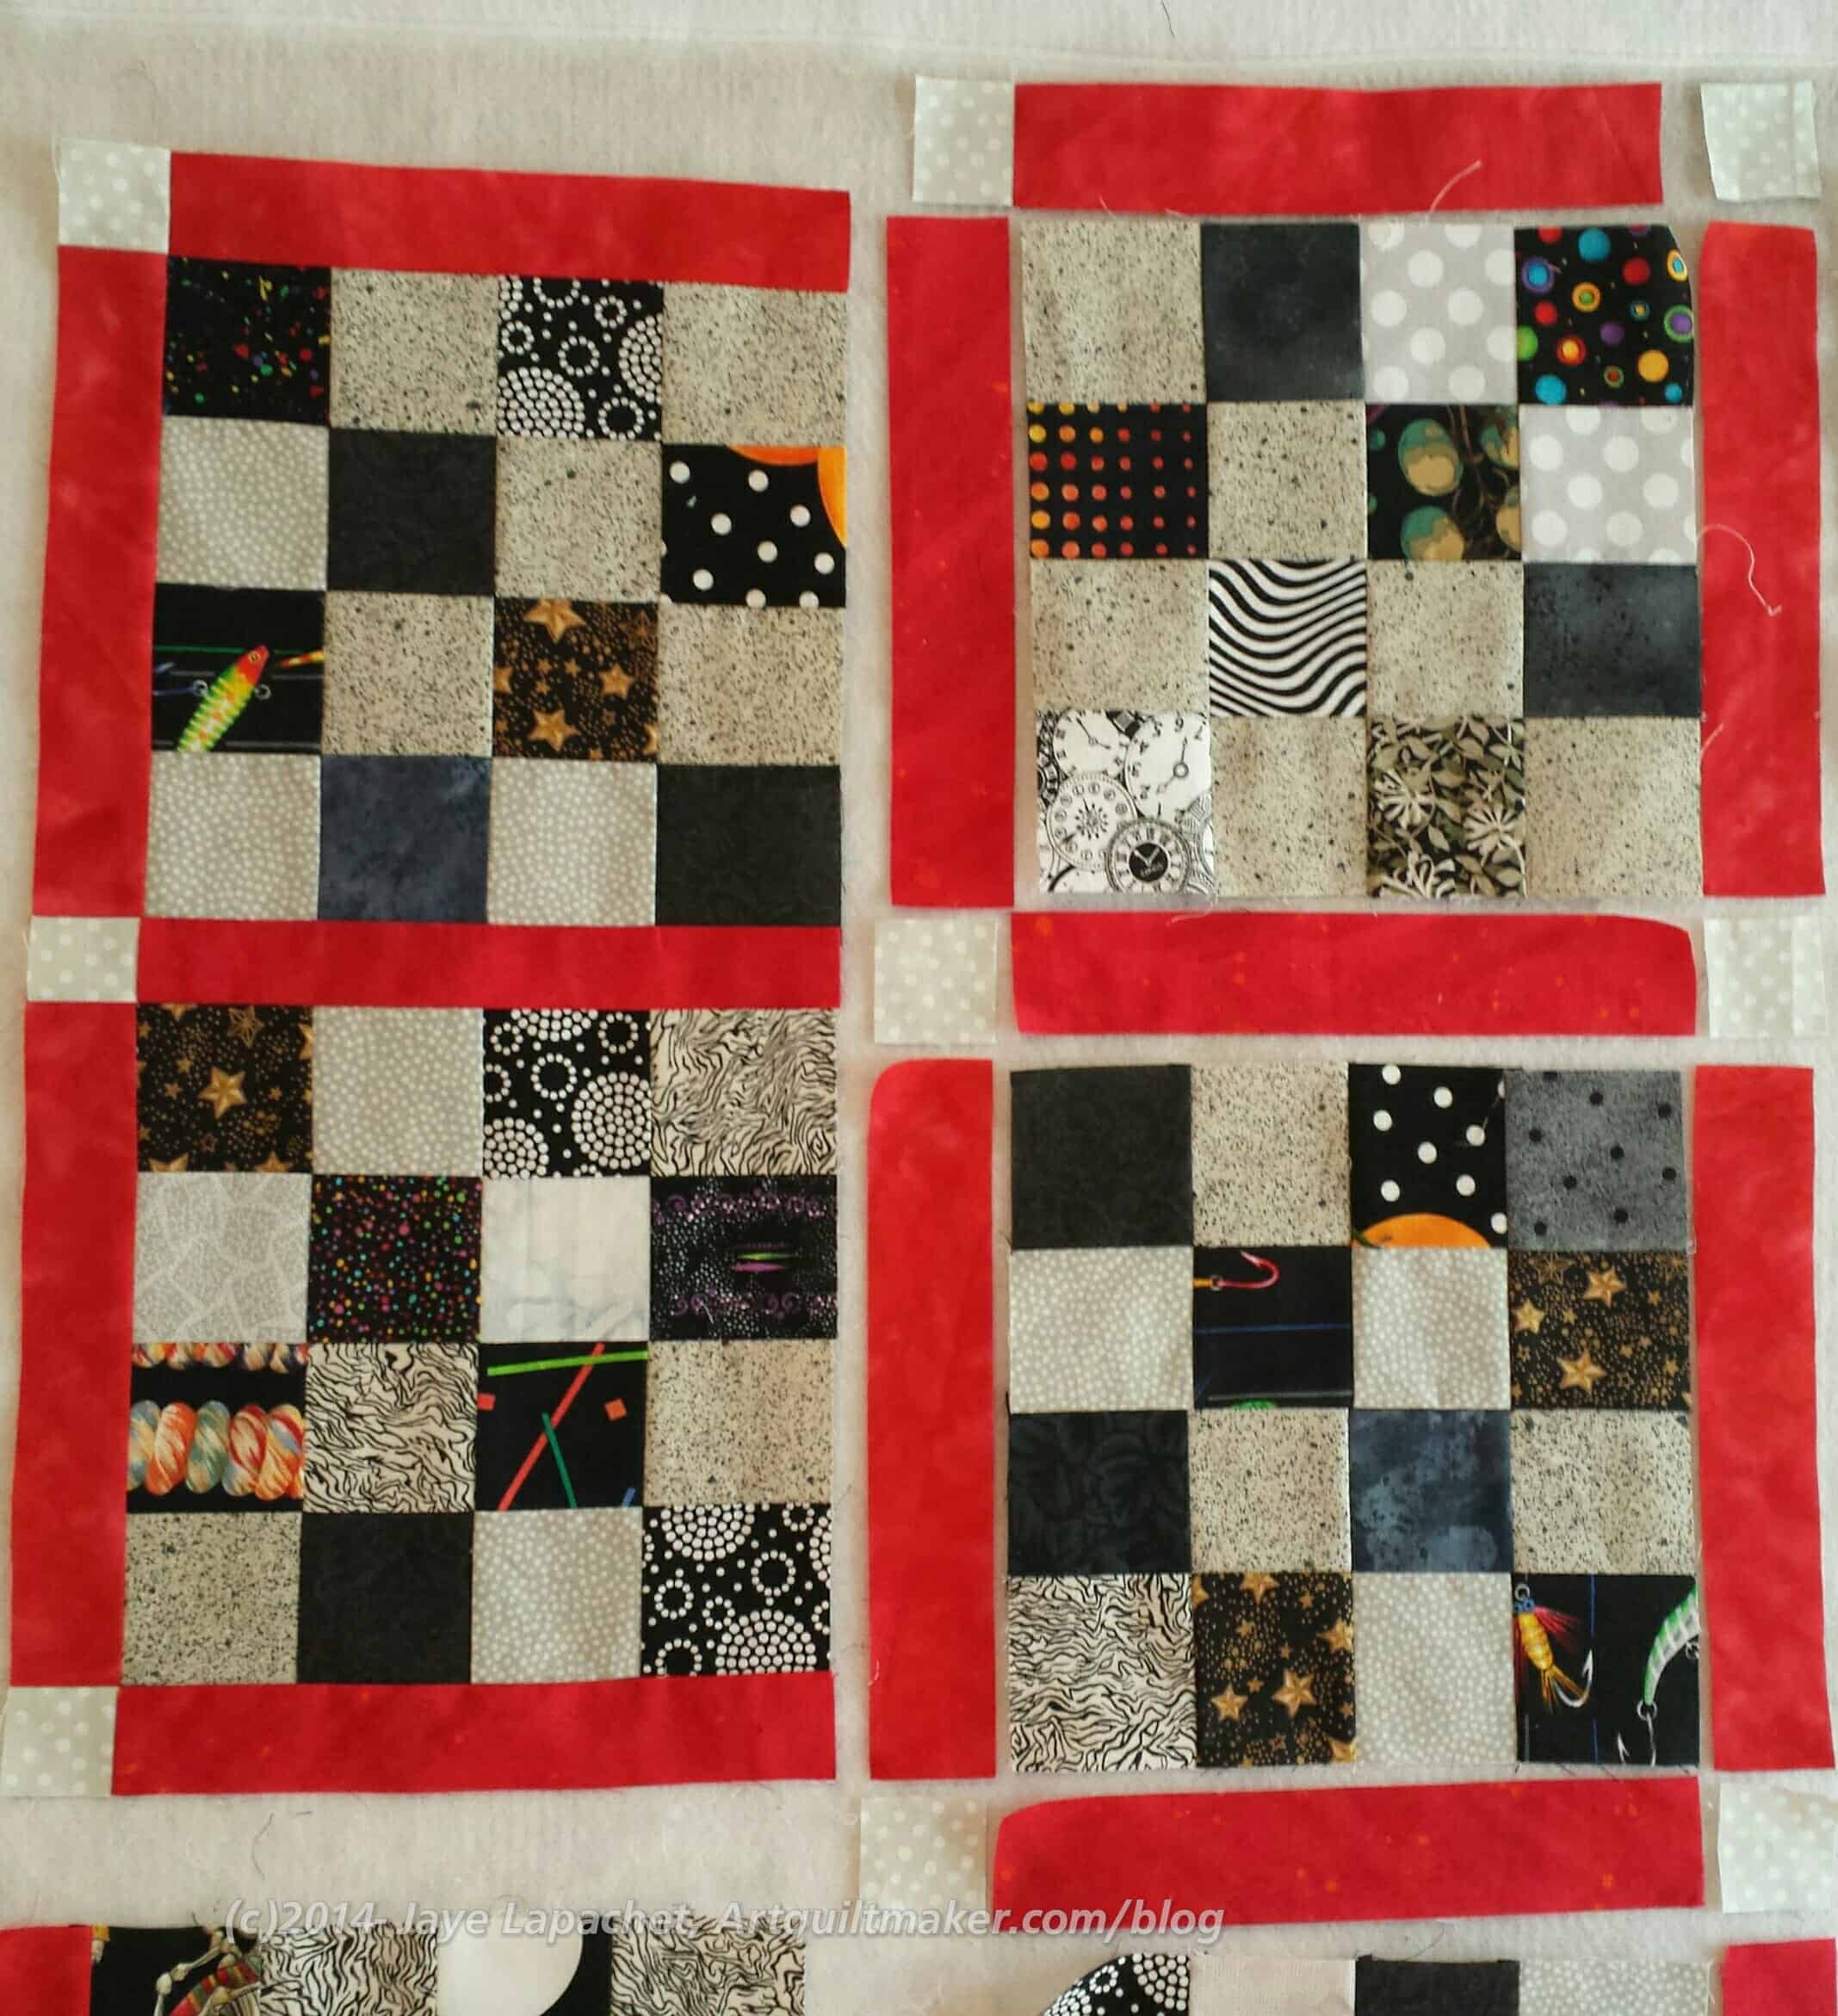
Pin sashing piece #15 to block #16. Now sew the sashing to the block.
Side sashing sewn to 2d chunk
Generally, there will be a piece of sashing that needs to be sewn to a block alone before you can sew a sashing-cornerstone combo to a chunk. You make the ‘chunk’ by sewing a piece of sashing alone to the block.
Sew bottom cornerstone and sashing to 2d block chunk2d chunk
The center ‘chunks’ are just comprised of one cornerstone, 2 pieces of sashing, and a block. Sew the side sashing to the block. Sew the cornerstone to the bottom sashing, then sew the bottom cornerstone-sashing combo to the sashing-block combo for another chunk.
Sew two chunks together
At this point, you can sew your two chunks together.
Now that you have two chunks sewn into a larger chunk, the next step is to prepare your next chunk. You do it the same way you prepared the two chunks above.
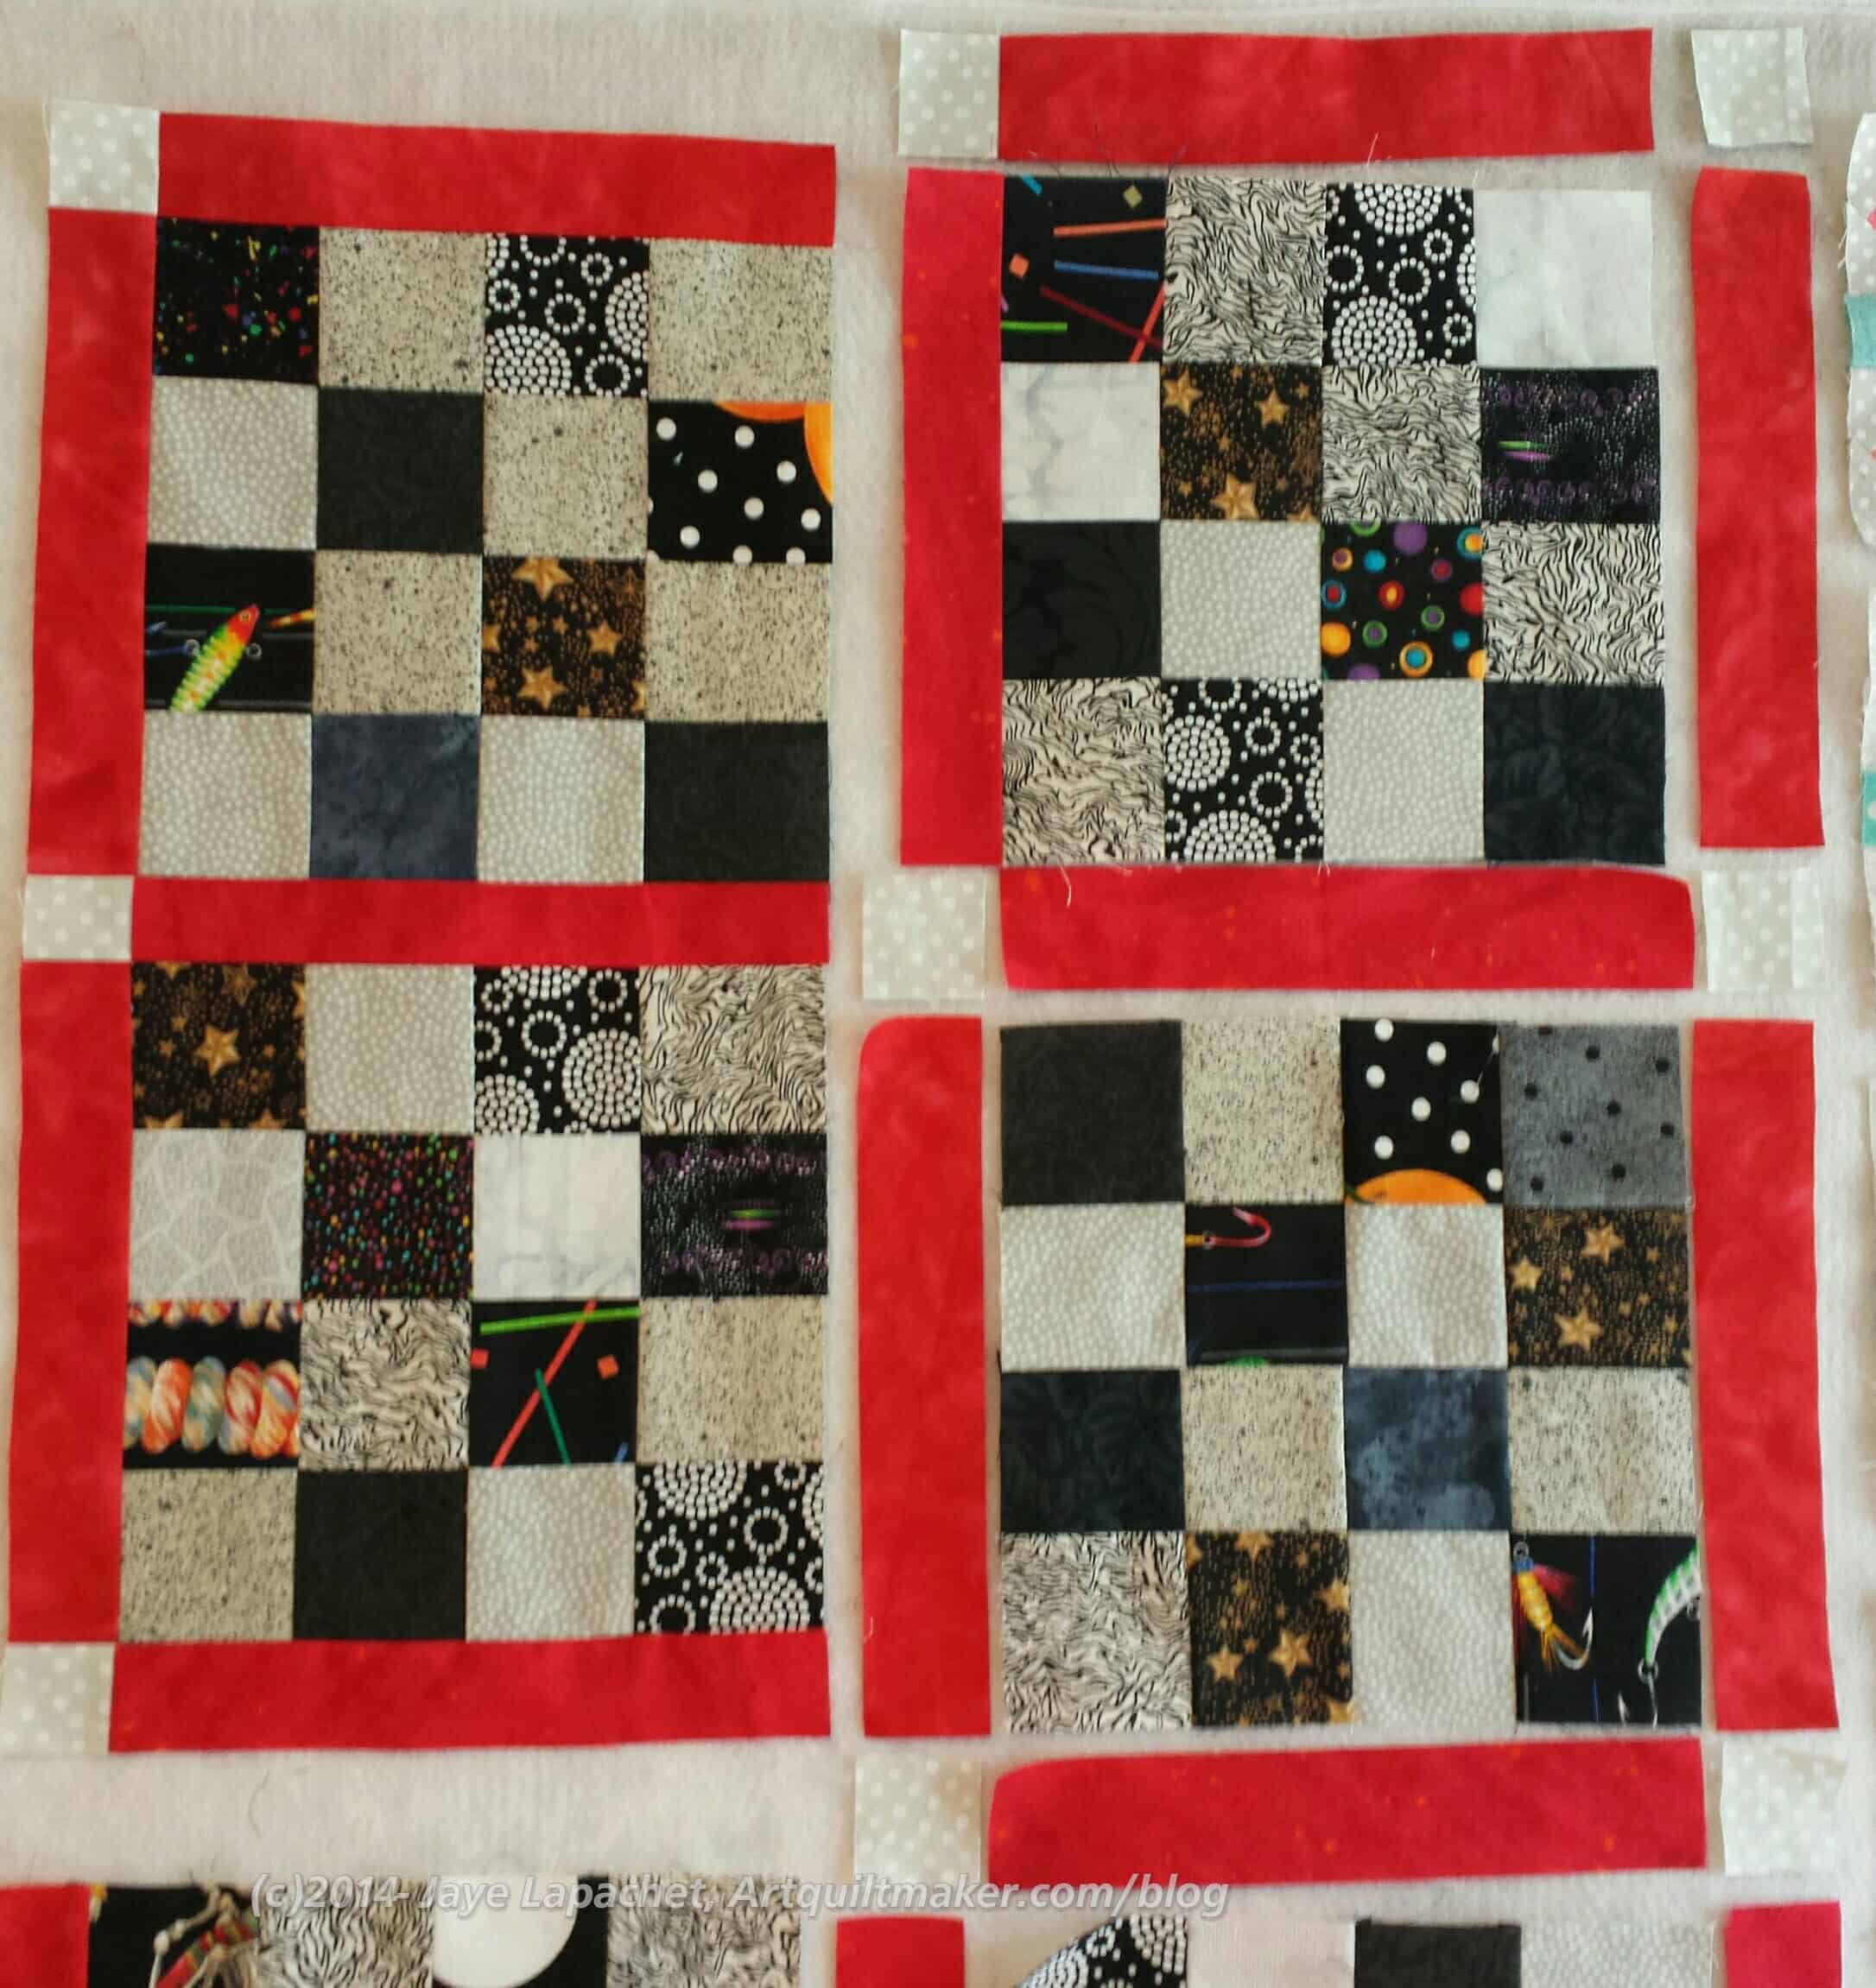
Pin sashing piece #25 to block #26
Pin sashing piece #25 to block #26. Now sew the sashing to the block.
Patch #30 sewn to #31
Now sew patch #30 to #31, the bottom cornerstone to the bottom piece of sashing. Then sew that 10-11 cornerstone-sashing bottom pieces combination to the first chunk.
Third chunkTwo chunks
With two pieces of sashing and a cornerstone sewed to block #26, you have your third chunk. You could sew the #25-#26-#30-#31 combo to the chunk you sewed together before, but I suggest you wait until you have more pieces sewed together.
Sew piece #3 to piece #4
Refer to the drawing of your pieces in Step 1. Now we move up to the top of the section again and sew #3 to #4.
Sew sashing #8 to block #8
Sew piece #8 to block #8**. This puts a piece of red sashing on your block #8.
Next, sew cornerstone/sashing #3-4 to sashing/block #8.
Next, sew cornerstone/sashing #3-4 to sashing/block #8.
Sew cornerstone #12 to sashing #13 and then to the block
Sew cornerstone #12 to sashing #13 and then to the block. I don’t have a picture of the two pieces sewn together before I attached them to the block, but you do have to sew them together before you sew them on the block. Now, sew that combination to the block.
Follow the same steps for block #18.
Follow the same steps for block #18 as you did for block #8. Sew sashing #17 to block #18. Press. Next, sew cornerstone #22 to sashing #23 and then to the block.
You will have two new chunks, one with sashing on three sides and another chunk with sashing along two sides.
Sew cornerstone #5 to sashing #9
Sew cornerstone #5 to sashing #9 (upper right).
Sew cornerstone #14 to cornerstone/sashing piece #5-9
Sew cornerstone #14 to cornerstone/sashing piece #5-9. You will have a piece made from three patches.
When you press, press the cornerstone seams in the opposite direction as you have pressed the other sashing already applied to block #8. This will allow you to piece your seams more precisely.
Sew the long thin piece made up of three patches to block #8
Sew the long thin piece made up of three patches (2 cornerstones and a piece of sashing) to block #8, which already has sashing on three sides.
Sew sashing/cornerstone piece #19-24 to block #18
Sew cornerstone #24 to sashing #19. I don’t have a picture of the two pieces sewn together before I attached them to the block, but you do have to sew them together before you sew them on the block. Now, sew sashing/cornerstone piece #19-24 to block #18 (middle right).
Sew sashing #27 to block #28
Sew sashing #27 to block #28.
Sew cornerstone #32 to sashing #33. Now sew combined piece #32-33 to block #28.
Sew cornerstone #32 to sashing #33. Now sew combined piece #32-33 to block #28. This will give you a chunk that is sashed on two sides (left and bottom).
Sew sashing #29 to cornerstone #34, then sew that combined strip to block #28. Pay attention to seams so you can line them up.
You now have five chunks and are ready to sew them together.
Sew the two blocks on the upper right side together.
Sew the two blocks on the upper right side together.
Sew the two bottom blocks together.
Sew the two bottom blocks together. Now you have three chunks.
Sew the top two chunks together
Sew the top two chunks together, which is four blocks.
Sew the bottom chunk, made up of two blocks to the top chunk
Sew the bottom chunk, made up of two blocks to the top chunk, which is made up of four blocks.
I have used a small piece as an example, but the same principles apply to a larger piece. I start in the upper left hand corner and work my way to the lower right hand corner, making chunks and eventually sewing them together into larger chunks until the quilt is finished.
Let me know if you have questions.
You will have easy access to this tutorial via the link on the navigation bar to tutorials.
**Nota bene: I accidentally labeled two pieces of fabric with the number 8 in Step 1. Note that one is a piece of red sashing and the other is a block. Please look at the photos to assist you with the correct sequence of piecing.
This tutorial started out after I watched an episode of Love of Quilting where Jo Morton was a guest. Based on what I saw Marianne and Jo do on the show, I tried the technique and was pleased with the results.
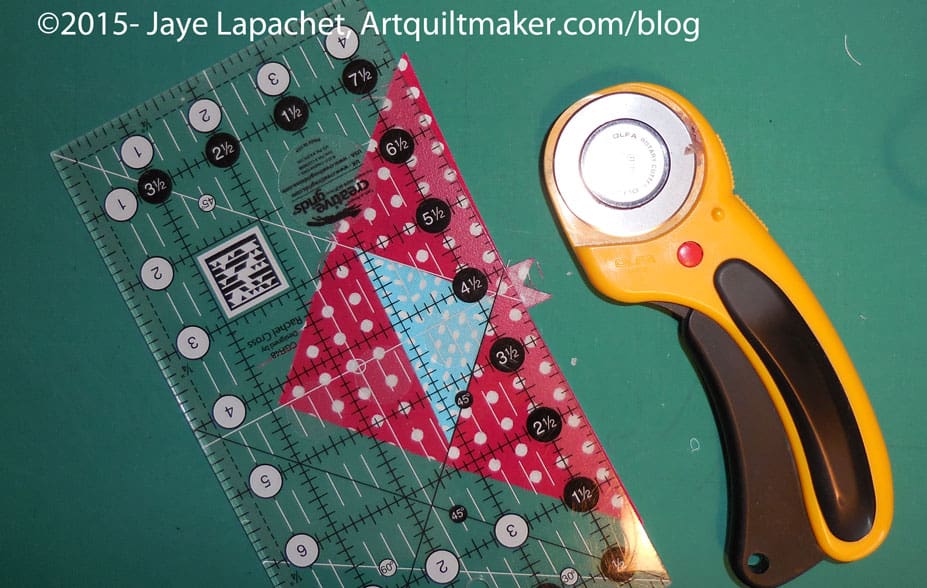
For the Flying Geese quilt, I needed 2.5″ finished HSTs, so according to the chart I made after DH did a bunch of math for me, I started with 6.25″ squares. All of the sizes on the chart make 8 HSTs.
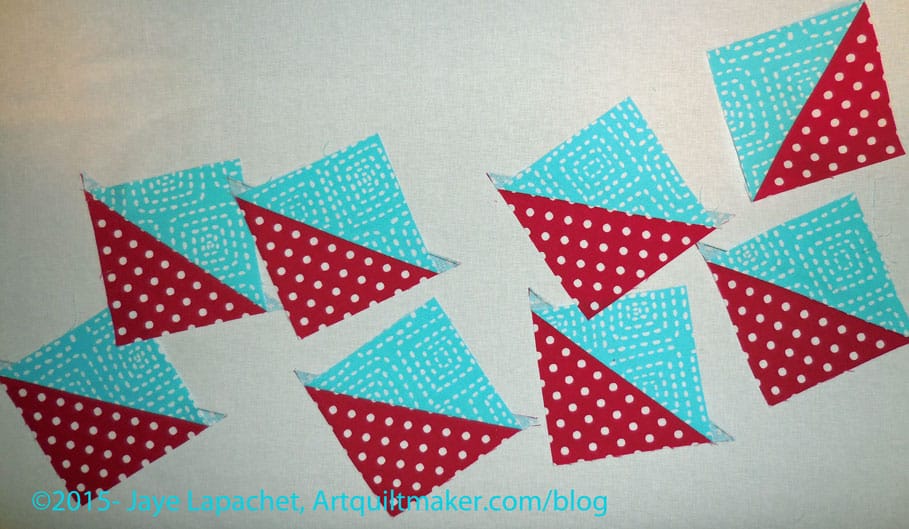
Cut 2 pieces of fabric[/caption]
Cut 2 pieces of fabric
First, I cut two pieces of fabric,foreground and background, the correct size. Again, you need to download the chart and look at it. I cut my squares a bit larger, because I like to trim my HSTs just to make sure they are exactly the right size. The chart does not take trimming into account. You need to make the starting squares larger if you want to be able to trim.
Draw an X corner to corner
Draw an X corner to corner
Next, I drew an X, corner to corner, on the lighter square. Then I put the 2 squares right sides together and pressed them. I securely pinned the two squares together.
Sew on each side of the line 1/4 inch away from the line
Sew on each side of the line 1/4 inch away from the line
Sew on each side of the line 1/4 inch away from the line
Next, I sewed on both sides of each of the lines of the X, 1/4 inch away from each line.
After sewing, I measured to the center of the X from the side of the square. This measurement is the PLUS cut.
Cut horizontal PLUS line
Cut vertical PLUS line
Cut the square in a PLUS configuration.
Cut diagonal lines
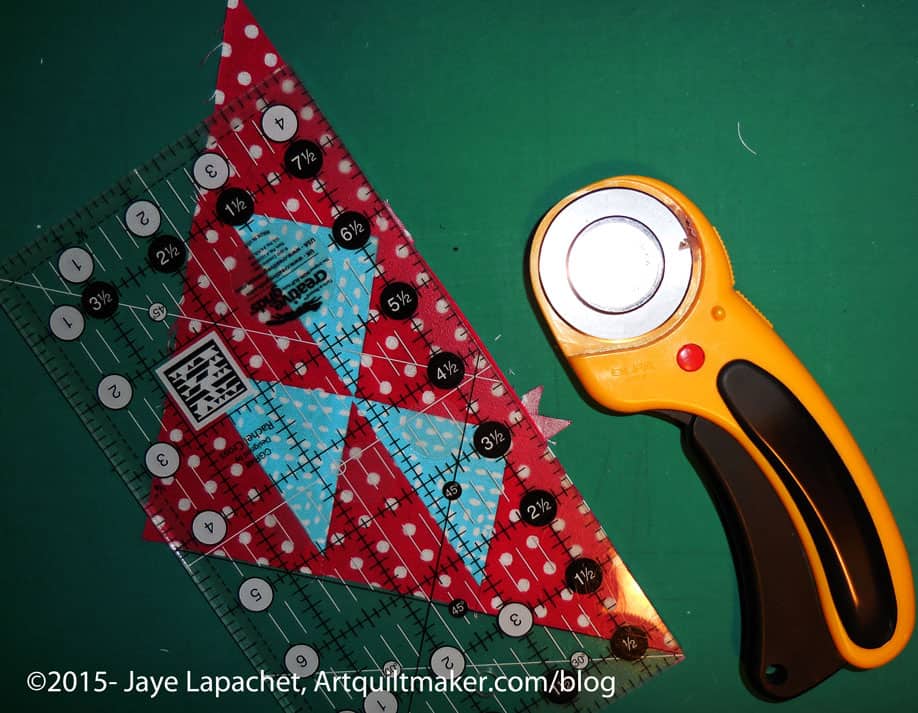
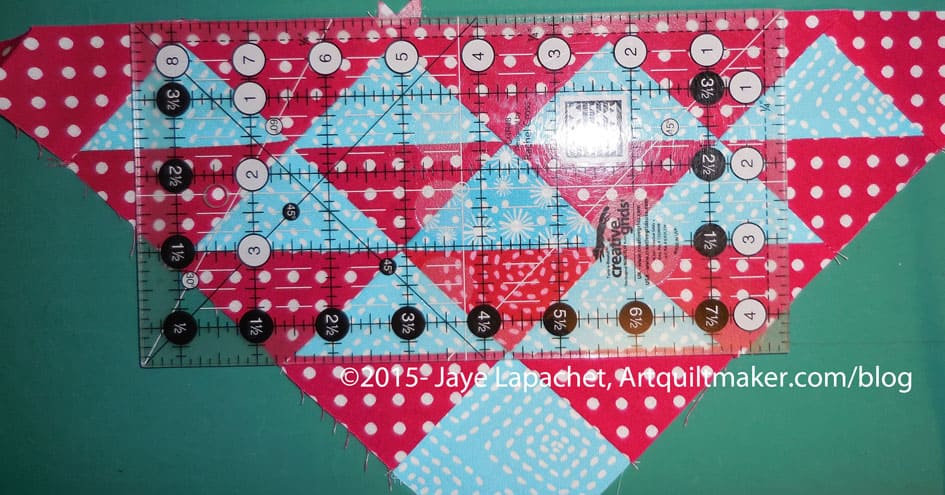
After you cut the PLUS, you will have four squares, each with a line drawn diagonally across the middle. Cut the squares in half diagonally. You can use the line as a guide. It is more important to line your ruler up corner to corner.
The result is 8 2″ half square triangles. You still need to press them carefully open.
Lay out unpressed HSTs
Press HSTs carefully open
Move the unpressed HSTs to the ironing board and press carefully. Use a stiletto to keep your fingers from getting burned.
Lay out HSTs to trim
Next, I trim. Layout your pressed and untrimmed HSTs.
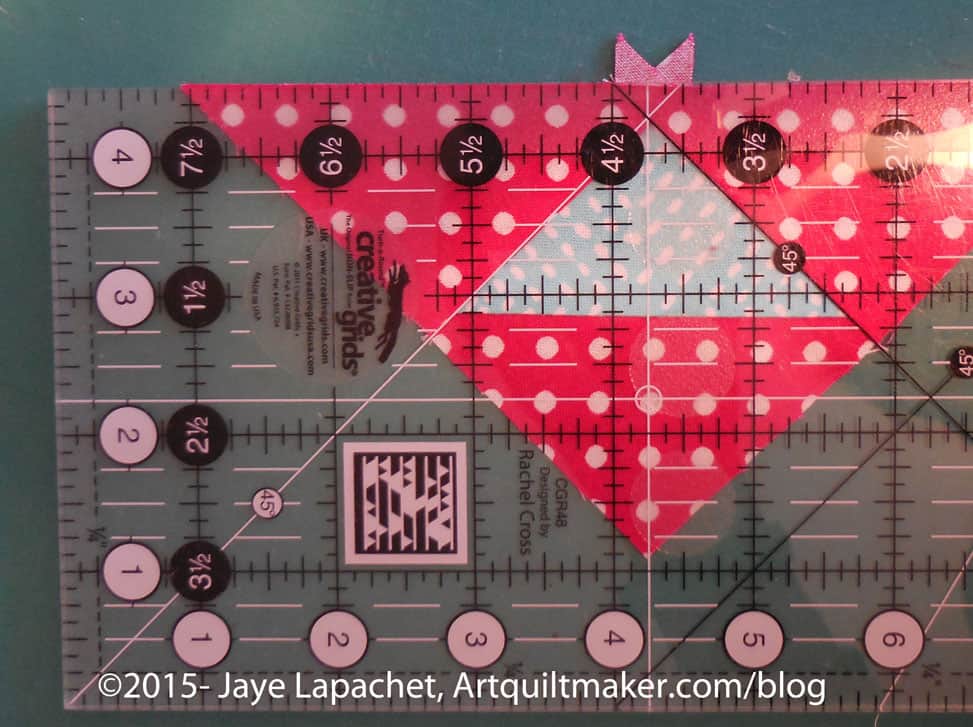
Line up diagonal lines
Line up the center diagonal line with the 45 degree line on your ruler.
Edges trimmed
Trim the edges.
Line up just cut edges
Once you trim the first two sides, line up the 2.5 inch line on your ruler with the just cut edges. Trim the second two sides.
8 beautiful HSTs
Now you have 8 beautiful HSTs.
N.B. : The bias edges shouldn’t be scary for you on the regular method, but this method makes HSTs much easier. I think this would be a fabulous method to make a lot of HSTs in a short amount of time. It is similar to a tutorial that p.s. i quilt posted, but times 4. I am planning to try out different sized beginning squares to see what sized HSTs I come up with.
I talked over the math with my DH and came up with a chart showing the different sizes you can make with this technique. This is the updated version and you need this chart to use this method.
This is a great technique to use as leaders & enders.
Self-Bordering is a technique that I use pretty frequently, though I don’t always know what I am doing. Basically, self-bordering means that you treat the border blocks the same as the blocks in the main part of the quilt. You piece them in as you would regular blocks rather than as a long row.
I don’t know if I made this technique up. I am sure others have done it. If they have, I am not sure what else it would be called.
There are several advantages to using a self-bordering technique for adding borders:
Precision is improved, because you are adding a block or so at a time
It makes it easier to get the border lined up correctly
Eliminates long lines of stitching
Makes adding pieced borders much easier
This technique works with Chunking. If you are sewing all your blocks, for the whole quilt, together in rows, then don’t bother with Self-Bordering.
En Provence – late October 2017
As you have seen recently, I am working on the En Provence quilt by Bonnie Hunter. The border is optional, but I am putting a pieced border on the quilt using self-bordering technique. In the photo, left, you can see the border on the bottom. It is made up of one row of four patches (or 3.5″ squares) all the way around the quilt.
All the blocks in this quilt are, essentially, nine patches. As I sew the blocks together, I work in threes – I sew three blocks in a horizontal row together. Once I have three rows made up of three patches, I sew two rows together, then I sew remaining row to the set of two I have just sewn together.
On the border, there is an extra 3.5″ piece. It is either a 4 patch or a 3.5″ patch. Instead of sewing 3 rows of three blocks together, I sew 3 rows of 4 blocks together and then sew three rows of four patches together.
En Provence Corner Block
The corner block ends up looking fatter, because of the extra patches. Once the corner and border blocks are integrated into the quilt, they look like blocks and a pieced border.
You cannot tell which way a border was made, if it was well done.
I like this method because I don’t like putting on borders. I also really like pieced borders. Depending on the design, of course, they really add additional interest to a quilt.
En Provence corner block annotated
Once I finish a quilt, there is really no way to tell where the blocks end and the border begins from a quick glance.
The top arrow, left, shows the very edge of the border – the seam line between block and border.
The bottom arrow shows the border.
As I have said, they integrate so well that a casual viewer can’t tell where the border is. I really like that.
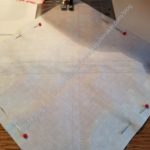
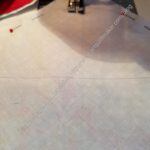
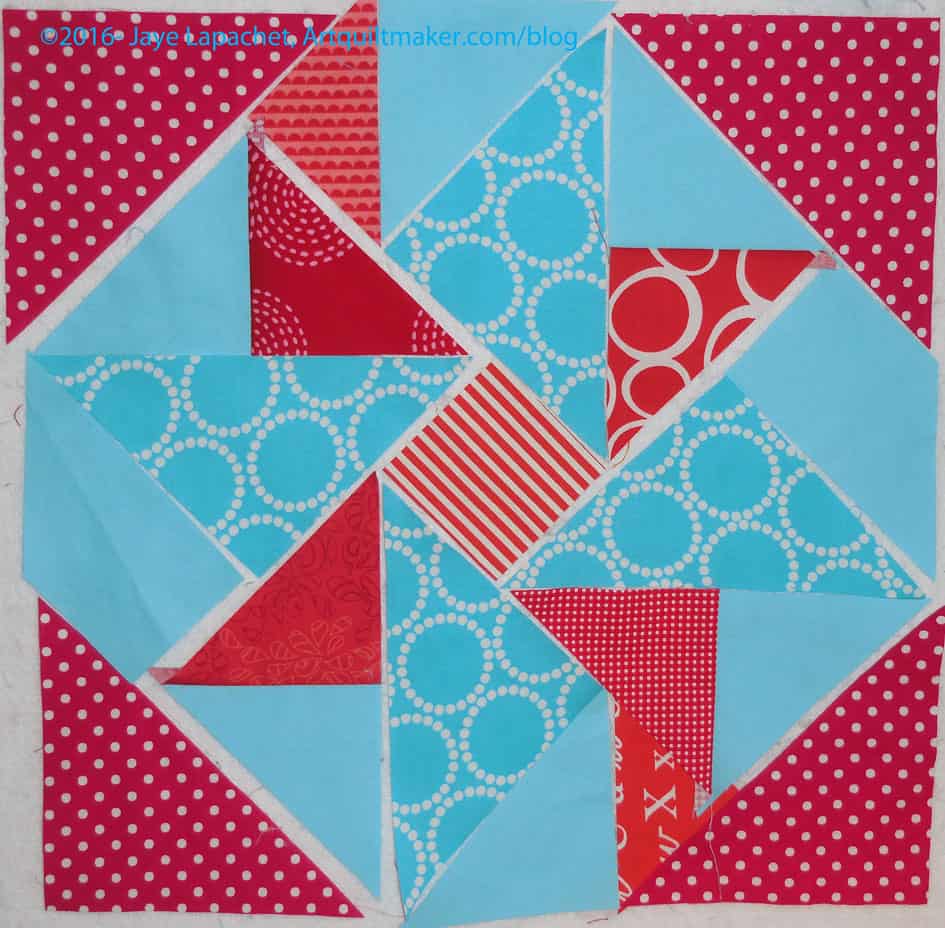
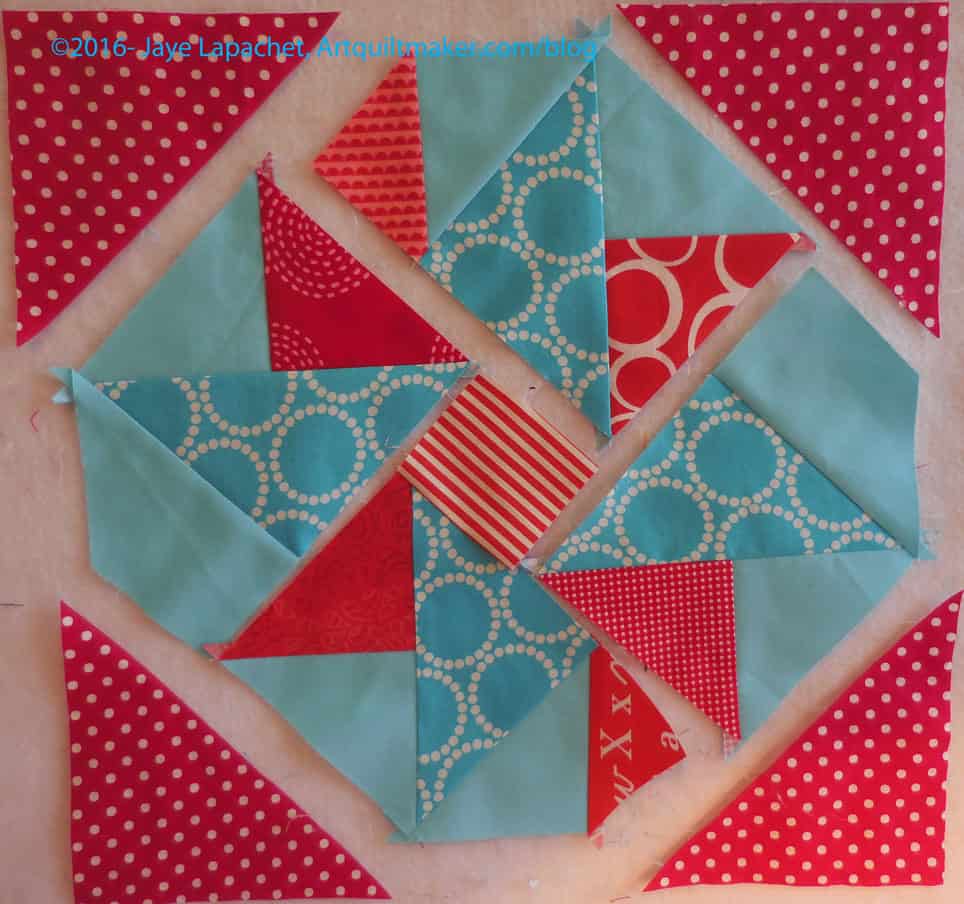
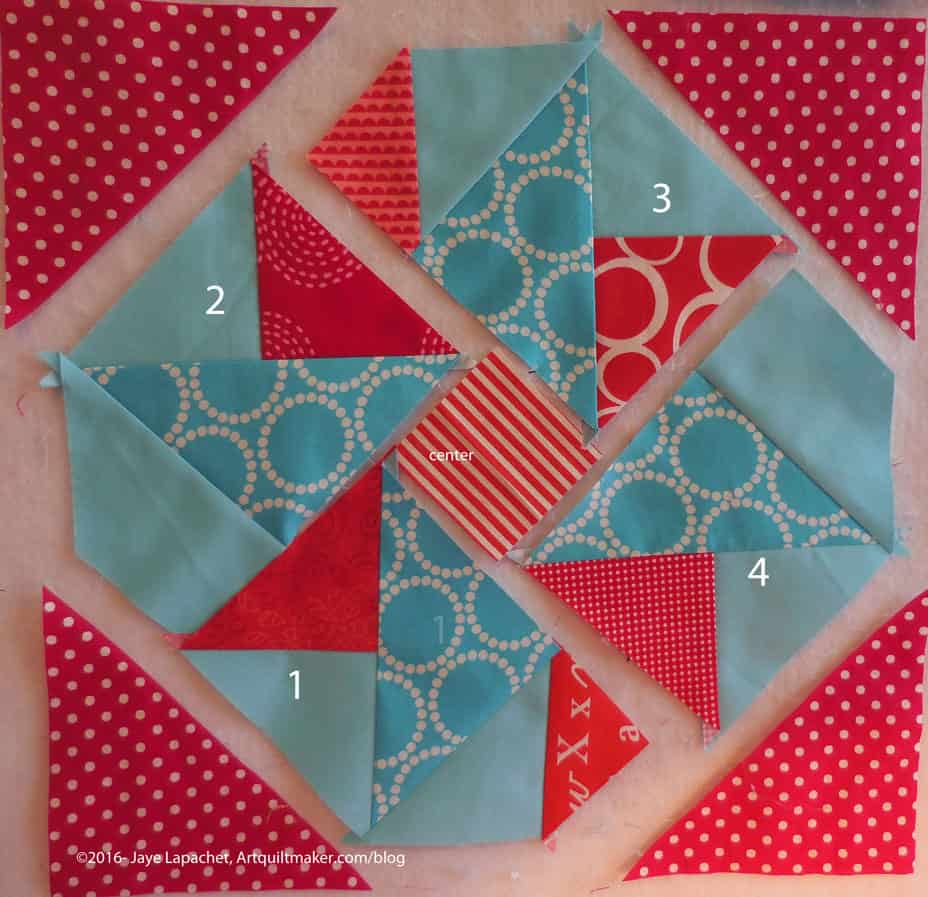
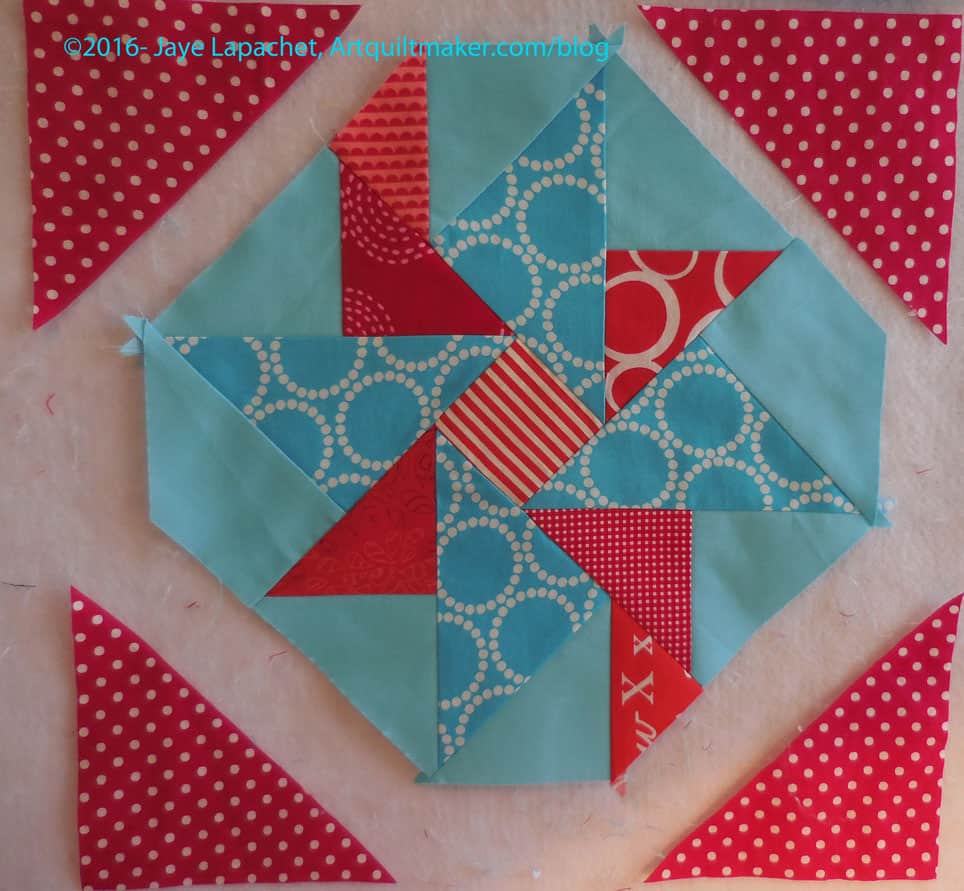
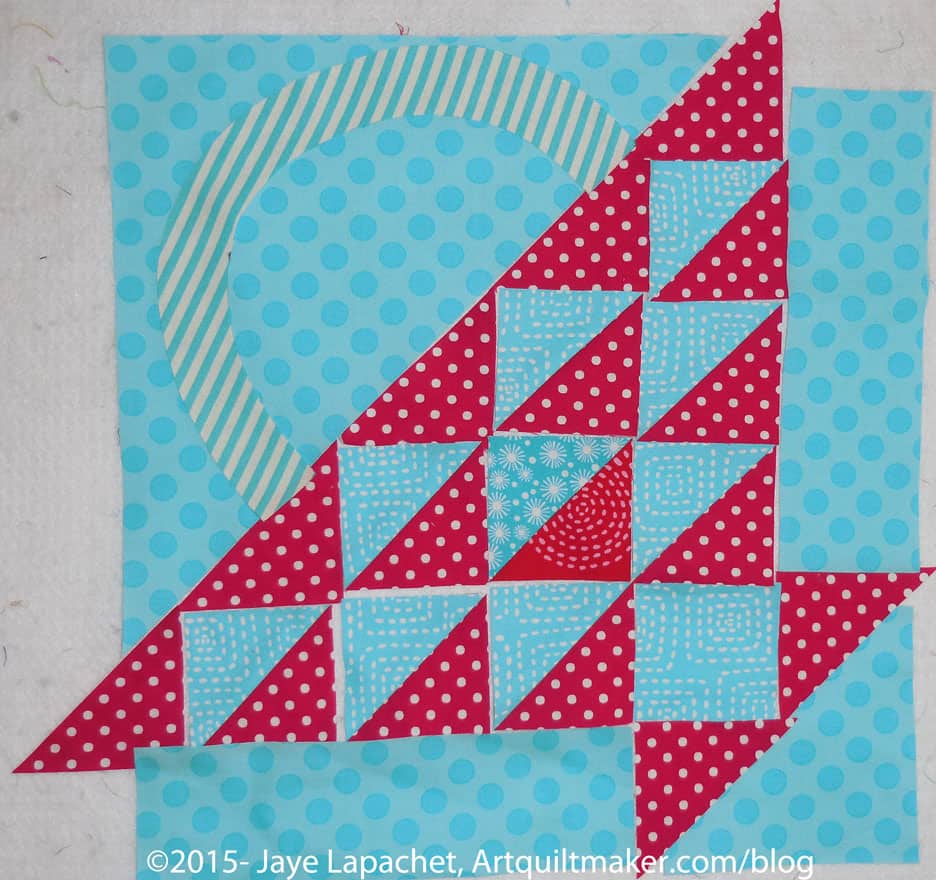
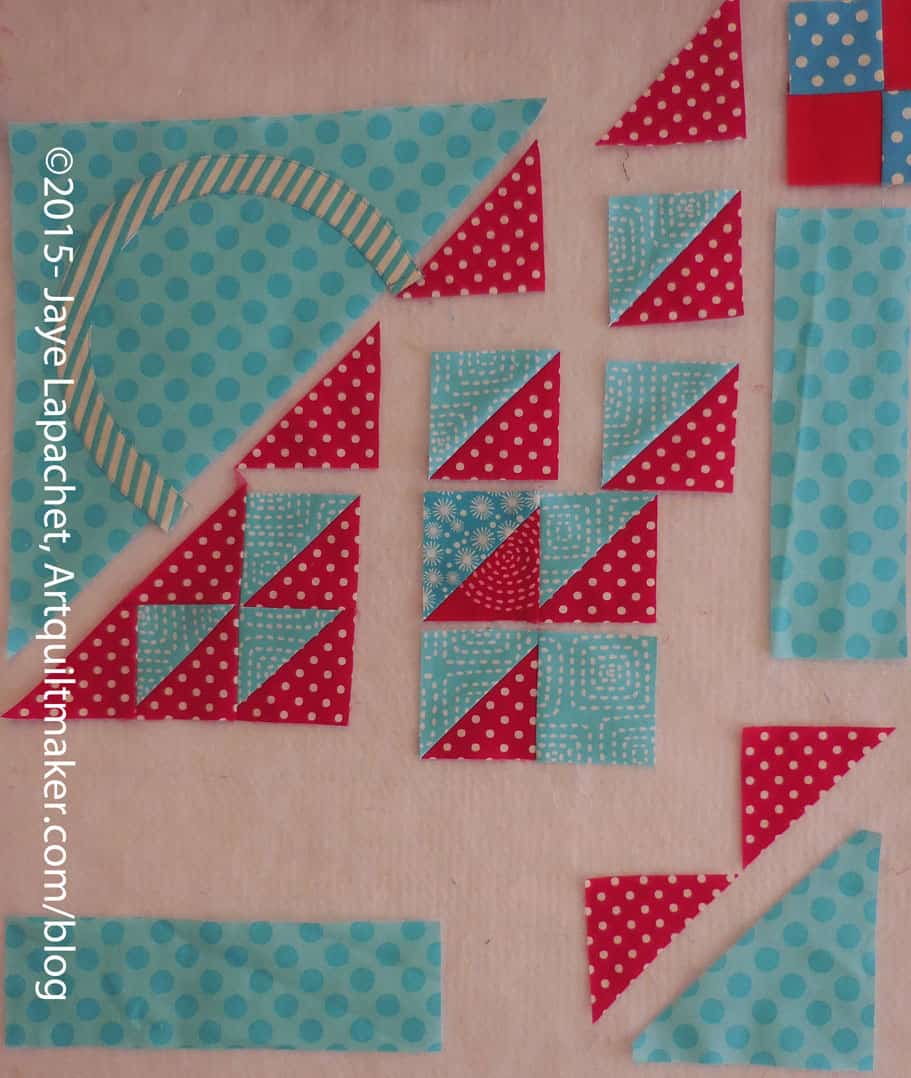
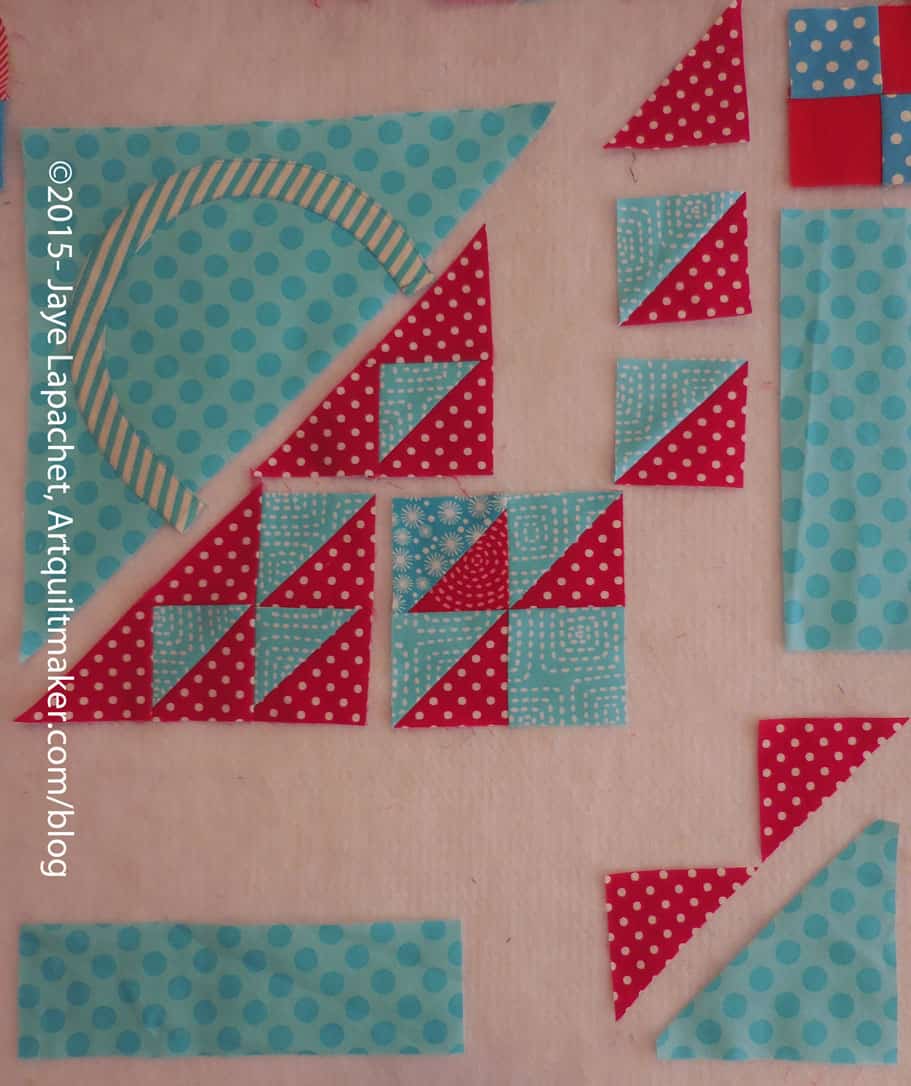
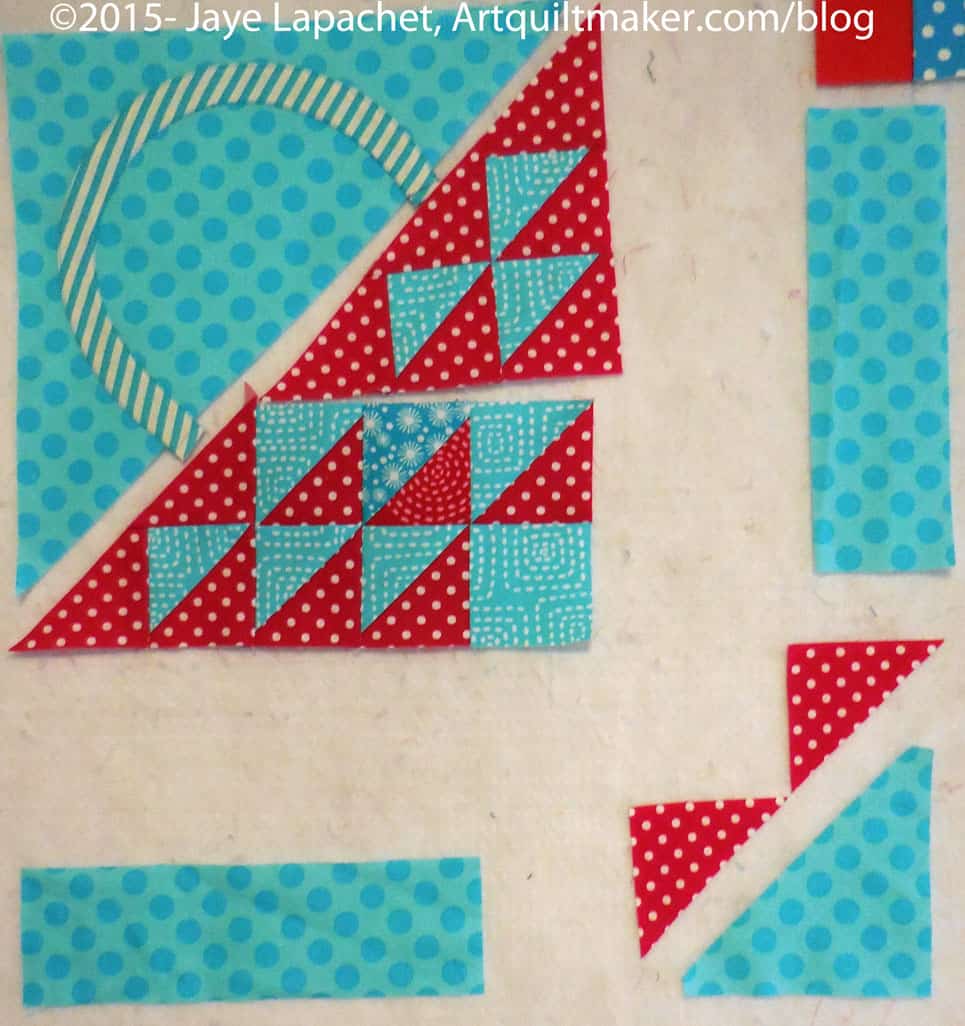
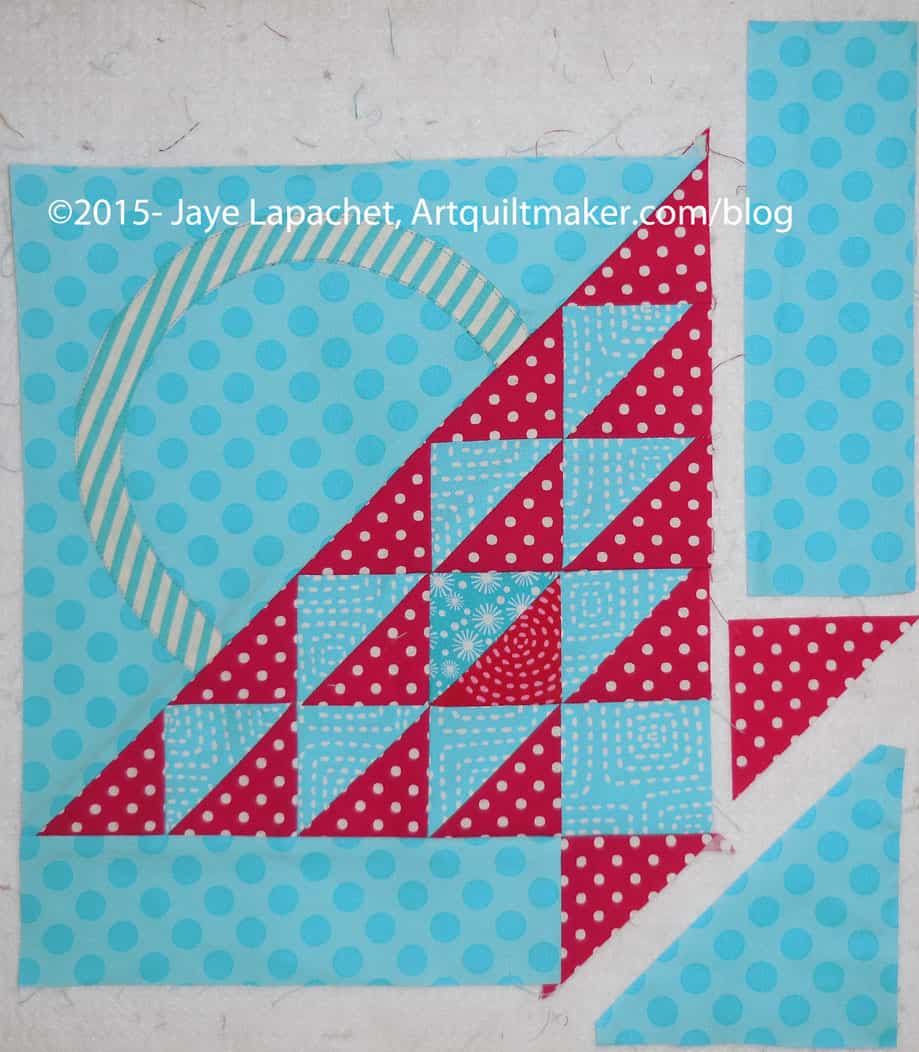
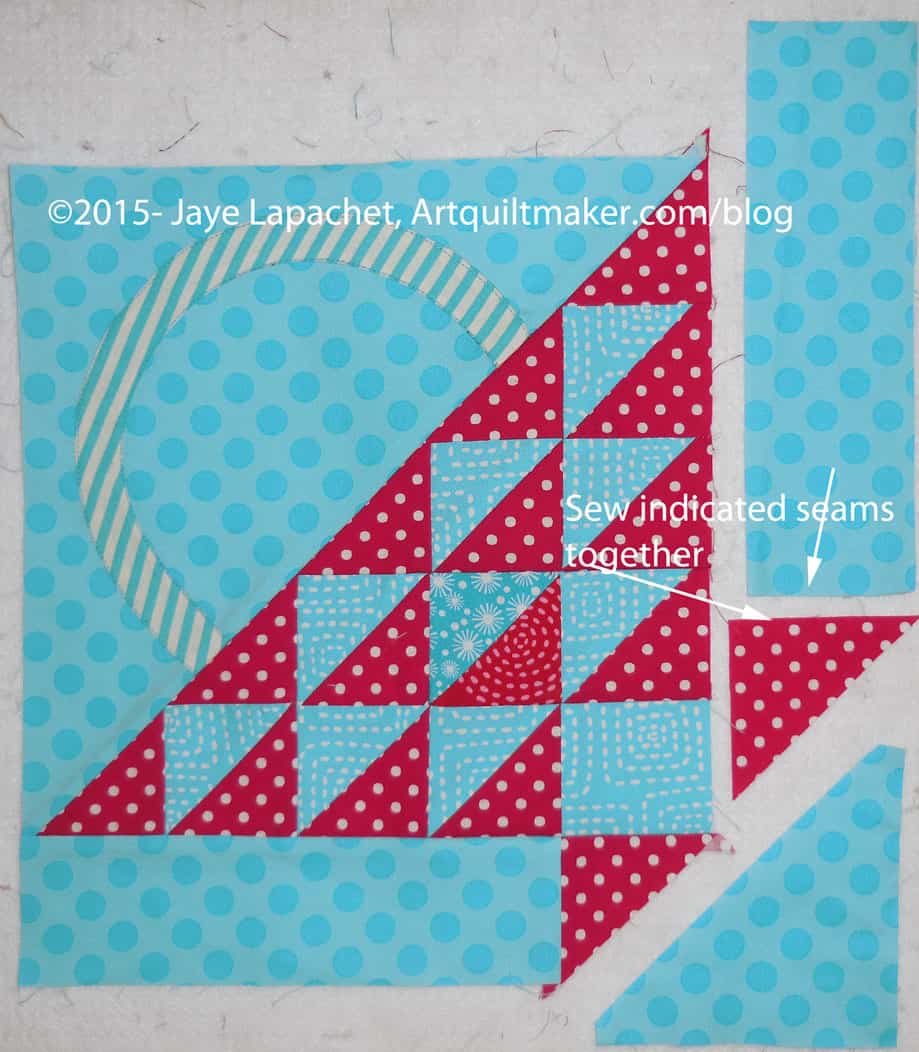
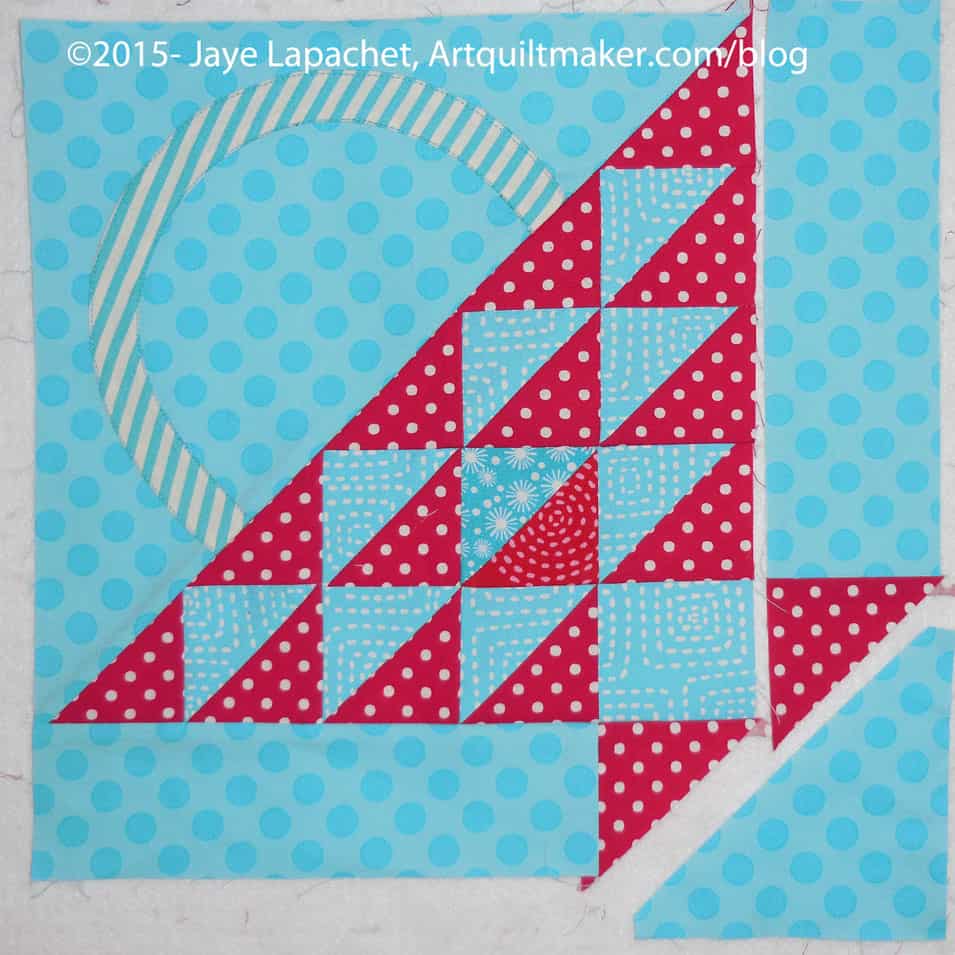
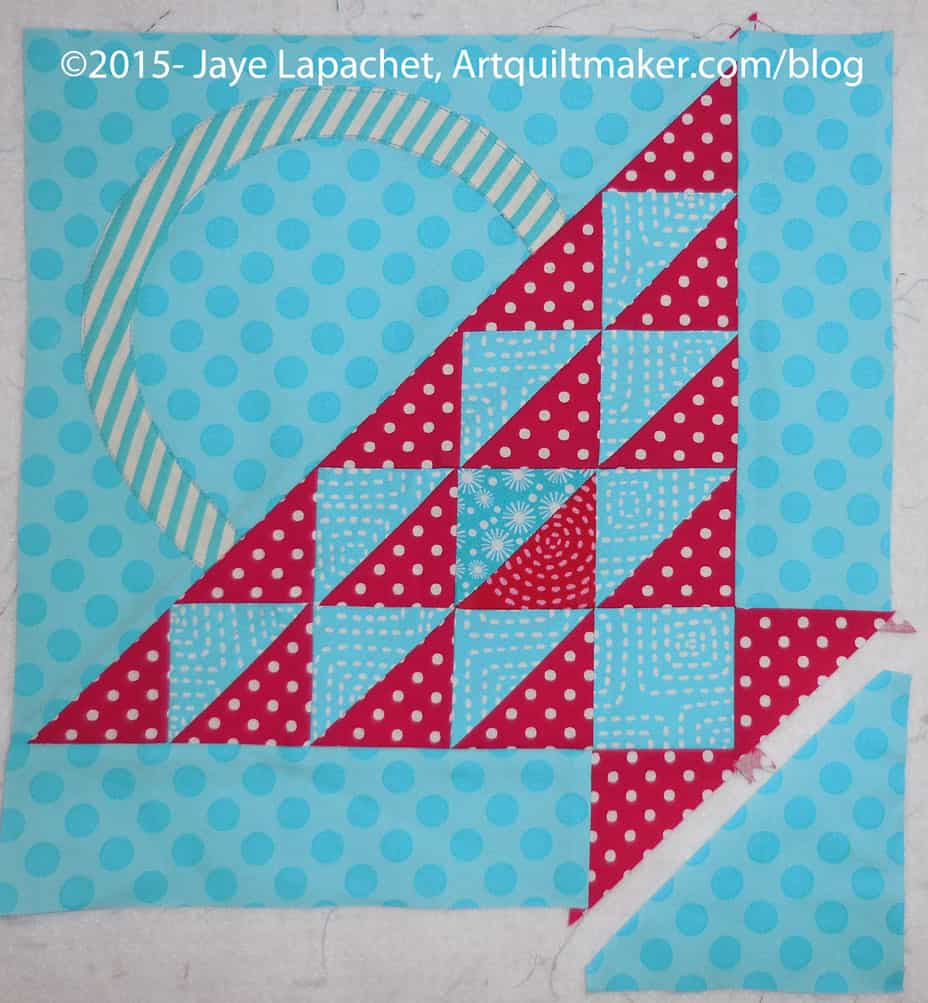
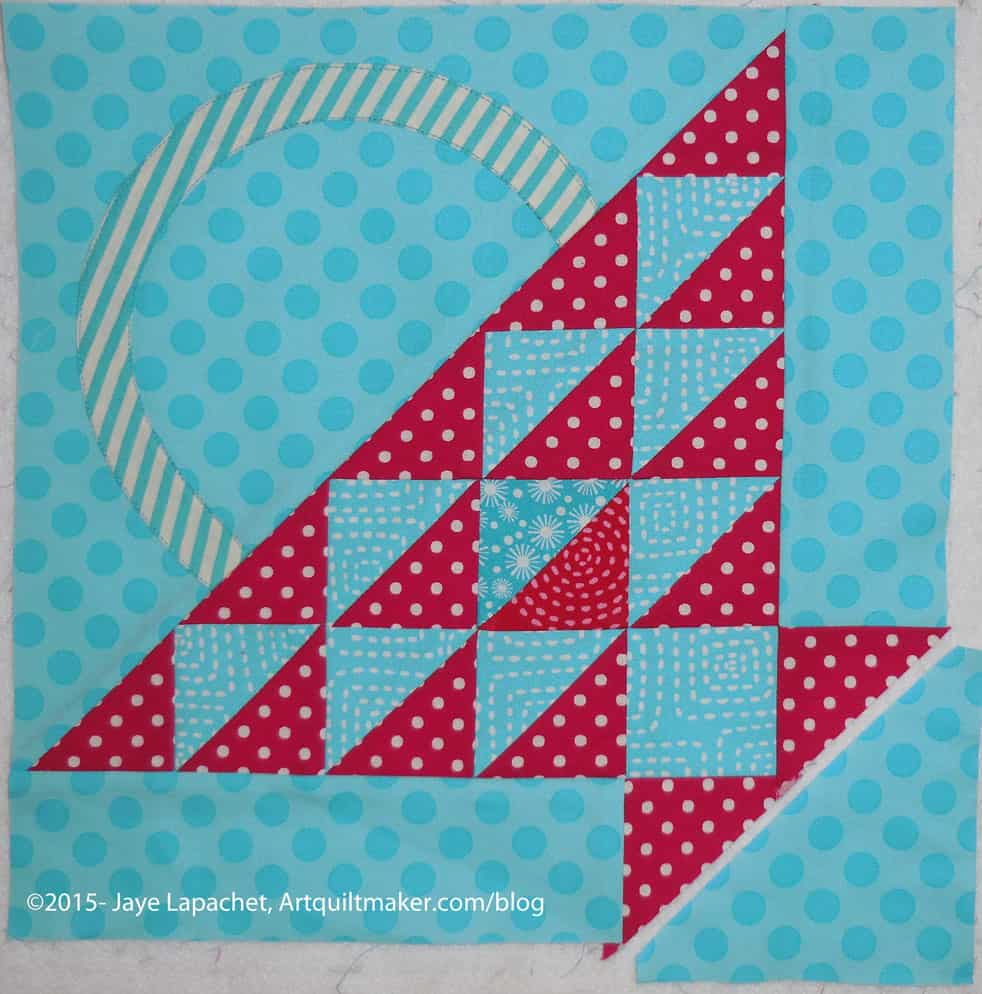
We are going to talk about partial seams. Partial seams are a way to create a more complex looking block without using truly difficult piecing techniques. Even a relative beginner can navigate partial seams successfully.
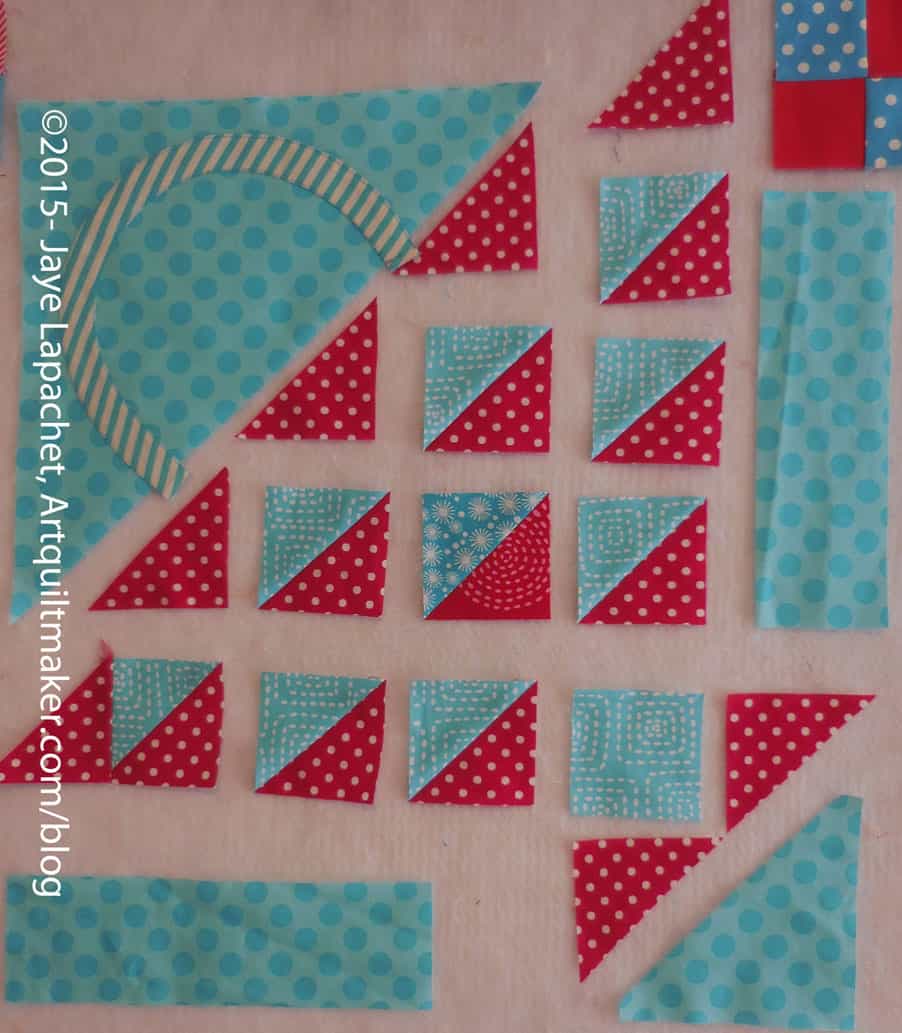
2. Select fabrics to fit the color scheme of your other blocks. You need contrast between the various pieces.
Partial Seam Final Colors
The one red triangle with the white curves might not be exactly right, but it will look fine in the overall quilt.
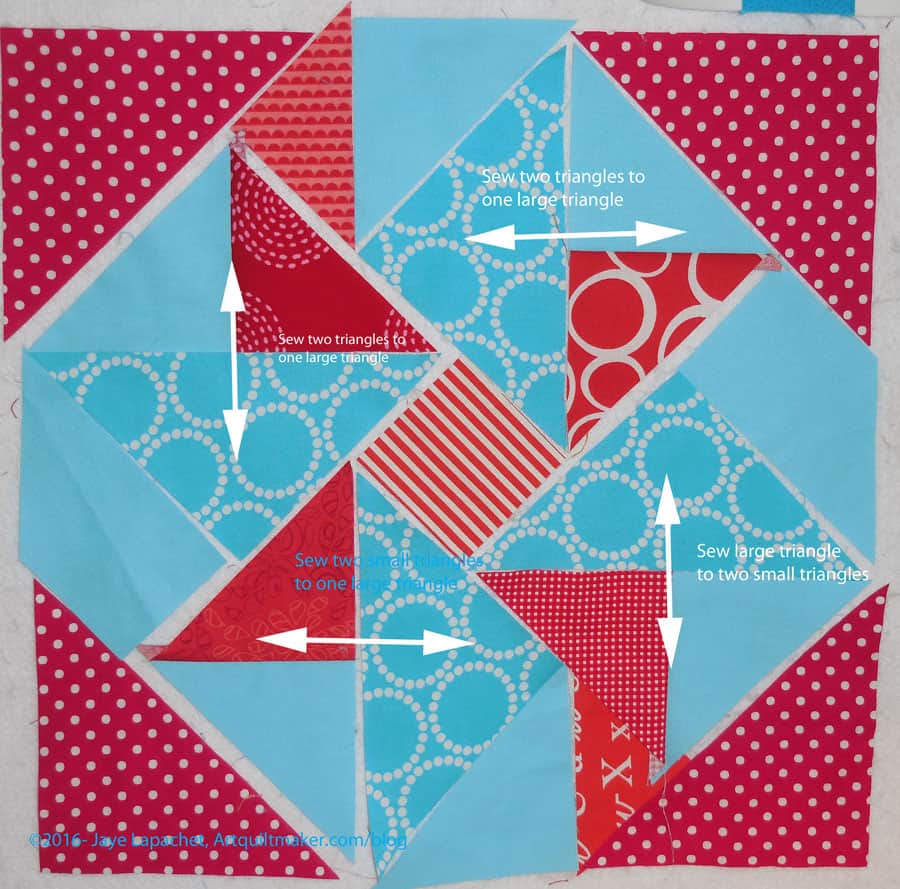
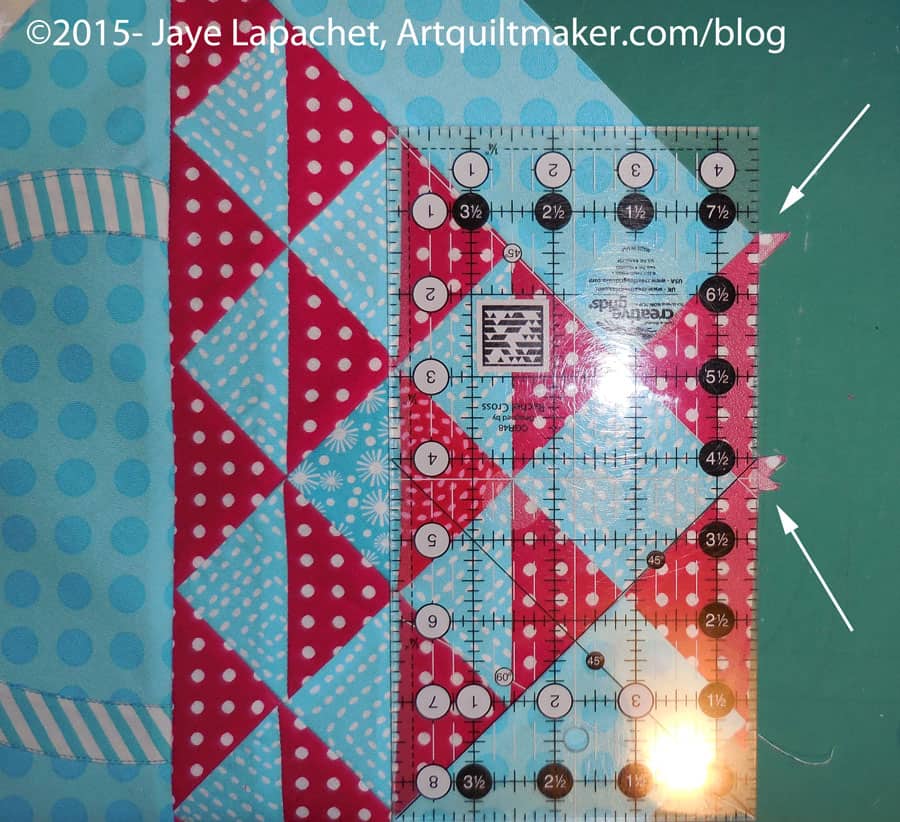
3. Cut out pieces using the chart. Press as you cut if necessary.
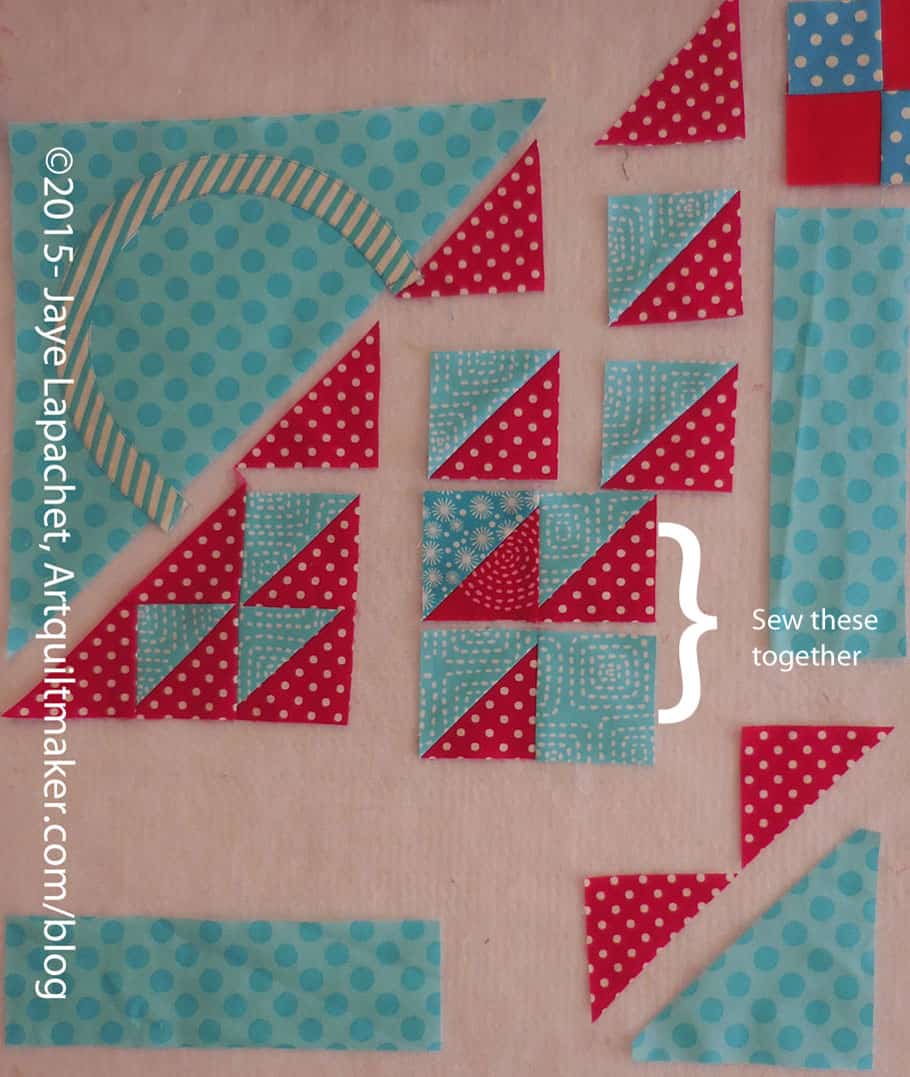
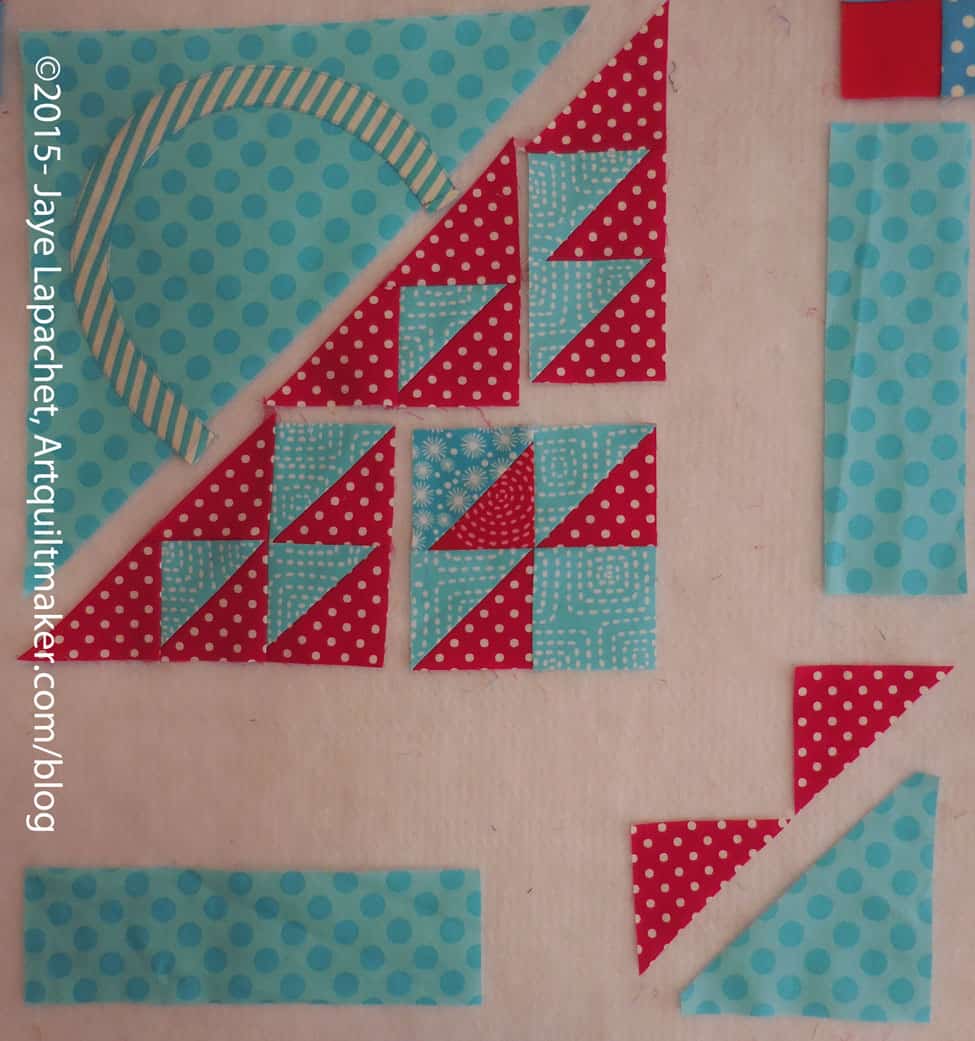
Partial Seams: Sew Triangles Together
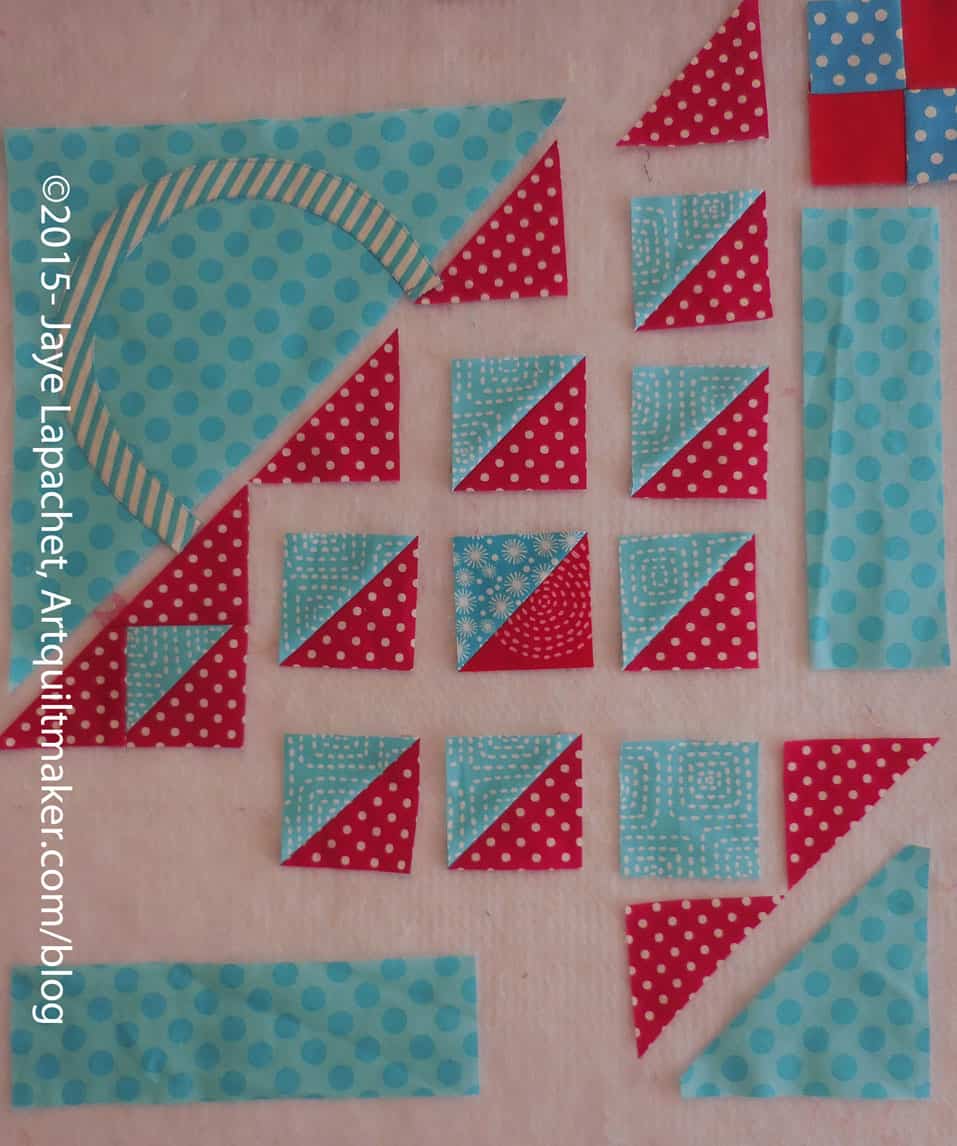
4. As we discussed before, sew smallest to largest. I started with the matching small triangles. Sew carefully without yanking the bias.
Press flat, then press to the red
5. Press flat and then press to the red. Press carefully without distorting the bias.
Partial Seam Triangles Sewn
6. Place the newly sewn triangles back in position on your design wall.
Partial Seam: Sew other like triangles
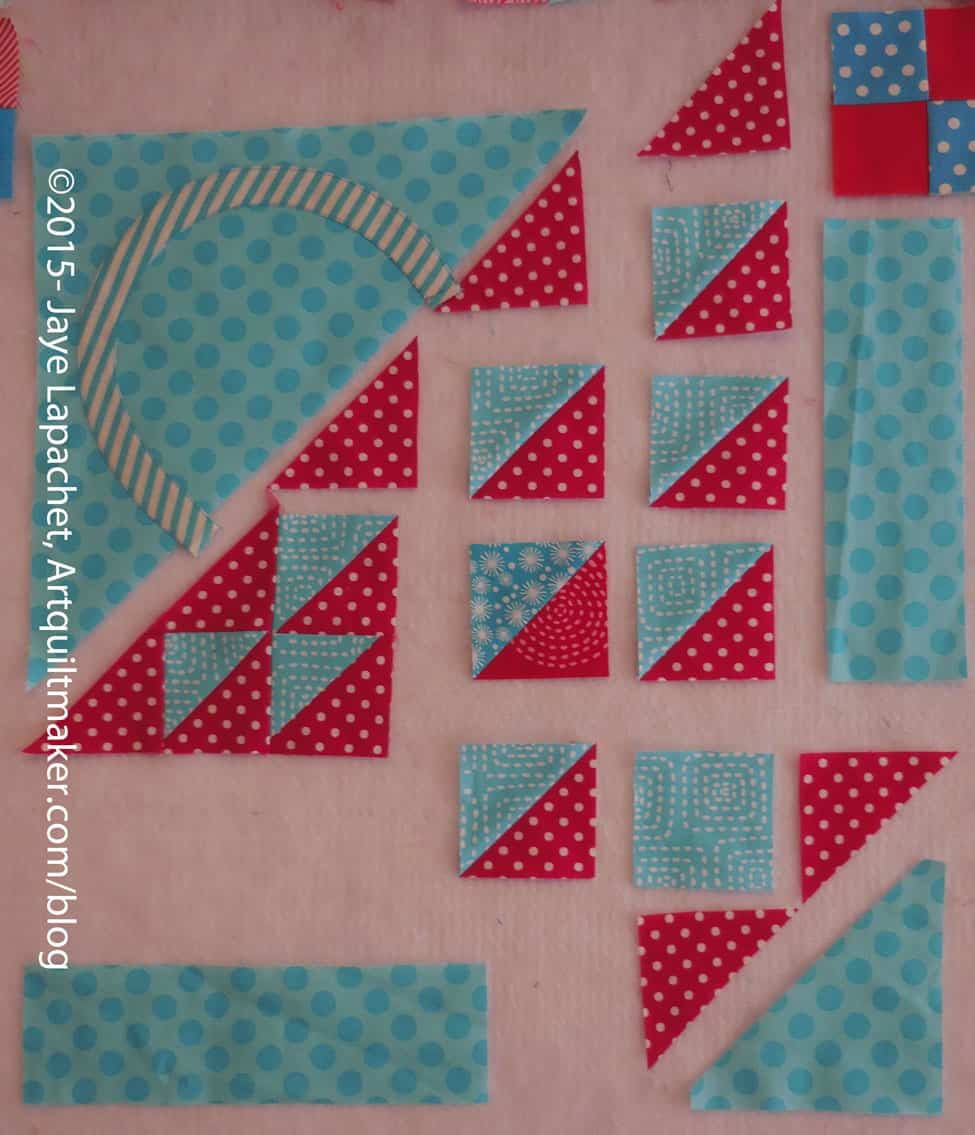
7. Sew the similar triangles, press and place back in place.
Remember, you are sewing from smallest to largest. This means that you are creating larger and larger sections until the whole block is done.
Patches Sewn in 4 sections
8. Once the newly sewn patches are back in place, it is fairly easy to see the next logical step. The large turquoise triangles (mini-Pearl Bracelets fabric in the example) should be sewn to your two triangles. This will make a square.
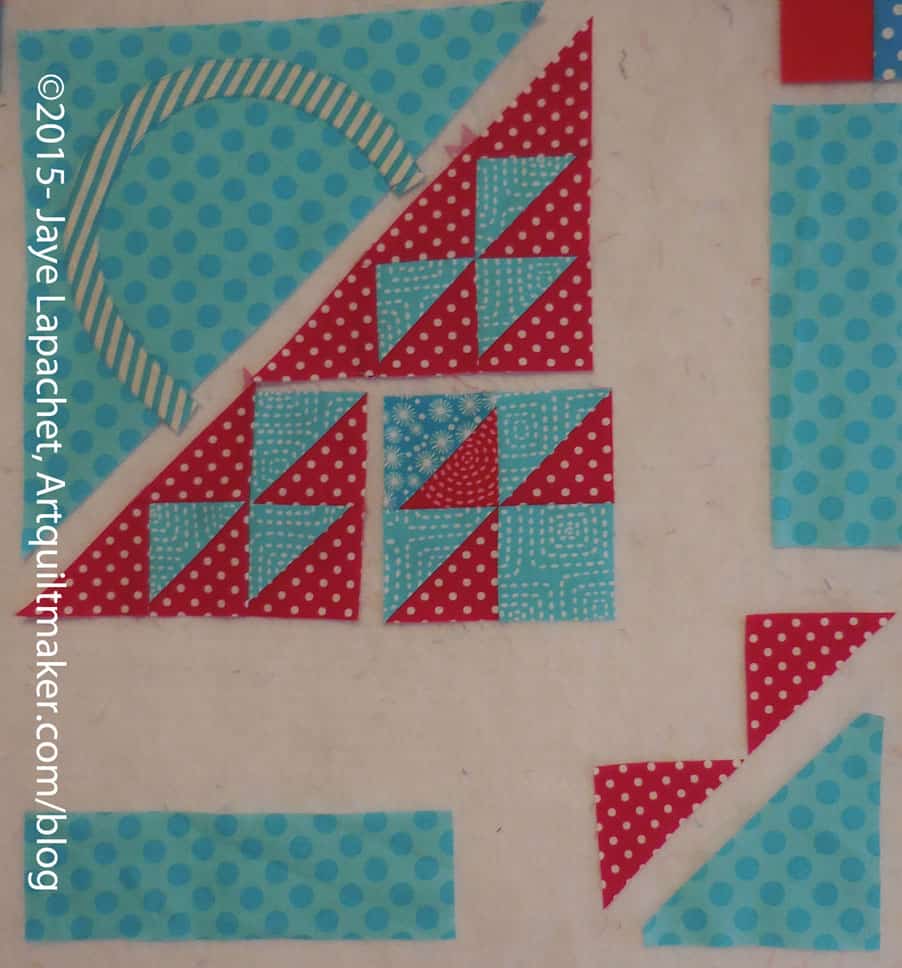
Sew small triangles to larger triangle
9. Sew the two small triangles, which are now sewn together (step 4-7), to the large turquoise triangle. This step makes the triangles into a square.
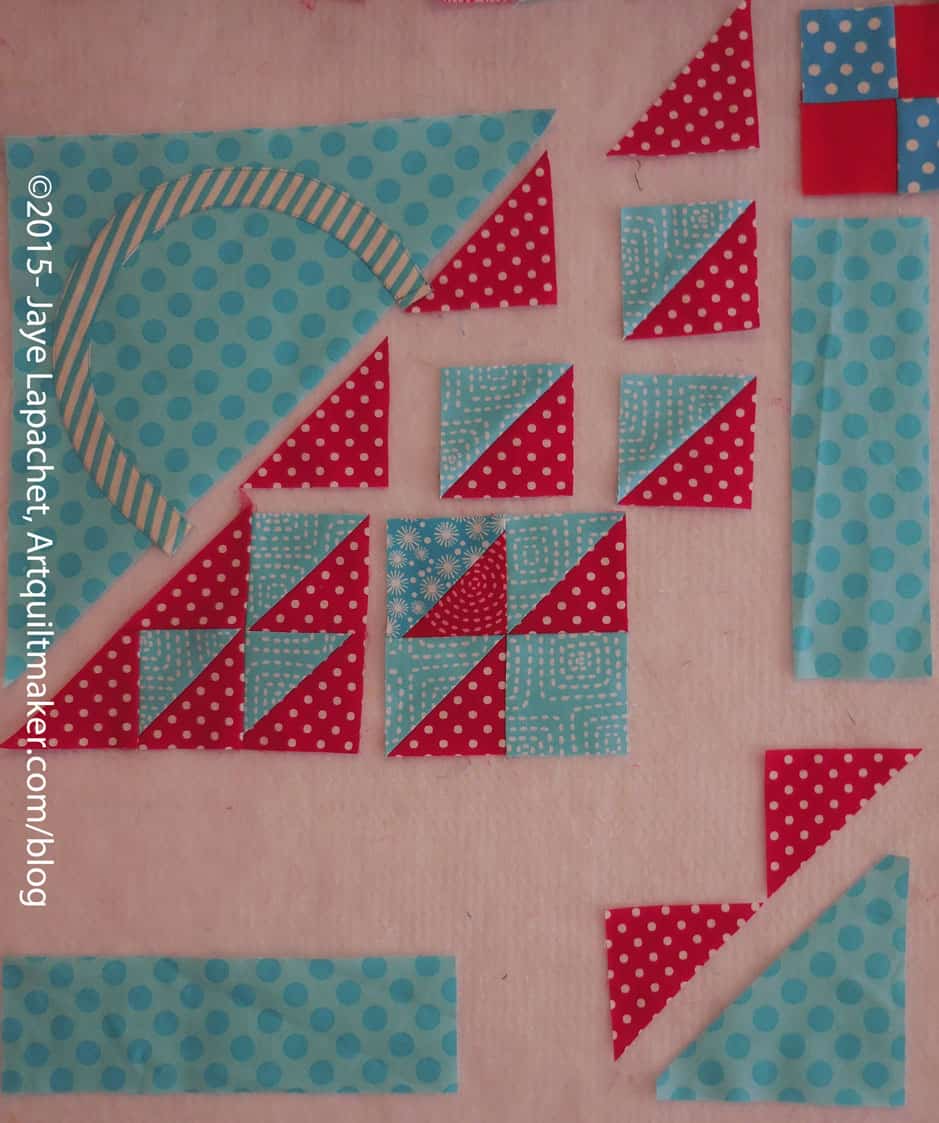
Place sewn squares on to the design wall
10. Press flat and then press to the larger triangle. Press carefully without distorting the bias. Place the squares back on the design wall.
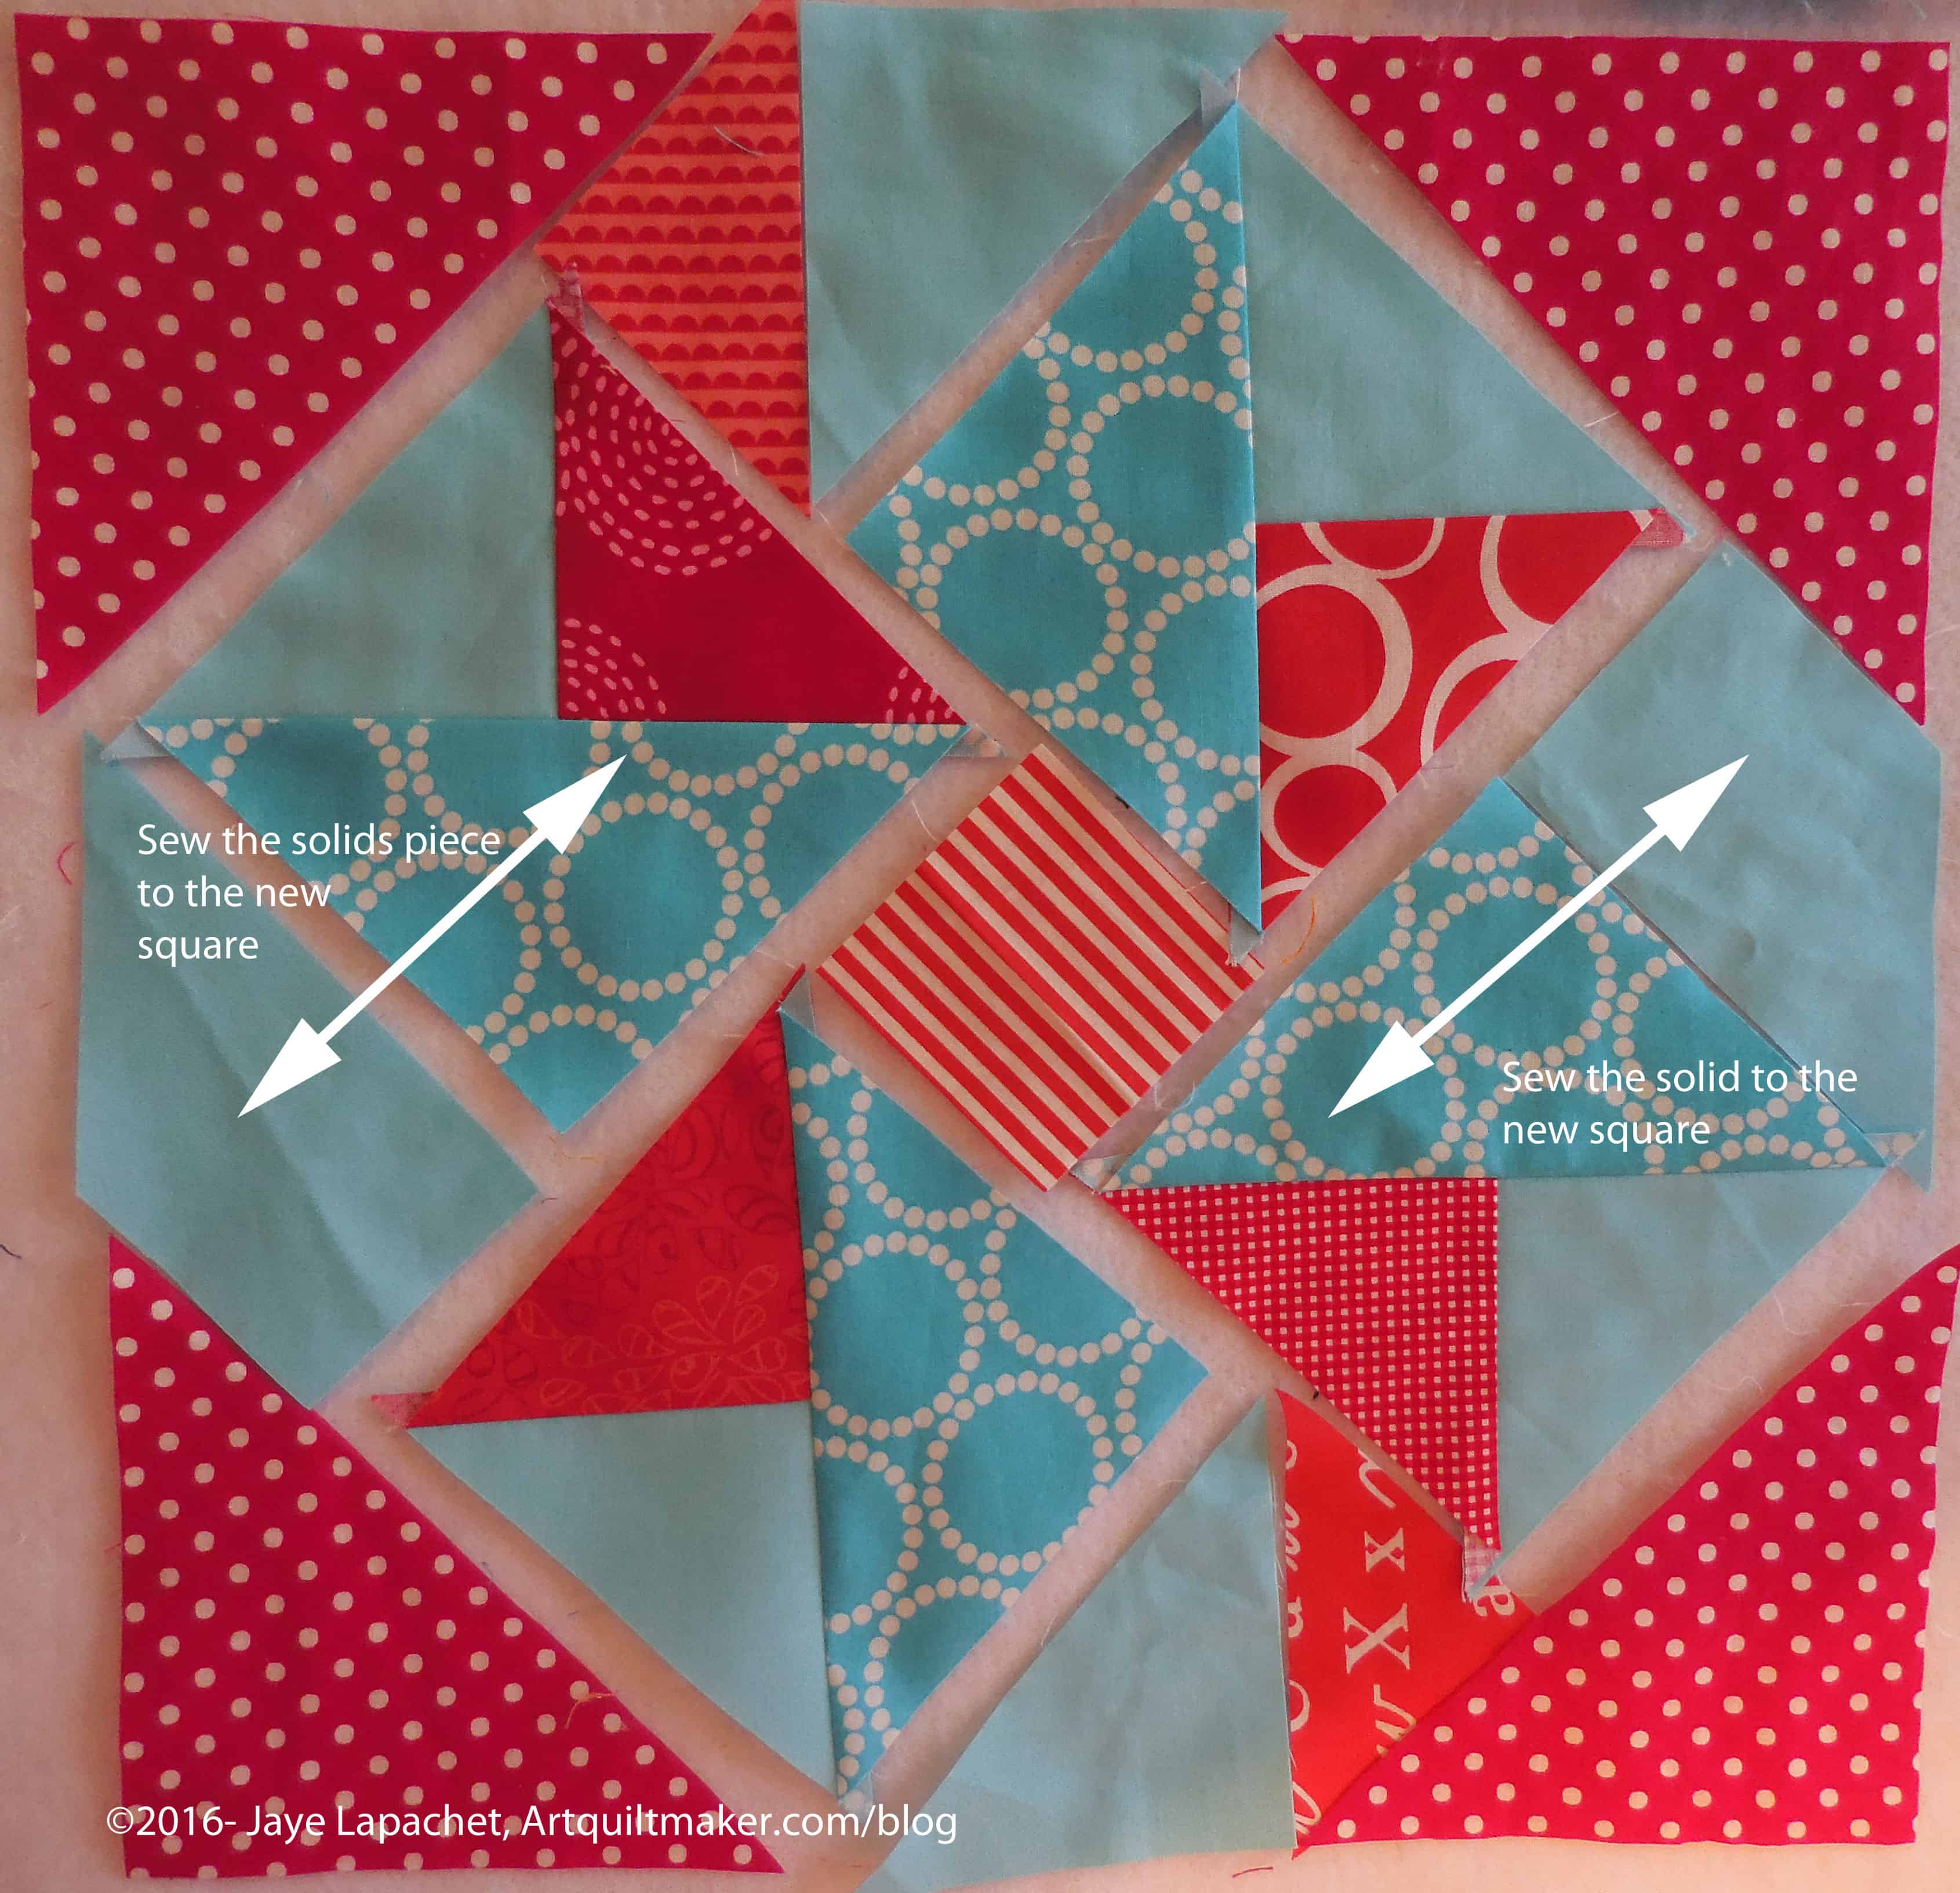
Sew squares to solid fabric
11. Sew the solid, rectangle-ish pieces to the squares you just sewed.
Place sewn sections back on the design wall
12. Place the sewn sections back on the design wall.
Sew small red triangles to solid triangles
13. Sew small red triangles to solid triangles
Sew new section to square
14. Sew new section to your squares.
Place sewn sections back on the design wall
15. Place the sewn sections back on the design wall.
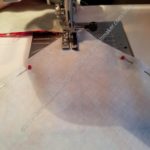
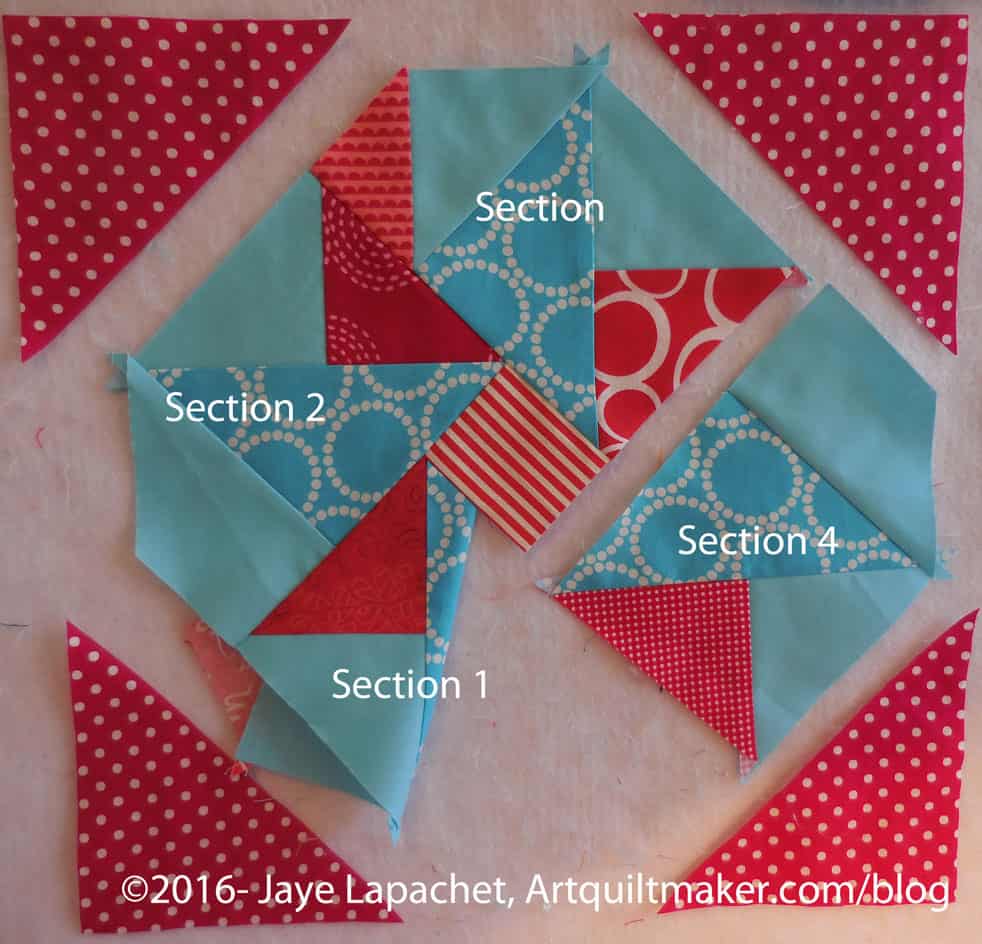
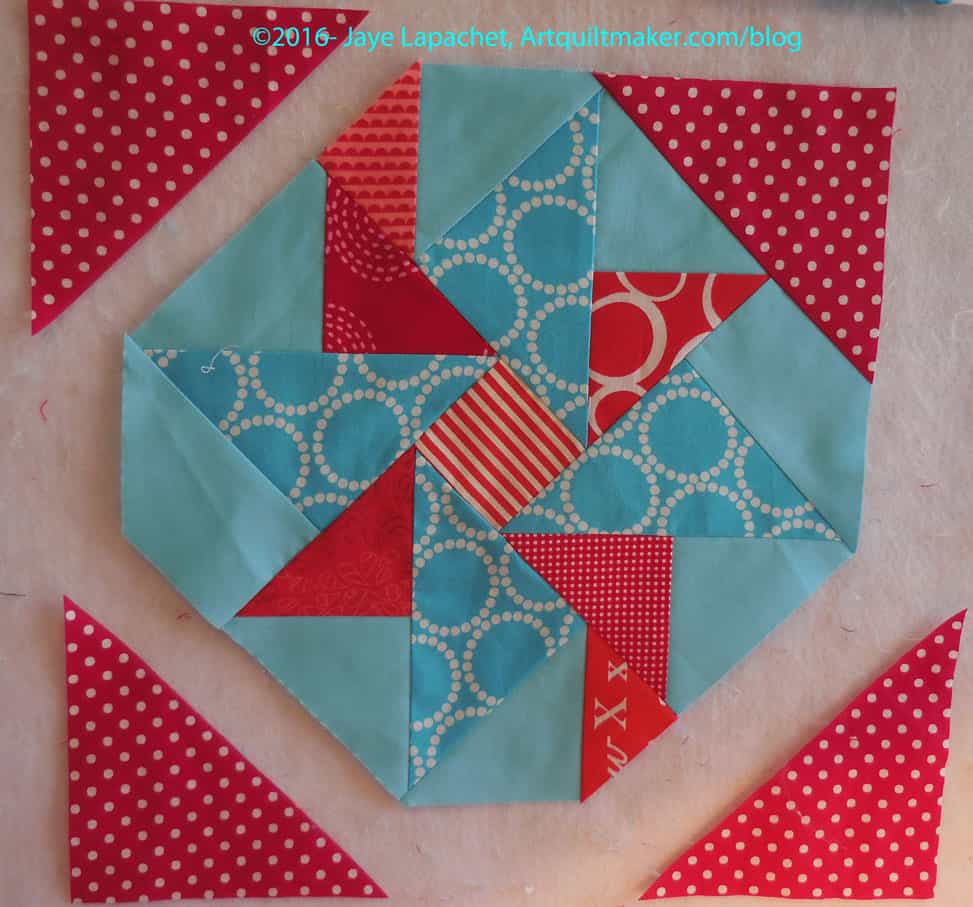
Now you have 4 major sections plus the center and 4 corner patches. Now we are going to get serious with partial seaming.
Take the center and section 1
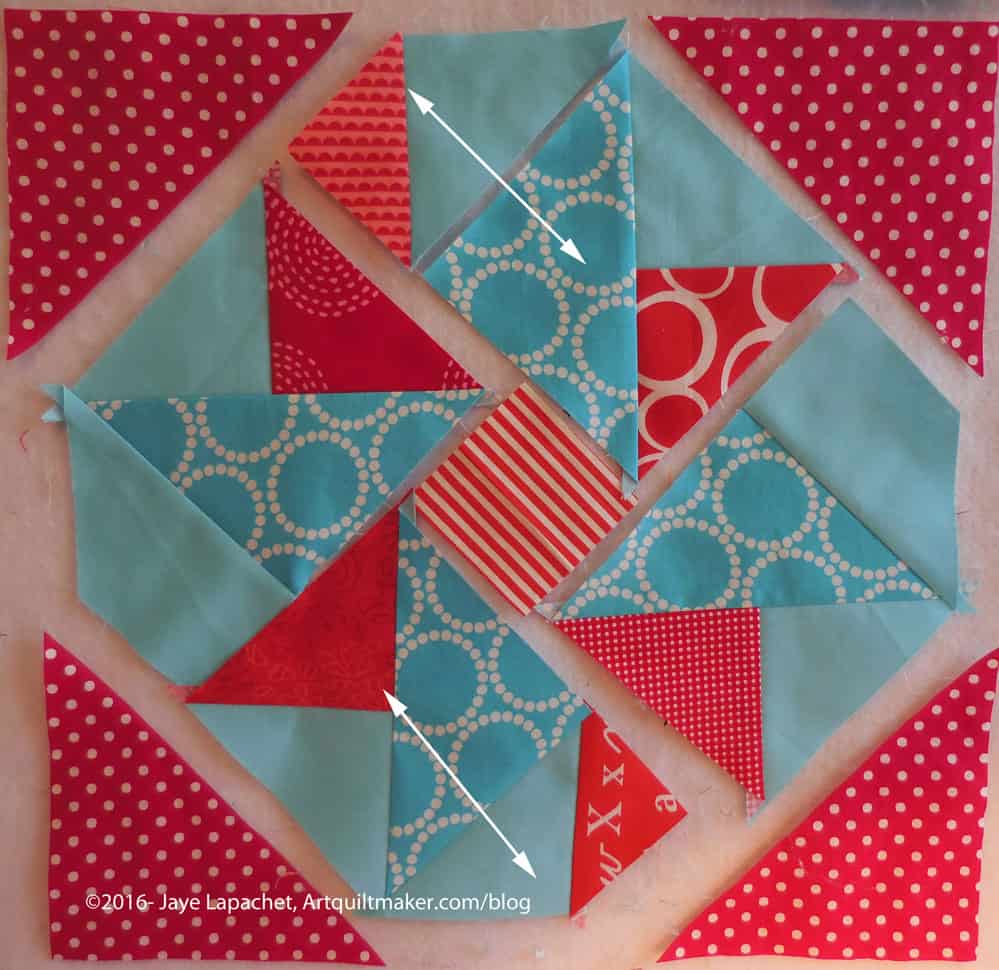
16. Take the center and section 1.
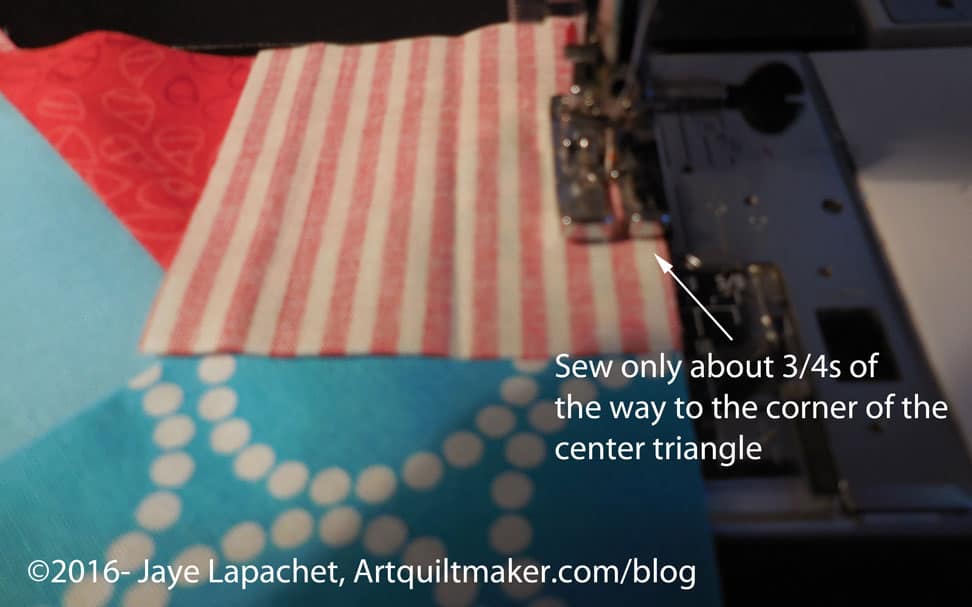
Sew about 3/4s of the way down the center square seam
17. Put section 1 under the needle with the center square on top. Line the center square up with the intersection of the red triangle and the Pearl Bracelets triangle (my fabrics used as a guide).
Backstitch at the end of the seam to secure the seam since you will be playing with it.
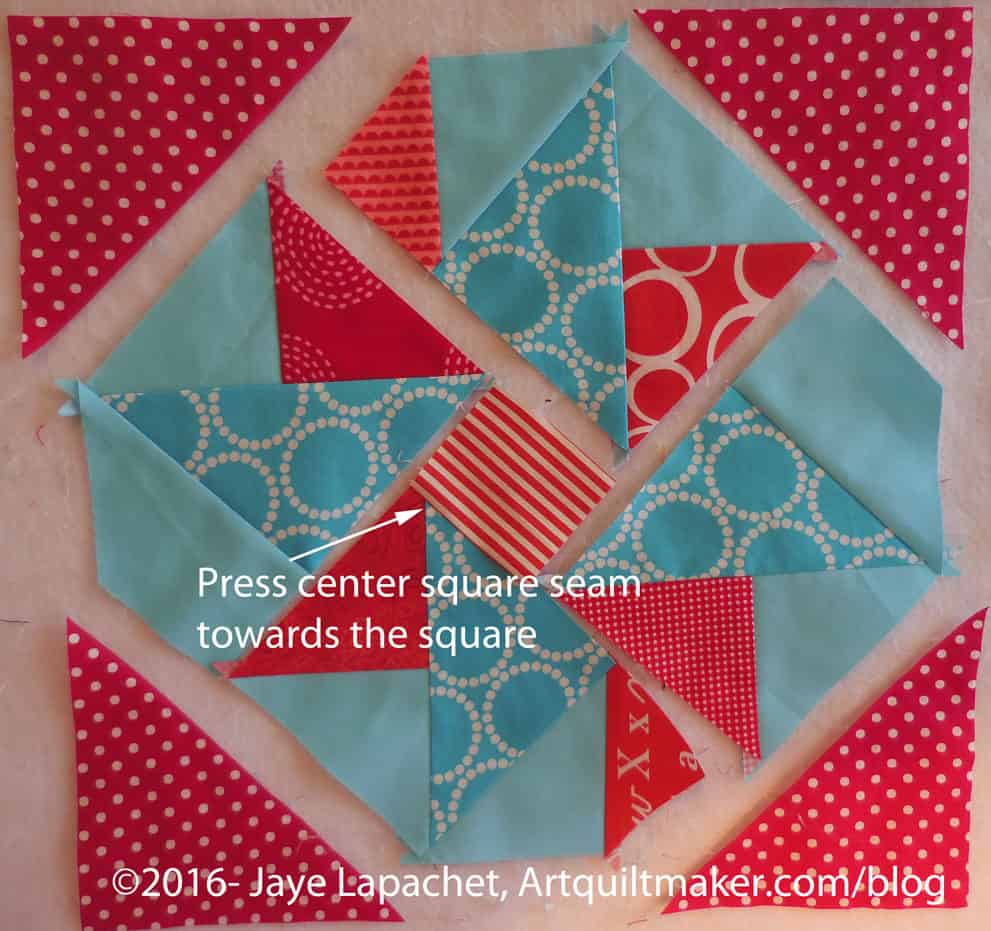
Press seam towards center
18. Press seam towards center square. Press carefully since the whole seam isn’t sewn.
Partially sewn seamPartially sewn seam – detail
The sewn piece will flip up. You can see about how much to sew in the picture above.
19. Take section 2 and lay it over section one and the center square with right sides together. The lengths should be about the same.
Section 2 sewn to section 1Section 2 sewn to section 1 + center square
Completing the sewing of section 2 makes the section look like it is possible to sew on section 3.
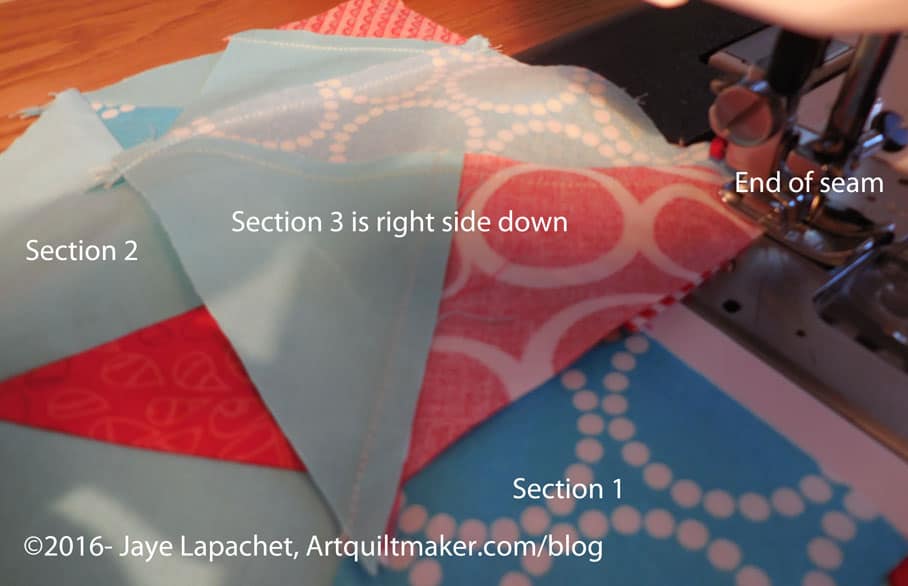
Section 3 right side downEnd of section 3 seam
20. Lay section 3 over section 2 and the center square. Line up the edges so they are event.
Center section almost done
Now your center section is almost done.
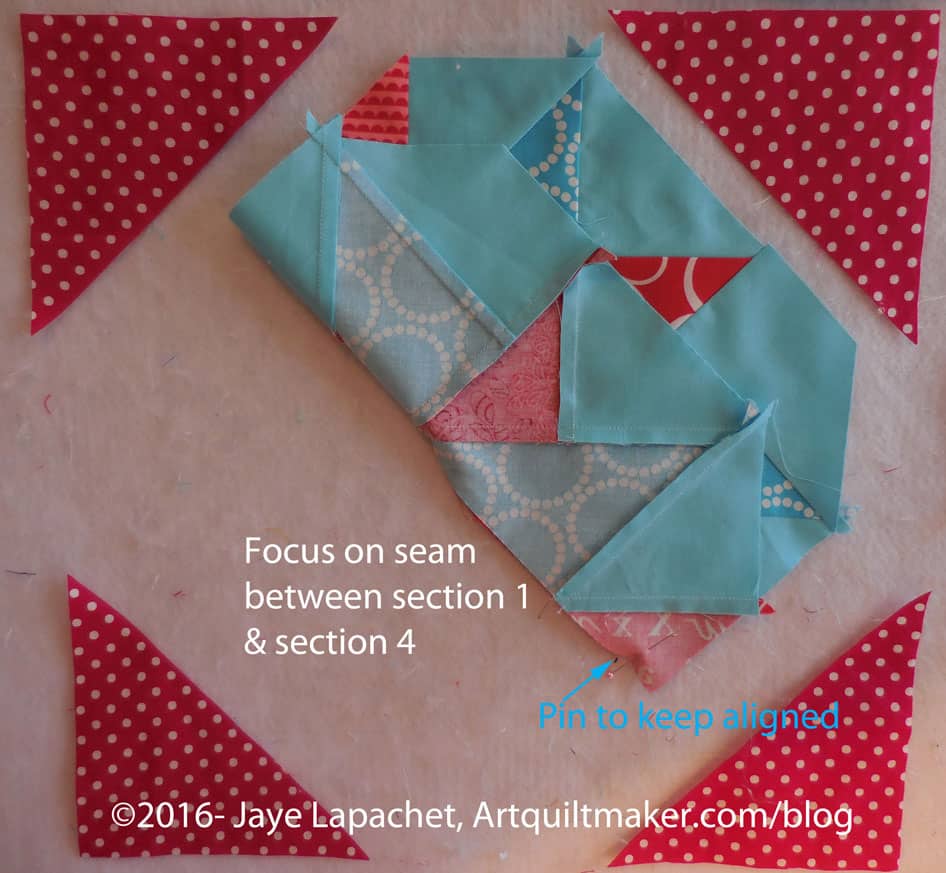
Tuck section 1 under section 2
21. Prepare to sew section 4 to the larger piece you have made by tucking section 1 under section 2. You might want to use a pin to keep it out of the way.
22. Lay section 4 over section 3, right sides together.
Section 4 sewn
Section 4 is sewn. Keep section 1 tucked under and out of the way for the next step. Get ready to complete your partial seam.
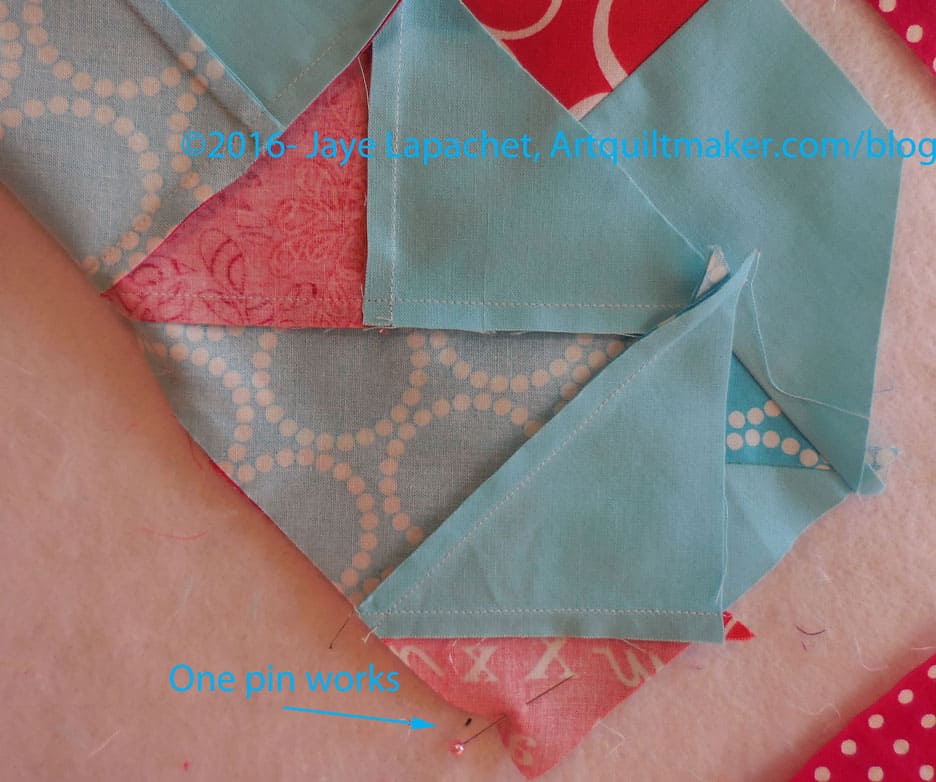
Fold center section upFold section up – detail
23. Fold the raw edges between section 1 and section 4 up like half of it wasn’t sewn. Use a pin near the end of the seam (edge of the section) to keep it in place.
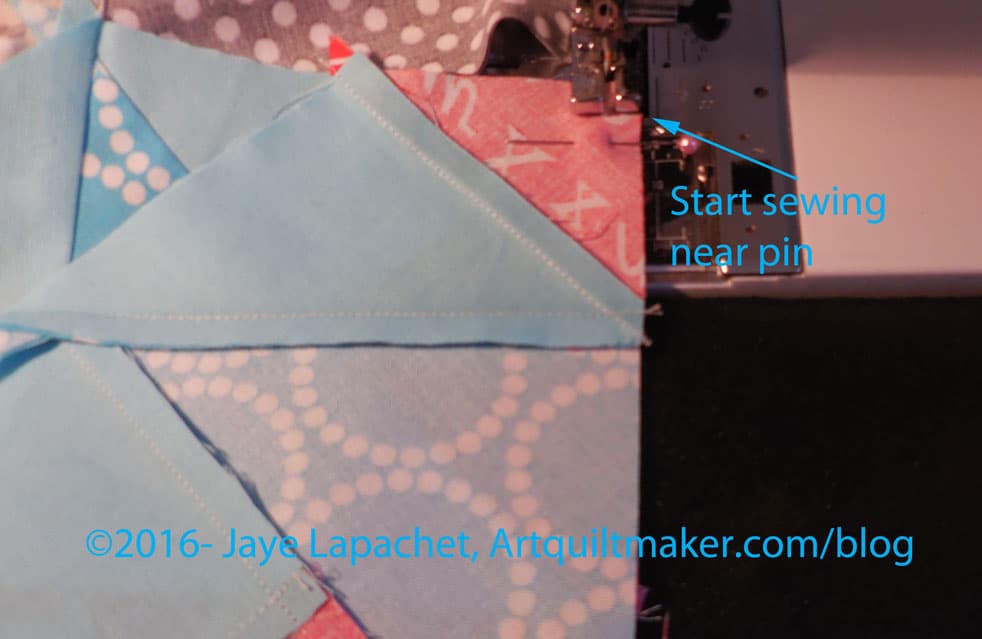
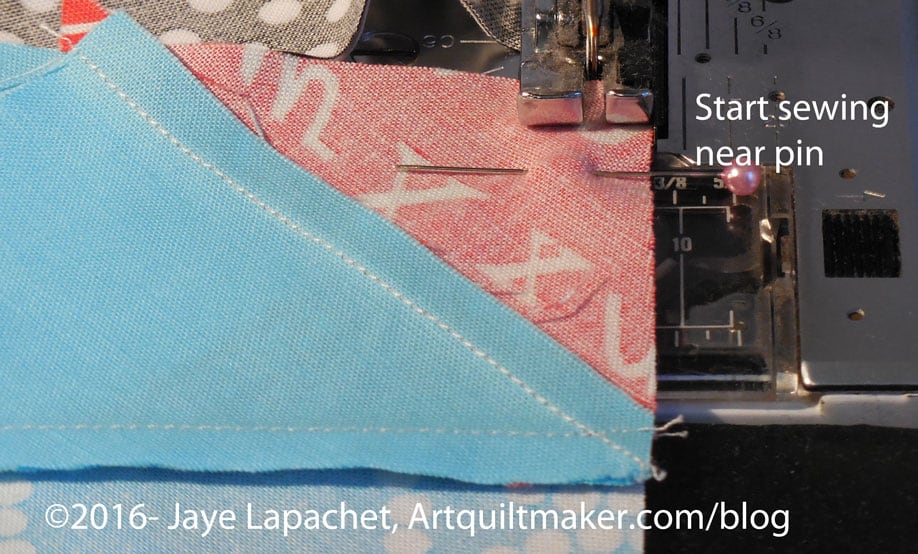
Position piece near pinStart sewing near pin – detail
24. Position piece so you start sewing near the pin.
Now you will sew the partial seam.
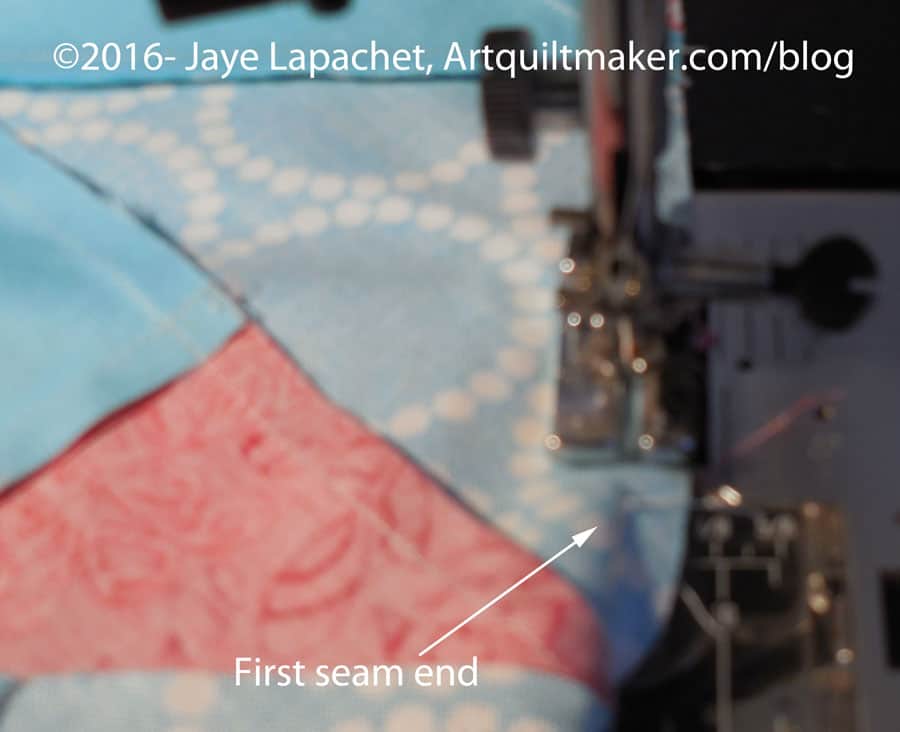
Sew partial seamSew partial seam
25. Once you start sewing from the pin (noted above), you will see the end of the first seam you partially sewed. Sew slowly to the end of previous seam line. To avoid a lump in the middle where the two seams meet, you can tug VERY gently towards your body as you sew. Do this only if necessary.
Center section sewn
Hooray!!! You have finished the center section
Now you have to sew the corner triangles to the center section to finish the block.
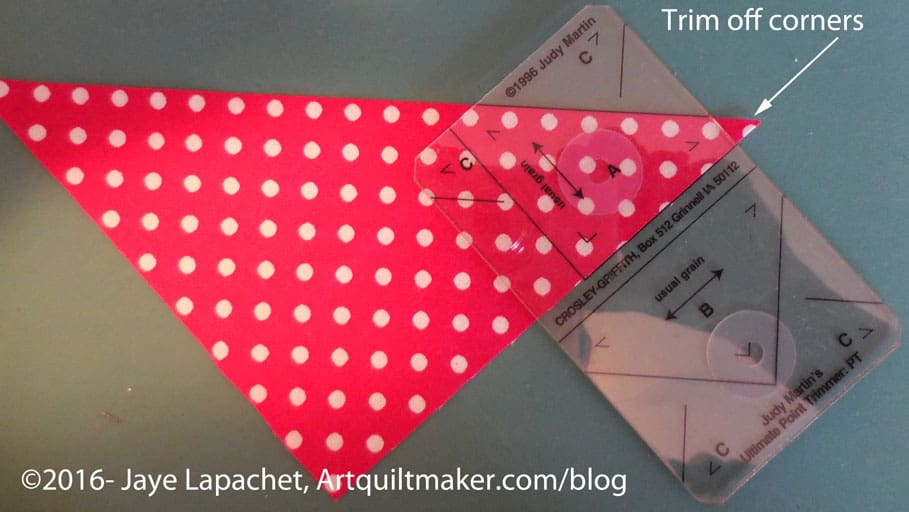
Trim off corners
26. Trim off corners of large corner triangles before you sew them on. You can trim them all at once or one at a time, which is what I do.
Lay out triangle on sewn section
27. Lay triangle on the sewn section, lining up trimmed corners even with edge of sewn section.
First corner triangle sewn
Your piece will look like the above image. Follow steps 26-27 for all corner triangles.
Finished Block
You are now finished! Great job!
___________________________________
Other resources and patterns regarding partial seams:
Laura Nownes tutorial on partial seams. Good tip about avoiding puckering on the last seam. I don’t agree with not pressing the seams until the end. Avoid pressing the first half seam, but press all the rest.
**Obviously, you should shop at local quilt shops and small businesses. However, if you are too busy or can’t find what you need there, I use Amazon affiliate links and may be paid for your purchase of an item when you click on an item’s link in my post. There is no additional cost to you for clicking or purchasing items I recommend. I appreciate your clicks and purchases as it helps support this blog.
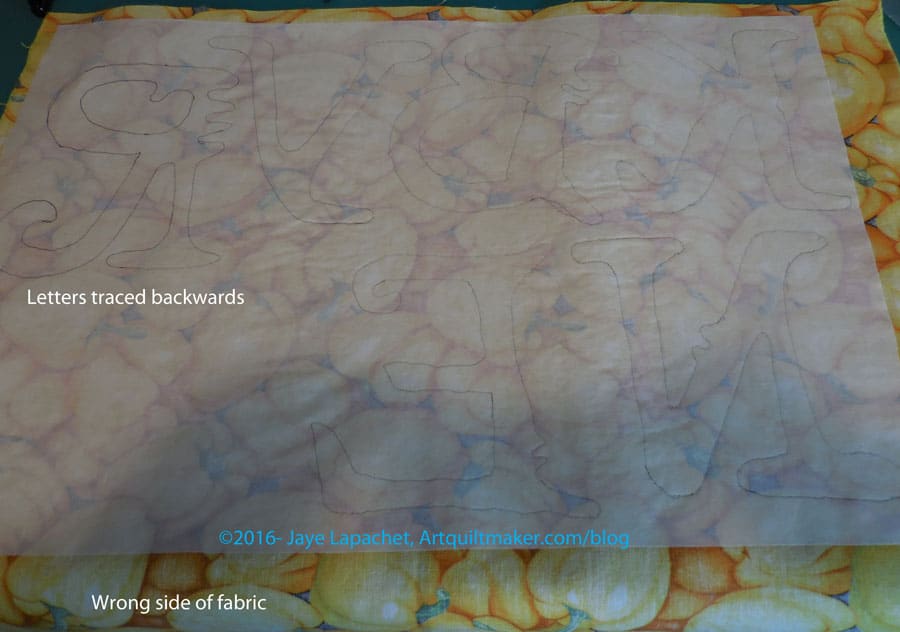
In my previous machine applique’ tutorials, I used designs where the direction of the motif didn’t matter. When I went back to review the tutorial (yes, I do use my own tutorials!) in preparation for doing some machine applique’. I was preparing to applique’ letters, which have a definite right and wrong way. I realized I had omitted directions for using directional motifs (where the direction of the motif matters, such a numbers or letters) for applique’, so I had to figure out how to do them again.
In order to understand this tutorial, you will need to look at How to Applique’-TJW and the 3 Fusible Applique tutorials (pt.1, pt.2 and pt.3). All of these are part of a whole.
Paper backed, double-sided fusible web, such as SoftFuse, Steam-a-Seam 2 or Steam-a-Seam Lite. There are many brands. Use your favorite. Follow the directions.
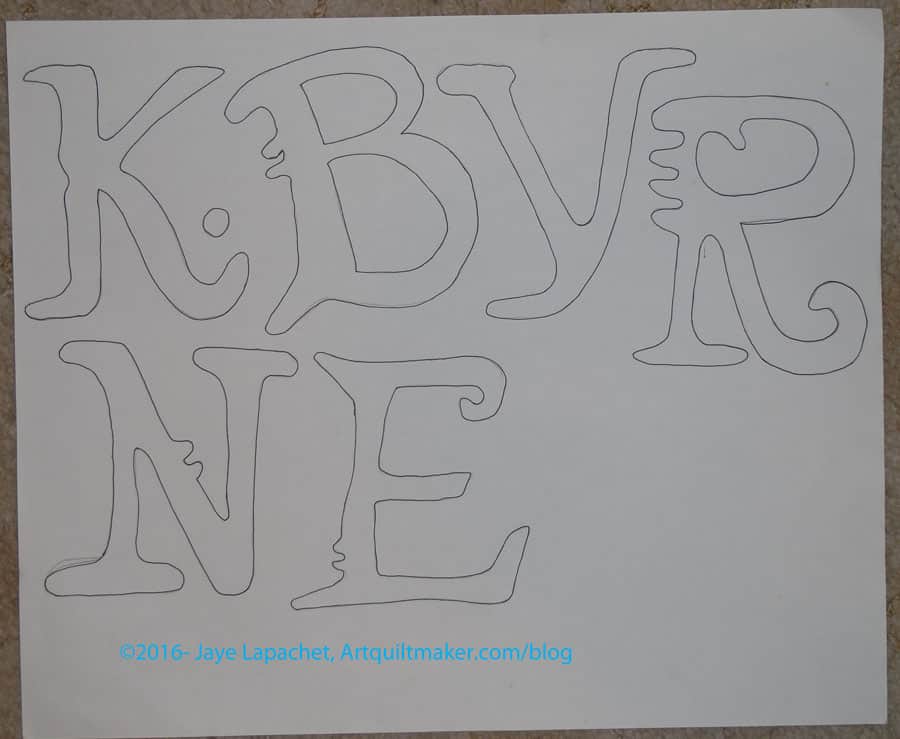
Draw out your design. I used a pattern for the letters I wanted to applique’. You can draw or print your design. There are a lot of free clipart you can use. Since I had a pattern, I laid out the pattern, placed a piece of drawing paper over the letters I needed and drew out the design using a pencil.
Trace over the pencil lines you used to trace the design with a Sharpie. The lines should be dark. Make sure the Sharpie does not bleed through to your table.
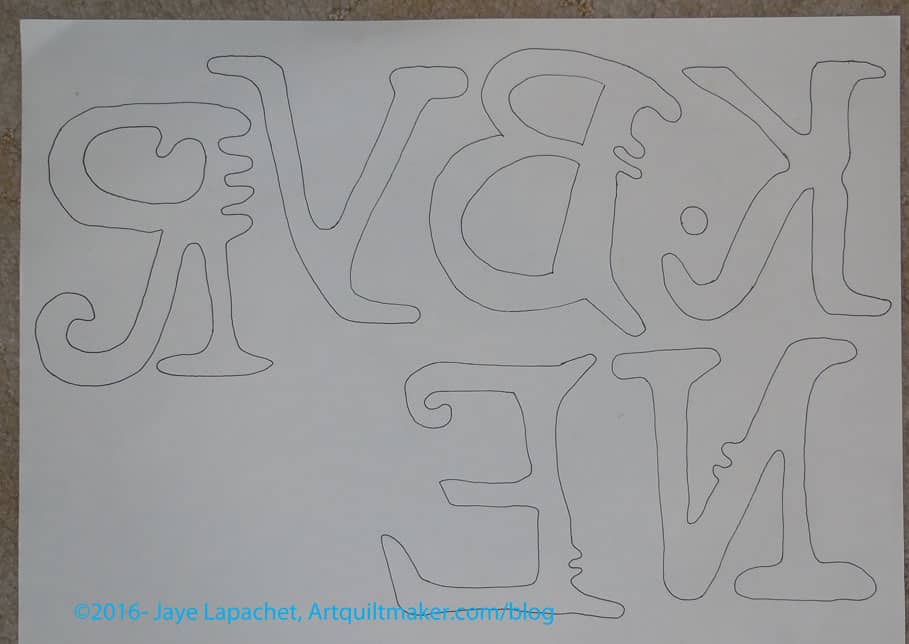
Flip your drawing paper over and put it on your light box. You can also tape it to a window or sliding glass door. The wrong side of the letters or directional motif will show through.
Directional motifs backwards on drawing paper
Using your Sharpie, trace the letters again on the wrong side of the paper. You will be tracing the backwards image of the letters.
Leaving the paper taped to the window (or laying on the light box), tape a piece of paper backed fusible, paper side UP, over your design which is on the window or light box.
Trace the backwards design on to your paper backed fusible using a Sharpie. **Nota bene: my Sharpie tended to smear on the paper of the fusible. I couldn’t find a pen that worked well, so be really careful to keep your hand out of the way to avoid smearage.
Once finished, remove everything from the window or light box.
Place the fabric you will use for your directional motifs right side down on the ironing surface. The fabric should be sized slightly larger than the fusible.
Place the fusible on top of the fabric with the paper side up. Make sure no edges are over your ironing surface.
Place your applique’ pressing sheet over everything.
Press according to the directions on the fusible package.
Fusible pressed to fabric
Once you are finished pressing, you will have a piece of fabric with fusible on the wrong side. The motifs (letters) should appear backwards and you will see the wrong side of the fabric.
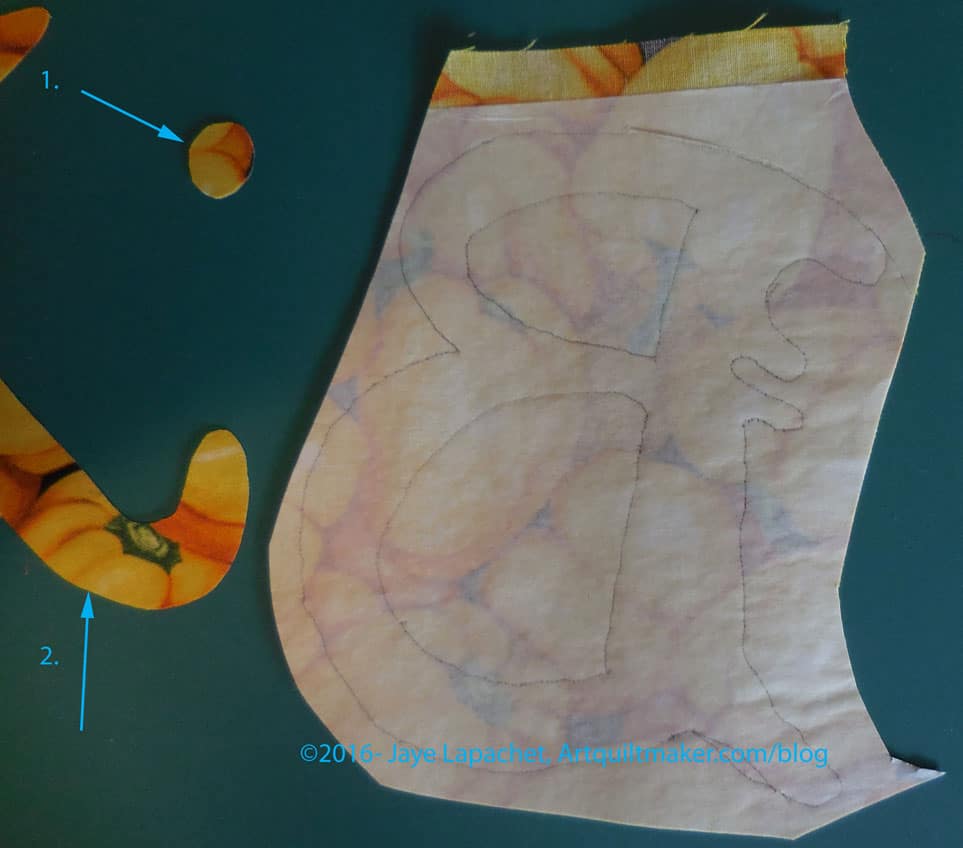
Decide on which scissors you will use. I always have a fight with myself about this. I don’t want to ruin my Ginghers, which are super sharp and great for cutting out detailed types of designs by using them to cut through paper. I also don’t want to ruin the edges of my motif with a pair of papers scissors that will not be sharp enough to cut through the fabric. I have a pair of Fiskars that I end up using for this task. Not ideal, but the best I am willing to do.
Cut out directional motifs
Once you have decided on scissors, cut out your designs (letters, in this case). First I do a rough cut, then I cut with more detail.
Cut out directional motifs – detail
Layout your background fabric on a flat surface, right side up. I use my ironing board, so I don’t have to move the motifs in order to press. If I have to sew two pieces of fabric together to make a large enough background, I press the seam open.
Take each motif, one by one, and peel off the paper. Carefully place each prepared applique’ motifs in their desired location before moving on to the next one. With motifs such a letters, I use a ruler to make sure they are straight.
You should be able to see your design correctly. If you are using letters they should not be backwards and you should be able to read the word.
Place your applique’ pressing sheet over everything.
Press your applques so that they are stuck to the background fabric.
Set up your sewing machine with the correct colored thread and a foot suitable for zigzag or satin stich.
I set the zigzag to 3.5 (width), 0.7 (density). I like my satin stitch to be a little open, but you can adjust it to your favorite length and density.
Cut a piece of tearaway the width of your motif and twice as long
Fold the tearaway in half.
Pin the double layer of tearaway to the back of the background fabric. Pins should be out of the way of the machine foot.
Satin stitch all the way around each motif, carefully negotiating curves so the satin stitch looks smooth.
Trim and/or tie off all threads.
Tear away/cut away the excess tearaway stabilizer.
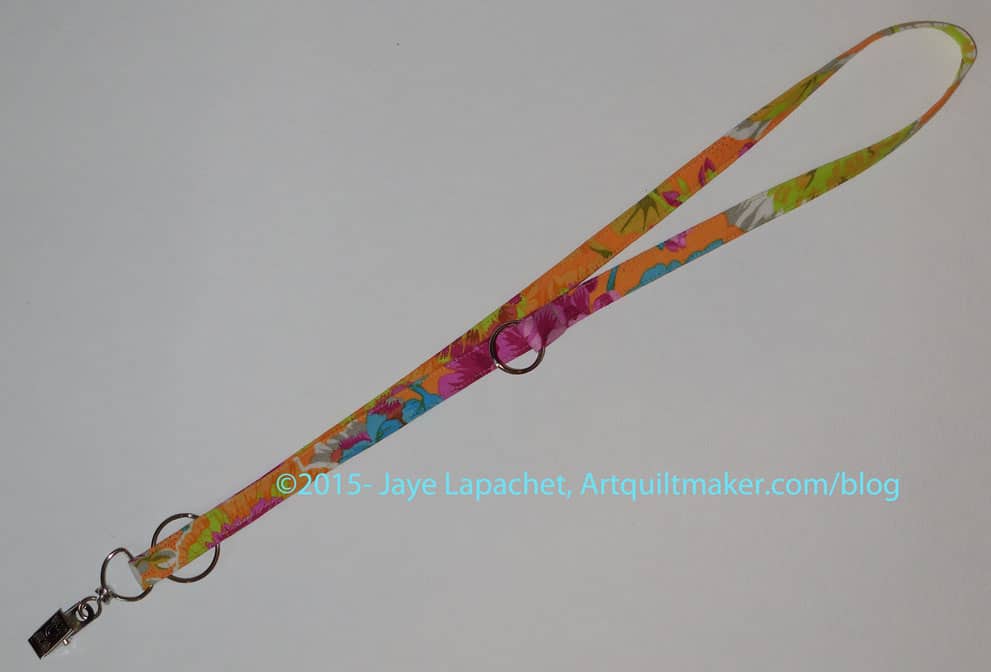
I wanted a certain kind of lanyard for my quilt guild nametag. I wanted my nametag to be near my shoulder so people could really see it. I also wanted some options to hang things from it, like a pouch for id, money, etc.
Make this lanyard fit your personality.
Supplies
sewing machine in good working order
ironing kit
thread
fabric
basic sewing kit (BSK)
pins
WonderClips
Shape Flex fusible interfacing (scraps are perfectly fine)
2 circle metal rings (D ring or similar will work also)
1 metal hanging clip
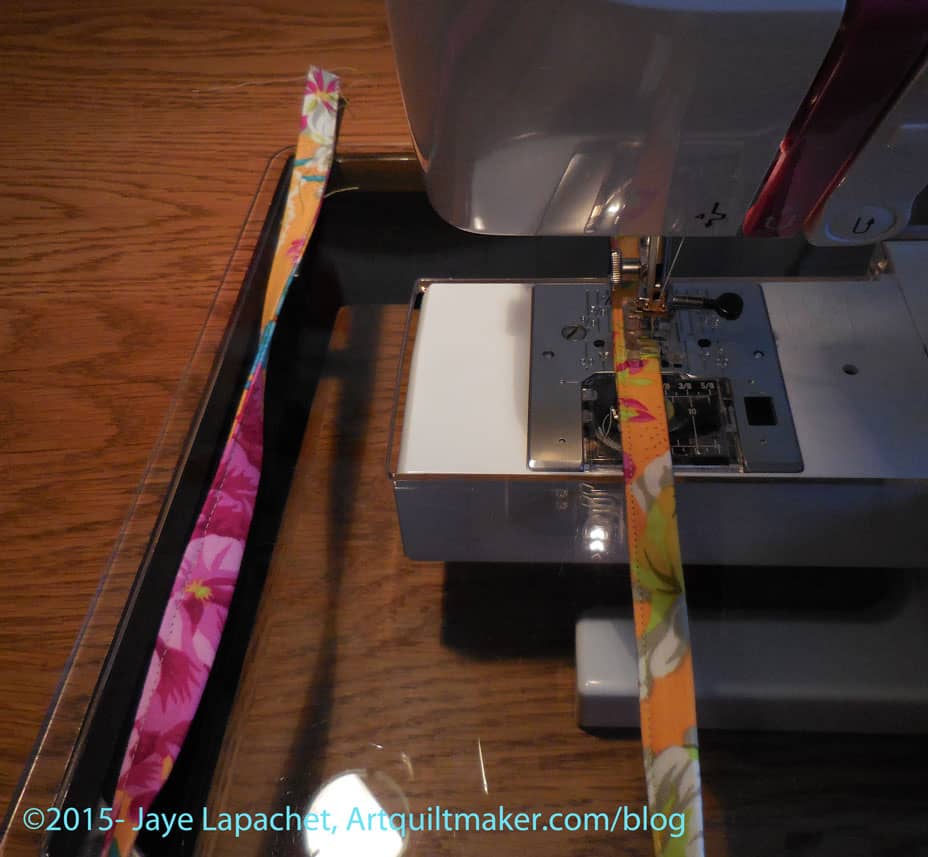
Directions
Wash and press your fabric
Cut 2″ strip
1. Cut a piece of fabric 40″ x 2″. You can adjust the length to fit your height, neck size, etc.
Cover with interfacing
2. Layout your strip on the ironing board wrong side up. Cover the wrong side of the fabric with Shape Flex (or similar) interfacing. I usually cut the interfacing so it only goes with about 1/8″ from the edge. This reduces bulk.
**Note the Christmas light fabric was what was laying on my ironing board at the time I took the photo.
Fold in half
3. Fold your ShapeFlex covered strip in half, wrong sides together, and press so the edges match up.
Fold ends
4. Fold both ends up about 1/8″ (WST). This will finish the ends.
**Note: I don’t know what that tool is or where I got it, but I use it to keep from burning my fingers when I iron.
5. Open the strip you have just pressed down the middle.
Fold towards to center
6. Fold both raw edges towards the center. Don’t fold past the center pressed line.
Folded lanyard piece
6A. Once you have pressed both raw edges towards the center, repress the whole strip together on the center line.
Topstitch around entire stripTopstitch around fabric – detail
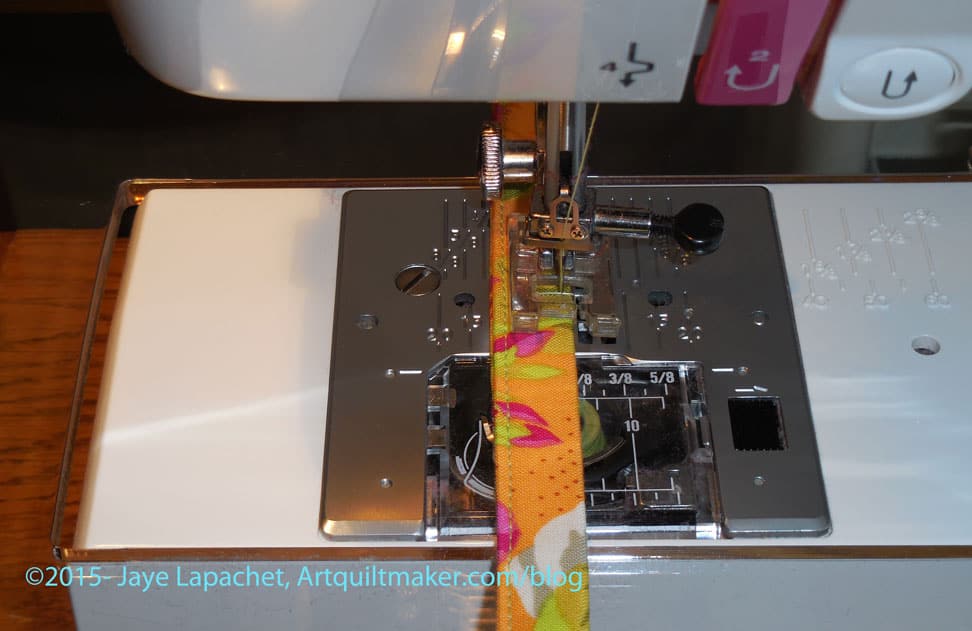
7. Topstitch around the whole strip using a matching thread. Of course, you can use whatever color you want, so do that. Make the piece interesting.
Topstitching encloses the whole strip so there are no raw edges visible.
Mark with a pin
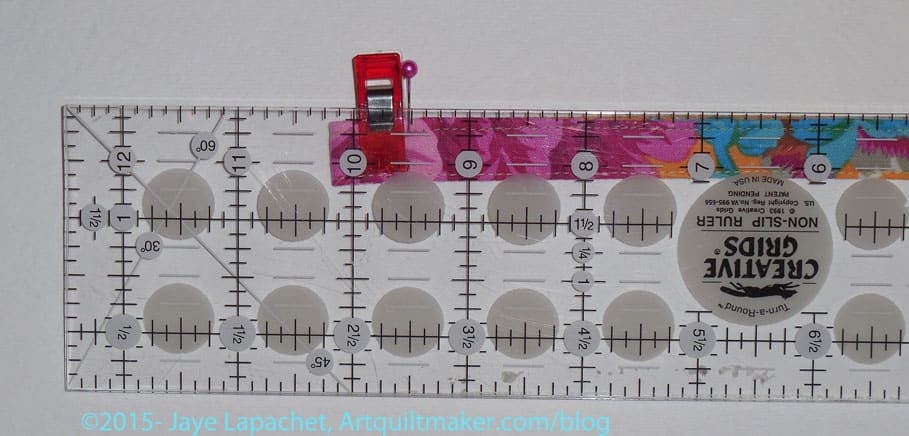
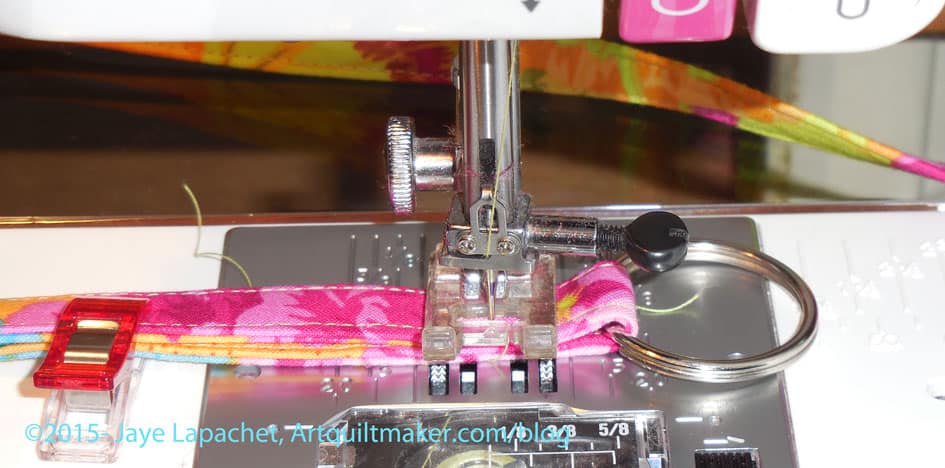
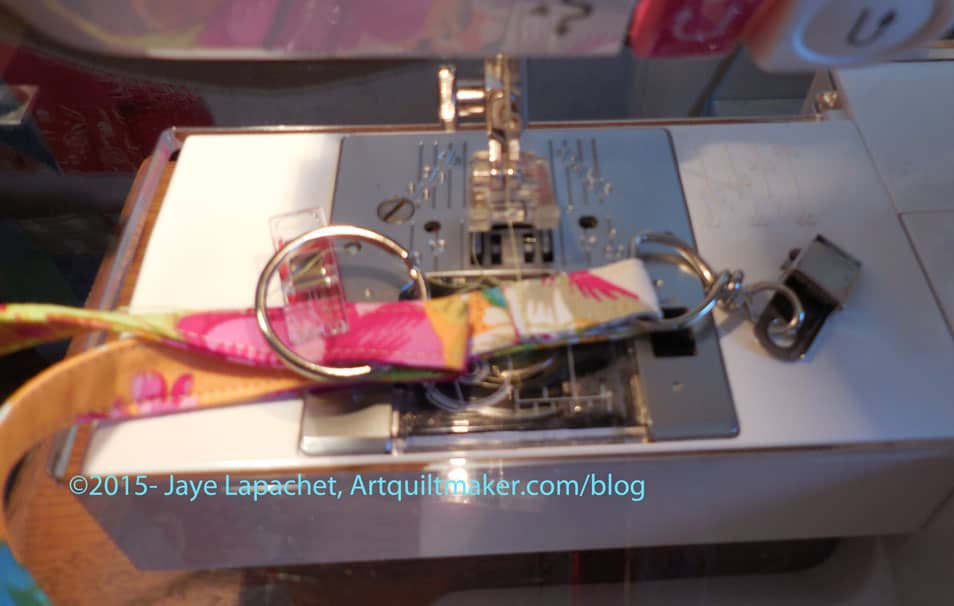
8. Mark 9.5″ up from the end with a pin. This will be your sewing line, which will create the lace to clip your name tag.
Fold at 10.25″
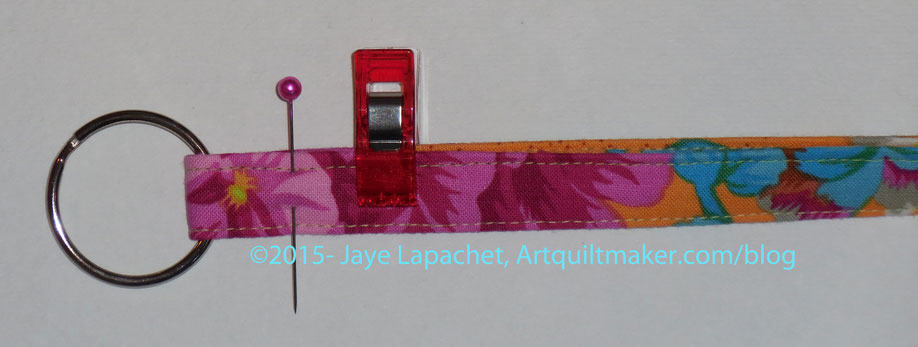
9. Fold that same end at 10.25″ and insert a ring or D Ring.
Clip to hold ends together
10. Clip piece with a WonderClip to keep everything together while you sew.
Sew on marked line
11. Sew on your marked line. I sew between the top stitched lines. The ring will need to face out so you can clip your name tag on to it and it will not be covered by the lanyard.
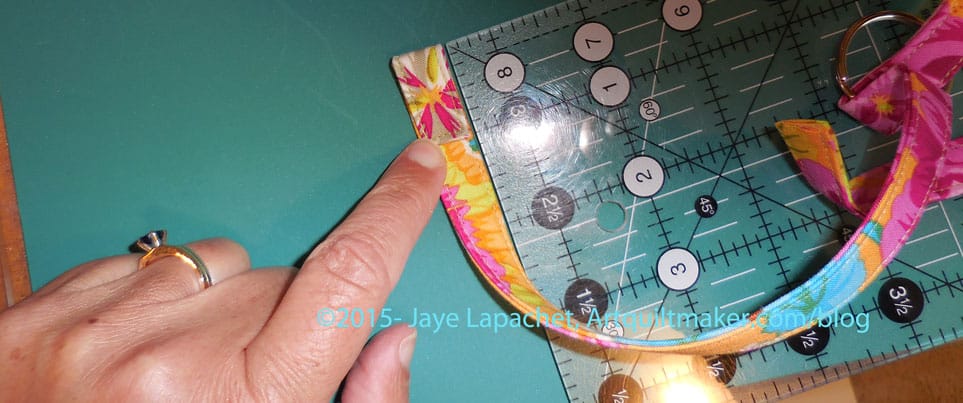
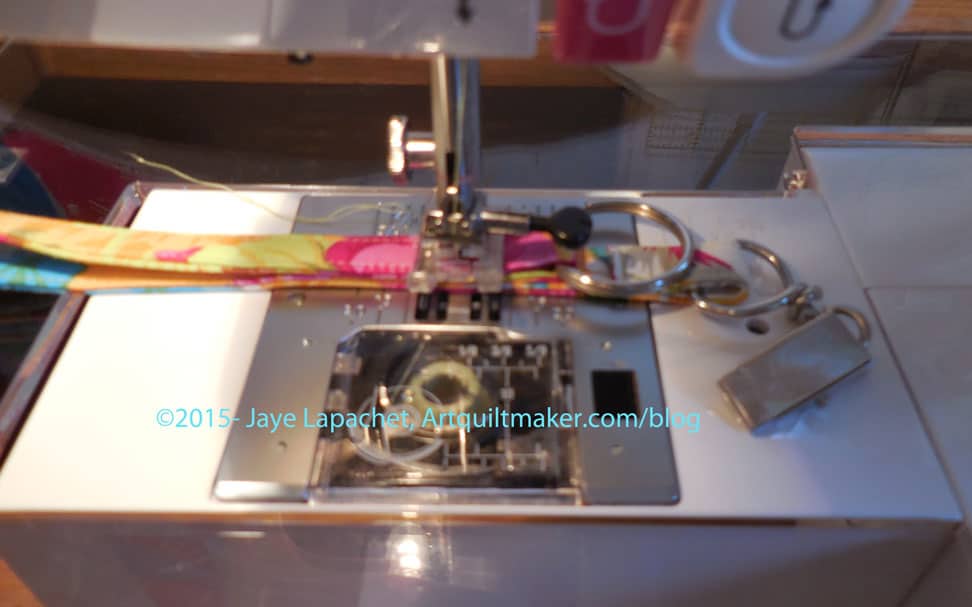
Fold ends up 1″Make sure hardware is on the same side as upper ring
12. Fold each end up 1″. Make sure that the fold on the same side as the upper ring is to the back.
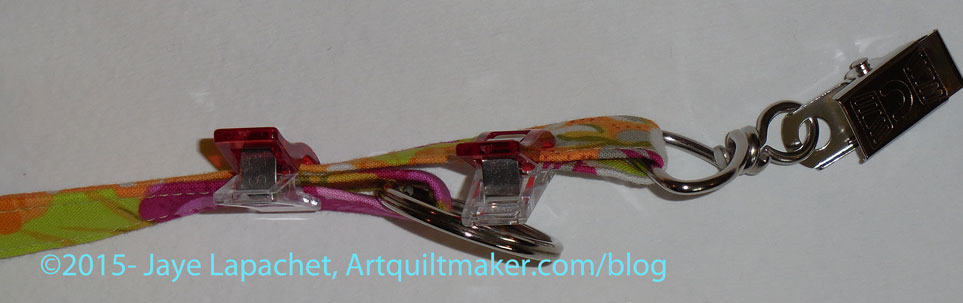
Add hardwareAdd hardware and clip ends
13. Add a circle ring to one end and clip with a WonderClip.
Clip end to prep for sewing
14. Add the metal hanging clip to the other end and clip with a WonderClip.
15. Adjust the ends so the circle ring does not clank against the hanging metal clip when you wear it. If it does it will drive you crazy. If it doesn’t bother you, it will drive someone with auditory sensitivity crazy. I always adjust the hanging metal clip to be the longer end.
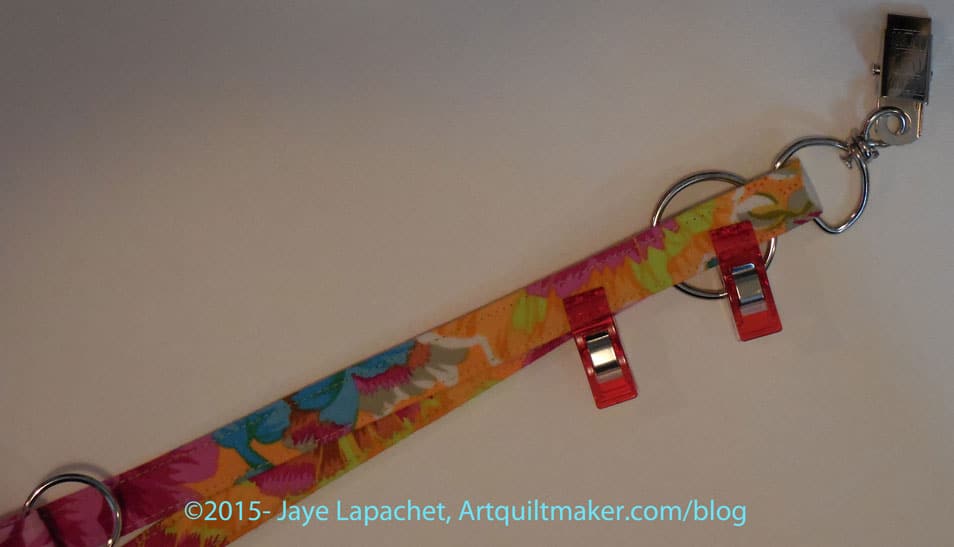
Sew First End Together
16. Sew the end of the hanging metal clip closed. Bury or clip threads.
Sew Layers TogetherSew Layers Together
17. Now, carefully sew all the rest of the layers together. I sew the end with the ring using a square stitch pattern to reinforce all the layers of the lanyard.
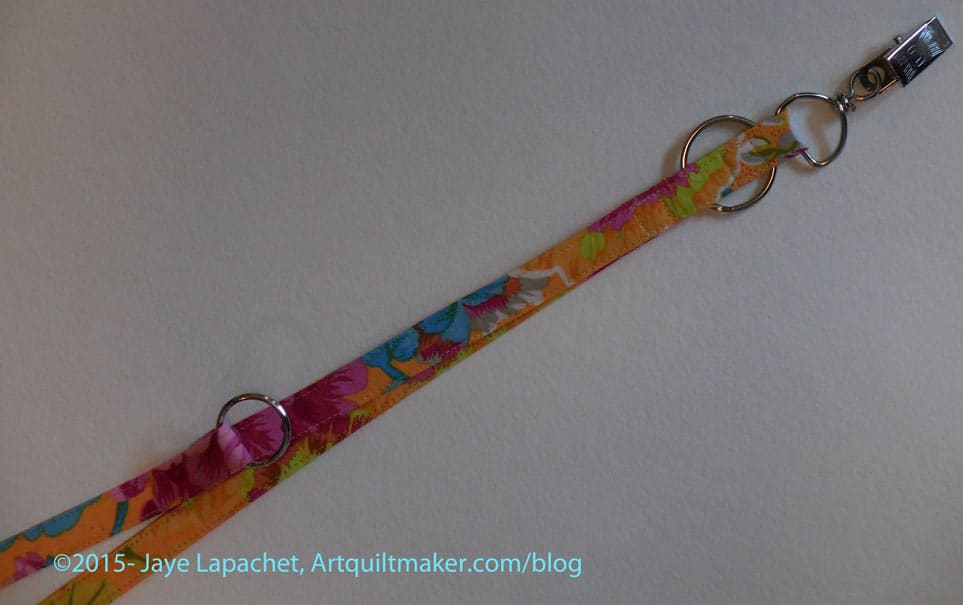
Finished Lanyard detail
Clip your nametag on, hang your pouch and you are ready to rock.
As mentioned in part 1, above is the current block in our Sampler Quilt Class. These directions are for machine sewing your Flower Basket and include a little applique’. The applique’ can be done by machine or hand.
Are you playing along? If you are just starting, below is the complete supply list. You won’t need everything for this step, but you will need to start with part 1 and that part requires more supplies. Also, note, there are a LOT of photos in this tutorial.
These directions use a quarter inch seam allowance. Check your seam allowance before you begin. If you don’t know how to do that, there are resources available, including one from Connecting Threads and Craftsy. You can search the web for others if you don’t like these tutorials.
You will be directed to use the Triangle Technique. Make sure you have the chart as well as the instructions handy.
Respect the bias.
After working through part 1, you have already chosen your fabrics, made your templates and cut your pieces. You are ready to sew.
Sewing
Carefully stitch along the hypotenuse of the large background triangle, about 1/8″ from the edge, to stabilize it. This stitching will be covered up when you stitch the handle part of the block to the basket part of the block.
Triangle Technique
Use the Triangle Technique to make your half square triangles. Make sure you have the chart available to confirm sizes. A brief overview is:
Draw an X from corner to corner diagonally on the wrong side of each of your 6.25″ x 6.25″ squares.
Place them right sides together and sew 1/4″ on each side of the diagonal lines.
Nota bene: If I had wanted to pin I would have pinned far away from any of the diagonal lines.
Now you have a piece with four seams forming an X.
Next cut the ‘Plus’ of your sewn piece. This means that you are cutting horizontally down the middle and vertically down the middle.
Line up your ruler with the edge of the fabric and the point in the middle where the two lines forming the X come together.
Cut vertically.
Do NOT move your fabric.
Reposition your ruler and then cut the piece horizontally.
The result is 8-2.5″ half square triangles. The above are actually a thread or two larger than 2.5″, which leaves the perfect opportunity for trimming to make them an absolutely perfect 2.5″.
Trim your HSTs to an absolutely perfect 2.5″.
Now you have 8 beautiful HSTs.
Of course, you can use whatever technique you like to make the half square triangles.
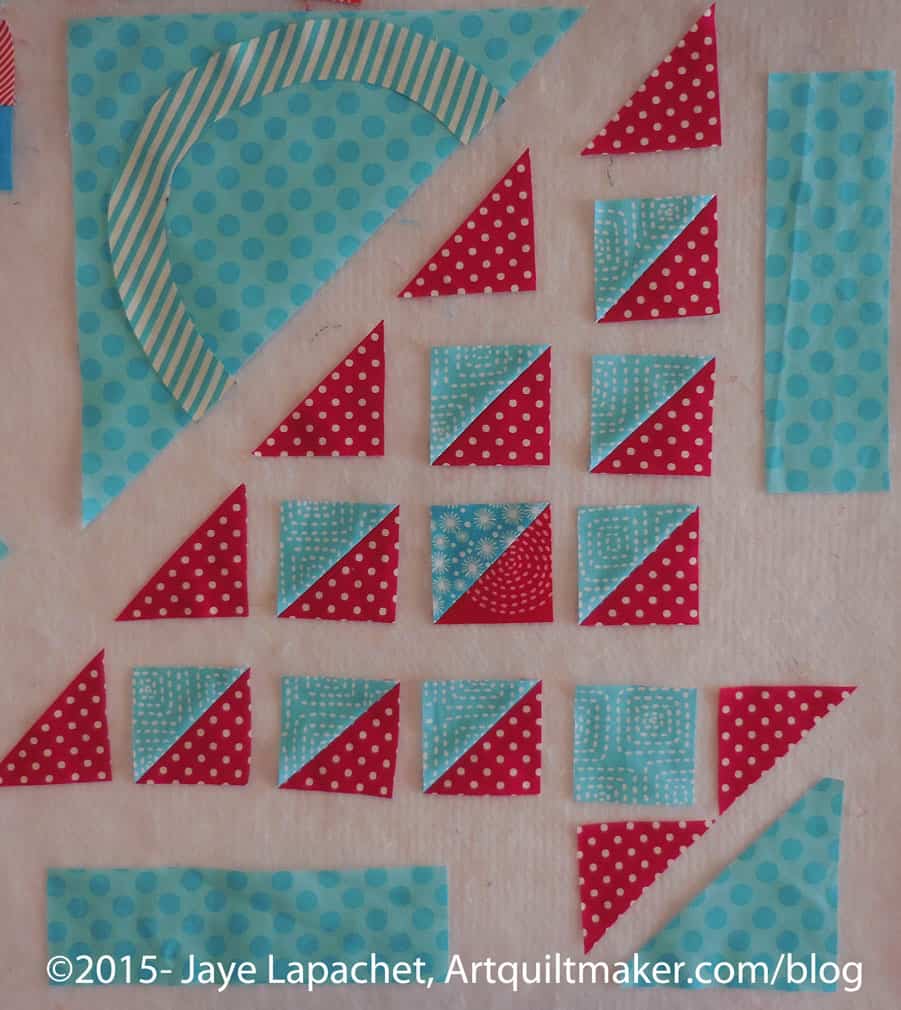
Layout and Assembly
Pieces cut and ready to sew
Now that you have cut all of your pieces, lay them out on your sandpaper board, or put them up on your design wall. It is great to be able to see where all the pieces belong and adjust any pieces that need adjusting before you sew.
Sew Handle to Background
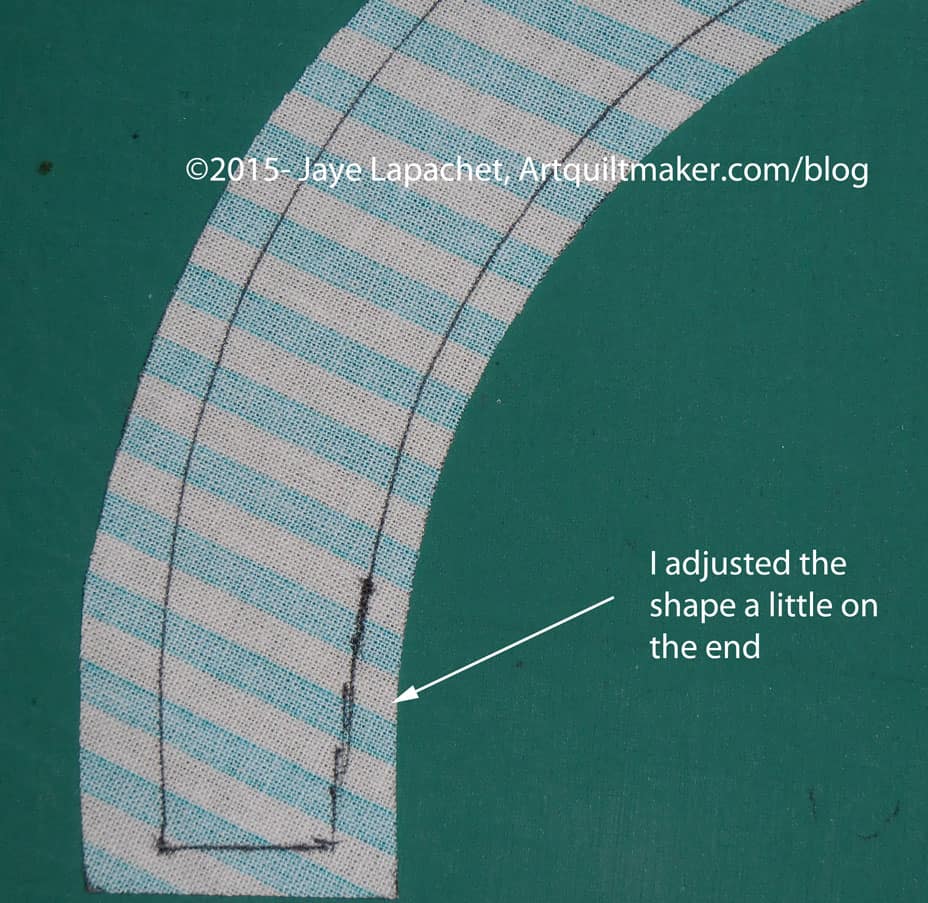
Template on Handle, ready to traceTraced & Adjusted
Because I decided to use the method described below, I made another handle template with NO seam allowance. I placed it on the handle I had cut from the striped fabric carefully so there was an even seam allowance on all sides. Then I traced around it with my thin black pen. I thought the template was a little wide at the end so I adjusted the line a bit to make the seam allowance larger.
Handle & Background Triangle Cut, Laid OutPieces Laid Out
My pieces looked a little weird-not the right size, etc when I laid them out. Have no fear! They will improve.
Press seam allowance underPress with hot iron
I was using my stiletto to adjust the seam allowance, but it was impossible to hold the stiletto, the camera and the iron all at once. Press carefully, so as not to distort your pieces.
Watch out for corners
Pay attention to the corners. The layers of fabric will want to pooch in weird directions. This is where one of those mini irons might come in handy. I used my regular iron and a stiletto, so I know those tools work.
Press seam allowance on handle under
Take your handle and press the the seam allowance under on both sides of the piece. Press so that the drawn line is on the inside of the handle and is covered by the piece once the handle is sewn.
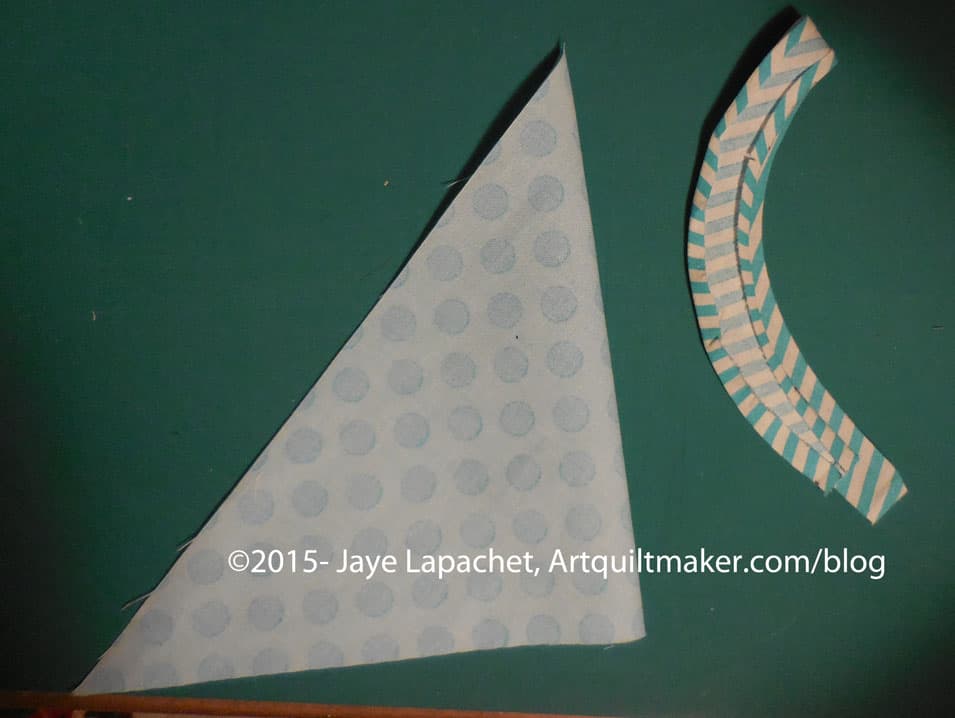
<Nota bene: the orange fabric was selected for good contrast so that the steps would show up well>
Finger press patches in half
Fold the handle in half with wrong sides together and finger press on the midpoint. Unfold.
Fold your large triangle in half with right sides together and finger press. Unfold and layout.
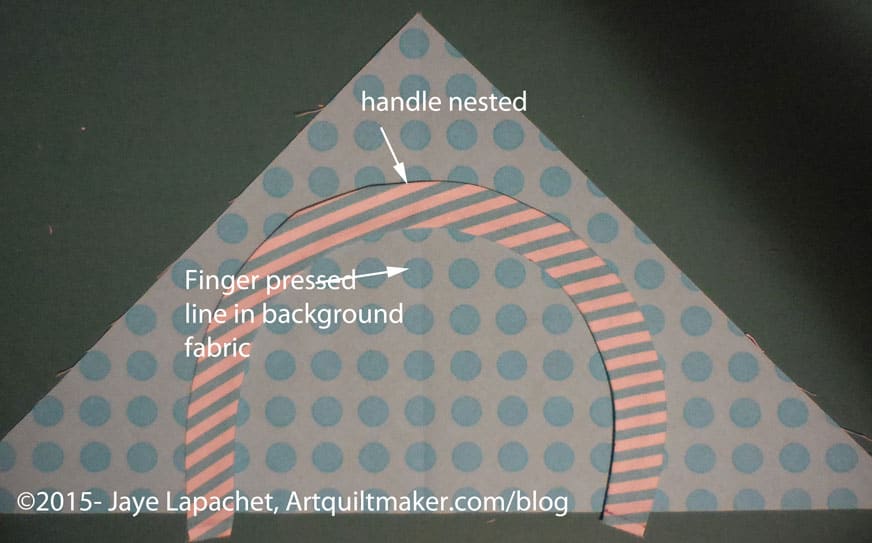
Nesting handle & background
Nest the handle into the triangle with the right sides up.
Line up the bottom edges of the handle with the hypotenuse of the background triangle. If the handle ends are a little over, it will be fine. You can trim them later.
Eyeball your piece to make sure everything looks good and even.
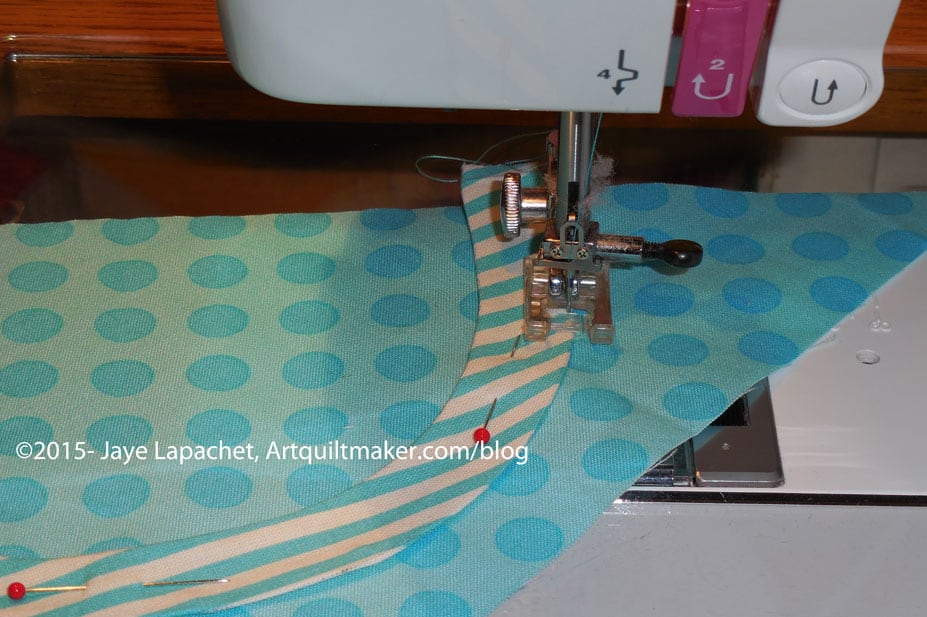
Pin the handle to the background down the center of the handle. Remove the pins as you sew. Try not to sew over them.
Using a lot of pins will help keep the handle in place as you sew
Sew carefully
Sew slowly and carefully along the drawn line around the curve. I chose a matching thread, an applique’ foot and a topstitch/sharp needle.
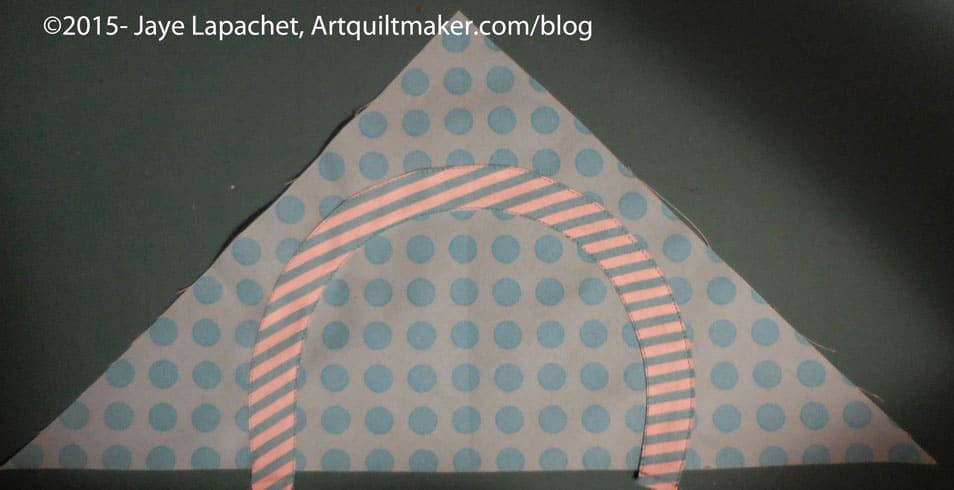
You will either need to hand applique’ the other side down or using a machine stitch that suits you.
You could sew both sides down with a straight stitch, like I did. There are many options.
Optional: You can satin stitch (see the Machine Applique’ tutorial) or blanket stitch or use some other decorative stitch to machine sew the handle to the background triangle piece. If you use one of these stitches, you may need some tearaway stabilizer
Optional 2: you can hand applique’ the handle to the background triangle.
Handle sewn to background with straight seam
Once the handle is sewn you are ready to move to the woven part of the basket.
Basket Sewing Layout
Sew Basket Together
The block can be broken down into two pieces: the top half with the handle and the bottom half with the basket.
The two colored HSTs are supposed to give the illusion of a woven basket.
Trim off dog ears
Trim off dog ears from the A,B-HST/1 combo.
Sew Basket parts together
Sew HST/2 to HST/5. Press towards HST/5.
Using the diagram above to confirm placement, sew your A,B-HST/1 combo to your HST/2-HST/5 combo. Press towards the red.
Sew basket parts together
Sew HST/8 to Square 10. Press towards the Square 10.
Sew HST/6 to HST/9. Press towards the red part of the HST.
Sew 2 sets of woven basket parts togetherSew basket parts together
Using the diagram above to confirm placement, sew your HST/6-HST/9 combo to your HST/8-Square/10 combo. Press towards the HST/6-HST/9 combo.
Sew Triangle to HSTs
Using the diagram above to confirm placement, sew C to HST/3. Press towards the red.
Sew triangle D to C-HST/3 combo
Using the diagram above to confirm placement, sew D to your C-HST/3 combo. Press towards D.
Trim your dog ears
Trim your dog ears.
Sew HST/4 to HST/7. Press towards HST/7, making sure your seams will nest with the seams you have already pressed.
Sew parts of the basket together
Sew HST/4-HST/7 together and then sew the HST/4-HST/7 combo to E. Press towards E.
Four sections of the Basket
Using the diagram above for placement, sew your HST/4-HST/7-E combo to your C-D-HST/3 combo. Press.
Trim dog ears.
Sew 2 Sections together
Sew your A,B-HST/1-HST/2 segment to the HST/6-HST/9 segment.
Trim Your Dog Ears
Trim your dog ears!
Sew last two segments
Sew the last two segments of the basket part together. You may have to re-press some seams.
I didn’t move the borders the whole time I worked on the quilt See how much the basket part shrank? That is seam allowances for you!
Trim the dog ears
Trim the dog ears, if you haven’t already.
Sew 2 halves together
Now you have two halves of the basket. Sew the woven part to the handle part by placing the woven part on top of the handle part, lining them up and then sewing carefully. You can fold the two sections in half, bisecting the handle, to match them up if you think that you need to trim the handle portion later.
Ready to sew last borders
Now you are ready to sew on the borders.
Sew triangle to borderSew triangle to border with words
Sew the B2-G background section by placing the red triangle (G) face down on top of background piece B2 and sew the short end of the background to the triangle, as shown in the picture.
Sew on background B2/Triangle-G
Take the basket piece that you sewed together above and place the B2-G background section on top of the basket section. Line up the red triangle’s seam from the B2-G background section with the HST/8-Square 10 section. You want the seams to match, so pin. Press towards background piece B2.
Only one more border to go.
Take the basket piece that you sewed together above and place the B1-F background section on top of the basket section. Line up the red triangle’s seam from the B1-F background section with the HST/9-Square 10 section. You want the seams to match, so pin. Press towards background piece B1.
Sew on Final Triangle
Now you are ready to sew the last piece.
Trim dog ears
Trim dog ears.
Basket almost complete
Your basket is almost complete.
Line up triangle with borders
Complete your basket half by sewing background piece B3 to the basket. You have already snipped off the corners so you just have to line up the triangle piece with the borders already sewn to the block. Press towards the background piece B3.
Your half is complete.
Take the top half of the basket, the piece with the handle, and carefully sew it to the basket half.
Frances finally let me know she was ready to move on with her sampler quilt. We decided to make the Flower Basket Block, so I sent her the pattern, promised the tutorial and did nothing.
These directions use a quarter inch seam allowance. Check your seam allowance before you begin. If you don’t know how to do that, there are resources available, including one from Connecting Threads and another from Craftsy. You can search the web for others if you don’t like these.
You will be directed to use the Triangle Technique. Make sure you have the chart as well as the instructions handy.
Respect the bias.
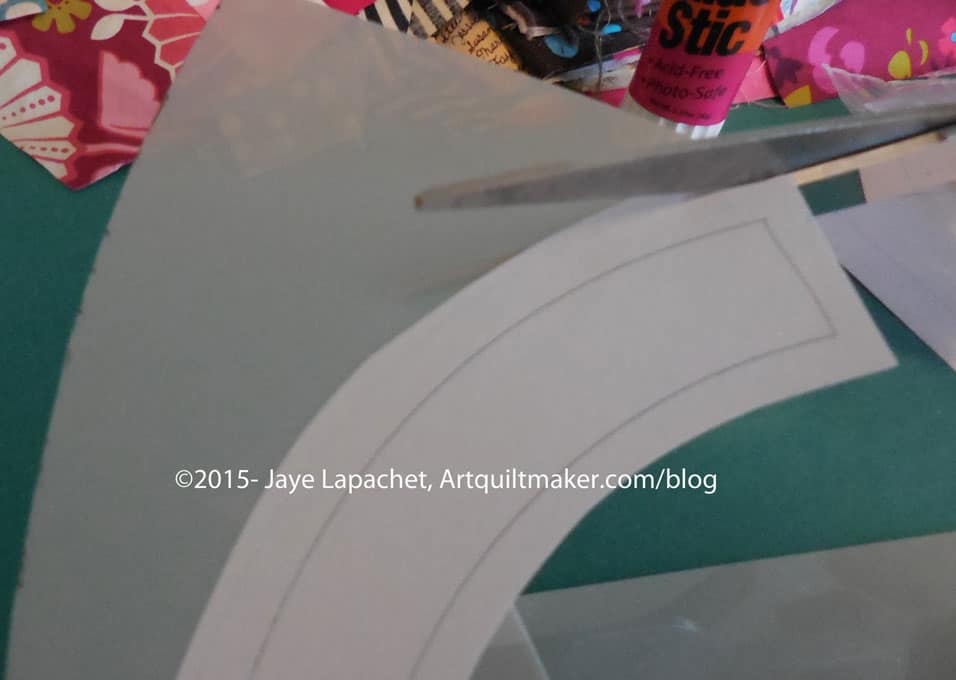
Templates
You really only a need a template for the basket handle. If you are using templates for all of your pieces, then prepare all the templates for pieces in the patterns as directed below.
Prepare pattern for your basket handle template by printing two copies of the pattern. I am telling you to do this first so when you get into the throes of sewing you won’t have to stop and fiddle around with templates.
You will eventually place one copy of the pattern in your binder, but keep it handy so you can use it as reference.
Nota bene: You probably know how to make templates. However, I am including a quick refresher. Look for a comprehensive tutorial soon. (I’ll update this post and link it from here)
Rough cut* the handle pattern out of the second printout.
Rough Cut Pattern
Glue the paper pattern (with seam allowances) using the glue stick (or other suitable adhesive) to the template plastic.
Ok to use scraps of template plastic
It is okay to use scraps of template plastic. Put a piece of tape on seam lines to keep the joins stiff.
Fine cut templates
Fine cut** the paper pattern and template plastic you have adhered so you have an accurate template, cutting off any seam allowance that may have printed.
If you plan to machine sew the handle at all, you will want to prepare another basket handle template, in the same manner, without seam allowance.
Fabric
Gather your fabric and press it all. You can rough cut some pieces and press it with Mary Ellen’s Best Press to help deal with the bias. Consider this step for the large background triangle and the basket handle.
Cutting
Flower Basket
Basket Handle
In my example basket, above (same as at the beginning of the post), this fabric is the medium blue.
Lay out template piece
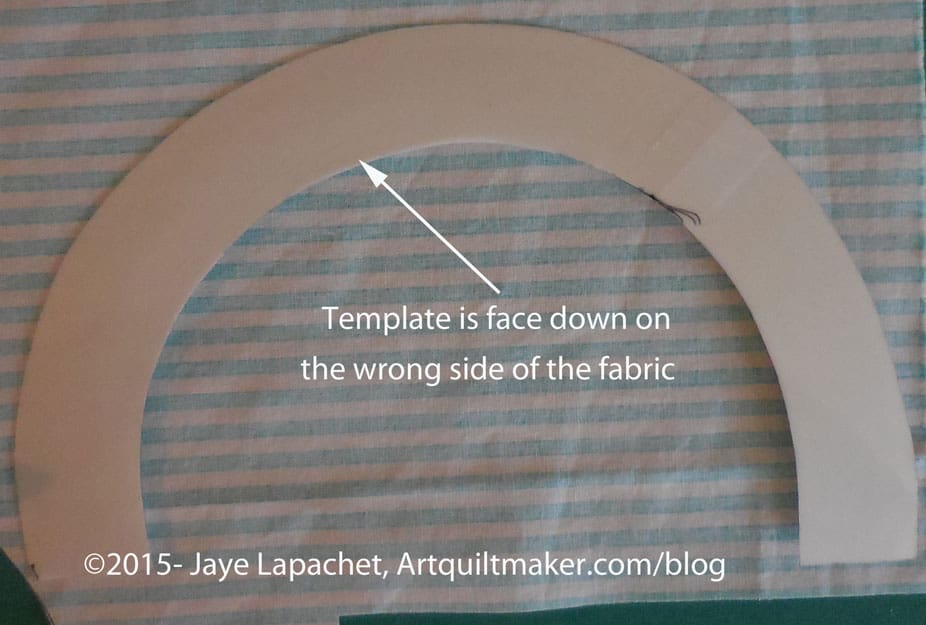
Draw around the template with your black fine tip marker. Rough cut a piece of fabric large enough for your basket handle.
Place template face down on fabric
Place your handle template right side down on the wrong side of the fabric. Trace around the template carefully with your Pigma pen. Trace carefully without pulling or tugging at the fabric. You will be dealing with some bias on the curves. You will need to carefully move your hand along the template to keep it in place while you trace. Use the Pigma pen with a light touch.
Cut out handle
Using your fabric scissors, cut around the traced image, cutting the drawn line off. If you are using a template with no seam allowance, leave approximately a quarter inch seam allowance on all sides.
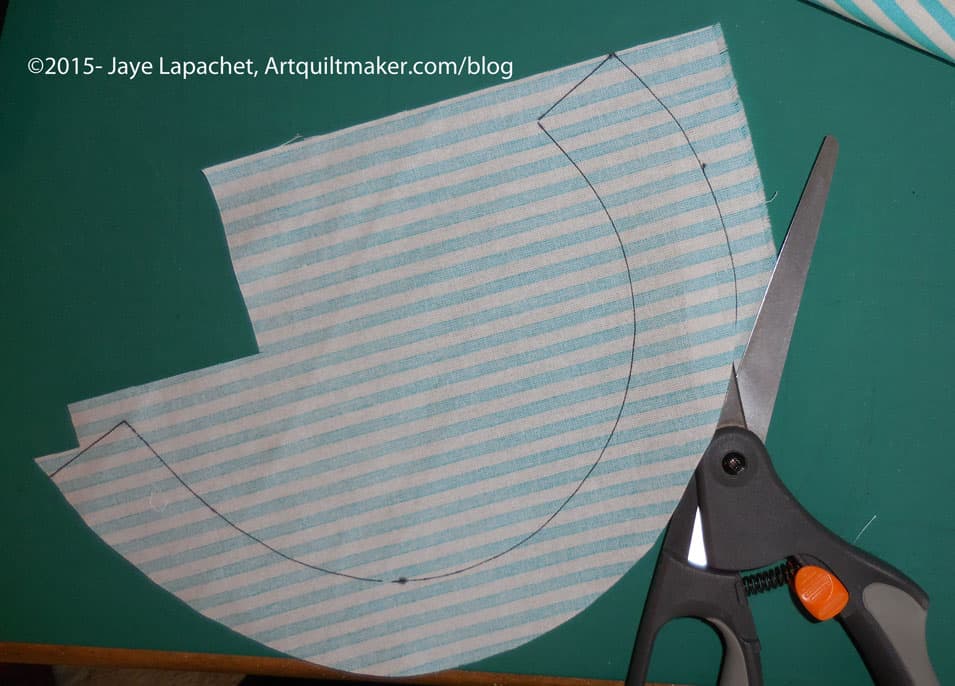
Background:
In my example, above, this fabric is the blue Michael Miller Ta Dot with white dots.
Measure background
Measure the template for the large triangle of background fabric. It should be 10″ on each of the outside edges WITH seam allowance. Cut a square 10.5″ x 10.5″. You can trim it later. Better safe than sorry. Press the square with Mary Ellen’s Best Press.
Cut square on diagonal
Cut the square in half along the diagonal.
Cut the following additional pieces according to the measurements given:
Background fabric:
2 patches: 2.5″x8.5″
Nip off Bunny Ears
1 patch: square 4 7/8″x 4 7/8″. Cut in half. Nip off the bunny ears with the Judy Martin Point Trimmer
1 square: 5″ x 5″. Cut in half on the diagonal and set your second triangle aside
Remember: you have already cut the large background triangle
Cut some pieces from extra background triangle
You can cut some of the background pieces out of the leftover triangle.
Foreground fabric:
The foreground fabric is used for the basket. You will need at least two fabrics for this part. In my example I am using a scarlet red and a medium blue. See picture above for placement of foreground fabrics.
1 square: 2.5″ square
For the HSTs, you will need 2 squares, according to the Triangle Technique Chart, 6.25″ x 6.25″. Each square should be from a different foreground fabric. See the picture above.
Nota bene: The above Triangle Technique only yields 8 HSTs. You can make another set using the Triangle Technique directions and have some extras, or you can cut the triangles themselves
1 square 2.5″ x 2.5″
Cut trianglesCut squares in half
Cut 4 squares 2 7/8 in by 2 7/8 in the second background fabric (red in my project). Cut in half. These are the base and top line of your flower basket.
Cut Pieces
You should now have all of your pieces cut. Look for the next part of the tutorial on sewing the block together.
* Rough cut means that you cut around the outside line and a little away from it, leaving some extra paper. This helps to position the template properly and eventually cut it accurately.
** Fine cut means that you cut the template out very exactly and carefully getting rid of any extra paper and template material used when you rough cut. This is the shape you will use to cut your fabric so prepare this step with care.
TFQ taught me this method of putting quilts together. I have adopted it as my own and use it for block-based quilts. Very occasionally I’ll put a long border on after the center of the quilt is complete, but otherwise I try to avoid the long seams required to put quilts together in rows.
Using this method, usually I have only one really long seam to sew at the very end and 1-2 mid sized seams.
This technique improves accuracy when you have sashing and cornerstones, but also improves accuracy with just sashing. If you have no sashing, then the pieces are much easier to handle.
Occasionally you will have a quilt where chunking is not appropriate for one reason or another, thus it is good to know many techniques, so you can choose the one that is most appropriate for the creative vision you have.
Blocks Laid Out Waiting to be Put Together
The quilt starts out as a bunch of pieces waiting to be put together. In the example above:
Blocks: grey and black Sashing: red Cornerstones: grey
The basic idea is to put the quilt together as you would a block: sew smaller patches together to make larger sections. I avoid sewing the quilt together in rows as I think the quilt is more square and there are fewer out of line intersections than when the quilt is sewn together in rows.
In the example above, the border can be incorporated into the construction of the quilt. You won’t need to put it on after, which will also help line up the cornerstones with the sashing.
Nota bene: The picture below is numbered, so it will be easier for you to follow the tutorial.
Numbered PhotoSew patch 2 to 7
First, sew #2 to #7, the top piece of sashing to the first left hand block. Press to the red piece of sashing. I press to the red, because there are fewer seams to get in the way.
Sew patch 1 to 6
Next, sew #1 to #6, the first grey cornerstone (upper left hand corner) to the first side piece of red sashing.
Sew first 2 sections together
Now you have two sections which you should now sew together. This is how you sew the border on. If you had a second border, you could also incorporate that into the piece, but this technique works best when the border is broken up into pieces (e.g. sashing and cornerstone). You can always put additional long borders on later.
First two sections sewn together
You now have your first ‘chunk’! Hooray!
Sew bottom cornerstone and sashing to block chunk
Now sew patch #10 to #11, the bottom cornerstone to the bottom piece of sashing. Then sew that 10-11 cornerstone-sashing bottom pieces combination to the first chunk.
Almost fully bordered block
Voila! You have a chunk fully sashed!
Pin sashing piece #15 to block #16. Now sew the sashing to the block.
Side sashing sewn to 2d chunk
Generally, there will be a piece of sashing that needs to be sewn to a block alone before you can sew a sashing-cornerstone combo to a chunk. You make the ‘chunk’ by sewing a piece of sashing alone to the block.
Sew bottom cornerstone and sashing to 2d block chunk2d chunk
The center ‘chunks’ are just comprised of one cornerstone, 2 pieces of sashing, and a block. Sew the side sashing to the block. Sew the cornerstone to the bottom sashing, then sew the bottom cornerstone-sashing combo to the sashing-block combo for another chunk.
<Insert photo of 2 chunks sewn together> At this point, you can sew your two chunks together.
Now that you have two chunks sewn into a larger chunk, the next step is to prepare your next chunk. You do it the same way you prepared the two chunks above.
Pin sashing piece #25 to block #26
Pin sashing piece #25 to block #26. Now sew the sashing to the block.
Patch #30 sewn to #31
Now sew patch #30 to #31, the bottom cornerstone to the bottom piece of sashing. Then sew that 10-11 cornerstone-sashing bottom pieces combination to the first chunk.
Third chunkTwo chunks
With two pieces of sashing and a cornerstone sewed to block #26, you have your third chunk. You could sew the #25-#26-#30-#31 combo to the chunk you sewed together before, but I suggest you wait until you have more pieces sewed together.
Sew piece #3 to piece #4
Refer to the drawing of your pieces in Step 1. Now we move up to the top of the section again and sew #3 to #4.
Sew sashing #8 to block #8
Sew piece #8 to block #8**. This puts a piece of red sashing on your block #8.
Next, sew cornerstone/sashing #3-4 to sashing/block #8.
Next, sew cornerstone/sashing #3-4 to sashing/block #8.
Sew cornerstone #12 to sashing #13 and then to the block
Sew cornerstone #12 to sashing #13 and then to the block. I don’t have a picture of the two pieces sewn together before I attached them to the block, but you do have to sew them together before you sew them on the block. Now, sew that combination to the block.
Follow the same steps for block #18.
Follow the same steps for block #18 as you did for block #8. Sew sashing #17 to block #18. Press. Next, Sew cornerstone #22 to sashing #23 and then to the block.
You will have two new chunks, one with sashing on three sides and another chunk with sashing along two sides.
Sew cornerstone #5 to sashing #9
Sew cornerstone #5 to sashing #9 (upper right).
Sew cornerstone #14 to cornerstone/sashing piece #5-9
Sew cornerstone #14 to cornerstone/sashing piece #5-9. You will have a piece made from three patches.
When you press, press the cornerstone seams in the opposite direction as you have pressed the other sashing already applied to block #8. This will allow you to piece your seams more precisely.
Sew the long thin piece made up of three patches to block #8
Sew the long thin piece made up of three patches (2 cornerstones and a piece of sashing) to block #8, which already has sashing on three sides.
Sew sashing/cornerstone piece #19-24 to block #18
Sew cornerstone #24 to sashing #19. I don’t have a picture of the two pieces sewn together before I attached them to the block, but you do have to sew them together before you sew them on the block. Now, sew sashing/cornerstone piece #19-24 to block #18 (middle right).
Sew sashing #27 to block #28
Sew sashing #27 to block #28.
Sew cornerstone #32 to sashing #33. Now sew combined piece #32-33 to block #28.
Sew cornerstone #32 to sashing #33. Now sew combined piece #32-33 to block #28. This will give you a chunk that is sashed on two sides (left and bottom).
Sew sashing #29 to cornerstone #34, then sew that combined strip to block #28. Pay attention to seams so you can line them up.
You now have five chunks and are ready to sew them together.
Sew the two blocks on the upper right side together.
Sew the two blocks on the upper right side together.
Sew the two bottom blocks together.
Sew the two bottom blocks together. Now you have three chunks.
Sew the top two chunks together
Sew the top two chunks together, which is four blocks.
Sew the bottom chunk, made up of two blocks to the top chunk
Sew the bottom chunk, made up of two blocks to the top chunk, which is made up of four blocks.
I have used a small piece as an example, but the same principles apply to a larger piece. I start in the upper left hand corner and work my way to the lower right hand corner, making chunks and eventually sewing them together into larger chunks until the quilt is finished.
Let me know if you have questions.
You will have easy access to this tutorial via the link on the navigation bar to tutorials.
**Nota bene: I accidentally labeled two pieces of fabric with the number 8 in Step 1. Note that one is a piece of red sashing and the other is a block. Please look at the photos to assist you with the correct sequence of piecing.