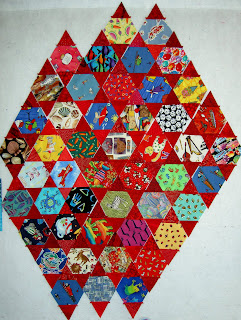
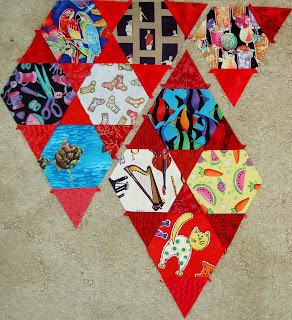
The first order of business this week (after all the cooking and tidying, of course) was to, once and for all, decide how I was going to put the quilt together. Below, you can see I have arranged the ‘blocks’ (two equilateral triangles and a hexagon) two different ways.
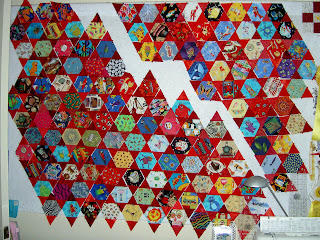 On the right the blocks were oriented with the triangles on the top and the bottom of the hexagons (Option A). On the left, the blocks are arranged with one triangle in the upper right hand corner and one triangle in the lower left hand corner (Option B).
I discussed previously that I thought the edge would be a problem. I finally decided that I would go with Option A. Mostly, I decided that I could better figure out how to make the edges straight using the diamonds. With Option B, the side edges seemed like they would really be a problem and I would end up hacking them off, which I didn’t really want to do. You can see the edge that seemed to be a problem on the photo above left.

I stood staring at the above piece for a long time trying to figure out what do next and how to deal with the edges. I decided that I would only hack parts off as a last resort and I was looking at pieces for the edges to see which motifs wouldn’t be compromised if I cut them in half. That still left me with the problem of how to finish the edges so that they could be bound in some normal manner. As the picture above shows, those points on the top and bottom don’t qualify as easy to bind. As an aside, I have no problem with doing difficult bindings, but there has to be a design purpose as in Pink Spider Looking at the Stars from my early days of quiltmaking.
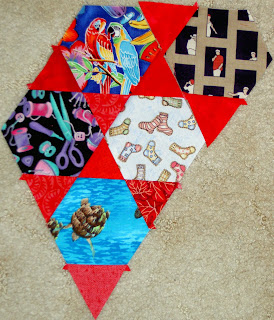
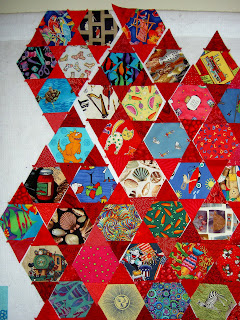
 This is a close up of one section so you can better see the connections between the pieces.

This is one unit. After finally deciding on a plan to put the blocks together, I began to look at a unit and see what it needed to create a flat top edge. One thing I did with a hexagon was to sew one triangle to the bottom only. That creates one unit with a flat edge.

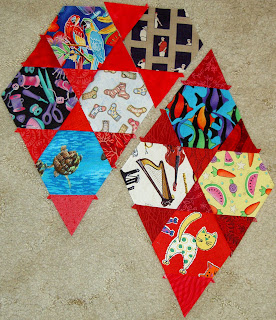
Having successfully created one flat top piece, I sewed a triangle on to the bottom of another. It wouldn’t butt up to the unit I already created, so I sewed a triangle to the side. Doing this made me realize that I needed to decide on which angle I would be sewing the units together. Once I made that decision I would have to strive to sew triangles to the top pieces to make straight lines to match that angle.
 By sewing the black and beige unit to the larger diamond unit, I was able to to make the flat top longer and keep the straight line angle for sewing additional units together in place.
 My challenges didn’t end there, though. I had to work out the next section. The way I started (above) obviously wouldn’t work if I wanted to avoid set in seams.
 In the overall scheme, the above depiction might work, depending on the way I sewed the piece together and how the rows lined up.
I sewed another red triangle on to the opposite side. This gave me a straight line. With this succeeding, I started to realize that I only needed to sew a triangle on to the bottom and the left side of each top piece. You can see how the black and beige piece fits with the tropical drinks patch.
 Above you can see the macro view of how I will sew the lines of the units together. I will sew from left to right.
I still have to make the rest of the top and that is what I am working on now. Stay tuned!

 The two above were taken on 9/29, but I didn’t see them posted. There are some calmer fabrics in them and I like the layout of the block on the right better than the the layout of the block above. It looks more balanced to me. How do you like that handbag black and white fabric I found?
 This is the quilt top Mom quilted. She has no idea where she got it, but it has a wide variety of fabrics. Some of them are not 100% cotton. There is a lot of interesting texture. I ended up sewing part of hte binding on for her on Pie Day.
 Here is some of the quilting she did. Mom said that she spent all week, while on public transportation, doodling and that really helped her feel comfortable with the motions of the machine.
 Flower motif.
 Little house. She had some issues with the tension here, but was able to figure out what the problem was. Mom said that she is not going to take the longarm class at Always Quilting; that she is just going to use her friend’s machine. I am still taking the class on Jan 9.


