I know you thought I forgot about the Tarts. Or, perhaps, you thought I abandoned the piece for another 3 years?
Oh ye of little faith!
Non quilt parts of my life have been busier than usual. I have still taken the time to diligently test your ideas for the whipped cream on the second piece of pie after I posted some thoughts in a previous blog post. I thought it would be easy and fast. HA! When will I ever learn?
Another issue is that the 9K is back in the shop. It is fixed now, but I won’t be able to pick it up (80+ mile round trip) until Friday since I am going out of town on Tuesday and the shop is closed on Monday. I tested an approximation of a satin stitch on the Jem. The Jem is a great machine, but the satin stitch it makes doesn’t compare to the 9K’s satin stitch. I need to wait until the 9K returns from his/her vacation. I’ll get everything ready, however.
Below are the candidates:
Whipped Cream #3
I liked this one, but didn’t think it was enough. I thought it needed more of something. Someone mentioned a drip in a comment, so I started working on that.
Whipped Cream #4
The drip above is too small. I want it to stand out a bit more against the plate.
Whipped Cream Test #5
The one above is pretty good in terms of having more than just an element on the top. However, the indentation in the top of the dripped whipped cream on the plate looks strange. It may be realistic, but it doesn’t look fun or interesting.
Whipped Cream #6
The one above is the option I have decided to use. I like the more engaged shape of the drip. I don’t think that is how drips really look, but this quilt isn’t reality.
As you can see, I take Lorraine Torrence’s admonishment to “make visual decisions visually” to heart.
I looked at Jill’s response (Quilt Rat) as soon as she posted it and I was lost. Her response was so perfect that I couldn’t think of anything. I tried different ideas and nothing seemed as perfect as her response. Finally, the next Friday’s response appeared and I knew I just had to do something and not be a slacker. That slippery slope is so easy to get on….
So, for better for for worse, here is my response. It is inspired by a magazine picture I cut out years ago. The inspiring picture is a close-up of a tea tray. I tried to incorporate some of the elements from other responses into this one to keep up some of the continuity.
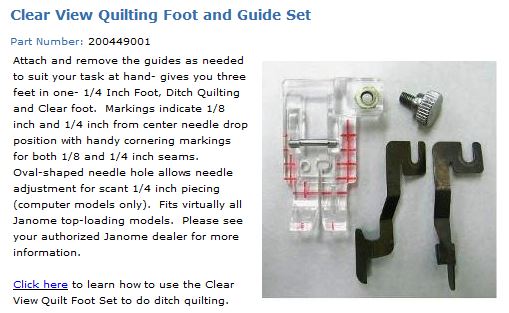
I saw this in an email from Janome yesterday and was already drooling about he possibilities. I decided to quilt the Tarts Come to Tea myself, so I think this would come in handy. I am going to put it on my Christmas list!
One of the things I like about it is that it gives the sewist cornering markings. That might make me better at getting even lines when I have to turn.
I’d love to know your thoughts if you have used this!
Janome Clear View Quilting Foot
Clipped from www.janome.com
Attach and remove the guides as needed to suit your task at hand- gives you three feet in one- 1/4 Inch Foot, Ditch Quilting and Clear foot. Markings indicate 1/8 inch and 1/4 inch from center needle drop position with handy cornering markings for both 1/8 and 1/4 inch seams. Oval-shaped needle hole allows needle adjustment for scant 1/4 inch piecing (computer models only). Fits virtually all Janome top-loading models. Please see your authorized Janome dealer for more information.
See the Creative Prompt page if you have questions about this project.
Post the direct URL where your drawing, doodle, artwork is posted (e.g. your blog, Flickr) in the comments area of this post. It will keep all the artwork together.
The Creative Prompt Project, also, now, has a Flickr group, which you can join and where you can post your responses.
One of the things about creation is that you never know how your pieces will come out.
At the beginning of August, I went with a couple of other CQFAers to Create It! Studio in Palo Alto for a glass fusing creation session. I wrote about the whole session at that time. I also showed pictures of all of the pieces pre-firing/fusing.
Diane, one of the CQFAers, was kind enough to pick up my pieces since I live far enough away to make it a pain. I thought I might get down to her house, but, alas, it wasn’t to be. As you know I was chained to my sewing machine for weekends on end. 😉
I finally got my pieces back on Saturday and I am really pleased with how they turned out. I am especially pleased with the divided dish, which will be part of the series I started my first time at a painting place. The red of the dish really came out well (4 coats!). There is only one little spot on which I should have put more paint.
Fused and Painted, full
It is fun to do something different; it is as though it doesn’t matter and I can play, because it isn’t my primary work.
If I didn’t think Anna Maria Horner was a goddess already, I do now. I spent the day on Sunday, minus a short chauffeuring task, with the Multi-tasker Tote (AMH MTT), a recent pattern from Ms. Horner. As I suspected, I did have trouble understanding the directions. It is the way I learn and not completely about the directions. I do think there were a few tiny parts that could have been clarified just a little bit more. I know they have a certain number of pages they can use to create a pattern and have to worry about font, enough photos, etc, so I really am not going to complain too much.
In all fairness, I think making 20 or 30 of the Eco Market Totes gave me a feel for what should be going on in the tote making process. Doing a multitude of those totes and making little changes in the pattern made me understand the bones of tote-making. The AMH MTT is much different than the EMT, but in the end they are totes and their goal is to carry things.
Multi Tasker Tote Pattern
In general, however, this is an amazing pattern. The way it goes together looks completely mysterious one minute and the next minute it is gorgeous and elegant. I was completely blown away, because it made me think about tote bags in a new way. I don’t think it is a beginner pattern, however I would say that any intermediate sewist who has a few tote bags under her belt could use this pattern to make a bag.
AMH MTT in progress, detail
In the above photo, you can see the bit that is folded over to accommodate the straps, including my lovely top stitching. 😉 I haven’t finished the straps yet, so there is another photo of this project to which you can look forward!
AMH MTT, Step #8
One of the steps I had trouble with was step #8. I really couldn’t figure out what the directions were trying to accomplish. Finally, I realized that she wanted me to sew the bottom of the pocket together! To accomplish that I had to pop the pocket (pattern piece is called pocket panel) out a certain way. When you do orient the section correctly, the whole thing looks like the section above.
Box corners
Remember I mentioned the gusset tutorial in the Bag Bazaar book? I didn’t have a chance to try it out. I found AMH’s directions to be stellar. You press a crease into the side of your bag, then you line up the bottom seam with that crease and you have a perfect triangle. I drew a line (not part of the directions), because of my A type personality. Perfect box bottom. I did it before I realized what was happening and was amazed at the results.
I love the fabrics that I chose for the current tote, individually. I am not happy with the two of them in combination in this project. Too many flowers, I think, which means that none of them stand out. Yes, I will be making another! As I mentioned in a previous post and as you can see from the photos, I used the Denyse Schmidt fabrics as a trial run.
MTT #2 Bag Fabric
My biggest challenge with this project is the requirement of Pellon Peltex Double-Sided Fusible Ultra Firm Stabilizer #72. I didn’t have any in my fabric closet, which didn’t worry me. I sewed and fused two pieces of Timtex together and the put Steam-a-Seam 2 on the outside and fused it to the bag. Having a stiff bottom is GREAT! It makes the thing stand up and much less floopy. Using my jerry-rigged method, I could easily see where something already stiff and fusible would be a lot easier. I searched the web and found it by the yard for $10+. I also found a bolt of it for $99+. Huh! I can’t make another of these using my jerry-rigged method, because I am out of SAS2. I have to decide whether to get a bolt (seems like overkill) or pay, what seems like, and exorbitant price for a yard. Anyone of you have any perspective on the price of Pellon Peltex Double-Sided Fusible Ultra Firm Stabilizer #72?
Kristin LaFlamme reviewed this pattern on her blog as well. It is a very complete review. She mentions a couple of the inconsequential typos I also saw and does some interesting things using recycled materials. Her rendition of the pattern makes me think about adding additional pockets to the outside. Adding a pocket to the outside would be especially successful when I don’t have a focus fabric (as shown on the pattern above) or fabric suitable for broderie perse.
The name of this magazine, which I heard about on FB, reminds me of a magazine I saw at the store yesterday. Sadly, the only one I can think of is Quilt Mania and I am pretty sure that wasn’t the one. Perhaps it was and they are wrongly connected in my head somehow. In any case, this is a new (?) and free mag to which you can subscribe online.
Our very own Andrea Bishop was invited to write an article for the new online magazine Quiltposium.
It’s a quarterly, online magazine that is free. Just sign up and create a password at www.quiltposium.com to view the online magazine and receive the link to the next issue in December.
I found my way to the Exuberant Color blog and found this wonderful tutorial for making journal covers. Since I seem to be making small things now, this project appealed to me for a variety of reasons.
I carry a journal with me and a cover would make it more private.
I have friends that use journals, so this would make a great gift.
Finally, it is small and looks like it would be a quick project, which I could use to try new fabric combinations or techniques.
Start with a piece large enough to cover the notebook plus flaps at each end to fold in. This is approximately 3/4″ -1″ taller than the notebook one way and the measurement around the notebook plus flaps that cover at least 3/4 of the cover on the inside in the other direction.
Iron on a piece of fusible fleece or batting the height of the notebook by the measurement around the outside of the closed notebook plus.
We spoke about a Recycled Round Robin at CQFA, where we bring materials from our stashes and put them together using a piece from other quiltmakers as a starting point. I thought this would make a good result for such a project.
My rating: 4 of 5 stars
I was sitting at a cafe’ when I started looking at this book. I glanced through it first and decided that I liked the format and the layout, but wasn’t enamored of the projects. I didn’t see any of the bags that I thought were useful looking.
“Listen to the Mustn’ts child, listen to the Don’ts.
Listen to the Shouldn’ts, the Impossibles, the Won’ts.
Listen to the Never Haves, then listen close to me.
Anything can happen, child, anything can be.”
-Shel Silverstein
That poem is how the text of the book started. It grabbed my attention and changed my idea about the book. I didn’t see it at first, because the color of the text was invisible in the glare of the cafe’ light. I looked through it a little more slowly and found that it is a book with really good bones. There are projects at the end that look useful and I would make, including a messenger bag and a wall organizer with pockets. I think the best part is that the author shows the reader how to think about bag making. The idea is not all about making her bags.
I, first, heard about this book on the Quilted Cupcake podcast. I wrote about in one of my summer catch up posts. I finally got it from the Library using Link+, a better, faster and more convenient way of getting interlibrary loans. It actually works for real people! Thank you, SFPL!!!
“A note on fear: It’s okay to be afraid to start a project. It’s okay to read the book for a while or just look at the pictures until you feel ready to jump in. The trick is that you have to jump in at some point. Like swimming or sky diving or picking up a pencil for the first time – like anything worth doing – you have to start somewhere. Start today. Start now. Don’t worry about getting it right or making the perfect bag. It’s likely that the first thing you make may not be perfect….but you will still treasure it. … the safety net will appear just when you need it. So jump.”
This note cemented my initial idea about the book. I thinkt he safety net comment is a good one to keep in mind. The tone of the book is really friendly and accessible and she has some great overarching ideas about making bags, such as “Build a bag from the inside out.” Another thing Lexie Barnes discusses is the length of the straps. I have been making the Eco Market tote with 54″ straps. 54″ fits me and works with the pattern. They go almost all the way around the bag and are sewn into the bottom of the bag seam. This reminder is good because I may want to make a bag where the straps do not go all the way around the bag. I also like the paragraph on designing pockets (pg.15), because it gives the maker practical ideas about making useful pockets. The section called “Graph, Paper, Scissors” discusses using graph paper (pg.14) to design a completely new bag to scale. I immediately drew a preliminary drawing (not to scale!) a for a saddle type bag.
I am going to spend some more time with this book.
The CQFA met at Always Quilting yesterday. The Always Quilting strip club was also meeting and somehow the space issue got mixed up so we crammed into one of their small rooms to do business, show and tell and swap ATCs. A few of us got in some project work also.
I am working on a deck of creative prompt cards using playing card blanks as the base. I decided that the ATC swap in CQFA would be another way of creating more prompt cards and expanding the Creative Prompt Project. The cards to the left are the ones I created for this month’s swap. They are ok. I did stitch words on them for the prompt and the words don’t stand out very well, which is disappointing. I should have used yellow thread to make the words stand out better. I will try and create more contrast next time.
In some ways this format is too small for me. In other ways, it is a good size, because it allows me to finish something and use up some scraps. I have been using scraps for all of the ATCs I have made so far. I am struggling with creating successful designs give the format and parameters. I am okay with not being as successful as I would have liked with this groupsince I only committed a little time to the project. I want to look at it as a learning experience. I have an ATC book, so I will look in there to get some ideas.
Maureen did a good job organizing the swap. She changed the guidelines a little this time. What I realized, after the change, is that I need to make my two sets of cards using different designs. Some people ended up with two of my cards. Since I used the same design for all they received duplicates. That is disappointing for them. I don’t know if it is better to do multiples of the same or if I should make each one different or somewhere in between? I’ll try something a little different next time.
ATC Back with Label
One of the CQFA members made a little label for her pillows and bags. I saw it when she showed her oilcloth bags and pillows at the last meeting. Something sparked in my mind. I haven’t been putting any labels or anything on my tote bags. I thought this would be a great solution.
Making the labels had been on my mental to do list for awhile, but it was just this week that I was actually able to sit and do it. I used the table function in Word, bu any word processor will do. I inserted the picture, wrote the text, played with the spacing as well as the font size and tested it on a regular sheet of paper before I printed it on a sheet of paper backed fabric. I am pretty pleased with the way it came out.
One of the things that the grid (from the table) did was give me a cutting line. Since the 9K is in the shop again, I had to play around with where the zigzag stitched on the Jem.
The picture is a .jpg of my Avatar. I originally made it on Elouai.com. Their Avatar maker has some fun options as well as the ability to save as a .jpg file.
I think this mini-label will be a good option for bags and pillows and other little items that I seem to be working on at the moment. It might also work for small quilts where I don’t really want to take up half the back with a regular quilt type label a la the Pamela Allen quilts. I’ll have to see.
My new ATCs
These are my new ATCs. I was really enamoured and inspired by the various techniques that people used. I especially liked the lower right (#3). Maureen made that and there is a wire on top of the red netting that says create! It is another creative prompt! I had to have it and was thrilled that it was available when it was my turn to pick.
CQFAers ATCs Group #1
A new person, Sonja, came to the meeting today. Her ATCs were fabulous. She made the ones with the sun and clouds. I really wanted a piece of the sun, but got a piece of the clouds with which I am happy. Dolores’ cards are on the top with the leaves. I’ll have to get one of those baseball card binders to keep all of these ATCs in.
CQFAers ATC Group #2
Maureen’s ATCs are in the above picture underneath mine. I love the one with squares on the left, but it didn’t come home with me.
CQFAers ATC Group #3
In the group above are ATCs made my JulieZS (top), Linda (left) and the famous, much loved writer Terri Thayer made some, which are pictured on the bottom right. One thing that I liked about Julie’s and Linda’s ATCs was that they both cut up pieces of projects that weren’t working and made them into successful ATCs. Terri is playing with stamps and embellishments in this group as well as the ones she brought to the last meeting.
CQFA ATCS Round 2
Above is the second group of ATCs for round 2 swapping.
I never wanted to collect ATCs. I am finding that I do enjoy seeing different techniques which people are using.
As an aside, someone directed me to Teesha Moore for art retreats. Her opening page looks like ATCs
SIL already used up a bunch of the Infinity blocks we swapped to make this quilt. She entered it in her county fair and won third place. I was so pleased for her.
I love the layout as well. Very clever of her to use the various values of the blues to make a design. A you can see from some of my photos, I was thinking more about how the blues and whites touched each other when I put the blocks together.
What I don’t love is that she has already made a quilt and I still have a block or two to go! I had better get busy!
See the Creative Prompt page if you have questions about this project.
Post the direct URL where your drawing, doodle, artwork is posted (e.g. your blog, Flickr) in the comments area of this post. It will keep all the artwork together.
The Creative Prompt Project, also, now, has a Flickr group, which you can join and where you can post your responses.
Tomorrow is Sept. 11. I was thinking about the event more than usual this year. No sure why. One thing that came to mind after Sept. 11, 2001 was the phrase “what if?” As a result, the desire developed to write about the quilts I made after that notorious day. I thought I would give you a mini tour of two of my older quilts.
What Comes Next is the quilt I really wanted to make for the America From the Heart quilt project, which was put together by Karey Bresenhan for the 2001 International Quilt Festival exhibition. I couldn’t process my thoughts and feelings fast enough, much less construct this quilt, to make the deadline. Once I sent off Fireball I could relax a bit. Not having the pressure of a deadline helped me come up with the design for What Comes Next. I can definitely finish a quilt under pressure, but not design a quilt.
The message I wanted to communicate with the quilt is that people are people and I would like them to treat each other better. I stamped words like consideration, kindness, caring, etc on the quilt. Pretty obvious method rather than being oblique, but I didn’t want there to be any ambiguity with what I wanted to say.
Fireball the quilt that went to Houston and is in the book, is part of a series of woven quilts that I have been making on and off over the years. It was fast to make on short deadline. I chose the colors – they were a fat quarter pack – because they looked like fire, smoked and charred wood. This was one of the first times I used dotted fabrics.
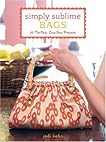
After listening to the tote bag episode of the Quilted Cupcake podcast, I went to the Library and checked out a couple of books on tote bags. They didn’t have the Lexie Barnes books, but they had the title below and another, called Bag Bazaar. Simply Sublime Bags: 30 No-Sew, Low-Sew Projects by Jodi Kahn
My rating: 4 of 5 stars
I really only glanced through this book as it is due at the library, but it was a thorough glance! Sadly, I am not going to have much time to get to know it intimately before I have to bring it back. One of the things I like about it is the tone in which the author writes. Her introduction is really nice in that she tells the story of her sewing life.
As with many project books, there are a few projects that I really like and others that I would never make. Still, Jodi Kahn talks about the project in a conversational way. She tells the reader why he is having them do things and gives tips about the materials. There is an undertone of encouragement in the writing, which I like.
I also like the novel materials that she uses. One thing that I thought was a great idea was the t-shirt bag. She uses Duct tape a interfacing, which I think is ingenious.
My rating: 3 of 5 stars
I mentioned the introduction in my review of Simply Sublime Bags 30 No Sew Low Sew Projects as being one of the highlights of that book. In this book, the introduction is perfunctory and fairly generic. However there is a section on basic bag making techniques, which I think I really stellar. I especially like the part on creating zippered pockets and making gussets. These hints are very useful!
My favorite project is the Bailey Baby Tote. I don’t have a baby, but it could be modified very slightly to make the pattern into a nice messenger type bag. I saw a similar bag in Amy Butler‘s Little Stitches, but didn’t want to buy that book for one project. This is a suitable substitute.
I also like the Mooney wine tote. It would be wonderful for gifts of wine. I’ll see about making one of those a well.
There are lovely drawings in this book, but no photographs. One shortcoming, which is common in bag books, is that there are not enough detail shots. I want to see what the inside looks like, what the outside pockets look like, what the back looks like, etc.
Megan Avery has really thought through her projects and I found there to be a lot of useful bag types in this book.