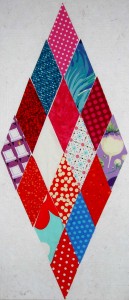
Late October Diamonds

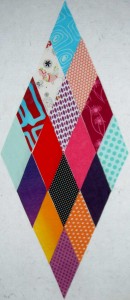
Late October 2010 Diamonds

These have been on my design wall for, what seems like, weeks. I have been and out of town for work and neglecting my patch cutting. I need to get going, as I have said numerous times. I am in town for the rest of the year, as far as I know now, so I should be able to spend many weekends cutting and pressing.

What looks like a view into my design wall is actually a white on white print. It looks really strange in the group, but I bought it so in it goes.

Creative Prompt #91: Autumn

Post the direct URL (link) where your drawing, doodle, artwork is posted (e.g. your blog, Flickr) in the comments area of this post. I would really like to keep all the artwork together and provide a way for others to see your work and/or your blog.

The Creative Prompt Project, also, has a Flickr group, which you can join to  post your responses. Are you already a member? I created this spot so those of you without blogs and websites would have a place to post your responses. Please join and look at all of the great artwork that people have posted. Post yours and get kudos!

Defintion: One of four temperate seasons.

Falling leaves.

Singer Autumn Boukadakis

A selection of autumn poems:

Autumn moonlight by Matsuo Basho
SONNET OF AUTUMN by Charles Baudelaire
Autumn Movement by Carl Sandburg
To Autumn by William Blake
Autumn Fires by Robert Louis Stevenson
Autumn in the Garden by Henry Van Dyke
Autumn Song by Katherine Mansfield
Autumn Perspective by Erica Jong
An Autumn Evening by Lucy Maud Montgomery
By an Autumn Fire by Lucy Maud Montgomery
Autumn by William Morris
Autumn by Thomas Hood
A Song of Autumn by Adam Lindsay Gordon
Autumnal Sonnet by William Allingham
Late Autumn by William Allingham
Autumn Song by Sarojini Naidu
The Autumn by Elizabeth Barrett Browning
An Autumn Reverie by William Topaz McGonagall
Autumn Birds by John Clare
As Summer into Autumn slips by Emily Dickinson
Autumn Love by Li Ching Chao

Grab Jane

TFQ and I spent a fewer days at PIQF this year, because we wanted to sew. I think that was a good choice, though we didn’t really find a quilt we wanted to make together. I enjoy it when we work on blocks together. I always learn a lot and think we do good work together.

Grab Bag by Sandy's Designs

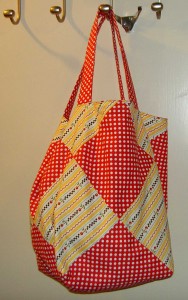
As I mentioned I bought a bag pattern called Grab Bag from Sandy’s Designs. I wasn’t able to find a website, but I found it at the Cranberry Quiltworks booth. When we returned, I worked on this bag and got advice from TFQ while she pressed fabric.

When looking at the bag from this angle, it is a great bag. I thought this pattern was a little bit fiddly. I didn’t really like making the patchwork for it. I think that is just a personal preference and not a problem with the bag pattern. Fortunately the designer gives directions on making the bag with longer strips. I want to try that. If I make these in any large scale way, I wouldn’t make a patchwork inside.

The designer gives options for different sizes and ideas for fabric placement.

The triangles used in the bag are all half square triangles. They are cut in that manner so that the bias is along the hypotenuse. The top of the bag is no exception. I think the pattern would be stronger if the designers suggested that people cut those pieces in the manner of cutting quarter square triangles so that the bias is not along the top of the bag. Granted, the makers sews the top right away.

The bag looks good in the photo, because I stuffed it full of batting to make it look good. I am not sure I like the unstructured nature of the bag as a whole. I am also having a hard time imagining how I would use it. It would be a good gift bag.

I added a little batting to the handles, too, and applied them using the method described in the Chubby Charmer pattern.

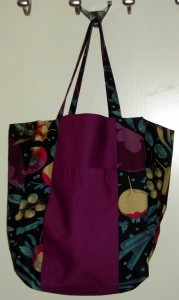
Jane Market Tote
Jane Market Tote

I also, finally, tried the Jane Market Tote pattern from Posy Gets Cosy. The pattern is a downloadable PDF, so you can go right now and buy it. I bought the Martha Negley fabric some weeks ago. I had been searching for the violet colorway, which I found. At the same time, the shop also had this black colorway. I couldn’t tell if it was black or a very dark purple before I bought it. When it came, I found the colorway to be a little grim. Still, it is a good fabric for tote bags, especially for boys moving out on their own. I do like the design of the vegetables scattered over the fabric.

Martha Negley Fabric

Anyway, TFQ has made a number of these bags. She uses them as the wrapping for gifts when she gives new parents receiving blankets. She encouraged me to make the bag while she was here, so I could ask her questions. I learn a lot better when someone shows me what to do as opposed to trying to figure things out from reading a pattern.

This is a great pattern. Lots of good instructions, no mistakes or weird things happening with the instructions. There are some nice little touches the designer uses to make the pattern a little more finished.

I do want to use some interfacing in the bottom just to give it a bit more structure. I’ll try it out and see how that works for me.

I think the bag is a little small. It is much smaller than a grocery bag. In a way that it is good, because it means I won’t fill it up completely and not be able to carry it.

I applied the put them on applied the handles using the method described in the Chubby Charmer pattern.

I plan to make a few more of those bags with the black Martha Negley fabric.

Shopping at PIQF

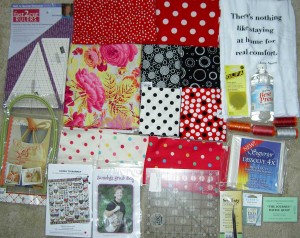
I am still overwhelmed with the amount of quilt shopping I did in July, so I went to PIQF with a list and with cash. I came away with everything on my list and pretty much stayed within my budget.

PIQF 2010 Shopping
PIQF 2010 Shopping

I was very pleased to find the rulers I think I will need to finish the edges and corners for FOTY 2010.

I have an idea in mind for a certain kind of “review writing bookmark”, which requires that heavy duty wash away stabilizer (interfacing?). Stay tuned for more on that project.

I did try out the Grab Bag pattern and will write a review of the pattern soon.

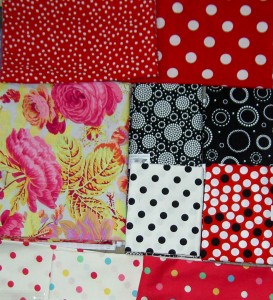
I have to admit that fabric wasn’t on my list, but I found a few pieces that will fill in holes (the blacks and whites) and a couple of dots that I couldn’t resist (bottom row). The dots were very expensive so I got little pieces and will need to use the judiciously. They were over $11/yard and that is just too much to spend.

PIQF 2010 Fabric
PIQF 2010 Fabric

The Floral Burst fabric by Philip Jacobs will be some kind of bag. It was on sale at Always Quilting and I couldn’t resist the pink and yellow combination.The red dots came from TFQ. Thanks!

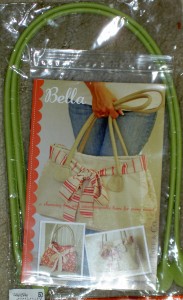
Bella Bag!
Bella Bag!

I also, finally, found the Bella Bag Pattern. I bought another bag with a bow, so I probably didn’t need this one, but Joanna Figueroa was so nice, and she had these fabulous chartreuse handles, that I felt like supporting her. Perhaps I will use the Philip Jacobs print to make this bag. A hot pink with white dots bow might be fabulous!

Making the Zig Zaggy Quilt

I have had some interest in the Zig Zaggy Quilt. I have had a lot of nice comments. While, it is not a completely original design, being related to the Oh Fransson! New Wave pattern and the Happy Zombie variation, I thought you might be interested in my version of how to make this quilt.

First, the differences: Oh Fransson’s pattern using templates. Happy Zombie uses the EZ Quilt wedge ruler. My variation uses the longer Philips Wedge Ruler.

Supplies

Basic Sewing Kit

Sewing machine

thread

2 Jelly Rolls (one Jelly Roll will get you 4 rows and a bit of fabric for the border)

sashing fabric (not sure how much you need for this project. I bought a 5 yard piece of Kona Snow and have been hacking bits off for various projects)

Mary Ellen Best Press

10 degree wedge ruler (www.phillipsfiberart.com)

stilleto

quarter inch foot to fit your sewing machine.

iron & iron board

Directions

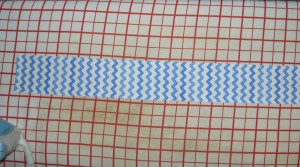
First, I cut strips of the Kona Snow, selvedge to selvedge, 1.5″ wide. I probably would cut them 1.75″ or 2″ wide if I were to make this quilt again.

Press strips
Press strips

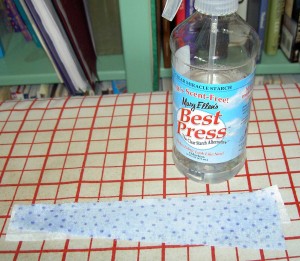
One by one, lay out your strips on your ironing board. Spray with Mary Ellen’s Best press and press with a hot iron. Follow the directions on the MEBP.

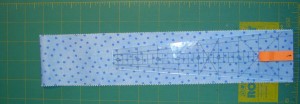
Place ruler on Jelly Roll Strip to Cut

After pressing the Jelly Roll strips with Mary Ellen’s Best Press, take your strip over to the cutting station and trim off the selvedges. Double the strip. Place the ruler on strip lining up your preferred ruler line with the bottom of the strip. My orange post it was used to remind me where I was cutting each time.

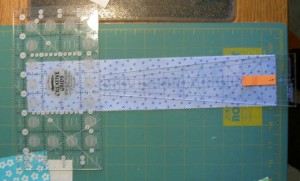
Line up small ruler
Line up small ruler

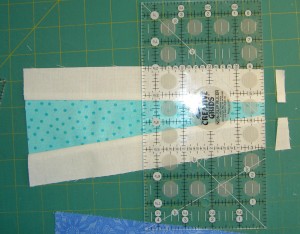
Use a small ruler and line it up against the short end of the wedge ruler. Remove the wedge ruler and trim the strips (remember your strip is doubled) to the desired length.

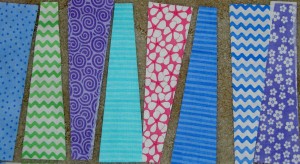
Lay out Wedges
Lay out Wedges

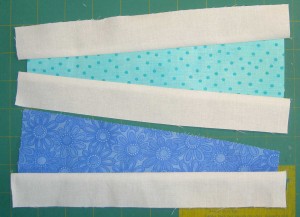
It is important to lay out the pieces, before sewing, so you know which way the wedges are sewn to the sashing strips. I also found this layout helpful in order to keep the colors in the correct order.

Sewing Wedges to Sashing

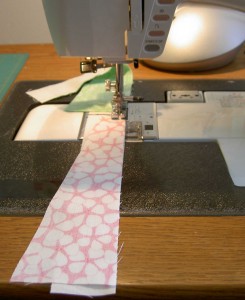
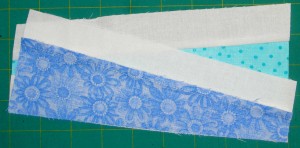
Carefully line up the wedge skinny end or fat end towards you depending on the orientation of the wedge and sew without pushing or pulling the fabric. Remember you are working with bias.

I sew each of the wedges to one sashing piece in assembly line/ chain piecing fashion. After I sew, I press and then lay the wedges in order by color on the floor. You could also use a design wall. Once that is done, all wedges need to be sewn together.

After stitching, press

After stitching, I lay the two pieces on the ironing board. The piece towards which the seam will be press should be on top. In the photo above, I am pressing towards the color/wedge and NOT towards the sashing.  I spray lightly with Mary Ellen’s Best Press and PRESS (not iron) the seam in the correct direction.

Lining up Sashed Pieces

Before trimming, lay the two pieces and eyeball how they would be sewn together.

Trimming Wedges
Trimming Wedges

After eyeballing the sashing, move the pieces aside and trim the sashing so it aligns with the top and bottom of the wedge. This may seem wasteful, but it is a lot easier than trying line up perfectly cut sashing with a diagonal line.

Sewing Wedges Together

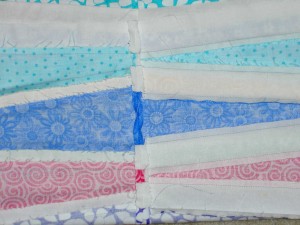
After trimming, line up the corner (bottom right in the picture above) on the sashing so that when you put the pieces in the machine there is a little v that is approximately 1/4″ from the edge (bottom in the picture above). You may not be able to see the v as it may be on the bottom.

Trimmed Wedge Group
Trimmed Wedge Group

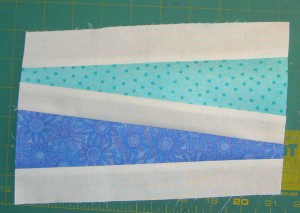
Above is what the trimmed wedge group will look like.

Line up Wedges after they are Sewn

After trimming the ends off the wedge group, put it back in it’s place in line, so you don’t get confused about where these colors go. You want to ensure that the colors are consistent lengthwise down the quilt.

Keep sewing the groups together until you have a whole row.

Once you have two rows of wedges completed you need to sew the rows together.

Press Consistently
Press Consistently

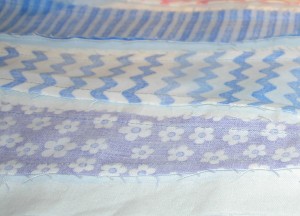
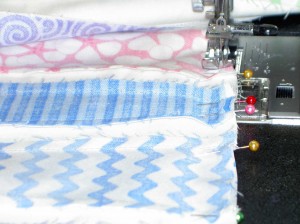
In the above photo, you can see that I carefully pressed the seams in the same direction on all the pieces in this row (towards the sashing). The row on the bottom has the seams carefully pressed in the opposite direction (towards the wedges). In that way, I was able to nest them together before sewing the row. This helped the pieces to line up when I put the rows together.

Sew Slowly
Sew Slowly

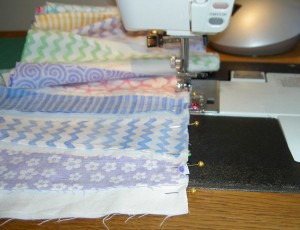
Notice: LOTS of pins!

Lots of Pins, Slow Sewing

When putting the rows together, pinning is very important. Also, using a stilleto and sewing slowly really helped.

Press Row Seams Open

Look! The world didn’t end because I pressed the seam joining the two rows together open. It makes the join of the two rows lay flatter. If you have gotten anything from this post it should be that pressing is really an important aspect of putting this quilt together.

You want success? Press. Carefully.

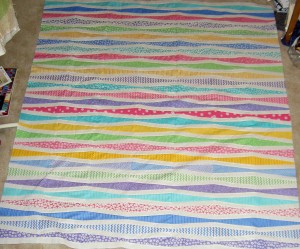
Finished Top
Finished Top

I left two edges wiggly. I didn’t feel like squaring them up.

Creative Prompt #90: Symbol

Definition: something such as an object, picture, written word, sound, or particular mark that represents something else by association, resemblance, or convention. (Wikipedia)

Post the direct URL (link) where your drawing, doodle, artwork is posted (e.g. your blog, Flickr) in the comments area of this post. I would really like to keep all the artwork together and provide a way for others to see your work and/or your blog.

The Creative Prompt Project, also, has a Flickr group, which you can join to  post your responses. Are you already a member? I created this spot so those of you without blogs and websites would have a place to post your responses. Please join and look at all of the great artwork that people have posted. Post yours and get kudos!

Names symbolize a person

Numbers represent an amount

A smell might remind you of a person, place or thing.

Spending Quality Time with Tarts

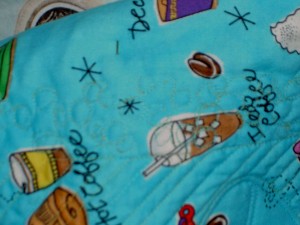
I got a bug in my ear a week or so ago to quilt the Tarts. They weren’t hanging in the closet quilting themselves and the label does say 2010. I hauled them out, set up the table and quilted away. I did mostly straight line quilting the background of the 3 cups blocks. I also quilted (mostly) the to go cup. I need a differented colored thread to finish that one.

FMQ Fail
FMQ Fail

Then I got cocky, practiced my free motion skills and did one small strip in free motion circles. Big time fail. I couldn’t get the tension quite right. Yes, I was using the same thread in both the bobbin and the top (different colors, but same thread. Yes, I matched my speed of moving the quilt with the speed of the machine. Fail. The bobbin thread ceased to show through the front, because all of the top thread went through to the back. The yellow you can sort of see in the photo is the top thread. Unsewing is required.

The good part is that I am back in the saddle on this project and there is hope that I will get it done in 2010.

Book Review: Creative Time and Space

Creative Time and Space: Making Room for Making ArtCreative Time and Space: Making Room for Making Art by Ricë Freeman-Zachery

My rating: 4 of 5 stars

This book is primarily about attitude, time and learning to say YES to creativity as a valuable part of life.

The author offers up the concept of living a creative life and interviews artists on how each of them deals with that concept as a lifestyle, a problem, a way of life. the reporting on their variety of approaches is excellent, because it forced me to think about what my approach is/would be. Seeing that different approaches work for different artists is a reminder that it is okay for me to craft my own solution. I can see that there are a lot of different ways to say yes.

After I finished reading this book, I went back to look over my notes and it became apparent that I had a list of tasks for myself to work through as a result of reading this book.

1. “…figure out what time means to you and how to establish a good relationship with it.”

Figuring out what times means is complicated for me, but not impossible to figure out. It can be figured out in steps. For example, blocking off a certain time to make art is one way to come to terms with time. Each artist gives his/her opinion of the various topics in each chapter based on his/her experience. Roz Stendahl explains “You get so absorbed in what you are doing that time as conventionally measured just ceases to exist. Time becomes very full and rich in ways I don’t feel capable of explaining. It’s like a deep, full, and calm breath” (pg.16). Throughout the book, Freeman-Zachery has exercises and little added bits of information. Not only are these sidebars helpful, but they also break up the pages. Play is also discussed with regard to time.

Everyone talks about not having the ideas because of time. The culmination of the section implies that we should all think about our creativity all the time, adding creativity facilitating media into every spare minute. When we can’t generate ideas, because the car is full of soccer bound children and the sink full of dishes is demanding your attention, ideas can be inspired by books, podcasts, magazines and other media that get you in the mood to create. The idea is that “being able to keep your brain up and humming is a first step toward having more time…” (pg.25) Many of the artists feel that their “creativity comes first and they make everything else fit in.” (pg.25) Pam Rubert thinks that “injecting creativity into anything I can”(pg.25) is really important. It definitely makes life more pleasant.

The artist share different techniques and strategies they use to “make” time, which is the theme of chapter 2. There are examples of lists and schedules and solutions. The bottom line seems to be that you have to figure it out for yourself and go with it. Rice Freeman-Zachery sums up a lot of the discussion by implying that it is important to acknowledge how you work, when your best time to be most productive and working with the strategies you have developed, such as making lists, flitting from one thing to another, to work your best.

Finally, in one of the ‘try this’ sidebars, the author suggests “writing down ideas reinforces the value of creative thinking and encourages your brain to spend more time in creative mode.” (pg.30) AHHHHH! License to dream! Thanks, Rice!

2. Think differently: while this wasn’t an explicit “to do” item from the book, it is definitely a theme that weaves its way in and out of the book. The daily life of vacuuming, carpool and doing laundry is addressed head on and one artist says “..so I remind myself to continue to find the joy in these activities”(pg.33), which is followed a few lines later with Rice Freeman-Zachery‘s reminder that the “everything else in your life – the day job, the childcare, the household chores, lawn work and shopping – doesn’t have to be an interruption or an imposition. As you train your brain to spend more time in its creative mode, you’ll find ways to encourage creative thinking, no matter what you’re doing.”(pg.33) A good reminder and mantra.

3. Practice patience and flexibility: I know that I am very hard on myself – constantly striving for perfection: the perfect seam, the perfect combination of fabric and design, perfect everything. Roz stendahl reminds us to wonder “What could I get accomplished today if I let go of perfect?” (pg.84) Change is ok, say the artists and change back is okay, too! Novel, don’t you think?

4. Do groups, classes and interactions with other artists add to my creative life? This part of the book was still talking about time, and specifically what can a person give up to make more time to make. Vacuuming? Groups occurred to me. To what groups do I belong and how are they contributing to my creative life? What classes help? Which ones distract?

The chapter ends with the reminder “you choose what’s important and where you want to put your energy because only you can figure out what you can live with and what you can live without.”(pg.41) Sigh. I wanted a magic pill.

5. Be kinder to myself: Judy Wise says, at the beginning of chapter 3 “I am very gentle with myself, very forgiving at this stage of life. When I was younger I was much more disciplined, but then I realized that was killing the joy for me.”(pg.42) Another good thing to remember is that “it’s not just about changing what you are doing; it’s also about changing how you look at what you’re doing.” (pg.75) I have to say that these two points hit home. It is not productive to criticize yourself all the time. Perhaps the work doesn’t live up to your imagination, but it is a step on the path. Look at it that way and you will make progress. I have found, recently, that I can see patterns in my work. I can see patterns in quilts that are, seemingly, completely unrelated. By studying them further, perhaps I can discern the kind of progress I am making.

In chapter 3 a lot of the artists have written out their schedules. In this way, we can see that there are different ways of getting things done, and the standards are different for different people. One good tip was to “keep a master list of projects that are current and for each try to list at least the next actionable step.” (pg.47) My WIP list acts like this for me. It is not ideal and I do keep folders of info I need and ideas or drawings or notes on difficult construction issues. The WIP list is constantly in flux even though you see it once a year.It does spur me on to keep working on projects or actively abandon them. It is also a good reminder of how much I have accomplished in any given year. I’ll have to think about whether a list like Pam Rubert describes would work for me.

6. Write your goals: I have always had problems with this (commitment, mostly), especially the larger goals, but the author makes a good point “to speak them or write them makes them even more powerful.” (pg.51). I noticed when talking about goals the male artists seemed much more goal oriented and the female artists seemed much more fluid.

7. Warm up: if you are cold, it is harder to move. If you have just woken up, your thinking will be a little fuzzy. The same is true for me in the making process. I need to warm up. Warming up to me means sewing some four patches, mosaic piecing, some kind of rote sewing, something easy that I don’t have to think about. Warming up is also related to getting your muse to come out and play. Many artists have rituals that put them in their making ‘space’.

8. Figure out what is my play? The idea is that if a maker gets stuck s/he can go play. I think my play is working in my journal gluing things down, but I am hesitant to put that activity out there since I don’t collage much. Experiments and trials are not wasting time, but we all seem to think that they are. It can really be a struggle to allow yourself to go with an idea — to test, to experiment. It’s hard to accept failure as progress when you have spent all of your free time on a project that is deemed a failure. “For artists, it means that you can pursue an idea however far you need to go without having to rein yourself in, counting the minutes you’re ‘wasting’ in experiments and trials…” (pg.18)

The first part of the mental space chapter is really good. There are three quotes (plus one a few pages later) that are really important for me:

  • “One of the biggest problems with granting creativity enough space in your thought and in your life is that it’s not seen as being valuable.” (pg.82)
  • “This is nonsense. Creativity is stunningly important, as important as almost anything else you can name except maybe food, water and shelter.”(pg.82)
  • “Your creativity is a vital part of you, one you need to be a fully functioning human being. Without it, you’re that proverbial shell of a person. You need it, and it needs you…” (pg.83)
  • “Perhaps you are like a lot of us in that your brain, when left to its own devices, can become, as the excellent writer Anne Lamott says, a bad neighborhood you don’t want to go into alone. Left alone with nothing to occupy it, it will begin to gnaw on the terrors of termites and taxes, death and toothlessness and whether you remembered to renew your car tags. Filling that interior space with ideas about light and color and texture and mixing tubes of paint is ever so much better.”(pg.90)

9. Work in my space, wherever that is: I am fortunate to have a space that is good sized. It isn’t ideal, but it works for me. As I mentioned a few days ago, it needs to be prettied up and offer up more creative nudges, but it is mine (mostly) and I don’t have to ask anyone to use it or store fabric there or anything. Creative Time and Space spends a bit of time discussing physical space. The artists all have different physical spaces from huge former peanut butter factories to kitchen counters and a small desk in the corner of the room. The mantra is the same “if you’re serious about wanting to make art, you can figure out a way to do it in whatever space you have.” (pg.107)

10. Figure out how I work: In the chapter on physical space, the topic of how people work creeps in. Physical space and how a maker works go hand in hand. If you splatter paint, your living room with new carpet probably isn’t the place for you. Along with this concept is the right and wrong way to work. The long and short “don’t try to force yourself to work in a certain way just because you think that’s the way you’re supposed to work. Figure out what works for you and go with it.” (pg.113)

I still have Twyla Tharp‘s book, The Creative Habit, on my nightstand. Creative Time and Space makes me want to pick it up again and finish it. I probably won’t create an improvisational dance, but I think I will finish the book. 😉

One thing I didn’t like about this book was that the page numbers were hard to find and there was no chapter information on the bottom of the pages within a chapter. When I was on page 40, I didn’t know if I was still in chapter 2 on Making Time or already in Chapter 3 on Corralling Time. I didn’t realize I used this information, but, apparently, I do.

One thing I found was that I spent too much time reading this book. What I mean is that a lot of the time during the months I was, ostensibly, reading it, it was mostly in my briefcase being carried around and not being read. I think I should have read it all at once. Still, I am glad I finally finished it. There is a lot of food for thought. It is definitely a book I would read again.

View all of my reviews
Historical Mosaics

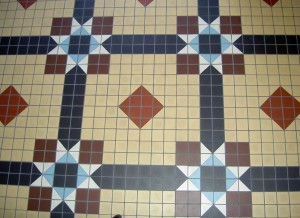
San Mateo County Floor

I saw this floor while I was at a Fourth of July parade, of course, in July. I haven’t had a chance to post them. I love seeing typical quilt blocks used in tile and mosaics.

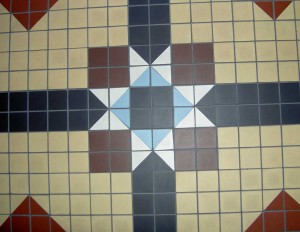
San Mateo County Floor detail

The detail shows a possible different way a block could be pieced.

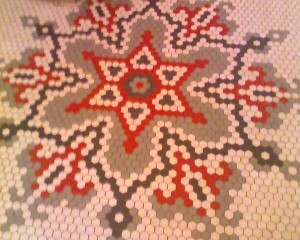
Center Mosaic
Center Mosaic

This is the center of a different, but related floor. Has anyone made a Grandmother Flower Garden with this arrangement of hexagons?

Creative Prompt #89: Pale

Pale in comparison

wan

Post the direct URL (link) where your drawing, doodle, artwork is posted (e.g. your blog, Flickr) in the comments area of this post. I would really like to keep all the artwork together and provide a way for others to see your work and/or your blog.

The Creative Prompt Project, also, has a Flickr group, which you can join to  post your responses. I created this spot so those of you without blogs and websites would have a place to post your responses.

Definition:

  • Pale, an adjective meaning of a light shade or hue; approaching white
  • Paleness (color), a relative lightness of color
  • Pale, a variance of human skin color, especially:
    • Pallor, a symptom of low oxygen content in blood or avoidance of sunlight

Pale River, Estonia

Toad the Wet Sprocket album

beyond the pale

pale ale

paleness

Pointer Assertion Logic Engine

Pale Rider 1985 (movie)

To pale into significance

Whiter shade of pale

PIQF Thoughts

Rice Freeman-Zachery’s book Creative Time and Space (look for a review soon!) says “I think artists need to see the work of other artists, writers-see movies, go to museums, go to a play on occasion. Nothing makes a person feel more alive than experiencing something excellently done. ” (pg.97)

So, I went down to PIQF in Santa Clara and had a look at some quilts and booths and vendors.

I am worried that PIQF is becoming an old person’s show. I didn’t see many, if any, Fresh Modern quilts.

People seem to be still working in a lot of brown, but the quilts didn’t feel as grim as in previous years. When I say brown, I don’t mean rich chocolate brown. I mean the kind of browns used for Civil War type quilts.

In this show I saw a lot of realism again, much less geometry. The geometric and blocks quilts I did see had a lot of really nice grid quilting.

The judges seemed to be looking for quilts with “more is more” and rewarding those quilts/makers with prizes. I wasn’t completely enamored with the judge’s choices, but I am sure they had their reasons.

There seemed to be a lot more quilts this year in general. I was glad to see the compention quilts, which was missing from the Long Beach show.

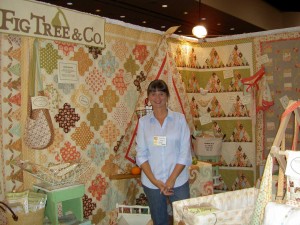
Joanna Figueroa in Fig Tree Booth

My best vendor experience was at the Fig Tree & Co. booth. Her staff is really friendly. Ms. Figueroa was there and nice and engaged with customers. I asked whether her bag handles (red dots!) would be on her website. She explained that they had bought out the distributor and were unsure of whether they could get anymore.They wanted a steady supply line before offering them. Good business sense! I also liked her honesty. I won’t be disappointed if I don’t see them there. The booth had a nice feel to it, a lot of energy. I hope she does well at this show. I found the Bella bag pattern there!

Elsewhere, in the vendor area, I was very sorry to see Custom Woodworks by Jeff going out of business for health reasons. I have long admired his cutting tables and sewing cabinets. I have never had the money to buy one, but it has always been on my list. I wish Jeff and his family well.

I noticed a lot of new styles of rulers and especially some extolling the virtues of no math. I am not sure how I would know where I was when putting together a block if I used one of these rulers, but I am sure they will be a big help to some people.

While a number of vendors were sitting morosely in their booths, there seemed to be a lot of demos going on. Sew Little Time Quilting had Nick Cowan there demonstrating a tool that takes the color out of fabric in a certain place so you can put other color back in. It is called deColourant from Harbor Sales.

I also thought the aisles were wider this year and Colleen at Sew Little Time Quilting confirmed that the booths were a bit narrower this year.

I noticed a lot of people buying yardage and the booths with kits only were vacant.

TFQ went back today for a couple of hours while I went to take care of some personal business. She said that the show was a lot more crowded and that a couple of the vendors were saying that they hadn’t brought enough stock. Apparently, at shows the last few years people haven’t been attending or buying and they are at this show. Glad to hear that the vendors are doing well!

You can take a look at some of the quilts by looking at my Flickr stream.