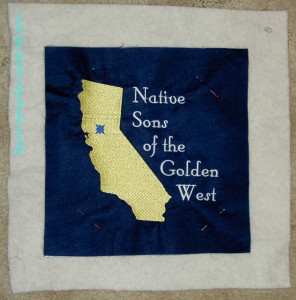
Since the NSGW pillows for 2012 went so well, I thought I would do a little tutorial. Remember, my SIL suggested I do it this way, so I am just passing on her information.
Supplies:
- basic quilting/sewing kit
- batting the size of the finished pillow top (leftovers, Frankenbatting are fine)
- pillow form
- fabric
- fabric panel or embroidered panel or fussy cut element from fabric
- square ruler the size or larger than your pillow
Tips, Tricks, Notes:
Please note that I am really only showing you how to make the pillow top. You can finish it anyway you want. I finish it with the envelope style of closure. I will briefly describe how to do that and, if I can find them, give a few links.
If you know how to foundation piece, you can do this. It is the same principle.
If you are not making a block that lends itself to foundation type piecing, you can make your block the normal way and then quilt it to get the same effect.
Instructions:
Cut strips of fabric the color(s) of your choice. Right now just worry about the width of the strips. You won’t need them any longer than 14″, but keep them as long as possible until a bit later.
Cut the batting to the size of your pillow form. I usually use a 14×14″ pillow form. I cut the batting/foundation half to a quarter inch smaller so that the form fills out the pillow cover well.
Cut a piece of fabric slightly larger than the batting. It will be used as a backing. It can be ugly fabric, if you want. Nobody will see it.

Lay your fabric back (ugly fabric)face down on your work surface.
Lay the batting on top.
Lay your panel or fussy cut fabric or embroidery panel over the batting. Center it, if you would like a symmetrical piece. Put it at an angle if you want more movement and don’t mind some bias edges.
Pin panel to batting to hold it steady.
Now you are ready to sew.

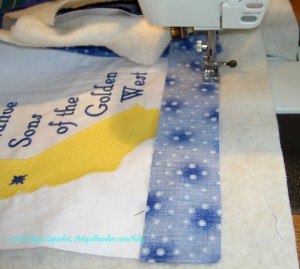
Lay a strips of fabric face down on the center panel even with the edge.
Trim the length of the strip to the length of the fabric panel. If you leave them too long, you will be tempted to sew to the end and it will eventually make the edges bulky.
Sew using a quarter inch seam. Really you can use any seam allowance that will stand the pressure of the pillow form trying to explode out.
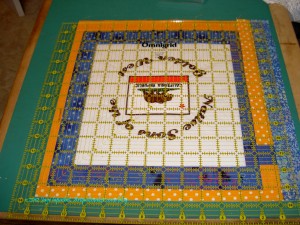
Sew strips until the batting is covered. If you want a scrappier look, use thinner strips. If you want the project finished fast, use a few thick strips.

Once you have covered the batting with fabric, take your large square ruler and square up the pillow top to the desired size. I trim my pillow top about a quarter to half an inch smaller than the pillow form, so that the form fits snugly.
Now you are ready to make the back. Make the back anyway you like. I use the envelope method, which I will describe below. There are a multitude of books describing different ways of putting together pillows. Pick your favorite and do that.
Cut 2 pieces of fabric per pillow. The fabric should be the same size as the pillow form in one direction and about 3/4s of the size of the pillow form in the other direction.
For my 14″ pillow form, I cut pieces that are: 10″x14.”
If you have a 16″ pillow form, you may want to cut them 12″x16″, etc
Where possible I use a selvedge as the edge so I don’t have to hem. This works well with batiks as the selvedge is usually the same color as the fabric.
Hem raw edges. I use a decorative stitch.
Lay pillow top face up on your cutting table or workspace.
Lay both pieces of back face down on top of the pillow top. If you care which piece will end up on the top of the back, put that piece on the bottom.
Align edges of back and pillow top so they match.
Pin backs to pillow top.
Sew around the entire edge of the pillow top. Sew back and forth over the spot where the hem of the pieces of the back meet the pillow top. There are four of these sections, which you will have seen when you laid out your pillow top and back. This step is to reinforce the most vulnerable stress points.
Trim threads
Turn your pillow cover right side out.
Carefully poke out the corners with a wooden knitting needle or your favorite tool.
Stuff your pillow form into the pillow cover.
Adjust form so it is evenly distributed.
Congratulations on your completed pillow form!
Nice tutorial, Jaye. I make pillows now and then. I learned a cool trick to help with those funny, sort of empty corner points. (but maybe cutting the square a bit smaller all around will work too.) The corner trim: measure 1/2 inch down from each side of the corner and mark it. Then measure 3 inches down each side from the corners. line up a ruler from the 1/2 inch mark to the 3 inch mark. Cut. do the same for the other side of the corner. And for the other three corners.
I have found this to make a really trim pillow that looks square, but has nice tight corners.
S
Susan said this tutorial explains what she means: http://www.dixiemango.com/2011/01/perfect-pillow-every-time-tutorial/
The other thing you can do to fill your corners is make a gusset. Turn pillow case inside out. Mark that half inch in from the corner on front and back. Match the seams that joins front to back across the corner and sew from mark to mark. Trim triangle. Do all four corners. This makes the pillow look thicker.
I need both of you to draw some pictures on what you are talking about. I read the instructions over and over and am not getting it. I want those corners filled! I promise space on the blog, duly credited! Thanks!
I will send you a pillow with gusset corners. Or demonstrate in August.
Demonstrating is fine.