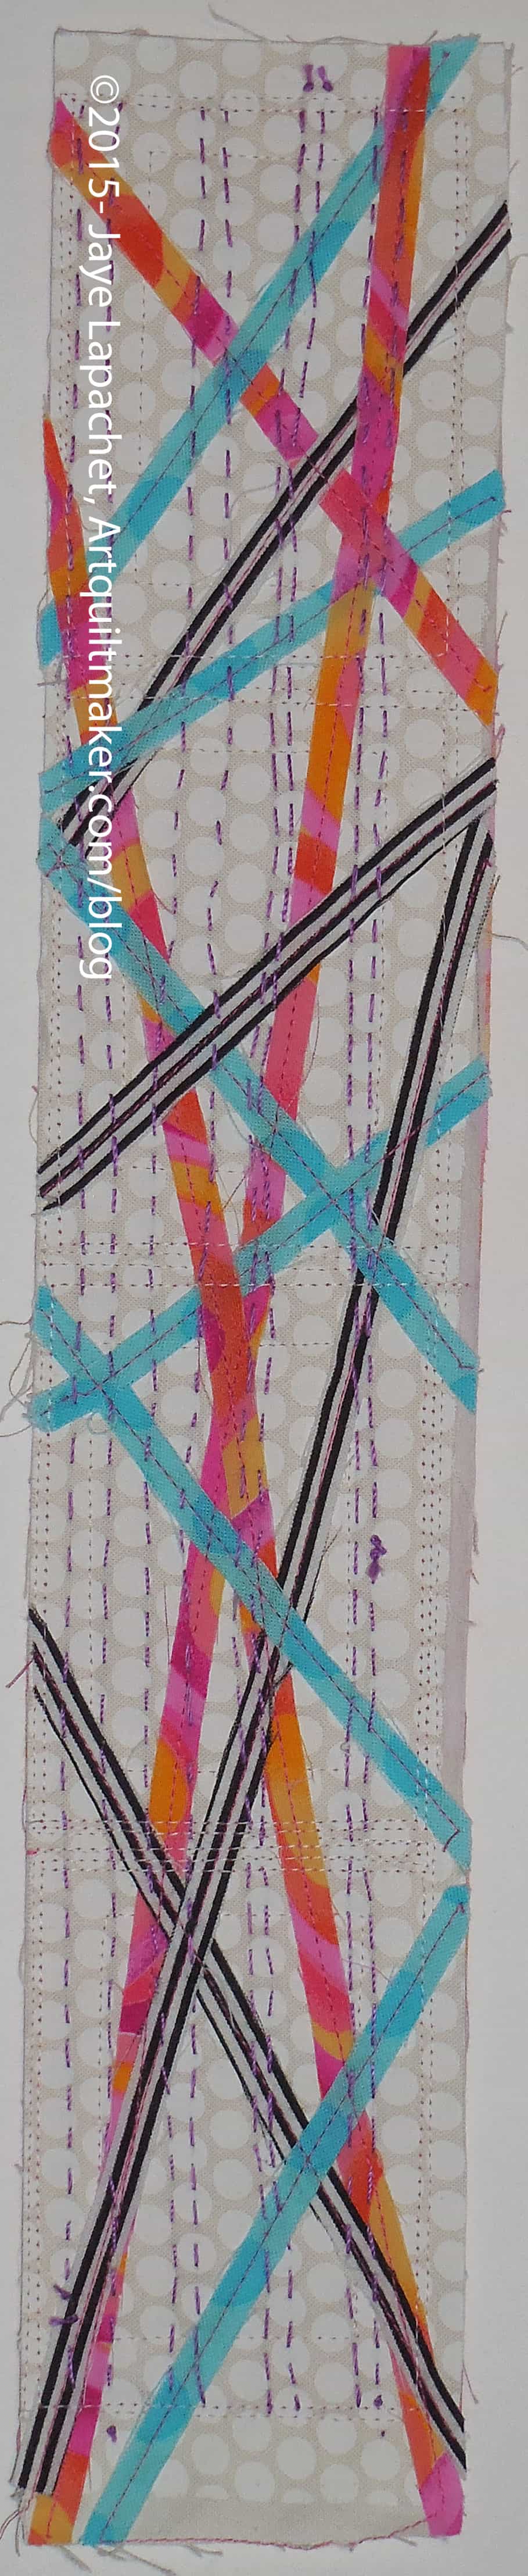
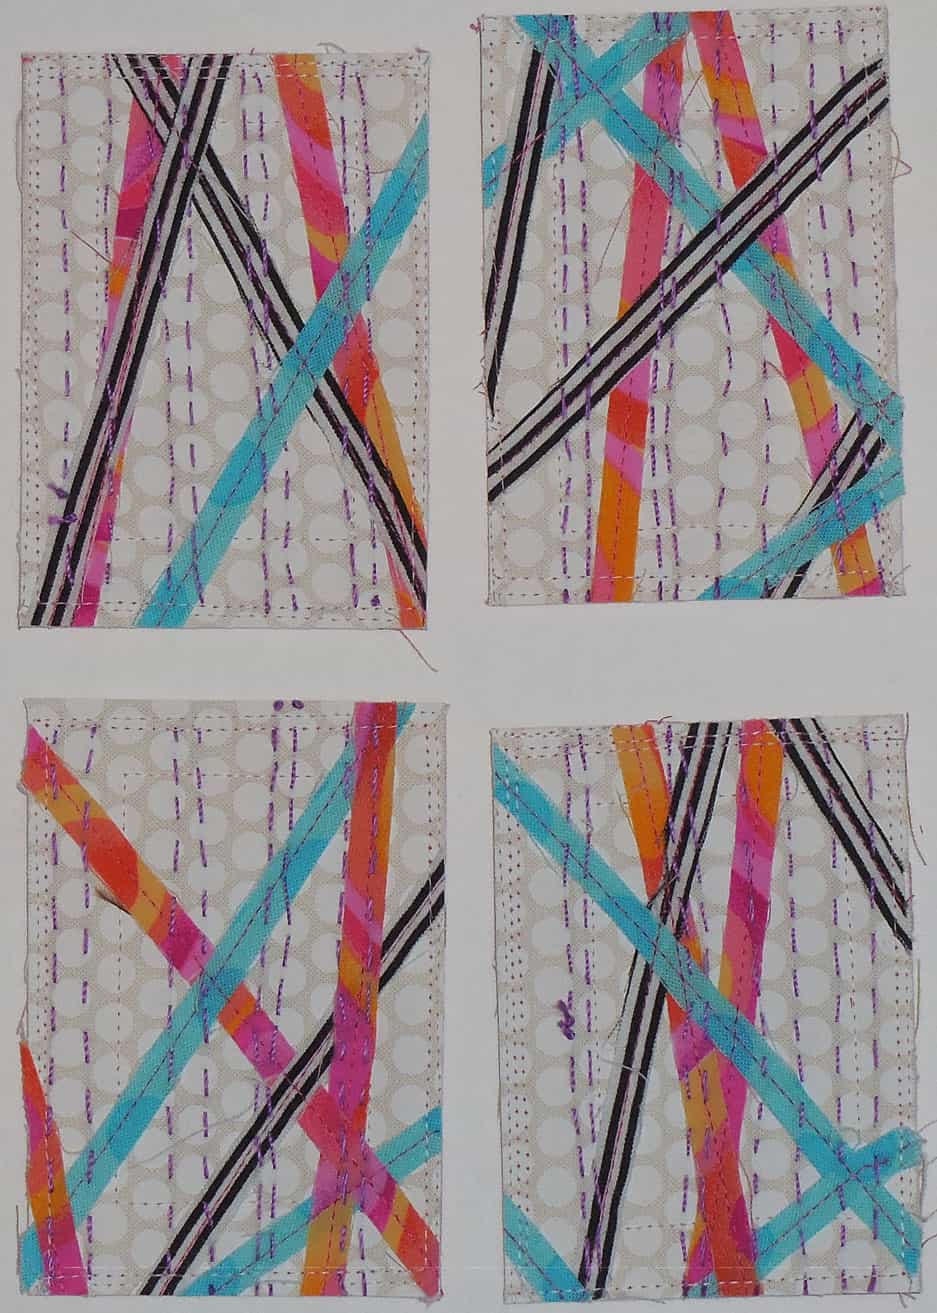
I did finally do the prep I had been intending to do to make ATCs. I cut two pieces of fabrics about 14″ x 12.5″. I marked the bottom layer of the ATC fabric into ATC sizes. I also cut some layers of Pellon for the middle. Then I sewed along the grid. I cut off 4 ATCs and began to decorate them.
Finished ATCs
I did the sewing in the strip format. Later I hand sewed some stitches using Aurifil embroidery thread before I cut them apart.
I ran into some problems which I can fix when I cut the next strips off. I have a label that I put onto each ATC. I sewed around the whole ATC before I put the label on and that meant that the stitching around the label showed up through to the front. I think that it limits my design ability. I limited that problem by using matching thread and I don’t think the extra stitching shows up on the front.
I won’t design them all at once. I’ll do a few at a time, but I have the basics done.
I am glad I finally got to work prepping ATCs for the next several swaps. I am also glad that I learned something about preparing ATCs in this manner.
One of the bonuses of living in California is that Disneyland is no more than a day’s drive away. When I was a kid, it was a couple of hours away and I was fortunate enough to have parents who took us there every year.
At some point, I was old enough to refuse to ride the roller coasters and I became okay with visiting the Haunted Mansion. I have been on all of the rides and seen most of the shows. I still enjoy the park and its attractions, but now I look at the details gain inspiration from them.
Seahorse detail
I have some bits and pieces that are supposed to be part of a challenge for CQFA. I didn’t know what do with them until I saw the seahorse on top of King Triton’s Carousel. KTC is really in California Adventure (a poor stepsister to Disneyland, but great details as well).
I like the stylized motif. The large nose (bill? beak??) and the very unrealistic outline, which is not cartoonish.
When I saw this, my idea was to applique’ a seahorse to a piece of fabric and then use the fusible pieces as a kind of border – clustered in a corner or something.
It was very high up, so this is the best picture I could get even using my extreme zoom.
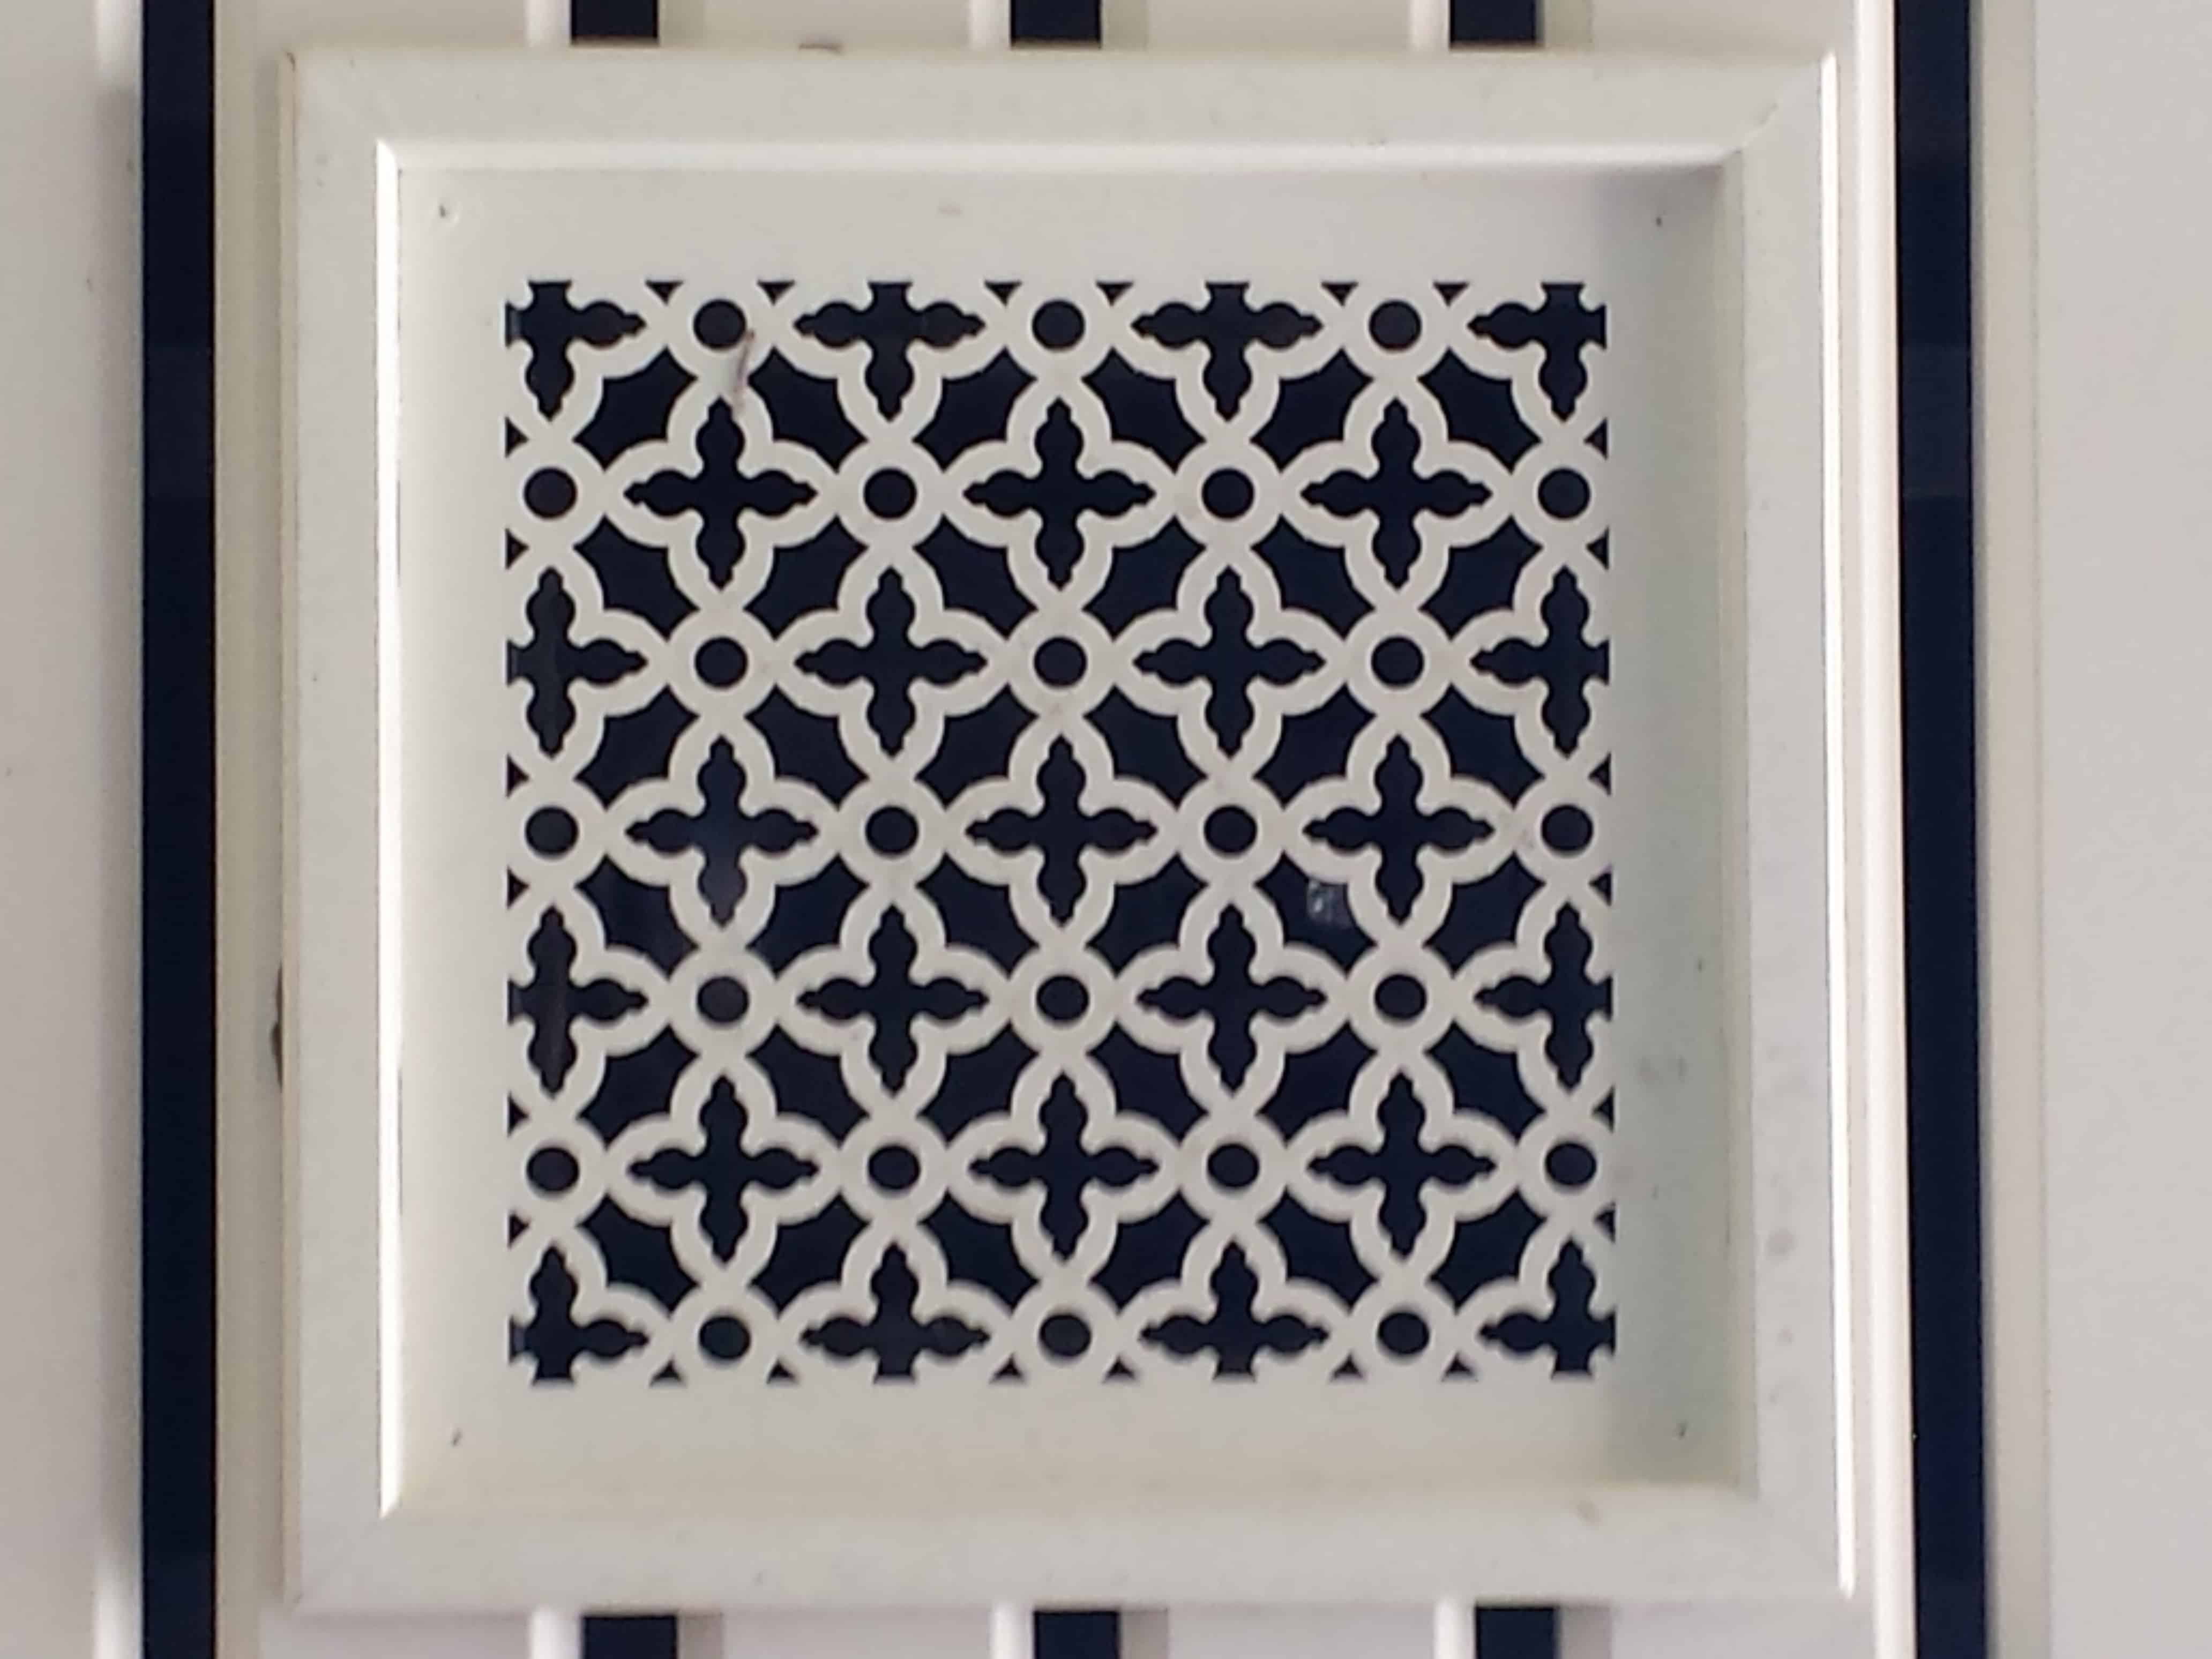
Grate
I thought of Kelly when I saw this grate (yes, I look at everything), because she is an excellent quilter. I posted it on Twitter and asked how people would make it. Predictably I got the gamut of responses. One interesting response, from Dan Rouse, was EPP, which I didn’t think of! I am not sure how that would work, but I am enjoying thinking about it.
I am pretty sure I have seen some fabric with this sort of motif. I may even have some.
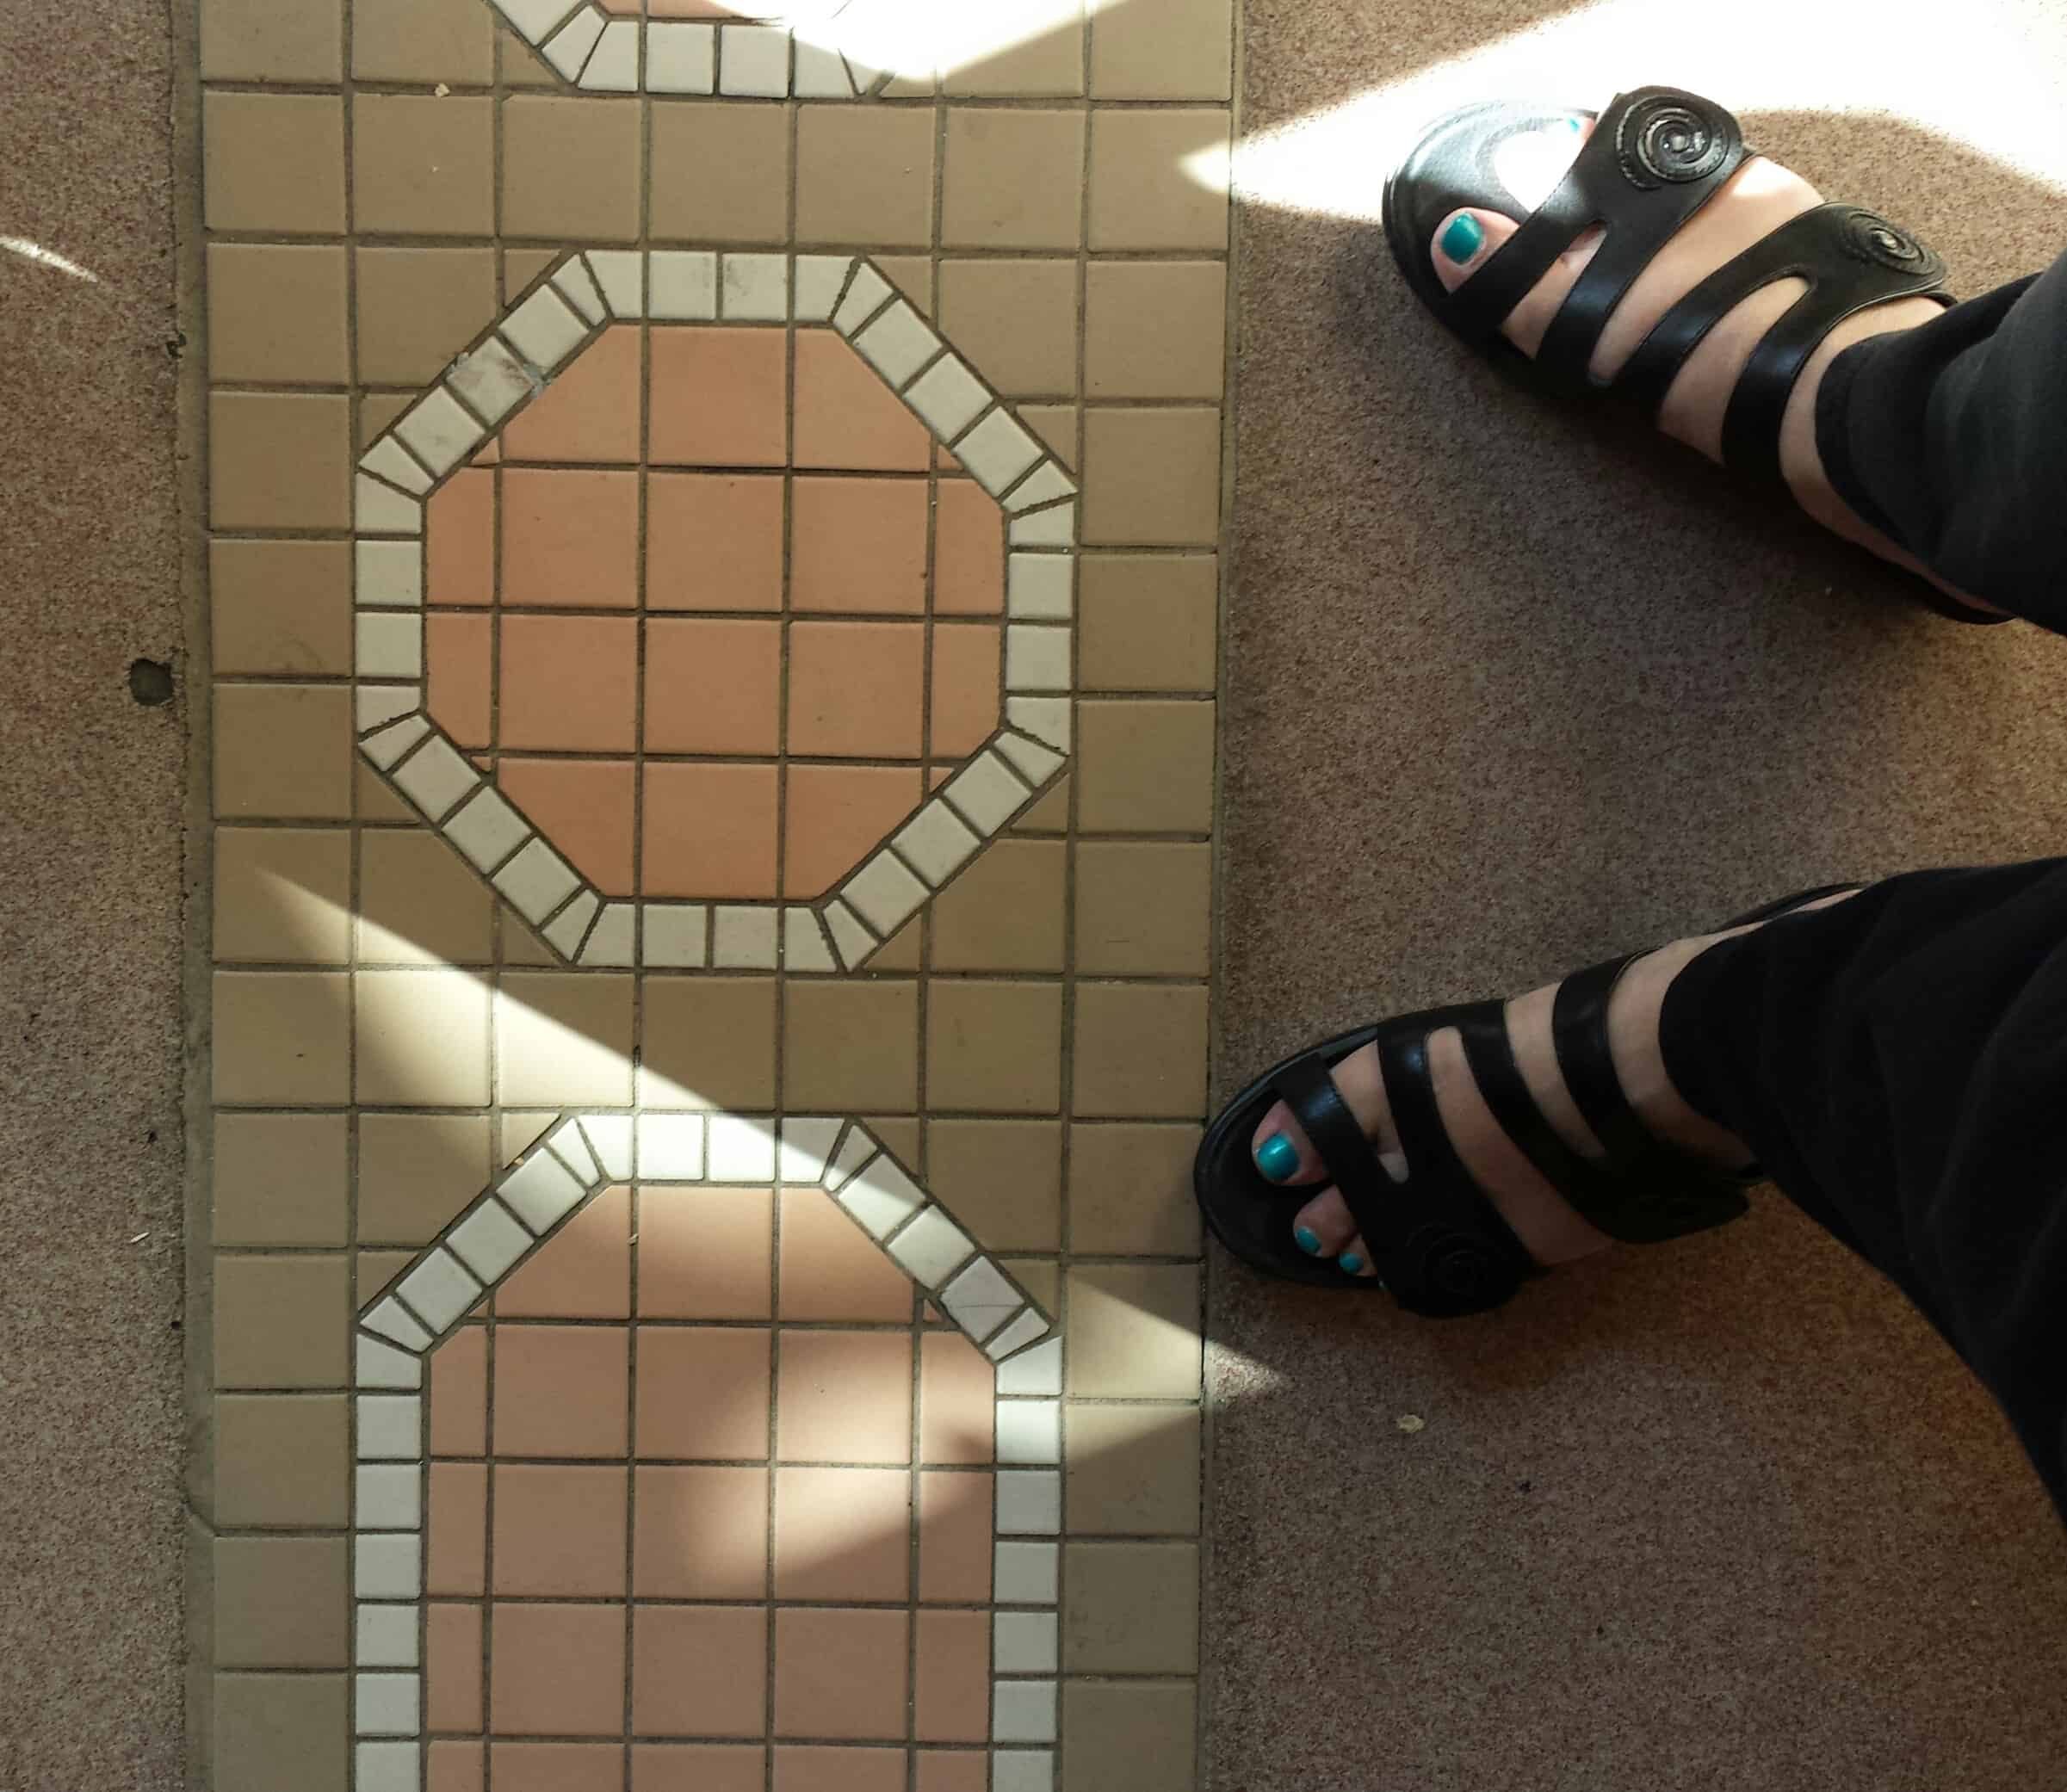
Floor detail, Midway Mania
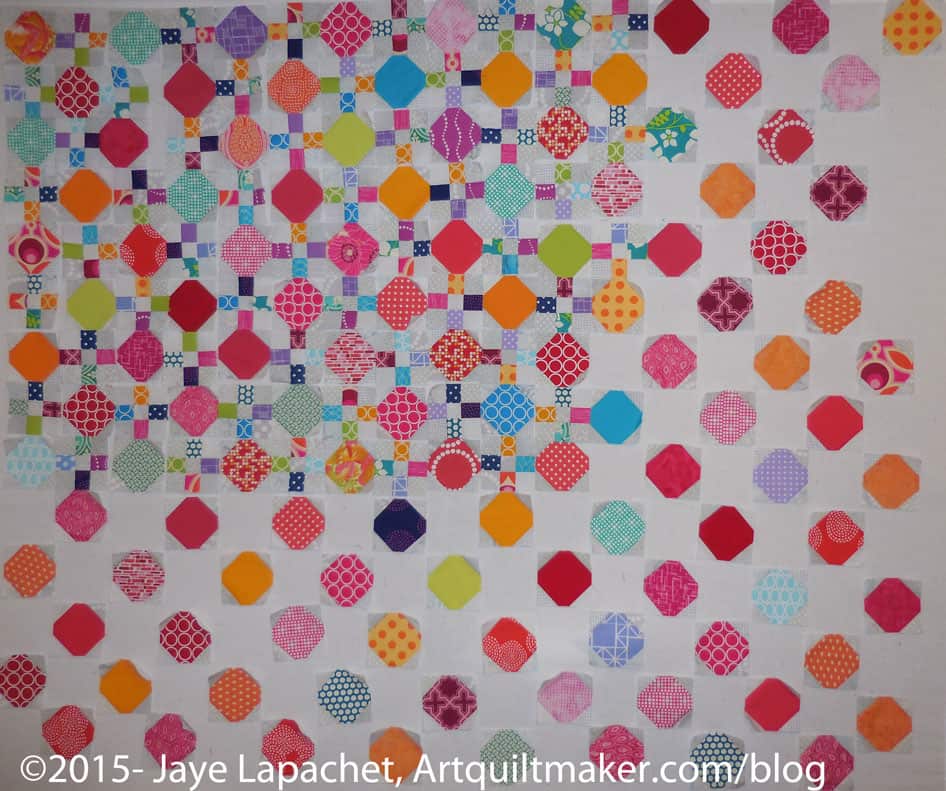
With the O9P quilt, I am on the octagon/snowball bandwagon. I saw this motif on the floor at Midway Mania (fun attraction, by the way) and am determined to put this on the list of borders to make. Alternatively, it would make a good row quilt using vertical rows.
I would make the pieces inside the octagon larger, perhaps a nine patch so that the portions of patches were not so small. The octagon border would also have bigger pieces OR one piece per side. I would have to see what looked better. Seams, you know.
I would also not break up the corners outside of the octagon (that would make the octagon into a square). It would just be one triangle. It would be an interesting challenge.
Buena Vista Street Vase
This vase was a quick drive by photo. I saw it as we walked by at a leisurely pace and didn’t take a photo. Then we were fighting our way through the parade crowd and I knew I wouldn’t have another chance, so I got ready and took the photo as I was walking by. I slowed down, but didn’t stop lest I be run over.
It is a good outline motif and could be appliqued. I see some piecing opportunities for the vase itself, though I would not want to piece the spiral handles.
I would have to think about the circle. I think it adds a lot to the motif as a whole, but would I want to applique’ it?
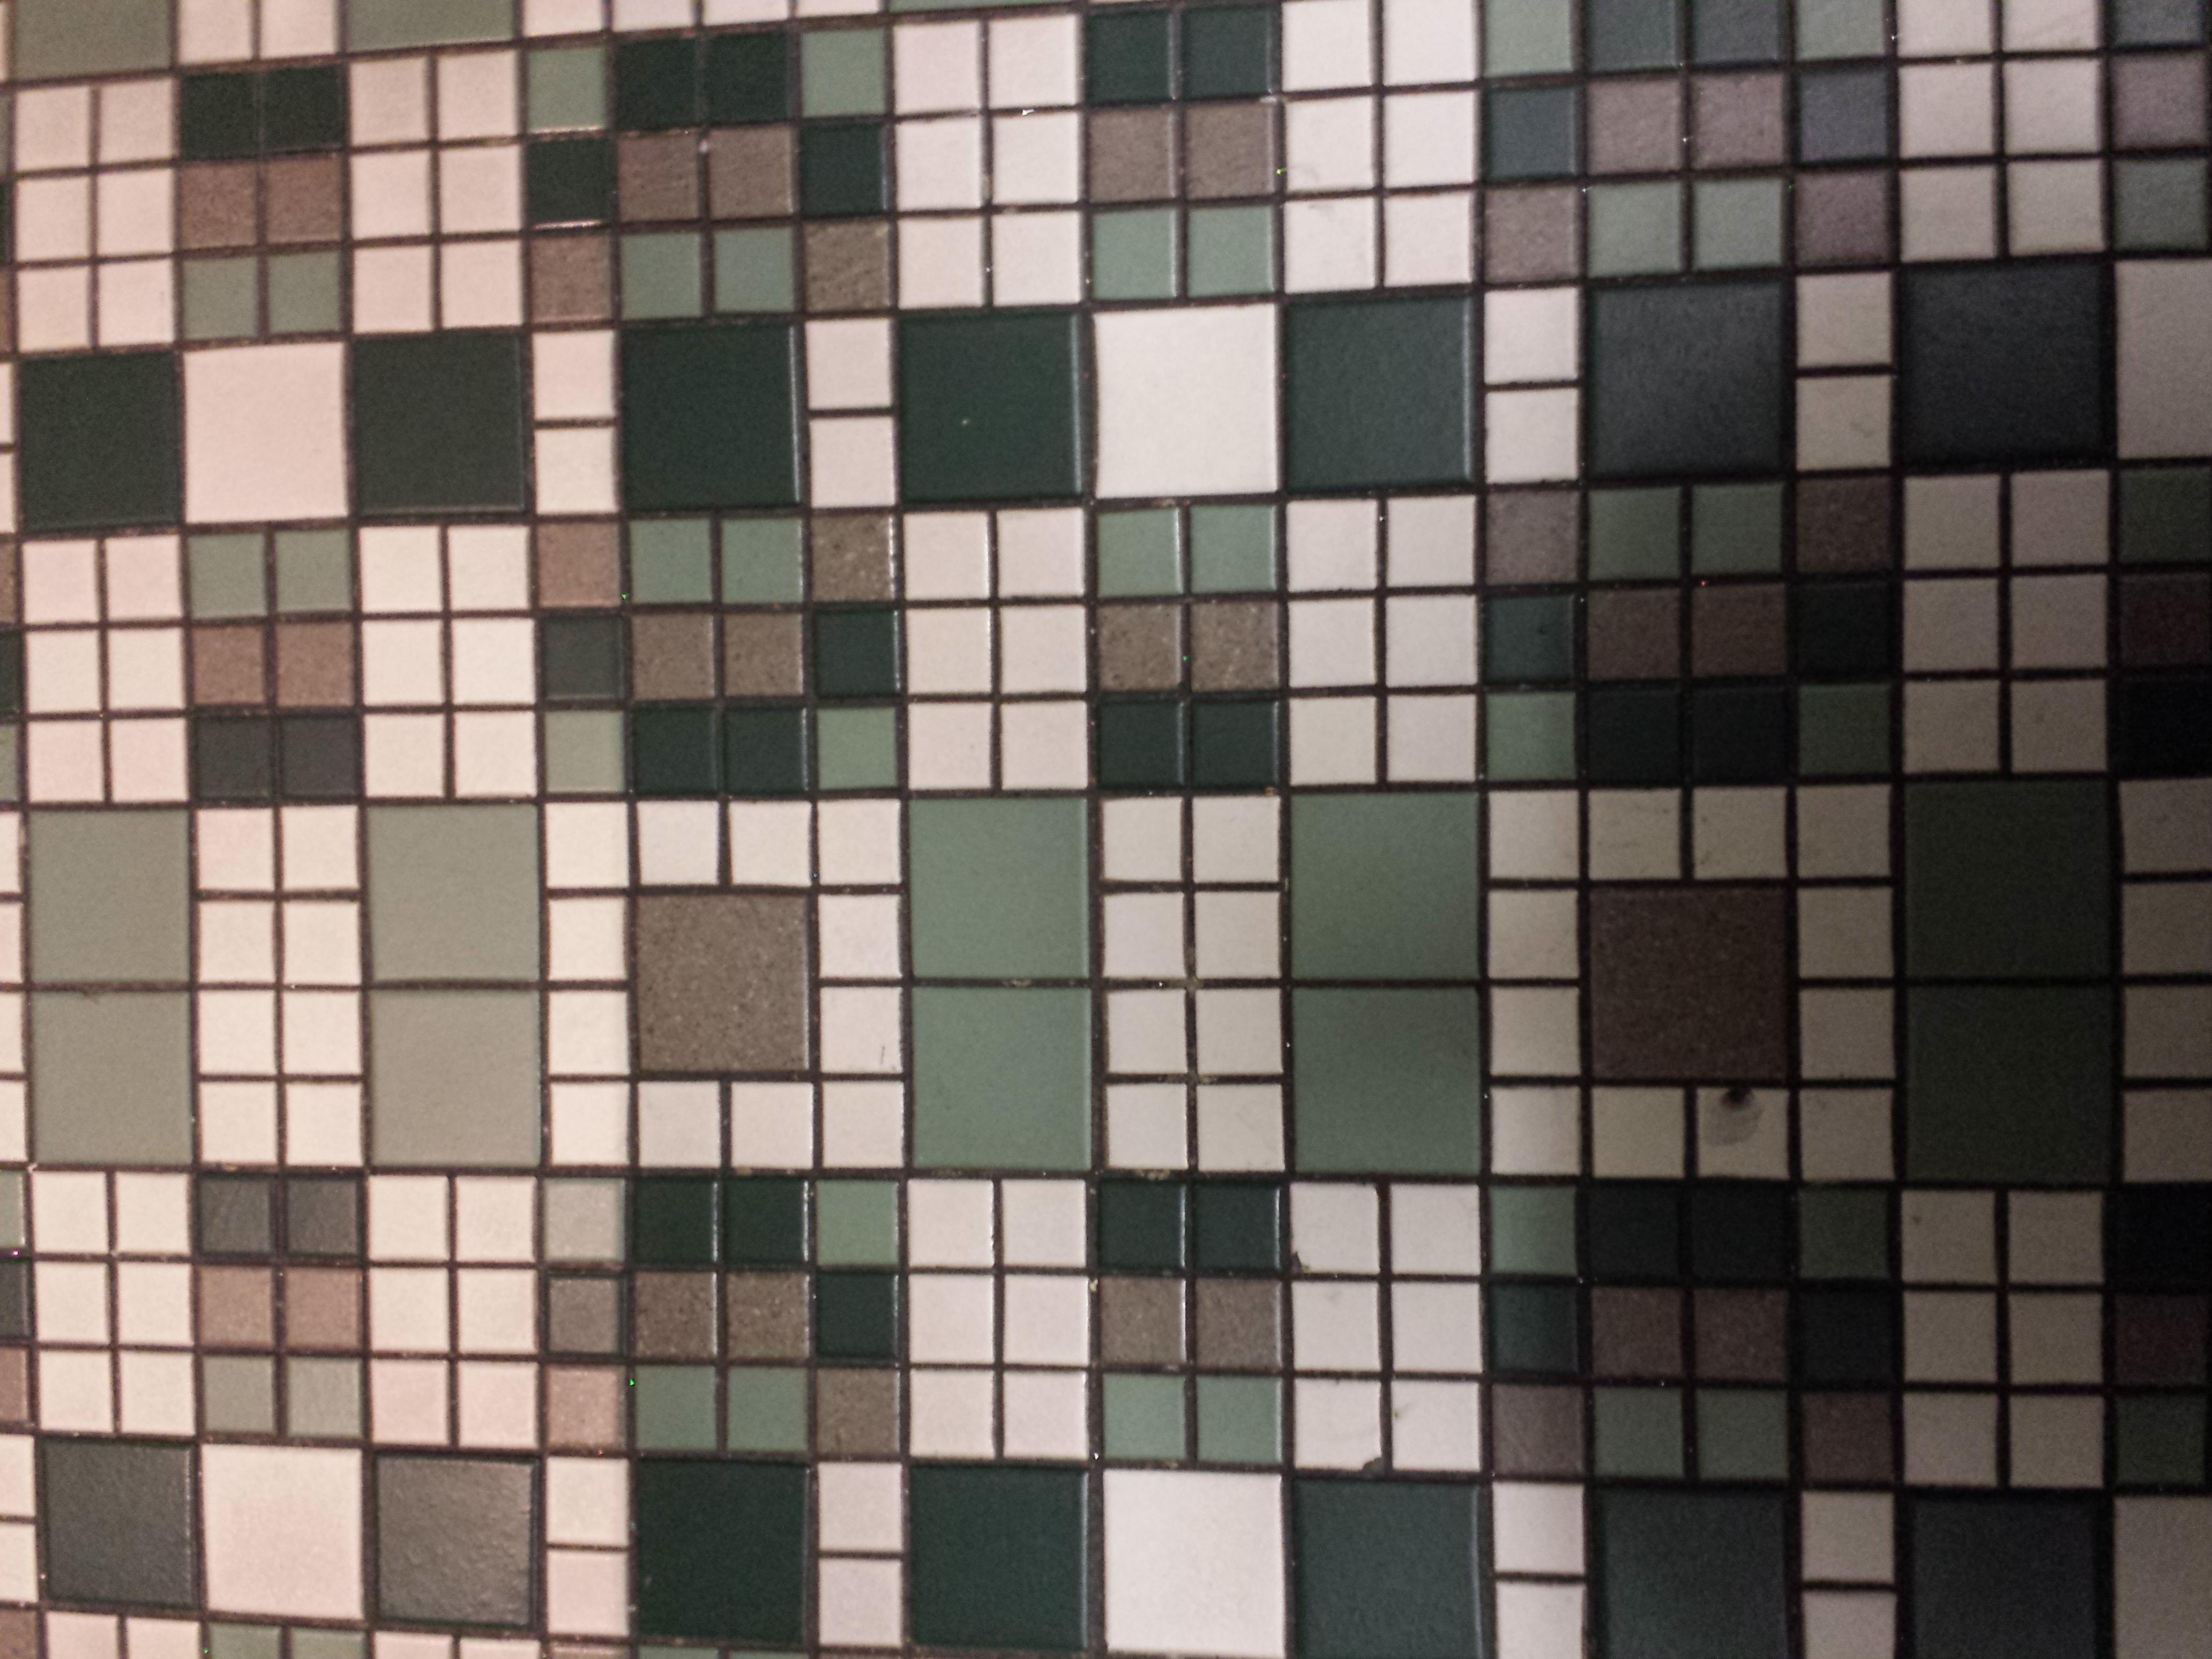
Tile Floor
Finally, I cannot leave you without some tile. This tile motif was a floor, again in CA Adventure and it looks like it would be an interesting and not to difficult baby quilt pattern.
Well, I called this post Disneyland Inspiration when all of the motifs were from California Adventure. I really don’t think of CA as a separate place so I will leave it and you to enjoy the inspiration.
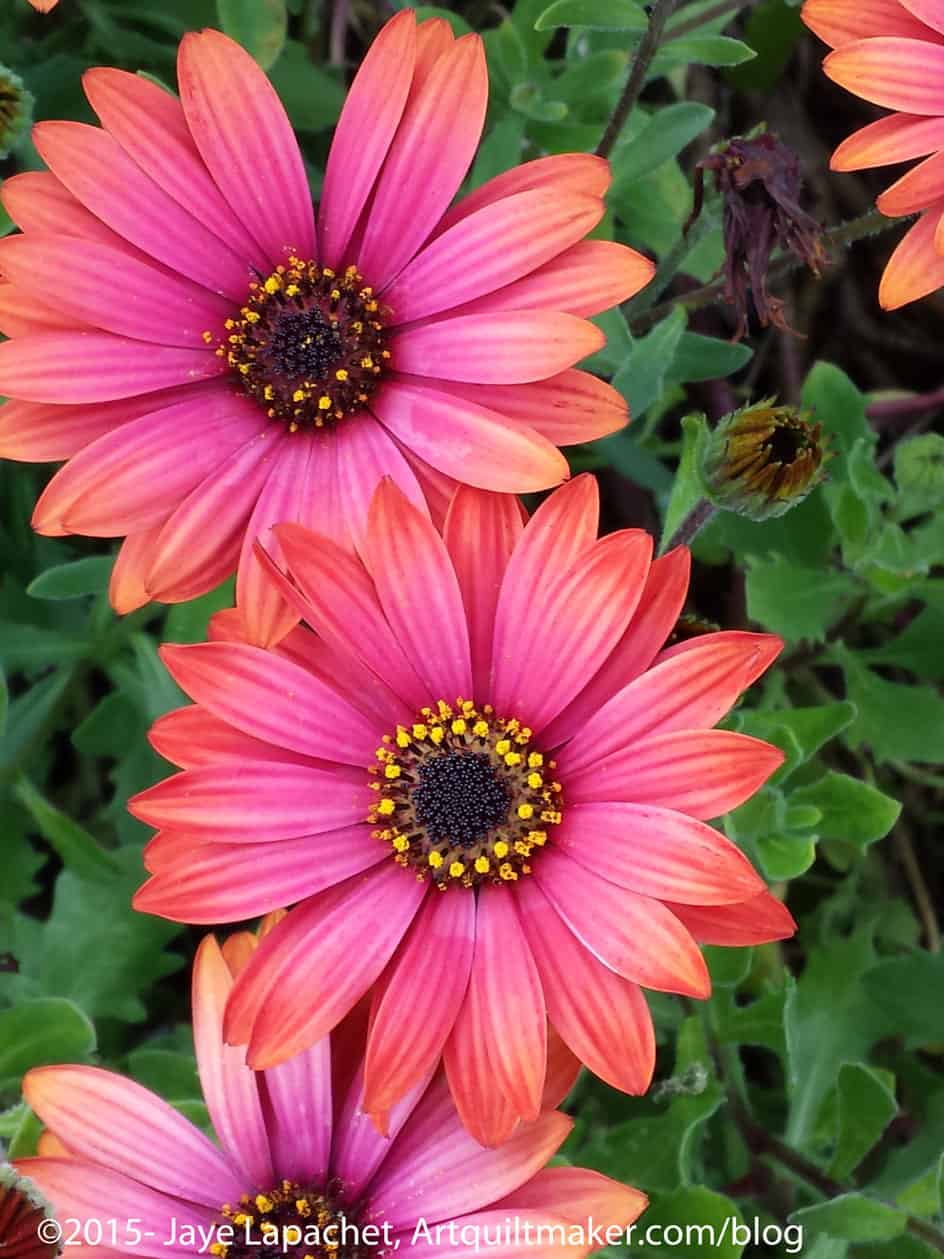
I saw these flowers when I was on a walk around the neighborhood. It is interesting what I see when I walk around the neighborhood on the same streets. I see different things or I see how things change as the days change.
I thought I would write much more about the Flying Geese swap than I actually have. The last time I posted was back in January. My lack of reporting is not an indication of lack of interest.
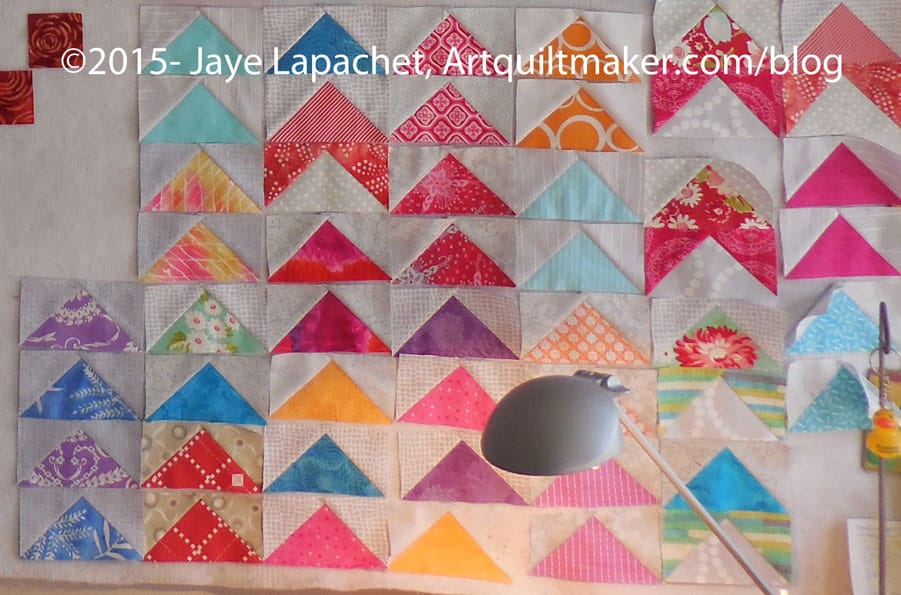
Flying Geese, Early April 2015
This is a great exchange and I am really enjoying it. First, the FGs are easy to make. Next, they have a good impact. Third, there is a lot of bang for my buck. I take 5 squares and come up with 4 Flying Geese. Also, they are like potato chips. I can’t make just one set at a time. Once I get started, I want to make bunches of them. Finally, though I am sure there are other positives, all the colors I try work well.
So, the photo at right is the sum total of the Flying Geese I have made and received until last week. Not, it’s not a great picture, but, as you saw on my last Design Wall Monday, my design wall is backed to the gills and there is no space. I’ll get a better picture at some point, but for now you’ll have to be happy with this one.
I brought this quilt to the last BAMQG meeting and someone was shocked that I had only finished 2013 not 2014. I have barely finished cutting for Fabric of the Year 2014 and have not yet begun to arrange the pieces. Fabric of the Year 2015 is now a glimmer in my sight as well. I seem to have two or three of these going at once. I wonder how I keep them all straight?
Anyway, the process is a bit arduous. Cutting the fabric patches takes me all year. I take the time to get a sense of what I bought and used during the year. Then I have to arrange the patches into the top I want, then I have to sew, make the back, binding & sleeve and get the piece quilted. This all takes time. So, yes, just now this is Fabric of the Year 2013 finished. Stay tuned for the others. 😉
There were a lot of firsts in this quilt. This was the first time I arranged the pieces from the center out starting with white/lights. This process was also the first time I heavily used my camera as a tool to arrange the patches. I took a lot of pictures, converted them to black and white and rearranged according to the value indicated in the black & white photo. If a patch stuck out, I moved it. Of course, I didn’t move purple patches into the green section. Some of the patches look odd if you look at the piece close, but standing back the placement works. The gradation is a big improvement.
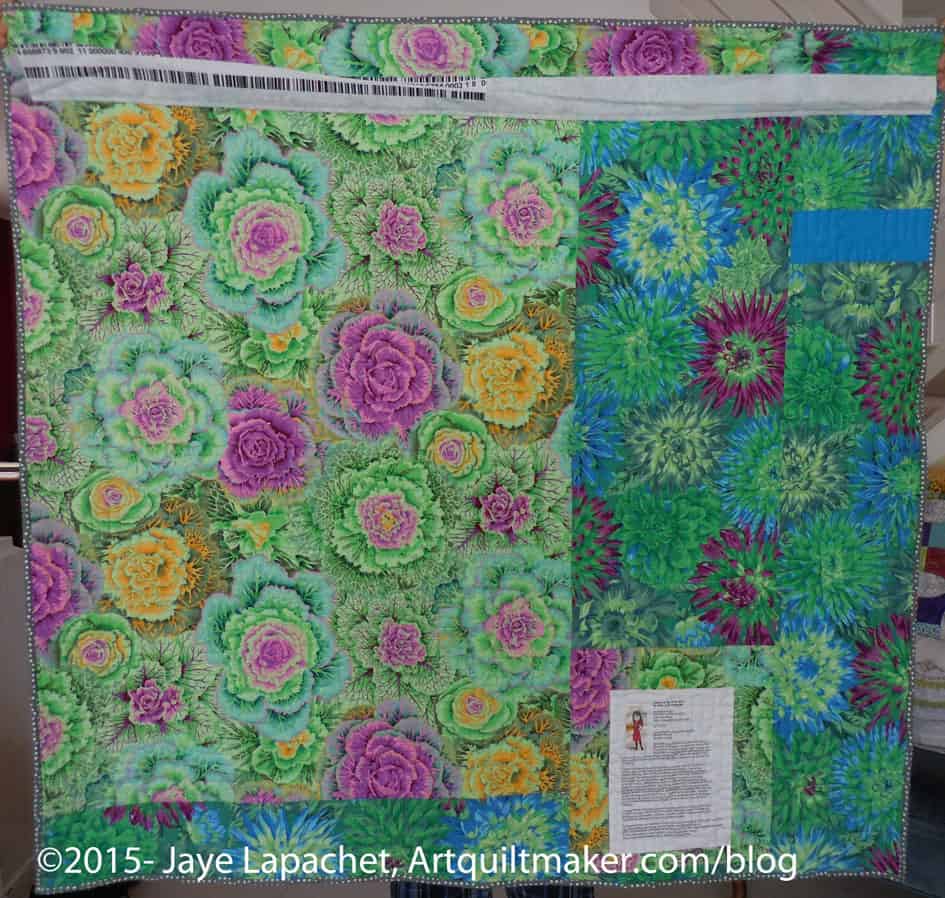
Fabric of the Year 2013 (back)
The back is a couple of Philip Jacobs prints. I got some comments that they clashed, but I like the boldness. I also used the wrong fabric for the sleeve! I got two quilts back at the same time and used the edge of the Russian Rubix, that was cut off to square up the quilt, instead of the edge of the Fabric of the Year 2013. Oh well. At least people can see the sleeve.
I am pleased that this one is done. As of this quilt, I have no (yes, NONE) quilts at the quilter. Of course, the Tarts Come to Tea is still in the process, but that is a story for another day…
“This two-step milk revolution may have been a prime factor in allowing bands of farmers and herders from the south to sweep through Europe and displace the hunter-gatherer cultures.” Nature article
coconut milk
goat’s milk
mother’s milk
2008 film: “Milk is a 2008 American biographical film based on the life of gay rights activist and politician Harvey Milk, who was the first openly gay person to be elected to public office.” (Wikipedia)
Definition: “Milk is a white liquid produced by the mammary glands of mammals. It is the primary source of nutrition for young mammals before they are able to digest other types of food. Early-lactation milk contains colostrum, which carries the mother’s antibodies to its young and can reduce the risk of many diseases. Milk contains many other nutrients[1] and the carbohydrate lactose. The majority of the world’s population is lactose intolerant.[2]
As an agricultural product, milk is extracted from mammals during or soon after pregnancy and is used as food for humans. Worldwide, dairy farms produced about 730 million tonnes of milk in 2011,[3] from 260 million dairy cows.[4] India is the world’s largest producer and consumer of milk, yet neither exports nor imports it. New Zealand, the European Union‘s 28 member states, Australia, and the United States are the world’s largest exporters of milk and milk products. China and Russia are the world’s largest importers of milk and milk products.[5][6]
Throughout the world, there are more than six billion consumers of milk and milk products. Over 750 million people live within dairy farming households.[7]” (Wikipedia)
splash of milk
The Dairy Council produces and gathers a wealth of nutrition information from a wide variety of worldwide sources to provide facts relating to milk
breast milk
Milk River
whole milk
Milk of Magnesia
skim milk
Harvey Milk
2% milk
MILK Photo Books and Albums
Milk Bar (San Francisco)
Milk Queen
Welcome to MooMilk.com, a fun and educational website about cows and milk with facts, contests, games and recipes.
App: Out of Milk
milky
Allergy to cow’s milk is the most common food allergy in infants and young children.
Milk: machine learning toolkit for Python
Britain’s ‘flashiest playboy’ splashes out £10,000 on a bath that runs pure chocolate milk for his girlfriend… and it costs £1,000 every time
Muscle Milk
milk and honey
Milk studios is a premier, full service photography studio in both New York and Los Angeles.
National Milk Producers Federation
The print journal milk created by Larry Sawyer in 1998 became milkmag.org in 1999.
The Human Milk Banking Association of North America
Milk Boutique located at 8209 West Third Street, Los Angeles, CA 90048
Milk Music lets you adjust what songs play, based on factors like release date and popularity.
milk-trafficking gang known as the Rawesome Three
Plant milk: “Plant milk is a general term for any milk-like product that is derived from a plant source. There is no formal or legal definition for plant milk. Plant milks have been consumed for centuries in various cultures, both as regular drinks (such as the Spanish horchata) and as a substitute for milk, such as by some Christian denominations during Lent. The most popular varieties internationally are soy milk, almond milk, rice milk and coconut milk.
In the United States, soy milk was long the most popular non-dairy milk, but starting around 2010 almond milk began to see an explosion in popularity, and in 2013 it surpassed soy milk as the most popular variety.[1] Other popular milks in the US are rice and coconut. In Europe, soy and oat milk are the most popular varieties, sold even in average supermarkets; as opposed to almond milk, which is usually more expensive, and is only found in health food stores.[citation needed] There is also hazelnut milk and milk from peas and lupin.[2]
Post the direct URL (link) where your drawing, doodle, artwork is posted (e.g. your blog, Flickr) in the comments area of this post. I would really like to keep all the artwork together and provide a way for others to see your work and get familiar with your blog or website.
The Creative Prompt Project, also, has a Flickr group, which you can join to post your responses. I created this spot so those of you without blogs and websites would have a place to post your responses.
We are also talking about this on Twitter. Use the hashtag #CPP
Drinkable liquids
Almond milk, a milk-like beverage made from almonds
Breast milk, milk produced by a human mammary gland
The last days of the CQFA Show Primal Green 2 is at the San Francisco Public Library. I went to see it one day on a trip to the City, but this is as much a reminder for me to see it again as it is to encourage you to go.
Did you go and see the show? The 24th is the last day to see it. Primal Green2 is a show of environmental art quilts at the Main Branch of the San Francisco Public Library.
The Wallace Stegner Environmental Center is one of the special collections at the Main Branch and, after a year of work with the Library, CQFA has over 20 quilts and other fiber art on display. The quilts all have an environmental theme. The show will hang until Friday April 24 and be available to viewers during the Library’s normal open hours. Don’t wait until the last minute! Oops! It is the last minute. Go TODAY!
This post is about selecting colors and should have been posted after part 1 of the Basket tutorial. I didn’t think of it until I was almost done with Basket tutorial part 2. C’est la vie.
I ended up wanting the fabric choices to be similar to the EQ rendering. May seem lame or small minded, but it is what it is.
Stitch Blue
The above is fabric I used for the other half of the HSTs. I wanted to match that fabric, but it didn’t work. The stitch fabric blends into the background too much, so I had to figure something else out.
Snowflake Handle
The above snowflake fabric is good, but I was concerned that the snowflake fabric might look too Christmasy.
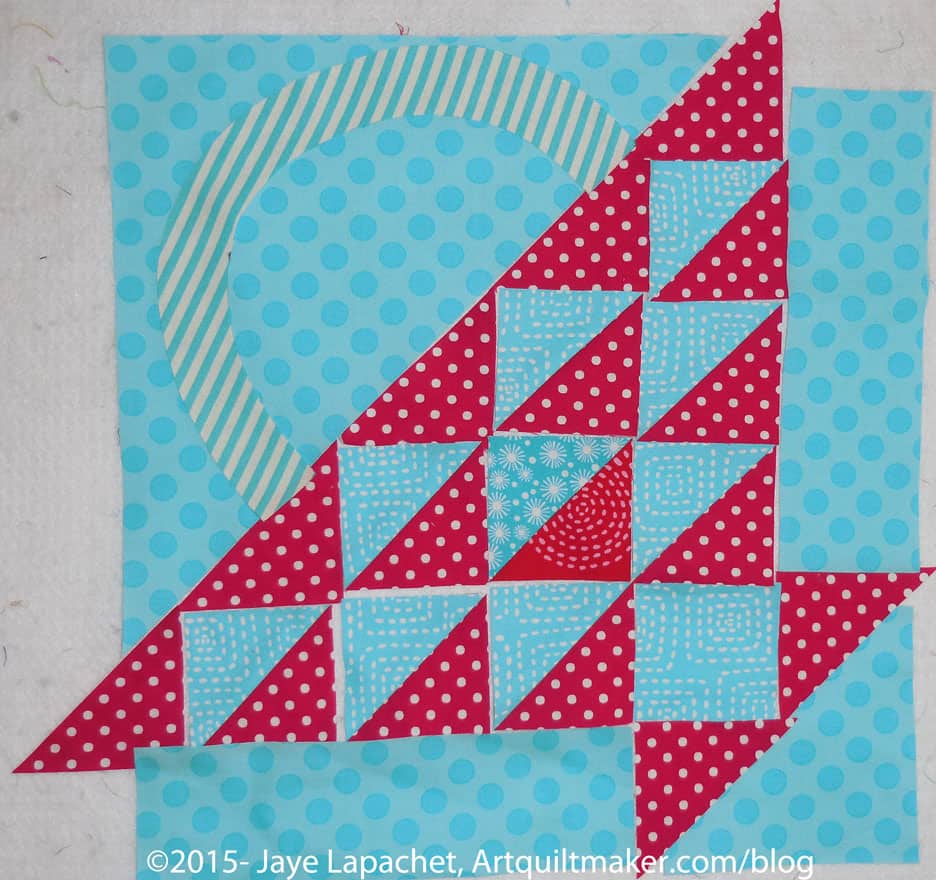
Completed Basket Block
The above fabric selection is what I finally decided upon. The stripe is good, because it is a different motif than any of the others already in the block. The white also stands out a bit from the blues. If I had used a blue with a white dot like the EQ rendering then one of the others might have been ok, but this stripe works well.
We are embroiled in college business/drama/selection. Of course, I have other stuff going on as well, but the college stuff seems to be dominating at the moment. This means that my quilt work is suffering and, particularly, my donation and charity projects.
I finally did spend some time a week or so ago finishing this Hawaiian quilt for BAMQG. You might remember that Gerre and I worked on it at a Sew Day recently.
I blather on about testing new techniques and practicing skills on donation quilts then I never do it. I tried something new on this quilt. I tested out applying a binding by machine on both sides. My first effort resulting in me ripping out 3-4′, but I persevered and the quilt is bound by machine.
I made sure that Gerre and Angela were both ok with me doing the machine binding. It requires some more experimentation on my part, but I am pleased with my first effort.
BAMQG Hawaiian Quilt by Gerre & Jaye
None of the fabrics were my choices, but I like the brightness against the black and especially think the back came out well.
As usual, I am really happy to help the guild. As usual, the Young Man worked hard as my quilt hanger.
I saw quilts made with this design at the San Mateo County Fair. One in particular, a black and white with turquoise beauty, grabbed my attention and inspired me to want to make one. From reading the first few pages, I thought that learning this technique might be better in a class than through a book. Towards the end, I got the idea and feel I could make some blocks using the book as a guide.
The book starts with a short introduction and some information on tools, supplies and fabric. This introduction makes it clear that quiltmakers will be sewing curved seams. Sisneros gets me on her side by admitting that the Winding Paths block is actually, historically, called The Snake Tail block and explains why she changed it for her purposes. I appreciated her honesty and her reasoning.
The project part of the book follows the introduction with making the original Winding Paths block. All the blocks in the book start with this block. Sisneros goes over trimming the block including her Secret of 4 and 6, which is actually a helpful tip that makes sense.
The project section of the book is, first, broken down into numbers of blocks- 12, 20, 36, etc for the original Winding Paths block. In this section, one thing I like is that she gives you the tools to make the quilts (teaching how to make the blocks), but then just shows what is possible when making the quilt. She doesn’t give every step for every quilt and she acknowledges that it is impossible to make an exact duplicate of her quilt. She makes the quiltmaker think a bit and I appreciate her assumption that quiltmakers have brains. Cutting directions and fabric requirements are included for the quilts in the Winding Paths block section.
The information on making the Circle Pizzazz block is a little less clear. I believe, from the images that the maker sews the D-E combination to the A block after it is made. This specific instruction seems to be left out, but makes sense from looking at the photos and the rest of the directions as well as the result.
The making of the Circle Pizzazz block section is, again, followed by a series of projects using this new block. It was a little hard for me to understand where to put fabrics I wanted to show up as a focus or featured fabric. The line drawings made this part easier. This section also has fabric requirements and cutting instructions.
I think that with all that curved piecing, I would want the piecing to stand out more and, thus, would use more contrasting fabrics. Ms. Sisneros’ quilts often have blendy fabrics that obscure the piecing. This might be a good strategy as you get better at the technique, but it is difficult to see the piecing when you are a beginner. There are a number of quilts on Google (type in snake tail quilt) so you can see the original block.
The Circle Pizzazz blocks are followed up with the Interlocking Circle Pizzazz block. This block adds a few more pieces to get a different look. The directions for the block are followed by projects. This book has plenty of illustrations and images, which makes understanding the concepts easier.
The book also includes a section on using the leftover pieces cut away when making the three other blocks. It is a nice idea as some quiltmakers might consider the cutaway pieces waste. I wasn’t particularly enamored with any of the projects shown. Of course, it all depends on the fabric, so YMMV.
I received this book as a gift in eBook form. I was excited because I didn’t have to devote my non-existent shelf space to another book. I started reading the book and also realized I couldn’t make copies of or print out the templates either. I will try a few things and see what works, but I can see this being a problem with the eBook version.
The book includes a gallery of student work. Transparency by Jeanette Pohl is one of my favorites. I like the way the background shows through some parts of the quilt.
The quilt I first saw and liked turns out to be in the gallery. It is by Rose Marie Hackett and called Black, White & Blue By You. The turquoise goes so well with the black and white and the combination really shows off the pattern.
Trails of Confusion by Teresa Williams is also very interesting, because of how the center pattern continues, partially, out into the border.
I had a great time at the meeting yesterday and it really didn’t have anything to do with the actual meeting.
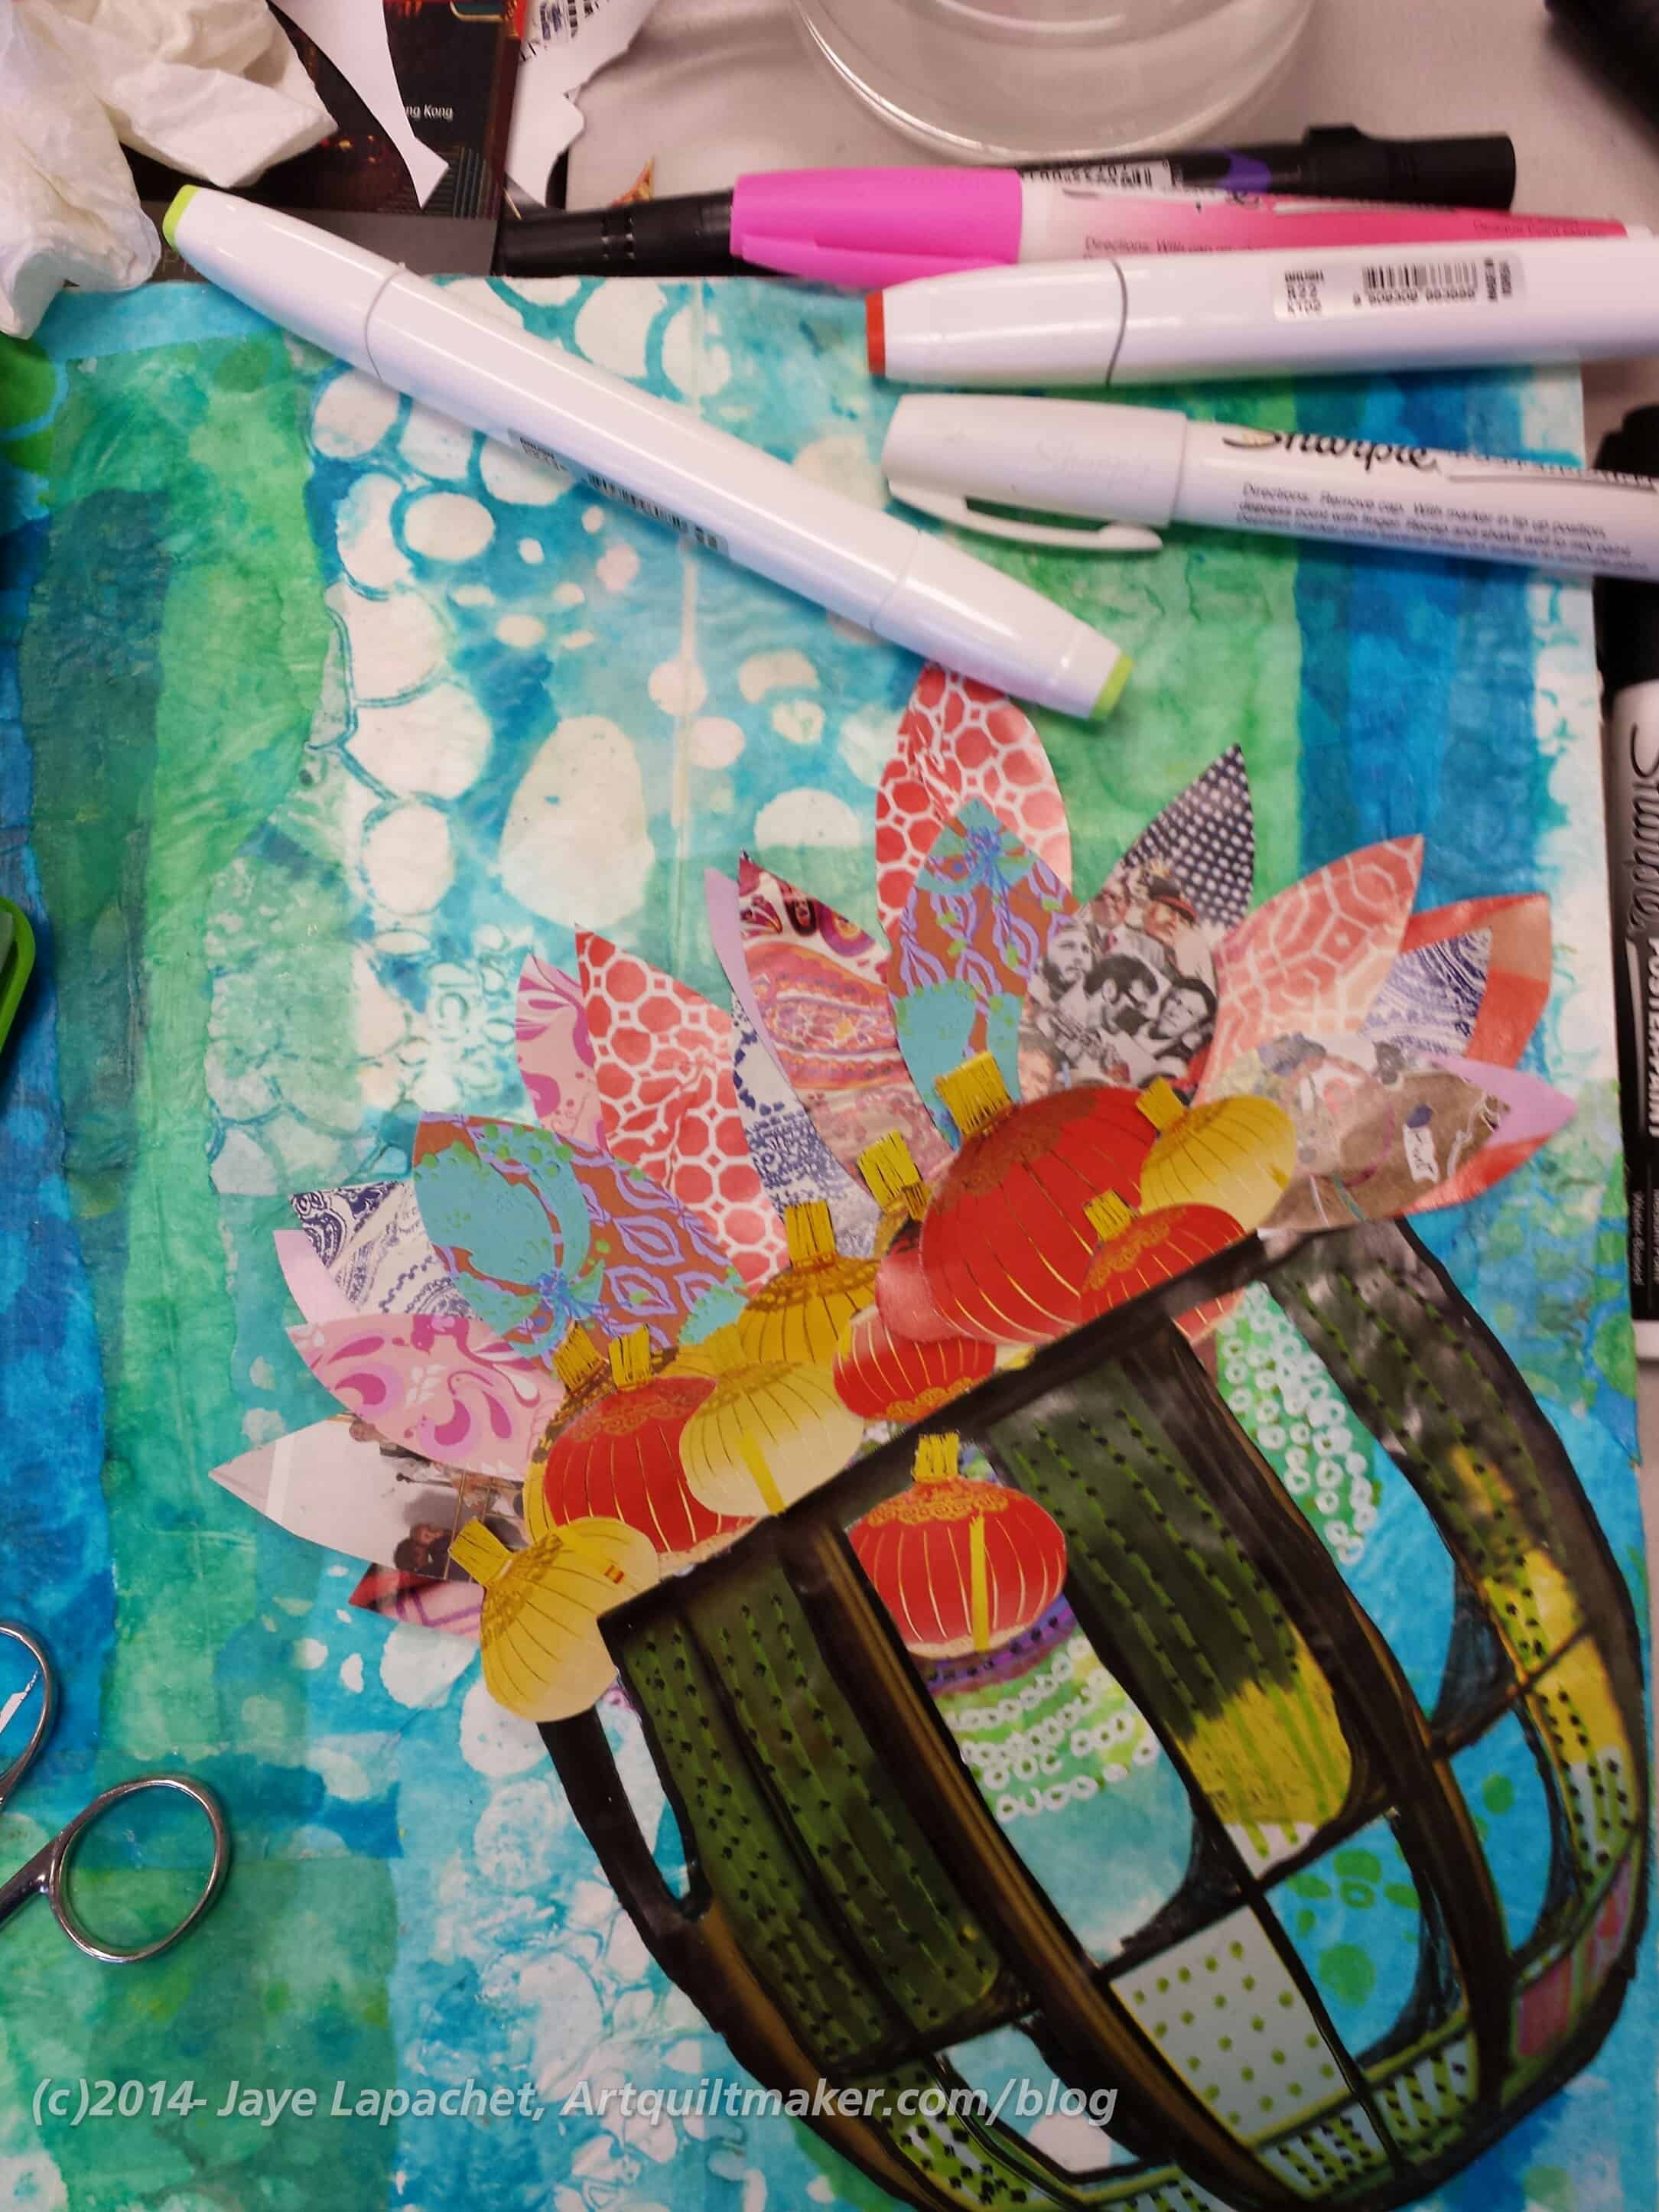
Gerre’s Collage
After the business and show and tell, we sat down to work on the picture I posted earlier this week as our workshop picture. We split up and added more tables so people had more space to work and I sat with Gerre and Rhonda. Gerre was doing work in her collage book (a giant board book she bought at a thrift store and then gessoed over. Great idea!!!) in colors vaguely related to the picture I posted. I would have taken the picture, but since it was in a book with beautiful collages, I thought it might be rude.;-)
I really didn’t know that Gerre was so talented with collage. I adore this piece and think it would make a great card.
Rhonda was doing her very precise improv piecing in the colors of the posted photo, tending towards the abstract. I was preparing a piece of white fabric for later painting with Tsukineko inks.
I finished my work pretty quickly. It really didn’t go as I intended and I didn’t want to work on it anymore, so I offered to press Rhonda’s strips. She sat and sewed her improv strips and I walked back and forth pressing them and getting more.
Bird Box for Rhonda
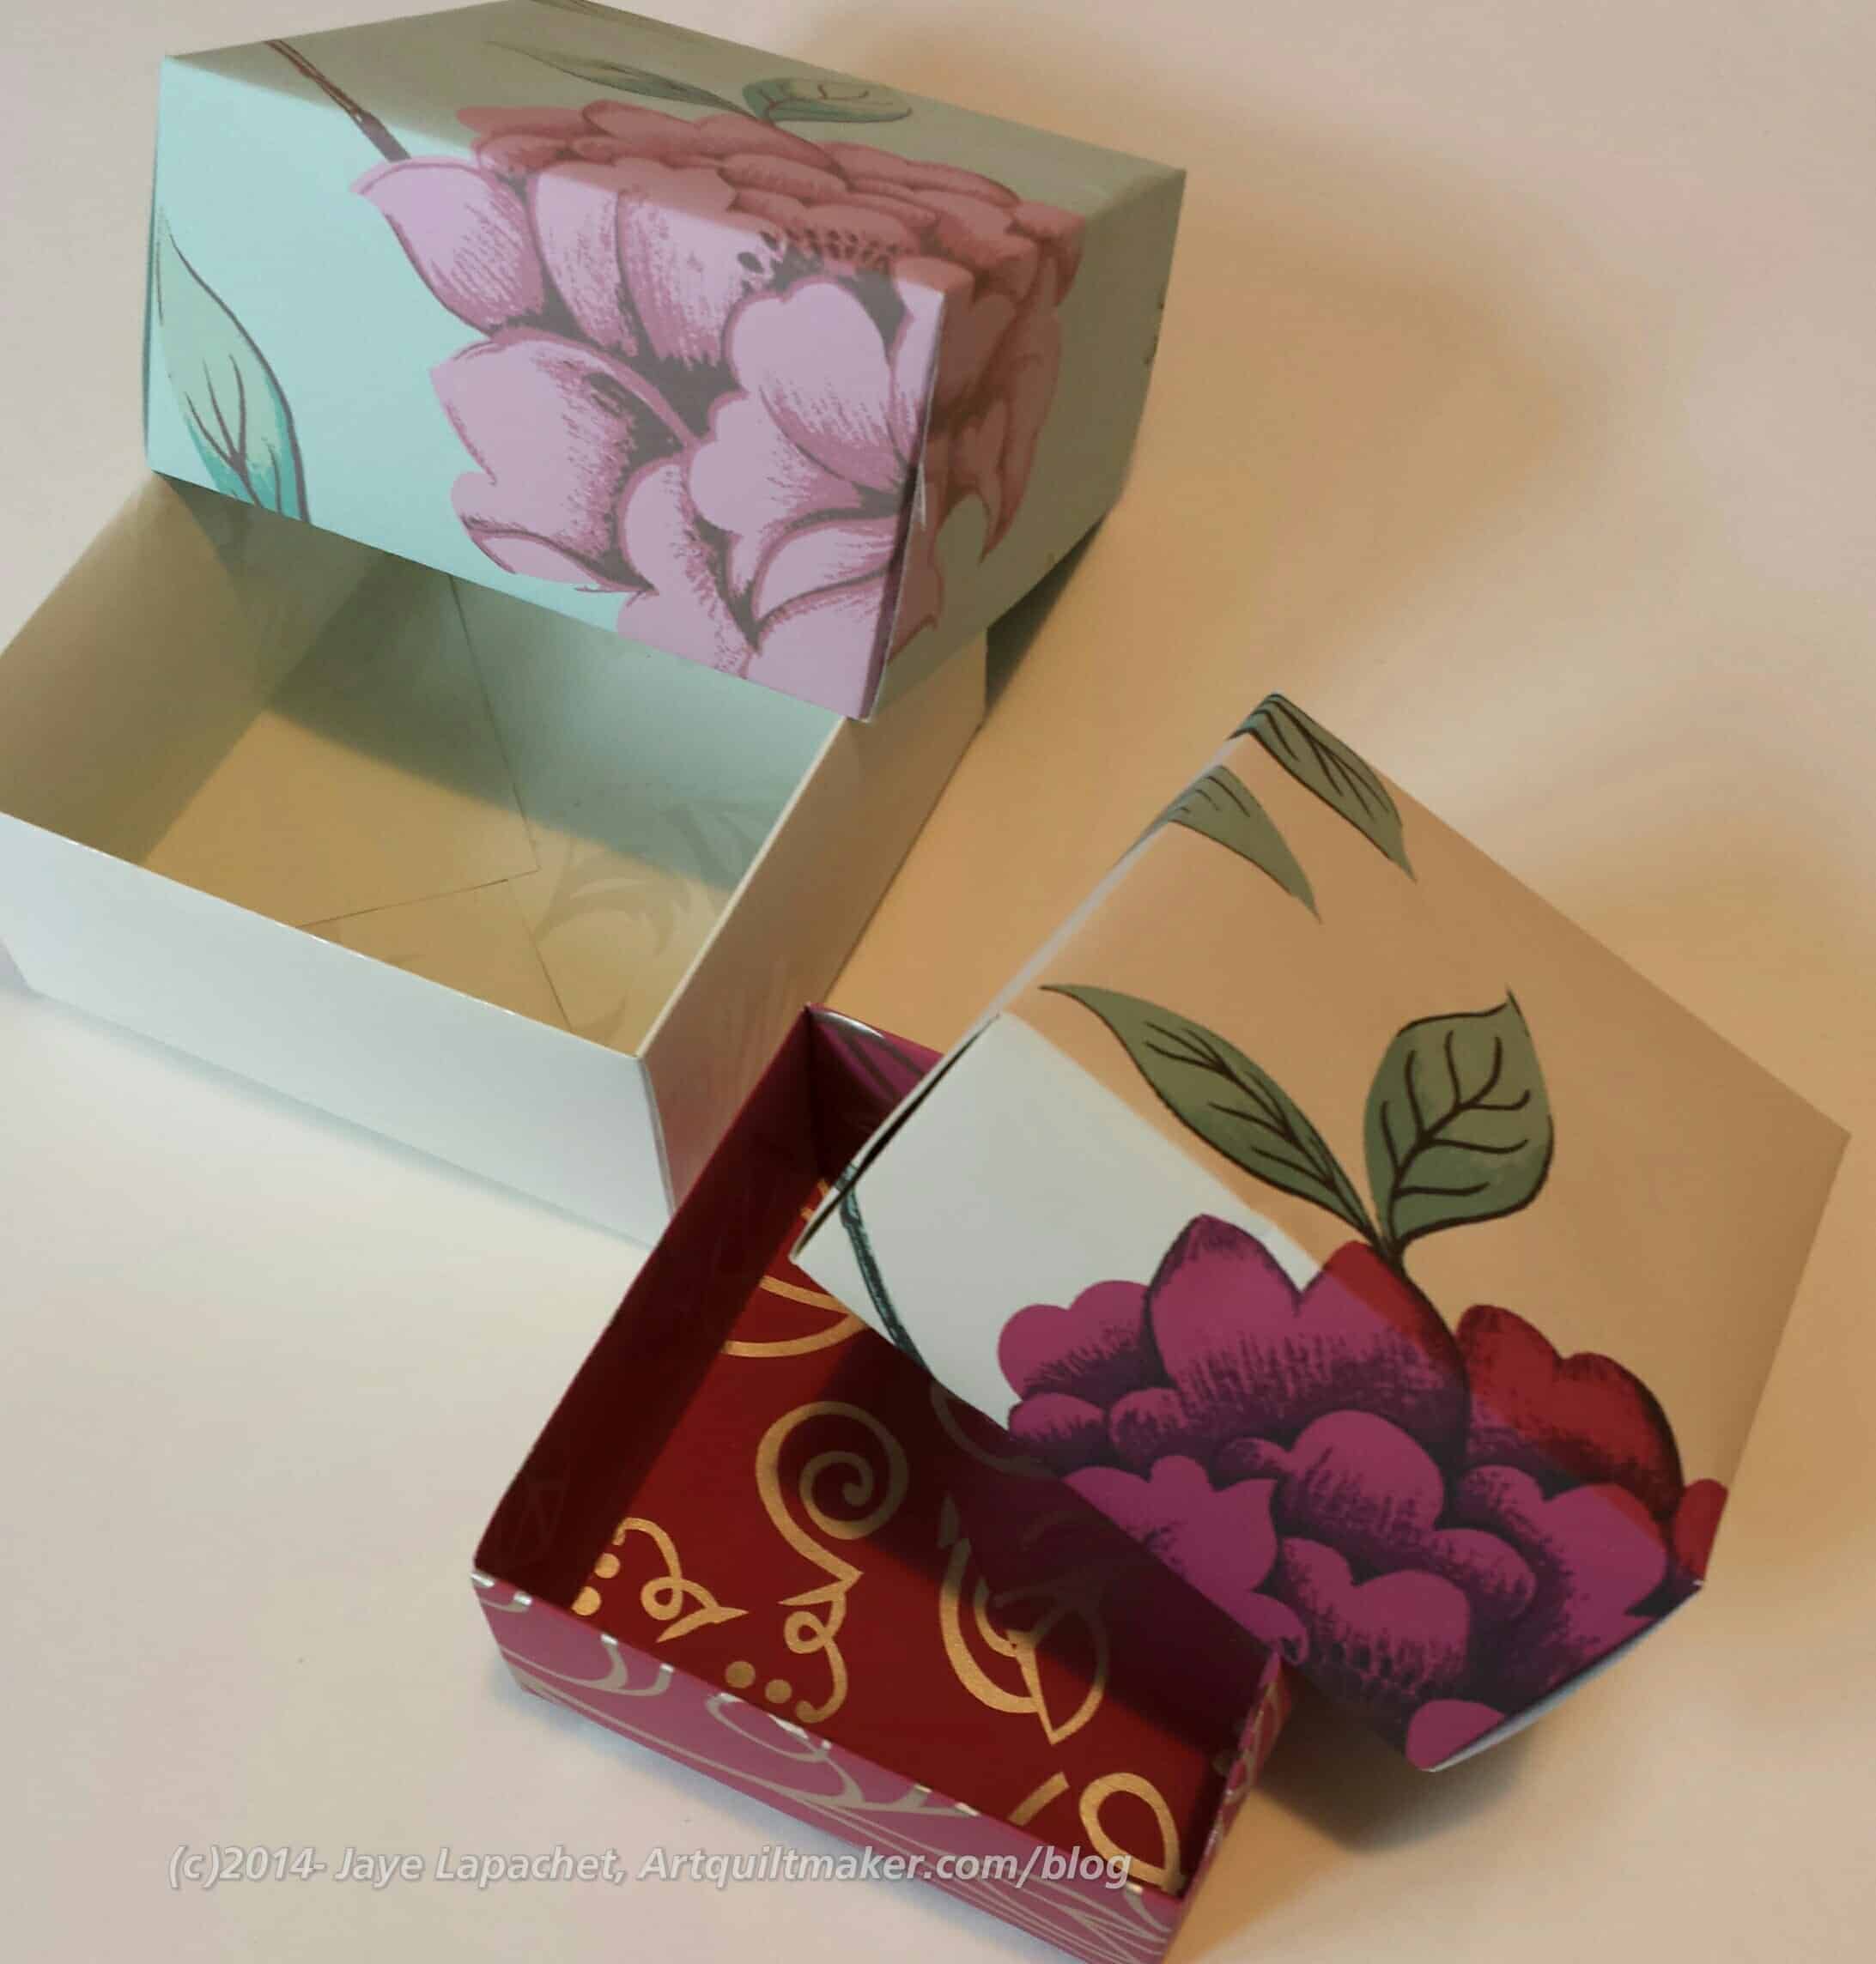
After some time I heard Bron talking about folded boxes. Rhonda said she needed some for her niece and nephew for Easter, so Bron and I sat down to make them, with Bron doing the teaching. It is amazing how they go together and I can see many of my wrapping problems evaporating.
Rhonda picked out the bird paper. We made two of the same and this box is about 3″ square.
Folded Gift Boxes
I decided it would be great to make my MIL a box and put a small gift in it for Easter, so we grabbed some sheets of wallpaper and I made a larger box from a 15″ sheet while Bron made a slightly smaller box, perhaps from an 11″ sheet. I ended up taking both home and will give one to someone else soon. I stopped and got some nice soaps to include in them.
Nota bene: We meet at FabMo and we have, pretty much, the run of the materials they have available. We still put donations in their box; we just don’t have to wait until selection day. In addition to fabric, they had books of wallpaper from which we took the larger sheets for the gift boxes. They are nice, because the sheets coordinate, though they are not always large. Some are half sheets or 3/4s sheets, which is why Bron made her box smaller. I thought some wallpaper with stripes would look great, but we didn’t see any in the quick look.
I enjoyed pressing for Rhonda and making the boxes. It interested me more than my Workshop piece.
The meeting went well. We talked about dues. We will be kicking people off the list soon, so people need to pay up. The Retreat is on and full, which si great. I can’t wait to check in and get sewing. I am going to work on the Field Day Zipper (I know! Blast from the past, right?) and the next Food Quilt. I suspect you can believe I won’t be working on FOTY 2014, but it works better for me to take more time and that requires working at home. I really want to get these two quilts done and 36 hours of sewing may be just what the doctored ordered.
The Field Day Zipper will be a gift. The fabrics and partially sewn pieces are clogging up my cutting table and I would like to get it done. I like the colors, but they are not demanding my time or attention. Too muddy. You knew that right?
The Food Quilt 2 will be a gift as well. It will be for a friend of Y.M.’s. We are friends with his parents and every kid should have a quilt. I keep looking at the Y.M.’s Food Quilt and trying to decide if I have cut enough fabric for the blocks I have slated to be made. The pattern is a Disappearing 9 Patch and I have decided that I will make 16 blocks. That means I need 64 food fabric patches (have already cut them), 64 black and white print fabric patches (almost none cut) and 16 purple patches, almost all of which are cut.
If I finish both of these projects, I also have the Box Full of Letters quilt on which to work. That will take come kind of miracle.
Anyway, the Retreat will be fun and I will have a lot to tell you about when I return.
The SFPL show is almost over. I’ll write more about that later. Be sure and go see it.
Rhonda will lead a workshop in June concerned with embellishment and hand embroidery. I can’t wait for that. I used some Aurifil embroidery thread for my ATCs and loved it! I will definitely buy more of that stuff.
Marie chimed in that there is a Stitchery show up at the San Jose Museum of Quilts & Textiles right at the moment. Fitting, don’t you think?
Show and tell was fabulous. Everyone does such interesting work and they all said kind things to me about the two pieces I brought: FOTY 2013 and the Hawaiian Donation Quilt. I know I haven’t written about them yet. Stay tuned for upcoming posts on those finishes.
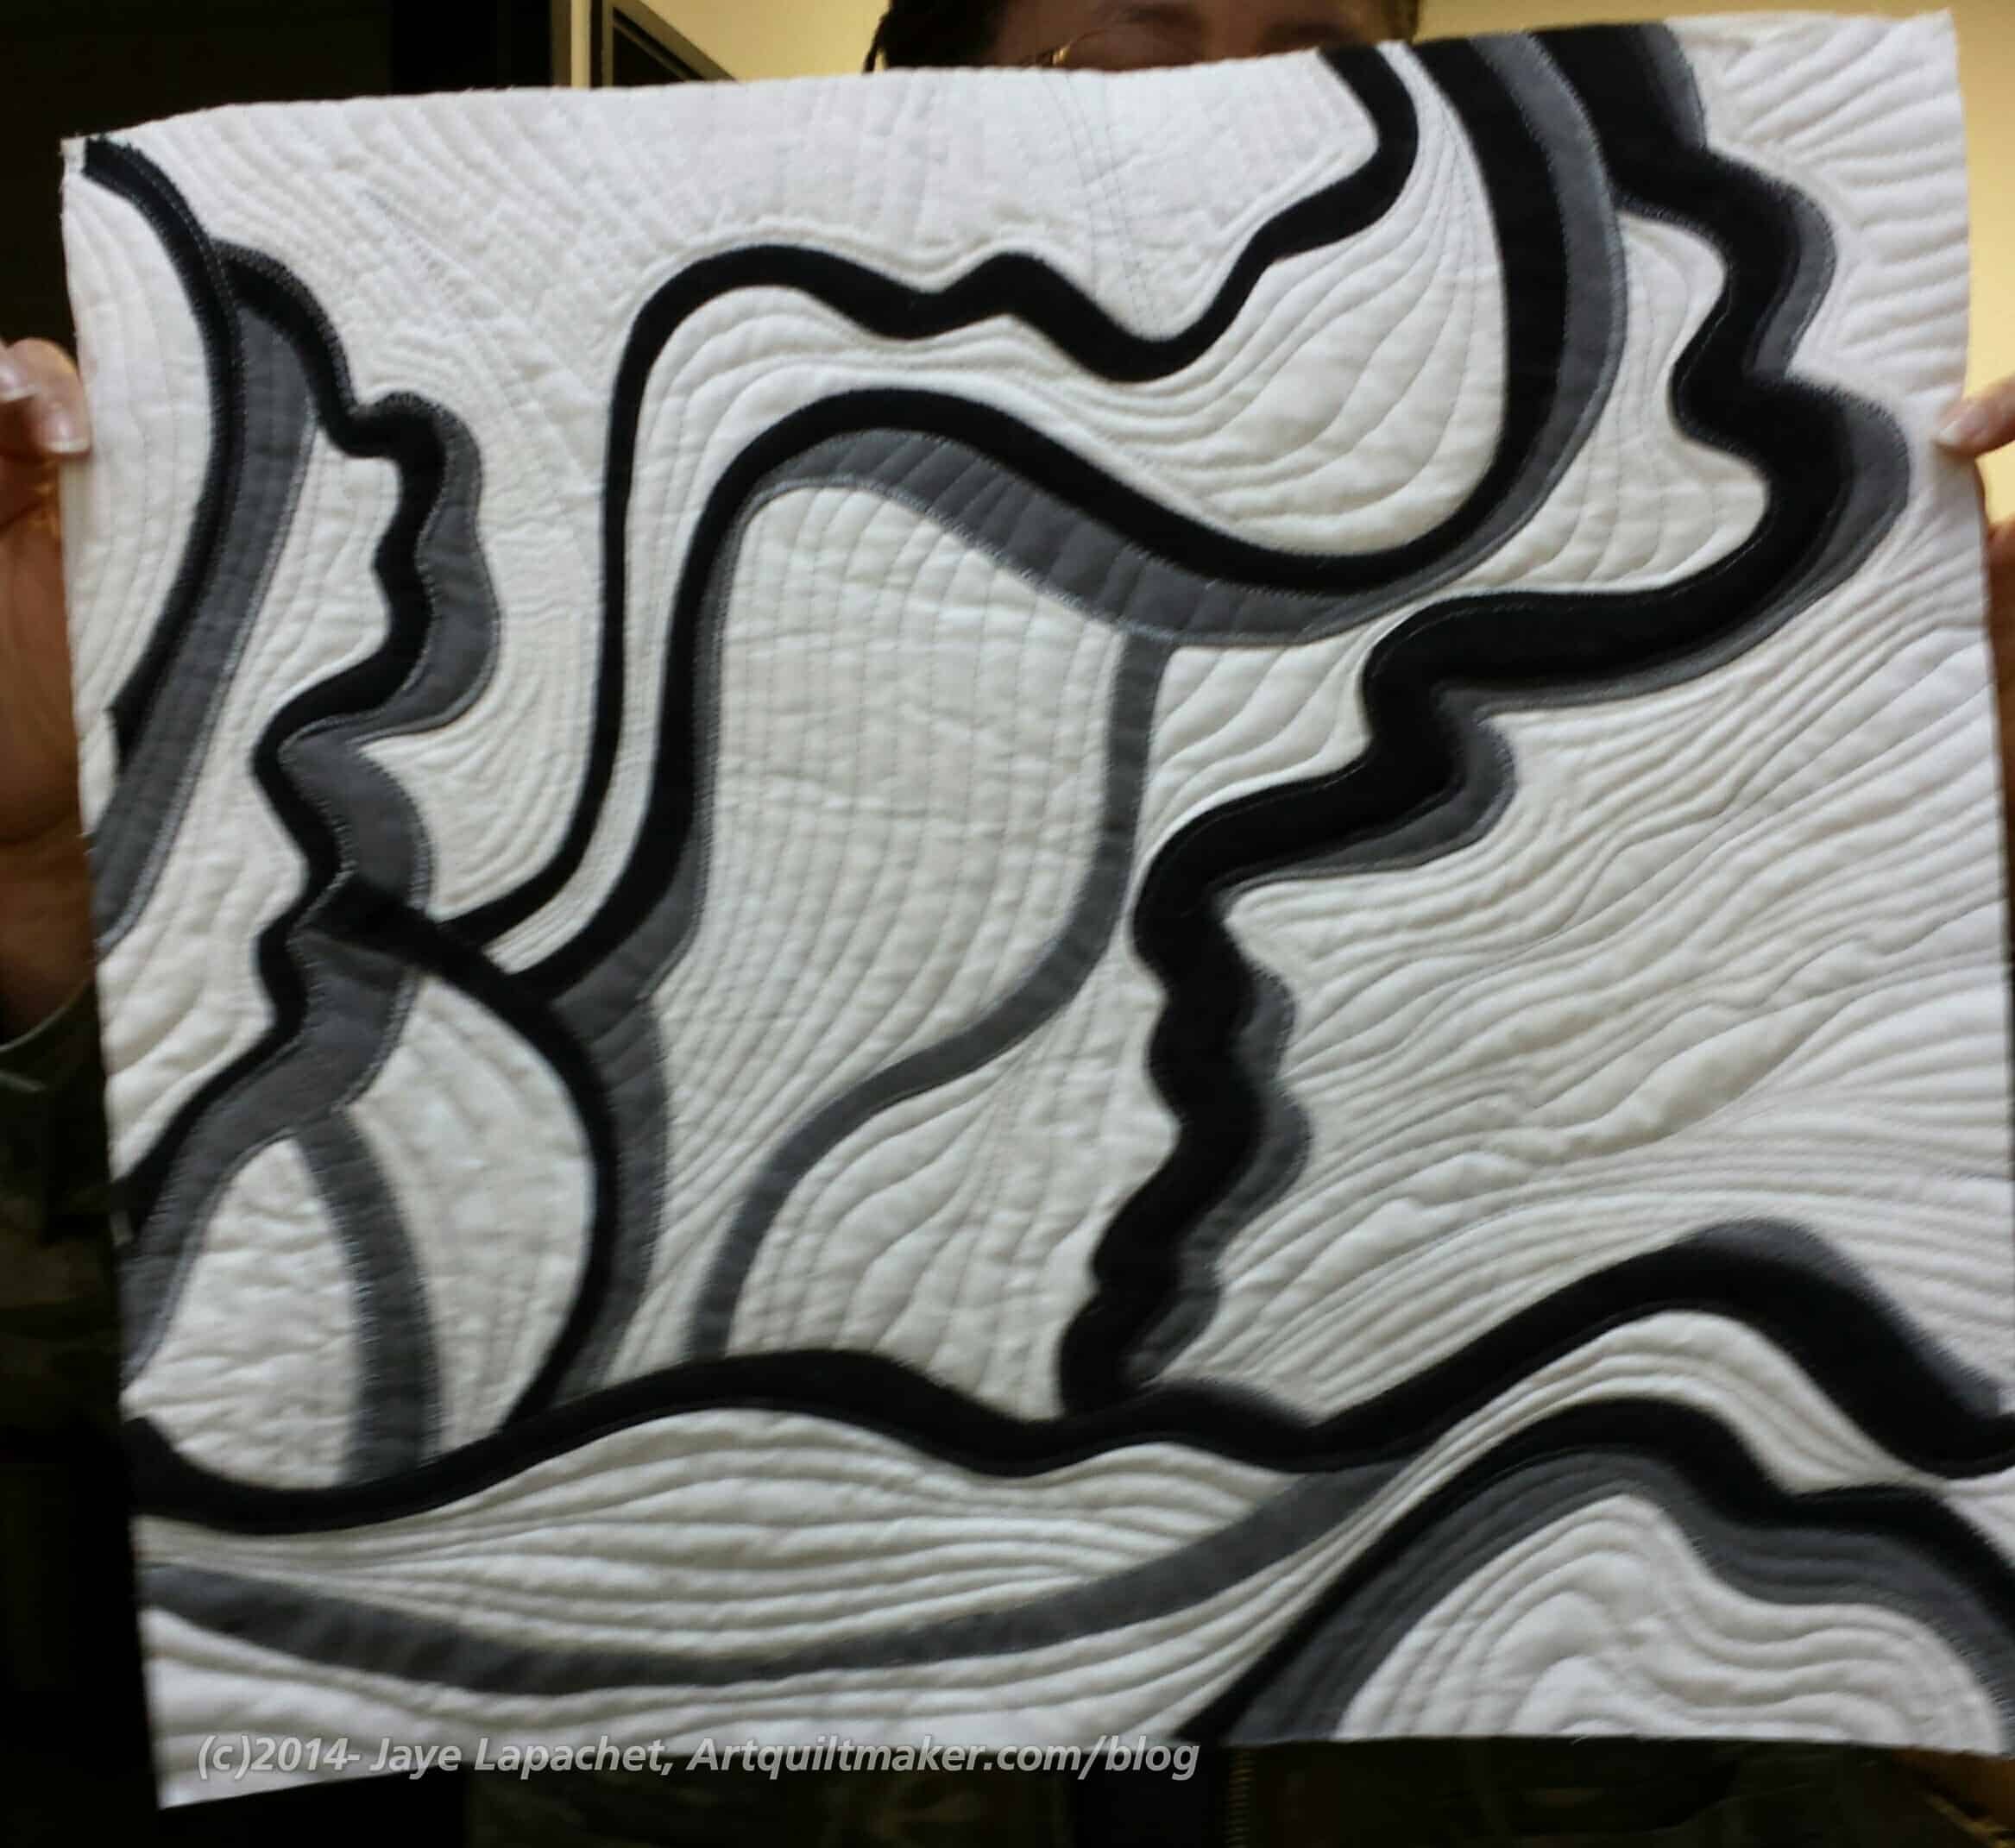
Sonja’s Flower
Dolores and Sonja are taking an online class with Elizabeth Barton. They are regularly bringing their pieces to show us and it is interesting to see the process through which they are working.
Sonja’s piece was a follow-up to a flower she finished a few years ago that took forever. This newest piece was finished within the month.
I love the curves and the lines. The color palette emphasizes the design and there is no distraction from color.
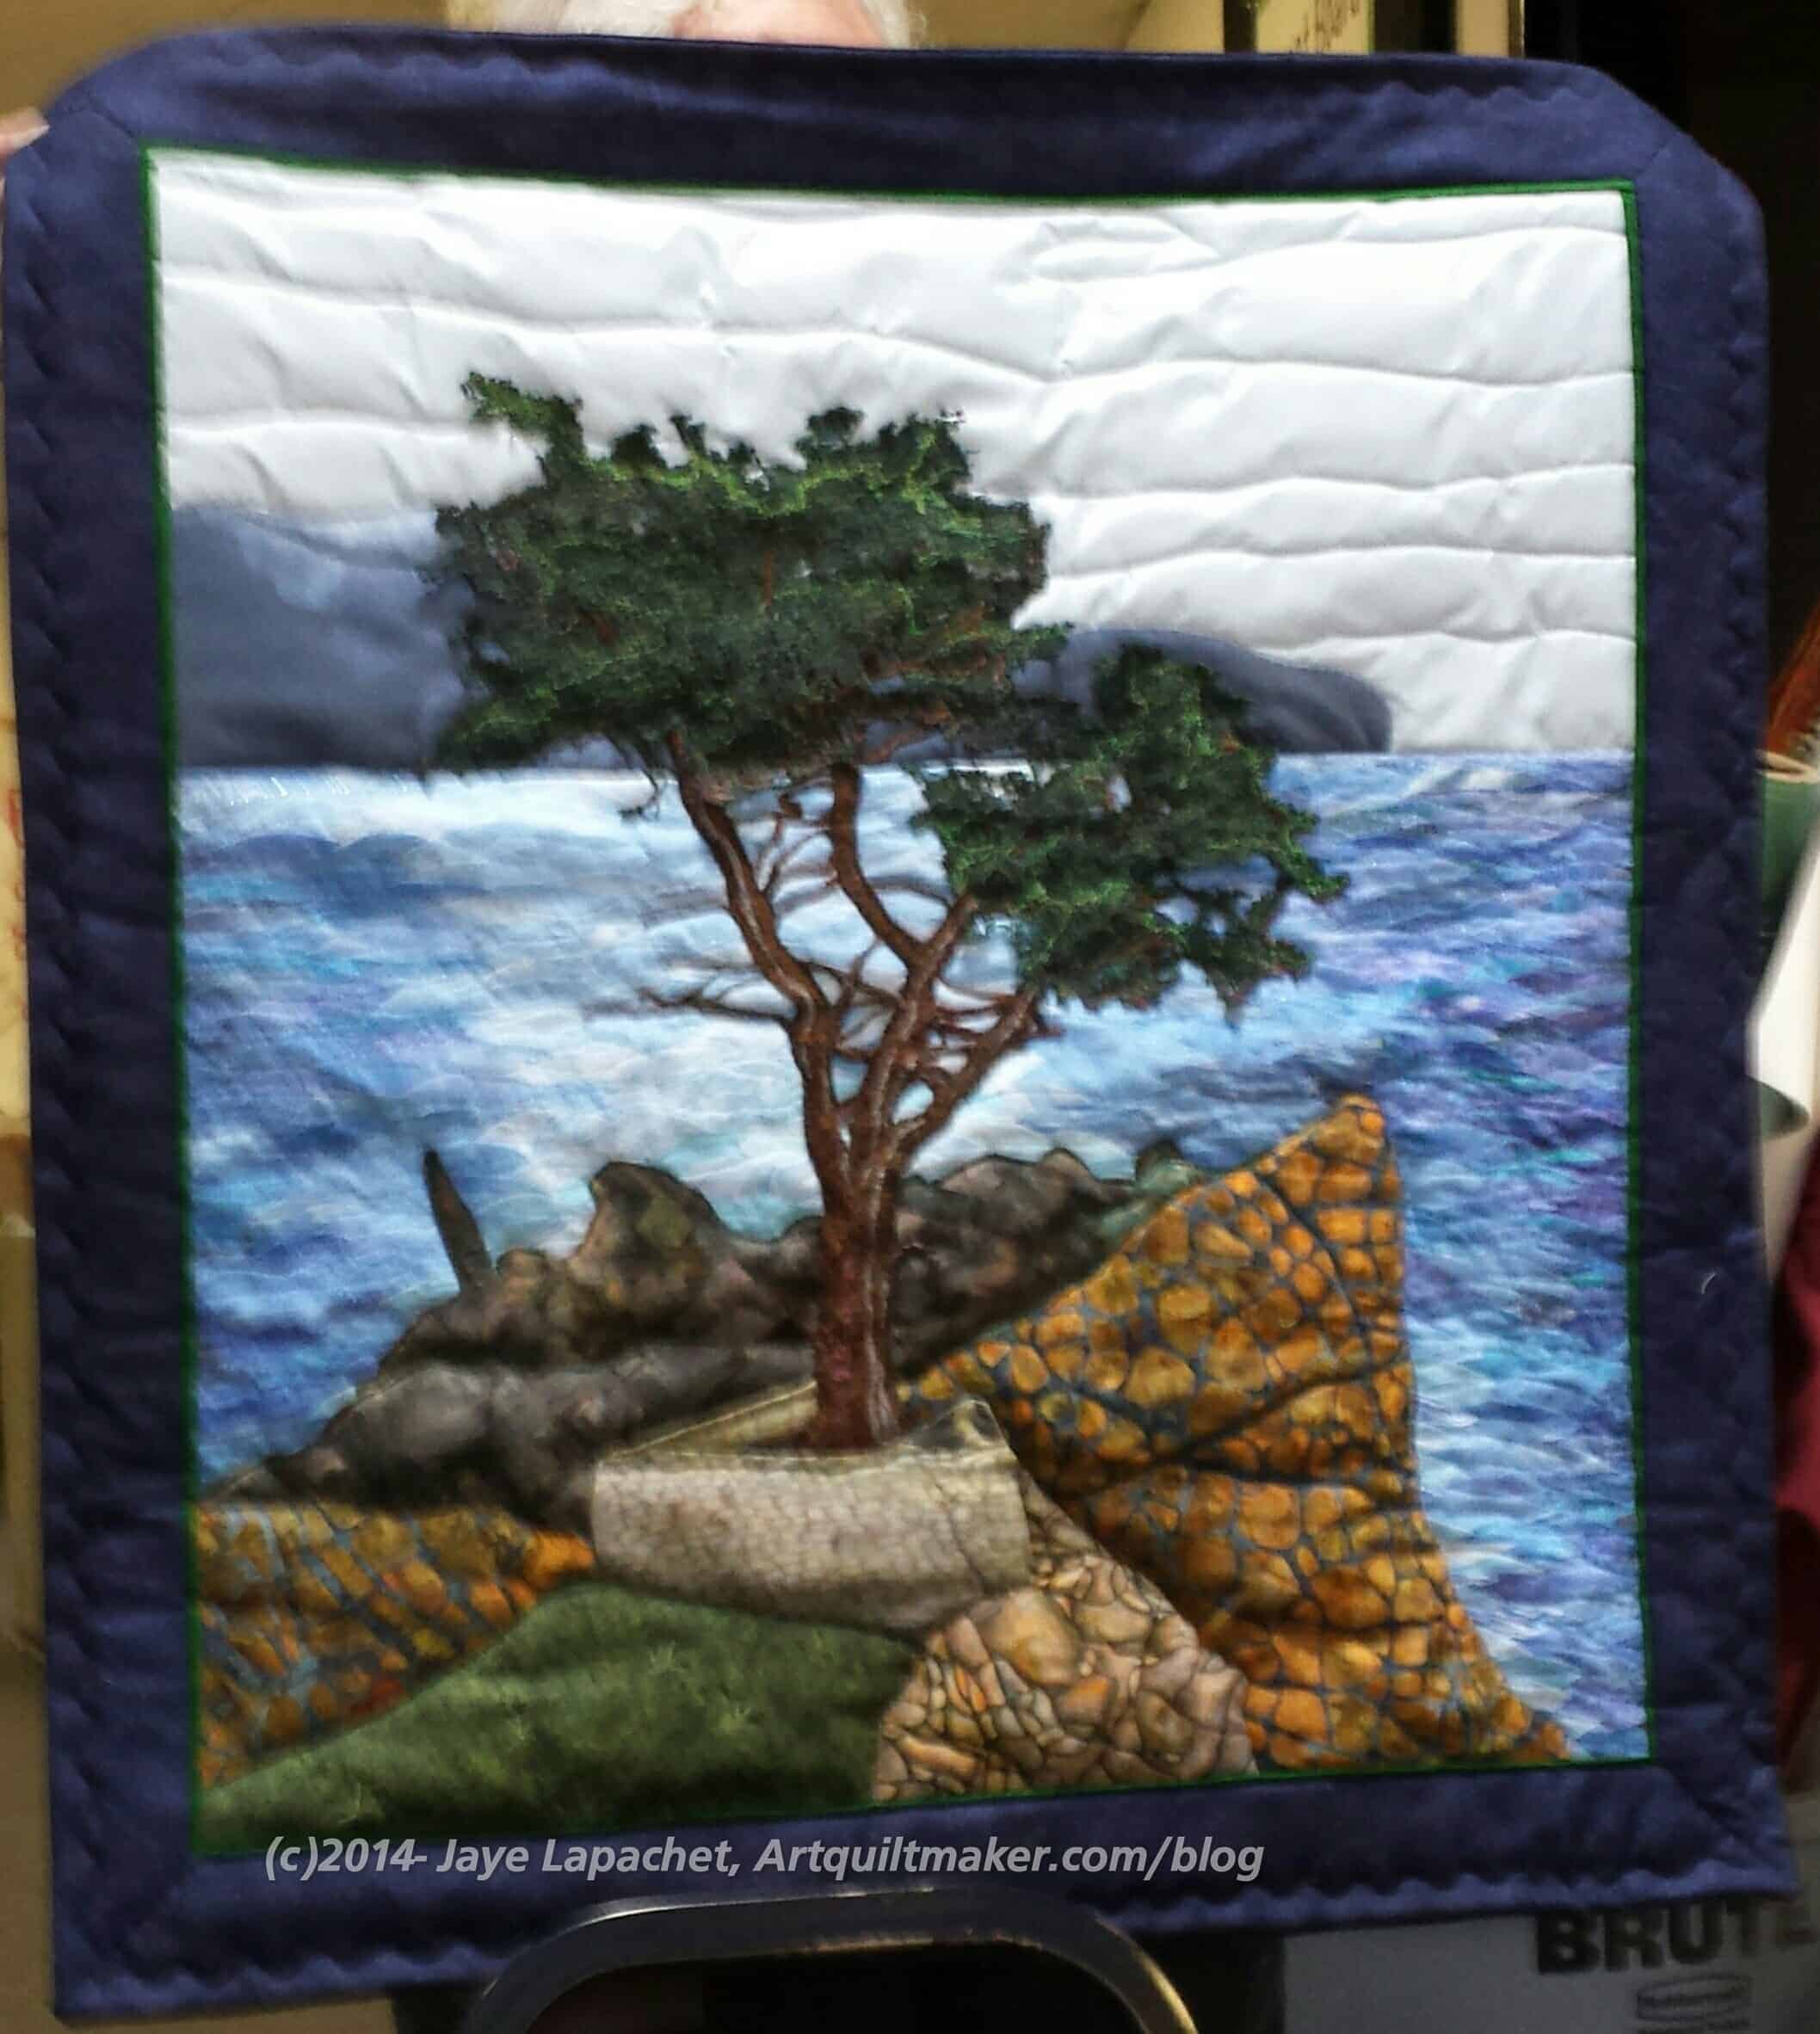
Caroline’s Cypress
Caroline does amazing landscapes and she is nearly finished with another one in her series of Lone Cypresses (Monterey Coast).
She threadpainted the greenery, but a new member showed some cheesecloth she had dyed, which sparked a discussion on the merits of making the greenery with cheesecloth instead of all of that threadpainting. Definitely doable, though different looks would be emphasized, I think. It was an interesting discussion.
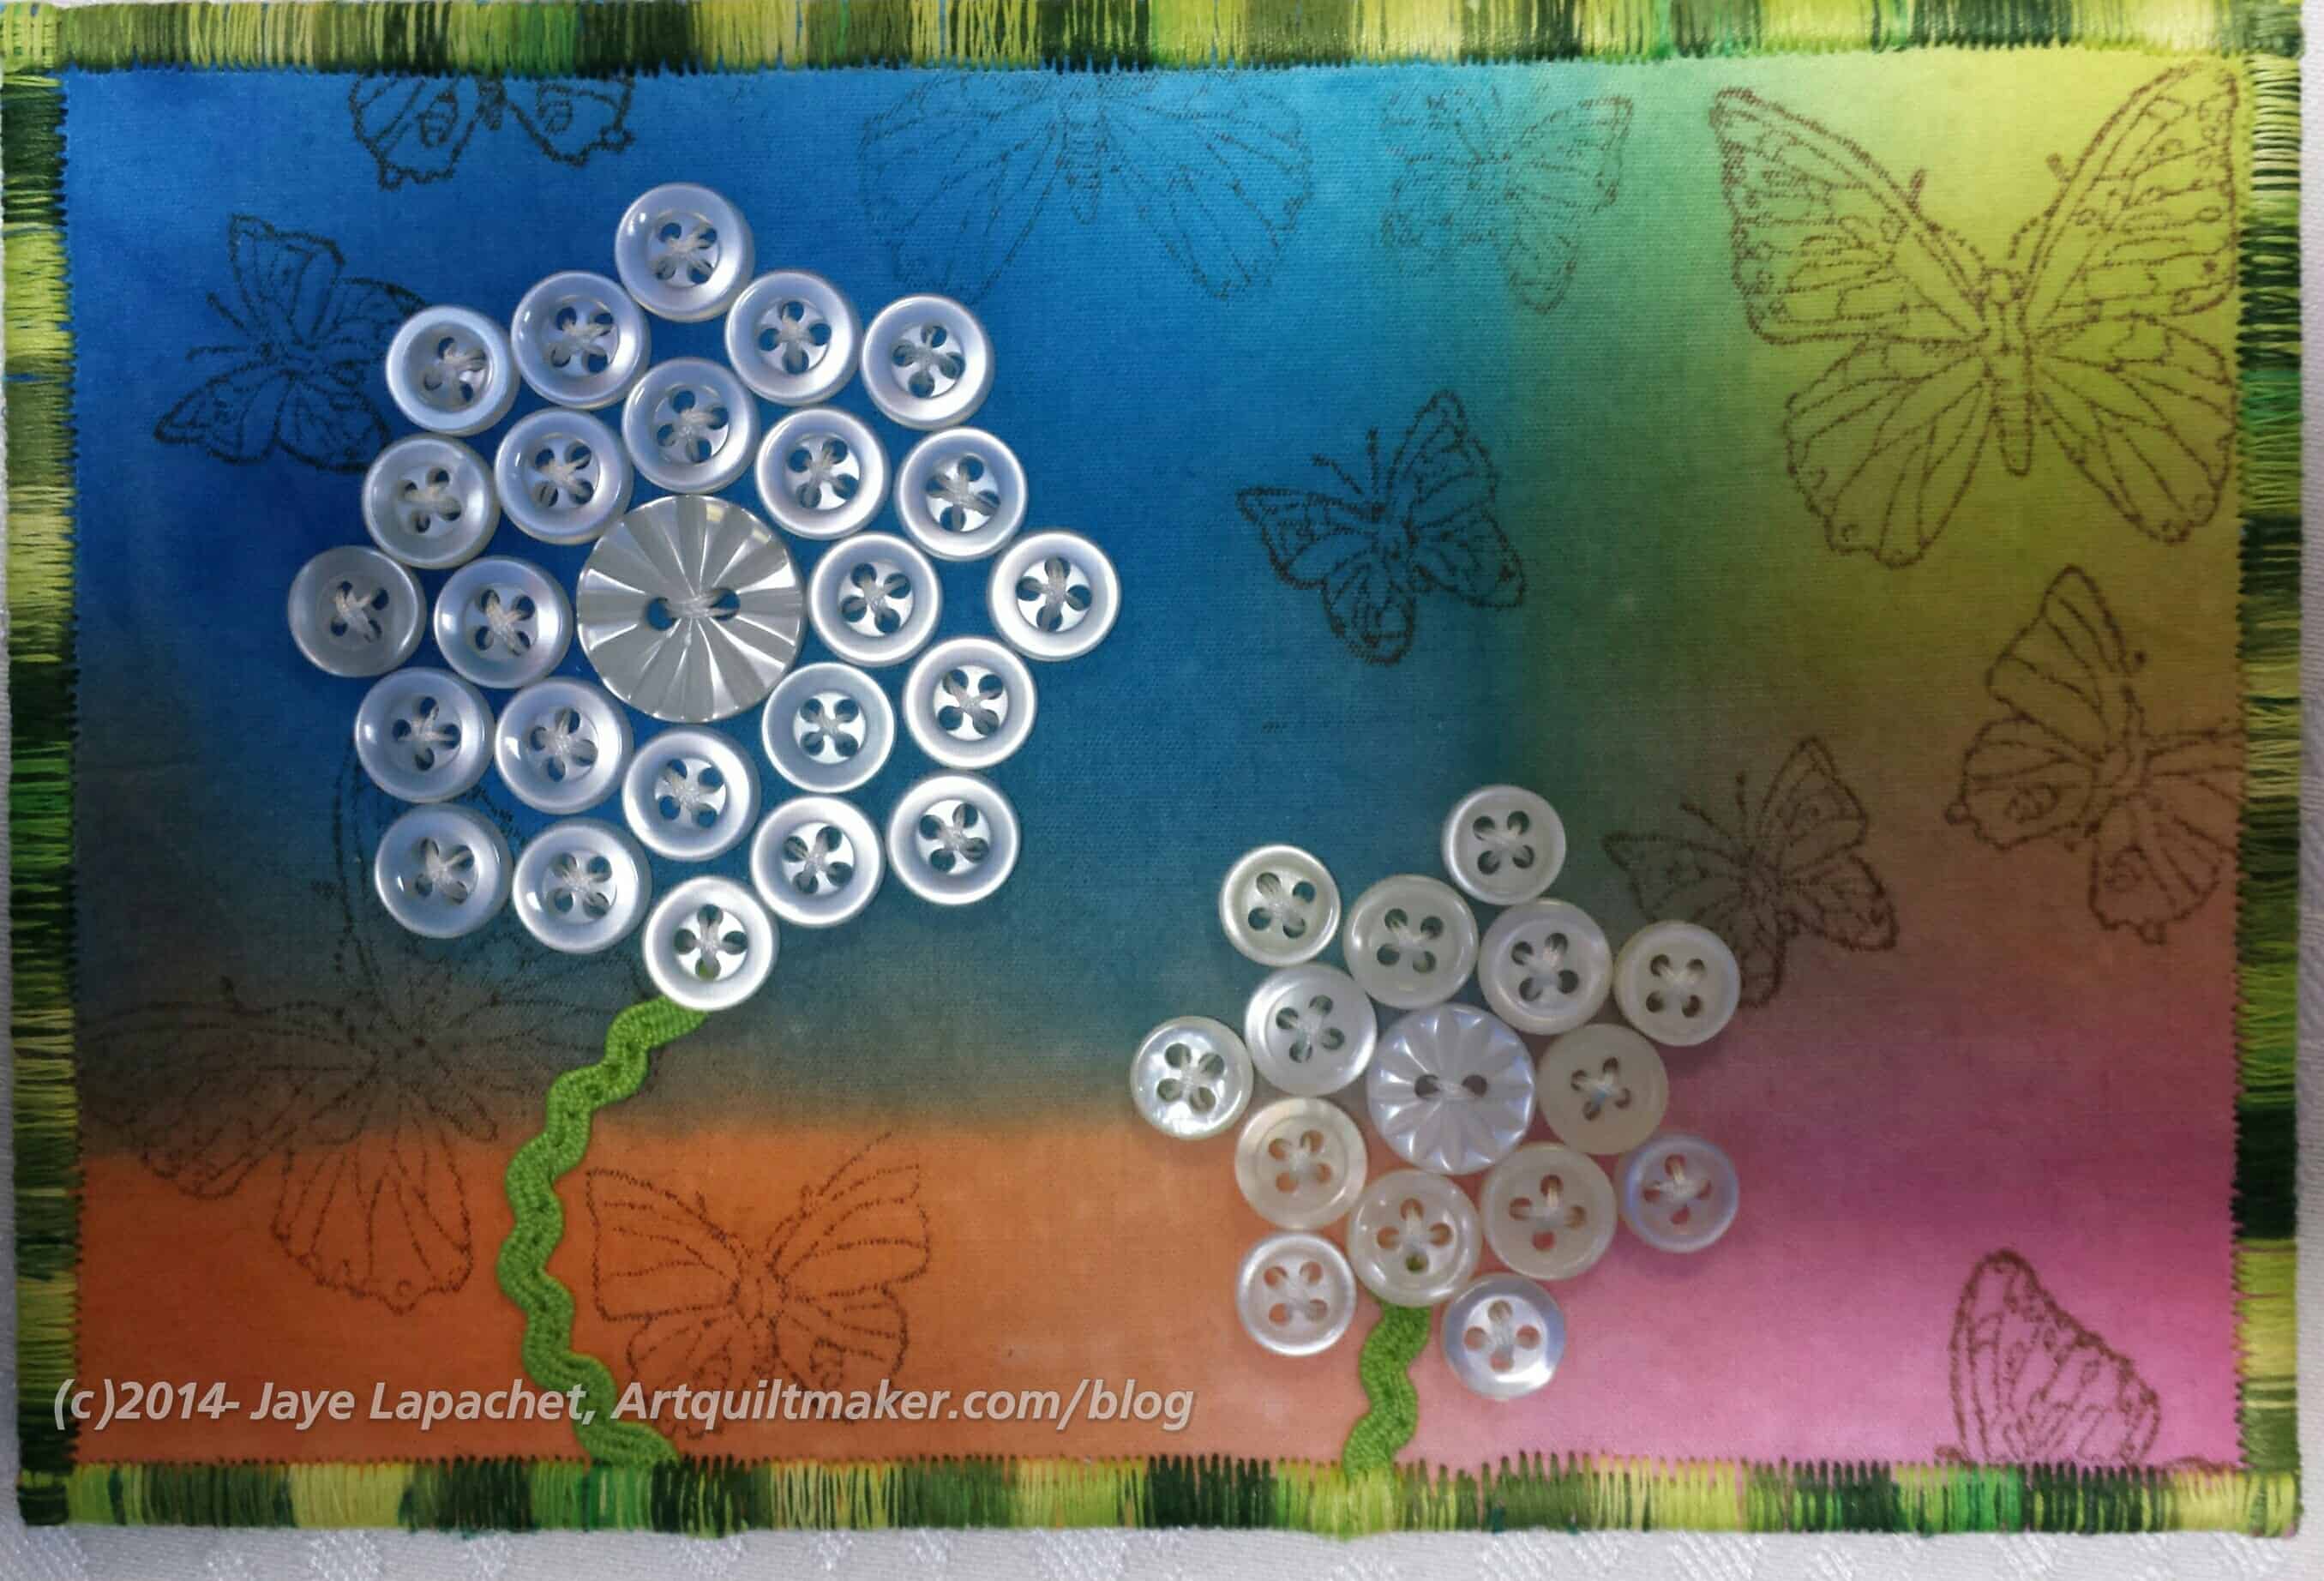
Valerie, one of the visitors does amazing work. I didn’t get to talk with her much, but she brought her dyed cheesecloth and embroidery floss as well as a bag she made from hand dyed fabric. I seriously thought about trying to slips some of her embroidery thread into my bag. I restrained myself and decided to make friends with her if she comes back. 😉 She also brought large covered buttons with beading work using seed beads, some fabric postcards and a fantastic name tag.
Valerie’s Postcard
As I said, it was a great meeting. I learned something, got to see my friends and got something to write about for you. The perfect day. 😉
Political Wifery is gearing up. Last weekend we went to Monterey to do site visits for DH’s Grand Parlor*. We had to review the various facilities including hotel rooms required for the event. We also talked to hotel event coordinators to give them details about the events.
It was sort of fun even though I didn’t get to visit any quilt shops and my Saturday sewing time was usurped by this task.
I have to say that it was a beautiful day in Monterey and I did enjoy being outside and walking around.
One of the things we did was look at a location for the BBQ. The proposed location is a historical site, which includes the tiled fountain shown here.
The fountain, sadly wasn’t working. Conscientiousness about the drought in California, I imagine. It was still quite beautiful and would be a great inspiration for a border on a quilt.
*For those of you just joining us, Grand Parlor is the Native Sons** annual conference
**Native Sons of the Golden West is a statewide fraternal organization which brings men together to support the preservation, teaching and education around California history. They also have a strong social aspect and support a charitable foundation that gives money to hospitals to support Cranio-facial Anomalies Teams at UCSF and St. John’s hospitals.
Post the direct URL (link) where your drawing, doodle, artwork is posted (e.g. your blog, Flickr) in the comments area of this post. I would really like to keep all the artwork together and provide a way for others to see your work and get familiar with your blog or website.
The Creative Prompt Project, also, has a Flickr group, which you can join to post your responses. I created this spot so those of you without blogs and websites would have a place to post your responses.
We are also talking about this on Twitter. Use the hashtag #CPP
A webcomic based almost entirely on chaos and tea.
BunnyRuby – Built to be easy to use. Bunny focuses on ease of use. Features, throughput, concurrency are important but ease of use comes first.
Big Buck Bunny is now even more a world standard for video standards.
beach bunny
The Explosive Bunny serves as ammunition for the Bunny Cannon. (Terraria)
Blue Bunny ice cream
Energizer Bunny
The Bunny Museum: Private museum features over 11000 toy bunny collectibles of every size, shape, and matter. Also features four Rose Parade float bunnies.
The Busy Bunny has been providing edible toy treats for pet rabbits and fun stuff for people since 1987.
Pat The Bunny Acoustic punk songs from the desert of Tucson, AZ about addiction, getting sober, and anarchism.
Bugs Bunny
These Honey flavored Bunny Grahams are hard to stop eating once you start! Bunny Grahams are the perfect size for toddler hands and grown-up handfuls.
The Bunny Collection featuring all synthetic brushes was specially designed to deliver a perfect makeup application. (Sigma Beauty)
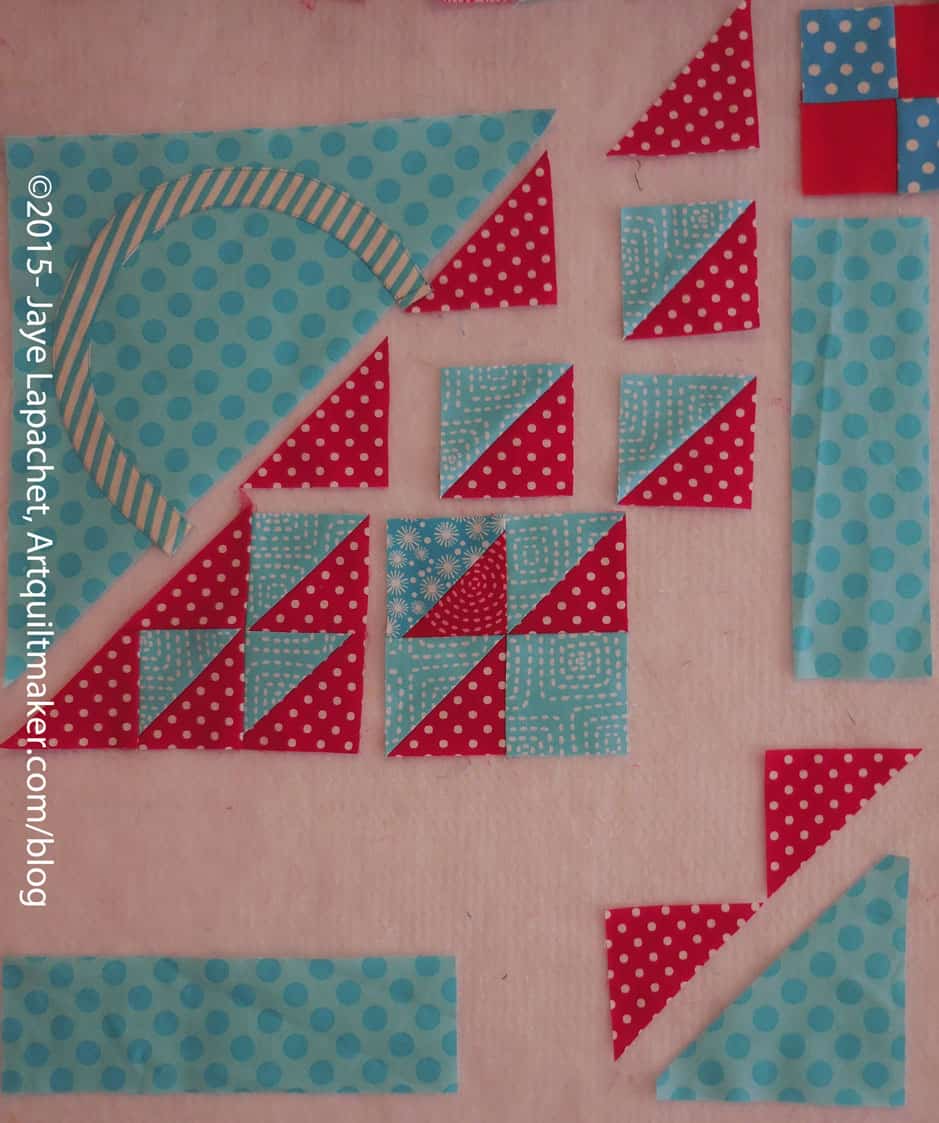
More progress on the Octagon 9 Patch. It seems slow, but I see the progress. Compare from last time and let me know what you think.
The 9 patches are not in their final locations. I started to arrange them as I made them, but it was hard to judge progress so now I just put each nine patch in the next open space. I’ll arrange them later.
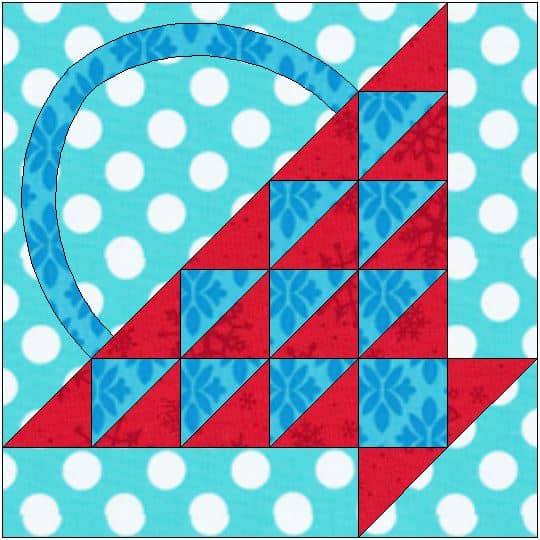
As mentioned in part 1, above is the current block in our Sampler Quilt Class. These directions are for machine sewing your Flower Basket and include a little applique’. The applique’ can be done by machine or hand.
Are you playing along? If you are just starting, below is the complete supply list. You won’t need everything for this step, but you will need to start with part 1 and that part requires more supplies. Also, note, there are a LOT of photos in this tutorial.
These directions use a quarter inch seam allowance. Check your seam allowance before you begin. If you don’t know how to do that, there are resources available, including one from Connecting Threads and Craftsy. You can search the web for others if you don’t like these tutorials.
You will be directed to use the Triangle Technique. Make sure you have the chart as well as the instructions handy.
Respect the bias.
After working through part 1, you have already chosen your fabrics, made your templates and cut your pieces. You are ready to sew.
Sewing
Carefully stitch along the hypotenuse of the large background triangle, about 1/8″ from the edge, to stabilize it. This stitching will be covered up when you stitch the handle part of the block to the basket part of the block.
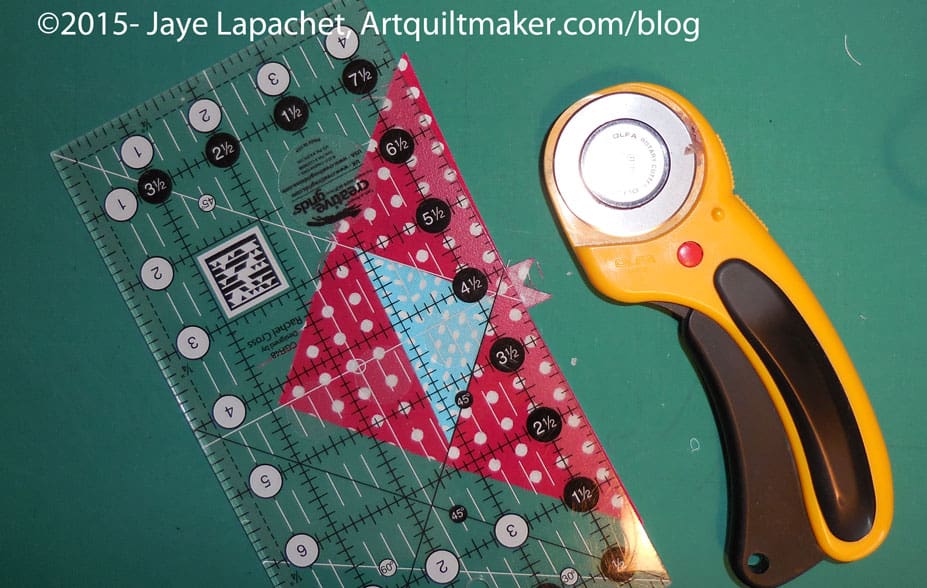
Triangle Technique
Use the Triangle Technique to make your half square triangles. Make sure you have the chart available to confirm sizes. A brief overview is:
Draw an X from corner to corner diagonally on the wrong side of each of your 6.25″ x 6.25″ squares.
Place them right sides together and sew 1/4″ on each side of the diagonal lines.
Nota bene: If I had wanted to pin I would have pinned far away from any of the diagonal lines.
Now you have a piece with four seams forming an X.
Next cut the ‘Plus’ of your sewn piece. This means that you are cutting horizontally down the middle and vertically down the middle.
Line up your ruler with the edge of the fabric and the point in the middle where the two lines forming the X come together.
Cut vertically.
Do NOT move your fabric.
Reposition your ruler and then cut the piece horizontally.
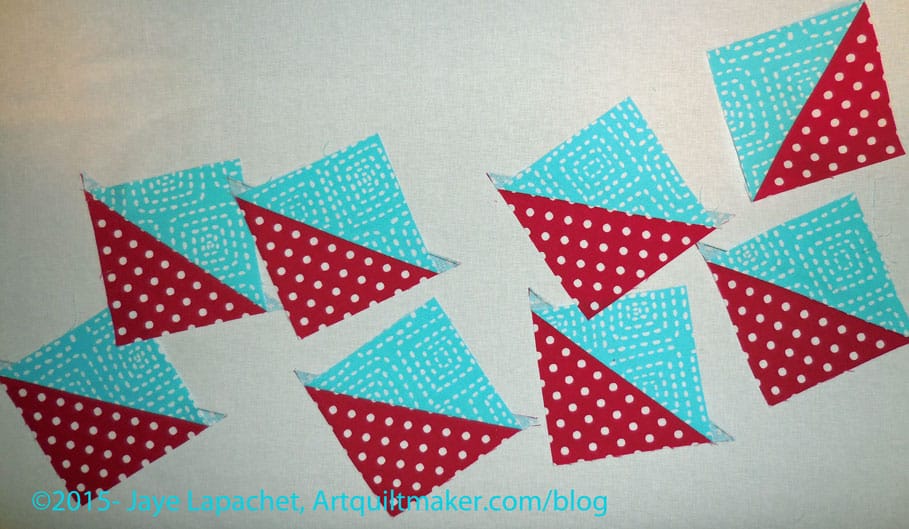
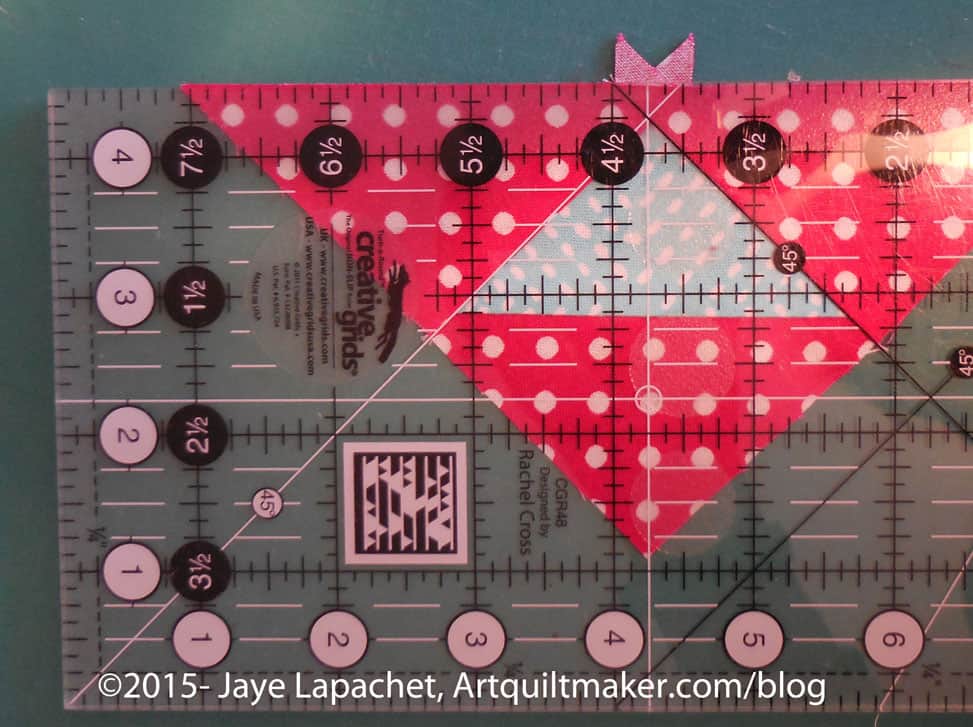
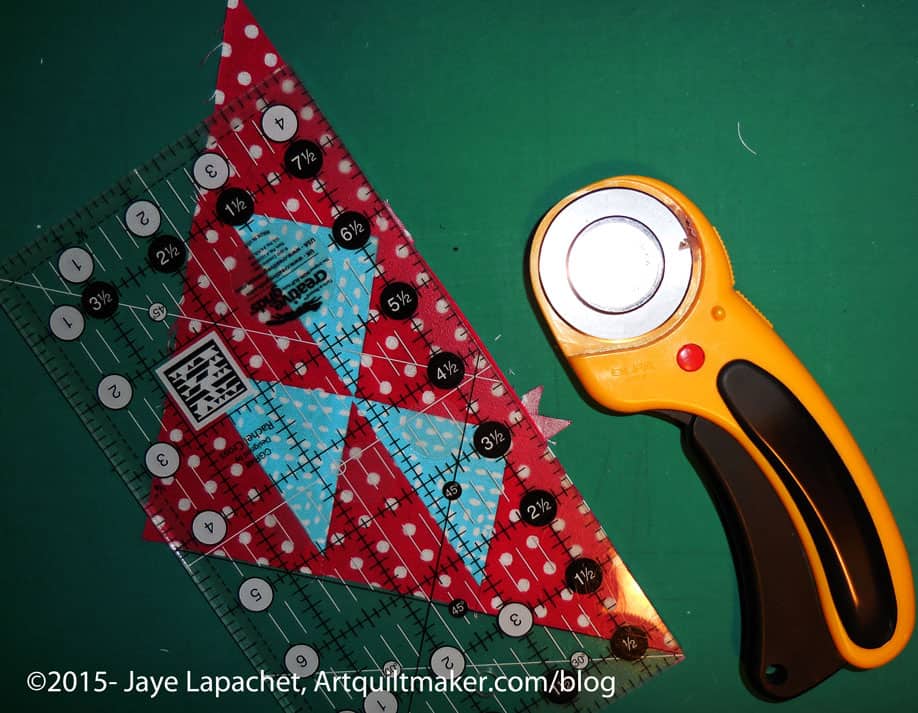
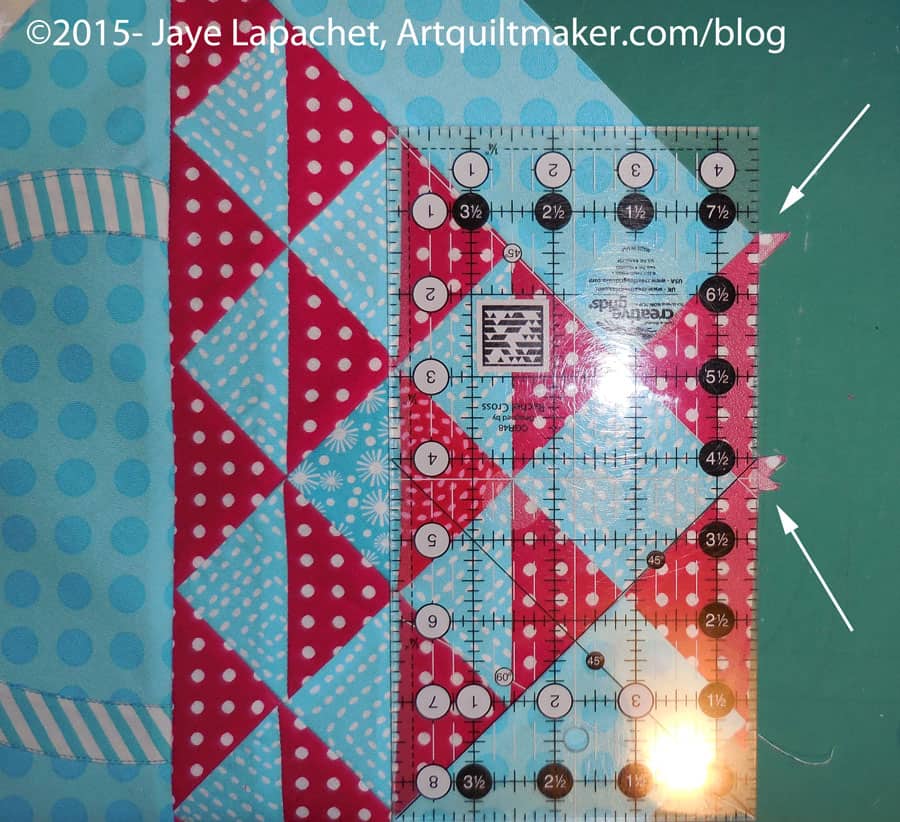
The result is 8-2.5″ half square triangles. The above are actually a thread or two larger than 2.5″, which leaves the perfect opportunity for trimming to make them an absolutely perfect 2.5″.
Trim your HSTs to an absolutely perfect 2.5″.
Now you have 8 beautiful HSTs.
Of course, you can use whatever technique you like to make the half square triangles.
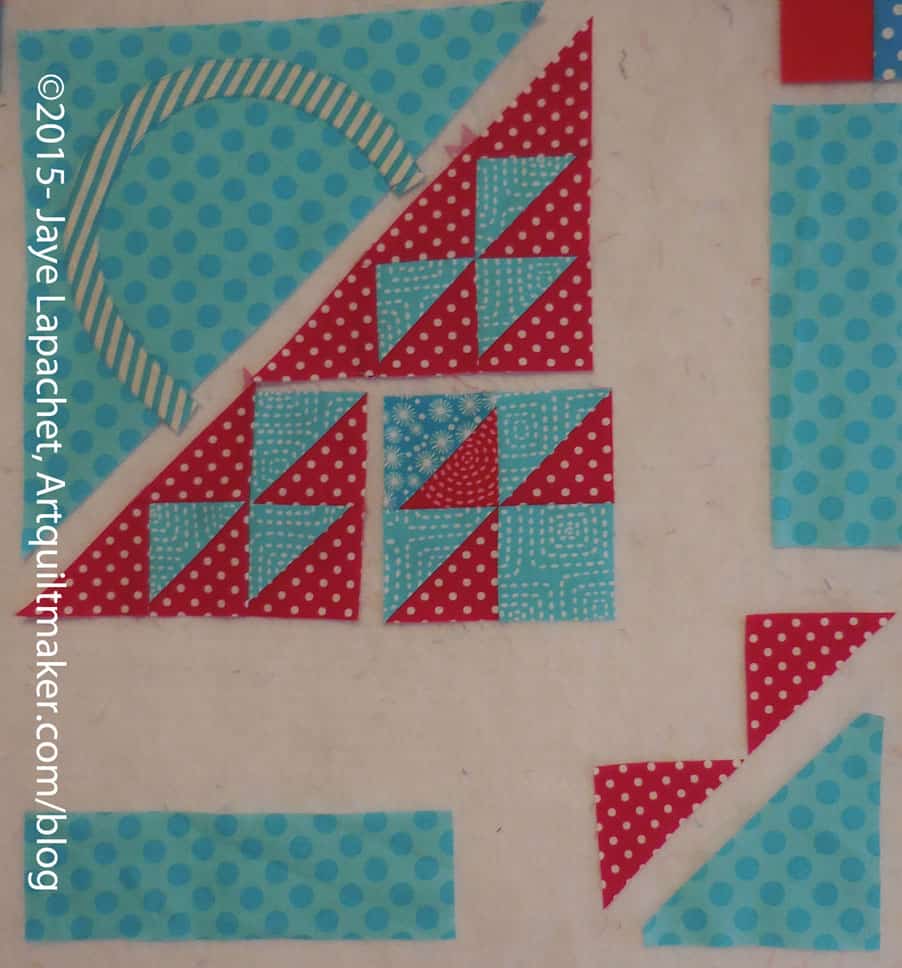
Layout and Assembly
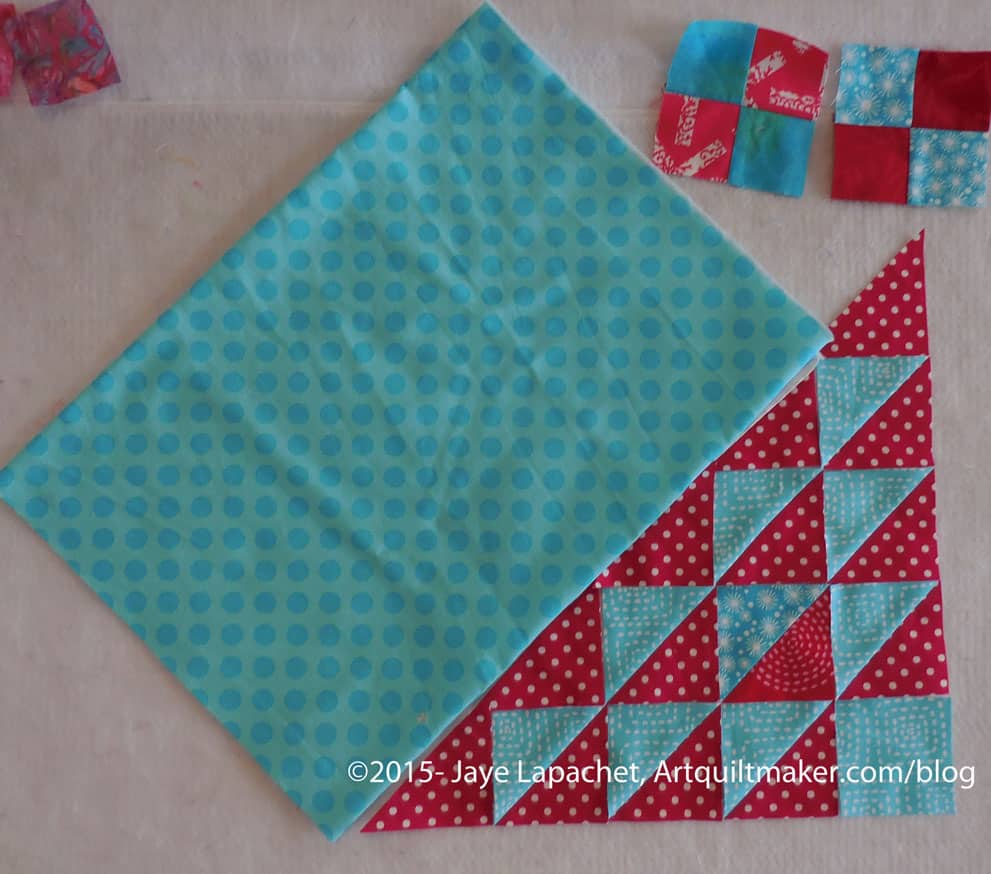
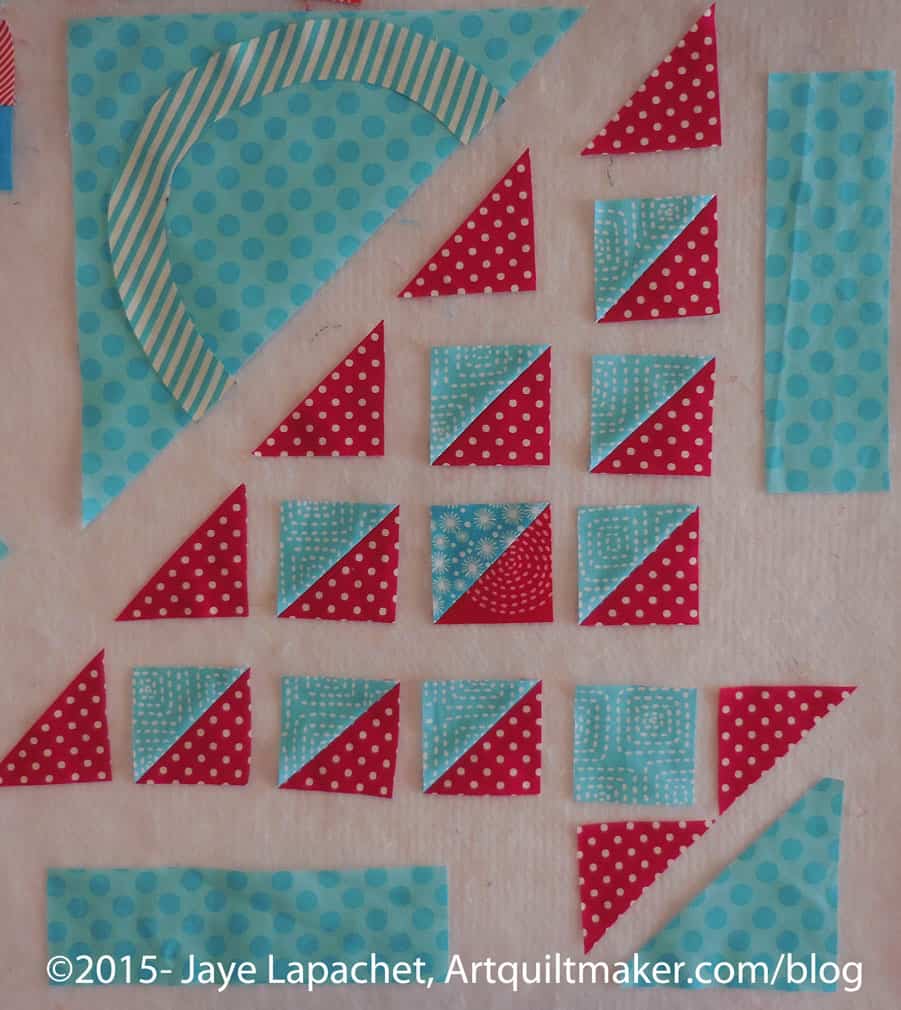
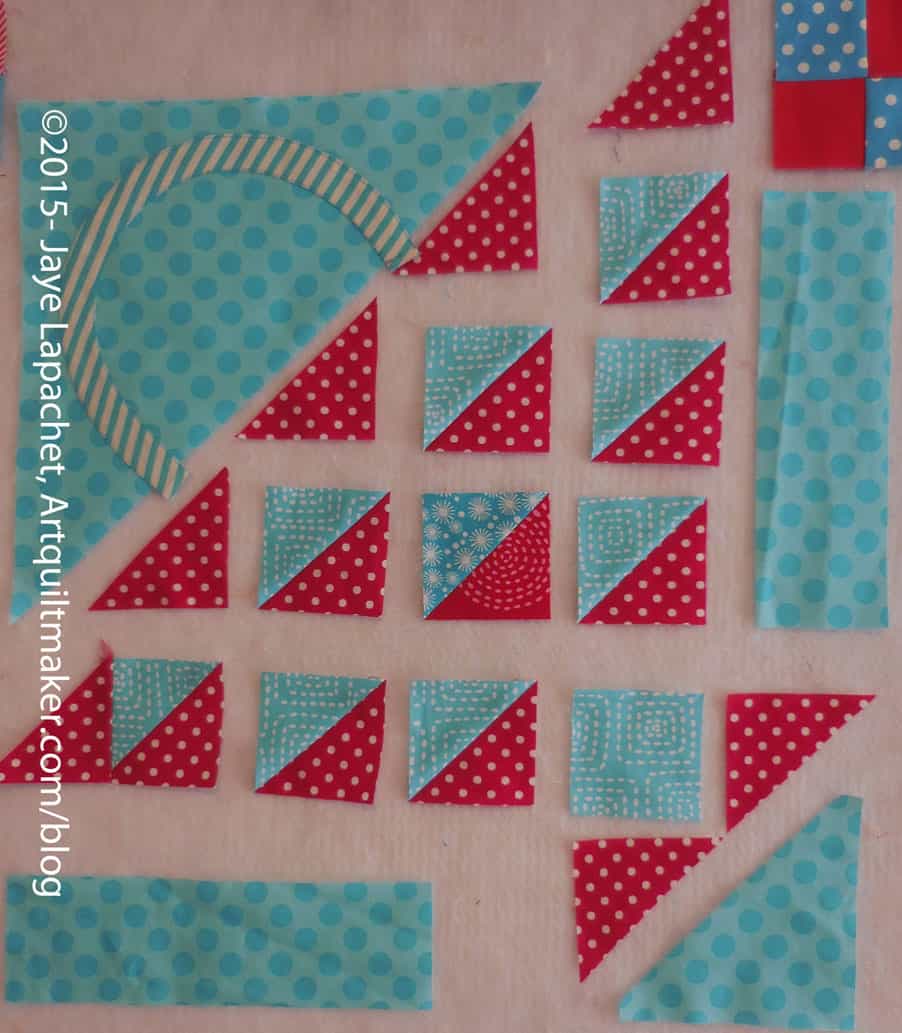
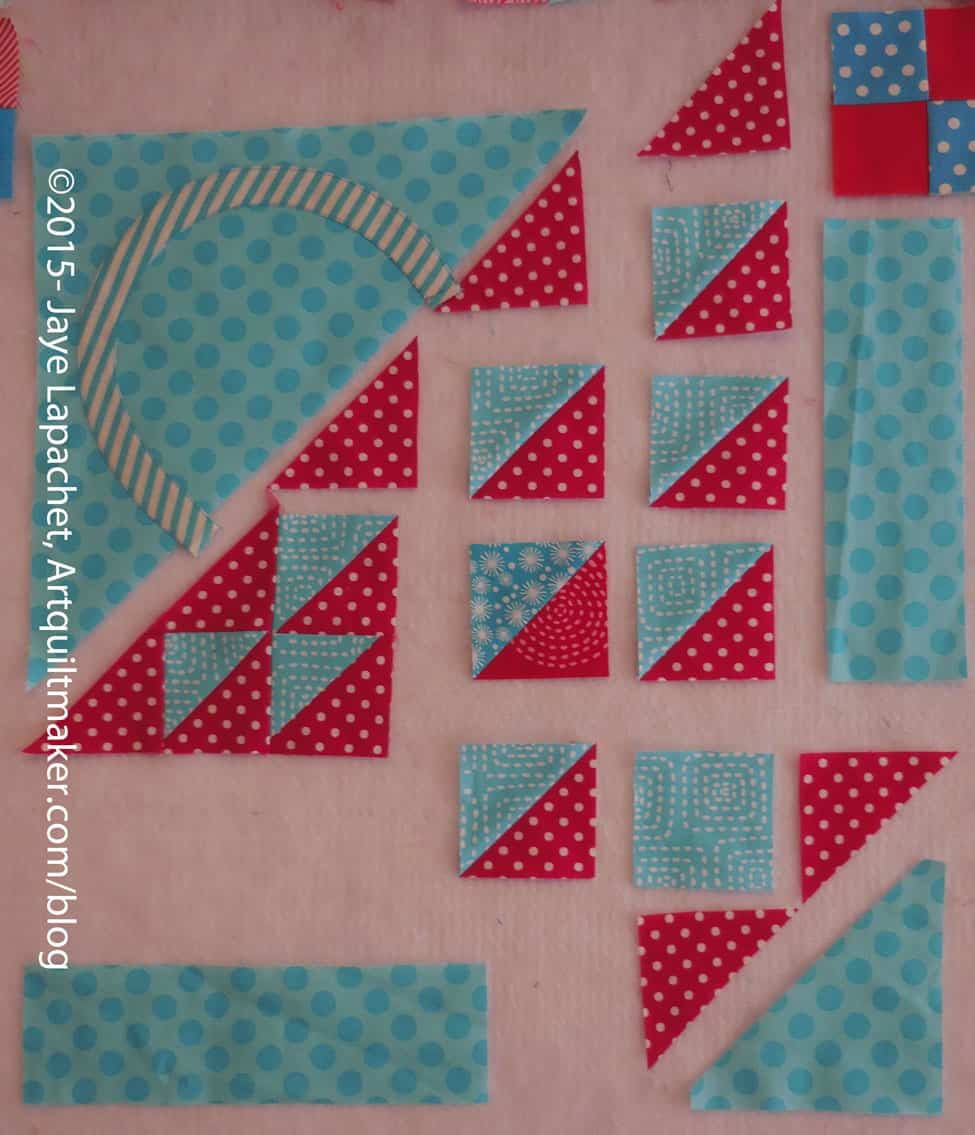
Pieces cut and ready to sew
Now that you have cut all of your pieces, lay them out on your sandpaper board, or put them up on your design wall. It is great to be able to see where all the pieces belong and adjust any pieces that need adjusting before you sew.
Sew Handle to Background
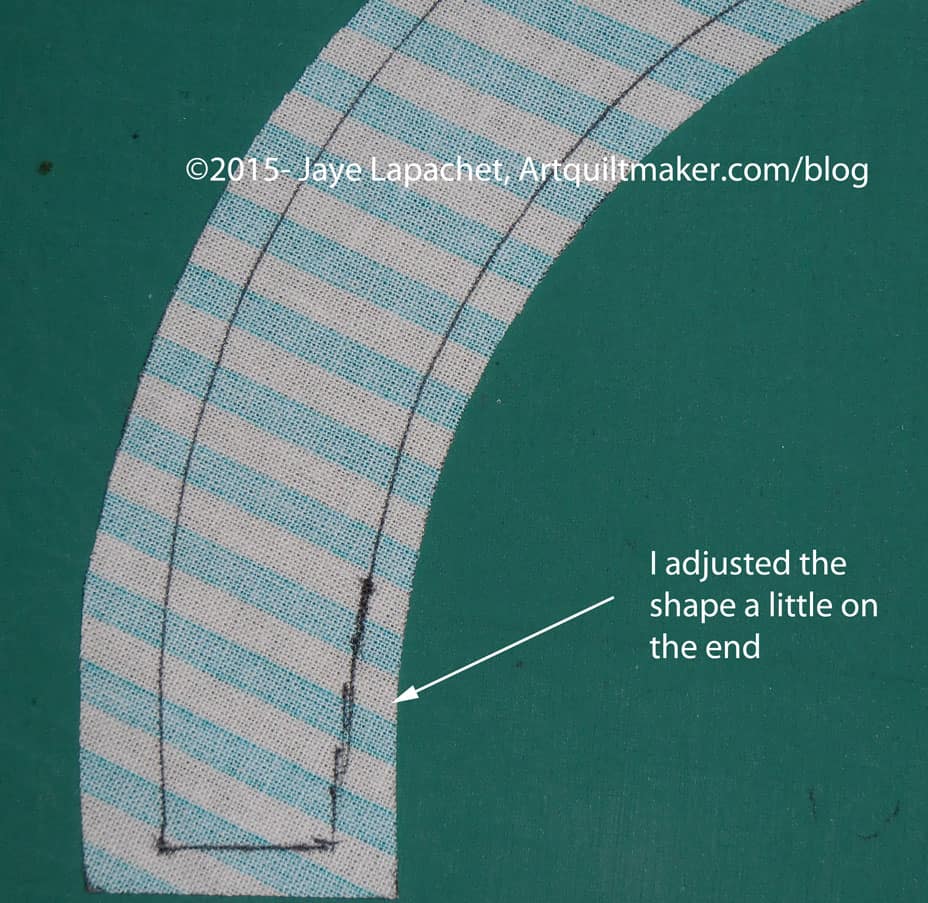
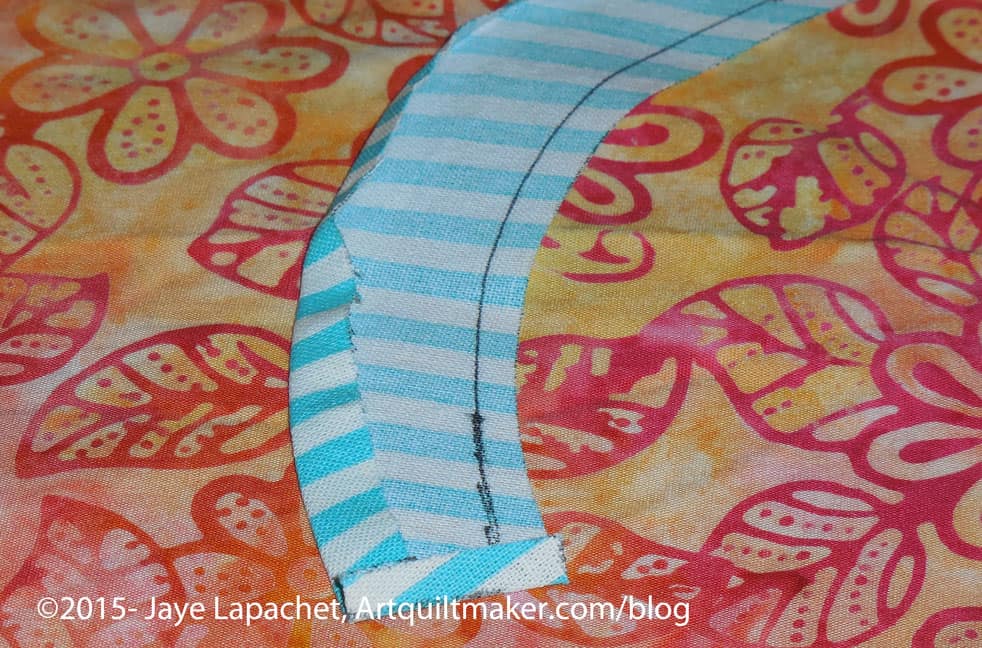
Template on Handle, ready to traceTraced & Adjusted
Because I decided to use the method described below, I made another handle template with NO seam allowance. I placed it on the handle I had cut from the striped fabric carefully so there was an even seam allowance on all sides. Then I traced around it with my thin black pen. I thought the template was a little wide at the end so I adjusted the line a bit to make the seam allowance larger.
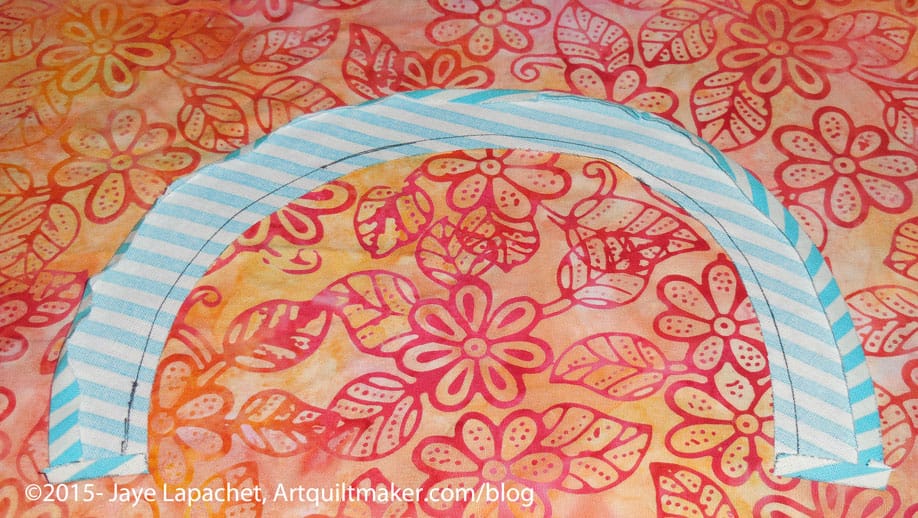
Handle & Background Triangle Cut, Laid OutPieces Laid Out
My pieces looked a little weird-not the right size, etc when I laid them out. Have no fear! They will improve.
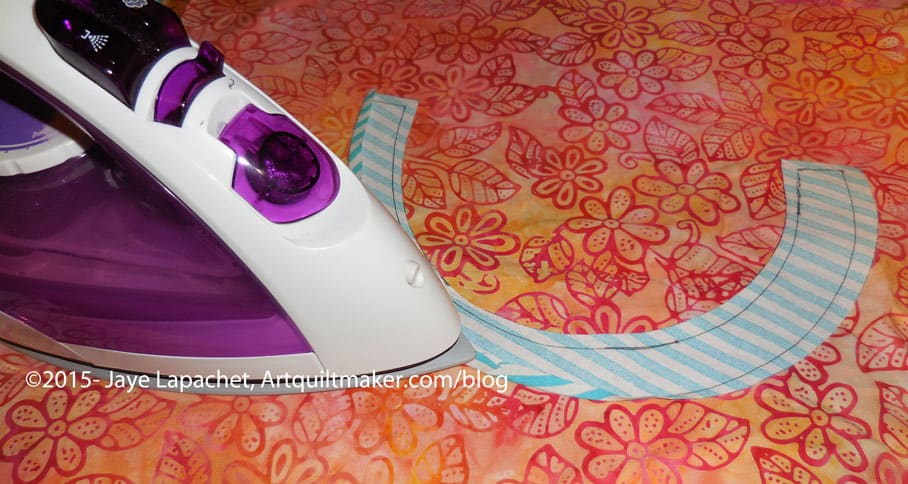
Press seam allowance underPress with hot iron
I was using my stiletto to adjust the seam allowance, but it was impossible to hold the stiletto, the camera and the iron all at once. Press carefully, so as not to distort your pieces.
Watch out for corners
Pay attention to the corners. The layers of fabric will want to pooch in weird directions. This is where one of those mini irons might come in handy. I used my regular iron and a stiletto, so I know those tools work.
Press seam allowance on handle under
Take your handle and press the the seam allowance under on both sides of the piece. Press so that the drawn line is on the inside of the handle and is covered by the piece once the handle is sewn.
<Nota bene: the orange fabric was selected for good contrast so that the steps would show up well>
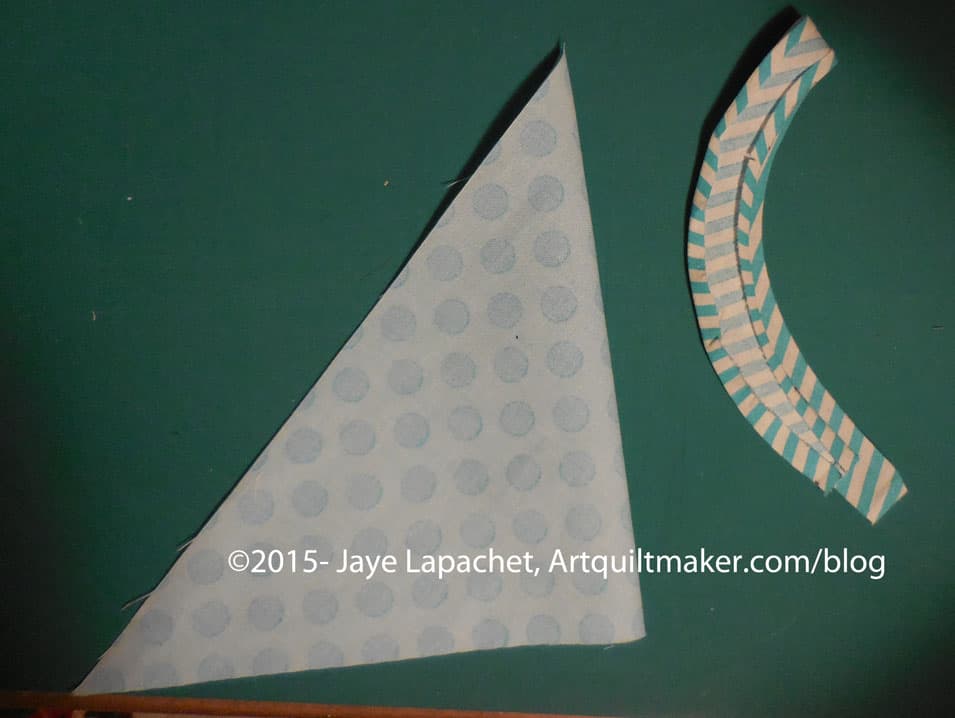
Finger press patches in half
Fold the handle in half with wrong sides together and finger press on the midpoint. Unfold.
Fold your large triangle in half with right sides together and finger press. Unfold and layout.
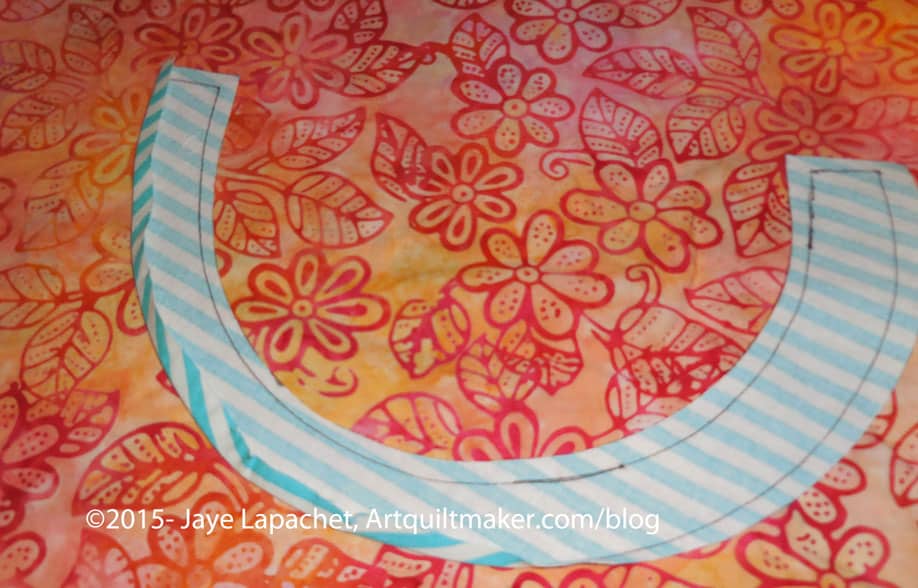
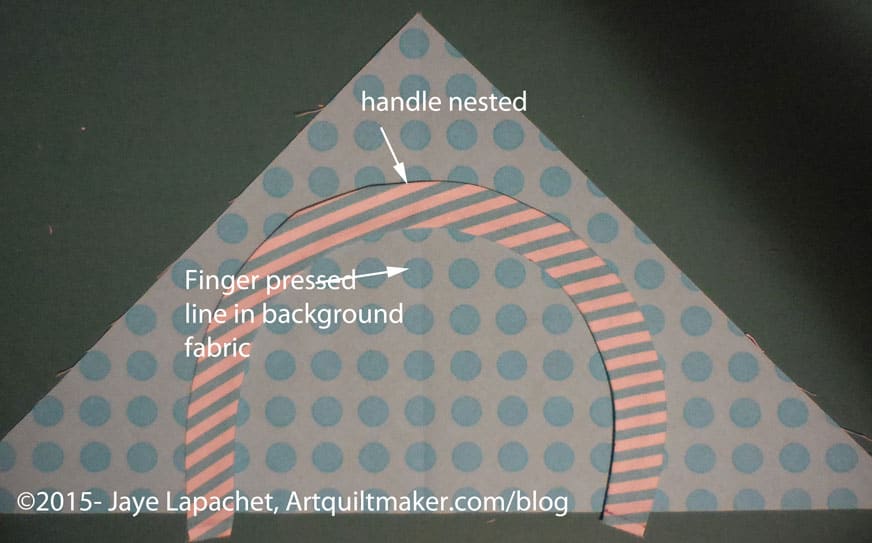
Nesting handle & background
Nest the handle into the triangle with the right sides up.
Line up the bottom edges of the handle with the hypotenuse of the background triangle. If the handle ends are a little over, it will be fine. You can trim them later.
Eyeball your piece to make sure everything looks good and even.
Pin the handle to the background down the center of the handle. Remove the pins as you sew. Try not to sew over them.
Using a lot of pins will help keep the handle in place as you sew
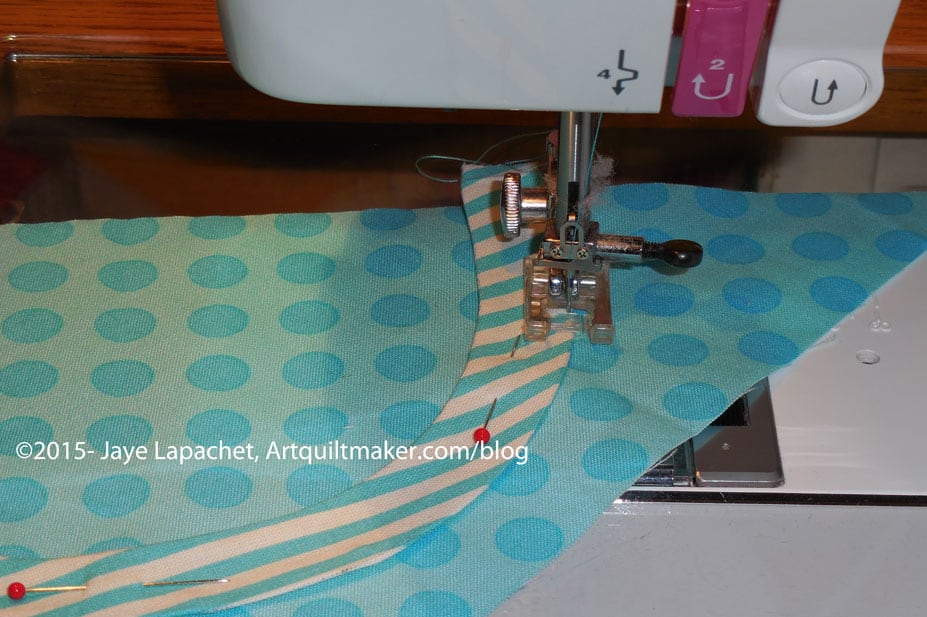
Sew carefully
Sew slowly and carefully along the drawn line around the curve. I chose a matching thread, an applique’ foot and a topstitch/sharp needle.
You will either need to hand applique’ the other side down or using a machine stitch that suits you.
You could sew both sides down with a straight stitch, like I did. There are many options.
Optional: You can satin stitch (see the Machine Applique’ tutorial) or blanket stitch or use some other decorative stitch to machine sew the handle to the background triangle piece. If you use one of these stitches, you may need some tearaway stabilizer
Optional 2: you can hand applique’ the handle to the background triangle.
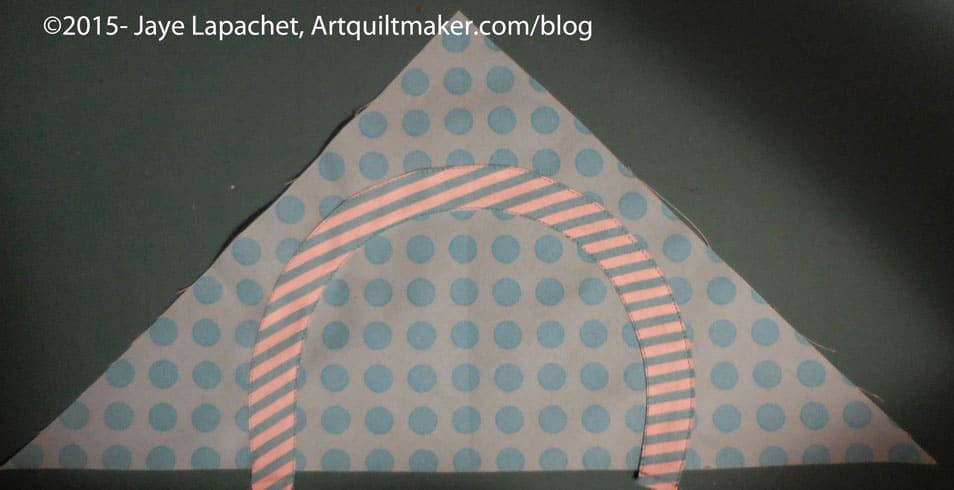
Handle sewn to background with straight seam
Once the handle is sewn you are ready to move to the woven part of the basket.
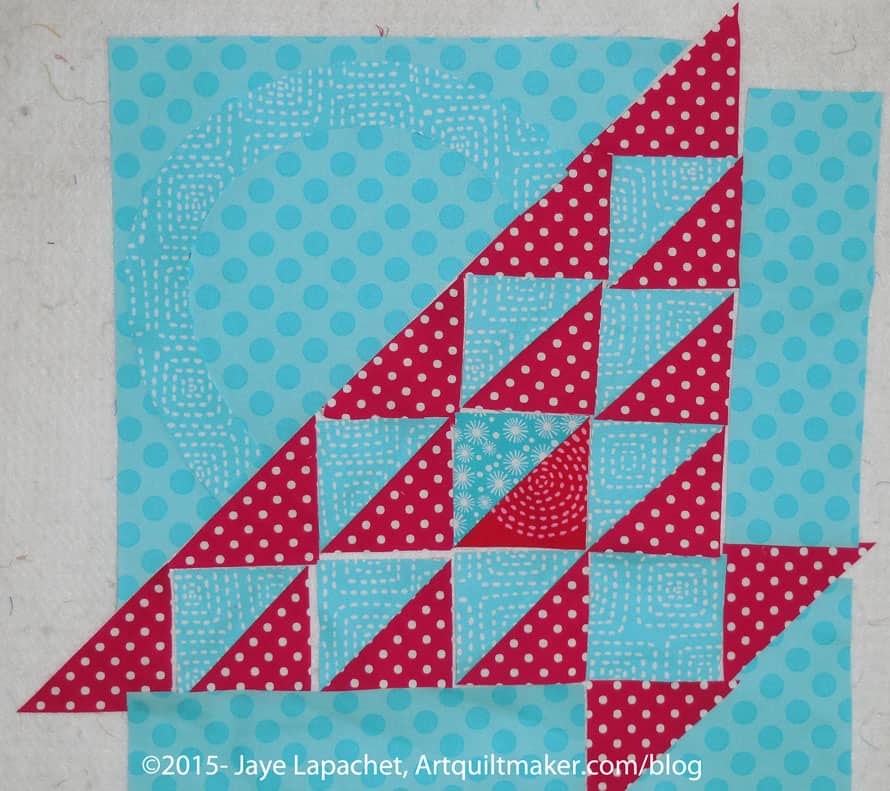
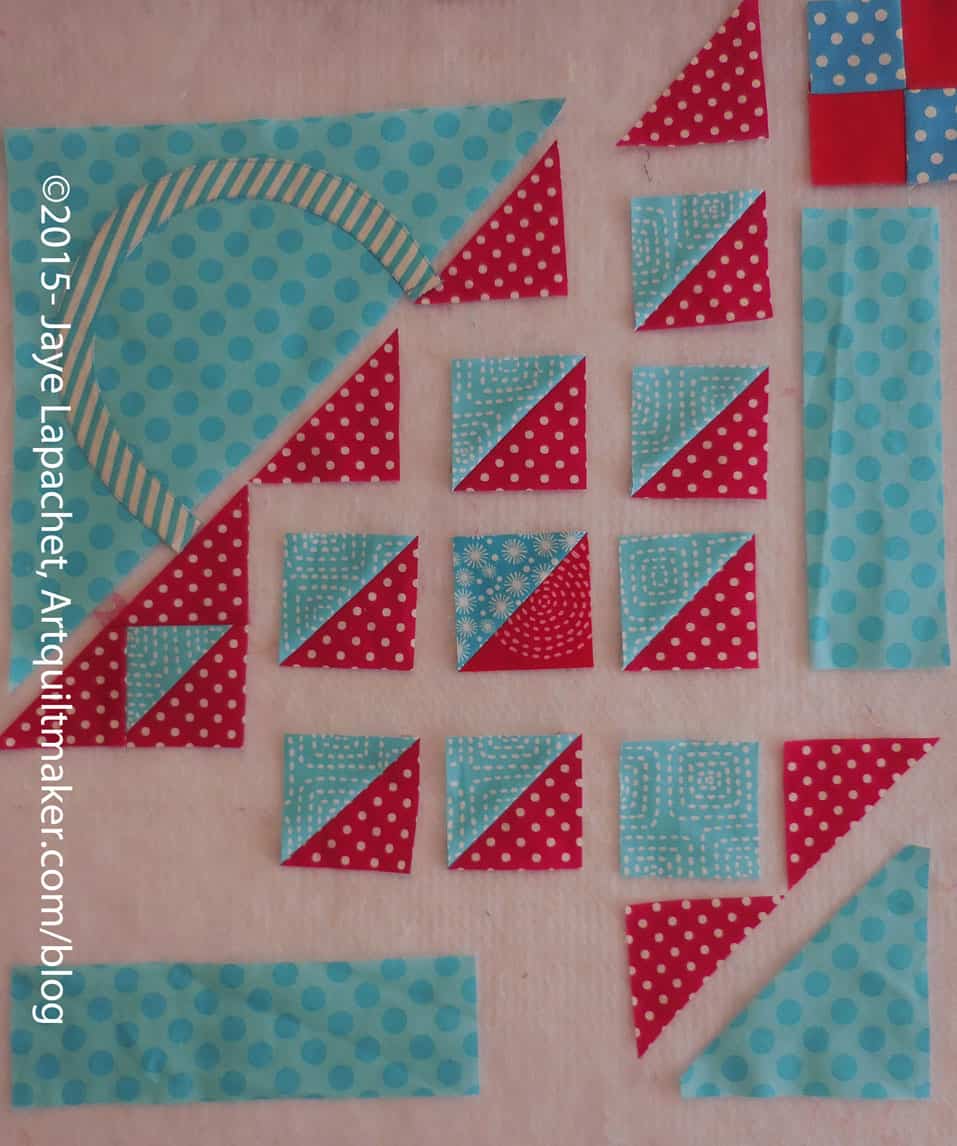
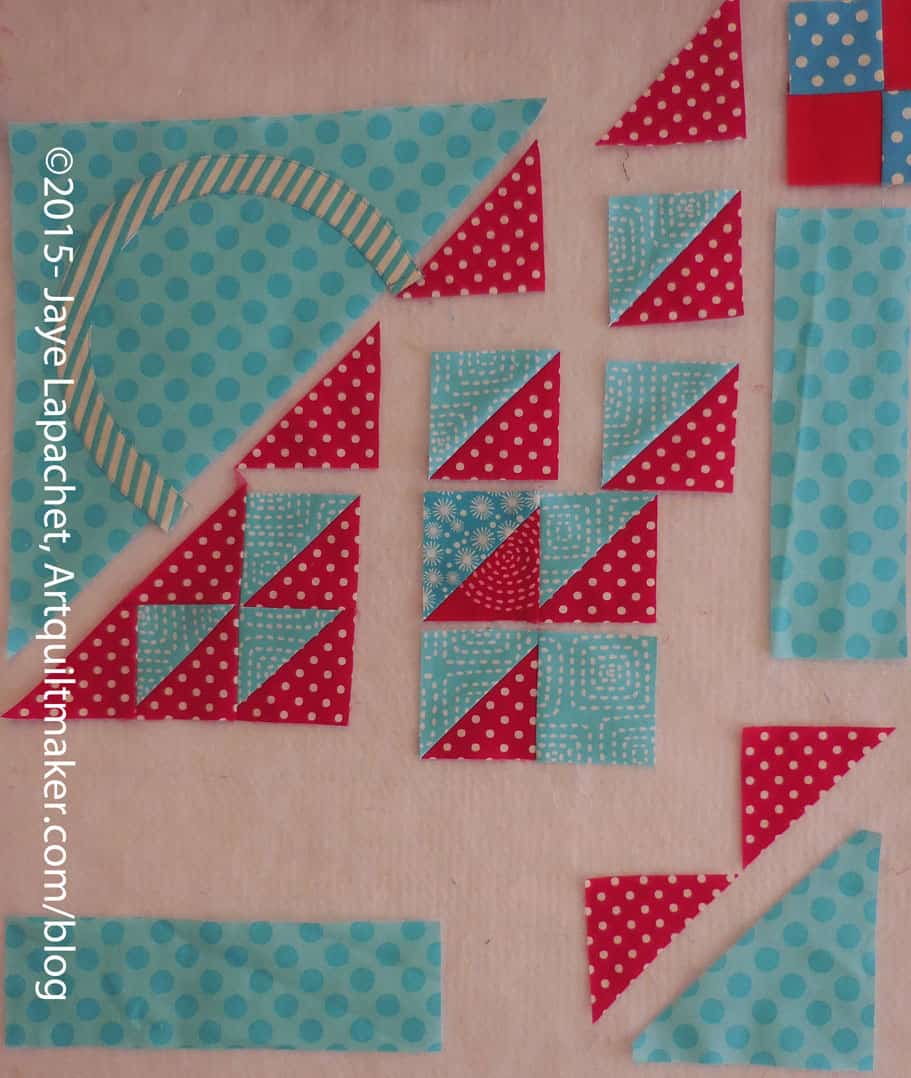
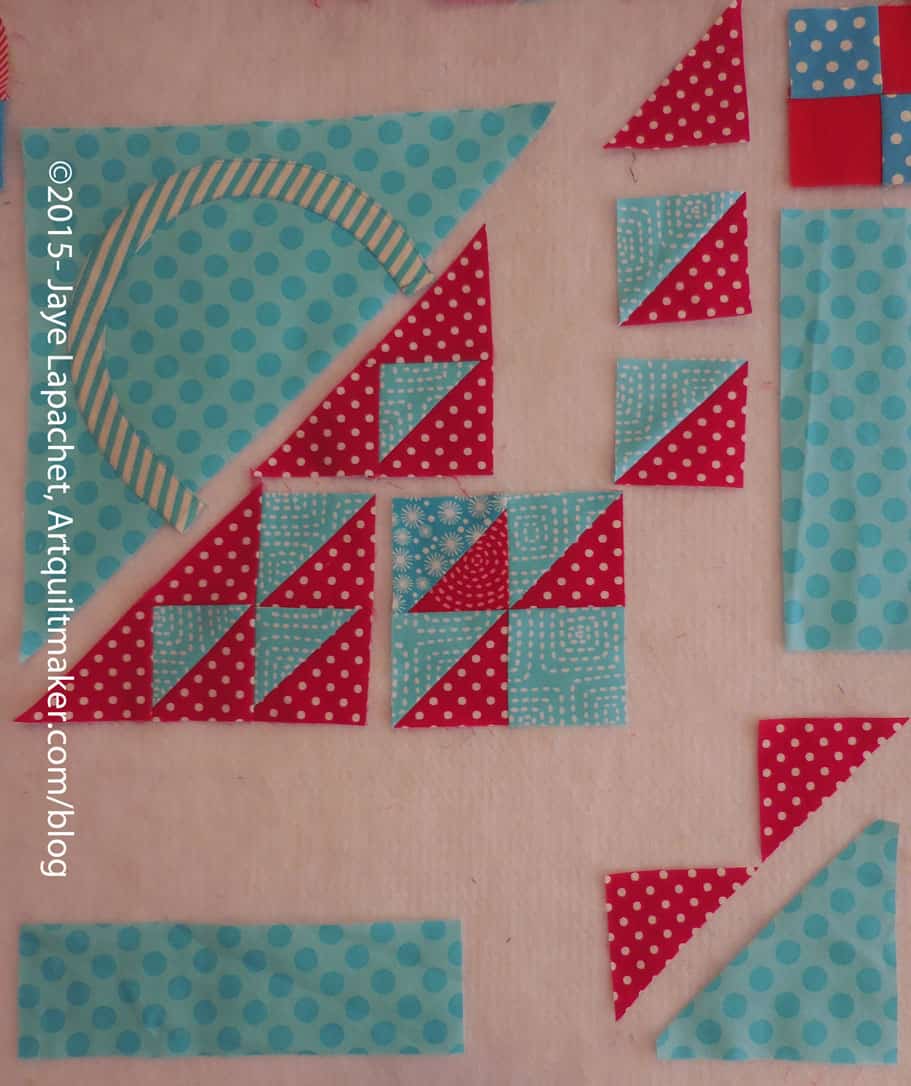
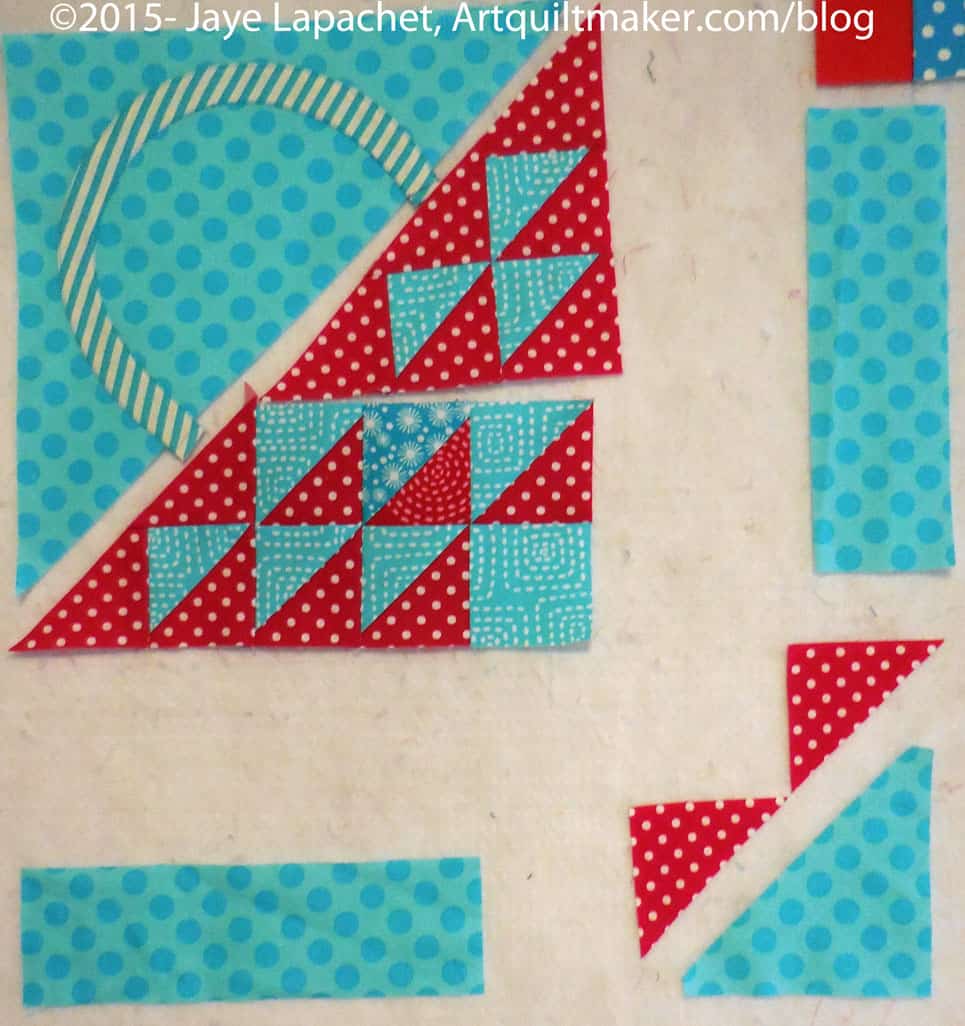
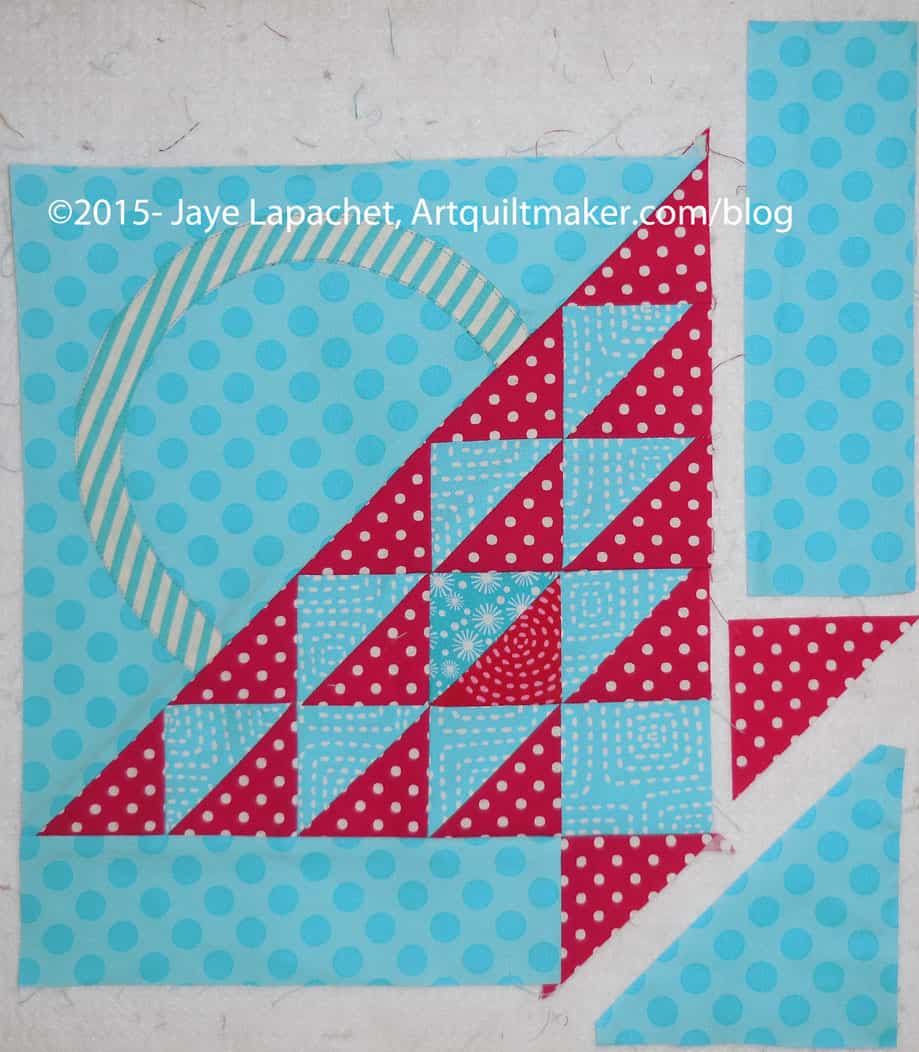
Basket Sewing Layout
Sew Basket Together
The block can be broken down into two pieces: the top half with the handle and the bottom half with the basket.
The two colored HSTs are supposed to give the illusion of a woven basket.
Trim off dog ears
Trim off dog ears from the A,B-HST/1 combo.
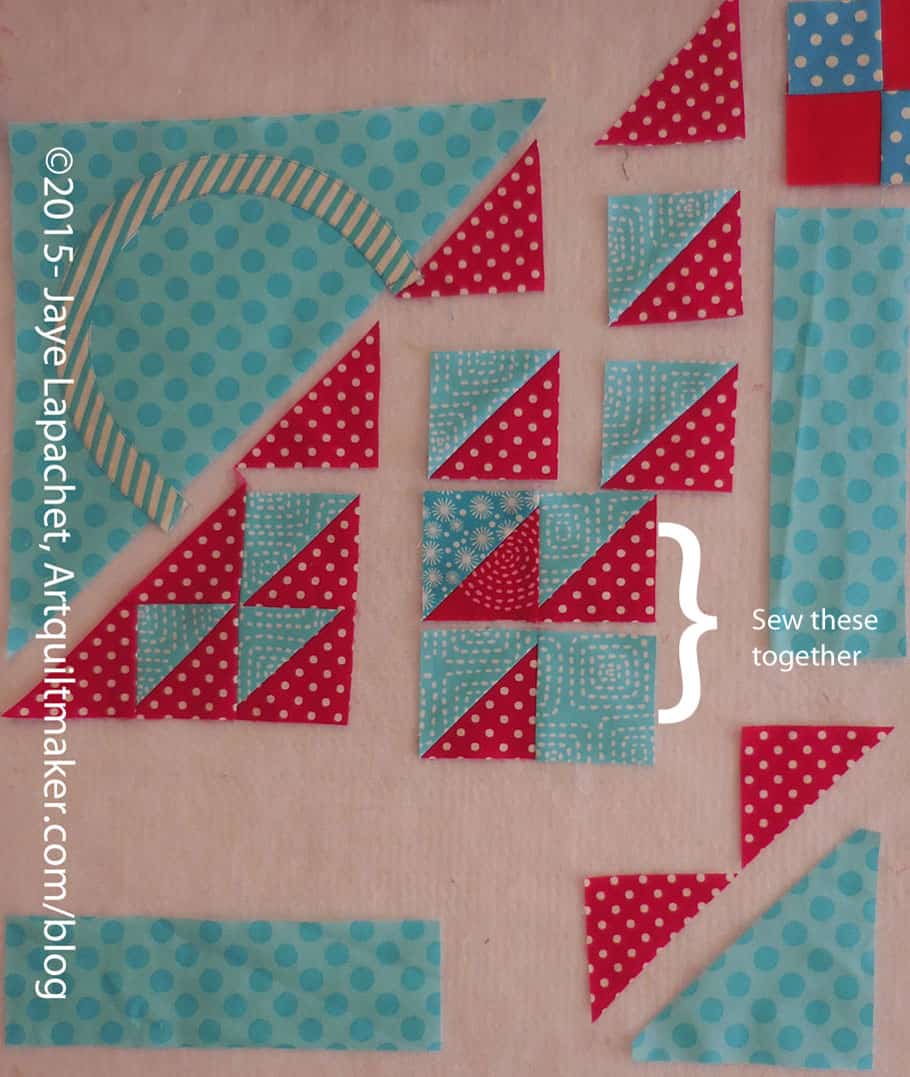
Sew Basket parts together
Sew HST/2 to HST/5. Press towards HST/5.
Using the diagram above to confirm placement, sew your A,B-HST/1 combo to your HST/2-HST/5 combo. Press towards the red.
Sew basket parts together
Sew HST/8 to Square 10. Press towards the Square 10.
Sew HST/6 to HST/9. Press towards the red part of the HST.
Sew 2 sets of woven basket parts togetherSew basket parts together
Using the diagram above to confirm placement, sew your HST/6-HST/9 combo to your HST/8-Square/10 combo. Press towards the HST/6-HST/9 combo.
Sew Triangle to HSTs
Using the diagram above to confirm placement, sew C to HST/3. Press towards the red.
Sew triangle D to C-HST/3 combo
Using the diagram above to confirm placement, sew D to your C-HST/3 combo. Press towards D.
Trim your dog ears
Trim your dog ears.
Sew HST/4 to HST/7. Press towards HST/7, making sure your seams will nest with the seams you have already pressed.
Sew parts of the basket together
Sew HST/4-HST/7 together and then sew the HST/4-HST/7 combo to E. Press towards E.
Four sections of the Basket
Using the diagram above for placement, sew your HST/4-HST/7-E combo to your C-D-HST/3 combo. Press.
Trim dog ears.
Sew 2 Sections together
Sew your A,B-HST/1-HST/2 segment to the HST/6-HST/9 segment.
Trim Your Dog Ears
Trim your dog ears!
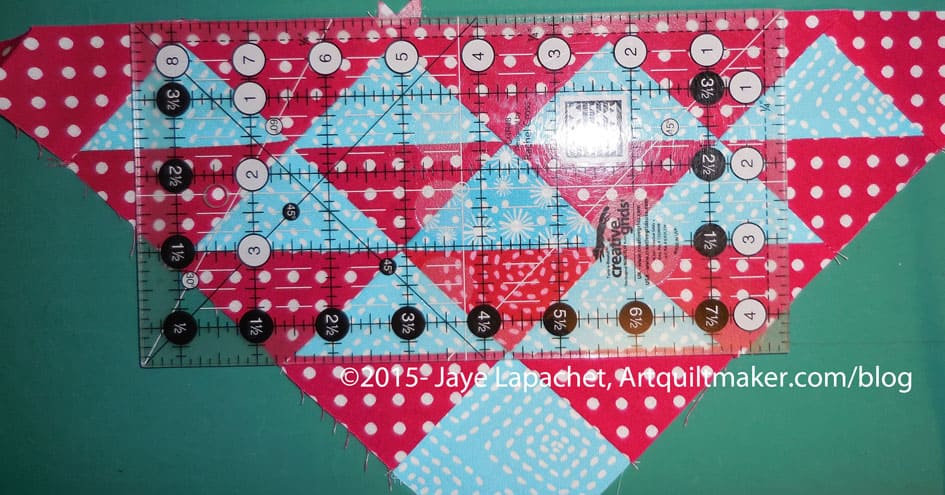
Sew last two segments
Sew the last two segments of the basket part together. You may have to re-press some seams.
I didn’t move the borders the whole time I worked on the quilt See how much the basket part shrank? That is seam allowances for you!
Trim the dog ears
Trim the dog ears, if you haven’t already.
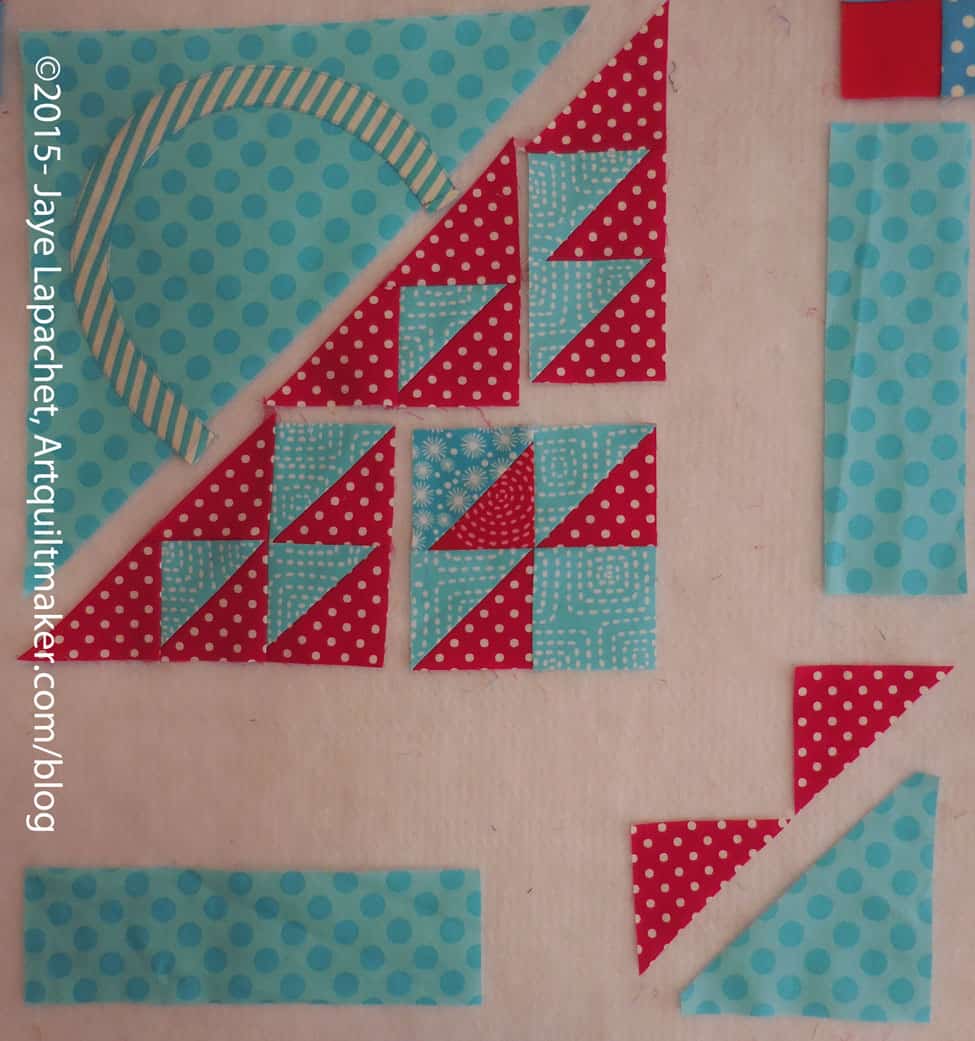
Sew 2 halves together
Now you have two halves of the basket. Sew the woven part to the handle part by placing the woven part on top of the handle part, lining them up and then sewing carefully. You can fold the two sections in half, bisecting the handle, to match them up if you think that you need to trim the handle portion later.
Ready to sew last borders
Now you are ready to sew on the borders.
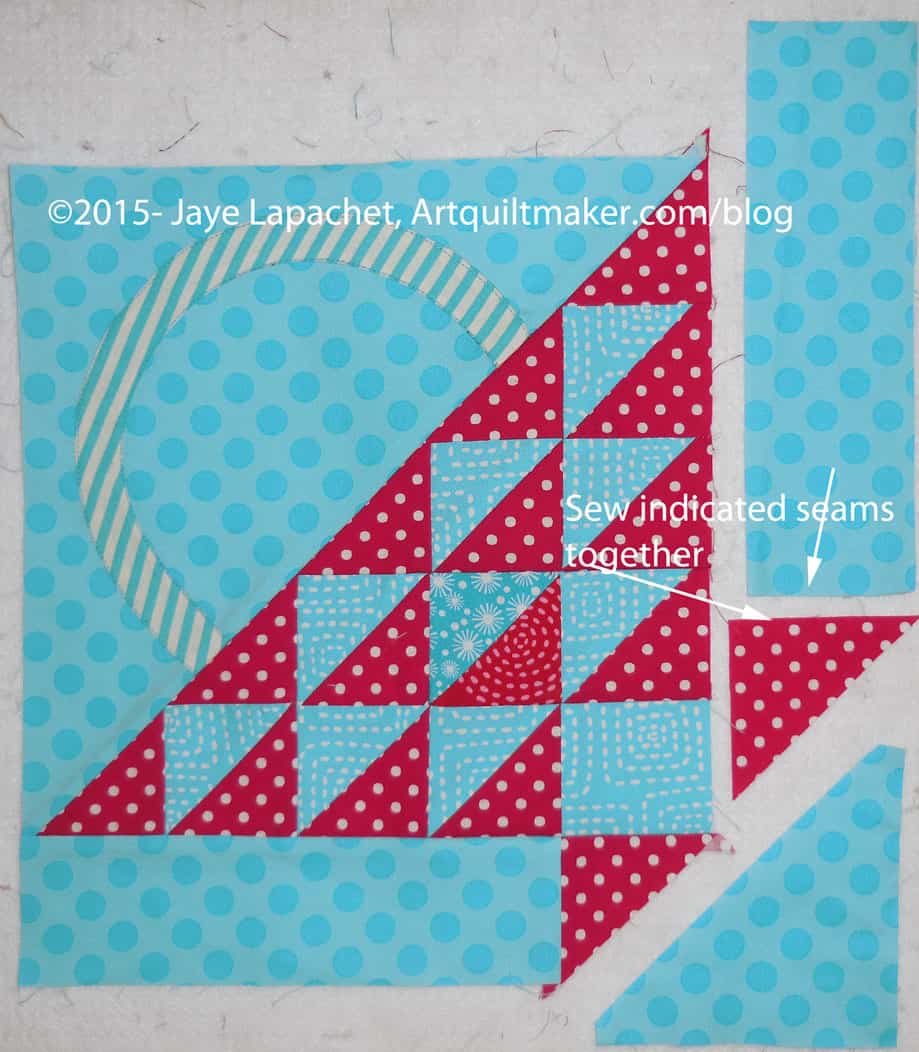
Sew triangle to borderSew triangle to border with words
Sew the B2-G background section by placing the red triangle (G) face down on top of background piece B2 and sew the short end of the background to the triangle, as shown in the picture.
Sew on background B2/Triangle-G
Take the basket piece that you sewed together above and place the B2-G background section on top of the basket section. Line up the red triangle’s seam from the B2-G background section with the HST/8-Square 10 section. You want the seams to match, so pin. Press towards background piece B2.
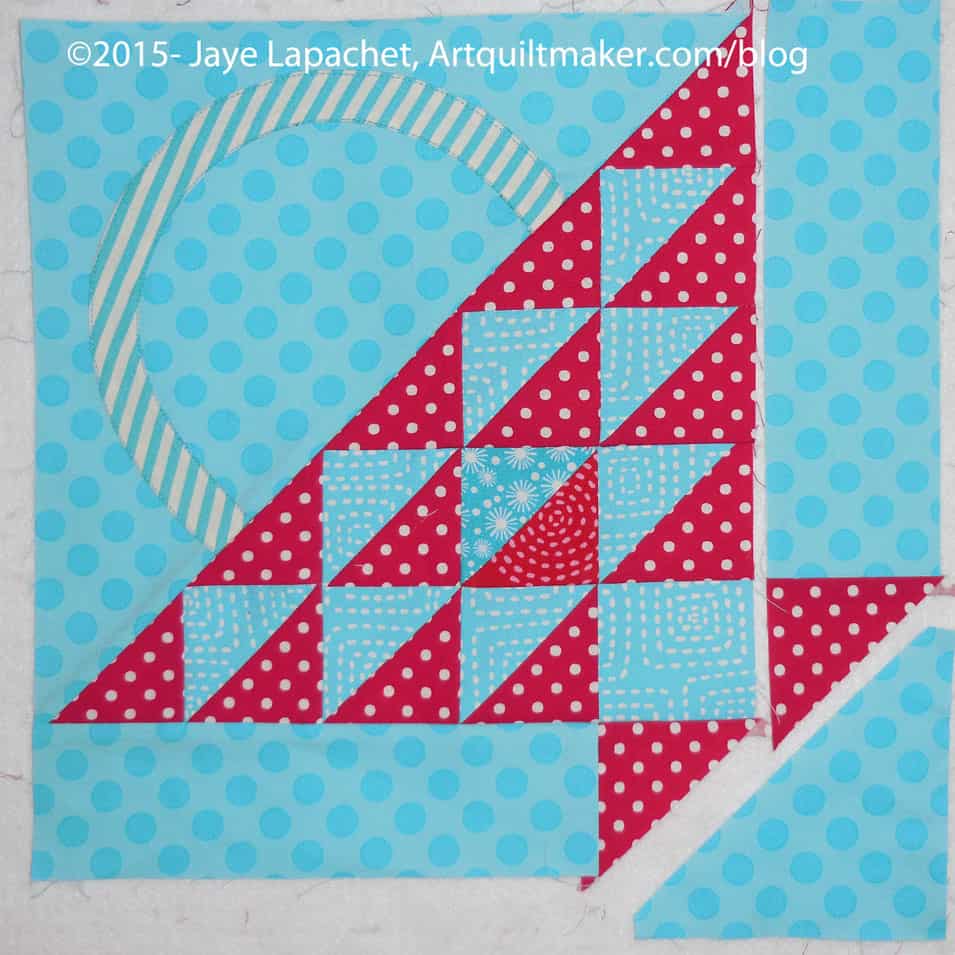
Only one more border to go.
Take the basket piece that you sewed together above and place the B1-F background section on top of the basket section. Line up the red triangle’s seam from the B1-F background section with the HST/9-Square 10 section. You want the seams to match, so pin. Press towards background piece B1.
Sew on Final Triangle
Now you are ready to sew the last piece.
Trim dog ears
Trim dog ears.
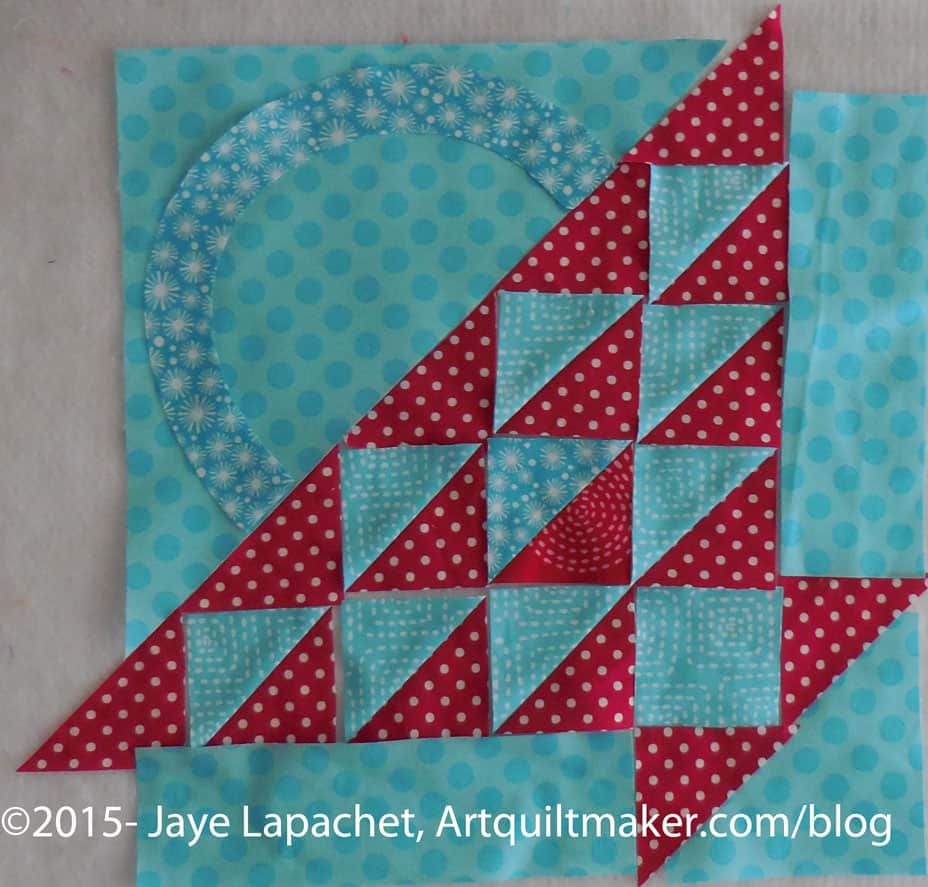
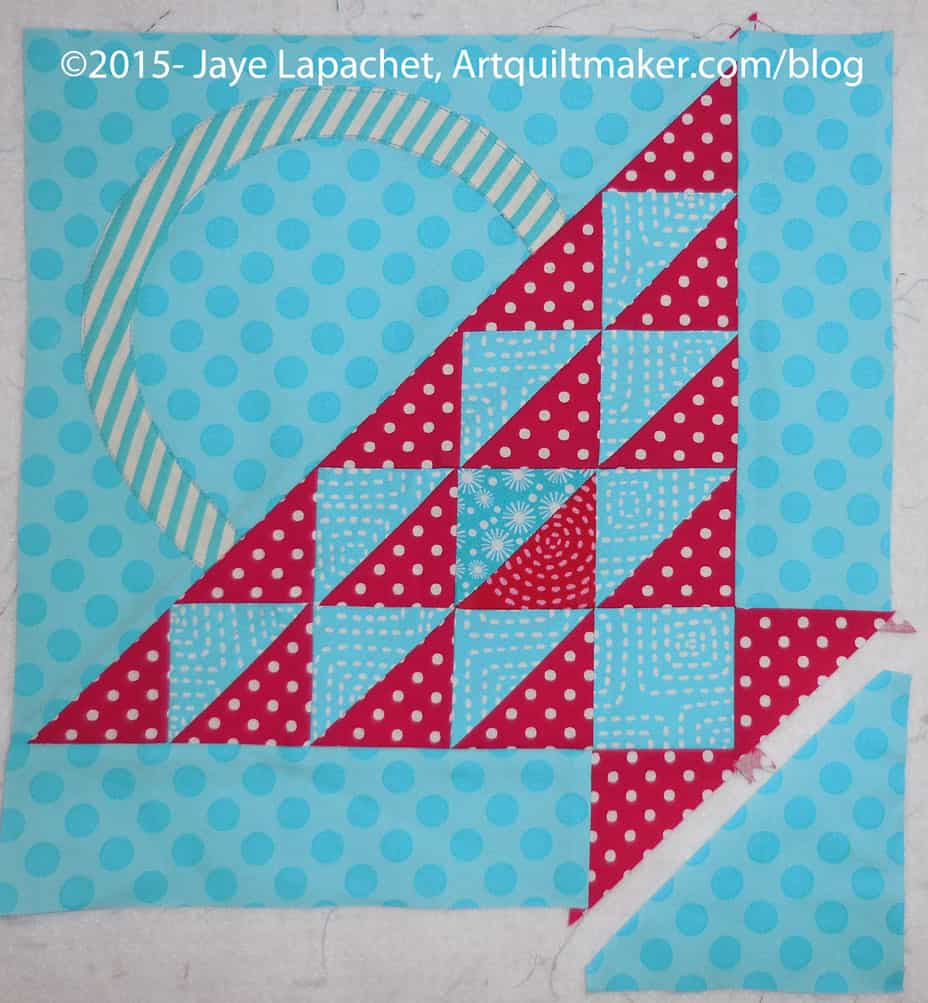
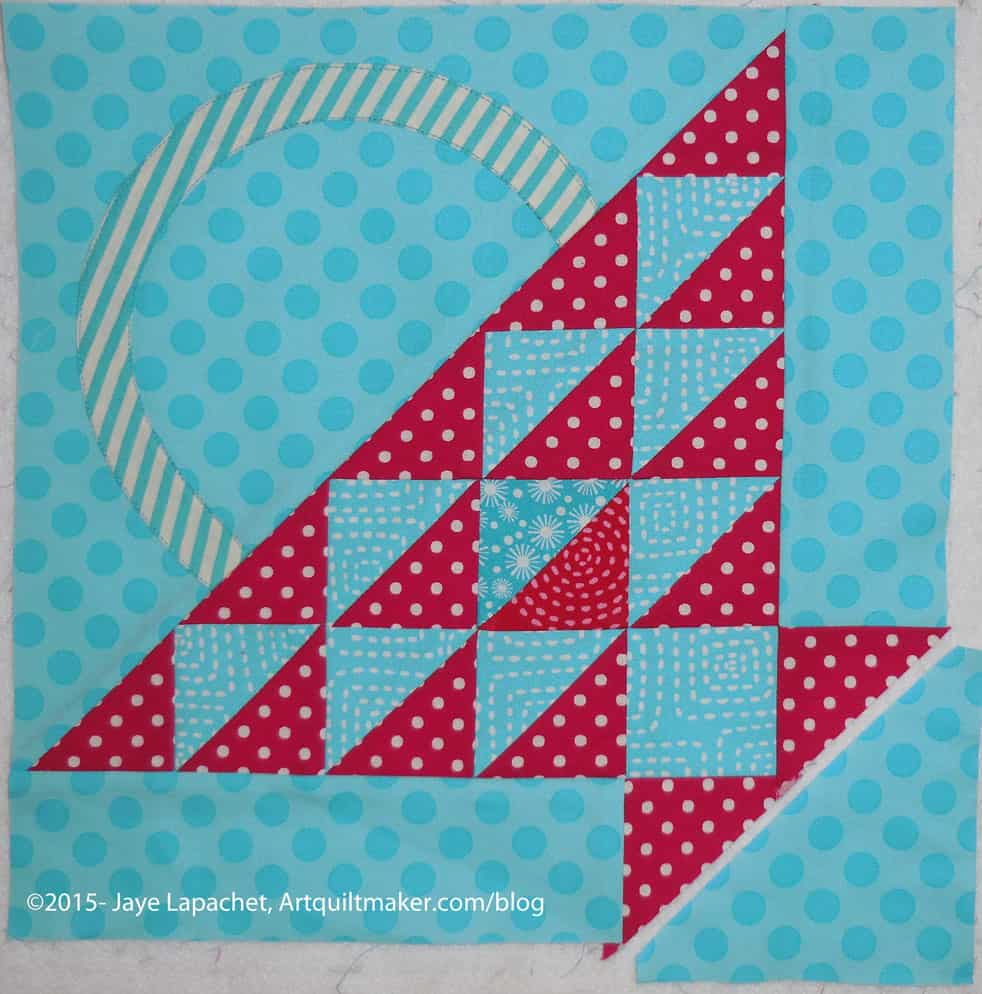
Basket almost complete
Your basket is almost complete.
Line up triangle with borders
Complete your basket half by sewing background piece B3 to the basket. You have already snipped off the corners so you just have to line up the triangle piece with the borders already sewn to the block. Press towards the background piece B3.
Your half is complete.
Take the top half of the basket, the piece with the handle, and carefully sew it to the basket half.