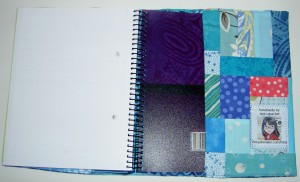
This journal cover tutorial is related to my post called Journal Cover Again from October 2009.
Supplies
- Fabric (amount depends on the size of your journal)
- Thread
- Journal of your choice
- Interfacing – sort of stiff, but any will do that can give the cover a bit of body. You could also use scraps of batting, but the cover gets a little squishier than I like it. I have found flannel to work really well even though it is not stiff. If you press ShapeFlex on to the fabric and then using flannel as the lining, it works really well.
- Sewing machine
Quick Instructions for making the cover to fit a #4 Miquelrius journal
- Cut 2 pieces of fabric 25″ – 26″ x 9-1/8″ (pieced ok). You will need to measure for your own journal if you are not using the above journal. If you will use pieced fabric, press the seams OPEN. This will make it easier to adhere interfacing.
- Press on interfacing.
- Position fabric right sides together and pin.
- Mark opening in bottom of piece for turning.
- Use 1/4″ seam allowance and sew around, leaving opening for turning.
- Trim corners.
- Turn and press well.
- Poke out corners.
- Pin flaps in place. You will only need a few pins.
- Starting at the edge of the pocket closest to the binding, stitch towards the edge of the piece. Sew along the cover flaps as close to the top as you possibly can so stitching can catch all four layers.
- When you get to the edge turn around and stitch all the way across the journal cover to the other pocket. Turn around at the edge and stop just after the pocket.
- Put cover on journal and enjoy!
Explanations
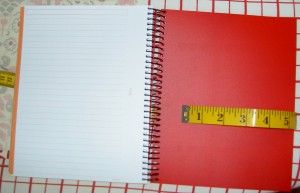
First, starting in the back of the journal, I put the measuring tape down and wrapped it around the back of the journal. You can’t see part of the tape measure because it is underneath the journal. I pulled enough of the tape measure to include a ‘pocket’ into which I could slip each of the covers.
Above you can see that the total width the fabric should be about 25″ for my journal. The extra part of the tape measure (measurements 25 1/8″-33″ means nothing. It is just laying on the journal.)
You MUST close the book with the tape measure held firmly in place to make sure that you have measured enough fabric to go around the journal when it is closed. I found that if I put the beginning metal bit of the measuring tape right up against the binding, then there was plenty of fabric, even with the book closed and including seam allowances.
To find the height of the fabric you need to cut, I used a piece about an inch larger than the book and that seemed to work.
I ended up with a total of 26″x 9 1/4″ for the #4 Miquelrius journal cover. You can either cut two pieces of fabric this size or piece fabric scraps together in the appropriate size, like I did for my first journal cover. Then cut another piece (not pieced) the same size. It reduces bulk not to piece both.
Press fusible interfacing to the inside piece. It is easier to press the fusible to the fabric that has not been pieced. I use scraps of fusible. You can also using batting, which I did in this turquoise pieced journal. If you use batting, be sure to anchor it with some quilting. I didn’t do that on the turquoise journal cover and when I washed the cover, the batting moved all over the place.
Now is the time to add your label. Use your journal to estimate where your label should go and apply with the stitch of your choice.
Next, place the fabrics right sides together and stitch around the whole piece. Leave an opening large enough to turn the piece. I leave the opening on the top above the binding.
Clip the corners.
Turn the piece and press.
Poke the corners with your favorite pokey thing. I use a wooden knitting needle. Press the opening so that it will look neat when caught in the final sewing stitches.
In order to make the pockets to hold the journal, fold over the edges towards the middle using the journal as your pattern. Make sure you close the journal with the cover around it. You will need a bit more than you think to cover the journal in the closed position.
Pin flaps in place. You will only need a few pins.
Starting at the edge of the pocket closest to the binding, stitch towards the edge of the piece. Sew along the cover flaps as close to the top as you possibly can and stitch catch all four layers.
When you get to the edge turn around and stitch all the way across the journal cover to the other pocket.
Turn around at the edge and stop just after the pocket.
Reinforce the stitching near the edge of the pockets by backstitching, so the stitches don’t come out when you are turning the fabric.
Place your journal cover on your journal and enjoy!
Above is the first finished journal cover I made. I put a bit of a selvedge on the front cover to add interest. Embellish your cover as desired.
This picture shows the journal open and how much changes from my original measurement of 26″ (see photo above) and this photo (directly above) once the journal cover was completely sewed.
I didn’t have to buy anything to make this journal cover, which was nice. It is a project you can complete with materials around the house. It is one of those projects that works when inspirations strikes late at night and everything is closed. 😉
Resources
–Quilts & More pattern – This pattern is a good reference, but is not good for determining size. That pattern requires that you buy a specific journal – the black & white composition notebook type, I think – which is a specific size.
-Wanda at Exuberant Color gave me an idea of how to measure my own journal so I could use my own favorite journal instead of going out and buying a new one.
Lyric Kinard put up a very arty sketchbook cover video tutorial. Her video is really quick to watch and I like the different way she shows to make her journal cover. I really like the way she does the corners.
Quilting Daily put up a blog post about notebook covers.
Let me know if you have any questions. I will update this tutorial based on questions.


