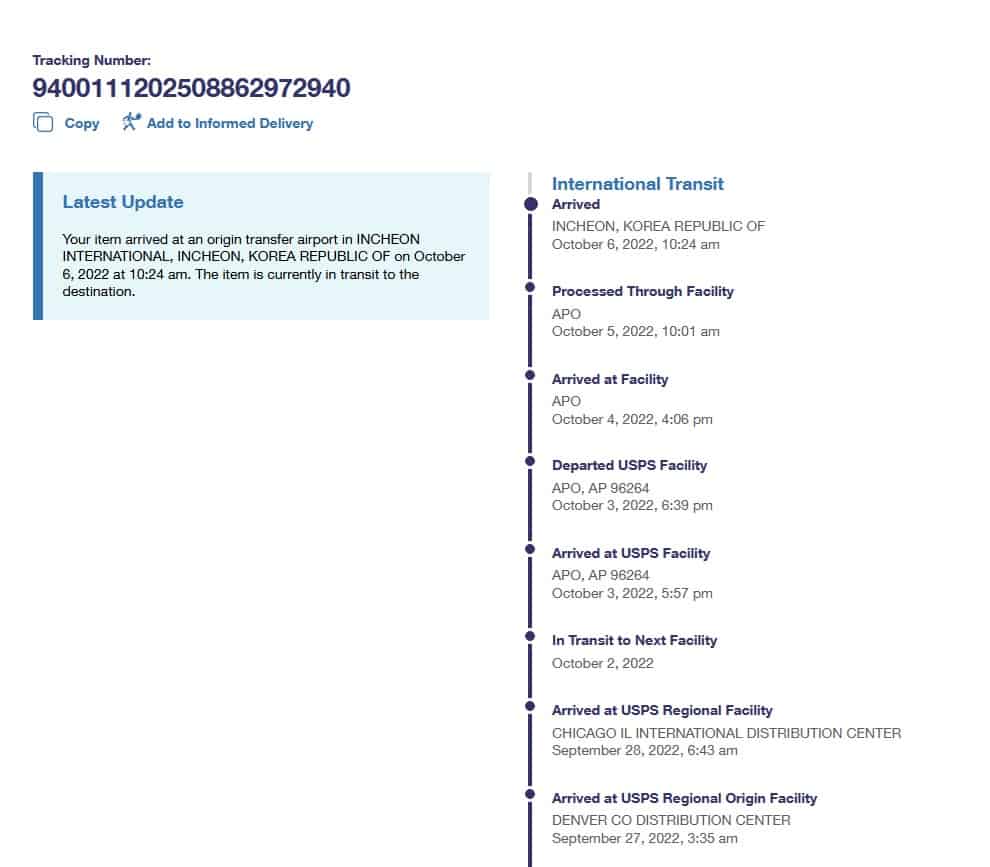
My La Pass package, which caused me so much drama for Sew Day is in Inchen Korea heading towards a military base.
Why?
Who knows. Pink Door has sent me a second package after a couple of inquiries. They also told me to go to the Post Office and ask them to help me. My local post office knows me and knows I am not a lunatic, usually. The helper, however, wasn’t very helpful and I got the boss. He said that they can’t do anything, because they don’t own the package. He suggested I tell Pink Door to issue an ‘intercept’ on the website and get the package sent back to them.
I told Pink Door, but haven’t heard back, so for now I am still waiting. I think I will start sewing the rosettes to each other. I have to do something and I am sick of knitting.
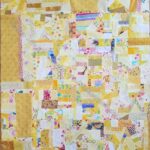
I worked all last weekend on the Pointillist Palette #4 project. I made good progress, but I am not feeling any connection with this quilt. I was quite enamored back in the day, but time did not look kindly on this project. I don’t sincerely dislike it, but I also don’t understand why my younger self loved the concept so much. I guess I need to think about how my quiltmaking has evolved and what makes up my quiltmaking.
This cements my resolve to not let projects linger.
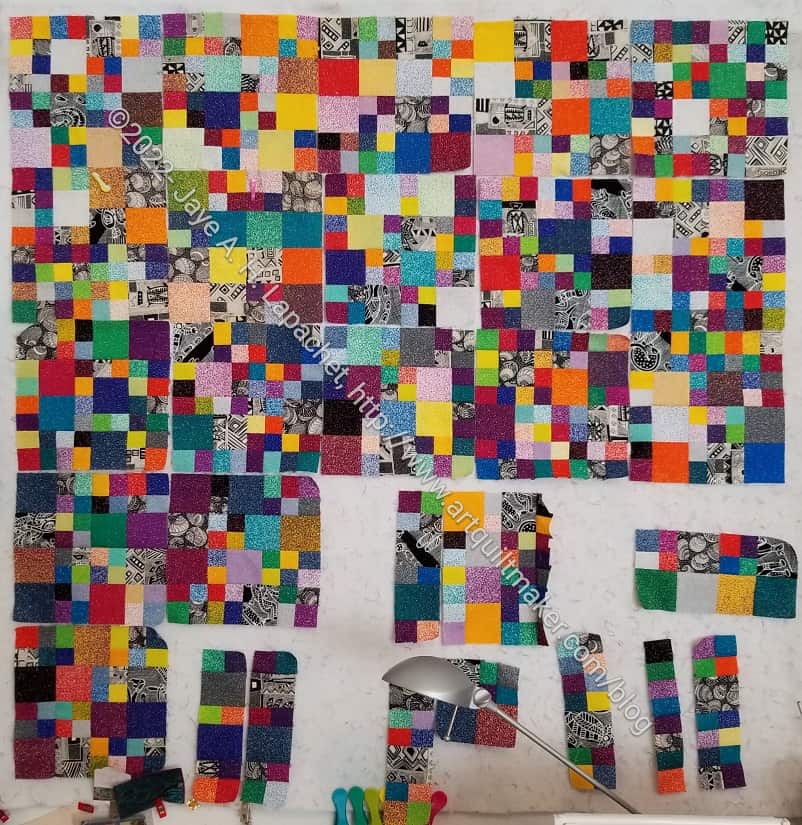
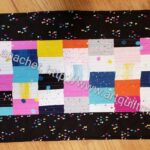
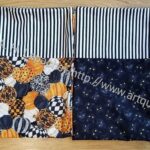
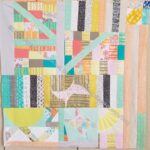
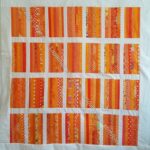
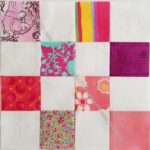
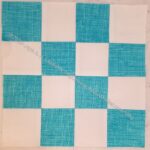
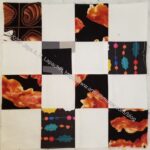
Pointillist Palette #4: blocks in process
So, I worked hard on finishing the blocks for this project.
The piecing is super easy, just a lot of straight stitching in long chains. It is going quickly. It is good after the other projects I have worked on recently.
For this quilt in the series, I want it to be dark, thus the black and white aboriginal prints. I stopped using the lighter parts of the ombre fabrics to get that darkness, but there are still a lot of light fabrics in the quilt. I wonder if I will have to resew some blocks.
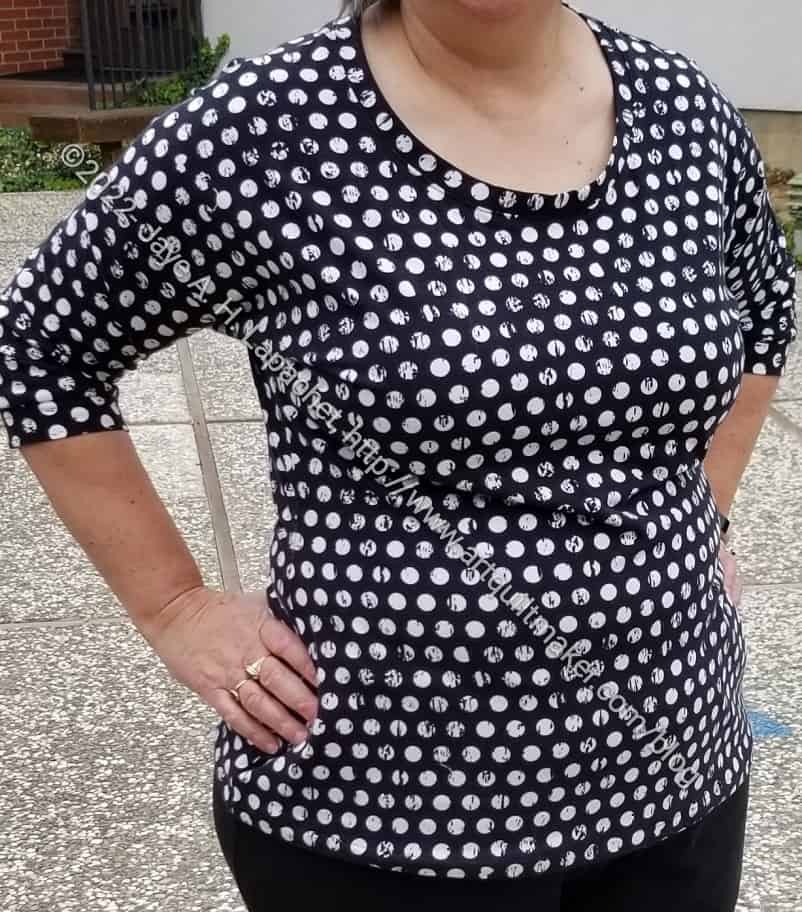
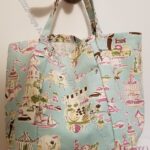
I finally finished the Westchester Top. Really Mary C. finished it for me. I went to her house with the full intention of having her tell me what to do then doing it. She was able to finish most of it very quickly.
One problem I had is that I couldn’t find the directions. I think I must have made a folder for the project and left it somewhere (or hidden it) in my workroom. I’d like to find it and see if the directions are included in the hard copy pattern or if the directions are in the video course only.
I knew the course was in my account, but on my phone, I could only see the hack parts of the course. Fortunately, Mary knew what to do and just serged the whole top, the put the neck and armbands on. She top stitched some of it and I top stitched the rest at home.
I think the top came out pretty well. I have a pattern that fits. I would make the neckline higher if I made this again.
This is a free pattern from Crafty Gemini. You do have to print and tape together the pattern pieces. I bought the hard copy pattern so I wouldn’t have to do that (laziness and printer ink).
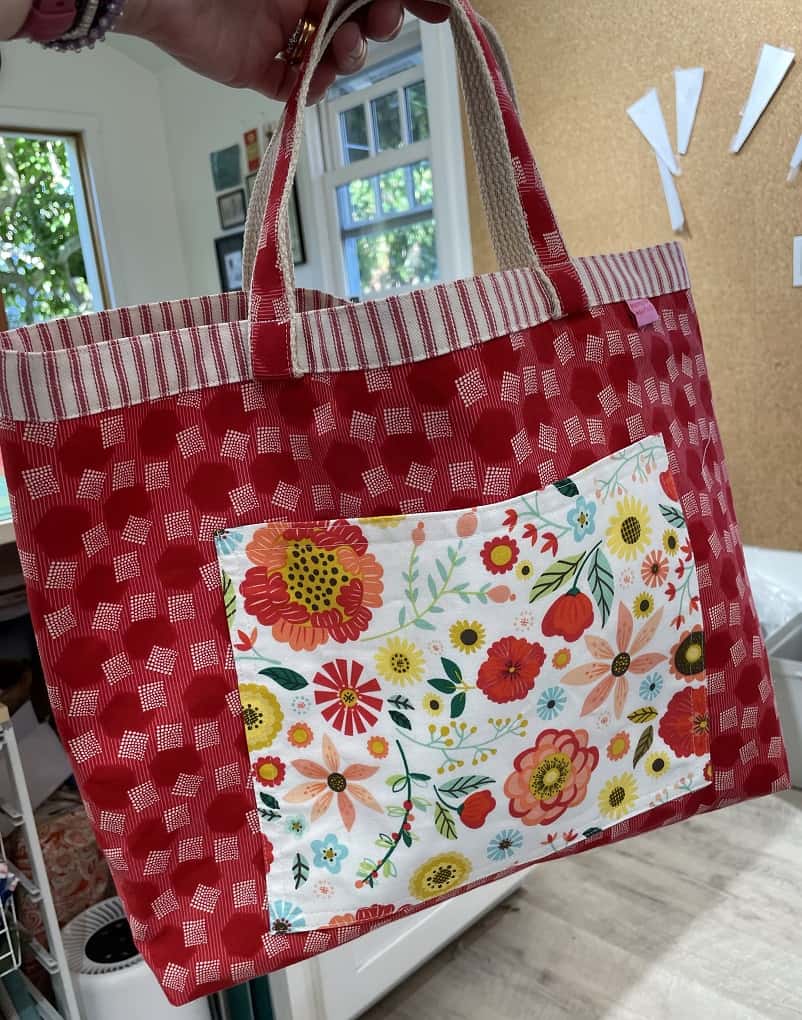
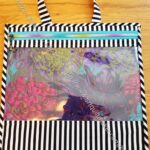
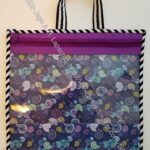
I am preparing the door prize bag for the October meeting. I didn’t have enough time to make a bag myself, so I put a call out to my team. Mary C. came through and I picked up the bag at Sew Day.
It isn’t a shoulder bag, but would be great for carrying a magazine or a small hand project.
I was not able to find a 12″ separating zipper so I used a 10″ and it worked fine. you might be able to find one the right size at Wawak.
Use E8 pieces for this step. The zipper flanges (fabrics surrounding the zipper) should be exterior fabrics ifyou want them to match the outside of the bag.
Tutorial:
Use a 3/8″ seam allowance for this step.
You will be using the pattern starting on page 20. Use the exterior fabrics for the fabrics surrounding the zipper (E8-zipperr flanges). Match thread to those fabrics.
Take the zipper apart. Keep all the pieces oriented as if you are going to zip them back together.
Clip E8 to the zipper
Make a zipper sandwich
Lay 1 E8 piece right side up
Position the zipper tape along the center of E8 half an inch from the end (see photo above where clips are)
Clip fabric to zipper tape
Put another E8 piece face down to make the sandwich
Reposition the clips on the E8 pieces to encompass the entire zipper sandwich
Clip the top of the zipper (side where the stop will be when the bag is closed) so you can veer it and the top of the tape will be hidden. Sew Sweetness has a tutorial on veering a zipper.
Follow these directions for the second piece. You want to continuously check that the two pieces of the zipper are lined up so the zipper will work properly.
Look at the images on pg.20 of the pattern as they will help.
Install the zipper. Stitch to the end of the fabric.
Check the zipper
Stitch both short ends closed. You have, basically, sewn around the zipper lining/edges in a U shape so that the ends are closed and three sides are finished.
Make sure the end of the zipper is OUTSIDE of the seam allowance. You want to stitch as close as you can to the stop, then match the seam allowance on the second side of the zipper.
Turn the piece right sides out and press. Top stitch the U after you have finished the second side.
Throughout this step:
Remember that this zipper comes apart.
Make sure the two sides of the zipper are in the correct orientation and the ends are even the whole time.
Keep checking.
N.B.: Quiltessa Natalie calls these zipper tabs, but I have never heard of zipper tabs being applied to the sides of the zipper. I call them zipper flangesI have also never used a separating zipper, so who knows?)
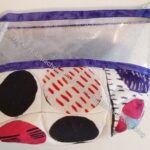
Small Front Pocket Tutorial pt.2 – Clippy pockets (instead of badge holders)
Pocket information – post showing additional mesh pockets (not a tutorial)
**Obviously, you should shop at local fabric, knitting shops or quilt shops. However, if you can’t, please know that I use affiliate links. I may be paid for your purchase of an item when you click on an item’s link in my post. There is no additional cost to you for clicking or purchasing items I recommend. I do not recommend items I don’t like. I appreciate your clicks and purchases as it helps support this blog.
Sew Day started off as a bit of debacle for me. Sew Day itself, once I got there, was fine. Getting there was a problem. I planned to cut and baste the pieces for La Passacaglia Month 15, like I have in the past. Unfortunately, the package didn’t arrive, so I was project-less.
I thought “no problem, I have plenty of projects on which to work.” I grabbed a project box that had some projects in it and found that the pattern hadn’t been printed, the templates were somewhere else and the fabric for the different bags wasn’t included. Same with a few other projects. Pointillist Palette #4 was the only project that had all the pieces, so I brought that. I had to lug my sewing machine as well. I prefer just to cut out projects, but I had very little time to prepare so Pointillist Palette #4 it was. I want to finish this project anyway, so it is skipping over Who Am I? for the moment.
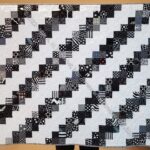
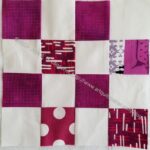
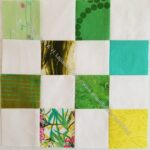
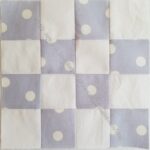
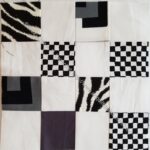
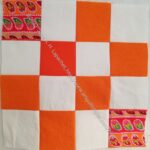
Pointillist Palette #4 blocks – Oct 2022
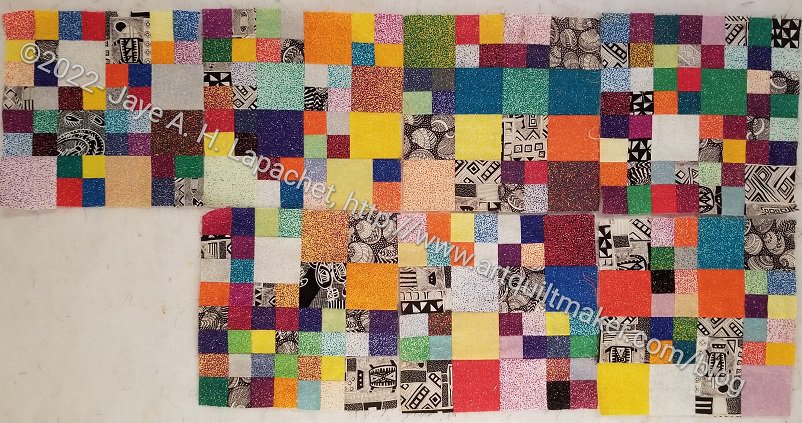
Pointillist Palette #4 mostly requires sewing a lot of small squares into larger squares. When I pulled everything out of the project box, I had about 8 blocks already. TO DO: find out how many blocks I need. That information was not in the project box.
The good thing about this project is that it is straight piecing and that is a relief after a lot of applique’ and bag making.
Pointillist Palette #4 organization – Oct 2022
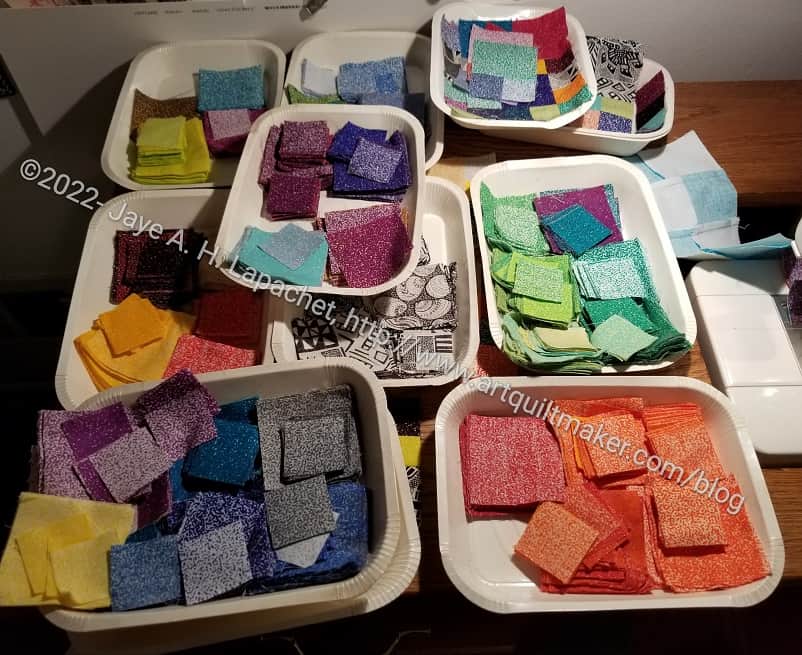
I had time after I got home and did more piecing. All of these trays were from the days when I would eat Trader Joe’s burritos for lunch. They are useful for organizing colors.
After quite a bit of sewing, I have many more pieces waiting to be sewn into blocks. I have in the back of my mind to finish this quilt in the next few days so I can bring it to Colleen with The Lobster and Orange You Glad.
It might seem like I am not enjoying my sewing and am just plowing through projects to get them done. That is true in a way. I want to get these old projects out of my hair and start some new ones which I will enjoy.
My friend Mary C really likes the projects provided by Jo Westfoot, the Crafty Nomad. Mary C has sewed along with several projects including Glitter Ball. I confused her work with that of GnomeAngel. Still, it is fun to explore new sites, especially when they keep their blogs up to date. I found that GnomeAngel has a lot of block tutorials. In the course of finding all of these links, I also ran into a site for Jo Avery. I love her voice. Check out the pirate chest pincushion. I would have loved to receive that as a swap gift!
The Crafty Nomad has a recent post describing/explaining a ‘scant quarter inch’. She also has a ‘Quilt Hive’ membership. Each month members receive video content as well as some live sessions. Good option, if you don’t want to work with me live. 😉
If you want to check out Jo’s teaching style, check out the Crafty Nomad tutorials. There are a wide variety, including different types of binding, sewing a variety of bags, cleaning your sewing machine and making holiday decorations.
FreeSpirit posted a video of how they fill bolts. Big machinery, but interesting.
FreeSpirit has a list of projects on their website. Not all of the projects are free, which I thought was odd, but not a deal breaker. There are a few free ones and information on where to buy the non-free ones.
Linda and Laura Kemshall have an English Paper Piecing series of 2 videos called Millefiore Patchwork. They show one of my favorite blocks, Jack’s Chain, in the example. Only 3 English pounds.
I got an email from Emmaline, which I read too late. It included a 20 bag pattern bundle from Sew Modern Bags. I have never heard of this bag company and they may be a resale type operation as most of the patterns were from a variety of pattern designers. As I said, I missed the sale, so I can’t tell you the cost, but if you sign up for their newsletter (no experience on how annoying) you get notified of future sales. I looked at the bags included and some were really cute. Do I need more bag patterns? No. Were some of them similar to bag patterns I already own? Yes.
Sew Modern Bags has a number of free patterns. Most aren’t that interesting, but all seem to come with videos, so if you haven’t made many bags, they might be useful learning tools. And the holidays are coming.
I have the Aunties Two Poppins Bag pattern. I am still seeking the perfect quilting supplies travel bag. I started reading the directions (shocking, I know) in anticipation of having Colleen quilt the panels for me. I found that they have video tutorials on YouTube. This is a good thing, because I couldn’t understand the directions. The first one, which I watched and is very clear, is about the center and side panels. I’d advise buying all the supplies as a group. I got the stays, the bottom interfacing panel already cut, the Bosal foam and the pattern as a package deal. Aunties Two also has free patterns. You can buy their patterns at Wingspan Crafts.
I was reminded of pattern weights recently when I was updating the gift idea list on the guild blog. I found a pattern for them at Tea Rose Home.
Torie Jayne has a Craft Organizer Bag Pattern with a great shape and style. The pattern is free, but it is not easy to download. She also has a book about home sewing.
Tools, Books, Fabric, Notions & Supplies
Latifah Saafir has a new HRT ruler called the Hurty. She is running a special right now with patterns and the ruler. Check the ruler’s webpage. This ruler is not included in the information I provided on making HRTs. I’ll add this ruler to the list when I have a moment. If you want to review the instructions, there is an instructional PDF available.
If you haven’t seen the Gray Muse website, take a look. Rubeena has pins and stickers for crafters and artists and anyone who likes a little ‘making’ humor and support in their jewelry. I went there the other day as the result of an email I received. I like to get things from this site for stocking stuffers. One series of interactive pins I saw was called Bold Affirmations. I wonder what to do with pins beyond giving them as gifts. The site has a blog post called ‘What to do with Pins’! One of the ideas encourages me to put my color wheel pin on my inspiration board so I could see it when I sat at my computer. It will be helpful, too, in class, because I haven’t found my color wheel after the workroom reorganization and that is a real problem.
Tula Pink has a new machine embroidery collection, Moon Garden. She talks about it in a recent Tula Talks Tuesday. I love the flowers, but could do without the snake. Find all of her embroidery collections at Scissortail Stitches.
I got a tip about a tabletop power strip. It is by Odom** and, while I haven’t bought one, the idea of not crawling under the table or sewing machine to plug things in is very appealing!
I found a new online fabric store called Hummingbird Lane Fabrics. Lots and lots of modern fabrics from all of the current designers. Fabrics are around $10.40 per yard. They have an interesting variety of notions, including some hard/impossible to find items from Tula Pink, such as her limited edition black and gold scissor tin. I like that it is very clear what is sold out. The shop has a good selection of bag making supplies including hardware, zippers and pulls, Sew Tites, mesh and Soft & Stable. Products from bagmaking companies such as Tula Pink (webbing), Sallie Tomato, Sew Hungry Hippie, Emmaline and ByAnnie are available. They are located in Arizona.
Articles, Tips and Other Information
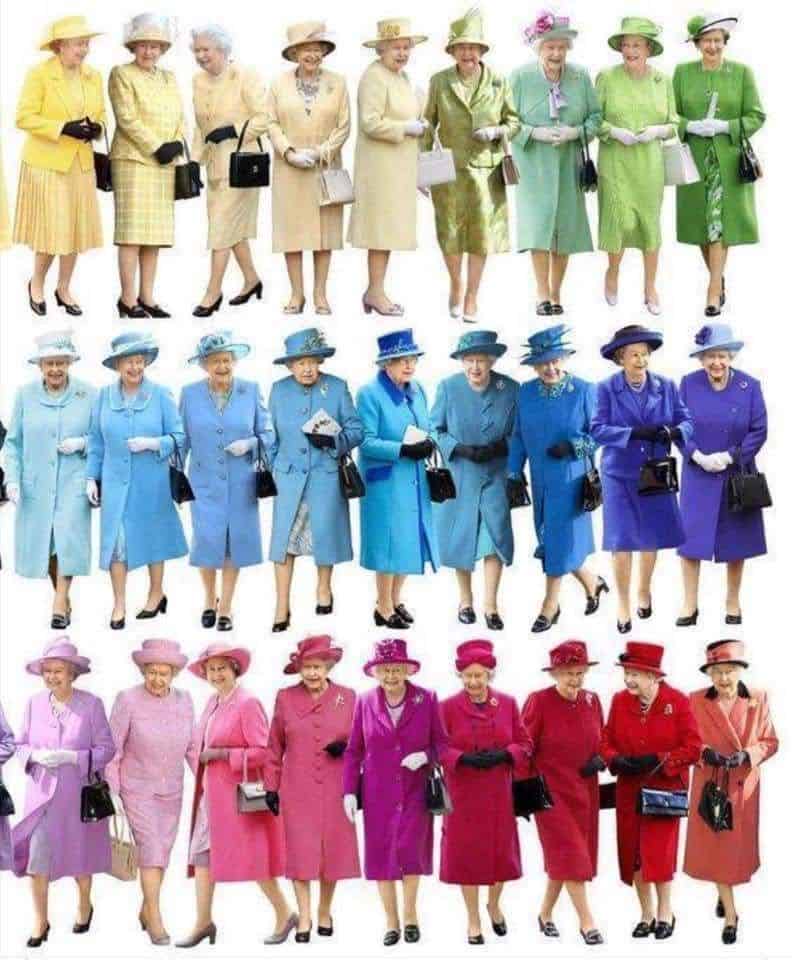
The Rainbow of QEII
I was saddened to hear of Queen Elizabeth’s death at the beginning of September. At that time, I read a number of articles about her and her legacy, including many about her wardrobe. I know newspapers would never write about prominent male wardrobes and I probably shouldn’t encourage them by reading the articles, but I loved her style. I’d love to dress with a suit, hat and Launer handbag everyday. I’d need a dresser, though, like the Queen had, which isn’t practical for this middle class California girl. I did go look at the Launer website, thinking I would get a Launer handbag next time I visit London. I think others were shopping online, because beyond seeing handbags on one page, I kept getting error messages.
Check out the Fons & Porter Reader’s Choice Award winners. From sewing machine to fabric, cutting tools to furniture, the survey results tell you what tools and products people selected as the best. I think some of it is true, but I think the categories in the Furniture and other section are name recognition mostly. Perhaps I am just disappointed that my favorites (clearly the best 😉 ) were not selected.
Someone shared a Washington Post article with me called “It’s time to appreciate domestic artistry like sewing and baking”. Finally, I thought, when I read the title. The article points out all the ways the author’s grandmother was artistic. Rather than a general article on ‘women’s work’ it is the observation by one granddaughter of her grandmother’s work. It is a really nice article and might make us think about other’s work, but it is not generally useful for the greater world. Maybe non-quiltmaking people will read it and look around at artworks by people they know, but will it change their views? Will it make them accept and pay higher prices for quilts or knitted sweaters? Will it increase the value the general public have around textile work done at home and not for profit?
Sarah Ann Smith asked about learning embroidery software? One answer was a reminder to me of DesignTV by the Kemshalls. I wrote a review of their Thr3fold Journal a few years ago. They have some modules on using embroidery software as well as some samples.
Global Quilt Connection is a teacher directory. If you are looking for teachers for your guild, check their list.
SFMOMA Bay Quilt
I am very disappointed in the SFMOMA, because they have a quilt for sale for $375. This is an amazing applique’ work of art and $375 not only undervalues the hard work of the makers, but undervalues the artistry and work of American quiltmakers. Very disappointing.
I took a class the other week and the teacher mentioned Allie from the Exhausted Octopus. Great name, huh? She has a very visual blog.
The teacher in the class also mentioned Pride and Joy Quilting. The artist creates amazingly complicated foundation paper piecing patterns and quilts.
Aneela Hoey has a rebranded website. She is the author of Stitched Sewing Organizers and has a lot of great patterns. The new website is a little easier to navigate, though her blog is gone.
Every Sunday, Caroline Hadley at Geometri Quilts posts a picture of a quilt she has designed. I like the way she includes different color ways in her designs so you can see how choosing different fabrics than the designer chose is not a bad thing.
Exhibits and Events
Souls Grown Deep is Proud to Sponsor the Inaugural Gee’s Bend Airing of the Quilts Festival on Saturday October 8, 2022.
I totally missed Quilter’s Take a Moment 2022. It took place September 13-18, 2022. Friend Julie told me about it so I went and looked. The live portion of the event has concluded. New ticket purchasers will receive recordings of each event by September 20, 2022 or within 24 hours of your ticket purchase. There is a Tula Pink interview.
**Obviously, you should shop at local fabric, knitting shops or quilt shops. However, if you can’t, please know that I use affiliate links. I may be paid for your purchase of an item when you click on an item’s link in my post. There is no additional cost to you for clicking or purchasing items I recommend. I do not recommend items I don’t like. I appreciate your clicks and purchases as it helps support this blog.
If subconsciously means that I never thought about what I was doing then subconsciously, I have been making myself a set of bags. However, I think I sort of made a choice of fabrics, so the bags would match on some level. Since I usually buy a few yards of Philip Jacobs prints, this isn’t an issue.
After I posted the last 26 Projects post, Sue S commented that I had accomplished a lot. It made me wonder if I should just post the new stuff and not make it an accumulation? That might make it easier to see what I have accomplished in one month. I tried it, but the result was so pathetic that I went back to normal accumulation posting. The problem is that I am working on gift projects and can’t show them until later in the year.
In Process or To Make
The ‘In Process’ is used to denote projects on which I am actively working or are on the design wall waiting for me to stitch. I am continuing to try not to put away projects. I find putting a project away ensures I never work on them, because I just lose steam.
I decided that some of my quilts are in a different class because they are hand piecing or embroidery or beading. They take longer. Thus I created a new category and have moved some projects here.
English Paper Piecing Project– half hexies – I worked on this project again while I was waiting for La Pass Month 11 to arrive. I need to lay it out and figure out the bottom so I can put the border pieces on
La Passacaglia – I am up to date on this project and waiting for Month 13 to arrive.
Small Projects
Most of my progress involves thinking or just cutting. I don’t have a bag in process at the moment.
Ultimate Project Organizer – another project from the Crafty Gemini Organizer Club, also on my list, but not yet started
Retreat Organizer – another project from the Crafty Gemini Organizer Club, also on my list, but not yet started. Recently, I saw one of these made up and I am not so nervous about it
Brocade Peony UCAB – in process
Rose Petrillo bag – I found the pieces for this bag cut out, but not sewn.
Superbloom tote using Hindsight fabric – not started
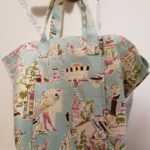
Westchester shirt – this is a Crafty Gemini pattern. I bought the fabric at PIQF in 2018. I have the pattern pieces cut out and ready to sew. I have given up on doing this on my own. I am going to visit Mary C and she is going to hold my hand while I finish it.
In the Quilting Process
The Tarts come to Tea – I am working diligently on getting this quilted. I am sick of looking at it.
Still UFOs
I still have UFOs. Who doesn’t, after all? A project in the ‘UFO’ category means I am stalled, it hasn’t been worked on in awhile or it is waiting its turn to be worked on. The list is a lot shorter and the projects are newer, for the most part.
I am annoyed that some of these are still WIPs. I just need to work on them!
Handbag Sampler – this is still the forgotten project. It should be on the UFO list. The blocks were teaching samples when I taught a sampler class some time before I started writing the quilt class sampler tutorials. I found one block recently, but otherwise I don’t actually know exactly where the blocks are hiding. I crawled up in the far reaches of my fabric closet to see if I could find them and they weren’t where I thought. I am sort of mystified as to where they could be. I haven’t even found a picture of all the blocks. WTH?
Pointillist Palette #4: Fourth is a series of 6 quilts; needs tiny square patches sewn together. No progress.
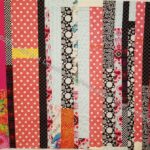
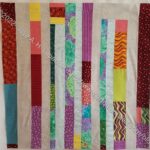
I made a few more blocks for the guild in addition to finishing the Rainbow Strip donation quilt and starting then finishing the Creamsicle donation quilt.
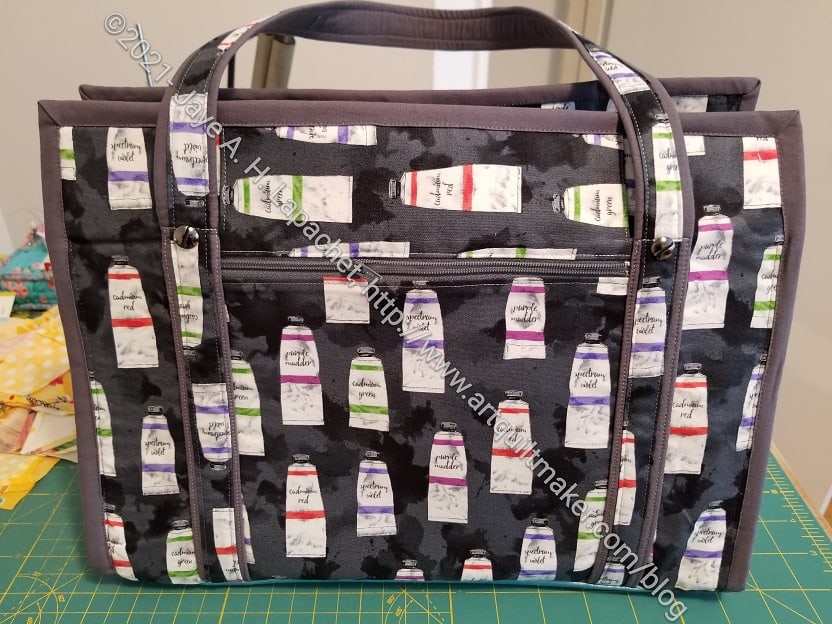
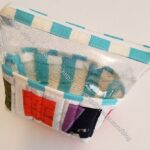
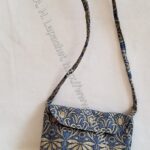
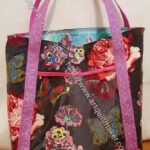
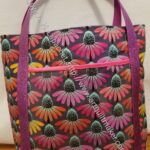
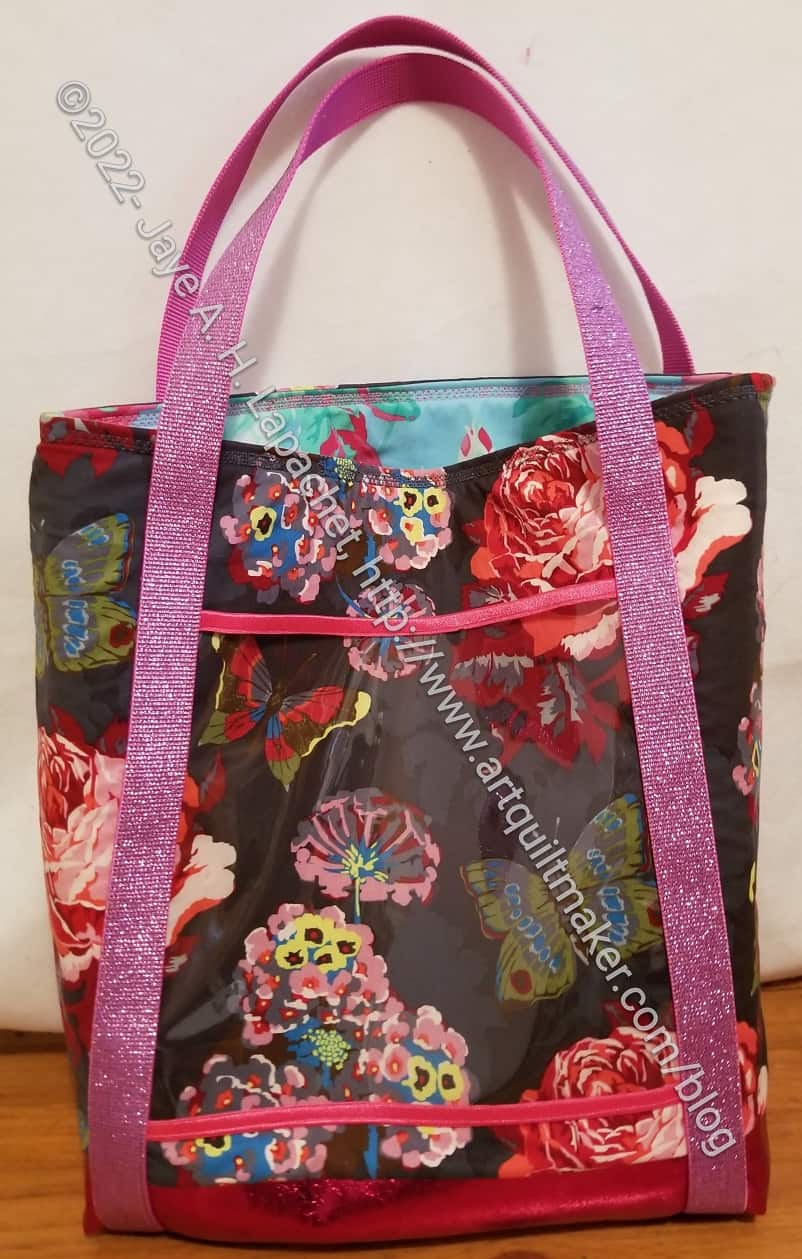
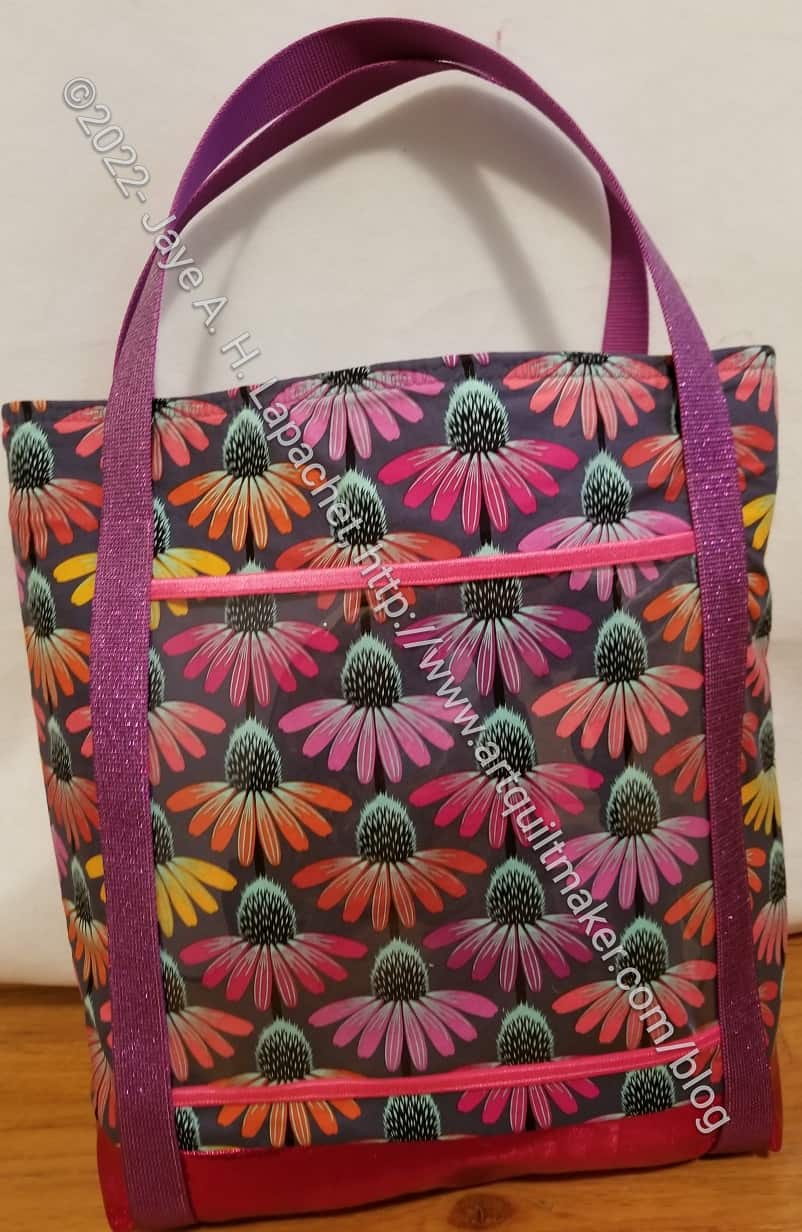
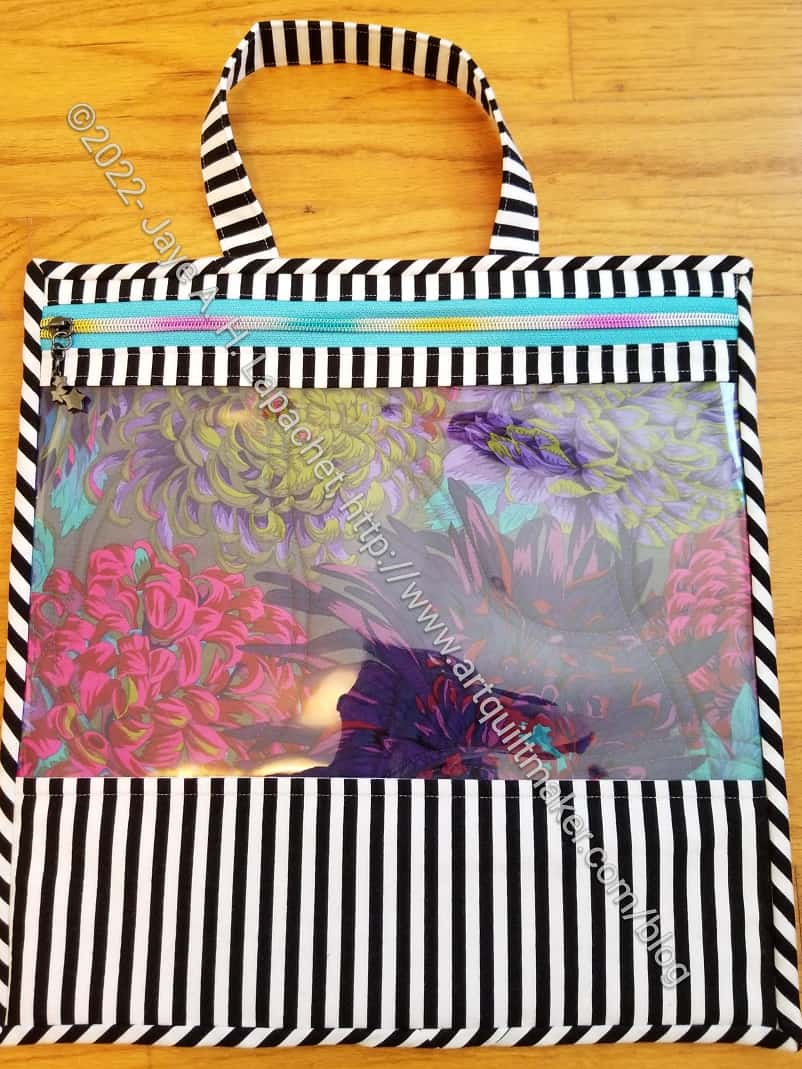
I finished the Essential Totes last week. I am really pleased with how they came out and am plotting when to make more.
Both totes are way more glittery than anything I normally make. I am kind of liking a little more glitter than normal in my life.
I have to give most of the credit to Natalie of SewHungryHippie. The pattern, Essential Tote, is designed by Natalie. It is my first experience with her patterns and I found it to be a really good pattern: clear, easy to follow, no stupid overly complicated steps, well written. I resisted buying it for awhile, but ended up purchasing it in the end. She had some Spanish Crimson soft vinyl and some glitter webbing in her newsletter and I couldn’t resist. Buying the pattern enabled me to make something right away with both unusual (unusual purchase for me) products.
Finished Echinacea Glow Essential Tote
The exterior fabric I used on both is from Anna Maria Horner. One is Echinacea Glow and the other is Clippings. These are sturdy totes, as well, since both have foam lining.
The bag supplies call for exterior fabrics such as canvas. I used regular quilting weight fabric and it worked fine.
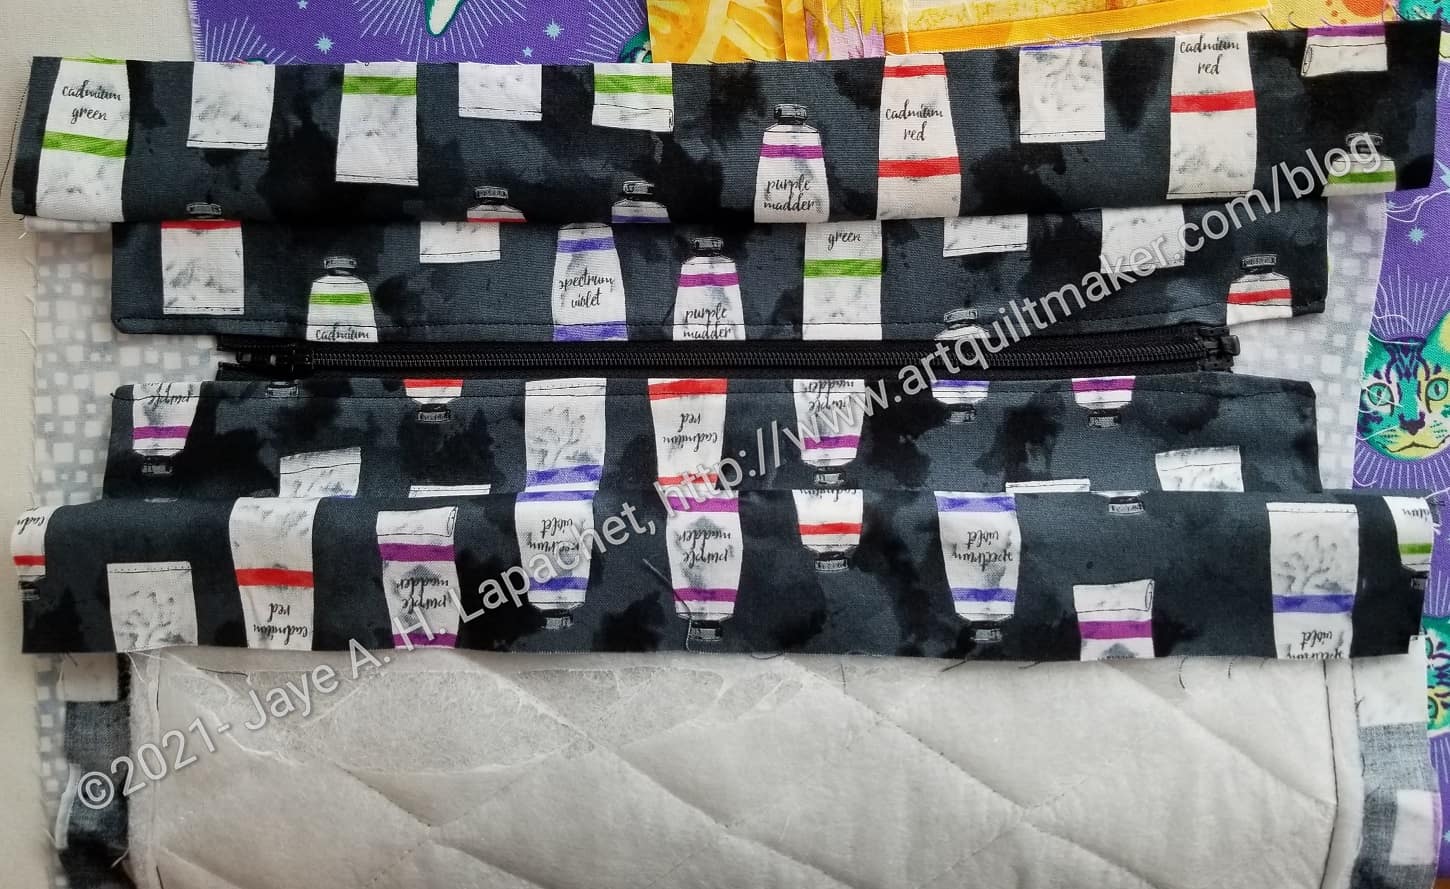
I did make some changes to the pattern. I used the Spanish Crimson soft vinyl for the bottom. This meant I had to change some of the cutting directions. I cut the exterior fabric 20 x 15.5 and the spanish Crimson soft vinyl for the bottom at 20 x 5.5. Then sewed the two pieces together to make one exterior piece 20×20, which I, then treated as one piece. 20×20 was the original size I was required to cut for the exterior. You could make the bottom larger by adjusting the cut sizes if you wanted. Make sure your final piece ends up 20 x 20 and everything will be fine.
I only put one vinyl pocket on the outside of each tote. Next time, I’ll put one on each side next time. I was just lazy about my cutting.
I think next time, if I use the same idea of a different bottom, I’ll make the vinyl pocket a little larger and have it sewn into the seam with the bottom fabric.
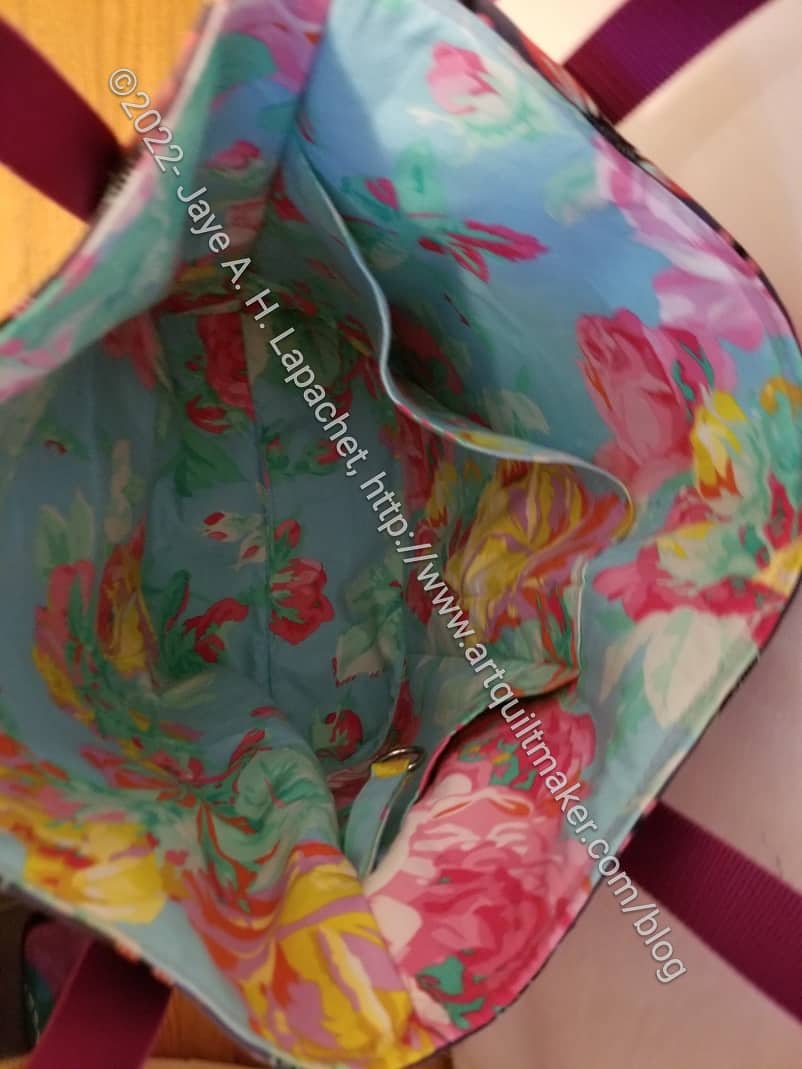
Essential Tote: Echinacea Glow Lining
As usual, I added a leash to the inside of both totes. You can see in the bottom of the photo, left. I never know when I’ll want to lash my keys or a pouch to my tote.
The pocket fit very well with the bottom boxed corners of the tote. I was impressed! I also used the measurements in the pattern, so mostly I was impressed that following directions actually worked. LOL!
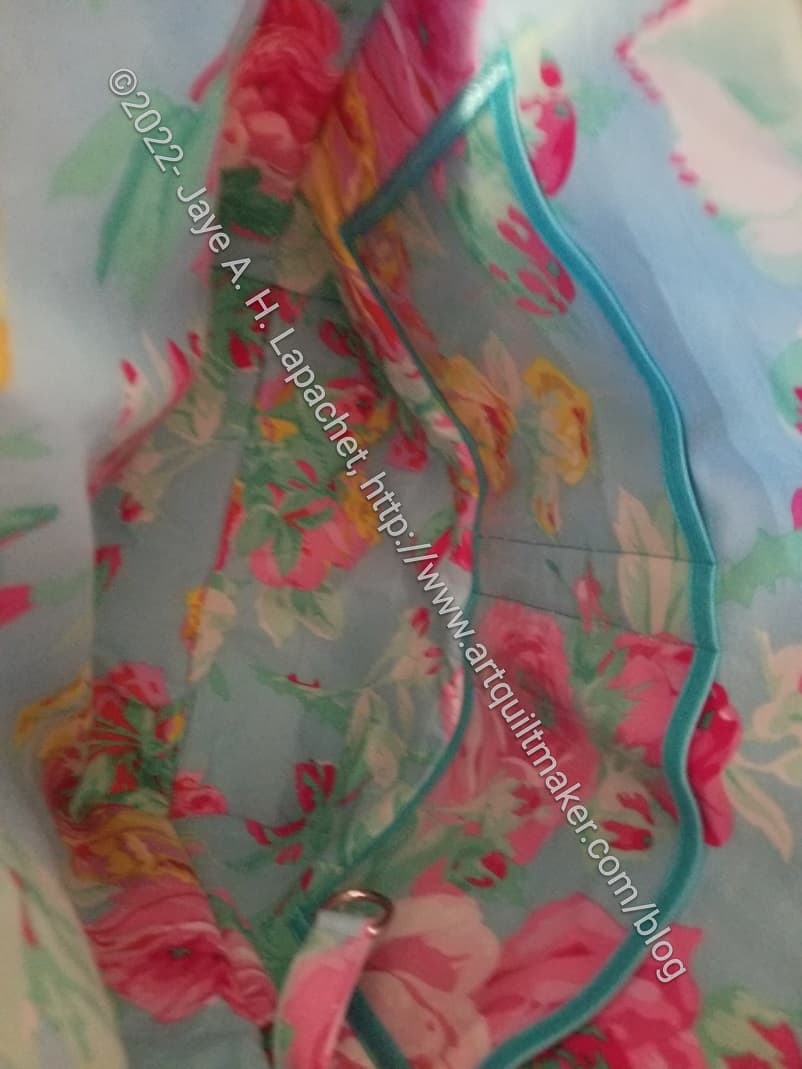
Essential Tote: Clippings Lining
The pattern calls for vinyl interior pockets, but I was running out of vinyl (shocking! I bought a lot back a million years ago and I thought I still had a lot. Apparently not.), so I made a fabric pocket for one bag, which will be fine. I had enough vinyl to make a slightly smaller, vinyl pocket (photo, right) for one of the bags. The vinyl required that I cover all of the edges. It was a hassle, but the results are good.
I used that Philip Jacobs rose lining, because it makes me super happy.
Essential Tote lining bottom
I am pleased with the great sewing job I did. It isn’t perfect, but everything came together really well.
I showed Tim and he liked the bag. I also showed it at Sew and Tell. People liked it.
I talked about the parameters of the Pantone Project in July, then again in early August and mid-August as my attempts to select fabric started. I didn’t feel confident after these attempts and the postcards started to stack up. As the postcards stacked up, the project started to weigh on my mind. As Friend Julie made progress, the project started to weigh on my mind.
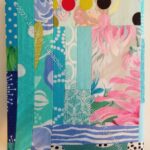
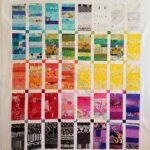
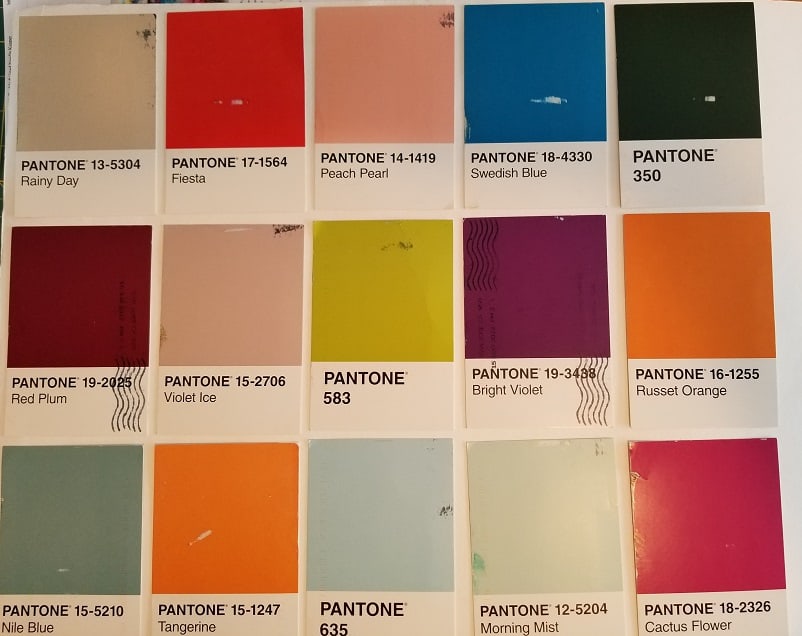
Pantone: first big fabric pull
I finished a big project on Saturday night and needed something different to work on. I was spurred on by wanting some basic piecing. The blocks for the Pantone Project will be basic piecing, but I had to choose fabric first. I was not excited, because I am getting a little annoyed with Pantone. Piecing starts with fabric, however. I decided that I had the time to pull fabrics for this project. First, I laid out all the cards I had received, so I knew what I had to work with.
Yes, Pantone 350, in the upper right hand corner is that green with which I started. It was still in the mix. I had the greens I had chosen separated out, but kept it in the mix since I thought I might find something better. I have to say that I made major progress on the Pantone Project on Sunday.
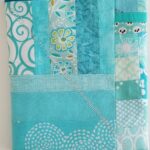
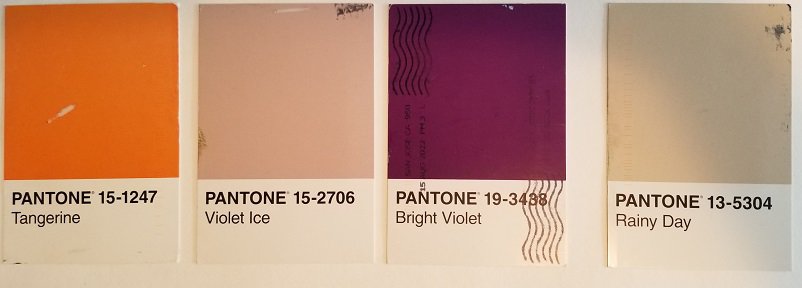
Pantone: Rainy Day Fabric Match
I started with the easy colors such as the reds and pinks. Fiesta and Cactus Flower were pretty easy, but I quickly realized that I had to pull out much more fabric to get more choices.
I even dragged out a bin that includes solid neutrals and found a beige that matches Rainy Day pretty well.
Pantone: tough color nuts
Surprisingly, or maybe not, a lot of my older fabrics are much more aligned to these colors than the newer fabrics. This could be my buying habits as well. I stick to pretty clear colors when I buy fabrics now. After awhile, I had only a few left. I had to not only pull out old fabrics, but I used several hand-dyed fabrics. I haven’t dyed and printed fabric in years so lots of old fabrics are getting an airing.
Pantone: 1st big color pull
Eventually, I found fabrics that were good matches to the postcards I have received. Some cards span 2 or more fabrics as I am still deciding. Some fabrics were a great match. I was really pleased with the fabric I found for the Swedish blue (2d row, 2d from right). It is a perfect match. The Nile Blue (bottom left corner) is a problem. The three fabrics I chose look better in person than they do in the photos, but are still not perfect. There is also a peachy pink, Peach Pearl, (2d row, 3rd from left) where I found a good match, but only have a little of the fabric. I’ll have to be very careful when I cut it.
I have to say that I have a lot of questions for Pantone, most importantly: why so many beiges? I need to read up a bit on Pantone and get a better sense of their business.
Now, I can get to piecing. I do feel a bit of a sigh of relief that I have made a start and nothing awful has happened when the fabrics weren’t perfect matches.
Fabric, Sewing machine and regular Sewing supplies (BSK)
Decisions to Make:
Size of units (blocks)
Type of units to make
Timeframe for making the project
Timeframe for sending postcards
**Obviously, you should shop at local fabric, knitting shops or quilt shops. However, if you can’t, please know that I use affiliate links. I may be paid for your purchase of an item when you click on an item’s link in my post. There is no additional cost to you for clicking or purchasing items I recommend. I do not recommend items I don’t like. I appreciate your clicks and purchases as it helps support this blog.
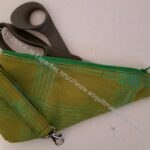
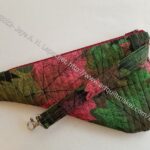
I have been wanting to try this pattern. I was thinking that a project bag might be a good gift for my bag recipients, but I wanted to try it before committing to another ByAnnie pattern. I think, in general, ByAnnie patterns seem overly complicated, but the projects usually turn out well.
I cut out the pieces at Super Sew Day, then finally sewed it together. I used one of the pieces of zipper I got for my birthday. I love it. It is so pretty. I also used more of the Philip Jacobs Chrysanthemum fabric like in the Without a Trace/Take a Stand bag and the APfE v.2.0. I am pleased with the binding, too.
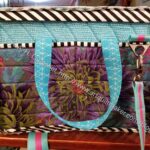
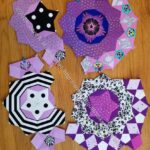
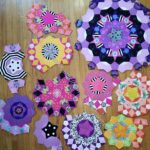
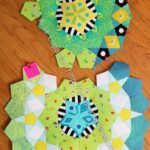
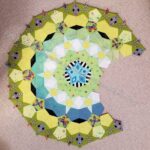
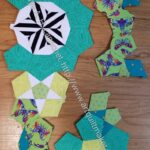
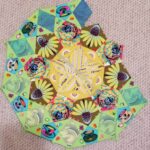
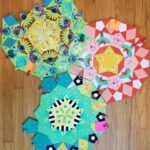
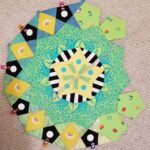
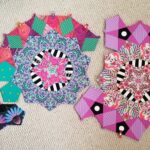
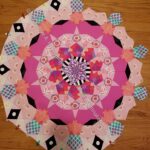
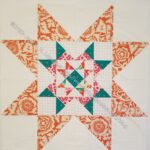
I finally finished the combined Month 13 and 14. This is a large Rosette, like Month 1/2. I did not finish Month 13 before Month 14 arrived, but since they ended up as one rosette, it was ok.
I started out putting Month 13 together using the Hearts & Cones method, as mentioned, that I learned early on in the process. I wasn’t able to sustain that technique with the Month 14 pieces, but having any straight lines is a good thing.
La Pass: Rosette M13/14 center detailParisville Deja Vu Cameo detail
I really like the center, which is cut from the main Parisville Deja Vu print. I did not use the faces as Pink Door suggested. I used the bows, because I love that motif. I wanted the bows to be the stars. The curls and some of the ship hairdo came along for the ride, creating a really pleasing, fussy cut center.
I have a few days before Month 15 arrives, so I am catching up on some binding and may be able to finish the foot part of my sock.
While this quilt has been on my mind, I only thought about it. I didn’t actually take it out and look at it until I finished Creamsicle.Now it is on the design wall and I am thinking harder about specifics.
I need to find the notes so I can be reminded of my ideas. It has also been 4 years since I even looked at this project.
I may have worked on it since the Rosalie Dace class, but I have no notes or blog posts unless they are well hidden and unindexed.