The Petrillo Bag Along Week 3

This week we are working on the sewing. Before  we can get to sewing the bag together, there is still some prep to do. Please note that this is not a tutorial on how to make this bag. I am just recording my experience and noting things I had trouble with. If you want to make the bag (and I think you should), buy the pattern and read the opening post. Keep in mind that I don’t learn well by reading directions, so I have more trouble than most when reading patterns. My trouble is no reflection on Sara’s pattern directions.

Prep

I was so relieved to finish the cutting. What a lot of work that was! Anyway, I was so relieved that I got right down to the business of putting the bag together. Since adding the magnetic snaps is one of the first steps, I immediately realized that that I had bought the wrong ones. I didn’t buy the sew-in snaps. I bought the ones with the arms you have to bend. This is absolutely NOT Sara’s fault. Yes, I did read the instructions for purchasing supplies, but I didn’t know there was such a thing as sew-in magnetic snaps and simply didn’t see those two words on supply list. UGH! A delay!

I ordered them immediately from Tantalizing Stitches’ Etsy Shop, which is the vendor Sara recommneds. I received the sew-in snaps in about 2 days. I put them in relatively quickly using a small zigzag. The sew-in snap was covered with a clear plastic square and I had to sew over the plastic, which was odd. My machine did it, but I had to yank on the piece a bit to get it started since I was sewing the plastic covered snap to the Soft & Stable (=very thick!). I went around twice just to make sure it would stay in place. The hard part was keeping the snap straight. It didn’t end up completely straight, but since the important part is the circle, I figured it didn’t matter as long as it was in the middle. These are sewed to the Soft and Stable so there is no distortion of the fabric.

I know I could have used the magnetic snaps that you bend, which I think Pam did, but I did like the sew in snaps: no cutting of the fabric.

A lot of the prep was preparing to sew the whole bag together and some of the prep involved some top stitching and sewing parts together.

Straps

I was pleased to see the way Sara creates the straps. None of that turning tiny strips inside out nonsense. She creates them using the folding method that I like. Hooray!

Sewing

Flap with Accent
Flap with Accent

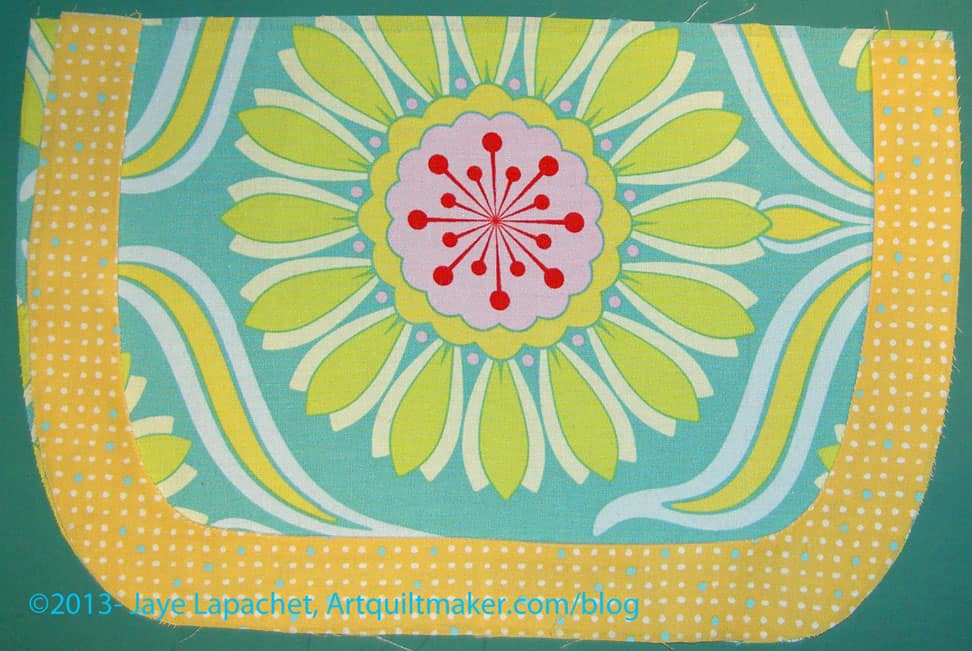
I decided not to do the gathered flap after having some trouble with the gathers. I can’t remember whether I have done gathers before. This was not unexpected as I was a little unsure of the gathers from the beginning. They do add some interest to the bag, but I kept wondering if they would catch on something as I navigate my way through the public transportation systems I frequent. Sara suggested just cutting out a flat piece of fabric using the Flap pattern piece, which is what I did. I also liked that I was able to highlight one of the motifs of the fabric

I was a little confused by the directions in Step #14, covering the flap, but I decided Sara meant topstitching and went with that. I was able to apply the accent with no problems, though, as usual, turning under a small seam allowance, like you would do for applique’ was a pain. I think you could do a regular quilt binding around this piece, if you didn’t mind a little bit of dimension.

PICT3421sm 
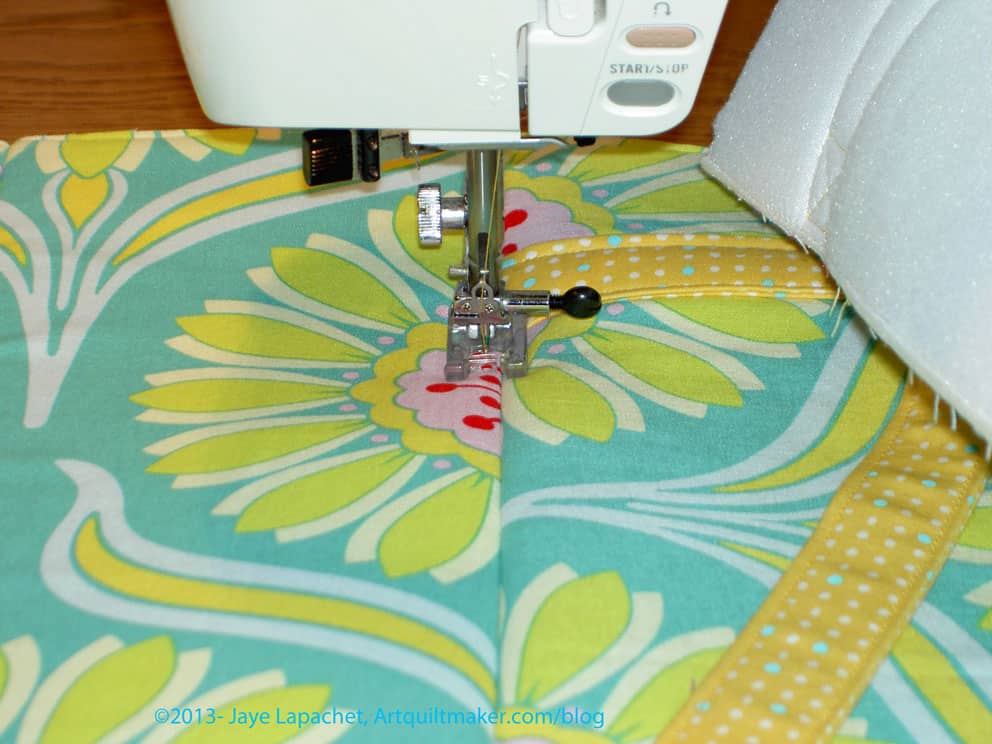
Tutinella suggests topstitching the bottom, which I thought was a great idea.

I used my clear applique’ foot and just measured using the inside of the right hand side of the foot, which gives me a line of stitching about 1/8″ away from the bottom of the bag.

One thing about all the prep is that you don’t have to stop to do prep. Once the prep is done, the bag starts to go together very quickly.

Petrillo Bag
Petrillo Bag

I was really surprised at how well the Soft & Stable acted with my machine. I thought I would have to fight with the machine, because of the layers (fabric + Soft & Stable, occasionally 4 additional layers with the straps).

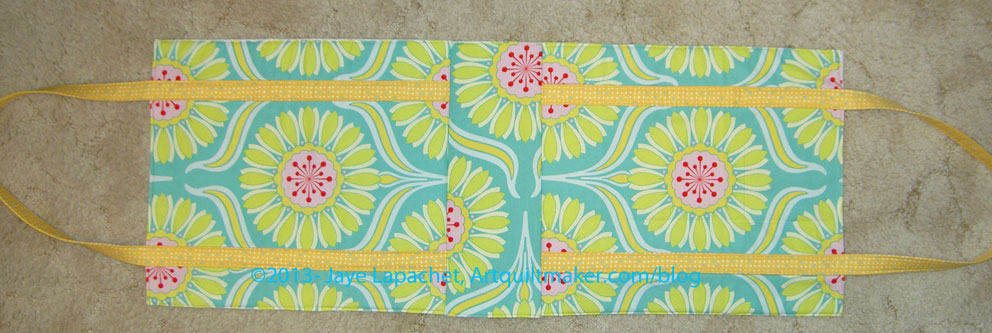
The first round of stitching was really satisfying because of the quick way the bag started to look like something. Yes, the above photo shows it being flat, but it still starts to look like a bag.

Finished Outside of bag

The directions say to draw a line 4 3/4″ from the top of the front of the bag. The purpose is to show you where to stop sewing the straps. You need to stop sewing, because the flap flap slides underneath the straps to keep it closed.

I missed that part of the directions and sewed the straps to the bag all the way around. when I realized what I had done, I knew I had to rip. Bleah. It is very hard to rip through all of those layers. I also had made the little squares with Xes through them at the top of the bag which made the ripping even more arduous.

I did it, though, and after an hour and a half I had the bag back to where I should have been.

Other relevant posts:

BAMQG Meeting Notes – April

I know it has been a week or so since the meeting, but I have had a couple of crazy weeks. At this moment, I am enjoying the benefits of a laptop by getting this post done while out of town.

We were back at our old location this time, which was a relief. I enjoyed the location of the last meeting. I thought it was a beautiful space, but felt like I was coming home this time. Everyone else was more relaxed and happy at this meeting, as well, for some reason. Or so it seemed.

BAMQG Banner

Bay Area Modern Banner

Last summer, the Modern Quilt Guild had a block challenge where they were making blocks for charity and for a banner that would be displayed at various events (I guess. Frankly, I don’t remember the details, but I wrote about it). At the same time the BAMQG leadership asked for blocks in the guild’s colors. Kelly has been working diligently on the banner and she revealed what she had so far. She has a bit more quilting to go, but the idea is to display it at the SCVQA show, which is this coming weekend.

Show & Tell

Everything that was shown was great. There wasn’t a lot, though. I showed the A-B-C Challenge. Jennifer has already posted the photos, so here is a slideshow from Flickr:

Color Group

Color Group
Color Group

One of the funnest parts of the meeting was the color group meeting. My group had Patti, Kelly, Suzi, Chris and Jennifer. This time Joan and Kathleen joined us, so our group is quite large and also enthusiastic.

Color Group colors
Color Group colors

At the last meeting, we met with our group and selected a group of colors from items that people brought. Our colors (see right) are purple, pink and chartreuse. This time we were to bring fabric scraps in these colors (I forgot) and decide what project we wanted to do. Others forgot, too, so we decided we would each make 2-8″ finished blocks from our own fabrics and bring them to the next meeting. One of the members, Jennifer, brought a large piece of a green wheel print and we will all use a piece of that in each of our blocks to help with continuity.We will create a charity quilt out of the resulting blocks.

Color Group Fabric
Color Group Fabric

I suppose the blocks have to be ‘modern’. Since I am in the groove of Sawtooth Stars, I may just make some Sawtooth Stars while work on the Star Sampler. I don’t know yet. The fabric is really stiff and I need to wash it before I do anything with it. I don’t think I have any of the fabric in my own fabric closet.

Another group is doing a round robin. Another group is making zipper pouches to exchange. It is an interesting exercise.

Destash Party

Destash Party
Destash Party
Destash Party
Destash Party
Destash Party
Destash Party
Destash Party
Destash Party

I didn’t bring anything to get rid of, but there was no shortage of stuff. I helped get everything out of bags and sort of organized before the contributors were let loose. “Organized” is a lot more generous a term than what we really did. We emptied the bags by dumping them on a big table in a giant mound. I couldn’t really believe how much stuff there was.

I was all for organizing things neatly, but was soundly vetoed. We did put all the patterns together, all the notions together, etc.

They made short work of most of the good stuff and the rest went to charity.

Someone brought 3 spools of Aurifil thread. I was tempted to slip one into my pocket before the frenzy started, but restrained myself.

There were patterns and tons and tons of fabric.  Cynthia brought a box she had packed a year ago to send to a friend’s daughter in Japan. The cost turned out to be prohibitive, so she just had the box sitting on a shelf. She brought it sealed and everything. Jennifer A took a chance and got the premium fabric, charm packs and fat quarter bundles. I looked through it and it was  a great haul.

San Mateo County Fair

Rhonda brought the applications for the fair for our group entry for the A-B-C Challenge. She was very organized, which was great. I helped her while she was a destashing/restashing by hunting down some of the members and getting their entry fee. I have to get my other entries in as well. I also have to finish the sleeve.

Various & Sundry 2013 #4

I am pretty excited that we have 19 people following via email! Thanks, email readers.

Are you a friend on Facebook?

Color and Projects

Wanda, over at the Exuberant Color blog, put up her March finishes at the end of March. One that I loved was her Japanese X quilt. As you remember, I have one quarter of one of those blocks in my A-B-C Challenge quilt. I saw a pillow that Kathleen made (talked more about this back in August 2012) and do want to make a larger piece with this pattern. Wanda’s version is GREAT. It truly has  exuberant color.

Take a look at the results of the March-a-Long that Darla, the Scientific Quilter organized. Lots of people participated and I think a lot of people made progress on their projects. Thanks to Darla for spearheading this effort and for thinking up a clever name.

Color confidence and Kaffe Fassett article.

Media

The City Quilter had to deal a change to the program in the PBS schedule: Visit https://www.dropbox.com/s/c1b08ucuf3ox145/CityQuilter-New-York-Originals.mov on your computer. This is one part of one episode of the excellent New York Originals public television series.

An excellent blog pointed me to this interesting video about Nancy Page, go here: http://vimeo.com/28386634. I promised to keep her secret blog secret, so I can’t tell you where I got the tip, but go look at the video, if you have any interest in 1930s quilts or just not making dinner, not bathing children or not going to the grocery store. You are busy watching a QUILT video for heaven’s sake! 😉

CraftyGardenMom talks about quilt shops in recent blog post and follows up with more information about more quilts in a future podcast (as of this writing).

Supplies, Fabric and Notions

Quilt Bear April Club

The Quilt Bear Aurifil Club sent me this variegated coral and yellow spools this month. I have them both already, but still enjoyed the little treat. Aren’t they nicely tied?

Rhonda brought an iron caddy that she made with the Madrona Road fabrics to the last meeting. I really liked the shape and thought it would be a good purse shape, or purse pattern. I was too lazy to try and find as I probably won’t make it. Today I was noodling around the BAMQG forum and Amanda posted a link to the site where a person (AHEM) could buy the pattern. It is by Kaye Wood and you can see the shape. The examples are not as cute as Rhonda’s caddy.

As you know, I bought some Soft & Stable from ByAnnies.com to make the Petrillo Bag. I was tidying up my workroom the other day and looked at the brochure that came with the Soft & Stable. In it, the writer of the materials details the variety of zippers they company has. When I went to buy the zipper for the Petrillo Bag, I wanted pink to make the inside, but all they had was a boring baby pink, so I ended up with a boring cream color. This brochure shows fabulous colors like turquoise, eggplant and seagrass. Sadly, they didn’t have the right length, but at least I know I can get cool zippers if I need one in a 24″ length. Now I just need to find some cool 9″ zippers. Well, maybe one additional 9″ zipper.

Creative Prompt #204: Laughing

Post the direct URL (link) where your drawing, doodle, artwork is posted (e.g. your blog, Flickr) in the comments area of this post. I would really like to keep all the artwork together and provide a way for others to see your work and/or your blog.

We are also talking about this on Twitter. Use the hashtag #CPP

The Creative Prompt Project, also, has a Flickr group, which you can join to  post your responses. I created this spot so those of you without blogs and websites would have a place to post your responses.

Laughing Yoga

Laughing Squid

Laughing Gull

Laughing Brook

The Laughing Owl Press


Definition:

Laughing is an involuntary reaction to certain external or internal stimuli. Laughter can arise from such activities as being tickled,[1] or from humorous stories or thoughts.[2] Most commonly, it is considered a visual expression of a number of positive emotional states, such as joy, mirth, happiness, relief, etc. On some occasions, however, it may be caused by contrary emotional states such as embarrassment, apology, or confusion (“nervous laughter)” or courtesy laugh. Factors such as age, gender, education, language, and culture are determinant factors[3] as to whether a person will experience laughter in a given situation

Laughter is a part of human behavior regulated by the brain, helping humans clarify their intentions in social interaction and providing an emotional context to conversations. Laughter is used as a signal for being part of a group — it signals acceptance and positive interactions with others. Laughter is sometimes seen as contagious, and the laughter of one person can itself provoke laughter from others as a positive feedback.[4] This may account in part for the popularity of laugh tracks in situation comedy television shows.

The study of humor and laughter, and its psychological and physiological effects on the human body, is called gelotology.

Laughing Coyote Project | Where human nature meets mother nature.

I would put belly laughing at the top of my highlights list. They always say that laughter is the best medicine. Carol Vorderman

Laughing Sal at the Musee’ Mechanique in San Francisco

Who’s laughing now?

You don’t stop laughing because you grow old. You grow old because you stop laughing.
Michael Pritchard

Cat Beds Again

As you saw in a previous post, I am back on the Cat Bed wagon. Some people had some good questions, so I thought I would gather up the information and put it in one place, to the best of my ability.

Schnibbles
Schnibbles

Kati asked “How large are the scraps you’re stuffing? They look pretty big to me.” These are the size that I put in the cat beds.  the little triangles are the ears off 2.5″ and smaller half square triangles, so you can get an idea of how big the shards are. I might be a bit crazy, but I really only throw away tiny schnibbles that really can’t be used at all.  For the longest time I worried about tossing even these tiny shards away. They seemed like they could be used for something. I just didn’t know what. As I read some Victorian novels and ‘rag & bone’ men were mentioned, I kept trying to figure out what could be done with these shreds of fabric. Amanda saved me when she asked for these cat beds.

Cat Bed March 2013
Cat Bed March 2013

One reader said “It’s easy until I come to the stuffing the tube…do you have any secrets to make it easier than having to put my arm into the tube up to my elbow to push the stuffing around? I am going to have to redo the second one because it is too stuffed/firm.” My answer was “I just dump it in and then once it is as full as I want it (about 3/4s full) I just kind of mush it around until it is ok. I think the cat will knead it to the cat’s liking, so I don’t worry too much about it except not making it too firm.” Amanda confirmed when she said “For the scrap pieces, I try to use nothing larger than an approximately 3×3? square. If it is too big a scrap, then they are hard to dry thoroughly in the dryer. You can also you the strippy castoff pieces that are thin but long – those are okay and don’t necessarily need to be cut down as long as they are thin. I think the best stuffing to use is leftover batting scraps – they dry really well, and make the bed nice and soft. But of course, cotton fabric pieces are always good too.

For the issue about the tube – just cut it shorter! When you are sewing the “side” part of the bed onto the base, if it overlaps more than 5 inches, just cut the extra off. You don’t want to have a big overlap because this does make it a pain in the booty to stuff.”

For the short version of the Simplified Cat Bed Tutorial, I am posting it again.

26 Projects List – April Update

17 Projects in Process! That is well under the 26 that I started with. Granted, some of the older projects are still lingering, but I really feel like I have made progress and am not deprived from starting new projects.

Finished 2013 Projects:

  1. Corner Store: Finished on 1/1/2013 YAY!
  2. The Garden. Finished on 1/5/2013 YAY!
  3. Stepping Stones: Finished on 2/14/2013 YAY!
  4. Fabric of the Year 2011: Finished on 2/27/2013 YAY
  5. Calm: Finished on 3/14/2013 YAY!
  6. A-B-C Challenge: Finished on 3/31/2013

Still WIPs

  1. Aqua-Red SamplerFrances  continues to work diligently and the foundation piecing tutorial is posted. We struggled with the class on foundation piecing as the concept is so backwards. I don’t think this particular lesson is over yet, so I am not yet working on what is next.
  2. The Tarts Come to Tea: I still haven’t worked on this since April 2011. I was mulling over some substandard stitching the I should rip out, which would be a great couch project.
  3. Pointillist Palette #4: Fourth is a series of 6 quilts; needs tiny square patches sewn together, which would be great leaders and enders, if I didn’t have about 1,000 4″ Sawtooth Stars to make.
  4. See: needs satin stitching. Small, also a possibility for finishing. I really have the feeling I came so close to working on this project this month.
  5. Self Portrait: started in 2006 at a class at Quilting Adventures in Richmond, Virginia. I like the piece, but don’t know where to go from where I am. Mouth? Hair? The attitude I need to have is that I can’t ruin it; there is always more fabric.
  6. Under the Sea: class project; like the design, but not the colors much.
  7. Flower Sugar Hexagon: I thought about sewing more hexagons together. Although not difficult, sewing Y seams is a bit of a chore, so I get tired of doing it after awhile. I could, perhaps, use leaders and enders to get this piece moving? I could also sew  1-2 together and then attach them to the larger piece.
  8. Young Man’s t-shirt quilt: have cut up the t-shirts and am still in the process of applying fusible, though I really hven’t worked on this in awhile.
  9. New: FOTY 2012: top, finished, though I can’t decide if I need a quilting border. Back done, ready for quilting.

I still have a few more WIPs than I do finished projects. Again, I have made progress on clearing out old projects and I am pleased.

Ready for Quilting

  1. Original Bullseye: At the quilter
  2. New: Wonky 9 Patch: needs basting, quilting and binding. Not on original list
  3. *New: Super Secret Project #2: Quilted; binding being applied. Not on original list
  4. *New: Super Secret Project: Quilted; binding being applied. ;-) Not on original list
  5. Infinity blocks: blocks sewn together into a quilt top, borders on. Back and binding made; ready to be quilted.
  6. *New: Sparkle Pink – At the quilter.
  7. *New: Swoon – At the quilter.
  8. Spiderweb: Top is together, binding is made. This is at the quilter.

Please note that even if you combine the two lists above, I do not have 26 projects on this list anymore. That is something, IMO.

In the Finishing Process

Abandoned

Nothing so far for 2013

Hunting and Gathering

  • Spin Wheel: really not started, but supplies gathered. Cutting fabrics as I go. TFQ does not consider this a UFO and made some good points to that end, which is why I have moved it to the Hunting and Gathering section. She says, and I have to agree, that quilts are not ‘projects’ until the sewing starts. OK. I’ll go with that.
  • Windmill quilt: Still hunting and gathering.
  • Stepping Stones #2 using Bonnie & Camille fabrics Bliss, Ruby, Vintage Modern: made two test blocks, but still in the thinking stage while I decide on the background colors. I want the contrast to be good.

As I mentioned, I am still trying to think of a new focus for this list for 2013. I feel that I made progress on the most ancient and difficult projects and I want to honor that, but there are still some ancient projects that I am finally thinking I might need to abandon.

Last update for the 26 Projects List

*New – Project started after I started working on the 26 Projects list

Making Some Star Sampler Blocks

Missouri Star
Missouri Star

This is the group of stars from the week of April 8 (I believe). They were a lot more work than I anticipated or expected. Somehow, they were temperamental and needed more attention than their 8″ siblings. I was also in ‘a mood’ for some of the week, which didn’t help either.

One of the things that happens when making blocks, regardless of how many you make, is that they don’t always come out the way you think they will. In the best of circumstances, I had to rearrange the look of blocks by cannibalizing parts of other in-progress blocks. In the worst circumstances, I removed certain fabrics completely and  cut new pieces in order to be satisfied with the outcome.

The above, with green and lavender, is the first version of the Missouri Star. I realized, again, that the green needed to be away from the background. I don’t know why I forget that, but I did until it was all up on the design wall. It took me looking at the pieces on the design wall to see how nicely the green and background were blending into each other.

I also realized that there was too much green. I love that green, but a little goes a long way.

Missouri Star block
Missouri Star block

I changed out a few fabrics and rearranged some of the pieces to come up with different options. The arrangement, left, is the iteration with which I am most in love. I moved some of the darker blues from the Flying Cloud Star block into the center, but it didn’t work for me. I tried a variety of the medium batiks that I have been enjoying in other blocks. The combination that I have now is not a usual one, but I like it and I think it works.

Flying Cloud block - 1st version
Flying Cloud block – 1st version

The dark blues in the first version of the Flying Cloud Star (below) just don’t work for me. Somehow they stood out too much, I guess.

I was trying to add in some more of the fuchsia that I used in Mrs. Lloyd’s Favorite in the 12″ group. It is one of the Simply Color ombres and I don’t have much, if any, of the fuchsia part of the fabric left. Thus, the one I used in the Flying Cloud is a different fabric. It isn’t as dark in person as it looks in the photo. It is also a solid.

Flying cloud
Flying cloud

After trying a few different options, decided, again, on the medium value batik. I worry about choosing mediums all the time. They do not seem like a bold choice. I do love those batiks.

Lesson?

MAKE VISUAL DECISIONS VISUALLY

THERE IS ALWAYS MORE FABRIC, SO CHANGE OUT ONE YOU DON’T LIKE.

Week of April 8 Stars

The last photo shows the finished blocks and I am pretty pleased with them.

The Petrillo Bag Along Week 2

If you are just joining us, please read last week’s post or Pam’s post.

If you read between the lines of my last post, I was a little ahead of those of you, because I had already gathered my supplies back in March and had started to cut. I did want to be a little ahead of you, so I could give you some tips and tricks if I found any.

Nota bene: Kay at Tantalizing Stitches sent the sew-in magnetic snaps out the day after I ordered them.

Fabric

The fun part was choosing fabric. You can see the colorways below, but the particulars about what I chose are:

  • For the exterior: Heather Bailey’s Pop Daisy  from the Pop Garden line (Westminster Fibers #HB02). It is a few years old and had been slated for a back, but called to me when I looked in the Fabric Closet – green, yellow, red print
  • For the lining: Savon Bouquet by Verna Mosquera for FreeSpirit – pink polka dots
  • Straps and accents: City Weekend by Oliver & S for Moda (Pattern #11165, I think. It might be L1165)- yellow

I am not sure what possessed me to choose these colors and this combination of the three. It was grey and foggy at my house the day I chose the fabrics, so, perhaps, I was seeking cheerfulness. I also wanted to use some dots for something. I do like a light interior for bags. It is hard to see what is inside if the chosen fabric is too dark.

Organization

Petrillo cut pieces
Petrillo cut pieces

Week 2 is all about cutting, so I did the cutting. It took me awhile to get the cutting done. I would say it took me about 3-4 hours. I was doing laundry, ate lunch and went to pick up the Young Man in between, so it is hard to say. It did take me a long time as I was trying to be really careful and not miscut. Don’t plan on doing it in a few minutes.

Additional supplies
Additional supplies

There are a lot of pieces to cut for this bag, so take the time to be organized. I would add the following to the supply list:

  • sticky notes, though paper will do as well
  • Wonderclips
  • pen

I like to pin a piece of paper or sticky note to each cut pattern piece with the corresponding name from the pattern, e.g. Lining Flap, and the size. Even if it doesn’t help me truly be more organized, I feel more organized.

I also felt like I needed a spreadsheet to track everything that I needed to cut. I think it would look like a main column of what parts needed to be cut and a main row of the materials out of which the parts needed to be cut. I might also put dual columns for each put a tick mark in one noting I needed to cut a part from that materials and the second column for when I had done it. I could have just ticked off the lines on the pattern. I didn’t because I didn’t want to confuse myself for the future use of this pattern.

Cutting

Sara wants you to cut the fabrics in the order listed on the pattern. In some places, she has you cut a smaller piece before a larger piece. I like to cut all the larger pieces first, so I rearranged a few, but really tried to stick to her pattern directions. I would like to see a layout sketch for the pattern pieces on fabric in the directions.

There is enough fabric to cut all the pattern pieces. Sara did a great job estimating yardage.

I did cut one piece wrong early on and had to piece together enough of the lining fabric later for one of the bottom pieces. As I haven’t made this pattern before, I am hoping it will be ok. I am going to rummage through the fabric closet and see if I have another piece of the pink fabric (shown above) and cut a whole piece out of it. You could add an additional quarter of a yard, if you are worried about screwing up the cutting.

I just used my rotary cutter to cut the Soft & Stable where possible. I did notice, during cutting of the Soft & Stable, the sounds of paper being cut. I couldn’t feel any paper on it, especially something like paper covering a fusible. I am not sure what it is made of or if it was a good idea to use a rotary cutter, but I did want to speed the process along as much as I could.

Fun and Games

Other relevant posts:

Petrillo Bag by Tutinella

This Petrillo bag by Tutinella is one of my favorites. I love the use of the map fabric, especially how she carefully placed the legend. I think Tutinella (great name, don’t you think? It is fun to say!) is a girl after my own heart. She writes “I’m a typical girl – no matter how many bags I have, I want more!” in her post about this bag. I also love how she calls her husband/significant other Mr. Right. I wish I had thought of that first! This is one of the great bags you can see in the Sew Sweetness Flickr Group, so go and take a look.

Creative Prompt #203: Kick

Kick up your heels

kick off your shoes

kickball

don’t kick me!

Kick back

Kickin’ it

Mean trick using a sign stuck to the back of someone’s shirt

A quick kick that interrupts spellcasting and prevents any spell in that school from being cast for 5 sec. World of Warcraft

kick the habit

Kickline

Rockettes move

Kickass

Kick-off

INXS Kick

2009 movie

kick the can

kick in the seat of the pants


Definition: “In combat sports and hand-to-hand combat, a kick is a physical strike using the foot, leg, or knee (the latter is also known as a knee strike). This type of attack is used frequently, especially in stand-up fighting. Kicks play a significant role in many forms of martial arts, such as Taekwondo, Karate, Pankration, Kung fu, Vovinam, Kickboxing, Muay Thai, Capoeira, Silat, and Kalarippayattu.

Kicks are also used for kicking objects such as balls, books etc. If a human uses a kick in sport, it would most likely be used for kicking an object into a goal such as kicking a soccer ball into a goal and so on.” (Wikipedia)

Kickstarter

Kicking, Austria

Progressive Kick is a national progressive 527 PAC, founded by Joshua Grossman

Post the direct URL (link) where your drawing, doodle, artwork is posted (e.g. your blog, Flickr) in the comments area of this post. I would really like to keep all the artwork together and provide a way for others to see your work and/or your blog.

We are also talking about this on Twitter. Use the hashtag #CPP

The Creative Prompt Project, also, has a Flickr group, which you can join to  post your responses. I created this spot so those of you without blogs and websites would have a place to post your responses.

Modern Quilt Studio QuiltCon Homework #8

QuiltCon Homework #8

Weeks writes: “Give and receive. Learn how to give and receive constructive criticism for those who seek it. Find four positive things to say about someone else’s quilt and look for one thing that you think they could improve”

I have been to many quilt shows. I have also stood in front of many quilts where I often have heard people talking openly about what they disliked about a quilt. At first, I was so green I did not notice these words, being completely in awe of the quilts hanging, the work involved and the time taken for creating all parts of the works. As I gained experience and some understanding of construction, color, fabric and design in relation to quilts, I began to take notice of the words spoken around me. I did not realize at the time that I had gained quite a lot of experience and only listened to these words thinking how much these women, for they were mostly women, must know about quilts to say such things about them. I turned away from a lot of quilts, thinking they were bad because these women thought so. I lost confidence and thought that I must know nothing about quiltmaking if I could stand in front of such awful quilts finding good in them.

At a dark time in my life, I had escaped to a quilt show for a few hours and was standing in front of a quilt that I really liked. It wasn’t a quilt I would make, but I found it to be  cheerful.  The fabrics were bright and there was a lot to look at. As I stood there, people swirled around me and two women stopped to look at the quilt. They were slightly behind me, so I couldn’t see them, but I could hear them. They proceeded to point out all the mistakes and, in their opinion, poor choices the maker had made. All the things I liked about the quilt were not good enough for them. In fact, they made these qualities seem so terrible that if I had been listening a few years further, I would have thought that cheerful quilts and bright colors were the spawn of the devil.

I thought of the unknown person who made the quilt and how hurt s/he would be if the words of the women had reached his/her ears. Unable to help myself, I turned to stare, openly stare at the women, not opened mouth, but glaring at them. They didn’t say anything, but saw my look and moved away. Not in embarrassment, but in indignation, as if my rebuke was unwarranted.

While I may have had no business acting the way I did, I learned a lesson that day. I didn’t know the lesson at the time, but it is clear to me know. I try very hard to find something good about every quilt I see. If someone has taken the time to make a quilt, and we all know that it takes significant time, there must be some good in that quilt.

I am not such a great person that I like ALL quilts, don’t get me wrong. I have a hard time with Civil War fabrics, but often the block designs can be quite interesting. I find many of the big block quilts not quite as interesting as they could be, but the vast space for fabrics often shows off the most magnificent fabric designs. The point is that I try and find something good about each quilt – a nice fabric, a bit of excellent quilting, the obvious knowledge of the maker’s machine.

I get nothing out of bashing someone’s quilt. In fact, I might hurt the maker if s/he is standing within earshot. I do get good exercise in ‘seeing’ when I look for something good in a quilt. This exercise can enrich my future quiltmaking and doesn’t hurt anyone.

In my teaching, I try very hard to boost confidence and steer the students towards good construction and good design. In the course of this effort, I remind them that quiltmaking is a process, that it takes practice and they will get better. I want more people to make quilts, not fewer. I want to encourage not discourage.

There are ways of suggesting improvements to a quilt or design:

  • “what would happen if you turned this block this way?”
  • “What would happen if you used a bit more blue here or lightened this up over here?”
  • Ask the person what they are trying to achieve. Keep in mind that the maker may not know. We don’t always know why we are making something when the urge simply to create is very strong. Be gentle. coax don’t pound.

There are a lot of other things to say depending on the quilt’s design; just find four things to compliment another quiltmaker about. Be nice.


Image courtesy of The Modern Quilt Studio

Sketching #187

Have you tried the Creative Prompt? I am continuing to work on my responses, though I haven’t posted many here lately. time, as usual, is my enemy and I have been spending tons of time on my Star sampler. I have a few responses to post, though and will do that over the next few days.

CPP Response #187: Princess

Check out the original prompt for Princess. Oh my goodness! I didn’t think I was ever going to think of a response, then I resorted to my window shopping theme. A princess shopping at Artquiltmaker.com? Why not?

5 minutes. Try out a response of your own. Have a great day

Star Sampler: 4 More 8″ Stars

Week of April 1 Blocks

These are the blocks for this week. Or so I thought. TFQ took the time to go through our list and found, though not her intention,  that I wasn’t ahead as I had thought. She found that I actually finished blocks for the end of the last week not the beginning of this week. I have to say I felt disheartened. I wanted to work on another project, which was why I got busy with these so early in the weekend. So much for clearing the decks.

We have a deadline of getting the 8″ blocks done by the beginning of May and I want to stick to that schedule. Her efforts, fortunately, got us back on our real schedule, rather than the schedule in my head, which is good.

Still I didn’t want to work on any Sawtooth Stars at the moment, even the new patterns. I just left these on the design wall and pretended I wasn’t behind again. This is an interesting exercise in working on one project almost exclusively. It is difficult for me to dedicate so much time to one project, I am finding. This makes me think more about my process. More on that later, I think.

Above are: Chevron Star (actually from the week before as I made the wrong block previously) (upper left) Basic Star (upper right) Home Treasure (lower left) and Stars & Pinwheels (lower right). All of these can be found in one of the Around the Block books.

I am using some of the 12″ blocks as inspiration for the fabric combinations.

Yesterday, I decided to do some cutting and cut out the new blocks. Life goes on.