Nothing for years and then a blast of Spiderweb posts. When it rains it pours, right? Thursday I wrote about working on the Spiderweb and how that felt. I mentioned the 7 blocks I had done and thought I should post about those.
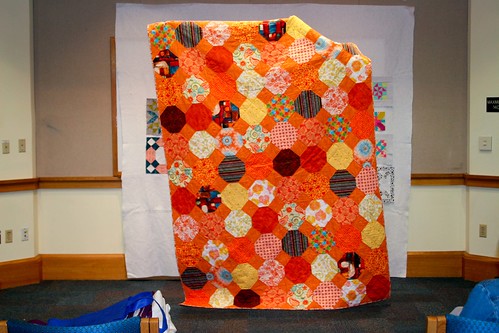
From this picture you can get an idea of what the quilt will look like. In order to complete the whole section, I will need 5 more border blocks and 1 center block. I have labelled the photo below so you can see what I mean.
7 Border Blocks annotated
As usual, what I am trying to do is to complete the plates. I want each of the plates to be complete. I don’t want any of them to be cut in half or just show a quarter. There is nothing wrong with those types of layouts, but they are not for me at this time.
Sometimes the border blocks take too long and I need to make some progress, get a little bang for my buck. At those times I grab some center blocks and sew them together. I think that alternating keeps me from getting bored. When I sew some center blocks together, I feel like I am making real progress.
I walked by my Sampler quilt, the first one I ever made and saw the Spiderweb block in that quilt and it made me think that the first Spiderweb block in the Sampler quilt was just a taste or precursor to this quilt. OR I might be getting just a bit too philosophical.
Take 5 minutes to do any kind of artistic response: poem, doodle, quilt, pastel, pencil. ANYTHING counts. No rules; just do it!
Post the direct URL (link) where your drawing, doodle, artwork is posted (e.g. your blog, Flickr) in the comments area of this post. I would really like to keep all the artwork together and provide a way for others to see your work and/or your blog.
The Creative Prompt Project, also, has a Flickr group, which you can join to post your responses. I created this spot so those of you without blogs and websites would have a place to post your responses.
Whispered Words, a Slash recommendations database.
Beatles Let It Be Lyrics
Songwriters: LENNON, JOHN / MCCARTNEY, PAUL
When i find myself in times of trouble
Mother mary comes to me
Speaking words of wisdom, let it be.
And in my hour of darkness
She is standing right in front of me
Speaking words of wisdom, let it be.
Let it be, let it be.
Whisper words of wisdom, let it be.
I really hope you can understand this when you read it. I stayed up too late watching the election Tuesday night and, as I write this, the exhaustion is taking over.
The last time I wrote about the Spiderweb was last December. Nearly a year later, something is finally happening. But the worst part of the story is that I started this project in 1998. I looked at the blocks many times and my tastes had changed and I didn’t really want to work with dark backgrounds. The project languished, but the 26 Projects list has forced me to get to it. Forced is a strong word. I could have donated all of the blocks to the Charity Girls and been done with it, but something prevented me from doing that.
I started small by buying some Carol Doak foundation paper. Then I continued by printing the main foundations for the border blocks. Then I started sewing and found I printed the foundations the wrong size, so I started over. Finally, I was able to sew enough to get some blocks put together.
In the process, I found something really remarkable. I feel really good making these blocks. I don’t know why. They don’t seem especially gorgeous, though they are pretty. I get a warm glowy feeling inside each time I work on them. It is so odd.
Spiderweb Border Block detail
I have all of the center blocks done, but, like the Flowering Snowball, I needed to make special border blocks so the border plates weren’t cut up. I wanted them to be finished.
In the photo, right, I have put numbers on the border blocks. You can see the differences, if you compare them with the center blocks.
The border blocks are definitely brighter and more cheerful, because of the newer fabrics I am using. I hope there isn’t a big disparity when the quilt is finished.
My biggest problem, however, is that I have nowhere to lay this quilt out. My design walls are full and the quilt, since there is foundation piecing paper on the back of the blocks, wouldn’t stay on the design wall without pins anyway. For the moment it is on the floor in front of a design wall and blocking the closet. This isn’t going to last long, but I don’t have a solution right now.
At the moment, I have 7 border blocks complete and one needing some trimming and pressing. The quilt will be 8 blocks wide and 10 blocks tall. I have about 32 more blocks to make and I hope I don’t run out of the border fabric. If I do, I will have to make the quilt smaller and donate a few of the leftover blocks to the Charity Girls.
I can’t remember the last time I went to a CQFA meeting, which is a very sad thing. I think it may have been May, which is forever ago. It was a great meeting – very well attended. In a way I wish BAMQG and CQFA were not on the same day, but, on the other hand, I get all the driving and being out of the house out of the way in one day.
ATCs
November 2012 ATCs
I made really cool ATCs. I saved the mesh wrapping from two different bags of fruit. Limes had a green mesh wrapping. The other was a red mesh bag. I opened them up to flatten them, then placed them in layers over a piece of fabric, which was of an unfortunate design. I tried not to think too much about the choices I made while I was making them. I just made the choices and worked through the design in my head.
I placed the two kinds of mesh over the fabric, pinned everything together and wove eyelash yarn through the mesh over and over using one of my book binding needles. Once I felt like I had woven enough of the eyelash yarn through the mesh, I pinned the backs to the front (which was one piece) and sewed with a straight stitch around the two parts to hold them together. To finish, I satin stitched around the outside.
There were only 4 of us swapping, so I got one of mine back, which I was happy about.
Notan
Notan Exercise #2
Julie, Dolores and Maureen set up a presentation on Notan. They did a great job. I learned a lot and can use some of it in my Design Series presentation on negative space in the future.
The thing to remember for me was to the think of the whole design not just the foreground. In the photo of the exercise 2 the white is just as important as the black. The designs are whole and neither the black nor white is more important.
I borrowed Julie’s book, because I couldn’t find mine and am looking forward to reading more.
Show & Tell
I showed the Flowering Snowball, which I finished the other day. No photo yet, but look for one soon. I have to get one of the boys to hold it up so I can take a photo. I am in love with the back mostly because of the large piece of Philip Jacobs fabric I included.
Dolores Self-Portrait
Maureen, Dolores and Bron brought their self portraits (workshop from last meeting), which really turned out great. Maureen wasn’t happy with hers, but I liked it. It didn’t look like the photo she started with, but it did look like a person.
I like Dolores’ self portrait, because it has the essence of Dolores. It has her feeling, joie de vivre and expressiveness without looking exactly like her. I have always thought that getting the feeling of the person right is more important than having the painting or quilt look exactly like a person. I love the way Dolores has used the different fabrics for different parts of her self portrait. The black on white works very well for the hair even though the fabric is numbers. I think it was an inspired choice.
Bron’s piece
I am not sure that Bron’s piece is a rendition of her grandmother, but I think it is. Many people commented on the background of the piece. The two different fabrics she used for the background are inspired choices. The different scales are good. The gold of the one piece of the background brings out the skin of the figure while the stripes in the left hand background mimic the stripes in the figure’s dress/shirt.
I also really like the scarf. I never thought of adding a scarf, but it really looks great and solves a lot of neck/skin problems. I would have liked to have looked at the scarf for longer to see how it was sewn, but didn’t get the chance.
I am constantly impressed by what CQFA people make and the choices they make within their pieces.
As usual, the meeting was great. Lots of people, quilts and a good demo. For some reason, my camera does not want to take photos when I am out and about. The battery (not fatal) ran out at CQFA and I forgot the spare at home, so I only took a few photos with my phone. Something has to be done about this camera. Perhaps I just need a few new batteries?
Pincushion Swap
Vintage Modern Pincushion
I decided to participate in the Pincushion Swap after I spoke with Joanna Figueroa at PIQF. Once I had the pattern and the know-how I picked out the most modern fabrics I could think of and really had a good time making it. I am going to make one for the raffle basket that will be given away at the Holiday party.
There were a lot of really great pincushions. One I was particularly enamored with was a Cathedral window pincushion. I never thought of that pattern before, but a pincushion seems doable. I am not going to make one, but I admired it. There were probably a dozen that were given in. It will be interesting to see what the Kansas City Quilt Guild sends us back.
Donation Quilts
Yellow & Pink Donation Top
I finished another donation top and back. I had the blocks done over the weekend. When I had a day off on Wednesday I put all the blocks together. I have used sashing before, but I decided to just put all the blocks together next to each other. I like the way it turned out. I like the movement of the squares of color. I almost randomly picked the border fabric, but not quite. I am pleased with how it turned out. It looks cheerful and happy.
For the back I used some more golds. I wanted to make one side a bit calmer. I hope it isn’t dour.
Yellow & Pink Donation Back
I was hoping for calm, as I said, but I also picked some fabrics that had a bit of color. It is a really different back that front.
I also wanted to clear off my sewing table. I need space next to my sewing machine, which I will probably fill up with other fabric “junk”. 😉 I had cut up a bunch of 2.5″ squares for future donation quilts. I have several left, but am kind of done with the checkerboards. Perhaps not completely, but mostly. I made some blocks with some of the parts I had and will give those to the Charity Girls.
Random donation blocks
They are kind of fun, but I don’t have enough parts to make a whole quilt with any of the colors. Peggy took them as well as some 2.5′ squares, so it will be interesting to see what she does with them.
I kept enough background fabrics in both grey and white to make another top, but I don’t know what fabrics I will use for the foreground. Jennifer saved me some kits for the Patchwork Wheel block and the next charity quilt I make will be from that pattern. Change of pace, you know.
I posted about the Patchwork Wheel blocks I made a few days ago. I realized as I was packing for the meeting that I had kind of a lot of donation quilts to give in. I posted about the quilt I bound and the Pink & Green donation top I made a week or so ago. It is a good feeling to give.
Cross/Plus charity quilt
Peggy made this Cross/Plus quilt for the charity effort as well. I was told that we are up to 99 quilts for the year. I don’t know if the one I turned in bound was counted.
The colors in the photo don’t do it justice. The quilt is a really nice combination of turquoise and scarlet.
I believe that Kathleen made a quilt like this in a swap earlier this year. These may be the leftover or reject blocks from that quilt. If they are rejects, they are perfect in this quilt. I am partial to the color scheme, but I still think that some youngster will like it.
Show & Tell
Sparkling Cider by Mallory
There was a lot of great show and tell in addition to the pincushions. One of the quilts that I really liked was a from a pattern called Sparkling Cider by All Washed Up quilts. The fabrics used for the packaging doesn’t do it justice. Mallory used Tula Pink’s Plume Collection from a few years ago. I always liked the larger prints in this collection, but didnt’ buy any because they were too large. I am not scared of really large motifs, but I have a lot of them and they are hard to use. there are two blocks in this piece and you can turn the block with the smaller Sawtooth Star different ways to create more movement and achieve balance. One thing I like about the Sparkling Cider pattern is that the blocks are large, but the quilt design is not boring. I am way past large squares in my quilt life. There are some nice renditions on Flickr.
Adrianne’s Modern Amish
Adrianne saw an advertisement for modern Amish quilts that were needed for a book. The deadline was very short and since publishers require that a quilt not be published anywhere else, including on a blog (I am so totally screwed on this front) that many quilts people had already made were in eligible. Adrianne got inspired and started work on this quilt. She said she didn’t make the deadline, but she finished the quilt and it is a really interesting piece. The negative space is a really interesting shape. This could be made with the Fons & Porter Pyramid ruler.
I know you can see it, but the quilting is horizontal lines across the whole quilt, which looks great.
Alison’s baby quilt
Alison brought a baby quilt made from fabric from a Malka Dubrowsky’s first hand-dyed looking line, A Stitch in Color. I really like the way it came out. It sounded like she said she did a sort of Jelly Roll technique, but I think she managed it more than the directions for a Jelly Roll Race quilt.
She added in the parallelograms to break up the fabric motifs as well. I like those parallelograms; I think they add a bit of stability to the design as well.
Sew Time
A few of us stayed until the bitter end. Only Alison was doing anything remotely related to sewing. I don’t know what my problem was, but I forgot to bring a hand project. Alison was basting another baby quilt. That girl makes as many baby quilts as I make donation quilts! Rhonda and Kathleen chatted about what items to put in the raffle baskets at the next meeting. Alison and I chatted about the house she is selling in LA (in Glendale) and I put my two cents into the raffle basket conversation as well. It was very pleasant.
Not a lot of people are staying for sew time, which I don’t understand. I love the social aspect. I get a few things done and it is usually pleasant. I think it is a pain to bring the machine for only a couple of hours, but there is plenty of cutting to do in a project, so people could do that. It will be interesting to see if this is just because of the busyness of Fall or if it is a trend.
I was really on the fence about the BAMQG pincushion swap. I wanted to try it, but was concerned I would have trouble making it. I didn’t quite know how to deal with the button and I didn’t want to make myself crazy trying to get it right.
I decided to participate in the Pincushion Swap with BAMQG after I spoke with Joanna Figueroa at PIQF. Once I had the pattern, Petit Gateau from Fig Tree Quilts, and the know-how I picked out the most modern fabrics I could think of and really had a good time making it.
I liked the way the pattern said to make small blocks and put them together. It was kind of amazing the way, after I cut the circle, the top looks like I sewed it into a circle.
I had a little trouble with the filling. I wanted something with weight, but I wanted to be sensitive to people with nut allergies. I went to the store and as I was being directed around the store for different fillings, I came across the pellets they use for Beanie Babies. I bought a package of those, because I thought they would be good for the weight. I thought about the sharpening qualities that those old tomato pincushions have and landed on some wool roving. I bought a bunch of that and the combination ended up working well. The combination was easy to put in the pincushion.
Vintage Modern Pincushion
It really didn’t take very long to make the pincushion and it was fun. I liked making it and kept thinking about who else needed a pincushion. Perhaps I’ll make one for a Black Friday Sew-In prize?
I am actually ok giving this pincushion in for the swap. I hope I get one back that is as nice.
I climbed up the ladder into the fabric closet to pull down the Spiderweb blocks. I had hoped no ladder would be required, but no such luck. Here in Northern California everything is stored vertically. I was in the process of squishing my hand getting Spiderweb blocks out of a plastic tub when I saw my mixed media box. Idly, I wondered if anything was in it.
Yes, after lamenting and wailing for so long, I have finally found the Original Bullseye. It was in the mixed media box I made back in 2007. Really, nothing fabric should be in that box and I have no idea what possessed me to store this quilt top there. Desperation and lack of enough storage space (or too much crap), I suspect.
I was sure that the last time I wrote about this quilt was about a thousand years ago, but happily, it was only last winter.
Original Bullseye – detail
The quilt is much smaller than I remembered, but, then, again, the quilts I have made lately are much bigger than what they should be.
Now that it is found, I can put a border on it and finish it. I see my eye wandering to the size and wonder if I should make more blocks to beef it up a bit.
Regardless, I can certainly finish this quilt now. Yay!
I had it on my list to deal with the disposition of a couple of projects and the Flower Garden was one of them.
Once I pulled it out of the closet, I was a little sorry to see it go as I do like the stitching and the border, but I still don’t like the flowers, so off it goes to a better life. I am going to use the border idea again, perhaps in piecing, definitely in fusible applique’.
Of course I will do stitching with Perl cotton in other pieces.
There is a woman making two quilts (one is done) for a mutual friend. Another participant decided to make a quilt for the first quiltmaker.
Are you confused yet?
I made this block to send along to contribute. I often, as you may have noticed make stars, especially the Sawtooth Star. I like Sawtooth Stars. I think star blocks give a lot of bang for their buck. I wanted this one to be as cheerful as possible. As you can see, I used fabrics from the A-B-C Challenge.
It is already sent off and I will probably never see it again.
a class or function designed to receive incoming events from another object or function.
wash basin
Definition: A sink (also sinker, hand basin and wash basin) is a bowl-shaped plumbing fixture used for washing hands, for dishwashing or other purposes. Sinks generally have taps (faucets) that supply hot and cold water and may include a spray feature to be used for faster rinsing. They also include a drain to remove used water; this drain may itself include a strainer and/or shut-off device and an overflow-prevention device. Sinks may also have an integrated soap dispenser.
A carbon sink is a natural or artificial reservoir that accumulates and stores some carbon-containing chemical compound for an indefinite period. The process by which carbon sinks remove carbon dioxide (CO2) from the atmosphere is known as carbon sequestration. Public awareness of the significance of CO2 sinks has grown since passage of the Kyoto Protocol, which promotes their use as a form of carbon offset.
Take 5 minutes (5 minutes only!!!) to do any kind of artistic response: poem, doodle, quilt, sing, dance, pastel, pencil. ANYTHING counts. No rules; just do it!
Post the direct URL (link) where your drawing, doodle, artwork is posted (e.g. your blog, Flickr) in the comments area of this post. I would really like to keep all the artwork together and provide a way for others to see your work and/or your blog.
The Creative Prompt Project, also, has a Flickr group, which you can join to post your responses. I created this spot so those of you without blogs and websites would have a place to post your responses.
Sigh. Camille Roskelley was featured on House of Turquoise. I love her house. I love her house, because it is beautifully decorated, but also because there are no giant stacks of paper or baskets of laundry. I am tossing things into the Goodwill bin right and left, but it doesn’t help me get to a look like Camille’s house. Sigh.
Short introduction to the Fat Quarter Shop’s new You Tube Channel. The quilt behind Kimberly in the intro is cheerful. Kimberly tweeted tons during Market earlier in the week. Go look at her Twitter feed (@fatquartershop) and click on the links to see new fabrics, etc)
I saw a video on the Quilt Bear Website for a new trimming ruler by Karen Montgomery. It looks like a great idea for snowball blocks and I am thinking of making one in orange since I saw Michelle’s at a recent BAMQG Meeting.
The Library of Congress has a new website with a lot of old newspapers called Chronicling America. Of course, I did a search for quilt in California in the late 1800s/early 1900s. I found a picture of a quiltmaker stitching away on a sampler quilt in the SF Call. The article is about quiltmaking and mentions various patterns. You can read it by zooming in. More coolness from the Library of Congress.
Need some special templates? Read about Brye Lynn’s find, Customplastic on her blog. Hhmm, what do I need to make?
I don’t really want to get into it with you, but this annoys me. Not the blog post, but the selvedge statement.
I found a Flowering Snowball pillow on the Cut to Pieces blog. Her pillow is really nice looking. I was so surprised to see that someone else found this pattern and actually made it. Love it!
I had to write a new post and the Renewed Jelly Roll Race has an interesting story. I know a lot of you have heard it all before, but I hope I changed it up a bit so you wouldn’t be bored. I also didn’t make that the only post of the day. See? I am always thinking of you, my dear readers. 😉 I thought about the Flowering Snowball, but it isn’t done yet, I don’t have a photo. Blah. Blah. Blah. If you feel like it, there are a lot of gorgeous quilts on the site that you could look at after you nominate and vote for my quilt. ;-). Here is the schedule:
October 26 – 31 Linky open
November 1 – 4 Nominations are made (this is where you nominate me)
November 5 -8 Vote for your favorites
November 9 Winners announced
I also saw this palette quilt-let via a link from the Blogger’s Quilt Festival. I have been wanting to make a palette block for my mom as part of larger quilt, which isn’t designed yet. Food for thought for sure.
I also this interlocking wheels pillow. I don’t know if that is the real name, but that immediately leaped into my mind when I saw it. Shape Moth has an interesting way of combining colors.
I also saw a CakeWalk quilt from Mountain Musings. The fabrics are very cheerful and remind me of the fabrics I am using for Flower Sugar Hexagon quilt. The maker links back to the designer’s blog and the story of what a CakeWalk is is very interesting. I have never heard of it before. I really liked this blog, in general. It wasn’t all quilts-all-the-time, but it had a nice feel to it.
One thing that surprised was how many quilts were from patterns. At least the makers acknowledged and/or linked back to the pattern makers. If you have never designed your own quilts, tell me what is stopping you. Perhaps that is a tutorial I can work up.
So far I have gotten some wonderful comments from people on the Renewed Jelly Roll Race. I am not the only one who is confused by the popularity of the technique! One person asked me to write a pattern!
Fabric, Supplies and Tools
I was asked recently to write some tutorials on EQ7. I haven’t done it, but the topic is on my radar. I saw an EQ7 tutorial for printing foundations from an Alabama artist. He doesn’t seem to tag his posts, so I would have troll through it to see what other EQ7 info he has posted. Too bad. Tagging is useful. I haven’t had a chance to explore yet, but it might be a source of additional information for you. Let me know what you find.
Other
Ellen Rushman wrote her Master’s thesis, called Modern Quilting: A DIY Discourse, for her degree from the College of Education and Human Sciences, major in Textiles and Clothing Design and has posted it on the UNL website for your perusal. The thesis explores the Modern Quilt movement from the perspective of quiltmakers who self identify as modern quilters or were at a meeting where interviews were taking place. Ms. Rushman concludes that the Modern Quilt movement is both an aesthetic and attitude.
Did you see the tutorials I posted this week? Part 1, part 2 and part 3 of fusible machine applique’. These will soon be posted on the Tutorials page as well. I really had to break it up into three parts. No sane person could write a post that long and no sane person could read a post that long. Hope you were able to follow along. Let me know if anything is unclear. I know the parts about how you turn your fabric to get a smooth zig zag are tricky. I know my brilliant readers will rise to the occasion.
I am really not starting this quilt, but it is firmly in the hunting and gathering stage. I have wanted to do another Stepping Stones quilts since I made the first one now that I know the color placement.
I thought this would be a good quilt design on which to use the various Bonnie & Camille lines I have (Bliss, Ruby, some Vintage Modern).
The idea has been on my mind and this week, I just got a bug in my ear to try out the colors. Not sure I like the great. It is kind of dark. I like the tone of the grey in the middle patch on the right, but I am not sure about the other greys. I have another block underway and will see when I put the two blocks together.
We are making the Flower Wreath block. To find out how to make templates, including the ring, see Part 1 for making templates and Part 2 for making the ring and positioning the ring on the background.
Flower Wreath
Now we are going to stitch the ring. If you haven’t started, check the Supply List in part 1 and grab your 3″x5″ tearaway backed fabric. Your ring should be applied to the background and ready to stitch. If your ring is not fused and ready to stitch, go back to part 2.
I stitch in layers, so that the stitching is easier, there are fewer starts and stops and the piece looks more finished. Now that you are ready to stitch, it is time to choose your thread.
Choose thread
Whenever you choose thread, you must consider the stitch. If the stitch will be dense like a satin stitch, you should choose the color by looking at the thread wrapped around the whole spool. That will give you a better sense of the color the satin stitch will end up.
It you will be using a straight stitch, you should unreel a bit of the thread and look at one strand on your fabric. You may need to pool a little of the thread together – less dense than the whole spool and more dense than one strand.
Now set up your machine for zig zag stitching. You will need to choose a stitch density. I like a semi-open zig zag that is not too wide, because it uses less thread and looks more interesting. Dense satin stitching, however, can really highlight and outline each piece. I use the following settings on my machine:
Ring: width: 3.0, density: 0.45
Flowers: width: 3.0, density: 0.45
Leaves: width: 2.0, density: 0.5
Flower centers: width: 2.0, density: 0.5
Even if you haven’t chosen all the fabric, I like to get the ring stitched down first, so I can audition the other fabric without worrying about the ring. Yes, it is fused and shouldn’t go anywhere, but I still like it to be stitched down.
In order to choose the stitch density, you will need to test. Get the tearaway backed sample piece you have prepared and start testing with the width and densities I have provided above. Stitch lines of zig zag stitching 2-3″ long using a contrasting thread similar to the thread you will be using to stitch the ring. Adjust the width and density on your machine until you are pleased with the look.
Stitch ring
Put the ring on the machine and start stitching. I always leave a long tail that I can pull to the back and tie shut later. My zig zag does not automatically tie the ends. If your machine is more advanced you may not have to tie a knot on the back. I don’t want my zig zag to come out if it gets snagged while being used, which is why I tie the ends.
I use my applique’ foot, which has a red arrow in the center to stitch out the zig zag. I place the tip of the red arrow on the raw edge of the ring and follow it around. You should stitch with needle down or use the hand wheel to put the needle down when you stop. If the center point on your foot gets off the raw edge of your ring, stop and readjust. Stop with the needle down on the outside of the ring’s curve whenever you need to readjust the needle to accommodate the curve. Turn the fabric to the left to get the center point of the foot back on the raw edge of your ring. The stitching will be slightly closer together on the inside of the shape, when the needle punches the fabric to the left, and more open on the outside of the shape or when the needle hits the background.
Tail of thread
When you have done about half – 3/4s of the stitching on the ring, stop and pull the beginning thread to the back and tie it off, if you need to.
I tie the beginning off before I get to the end, because the beginning and ending threads can get tangled up and make it impossible to make small, neat knots. I have tied all four ends together in a pinch, but prefer to make the knots as small as possible.
Fold work back to tie
I also use this technique also if I have to stop and pull the work out of the machine because of thread breakage or necessary bobbin refill.
I fold the work back (I only used my pincushion so I could photograph what I was doing. Normally, I just hold it with my wrist as pull the front through to the back and tie the ends together. I don’t take the work out of the machine unless there is a good reason – like a big knot, or thread breakage, etc.
Completely stitched ring
Once your knot is tied, continue stitching to where you started. I don’t overlap much once I get to the beginning, perhaps only a stitch or two, because I don’t want the look to be too different.
I pull the work out of the machine and tie off the ending threads. You may not need to do this if your machine does it for you.
Now do the same thing, but on the inside to finish stitching down the ring. Once you have stitched both the inside and outside of the rings, your ring will be complete and you will be ready to place the leaves and flowers on the ring.
If you have not already done so, choose the rest of your fabrics. You will need fabric for the flowers (1-4 fabrics) and leaves (1-20 fabrics). If you have not cut out and fused the wreath to the background, please go back to part 2. The leaves can be the traditional green or you can use something else. If you use one color, you might want to mix up the prints to increase interest. You can also use different colors. Make the block your own.
Make visual decisions visually
I thought about making the leaves green to make them more realistic, but decided I was still of a mind to use a variety of turquoises and aquas and keep my quilt’s color scheme of aqua/turquoise with red consistent. I found more leaf fabrics in my scrap basket. It is important, with my limited color scheme, to make sure the viewer can see the individual leaves. For that, I will need to have enough contrast between the various aquas and turquoises. Remember, when choosing your fabrics, to make visual decisions visually. Put your potential fabrics on the background and step back to look at them. From my test piece (right) you can see that there are a variety of tones of aqua and turquoise. Some of them blend a bit into the background. I want movement and interest.
Cover fusible with fabric
Once you have chosen all of your fabrics press the wrong sides, cheek to jowl, to one side of the fusible.
You are not going to be able to cover every inch of the fusible, which is why you have a pressing cloth or applique’ pressing sheet. If you press directly, the fusible that is not covered by fabric will end up on the bottom of your iron.
Cover this piece with a press cloth and press the fusible to the fabric following the directions on your fusible’s packaging.
Trace leaves & Flowers
Make all of your leaves and flowers. Flip the fusible so that paper side is up. You will be able to see your different fabrics through the paper. Place a template face DOWN on the appropriate fabric and trace with a writing implement. I use a Sewline pencil, but you can also use a pen, regular pencil or anything. I wouldn’t use a Sharpie even though I don’t think the paper will allow the marking to bleed through to the fabric.
Once you have traced all pieces**, cut them out right inside the drawn line. You should have 20 leaves, 4 flowers and 4 center flowers.
Take all of your pieces and arrange them the pleasing way. Arrange them into the position you want them to end up once they are fused. You are doing this to look at the effect. Once you are pleased with the arrangement, take a photo or sketch out placement.
Fuse & Stitch Flowers
You will need to stitch the flowers first, then the leaves and finally the flower centers. The flowers and leaves are on the same layer, so you can stitch them in any order. Anything that will be covered by another piece will need to be stitched before you fuse the covering piece.
Place the flowers on the ring using the press marks you used to place the ring on the background (or fold the background in quarters and finger press again). Place them symmetrically along the ring, or in a pleasing way to your eye.
Fuse them into place and get ready to stitch. You can also reference the machine applique’ tutorial for more information. Again, pay attention to where the layers of the design are placed. If there are leaves that you want to place under the wreath, you will need to satin stitch them before you fuse the wreath down entirely. For the flowers, you will need to satin stitch down any parts of the design that will be covered by another piece of fused fabric, such as the centers. The design will look better if you satin stitch a layer and then fuse the next piece down.
Place the interfacing under the background. You could use a machine basting stitch to stitch the interfacing temporarily to the background, but pinning works fine, too. You will need to zig zag with the interfacing under the background.
Stitching flowers
Satin stitch all the other pieces down using the thread you chose. When you stitch, the middle of the stitch will cover the outside raw edge of each piece. I line up the red arrow on my foot (see photo) with the sharp edge of that raw edge. The pieces you will satin stitch have curves, thus you will need to manipulate the stitch so it is smooth. This means that you will need to stitch with needle down.
Stop stitching to create smooth curves
Stop with the needle down on the outside of the curve for the leaves and flower petals. For the inside point between the flower petals stop above that point on the inside. If you do not have a machine that automatically stops with the needle down, then you can use the hand wheel to move the needle into the downward position when you stop. Do this carefully without moving the fabric. Once the needle is down you will need to assess the way to turn the fabric. Always turn the fabric very slightly to ensure a smooth curve. You may only need to take one stitch before adjusting the fabric again in order to get around the curve smoothly. For the outside curves, generally, you need to turn the fabric to the left to make a smooth curve. (Updated 10/30/2012: My engineer SIL says: You turn it clockwise for outside curves and counter clockwise for inside curves.) The stitching will be closer together on the inside of the shape and more open on the outside of the shape when you move in this direction. For the inside point of the flower, between the petals, you will need to take a slight adjustment of the background to the right. For the pointy ends of the leaves, stop the needle on the outside of the leaf near the point and adjust the fabric to the right very, very slightly. Take one stitch, stop on the outside of the point again. Adjust very slightly to the right. Your goal should be to get the needle into the same hole on the inside of the leaf until the arrow or line on your machine’s foot is in line with the raw edge of the other side of the leaf. When you move the fabric always keep the needle down. Before starting, take a few of the shapes, e.g. a leaf and a flower, make some test pieces and do a test on junk fabric so you get the feel of the procedure. This is not something you should work on when you are pressed for time.
Arrange leaves
Once you are finished with the flowers, change your thread and adjust the width and density of your stitch, if desired.
Arrange the leaves in a pleasing manner. I placed 5 at a time on the background and stitched them down.
Stitch leaves
Arrange and stitch all of the leaves. My photo shows only 10 sewn leaves.
Place the centers on the flowers and stitch them down. Follow all the directions above for tying off and moving the needle to create a smooth curve.
Back of block
Once you have stitched all the pieces, rip off the tearaway. I use a seam ripper to get the ripping started on pieces that are surrounded by stitching.
Once you are finished with the entire stitching and tearaway ripping, trim the background down to 12.5″
**Nota bene: These pieces have no right direction. You can trace them any way and apply them anyway and they will look fine. Pay attention if you are cutting out letters or another motif that has a special direction. Put the right side down on the paper backed fusible and trace the motif backwards.
I am entering the Renewed Jelly Roll Race into the Blogger’s Quilt Festival. Amy’s Creative Side is putting on the Blogger’s Quilt Festival. My entry number is 430 (though on some screens, it seems to show up as 431. Very strange). If you haven’t entered, don’t, because *I* want to win!
Me, yes. You can win next time. 😉
OK, truly, I also would like people to be exposed to my blog. Do you have a friend you can refer?
Here is the schedule:
October 26 – 31 Linky open
November 1 – 4 Nominations are made (this is where you nominate me)
November 5 -8 Vote for your favorites
November 9 Winners announced
Renewed Jelly Roll Race
The Renewed Jelly Roll Race is my most recent finish. I have another quilt that is nearing completion, but I am pretty excited about the RJRR! It really is a quilt that came out of something I was going to toss. I felt like the original Jelly Roll Race quilt was a huge, ugly failure. An ugly duckling into a swan.
I became intrigued by a discussion at my Modern Quilt Guild about Jelly Roll Race quilts. I had heard of them in passing, but during the discussion, finally understood the concept. People wanted to do the quilt top at a meeting. I sew slowly, so I didn’t want to race.
I bought a Jelly Roll and got to work sewing the strips together. For a person who doesn’t like really long seams (I prefer chunking!), this project was kind of a nightmare of long seams. It was kind of a tedious job and I soon realized I had no control over color placement, no control over fabric pattern placement. Basically, I had no control.
Jelly Roll Race – Finished Top
This was a problem for me. While I like serendipity and happy accidents, this quilt was not turning into the successful result of a happy accident. It was turning out very, very badly. My fears were confirmed when the top was done.
I liked the colors. I liked the fabrics. I sincerely disliked the top.
I put it away and left it for awhile hoping it would grow on me. Periodically, I took it out, hoping I would like the top and be willing to put some work into finishing it. My heart sank every time I saw the top and I began wondering what the designers of the Jelly Roll Race concept were thinking.
I began looking at other JRR tops and all of them looked cute or interesting. ARound this time, I heard a CraftyGardenMom podcast. Tanesha was also working on a Jelly Roll Race quilt. She said she cut 20″ off the first strip to make the quilt more irregular. If I had read any directions I might have known that. I wasn’t about to rip all those seams and start over, but I did feel a spark of hope that all was not completely lost.
Jelly Roll Diamonds
Last year I finished a very successful quilt from my Fabric of the Year series called Fabric of the Year 2010. This quilt is made with diamonds and I still have the Creative Grids ruler. I came upon it and the spark of hope grew brighter. Since the top was languishing, I decided to be drastic. I decided that I would cut the top up into diamonds. What is the worst that could happen? The top could not be any uglier or anymore useless than it already was.
I tried sewing the diamonds together by themselves, but VERY quickly realized that the diamonds were busy and needed their space.
I sewed the diamonds together in chunks with Pure Elements Linen as the sashing. I go into quite a bit of detail about the construction in a post from February. I sewed and sewed and sewed. The sewing seemed never ending. Diamonds are not hard to sew together, but you do have to pay attention and there were a lot of them. I ripped out a lot of seams to make lines match up. There are a few that don’t, but I can live with them.
Renewed Jelly Roll Race – back
DH helped me with the math, but I still had quite a few diamonds leftover. I decided to put the extras on the back. You could say that the quilt is two sided, but the quilting wasn’t design with the back in mind.
The back is my typical pieced back, but I haven’t done anything like the big off kilter diamond in a long time. I kind of like it.
This is an original design and there isn’t a pattern. If you want to make one of these quilts, make a Jelly Roll Race quilt that you dislike. 😉
The coup de grace may be that this quilt was chosen to be part of the New Quilts of Northern California exhibit at the Pacific International Quilt Festival, which was held in Santa Clara, California October 10-14, 2012.
So, the bottom line is that this hideous mess was salvaged into something that I like. I want to make another Jelly Roll Race to see if I tame the technique even a little bit.
Fabrics:
Pure Elements Linen by Art Gallery/Pat Bravo Designs
Terrain by Kate Spain Jelly Roll
Random purples for the back from my stash
Blogger’s Quilt Festival Stats
Finished quilt measures : 61?x 61?
Special techniques used : Jelly Roll Race Technique
We are making the Flower Wreath block. To find out how to make templates, including the ring see Part 1.
Flower Wreath
Choose your fabrics. You will need fabric for the flowers (1-4 fabrics), leaves (1-20 fabrics) and the wreath (1 fabric). The leaves can be the traditional green or you can use something else. If you use one color, you might want to mix up the prints to increase interest. You can also use different colors. Make the block your own.
I am going to try and use a variety of turquoises and aquas to keep my color scheme in the aqua/turquoise with red range. I have a few of the leaf fabrics picked out from my scrap basket, but need to find more. It is important, with my limited color scheme to make sure the viewer can see the individual leaves.
Cut piece large enough for ring
The ring is the biggest pain to deal with so I deal with it first before I even really think much about fabrics for the other parts. I decided to use one of the Pat Bravo Pure Elements solids in the turquoise range, but more on the green side. I haven’t used it in this quilt before. I picked it to highlight the leaves a little more.
Cover fabric with fusible
Now you need to make sure that your fusible will cover your fabric.
I used a package of Steam-a-Seam 2 Lite, but there are many fusibles that will work just fine for this project. Use what you know how to use or what you have on hand.
Tear the paper carefully off of one side of the fusible (or follow directions for your fusible) and stick it to the fabric, smoothing it carefully so there are no puckers or bubbles. The fusible is sticky so you can stick to the fabric and reposition it until you are happy.
Back of fusible backed fabric
Since the pieces I had were 8.5″x11″, I needed to cover an extra piece (bottom of the photo above) that was wider than the 8.5″ width of the fusible. I cut a piece from the fusible (white part in photo above) and re-positioned it to cover the part of the fabric I need for the size of the template.
Once you are happy, fuse the 2 sided fusible (should have the paper left on one side) to your ring fabric. Follow the directions on the package or website. You may want to cover your ironing board and the piece with junk fabric or an applique’ pressing sheet to keep your iron and ironing surface clean.
Turn your fusible backed fabric so that the paper left on the fabric is face up, as in the photo above. Place your ring template face down on the paper and trace around it with a pencil.
Ring cut out
Cut out the ring carefully on the line. I used an X-acto knife to start the center. I did use a pair of fabric scissors, but not my Gingher scissors. It is kind of hard to know what to do, because you are cutting both fabric and paper and you need a nice sharp edge. I use a pair of my mid-range scissors and hope for the best. They still seem sharp even after a bit of this type of cutting.
Fold the ring into quarters and finger press lightly. Again you will be lining up the folds to center the ring.
Retrieve your background. Fold the background into quarters and finger press, so you can see the folds.
Line up ring on background
Remove paper from the ring.
Line up the folds of the ring on the folds of the background. If they are all in alignment, there should be a ring fold snuggled with a background fold evenly. If you want to check, measure from the edge to the ring. You do need an absolutely square block for this to work.
Press the ring onto the background so it sticks.
Carefully bring background with the ring stuck to it to the iron. Check to see that your ring is still in place. According to your fusible directions, press the ring into place.
Your ring should now be firmly ironed on to the center of the background.
Leave this piece on the ironing board temporarily.
Get the tearaway you purchased (or had) and cut two pieces of tearaway stabilizer a little bit larger than your background. Place your background on top of the tearaway and pin it to the background. This will provide stability and prevent the piece from puckering when you zig zag stitch the pieces.
You are now ready to machine applique’ your first part of the block. See part 3 for machine stitching the block.