Cargo Duffle Handles Tutorial

Handle front
Handle front
Handle back
Handle back

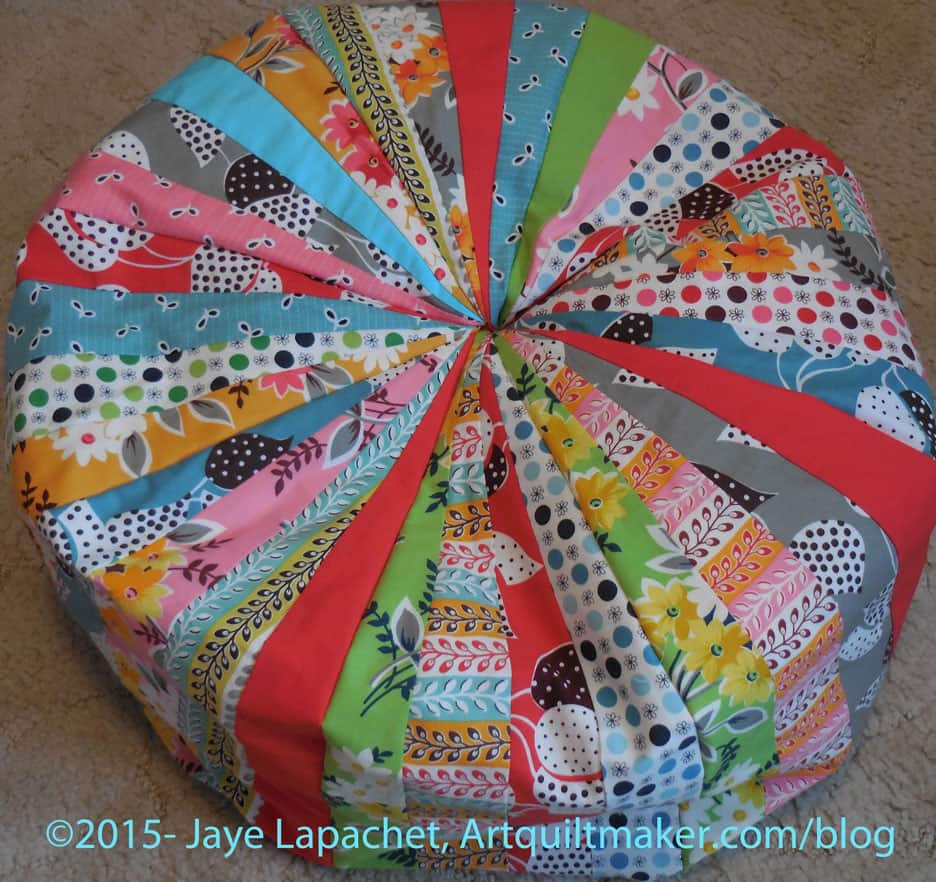
As you know I have been working on the homework for the Noodlehead Cargo Duffle*. This is one of the most difficult bags I have ever made, including the Liesl Backpack, though I think the directions are the problem and not the actual bag. Also, there is a lot of prep and, as you know, I like to get straight to the sewing. As I have said, the directions are too brief for me.

These handles can be used for other types of bags, so this tutorial creates a useful skill. If you want to use webbing, look at the directions in the Running with Scissors pattern to learn how Annie Unrein of byAnnie covers webbing with fabric.

In this case, I couldn’t understand the directions for making the handles. I looked at them several times until I decided just to try what they said and see if that worked. I did what the directions said, though they didn’t make sense, and the directions actually worked! Me or the directions? You decide.

Since I think the pattern instructions just need a bit of explanation for those of us who need to know more why in their patterns, I wrote up a tutorial.

Supplies
-1.5″ cotton webbing.
-fabric
-BSK
-Shapeflex (optional)

Handle Strips Cut
Handle Strips Cut
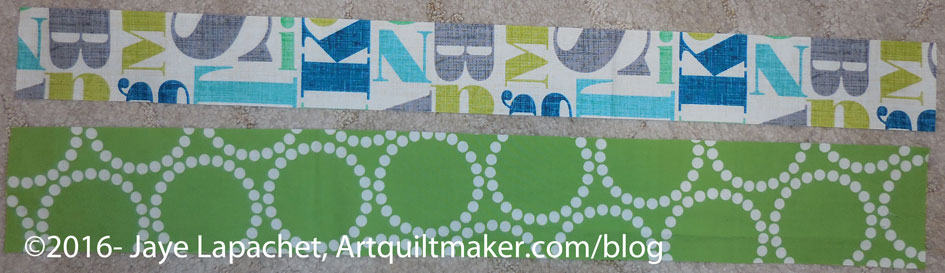
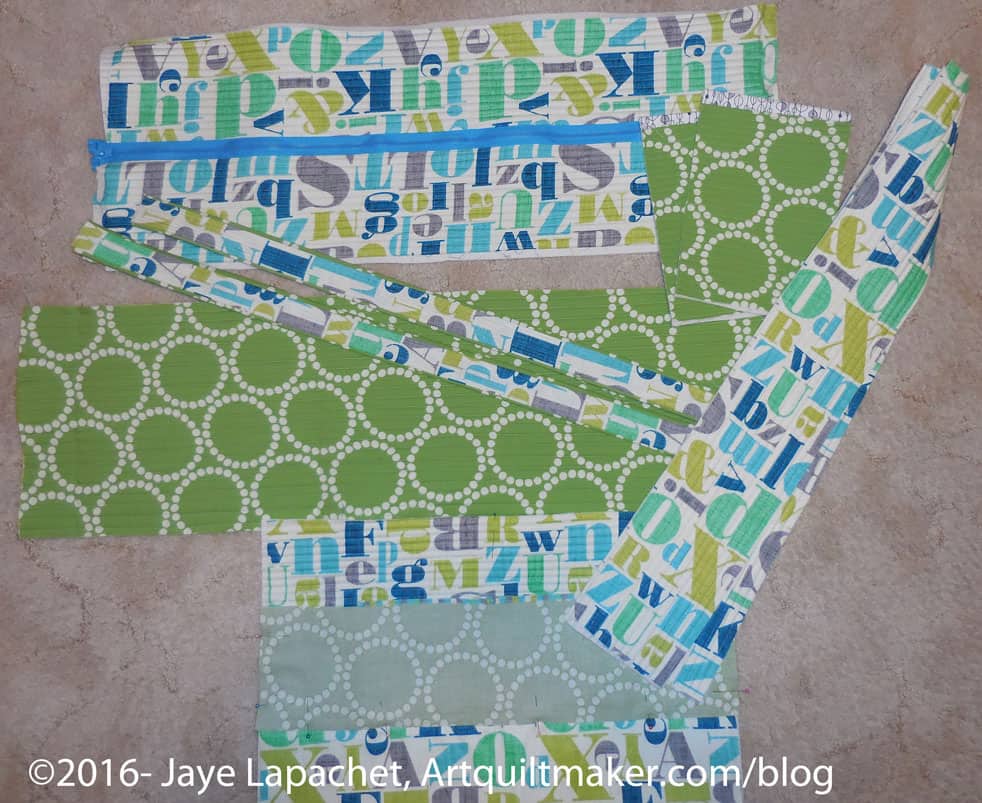
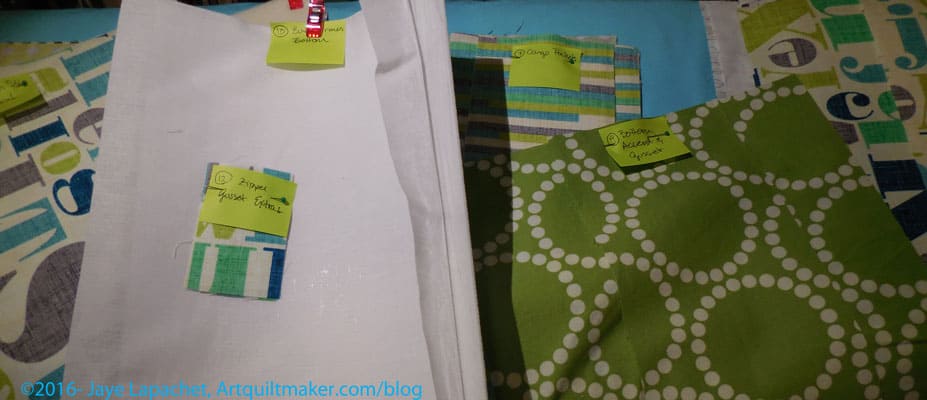
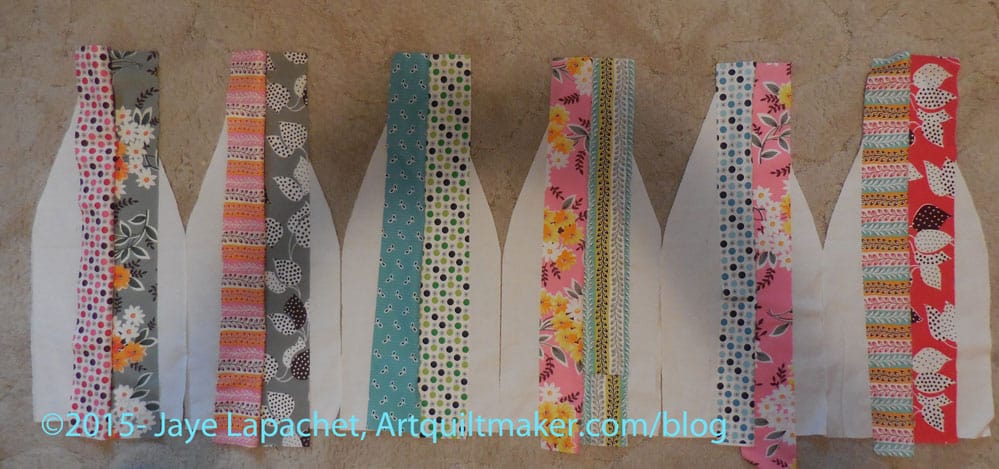
  1. Cut strips according to the directions or according to your needs. I made mine a little longer as I wanted to have more carrying options.

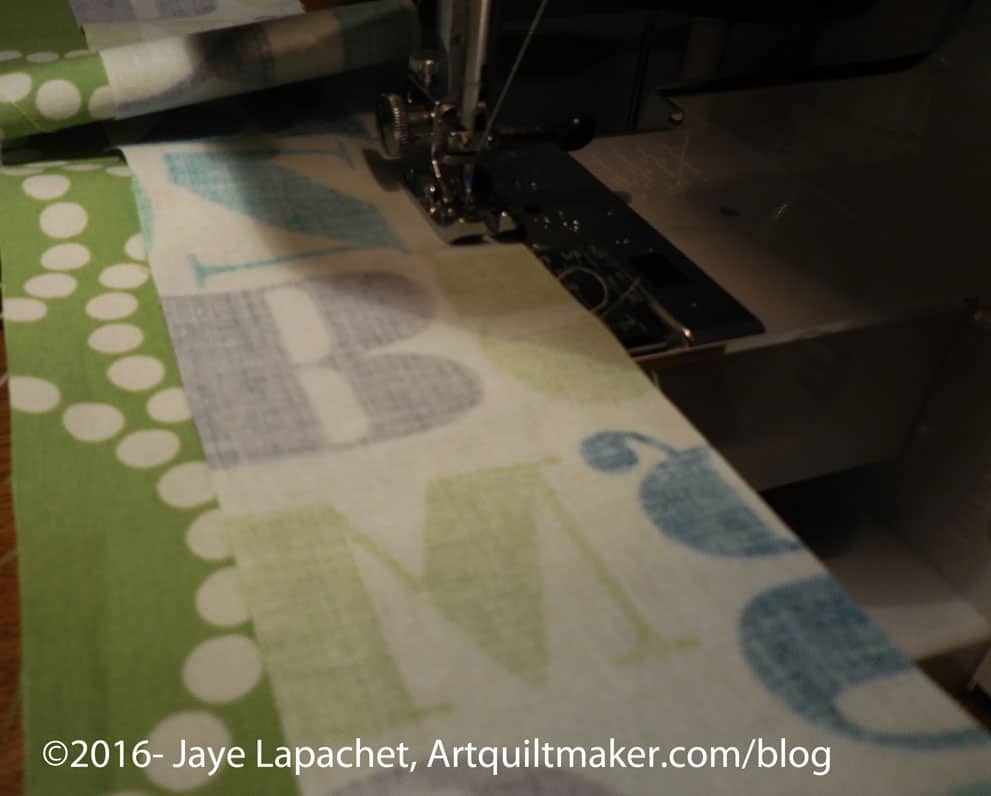
2. Sew strips together. They are not the same width so they will not line up, width-wise, exactly.

Handles - press seams open
Handles – press seams open

3. Press seams open. This is not critical and if you don’t want to, press how you like. I press seams open on handles, because I want to reduce bulk. You get a lot of bulk in handles, especially if you add some kind of filler like cotton webbing, which I used in these straps, or Soft & Stable or any other kind of interfacing. Pressing the seams reduces bulk.

Optional: At this point you can add some ShapeFlex to the handles to add strength. If you add ShapeFlex, cut a piece that covers both strips and covers the seam. It will add strength to the seam.

Handles tutorial - Fold raw edge towards the center
Handles tutorial – Fold raw edge towards the center

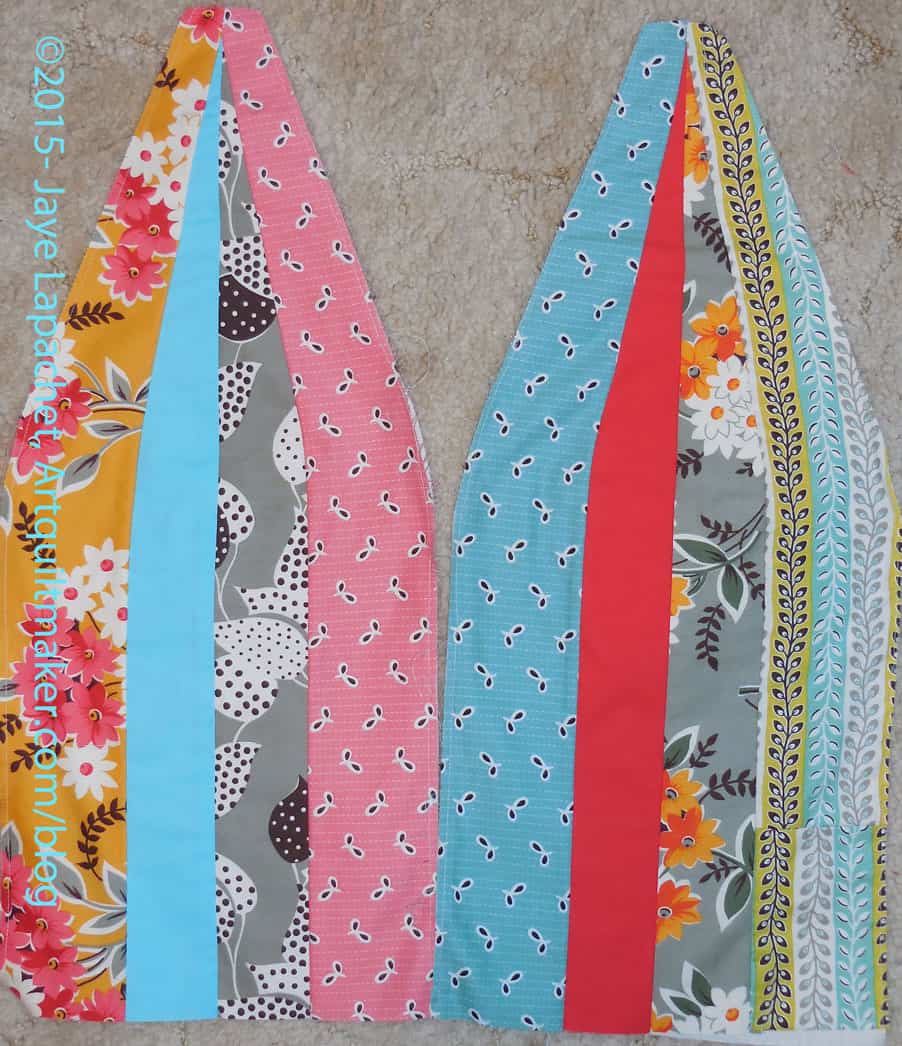
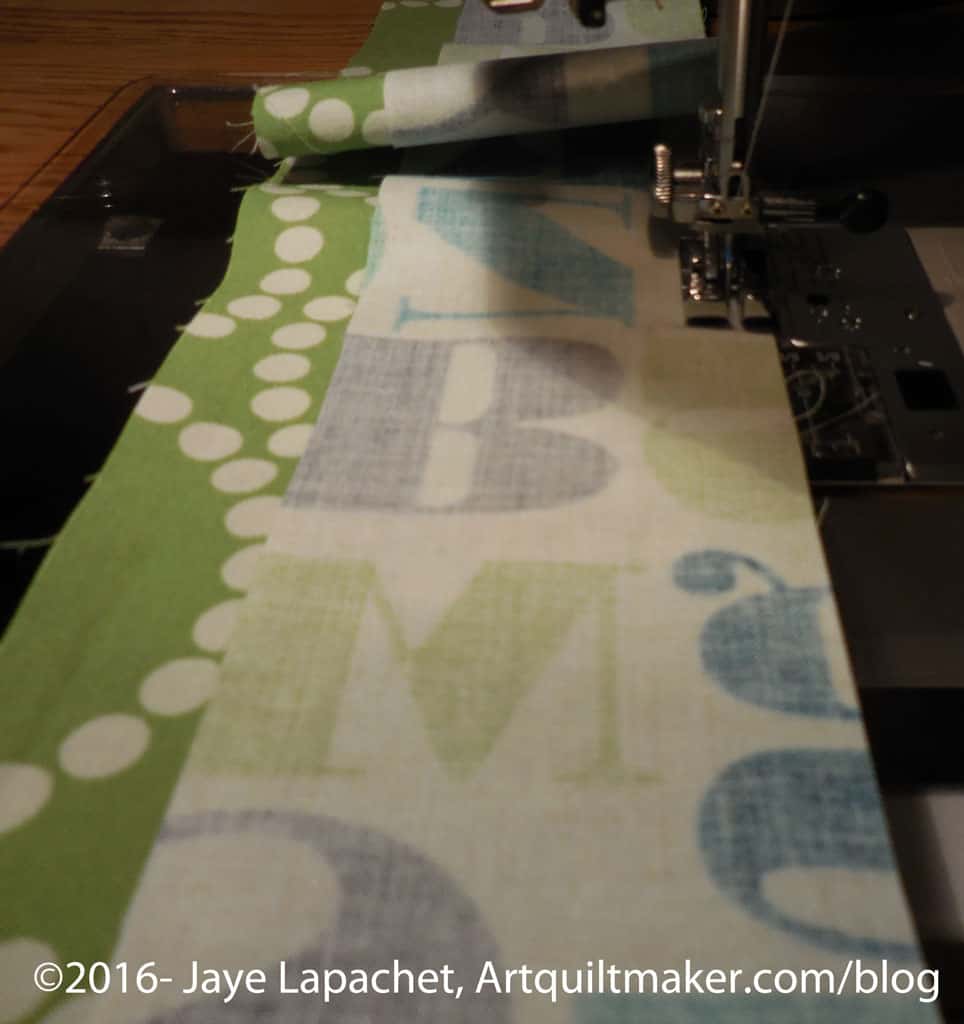
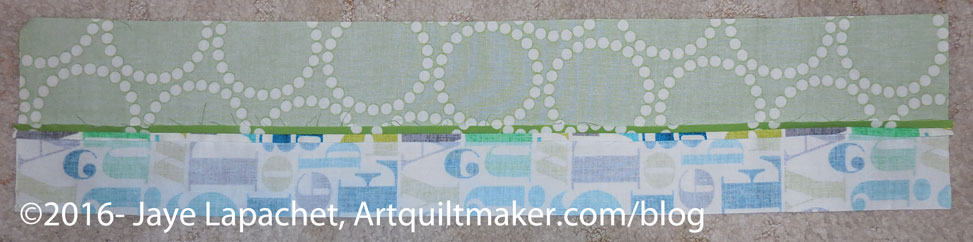
4. Fold the long side of the raw edges towards the center seam. I folded the Pearl Bracelets green piece first, but where you start doesn’t really matter, I don’t think.

5. Press fabric so there is a crease in the fold.

Handles - fold towards center
Handles – fold towards center

6. Next, fold the second long side, raw edge towards the center seam (yes, it is slightly off center, which is part of what confused me).  This is the fabric (text fabric) with the smaller width.

7. Make sure to line both raw edges up with seam you just pressed open. Each different fabric will be a different folded width.

7. Press just folded fabric so there is a crease in the fold.

Handles tutorial - fold narrower fabric up
Handles tutorial – fold narrower fabric up

8. Fold the fabric with the smaller width (mine is the alphabet fabric) up towards the wider fabric (green Pearl Bracelets). There will be some green showing, which is what you want.

9. Press so you have crisp folds. Some of the wider fabric (green Pearl Bracelets, in my case) will show. This detail makes an accent.

10. Now unfold and add your cotton webbing or other stiffener. I used 1/5″ cotton webbing. I had never used this and was pleased at how well my machine sewed through it.

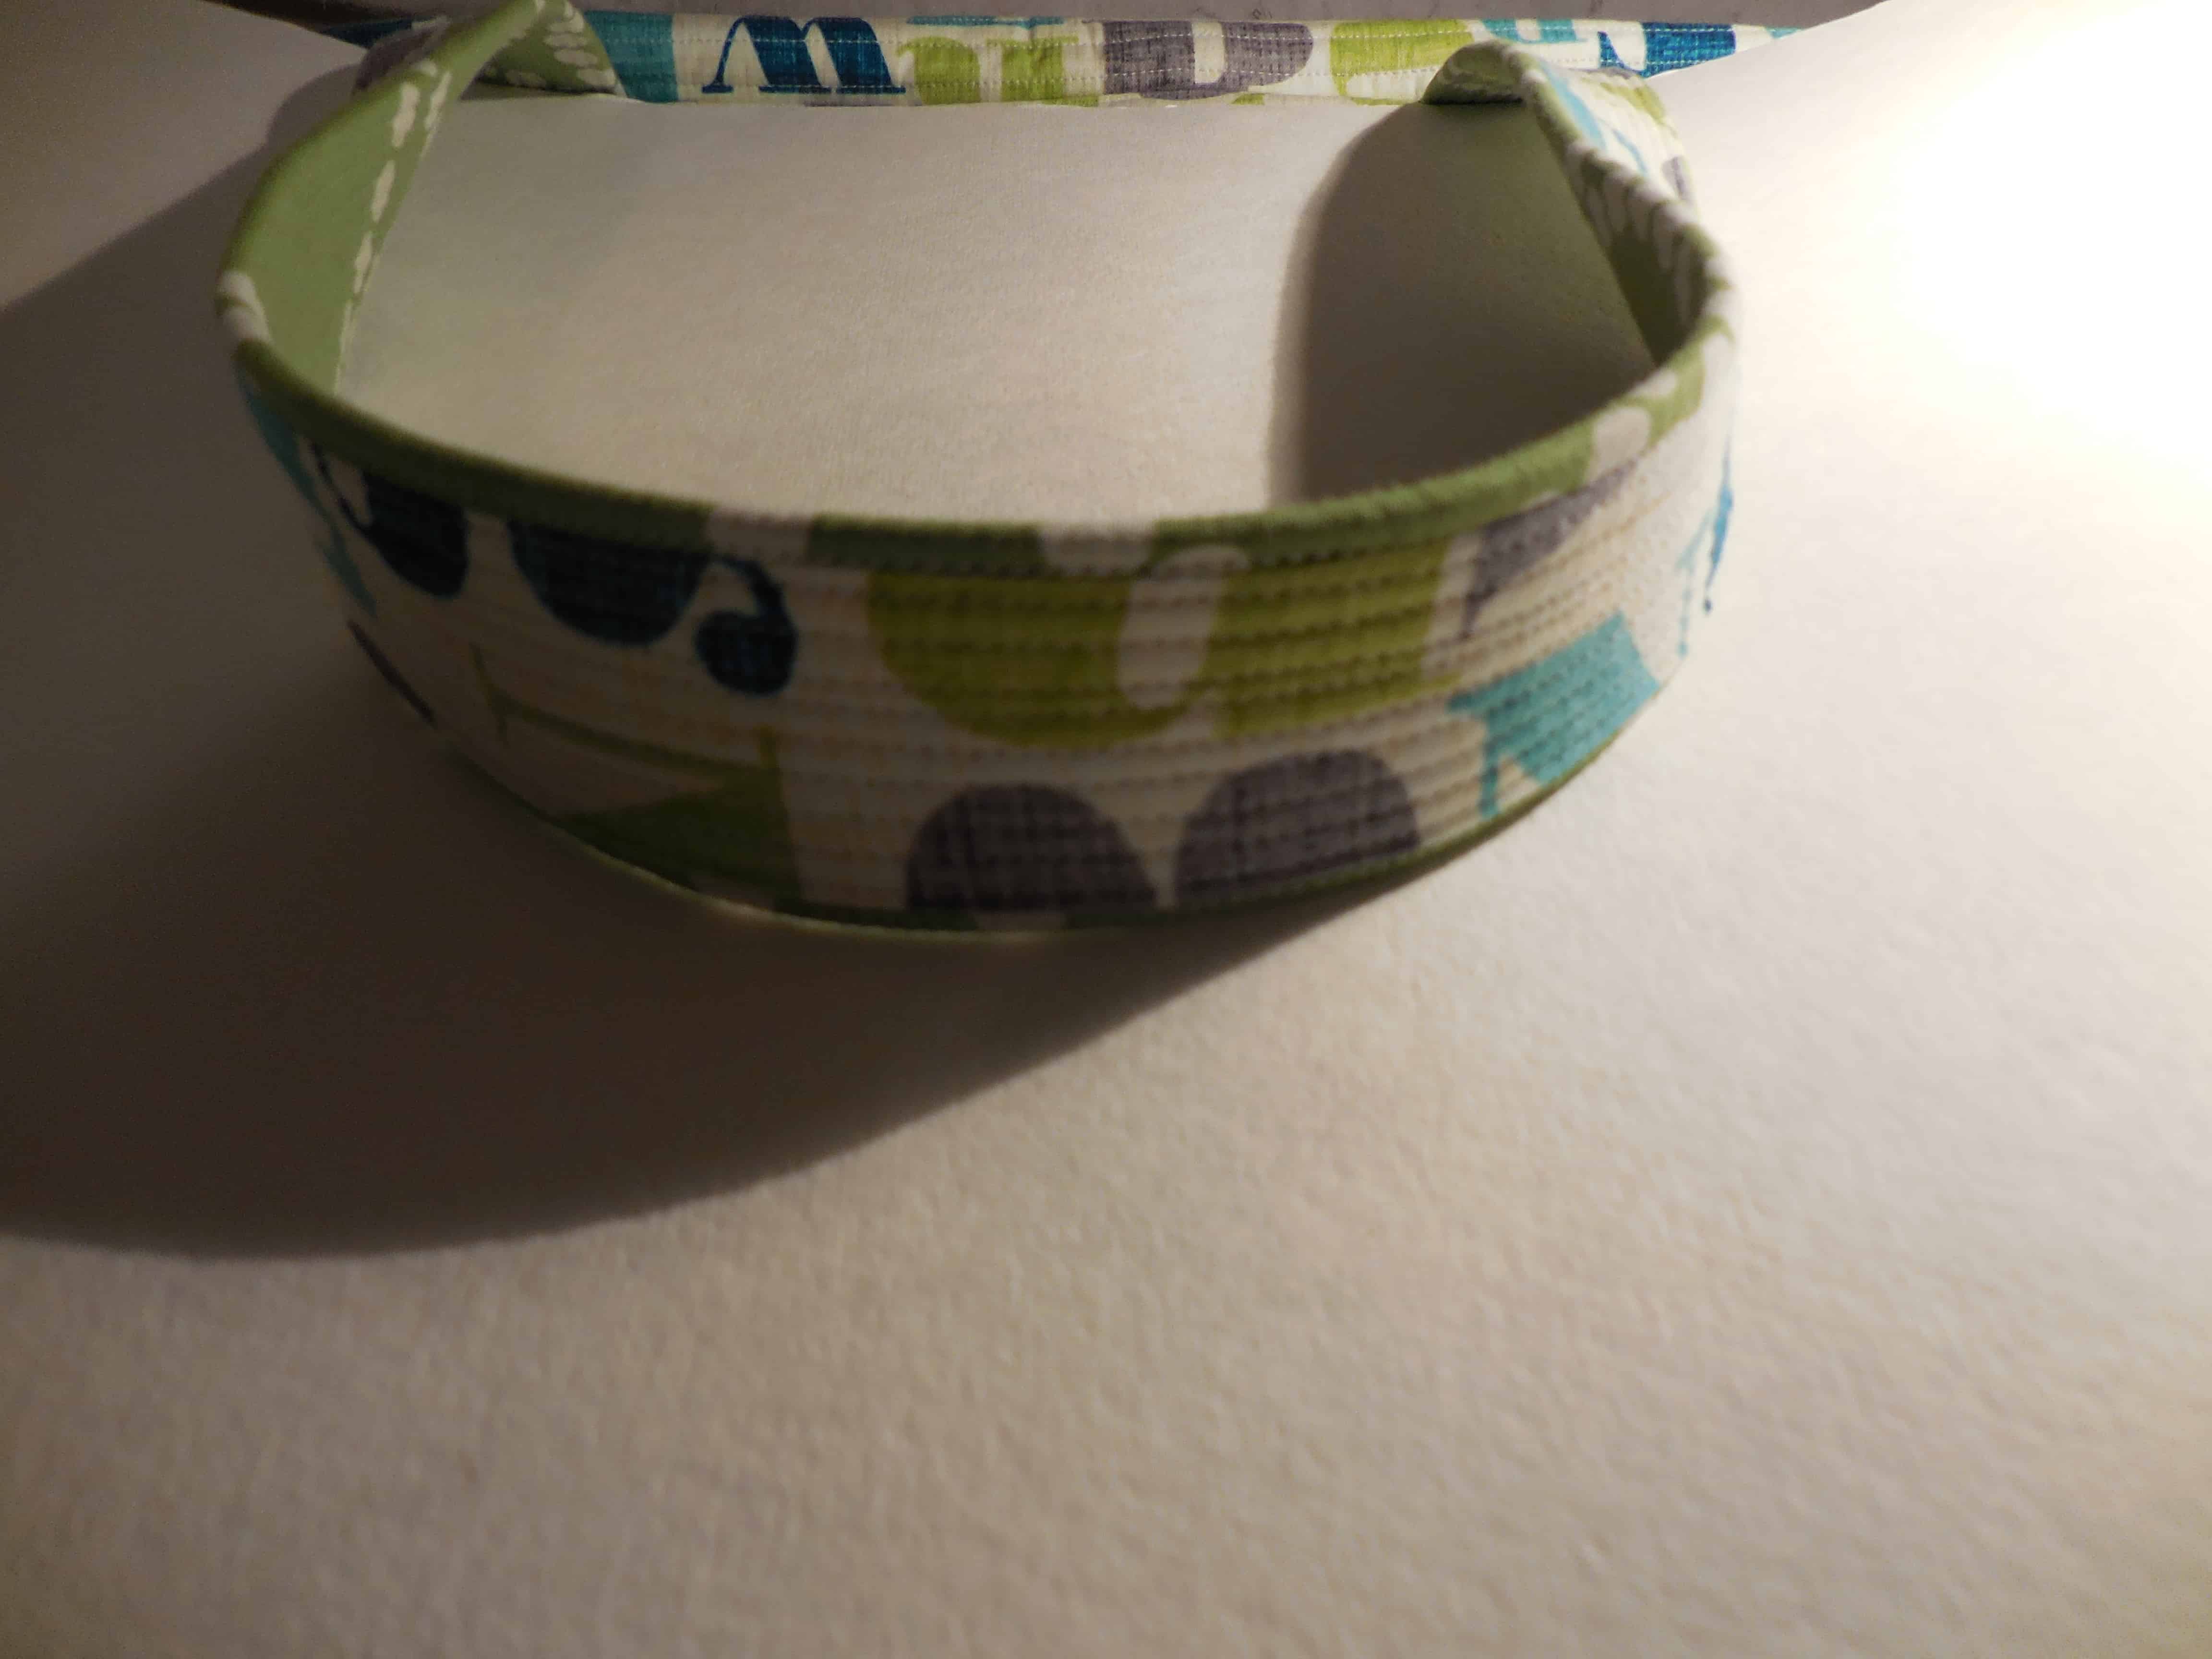
11. Refold so the cotton webbing does not show.


Handles tutorial - densely sew long way
Handles tutorial – densely sew long way

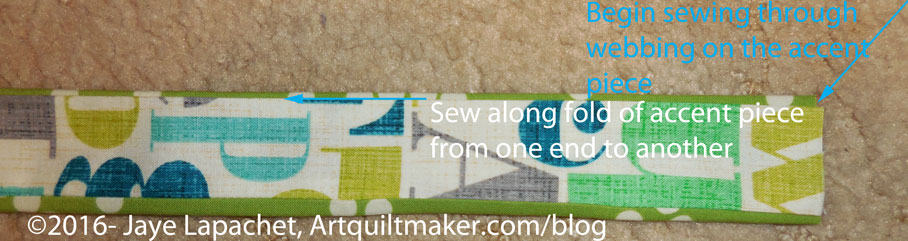
12. Quilt lines lengthwise, approximately 3/8″ apart, starting with the open seam. This will make the handle is very dense with quilting and add to the strength.

Ta da! You have very nice handles that will be sturdy enough to carry a heavy bag.

Ruth, being the super intelligent woman she is provided a link after I had figured out how to make these handles. I did search, but didn’t come up with the tutorial. I hope you like my instructions for the Cargo Duffle handles, which will, with any luck, come up in search results for others who try to make the Cargo Duffle.


*I really don’t know if the project includes the spelling ‘duffel’ or ‘duffle’. I am going with ‘duffle’ as that is what the dictionary says. You may want to search both, if you do any Google searching in order to get all the results.

Cargo Duffle Prep

As you know from a previous post, I have been working almost exclusively on the prep for the BAMQG Cargo Duffle class. I haven’t had tons of time to sew. What I have had I have spent on prep.

I like making bags, because I have something useful at the end of the process. Also, people seem to like them when I give them as gifts. I do not, however, like the prep required, regardless of whether I am just sewing a bag on my own or preparing for a class. In fact, I always swear a lot and then swear I will never make another bag again when I am in the bag prep process.

Part of this feeling has to do with my, well documented for you, difficulty in reading pattern directions and understanding what the designer is trying to say. I’ll take some, but won’t take full responsibility because I believe that the directions for this bag were briefer than necessary. I understand why, especially after working with Alison, because patterns need to be printed and printing 60 pages of directions including photos is daunting.

Cargo Duffle pieces and parts

One of the things I had to do, which was different for this pattern was to quilt a lot of the parts. I understand why, and you will as well after seeing the finished piece, but it made for a lot of extra work.

Friday night I stayed in my workroom until 10pm sewing on this project. Finally, DH called me down to watch the parade of nations for #Rio2016. I decided that I would have to work on whatever I didn’t finish in class. I estimate working on the prep for about 20 hours. I didn’t keep strict track, but I think that is in the neighborhood.

What I really needed was a chart showing the pieces and giving their sizes with arrows pointing to the piece on the finished bag. I really needed that visual. I think it would have made my life a lot easier. I didn’t really understand what a gusset* was, especially in this context, and that added to the confusion of all of the parts and pieces.

I am not criticizing the teacher who was extremely patient on her first outing as a teacher. She responded quickly and non-snarkily each time she got a question on the guild forum from one of the 20+ students.

I would have liked to have seen more meshing of the pattern and the hacks/supplement (by our teacher), including references back and forth to when to go and do a step from the pattern and when to stop. This addition would have required a lot more time on her part and we weren’t paying her so I think that would have been too much to ask. It might have been nice to get together with other students beforehand to work on the prep.

I constantly learn from creating new bags and, though, this isn’t the kind of bag I would tend to use, I am learning quite a bit from making it, not the least of which has to do with gussets. 😉


The definition of gusset didn’t match what I was seeing in the Cargo Duffel pattern so that created some confusion. Wikipedia’s definition is similar to the American Heritage and Merriam Webster. I didn’t didn’t find any of them to be super helpful in the context of this pattern: “In sewing, a gusset is a triangular or rhomboidal piece of fabric inserted into a seam to add breadth or reduce stress from tight-fitting clothing.[1] Gussets were used at the shoulders, underarms, and hems of traditional shirts and chemises made of rectangular lengths of linen to shape the garments to the body.[2][3]

Gussets are used in manufacturing of modern tights and pantyhose to add breadth at the crotch seam. As with other synthetic underwear,[4] these gussets are often made of moisture-wicking breathable fabrics such as cotton, to keep the genital area dry and ventilated.[5][6][7]

The phrase “don’t bust a gusset” (a variation of “don’t blow a gasket”) is an admonition to calm down; becoming so enraged and inflated that one busted a gusset would imply extreme rage and expansion beyond one’s clothing capacity.

Gussets are also used when making three-piece bags, for example in a pattern[8] for a bag as a long, wide piece which connects the front piece and back piece. By becoming the sides and bottom of the bag, the gusset opens the bag up beyond what simply attaching the front to the back would do. With reference to the dimension of the gusset, the measurements of a flat bottom bag may be quoted as LxWxG.[9]

Pillows too, are often gusseted, generally an inch or two. The side panels thicken the pillow, allowing more stuffing without bulging.

Gussets are also used in other areas of manufacturing, e.g. bicycle frames employ gussets to add strength and rigidity.[clarification needed]” (Wikipedia)

Cargo Duffle Homework

Cargo Duffel homework

I am taking a workshop to make the Noodlehead Cargo Duffel in a few weeks. The class isn’t just making the duffel, but we are making it with some hacks that Jaime figured out.

I spent a few hours the day after the BAMQG meeting familiarizing myself with the pattern and beginning to cut the pieces. There are A LOT of pieces in this pattern. Last Saturday and Sunday, I spent time cutting the rest of the pieces. 

I now have to do the rest of the prep. This involves buying a couple of zipper and sewing bits and pieces together. There is homework because this is a serious bag and it can’t all be done in one day.

I am happy to do the prep even thought I was confused at the beginning. I think it makes for a better start for me once I am in the class.

I actually contemplated cutting out another whole bag so I could make two at once. I am trying to restrain myself.   😉
 

Reno’s Premier Quiltmaking Event: Make it Modern

Make It Modern
Make It Modern

My friend Kathleen is organizing a great event in beautiful Reno: Make it Modern. This is the premier Reno event for modern quiltmakers. It is a great opportunity to work with a couple of QuiltCon 2016’s hottest designers.

What: Fun and fabulous days of creating, led by modern quilters Christina Cameli and Libs Elliott. Additional help, discussions, and general shenanigans each evening at the sewing salon, and a trunk show on Sunday morning.

Where: Peppermill Resort, Reno, Nevada

When: June 9-12, 2016

Who: Christina Cameli and Libs Elliot will be teaching

Why: Because it is fun to meet up with other like minded quiltmakers and have some fun sewing

How: easy access by car and plane

Find out more information and register on the Make It Modern Events website.

Make it Modern – Reno

Make It Modern
Make It Modern

My friend, Kathleen, is organizing a great event in beautiful Reno: Make it Modern.

What: Fun and fabulous days of creating, led by modern quilters Christina Cameli and Libs Elliott. Additional help, discussions, and general shenanigans each evening at the sewing salon, and a trunk show on Sunday morning.

Where: Peppermill Resort, Reno, Nevada

When: June 9-12, 2016

Who: Christina Cameli and Libs Elliot will be teaching

Why: Because it is fun to meet up with other like minded quiltmakers and have some fun sewing

How: easy access by car and plane

Find out more information and register on the Make It Modern Events website.

I Took a Class (QuiltCon Day 2)

This will be another quick post about my adventures at QuiltCon.

Quintessential Pasadena

Today I was in class with Julie and Kathleen all day. We were pleased Leona was there as well. We took a class called Pies & Points from Victoria Findlay Wolfe.

Short version: she is a great teacher, I learned a lot want to buy a Sizzix Big Shot Pro. 🙂

Longer version

The class was called Pies & Points and is an updated version of a variation on the Drunkard’s Path. This pattern was popular several years ago and was called Snails Trails or something like that. I’ll look it up when I get home (if I remember). I have always wanted to make a quilt like this, so it was the perfect opportunity.

Victoria Findlay Wolfe is a great teacher and if you have the opportunity take a class from her. She was very clear. She was supportive and didn’t try to have us accomplish too much in one day. She was available, was walking around the room offering assistance and seam ripping services. VFW was also accessible and made the project accessible. She was pleasant and funny and very human. I liked her very much and want to be her BFF. She also wore leather capri pants, which were super cool.

I am not a project class person. This class kind of bordered on that type of class, but was full enough of technique that I could apply to other projects that the class worked for me. I could work within certain boundaries, but still spread my wings.

She gave a little bit of information and the Sizzix people passed out the Pies and Points die to us. We each got our own!!! I didn’t know that was going to happen and it was useful as well as exciting.

About this time, one of the QuiltCon people came in and announced that Victoria’s quilt, Mr. Swirly Bones, won Judge’s choice! We all clapped and she was very excited.

VFW showed us how to cut using the Sizzix and then how to sew the curved seams and then we got busy cutting and sewing. You can cut a lot of pieces at once, but there is still prep time for using the Sizzix. Without my normal setup, it took time to get the pieces cut.

I had a bunch of pieces cut and ready to sew, but wasn’t able to sew much before lunch. Right before lunch, I was able to sew one seam and that made me feel better.

Lunch was two hours. Very civilized IMO. We brought our lunch so wolfed it down and then went to check out the vendors and some of the quilts. There were not as many vendors as I expected, but there were manufacturers at the show giving away prizes and showing off stuff, but not selling.

The whole feeling of the show area is so light and airy. Everyone seems cheerful and there is very good energy. People seem excited to be there. I love that.

We looked at the vendors – more getting the lay of the land than shopping – and started to look at the quilts. After 1.75 hours it was time to head back to class and to sewing.

Sewing Pie Points
Sewing Pie Points

I got right down to business and started sewing. I had a lot of little pieces to sew together, but the first seams to get the middle arc were all straight seams. Once I got a few of the arcs done, I started making quarter blocks.

The class was supplied with Sizzix machines, rotary mats, rulers and cutters, irons and sewing machines. The sewing machine I was using was a Juki electronic machine. I wrote down the model, but am too lazy to go look for it. I’ll post about it later. It is a little disconcerting to use a different machine. This one kept lifting the presser foot every time I stopped the machine. It made it really hard to line up the edges of the curved seams. There was a Juki lady, Chris, who was there to help with machines and she changed a setting so I didn’t have to deal with that. I could probably learn to use that feature, but for one day I didn’t want to deal with it.

Without too much pain and suffering I made a whole block. I planned to put them together in her Snail Trails arrangement.

Whole block
Whole block

After working on the one block and looking at the options I had chosen for myself, I decided to make some of the other parts and mix it up a bit. No photos of that to share yet, but soon.

I want to work some more on this piece. I may add some different backgrounds to add interest (my idea turned out to be more boring than cool looking) and because I only have about a yard left and I’d like to make a larger quilt than a wall hanging. I also have the Sizzix problem. I do not have a Sizzix. There a few reasons I am not buying one, but the most important is that I have no place to put it. It is a desktop model and it stays out on a table (desk, worktop, etc). This is problematic since I have to cut more pieces for the quilt. I hope one of the local shops has one to rent and, perhaps, I will buy one at some point. I can also make templates and cut the pieces that way, though …. bleah.

Julie rested after the class and I walked around the show a little bit more. we went to a Brazilian steakhouse for dinner. They bring all different kinds of meat around and you can take what you want. It was a little bit on the pricey side, but extremely tasty. I was a little protein deficient, so it was just what the doctor ordered.

One of the projects was posted on Instagram. I didn’t take a lot of pictures of other students work 🙁 , but I did take a few.

Stacy's pieces
Stacy’s pieces

You can see some of the options available in the above blocks. My latest block has the pieced center like Stacy’s bottom block.

More Tuffet

Tuffet in process (3/4 view)

I was so nervous about the fabric selection, but I am so pleased about how it turned out. I hope it will fit well with my living and dining room. My dining room is a rich red and my living room is a butter yellow, so this piece isn’t a perfect match, but it is an interesting combination of motifs.

My issue from the other day was seam allowance. You know that I have hard time actually reading directions and understanding them and the Tuffet directions were no different (all me, not Robin). I always assume a 1/4″ seam allowance, which, as a quiltmaker, is normal. As a real sewist it is absolutely not normal. In this case, the pattern had the seam line on it or I could use a 3/4″ seam allowance.

I had to unpick all the stitching that held the tuffet top together, but when I resewed, it looked like Robin’s description of how it should look.

Tuffet Button Cover
Tuffet Button Cover

I was running up and down the stairs, doing as much as I could while chatting with my Mom as she cooked (she was cooking the Y.M.’s last meal with her and the Big Guy and preparing a meal for us for later in the week. She is awesome!). One of the things I was able to do was make the button cover.

I fussy cut some flowers out of one of the Flea Market Fancy prints. The button blends in, which I might not do again, but I kind of like it.

I was thinking that Robin should print the patterns at Spoonflower and then people could just buy them without having to make the foundations as part of the class. I do think that there is an element of “becoming one with the pattern” that you get from drawing out the pattern, but printing them off of Spoonflower would be much easier and it might be less expensive than some of the other pattern choices Robin described.

I am thinking that I will make another so both DH and I have one to put our feet on. We will see since the class is tomorrow and I have to see how it goes.

Tuffet Progress

I was naughty and didn’t work on my Tuffet at all last weekend. The class is Thursday, so I got to it a little during the week and then seriously on Sunday.

Tuffet Class Work
Tuffet Class Work
2 finished panels
2 finished panels

I came home from class with some work done, but not enough. I finished 2 panels and sewed 2 strips (one seam) on the 6 other panels. Respectable work, but not a finished top. I still had work to do.

Making the Tuffet uses foundation piecing, so all I needed to do was place more strips on the foundations and sew.  For some stupid reason I was reluctant.

This is new to me. I didn’t want want to ruin it. I wasn’t 100% sure of my fabric choices. Blah Blah Blah. Fear.

I decided to just take one step at a time. So, last Thursday or so, I laid out the foundations in the photo above and looked at them for a few minutes. I got my stash of project strips and laid them out. I moved them around and then I sewed one strip on. Nobody died.

Yesterday I did the same with the last strip on each foundation. Because I am using 3″ strips, I didn’t need as many as those using 2.5″ strips. That made the process go a little faster for me.

Panels ready to sew
Panels ready to sew

I also trimmed all the excess fabric and stay stitched the edges. This means that the panels were ready to sew into a 3D bubble.

So, I am making progress. I will, for sure, be ready by Wednesday night. There is no choice about it.

Miss Muffet’s Tuffet

I am not Miss Muffet, but I am making a tuffet. As I mentioned, I have wanted to make one for a long time. I took the class at Scruffy Quilts and had a great time. The teacher, Robin Koenig, of West Coast Tuffets, was excellent. She was funny and helpful and engaging. She didn’t patronize us and she wasn’t a ditz.

The class is four hours, 2 sessions. The first session was last Thursday. We had to cut strips in advance (or buy a jelly roll), so we were ready to make the pattern and sew when we got to class. The patterns were a bit of a pain to make, but Robin had the templates ready, so we had to trace and cut. I was able to sew two sections out of eight, an accomplishment of which I was very pleased.

Tuffet, 2 sections
Tuffet, 2 sections

I got so much done, because I used 3″ strips, which meant that each section only required 4 strips. My fellow students used jelly roll strips and their sections required at least 6 strips per section so they had a lot more work to do.

The next class is in two weeks. I need to have all eight sections finished. I also want to make the button that covers the center.

I can’t wait to go back!


Improv Class

4 'A' Blocks
4 ‘A’ Blocks

Yesterday was a BAMQG Improv class at Always Quilting with Tina Michalik. I really liked it and it wasn’t  long enough, mostly because I was on a roll sewing and wanted to keep it up. Mostly I took it as a reward for smiling and being the perfect soon-to-be First Lady.

I wouldn’t really start an Improv quilt on my own in my workroom. It isn’t that I don’t  like the technique, the issue is that I have other things  to work on and the technique never comes to mind.

The last Improv quilt I made was the Women’s Work quilt I started in the Gwen Marston workshop. I like that quilt and remember the freedom I felt making the blocks. There was a similar feeling in the class yesterday. I think because of the constraints on my time lately I really liked that feeling of freedom.

I switched around the background and foreground so the red is actually the foreground according to Tina’s pattern. I wanted the interplay of the prints as the background. I may have been wrong in that choice as I am not liking what I have made so far. I like the interplay of fabric motifs and the black, white, greys with the red, but the center is too cross like. The center is sewn together, but I am considering unsewing and resewing in the way that Tina suggested. I am a little angry at myself because I did not even turn the blocks in Tina’s direction to consider laying them out with the red as the negative space.

Kelly's 'A' Blocks
Kelly’s ‘A’ Blocks

Kelly used some Alison Glass and Anna Maria Horner prints and I love the way hers looks.

Regardless, I want the prints area to be fatter, so I think taking the four blocks apart is in my future.

I’ll have to think about it.


Playing in Maryland pt.2: Shirts

Vintage Looking Tablecloth

As I mentioned in the previous post, we made shirts for DH and BIL#3 (I have to give designations now since there are multiple BILs involved). As you have heard both are involved in the Native Sons of the Golden West. Over the course of a few months, I found two different types of California themed fabric and bought it. I knew I was heading to Maryland and SIL#2 is almost always game for the crazy ideas I have.

My idea was to make two shirts out of each fabric. We started with the tablecloths. They were available on eQuilter. Mrs. K saw them and emailed me about them. I bought the last three. As I said in the previous post from Sunday, we had to fussy cut in order to get the most out of the motifs on the fabric and to have enough fabric to make two shirts.

Pattern Layout
Pattern Layout

The first order of business was to lay out the pattern pieces on the tablecloths (yes, we washed them) and cut out the pieces. We tried to get the most pieces out of tablecloth #1 to ensure we had as much of the motifs on each shirt as we could and as we were nervous we wouldn’t have enough fabric.

While we were laying out the pattern pieces, a story appeared. Not a story with a murder and a romance, but a story about California. One of the shirts we decided tended towards water and boats and the other land. We couldn’t use all the motifs for each shirt. It was kind of a shame we couldn’t fit the California motif into both shirts. It just wouldn’t work. I kind of wish I had bought four tablecloths, but I know there were only three left.

Tablecloth in process

We decided not to do all of the shirts at the same time and we focused on the tablecloth shirts. We sewed and pressed and marked. By the time I went to my work conference, we had two shirts done in including the buttons.

We were pretty thrilled with the way the tablecloth shirts came out. Would we have wanted them to have more of the California map on them? Yes. Would we have preferred it if the lines around the border could have been made symmetrical? Yes. It wasn’t possible yet we are very happy with how they came out.

There were a lot of design challenges with these shirts, but I think that the design challenges made this project fun and the shirts unique.

Black NSGW Shirt for Paul

SIL got me on the garment sewing bandwagon by making me sew the entire third shirt myself. She was there to guide and be my marking slave, but I did all the cutting and sewing.

We were able to finish that except for the buttons.

I came back on Saturday and we blew through the last shirt. I cut out the pattern (only one piece wrong this time) and then SIL took the lead and I took slave position again. We got it done, though we are both skeptical that it is a three hour shirt as the pattern advertises.

I have made a few garments before, but the patterns seem very complicated and I am not a confident garment maker. Working on Shirt #3 and alongside SIL on the others really helped boost my confidence. I won’t be making ballgowns anytime soon, but I might try an easy dress from a pattern I bought. Or remember that skirt?

Tsukineko Inks Class

Work area
Work area

I have a lot of Tsukineko Inks. I love the idea of them. They don’t change the hand of the fabric. They purport to be permanent (have not Googled that nor do I have personal experience). They are not too messy and have fabulous colors.

Sadly, I have never had a lot of time to learn to use them or practice with them. Awhile ago, Nancy and I got together one time to try them out. I had fun and was inspired, but I haven’t really had a chance to work with them since. I love them so they have been on my mind.

It turns out that my class was with Judy Coates Perez. She is awesome and then I read my blog and found out that the first time I wrote about Tsukineko Inks had to do with Judy Coates Perez!

So, this was an EBHQ workshop and I signed up a few months ago knowing I would be on the East Coast around the same time. I signed up and made plans to be sure and be home by the time the class started.

Then I found out I was on the waiting list.

I was #8.

I had no chance of getting in. I was disappointed. Supremely disappointed.

What else could I do? I moved on. The inks stayed on the shelf.

Then I went on my trip. Practically as soon as I settled into the East Coast I got an email from the workshop coordinator saying I had gotten into the class and needed to confirm ASAP. I couldn’t believe that I, #8, had gotten into the class. That is practically a 50% dropout rate. I found out later that the dropout number was the most people who had ever dropped out of a workshop in recent memory and the most people on the waitlist who had ever gotten into a class.

I was really happy! I RSVPed ASAP and then panicked. Did I have the right colors? How could I know? I wasn’t at home to check. I panicked about it on and off until I got home. Finally, when I checked, I was completely astounded to find that I had all but one of the colors. I must have bought a ‘basics’ kit at some point. It didn’t even matter than I didn’t have that color once I was in the class.

Judy Coates Perez is an awesome teacher and I would take a class from her again in an instant. She is caring, giving and very easy going. She has a lot of extra colors (yes, I bought a few more) and supplies. Since I didn’t really have a chance to buy anything on the supply list, I scrounged a water cup from Peet’s when I got an extra cup of morning tea and bought the rest from her: brushes, etc. Fortunately, the supply list was short and sweet.

Blending
Blending

The first thing we did was work on getting used to the ink and blending. I wrote the colors down next to my practice pieces so I would know what I had done in the future.

It takes practice.

The technique requires a light touch. Having a light touch, I found is not my strength. I also found that, since I was determined to succeed, that I made an effort to calm down, slow down, be patient and realize that this technique was a commitment and not a sprint.

I really like the slow and careful way one has to apply the inks. It is soothing in a lot of ways.

Leaf and Flower
Leaf and Flower

Once we started in on leaves and flowers, my rhythm was in full force and, though, my first leaf was a little heavy handed, but the practice helped and I got better. I needed to slow down and apply the ink more lightly. I tried to do that with the second leaf. It isn’t perfect, but it is much better.

The squiggly lines are me trying to get a smaller amount of ink of the applicator.

Tsukineko ink Flower, January 2015

I made a really nice flower. It isn’t as good as Judy’s, of course. For having only worked with Tsukineko inks for  a few hours, I was pretty happy with my work. I can see shading and some shadows. I can also see how the blending changed the original tangerine I used for the first coat.

In the afternoon we switched to using paintbrushes. It is completely different and you make the inks more transparent and lighter in color using aloe vera gel (no additives).

I had to get used to a whole new technique, but I tried to take my patience with me into this new technique. The key with the paintbrushes is to have synthetic brushes (boar bristle for oils are too stiff and sable used for watercolors absorb too much liquid) and work in small spaces at a time.

Tsukineko inks, Peony in progress

Judy had copies of botanical line drawings and I picked a peony. I didn’t want to get the snail! My neighbor did, however, and she did a really great job with it. Snails, though, YUCK!

While trying to make the ink looks smooth and even, I was also practicing managing the amount of ink I was using. I got better as I went along.

I could tell other people were getting frustrated with the technique and the inks as the noise level grew as people stood up and started to chat. I just sat and worked away at my little spaces on my Peony.

Tsukineko inks, Peony in progress 2

I used Orchid Odyssey for the petals, Thistle for the shadows on the petals and Tropical Lagoon for the leaves. I wanted to something a little different in terms of color and to try out some of my other inks.

Way too early they chivvied us along and got us to pay our bills and clean up our areas. I didn’t finish, but I am pleased with my progress.

The inks get heat set and are permanent when they dry. I learned in this particular exercise to heat set areas once I am happy with them.

I am trying to think of a way to use these inks in my work. I can’t think of anything at the moment, but will keep thinking as I want to use them.

Thanks for reading!


JCP Samples
JCP Samples

Don’t Should on Yourself

During the storm last week I should have sewn more.

Over the weekend I should have made progress on the Field Day Zipper.

When I have a spare moment, I should be working on the Teenaged Boy Black & Grey Donation Quilt.

I should be farther along sewing triangles to the leftover octagons.

These are words going through my head recently. Finally, I sat myself down and we talked.

I DO want to sew. Really. There is no reason I shouldn’t be sewing. I feel like I want to work on a project about which I am really excited. The problem is that I have a couple of other projects I also really want to get done, mostly to get the off my plate. I am not excited about them, so creative things kind of bog down.

I have to figure out what will get me out of this mood. Am I in a rut? Did I should badly on some projects that are not exciting me? Are projects not moving off my design wall fast enough? I don’t know.

My mom always says I shouldn’t ‘should’ on myself. I do a lot and I get stuff done. beating myself up about sewing is stupid. Yes, I want to finish projects, but clearly there is something else going on. Life is taking up space in my head and that is a thing that sometimes happens. Other stuff I enjoy is getting shoved aside for a lot of things I feel I ‘should’ do.

Bill Kerr Workshop: Fabric Smackdown

Remember I wrote a really long post about the Bill Kerr Workshop? Well, that was only the talking part of the workshop. The Fabric Smackdown was the working part of the workshop. I moaned when I heard what he wanted us to do, but once I was into it, I loved it!

This is the best, most exciting way to make fabric selections for a quilt!!! At least until tomorrow when I find a new way to choose fabric. 😉

My fabric choice
My fabric choice

He asked us to each to pick a fabric that gave us trouble from the fabrics we brought.

Hhmmm. Difficult. I didn’t want to pick anything too hideous as I suspected we would have to do something with the fabric. I thought about brown, which is really a challenge for me, but decided to stick with some color.

I chose this green and pink. Despite pink and green being compliments on the color wheel, this fabric is so strong that it is a challenge to work with. I still wonder why I bought it. Perhaps someone gave it to me or it was part of a pack.  I haven’t been able to find anymore of it so I used it for something. How quickly we forget.

Bill Choosing Fabrics

Yes, we did have to use the fabric for something.

Bill picked two fabrics, mostly, gave the two fabrics to their owners and then the owners had to make a fabric palette that got the fabrics from one to other.

There were two groups with three people. I was in one of them with Jennifer (of the photographing the meetings fame) and Lynette (of the A-B-C Challenge fame).

We used our fabric and our group shared, so Jennifer pawed through my scraps bags while I looked through Lynette’s neatly folded FQs. The criteria we were supposed to use in addition to hue were:

  • scale
  • figure/ground
  • illustration style
  • pattern
  • value
  • saturation
  • Large scale prints-isolate or integrate
  • Think about fabrics as a conversation.
  • etc

The thing to remember is that this type of exercise takes practice. And more practice and even more practice. He told us that we would not be able to speak very well about what we were putting up, but that we had to try. The more we tried, the better we would get at it.

Interim fabric palette

We had an interesting group of fabric and our interim attempt at selecting fabrics was pretty interesting.

You can see my little green and pink piece in the middle right. I don’t remember what the other two starter fabrics were, but I think the blue, white and brown floral and the yellow, brown and green floral at the top. I am not 100% positive.

Now, the rule is to “Love it for 10 Minutes.” Remember the homework we did around the topic of ‘Encourage’? At first you might think “YECH!” What were they thinking.

Final Fabric Patlette

We thought that, too, trust me. This selection was way out of our comfort zone, but we kept looking and fiddling with choices and, in the end, I think we all really liked it.

I would love to have all these pieces and make a quilt.

Definitely, there are two palettes into which this grouping could be divided. If you look and think about it, the fabrics can be used successfully together. I wouldn’t put equal amounts of all of the fabrics in. I might put a touch of the yellow and more of the salmon and blues. I don’t know.

I just know that I thought this would be impossible (though what teacher,in their right mind, would give an exercise that couldn’t be done? It would be all over the Internet in 2 seconds signaling they should hang up their rotary cutter) and now I am trying to figure out how to do it at home by myself. I am looking at the starter fabrics for the Jelly Roll I want to make and wondering… I think the exercise was very successful.

Variety of Fabric Groupings

The groups of fabric are unusual, but not crazy. When you look at where people started (their fabrics) and how they got from fabric A to fabric B, the grouping make sense and are excitingly different. Enlarge the picture and see what you can.

What makes these groupings work, aside from hue, is the variety. The variety of pattern, scale, motifs and the inclusion of some drabs. And so much more.

Workshop Group
Workshop Group

And, by the end, we were all tired, but we look happy. I was happy I know that.


Bill Kerr Workshop

Bill Kerr
Bill Kerr

The Bill Kerr  Workshop was awesome. It came hard on the heels of the Sew Day held on Thursday and there were 35 people there! We didn’t get to see Weeks Ringle or the famous Sophie, who has recently published her first book, A Kid’s Guide to Sewing, but I’ll suffer through.

I said somewhere that I want to crawl inside Bill Kerr’s head and suck out all the information he has in there. It sounds gross, but that is how I feel. This is the second lecture/workshop I have taken from him and this was all new information. Or I wasn’t really paying attention last time and he just got a gimme in me.

He is a very good lecturer, regardless, because even if he said the same things over again, they resonated with me and I want to incorporate them into my work.

The last time I heard him speak was at the Peninsula Quilter’s Guild in 2008. At that time I wrote “I am hopeful that I will get to work with them, because he mentioned that they teach a week long, intensive design course. It is now on my list of things to do when the work situation simmers down.” I remember that a month after i wrote this statement, my work troubles were put firmly on the back burner, because my husband was laid off and it was a year and half before we could even consider something like this workshop. I still want to take the design course, and will still have to inquire, though he said they are still busy, but Weeks has created a Craftsy class with a lot of information and that class has 6,000 students in it. I can’t even imagine having that many students. I know they are not all in a classroom at once, but still that is a lot of potential questions.

My ideal would be to have a once per week class with them where the students, including me, went away, did some work and came back the following week to work with them some more. Since they live in Chicago and I live a few thousand miles from them, I will have to put that on my list of things to do when I win $100,000,000,000 in the lottery.

If you don’t know Bill Kerr and Weeks Ringle, they are the owners of the Modern Quilt Studio (formerly FunQuilts). Weeks is the author of the popular Craft Nectar blog.  They are the authors of several books:

Workshop

The workshop was scheduled to last from 6:30-9:30, but we really went until about 10:00pm. At 6:30, Bill bounded, literally, into the room and just started talking to us about color and design and I was, immediately, riveted. I think he really did chat with Rhonda for a minute before he started, but being in the way back of the room, that was my impression. He is energetic and full of life and I know I would gain so much by truly studying with him and Weeks.

He said something that I truly believe. When I looked back at the208 blog post from the last lecture I attended. He said a version of “He suggested that people think you are born Picasso or doomed to mediocrity. He believes this to be wrong and that visual arts take work, like anything else, and that you can be successful if you work at it.” He really emphasized that everyone has an artistic spark and that the owner of the spark has to practice and practice. For us that means making many, many quilts and failing at some of them.

A lot of what I write below is from my notes, so some of the sentences may be just fragments.

Definitions:
Hue – what we call color. When I say my favorite color is turquoise, I really should be saying my favorite hue is turquoise.

Value – relative lightness or darkness of a hue

Itten Color Wheel-saturation

Saturation – in-tenseness of the hue – hue in purest form – middle of Itten color wheel. e.g. Pure saturated yellow can never be dark.

Black is the most desaturated “hue”.

The other thing he said that I need to remember for my own work is that it is never, ever solely about the color; it is about the role that the color plays in the quilt. THE ROLE. Fabric is fabric; you can use all types and styles together. There is no quilt police who will look at your quilt and tell you to take some fabrics out. Who cares if it  is modern or civil war, etc? If hte fabric has the right role int he quilt and it is a modern fabric next to a Civil War reproduction next to a feedsack, and the piece works, you have succeeded.

Isolate one concept, express one idea:

  • showcase 1 fabric
  • showcase 1 pattern
  • etc.
David Butler/Jo Morton quilt

Above is one of the quilts Bill Kerr brought as an example. It is a perfect example of the above statement. It is a combination of David Butler’s first collection and Jo Morton fabrics. David Butler is Amy Butler’s husband and his quilt fabrics are more ‘modern’. Jo Morton designs Civil War reproduction fabrics. The fabrics work together despite their different styles and, thus, the quilt works. Don’t limit yourself because you think “I don’t do Civil War.”

Drabs work really well with brights. “Drabs” are taupe, putty, some greys, olive green, some browns, etc. Drabs are forgettable. Drabs allow other fabrics to shine. He didn’t have a chance to go into this very much, but he said that a lot of times a drab version of the complementary hue can really spark up another color. Drabs can add some relief, <Jaye editorializing> I think that what Kerr discussed was what is sometimes referred to as “buying ugly colors” or “using ugly colors”. I don’t like to think that there is a hue that does not have a role to play in some quilt (see above in David Butler/Jo Morton quilt). I also like the idea of calling these types of hues “drab” rather than “ugly.”

He also said, and I really like this metaphor, that putting fabrics together for a quilt is like creating the perfect guest list for a party. Think about hue, scale, pattern (like polka dots). Think about eliminating the ‘loud obnoxious guest.’ Think about how the scale, pattern and hues work together as a harmonious whole. I keep thinking back on his comments comparing quilts to a party.

Figure Ground and Illustration Style
Choosing fabrics for a quilt is not just about looking at the circles on the selvedge and picking colors. Figure Ground and Illustration Style are two things to consider.

In simplest terms the figure is what you notice and the ground is everything else…The figure always defines the ground and the ground defines the figure. They are inseparable — you can not have one without the other. If you draw the figure in a composition, you are drawing the ground at the same time… (Daphne)

Illustration Style is the style in which motifs are drawn. Are there light objects on dark field? Are there dark objects on light field? Are the motifs are outlined in black? Are the motifs not outlined? The type/style of drawing, such as the way I draw my CPP responses or a watercolor color style are all examples of illustration style and they are another tool that you can use to choose fabrics.

Bill likes RJR Linen White as a great background. He likes it better than Kona Snow and there was a suggestion that Kona, while dominating the market, ravels too much. The RJR Linen White is very warm.

Other

Every quilt is an opportunity to learn.

Weeks Ringle wrote an article in the June 2013 American Patchwork and Quilting called Stash RX

I’ll write another post about the Fabric Smackdown exercise we did.