Monday was the Boxing Day Sew-in, which was organized by Sandy and contributed to by various other podcasters and quiltmakers. I have to say that I jollied myself along to get involved and am glad I did, because I had a great time watching the tweets scroll past AND making major progress on the Stepping Stones.
Somehow the Stepping Stones project was well on it’s way to becoming a chronic UFO. I don’t know why. Somehow it just became a chore. I think that starting it around Thanksgiving and then not having my usual sewing time to devote to it contributed to the feeling.
Spending time on it on Monday and getting cheers from others participating in BDSI was the shove I needed. The support felt great and the project is well on its way to completion.
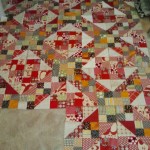
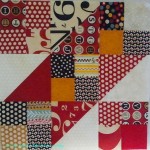
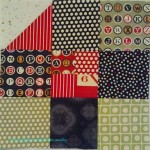
Starting Point
This is where I started. Looking at it now I find that I had made good progress. My whole problem was my attitude. Perhaps I am a fickle creature and if I cannot work on a project intensely, I become angry at it and want to move on?
During the day, we were all tweeting our progress and I was using my cell phone to take pictures. I hope the pictures are acceptable quality.
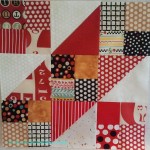
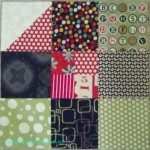
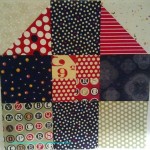
Center Done
By 10:30 or 11am, I had finished the center part of the quilt. I was able to start in on the border. As you may have seen in the previous post, I decided to modify the border so it looked more finished. As such, I needed 4 corner blocks that were slightly different from the side blocks and then 20 side blocks.
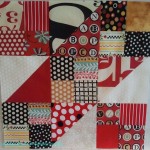
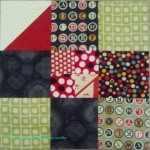
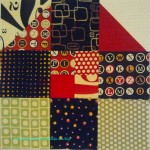
Corner labeled
Again, I was able to finish the corner (4) blocks and 2 of the side blocks. This allowed me to take a look at the way the corner would look and if my design had the desired effect. The quilt top always looks different once sewn together, but I think it will suit me.
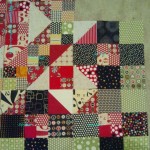
Yesterday, I sewed several big chunks together. this is another monster quilt, so it is taking me some time to get it sewn together. I would like to have the top and back done by the time I go back to work on the 2nd. I had really big sewing plans and the holidays got in the way.
Now back to listening to my audio book and getting this baby finished!
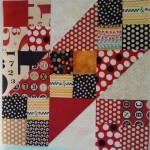
The only quiltmaking I have gotten done in the past few days is in my head and on EQ. I decided I would rather have a self border on Stepping Stones. I thought the border they had looked nice, but a bit unfinished. This is the current border I am planning on making.
TFQ pointed out that the green in the border looks good in the border, because I have more green in the center blocks in the EQ drawing. I have to make sure that I have enough green in the actual quilt.
I am at the difficult point in this quilt where I am over it, so I need to make some progress so i don’t have to add it to the 26 Projects list. I hope to make some progress, even a miniscule amount today or tomorrow so I feel like I am actually sewing. There is a possibility since all of my houseguests are gone until Christmas Eve and it is some kind of rule that I can’t sew on Christmas, so it is ok that they will be here. They may not even sleep in my guest/workroom since they hate walking up the 3 flights of stairs. Perhaps I’ll pretend I am doing last minute wrapping and go sew. 😉
One thing I have learned (or hope I have learned)is that projects get stale for me. This means that I need to focus on them, get them done and move on. Have I said this before? I think so. I am reiterating it here.
I have a stack of various sized strips I have been saving for this project. The longer they sit around, the easier it is for me to forget why I am saving them and the other day I thought I would just send them off to Katie. Then, I remembered why I am saving them and the big problem with finishing this quilt.
1. I have too many blocks. What do I do? Make a giant quilt that comfortably seats 12?
or
make a normal sized quilt and put the extra blocks in the Children’s Quilt Project bin at EBHQ?
2. The border. I want to use the self bordering technique, but I need to sit down and figure out how that will work with this pattern and paper piecing. I just have to do it. I never seem to do it.
This is an old photo of the original bullseye. I have made several bullseyes since I started this blog: Seeing Red, Feeling Blue, Passionate Purple. Still the original bullseye that started this whole crazy series is undone.
This quilt, and the Spiderweb are two that I want to finish! Perhaps in 2012? We will see.
I have really not turned on my sewing machine in two weeks. A little here and there, but nothing major since Thanksgiving. I am scraping the bottom of the barrel for blog posts as a result. I am planning to ignore the world (possibly in my pajamas) all day today and work on this project.
Stepping Stones
As I mentioned before, I got this pattern from a Pam and Nicki Lintott book. One thing that is very confusing is that they have written the pattern for one line of fabric. I am not using that line, so I had to translate and that proved difficult for me. I don’t like the directions very much. I don’t think they are bad, but they don’t really work for the way I work.
So, earlier this week, I sat down with EQ7 and made a rendition of the quilt. This helped me wrap my head around the project a little more. This exercise coupled with the math that TFQ did for me when she was here made me less frustrated and excited about this project again. I organized a bit last night while the boys were out, so I am ready to sew like crazy.
Some time ago, I checked a Pam and Nicki Lintott book out of the library. One of the patterns intrigued me.
Moda Circa 1934
The other day, I stopped at the Granary in Sunnyvale and saw the Circa 1934 fabrics from Moda. I bought a few of them and a layer cake. Once I got the fabric home, I decided to try the Stepping Stones pattern using the fabric during the Thanksgiving weekend. I can’t even remember the last time I bought fabric, washed it and immediately started using it. I want to get to the point where I do that more often. Sometimes the excitement of the fabric is fresh in my mind when I buy and I would like to capitalize on that excitement in my work.
Fabric selection for quilt
I didn’t buy large pieces of the whole line, so I knew I needed some additional fabrics. Also, I want to take Joanna Figueroa’s advice and work towards using only 80% of a line so that my quilts look different from other quilts that use a whole line.
4 Blocks
I looked at the layer cake to get a few ideas about colors to use. I picked some fabrics out of my fabric closet and set to work. There was a bit of pulling colors out of the pile, but I really wanted to sew and tried not to be too picky.
I am not very experienced at following patterns and I had trouble with this one. I am not used to making a whole bunch of one element at a time, then making a whole bunch of other elements and finally sewing them together. I have to admit that once your elements are made the sewing goes quickly, but it was a lot of time on my feet.
Also, I didn’t like the pattern, because it didn’t clearly tell me how many of each triangle square and four patch I needed, nor did it tell me what size they should be (finished or unfinished). I tried to guess and hope I got it right.
Finally, the pattern is not written in such a way where it is easy to switch out colors. I would have preferred if they used terms like “light,” “dark” or “medium.” Even if they used “large floral” or “fabric with small repeat”, it would have been a bit easier to NOT use the colors and fabric line the authors used.
1 block
The blocks appear large and are coming out fine. I am liking how it looks, though I see now where I could have used more contrast.
I can’t believe I haven’t posted triangles since mid September! But it’s true. I haven’t posted triangles since mid-September. I guess if I had actually pressed fabric in the past 2 months, then I wouldn’t be so behind.
It turns out that I have to press fabric, because the chair I lay the fabric over while it waits to be press keeps falling over. I spent a few hours on Sunday, after finishing a big project pressing and cutting the bits and snippets I need for various projects. I got quite a little pile going after not too long. I think the chair is a bit more stable now, but I just need to get the fabric pressed. AND stop buying new fabric.
As you may have inferred, I got two quilts back from the stand-in longarm quilter last week, so I had two quilts to trim and bind. I don’t enjoy these steps in the process, probably because I don’t have a good set up for dealing with them. Colleen usually machine applies the binding and trims the quilts for me, but I didn’t feel like asking the new person since I don’t know her that well.
Friday, before the weekend, when I was at work, I made a list of tasks I wanted to accomplish during the weekend and trimming and binding these two quilts were among them. All of the tasks I wanted to accomplish were what I call ‘finishing tasks’ – making backs and bindings, trimming, applying bindings. Unsatisfying tasks, IMO. Of course, I like the finished products and I don’t mind hand stitching the binding, but getting to that stage is an uphill battle for me.
Hexagons, early October 2011
I buckled down and did the tasks and in between I added hexagons to the Sugar Flour Hexagon quilt top. I am not sure I will make a thousand hexagon quilts, but I making this one is really fun. The pieces are large enough so that it is not misery to machine sew the hexagons together.
I also enjoy the fabrics and, thus, the color placement. I thought of adding the hexagons in rows, but adding rows wouldn’t allow me to control the placement of the color in the same way.
I had fun with the blob, but want to make it more square, in anticipation of it actually being used for a quilt like purpose. I don’t know how large I will make it – I have plenty of fabric so that isn’t an issue – but I think, perhaps making the width in the neighborhood of how large I want the quilt to be would be a good idea.
Adding the hexagons was a really nice treat in between making the back, and binding and trimming Pavers and Stars for San Bruno #2.
Mid September already! The CQFA Retreat has been set, so now I have a working deadline. I am pretty good in the fabric washing department. The cutting of triangles for fabrics I have used this year (already in my fabric closet) has been spotty. I am not going back to make that up and will try and do better. No promises. It will be what will be.
Some of the blogs do a feature every week called WIP Wednesday where they show a work in progress. I don’t want to do that every week, but somehow this week it seems appropriate.
Original Bullseye
This is the project that started the whole Bullseye project. This has been on my mind lately, for some reason that I don’t know. I always planned to do a border with curves in it, so it would look like a curve was going all the way around the quilt. I found directions. I have a test piece and I just decided that was not the way to go.
This quilt doesn’t lend itself to the self bordering technique. I have a lot of leftover circles that I could use in some way, but I don’t know what way. Aside from slapping on some borders and calling it good, I don’t have any ideas. Do YOU have any ideas? Even a little spark would be helpful. Let me know.
Pavers is ready to quilt. I am not sure the name suits, but that is what it is. It will be a gift.
Pavers - top
This pattern is based on a photo I saw on Flickr from Green Couch Designs and related to the Purple quilt I finished a few weeks ago. Both on the Purple Quilt and this quilt I wanted to work with asymmetrical borders. I wasn’t happy with the border on the purple quilt, so I tried again on this one. I think I want to work with the border a little bit more and will make one more quilt in this pattern.
This is an easy quilt to make and I basically finished all of the blocks by using them as leaders and enders.
The photo above has that lovely pink post-it on the top as a direction to the quilter. It just says what I have designated as the top. I do that for the back, too.
Pavers - no borders
Above is a picture of it laying on my ‘design floor’ before I put the borders on. I was amazed at how much better the piece looked sewn together. The duplicate fabrics near each other didn’t seem to matter and the whole thing just came together.
This is reposted from Pam (Hip to Be A Square)’s Flickrstream with only slight revisions/additions:
Srsly guys. They are EVERYWHERE.
Sandy at Quilting for the Rest of Us, Jaye from Art Quilt Maker, and I are loosely doing a hexagon-along quilting type thing this this summer. Sandy and I will be sharing our process and pitfalls on our podcasts, while Jaye will share on her blog.
You can find Sandy all over the web. Click on the link and it will take you to her podcast, Flickrstream- just about everywhere.
You can find Jaye at https://artquiltmaker.com/blog/ (where you are now!) (for her blog) or on Flickr at http://www.flickr.com/photos/artquiltmaker
You can find me at www.hiptobeasquarepodcast.com for my blog & podcast.
Feel free to grab this button if you want to show some solidarity. The current size is 277×277 pixels, but it can go down to 180×180 without distortion.
As I mentioned in the Zig Zaggy post, I am working on finishing tasks for a number of quilts. One of the tasks I finished was the back of the FOTY 2010.
The Zig Zaggy quilt back was miserable to make because I used too many small pieces. I put it aside 4 or 6 months ago and I hadn’t finished it when I started the FOTY 2010 back.
I decided that I would try and use similar colors instead of using all variety of colors. Is this a new way of making backs? I don’t know, but found it a lot easier to use big pieces instead of a bunch of fat quarters. The process went faster and wasn’t so frustrating. It also didn’t take up an entire weekend to make one back. I think that using a similar color will be better for the quilting. I think it will help the quilting stitches blend in.
Building the Back
I built the back on the design wall, which I found to be a lot easier than trying to lay it out on the floor. I really like having a second design wall, as I think I said.
I had the Metro Coffee fabric I had saved to use. The Metro Coffee fabric was printed in such a way that made it too much of a pain to use for another bag. I found another large of piece of fabric in a similar color.
In addition, I used number of the fabrics from this year, but I also used a fabric or two from one of my fabric bins.
Somehow, I found using similar colors was a lot easier to make than using many different colors. I think it took out one decision from the process of making the back.
FOTY 2010 Back Finished
I don’t know what has gotten into me with this finishing jag. I think some factors were: not having enough time to sew for a week or so which made just want to sew as quickly as possible. Bringing a quilt to the quilter and knowing she could do a just a little more for me made me get on with the bindings so I would be farther ahead when I got the quilts back. I also think that talking with Colleen about three quilts ma and then made me see the possibilities if I did just a bit more work to get more quilts to her. I am behind on FOTY 2010 and finishing the FOTY 2010 top made me want to try and catch up on it.
I knew I would have a good chunk of time on the weekend to sew, so I got a bug in my ear to move through some of the finishing tasks. I also knew that I didn’t want to spend all of my weekend sewing finishing tasks, which doesn’t seem like creative sewing to me. Since I had a bit of time during the week, and small amounts of time are great for making bindings, I decided to make the bindings for the 3 quilts (Frosted Stars, Frosted Stars Leftovers and the Purple Quilt) which are currently being quilted. I also made the binding for FOTY 2010 and will make one for the Zig Zaggy quilt.
It is great that my longarm quilter will machine sew the bindings to the front of the quilt for me. I normally do it myself, but, this week, I decided that having her do it would move the process along a bit quicker.
On my list for this year is finishing one of my UFOs. I need to move through some of these other projects before I can get to that UFO. I have been trying to move projects past the piecing process before I start something new. I am trying to move some of these projects past that point.
I have been on a finishing jag since my post about projects on my mind. I want things out of the half finished stage. I want to feel ok about starting new projects, not that that is really a problem.
I am not finished with anything completely yet, but I am in the process. Three quilts are at the quilter and in the past few days I have finished two more, which will be dropped off at the quilter on the 25th.
Zig Zaggy Back - Finished
I took the FOTY 2011 off of my portable design wall after finishing the back and, instead of taking the portable design wall down as planned, I put the Zig Zaggy quilt up. I have to say that I really, really like having 2 design walls. I only had two sides of the back to finish to make the back big enough to quilt the quilt. Since I was in finishing mode, I just sewed some extra pieces on to the back. Now I will make the binding and be done with it.
I like the front, and the back started out as a good idea, but I stopped working on it because sewing all of those leftover strips was a big pain. I am not doing that again. I am sure I can find a use for strips. I had a much better time finishing the FOTY 2010 back. I used large pieces and it was a lot easier. That is my new mantra for backs: big pieces of fabric.
Zig Zaggy Back - Finished
Here is a the detail of the top. The top came out smaller than I thought. When I was working on it, it seemed huge. Now it seems tiny. Compared to the FOTY 2010, it is small. I guess it is all about perspective.
I had an appointment with Colleen yesterday to talk about the quilting for the Frosted Stars, the Frosted Stars Leftovers and the Purple Quilt. I wanted to bring the Fabric of the Year 2010 top over as well, but I wasn’t able to even start the back. My life felt like it was spiraling into complete craziness this past week as things just continued to get heaped on to me. To add to the general life craziness, my work computer is acting up. It has been for awhile, but it reached new heights of not working on Wednesday afternoon and I lost patience. Nothing would load (web pages, local programs, nothing) and I could hear the hard drive churning away, which I knew was a very bad sign. Finally, on Wednesday afternoon, completely and totally fed up, I went to my boss, told him him the problem and asked him if I could just read my email from home on Thursday if my computer was working the same way. He said if my iPad was faster, I should just go home and use that on Thurs. WOOHOO!
Sadly, his IT staff came in early and did a stopgap fix on my computer. It was much better on Thursday, so I had to stay at work instead of hang out at home with my iPad next to my sewing machine. 😉 Oh well.
The computer problems just added to my stress and in light of the craziness, I decided I had to be okay with not getting the back of the FOTY 2010 finished. I talked to Colleen and will bring it in two weeks when she is back in town and ready to quilt again. That means I have two weeks to finish the back.
FOTY 2010 Top - Finished
This past week wasn’t a complete quiltmaking desert. I did get a break on Monday when I didn’t have to take the Young Man to his regular Monday appointment and I took the opportunity to finish the FOTY 2010 top! Yay! I feel so good about that.
All the diamonds were sewn together and the border strips were cut, so I just had to sew them on to the top. It took me a long time – about 3.5 hours. I never think that borders and backs are going to take long, but they always seem to take longer than I expect. Oh well.
I learned a couple of things making this top. First, my deadline was to piece the whole top at the CQFA Retreat. It turned out that I wasn’t ready to piece this whole top. Diamonds require finding my sweet spot of piecing. I had to develop a rhythm and a method and I hadn’t done it by the time I reached the retreat. Second, this was a top that needed me to take my time. I ripped out much of the piecing I sewed at the retreat. A lot of people don’t care about points being cut off and I am not going to beat myself up about every single point, but I absolutely don’t want my bad technique to distract viewers from the overall look of the quilt. Finally, this quilt needed to be pieced slowly and carefully.
FOTY 2010: bottom leftFOTY 2010: top middle
I have been lamenting my pictures (my whole blog, really) lately and these two show great detail, but they are not great photography. I am pretty pleased with the color layout on the pink and white section.
The diamonds are not in perfect positions colorwise, but I have improved since FOTY 2009.
In the photo of the pinks and whites, I am really pleased that I clustered the whites in the corner. In FOTY 2009 I put them along the left side one on top of the other and I decided that wasn’t as effective in terms of the colorwash idea. It is very difficult to get a really smooth colorwash effect when using prints. As I said, I think I improved over last year.
My mom kept telling me to move diamonds AFTER I had already sewn them and finally I had to tell her to make her own colorwash quilt!
FOTY 2010: alternative universe
As I mentioned in a post earlier this week, I will be making a block or two from Joel Dewberry fabric. I have the fat quarter laid out on my ironing board (see previous comments about horizontal space in my workroom!), because my design wall is full, and there is no horizontal space.
As I was finishing the FOTY, I kept pressing bits and pieces. When I was pressing the corner of the inner border on top of the JD fabric, I noticed how interesting this particularly corner looked with the JD fabric as the border. I didn’t want that active a print on the outside of this quilt, but I thought it was interesting.