You might remember about a week ago I talked about selecting bag fabrics. I just couldn’t decide so, instead, I started on a different bag where the selections were already firm in my mind.
AMH MTT in Progress
I really enjoyed working with these fabrics. I loved the colors and the feel. I finished the bag on Saturday and took it out with me on Sunday. I have to admit that even if I give bags away, I try most of them out. I intend to keep this one, but tote bags flow through my life so quickly that who knows?
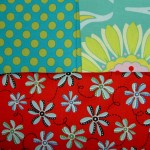
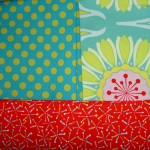
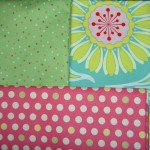
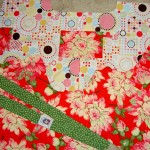
These are fabrics that I bought in Ferndale and the large flower print is by Martha Negley. I do love that color, a reddish pink tending towards salmon. It is a cheerful color.
This is the first time I have made the pocket panels the same color as the exterior of the bag. They are the pieces right under the dot fabric you can see peeking out of top left and right.
It made the fabric selection process a lot easier. The pocket panels aren’t highlighted at all; they look like part of the exterior. I don’t know yet if that bothers me. I did a lot of work on the bag and wonder if I need people to see the pocket panels? I’ll have to think about it and let you know.
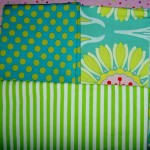
I like to make the inside of the bag a light color, so I can see what is hiding inside the bag. I really like that dot fabric! I got some a long time ago with a chartreuse-y / olive background. This colorway works very well for the inside of a bag.
I realize that this is another non-quilt project. Yes, I have quilt projects; I just don’t seem to be working on them. Two quilts, Chocolate Box and Passionate Purple are ready at the quilter and I haven’t gone to get them yet. I also finally called for a longarming date. I could have had March 26, but have to work that day, so FOTY 2009 will be quilted on April 23. Don’t give up! Some quilts are coming.
Every horizontal surface in my workroom is covered, mostly with fabric, but other stuff, too. I don’t have large enough horizontal surfaces, but that is no excuse. I have so many things going on. On the top of my list is sewing!
I am trying to pick out fabric for my latest Anna Maria Horner Multi-tasker Tote. I’d like a new one for spring and it just isn’t going well. I tidied up a little after I got home from CQFA, but I still don’t have enough space to work.
Option 1
Option 2
Option 3
Option 4
Option 5
Final Selection?
Option D
Option A
Option C
Option B
Cell Phone Pocket in Progress
AMH MTT in Progress
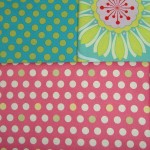
I had three fabrics ready to make the next Anna Maria Horner Multi-tasker tote and one of them disappeared or I lost it or misplaced it. To make matters worse, I don’t remember which one I had selected. Bleah!
I was looking for a red or a pink to bring out the middle of the flower, but am considering another green to encourage subtlety. I looked at pattern on the fabric as well as the color and I am not really sure any of them work. The above are some that I tried out to see if I liked them. I think I need a red with a little more pink.
Final Selection?
Perhaps you like the above?
No? I found more fabric choices in the pile behind the door. they caught my eye when I was wandering in and out. This area is like the Tollbooth in the Phantom Tollbooth and they haven’t been on my radar since my sister moved a bunch of stuff around in my workroom.
Option A
I definitely like the pink dot better. It is a lot of dots in the piece, however.
Option B
The small dot kept catching my eye as I looked at some of the other choices. It was on the top of my ironing board because I had just ironed it. I kind of like the lavender/pinkish color.
Option C
Stripes don’t work for me. Well, actually, the stripes work, but the color of the stripes doesn’t work. Too Pepto Bismally.
Option D
Too much green?
I really wanted to get going on that tote today. It has been too long since I sewed. Since I couldn’t decide on colors, I was stuck. NOT!
AMH MTT in Progress
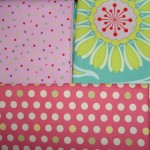
I have plenty of fabric and had just come across the perfect green to make the straps for another AMH MTT, so I started in on that and got pretty far after I made the straps.
The reddish pink fabric is a Martha Negley for Rowan fabric from the Variegated Garden collection will be used for the exterior. This particular print is MN-40 Dahlia.
That fun dot is the inside. As you can see I have the pockets pinned and ready to sew, but haven’t sewn them yet. I was tired.
I added a cell phone pocket, which is the smaller pocket also waiting to be sewed on.
Cell Phone Pocket in Progress
Sorry, this photo is bleary. I have been up and down the stairs (4 flights) at least 8 times to fix photos and I am not doing it again. This idea is from the Sweet Harmony bag. The dimensions of this pocket are 4″x5″. I cut it 8″x5″, sew around the outside with right sides together, turn it and then sew it to the lining of the AMH MTT bag. The way I make it fit the cell phone is that I pin the bottom so that it measures only 3″, which makes a pleat.
This is a denim bag I made out of of an old pair of jeans for my stepdad, The Big Guy. I made one of these in high school that I carried around and embellished. I am not really sure what happened to that bag or whether there are any photos of it anywhere. I stitched around the edges of the pockets with embroidery floss and embroidered flowers on my version.
I wanted to do something like that on this bag, but really ran out of time. I had a lot of gifts to make, as you know.
The shoulder strap is pretty wide. I made it that wide because of the seams and because I thought it might be a little more comfortable for him to carry. The straps will be a good opportunity for him to embellish.
I really had a hard time sewing through the denim and all of the layers in various places. The 9K did NOT like the denim. As a result, I couldn’t do as much topstitching as I normally do on bags. Both of the issues I ran into allowed me to go with the flow, though, and I billed it as a joint work in progress.
The Big Guy is VERY creative. He works in various media including leather. He has made leather slippers before, so I thought the bag might be a good canvas for him to stitch on. He loved the idea! I am looking forward to seeing what he comes up with.
I am pleased [with myself] to say that 2010 started out with a sewing bang. I finished the bag for my aunt (she never reads this blog as far as I know, so I don’t feel bad about posting it even though I haven’t sent it off yet).
Jeri’s Bag
I started this bag way back in December 2009, but with one thing and another wasn’t able to finish it until Friday. I feel bad, because it was intended to be a Christmas gift. My aunt really loves purple, so I made this bag in purple for her. In terms of fabric selection I had a couple of things I wanted to accomplish and some limitations to deal with. First, I was limited in my fabric choices because of the size of the pieces of fabrics I had available. For a long time I have purchased half yards and FQs. These are fine for quilting, but I am finding that they are barely adequate for bag making. I intend to try the Mini-Multi (AMH’s pattern for the Multi-tasker tote that I resized)This limitation directed me to more plummy colored purples.
Also, I wanted to try a bag where I didn’t use fabrics with a ton of contrast. I think Marilyn’s Multi-tasker was pretty successful. That one wasn’t boring to make. Thus, I wanted to try another interesting combination of fabrics that were also not wacky looking and my aunt wouldn’t feel bad about carrying around.
I am pretty happy with the way this bag turned out. It looks nice and does not look wacky. I made the pockets and straps at the beginning of the process even though AMH says to make the straps at the end of the process, right before I am supposed to attach them. I think my process worked better for me, because once I got past the tedious, fiddly parts, I was able to put the bag together relatively quickly. I like to get all the fiddly parts done, so I can move through the process quickly as I tend to get bored if I have to keep going back to the fiddly bits periodically throughout the process.
Jeri’s Bag – detail 1
I think the combination of fabrics is a good one. The colors work well together and there is some interest in the combination. They are all older fabrics, so an added bonus is that I delved into the fabric closet and used some stuff that has been hanging around. I think Auntie would have preferred less plummy and more purply colors, but the bag is what it is.
Jeri’s Bag – detail 2
AMH does not make her pockets fully lined. Another change that I have made is that I make them fully lined [by cutting a piece of fabric, folding it in half (right sides together), sewing around, turning] before sewing them on to the bag. I think this method makes a nicer finished product and doesn’t take much longer. I want to remember next time to add a label to the pocket. It seems like a good place to include a label.
Jeri’s Bag – detail 3
I am still liking the cell phone pocket, which I learned to make from the Sweet Harmony bag, so I added one to this bag as well.
Cloth Napkins
I have bought some of the fruit and vegetable fabrics, that seem to be popular, recently. I had a joint project with my mom in mind, but decided I liked certain ones too much to give away, thus I made napkins. Perhaps I am making a series after taking a look at the raspberry napkin I made in 2009? The cake fabric and the pots and pans fabric is from my collection of fabric for backs. Those pieces are large, so I can make FQ napkins with no problem and no piecing. In general, I don’t really like making napkins. Turning the pieces and getting the seam crisp are really frustrating and I am generally not successful at it. I tried a couple of different methods this time and am progressing. I do enjoy using the new napkins! I also enjoy looking at the cake fabric. My sister wants a set, but I don’t know if I have it in me to make a SET. Perhaps I can make one a month for her, then give her a set of 12 for Christmas? We’ll see.
In a way I wanted to set a trend for 2010 of major league sewing. In 2010 I want to make major progress in the sewing-quiltmaking-bag making department. I think I did well last year. Still, I want to do better. Not necessarily in terms of numbers of projects completed, but improvement in my processes. Oh, and I would like to see major improvement in my organizational systems. I am not committing to anything on that front, but would like to see it. We’ll see about that.
I love my sister dearly, but she is hard to shop for. She buys what she wants, so I always have to think early and creatively. I found this Basic Grey fabric and just knew I had to use it for a gift for sissy. She is an invertate scrapbooker and LOVES Basic Grey paper. It started the whole thought process, actually.
Sweet Harmony - Full
On my week away, TFQ tempted me with doing a joint Sweet Harmony Bag by Amy Butler. My idea was that we would each make one at the same time. However, it turned out that we worked together on one bag.
This is probably the last time I will make an Amy Butler pattern. I purposefully did not write the review right away, because I wanted to give the shock time to wear off and give the piece a fair hearing.
While the finished product turned out really well, the directions were overly complicated and the pattern promoted extreme wastefulness.
Here are some tips and things to be aware of when making this pattern:
Trace the pattern pieces on tracing paper and keep the originals all together on the pattern sheets.
Trace the pattern pieces again, but smaller (approximately 3/4″ will work) for the fusible fleece and interfacing pieces. If you don’t do this, the pattern will tell you to cut them full size and then trim them down. Thus, this direction promoted a lot of waste in the interfacing, Peltex and fusible fleece.
Make a separate pattern piece for the inside pocket as well. This is a combined piece and it is just too confusing not to have a separate pattern piece.
Make a chart (Excel or the Google Docs Spreadsheet feature would work) of the pattern pattern pieces you will need and which fibers you need to cut them out of. I didn’t know to do this and ended up laying all the cut pieces out and reading the list over and over while counting pieces.
The designers seem to have a problem with naming pattern pieces consistently. In Step 4G, they ask you to do something to a Lining Panel. This was the first time I had ever heard of this piece.
This pattern and the directions don’t always make it clear which layer (fleece & interfacing or interfacing only) the designer wants you to work with.
Sweet Harmony Org System
Directions should have included a rotary kit (cutter, mat, ruler). The instructions do not include these tools, but they make the process much easier. I understand that the pattern isn’t necessarily targeted at quiltmakers, however I think many sewists now have rotary cutting kits as part of their tool arsenal. If you only sew garments and accessories (e.g. no quilts) and do not have a rotary cutting kit, I think you should go and buy one. What do you think?
Use tailor tacks to mark dots.
Handbag pattern includes a 20″ zipper in the list of supplies needed. Then the designer wants you to modify this zipper to make it about 8″ shorter. I don’t know about you, but I don’t know how to modify a zipper. I also did not want to modify a zipper. I barely know how to put in a zipper. TFQ who has LOTS of garment sewing experience and she didn’t know how to modify a zipper with confidence either. This is another bit of waste. I ended up omitting the zipper (it’s for a an inside pocket), but I would recommend buying a 12″ zipper and not modifying anything. The pattern also gives the pattern pieces for a tote bag, which I did not make, and I believe that the 20″ zipper would work with the tote bag. I think they were trying to save space on the pattern by not listing two supplies.
The marks for the magnetic snaps are below and to the left of where they actually should go.
Sewing piping to outside pocket
The pattern asks you to make much more piping than you actually need. You will really only need about 25″.
Finally, there are not enough pictures, despite the price of the pattern, so I would recommend giving yourself plenty of time and using nice fabric. You may never make it again, so you want to like it!
I think that making all the tote bags I have made really helped in understanding the pattern and how to follow the directions. The final product is really nice and looks very professional. I als learned how to make a pocket that has a little tuck so larger things will fit and you can actually pull it out.
I mentioned that I am trying to make as many gifts as possible for the holidays. I am having fun doing it, but I wish that I had started earlier. I wasn’t sure what to make Grama since all she really likes to do is shop and play bingo. I decided to make her a ‘Grab Bag’ from the All People Quilt pattern.
She has started bringing bags back to the grocery, so I decided to make her this bag. I knew how to make it since I made it for a gift previously and could use a couple of FQs, if necessary.
Grama's Grab Bag in process
I found the older Jinny Beyer border print and a floral for the inside and think that it turned out well. I know she doesn’t read blogs, so I am not worried about ruining the surprise by posting this before Christmas.
I was walking back from lunch the other day. I am always on the prowl for the perfect bag and saw a display of luggage I had never seen before. I looked closer and really couldn’t figure out the purpose of these suitcases. Finally, I stepped back and looked at the store’s sign and found it was a pet store and these carriers were for pets! I was amazed at the complexity.
The other day my sister sent me this picture of her dog, Cherry in the tote I made. I never thought of using the Eco-Market totes as dog carriers, but I am sure it was much cheaper than one of the pieces of luggage I saw downtown. Doesn’t Cherry look cute and sweet? She is sweet, but only intermittently. My Sis saved her from a bad home and she has to contend with 3 other dogs, the smallest of whom is 3x her size!
I hope her little claws don’t rip through. The bag has already been back and forth a time or two.
Here is my latest Multi-tasker tote. As usual, I made it from the Anna Maria Horner pattern. The more MTTs I make, the easier this pattern gets. Will this be my new tote bag pattern of choice?
I bought the laminated cotton (oilcloth) at the Quilting Loft in Seattle on my week away. As I mentioned, it poured rain part of the time I was there and the regular cotton Julie MTT got wet. When I saw the dotted laminated cotton, I thought it would be a great winter bag. I made it big, even though I still need to make the Mini Multi to see if it is a better size for my height and shape and the amount of space I usually have on public transport. I had a lot of stuff I was hauling around from cafe’ to cafe’ that week.
Dotty MTT, inside detail
Aside from the laminated cotton, the inside is an old, but still fun and fresh and bright Marimekko print, and the pocket panels are some random turquoise that I had. I am not happy with the outcome of this bag. I am not happy with the pocket panel fabric I chose (the turquoise). It goes well with the other fabrics, theoretically. Made up it just looks wrong. I wish I had used a stripe. I may make another one and use this one for a gift or something else. I have more of the dotted fabric.
One great thing about this project was that I was able to utilize a skill I learned during my week away to add a cell phone pocket to the inside. Apparently, cell phone pockets have a little pleat in them (do they all??). While I don’t know if I would put my cell phone in this bag, I might if my jacket pockets are full of other things. The pocket might also be useful for a Nano, or other small electronic devices. It is definitely a pocket I will use in other bags, mostly because it is cool to make and I feel proud of myself for learning to do it.
After I made this bag and looked at the seven (yes, SEVEN) hanging on my workroom door, I started to wonder if I was giving up quilts and moving on to other accessories? I don’t think so, but the speed with which I can churn out a bag is very attractive and very fulfilling. I will have to put some block making on my agenda for the rest of this long weekend.
Most of you have probably heard about oilcloth recently. Anna Maria Horner has some as does Michael Miller and many other designers. While on my week away, I bought some dotted oilcloth designed/produced by Michael Miller from the Quilting Loft.
I don’t have a very strong garment sewing background and part of my tote bag adventure is learning to construct 3D objects. As a result, I have never used anything like oilcloth before, except for the tablecloth vinyl. Some issues I ran into were:
What scissors to use: if used my good sewing scissors, would the oilcloth dull the blades?
What foot do I use? Will I need the roller foot?
The directions I found said press on low heat. What is low heat? Testing required, I suppose.
What thread should I use?
Will the oilcloth play nicely with the regular cotton?
As I may have mentioned I have wanted to try the oilcloth after carrying the Julie Bag around in the rain and trying to keep my stuff from getting soaked. The bag is complete, as you can see and here is what I found.
I used my medium scissors – not my good Ginghers, but not paper scissors either. They still seem sharp.
Using a regular foot was fine. The machine had no problems feeding the oilcloth.
Pressing the oilcloth was not an option. I used the very lowest setting on my iron and the oilcloth just curled up. After I found that out, I just finger pressed. Not as good as a nice crisp seam, but it worked. When I put the floor into the bag, I pressed from the lining side.
I used regular Aurifil thread and had no issues
The cotton and the oilcloth were nice to each other. The oilcloth was not too slippery. I think I sewed mostly with the flannel-ish side against the bed of the machine, which probably helped.
Vicki posted her Field Trips in Fiber post today and she linked to Geta’s blog. Geta is like me and does bags over and I over. I loved her fabric combinations. I am not sure if she created her own design or not. Very cool bags!
This is the Chubby Charmer. Two of my friends, Maureen and Terri both had bags made from this pattern and I admired their shape and size. On my week away, I made one.
This is a BIG bag. I could fit my 3YO nephew in this bag! I didn’t realize the size in relation to my size until it was finished. I like it and will probably use it to carry stuff up and down the stairs in the house, or perhaps out to the car. I can imagine it would be useful for carrying packages out to the car to take to the post office.
I don’t think it will be great for carrying around on a general basis, because it might get really dirty and I am not sure about the washability. I also think that I could easily fill it up with 30 pounds of stuff. I’ll have to make an effort not to fill it with 30 pounds of stuff.
I used a Moda pack of charm squares from approximately 2007 called Recipe for Friendship by Mary Engelbreit to make the outside of the bag. There weren’t quite enough so TFQ threw in a few from the more recent Snippets collection. We agonized a bit, but not too much and then I began sewing them together.
Side oneSide two
One of the things I liked about this pattern is that it is specifically designed for the Moda Charm Packs. I don’t know if other companies make 5″ charm packs. I assume some do. It is very easy to cut your own 5″ squares out of your favorite fabrics. If I were going to use my own fabrics, I think I would collect 5″ squares as I cut fabrics for other projects.
I was putting away some other charm packs I have (Figgy Pudding and Pumpkins Gone Wild), I was thinking about what else I could make from these charm packs. I don’t need to have a specific charm pack pattern; I could just sew the squares together and then cut a pattern out of that new fabric.
I also used the red and white dotted fabric (by Susie Osborne, Emmalyne’s Day of the Week line) for the handles and TFQ gave me the red fabric (Mary Lou Weideman for In the Beginning Fabrics) for the inside.
I bought a pack of fusible fleece at the same time I bought the pattern at PIQF. I found, though, that that pack didn’t have enough of the fusible fleece and I had to get more. Both the inside walls and outside walls take two layers of fusible fleece. I didn’t find that it stuck together very well afer pressing. As a result I think I would just use my leftover batting if I made this pattern again.
The pattern designer has a really cool trick for making the box bottom. The maker traces a square template (provided in pattern) on to each bottom corner. After some sewing gymnastics, which are well explained in the pattern, you end up with a line to sew across that makes the box bottom. Very easy and no box bottom guessing. TFQ came across a similar trick in the Jane Market tote by Posie Gets Cosy. We tried to find the ratios of squares to front panels so we could try it ourselves on our own designs, but haven’t yet been successful.
I realized that one of the reasons I like making the same tote bag pattern over and over is that I am trying to understand it. I want to understand it so I can change the pattern to suit my needs and also incorporate the techniques into my own design bag of tricks.
Completed Bag, Nov. 2009
The Anna Maria Horner Multi-tasker tote is no exception. As I mentioned in a previous post, I love the way this tote goes together. Above is my completed Multi-tasker tote #2. This will be a gift for a friend of mine. I used Lonni Rossi’s new fabric line in the black and white colorway. You can buy them at Back Porch if you want some.
I used a FQ pack and had to piece some of the fabrics together to make them large enough to fit the pattern pieces. The pattern calls for more yardage than an FQ pack, however I only had a FQ pack of the fabrics and am always up for a challenge.
Nov. AMMTT in progressBernina Bliss
I always enjoy using TFQ’s Bernina 1230. It is a tough little machine that has never really given me any problems. Now I know how to wind the bobbin and rethread. TFQ better watch out or I’ll just take it over! 😉
It doesn’t have the bells and whistles that mine does (I miss the auto needle up button!), but it does bags very well. I also like the button holer.
I always have a tough time maneuvering the fabric through the sewing machine as the layers increase. Towards the end of the process I was sewing through about 8 layers of fabric or seams or interfacing. I found that TFQ’s machine was powered right through with no grunts, groans or complaints.
Nov. Tote, detail
The pattern doesn’t call for as much interfacing as I put in, but I like my bags to have some body, so I put interfacing on the exterior and lining pieces. I omitted it from the pocket panels.
I am pretty pleased with how it came out and hope my friend is as well. I am going to size this pattern down so it fits me better. If it doesn’t work, then I probably won’t make anymore of these totes, despite the great way they go together.
I got the directions for making this little bag, just with folding an sewing from Maeda Trading Company at PIQF 2009.
They sold squares of fabric so you could make this little bag right away. Of course, a person could also use their own fabric with no problem.
Mine looks a little weird, because I didn’t have enough of the right ribbon to make this work. I thought about using these types of bags as another kind fo gift bag.
Friday was a busy day, of which the crowning glory was a trip to buy wine as a gift. I bought the wine and laid the bags (small paper wine bags inside a doubled plastic grocery bag) in the trunk for the trip home. I don’t know why I didn’t bring my own bags into the store, especially since two of which were right there in the trunk. If I had, we may not be having this conversation right now.
Just before I closed the trunk I thought what a hideous wrapping that collection of bags was. Please note that I do not wrap gifts with paper. I avoid it at all costs. Once in a blue moon, if there is some good reason why I must, I will struggle through the process. Imagine a small person who has rumpled gift wrap all over the room, tape covering her hands, face and legs, a sore back and who is fuming with rage. That is me. I sincerely dislike wrapping gifts with paper. I remembered a pattern I had copied from the Bag Bazaar: 25 Stylish Bags to Sew in an Afternoon by Megan Avery for a wine bag and thought I would make a couple for the bottles.
I dutifully read through the directions, which made no sense, as per usual. I started in on following the directions. I find that if I go slowly, I will get through the pattern. Except for this one. There were two directions that were on pages that I had not made notes from. The first one was for the handle, which said ‘make handle according to directions on page 18.” I didn’t have notes from page 18 so I made the handle like I would for the Eco-Market Tote.
After I got to the instruction for the main body of the bag, which said, something like, trace pattern from next page on cardstock or a manila folder. Since I didn’t have that page either, I went online and found a pattern for gift and wine bags so I could just get the measurement. This was an okay tactic and I used some of the directions from the online pattern. I ended up, however, essentially taking my own measurements – 12″x15″ for the outside and 11.5″x14.5″ for the lining, if you are interested. I read and sort of followed the basic overall directions in both patterns, dealing with the details myself.
Wine Bag, test mode
One of the first issues was fabric. I have no shortage of fabric, but I wanted to use something that wouldn’t kill me with boredom and would fit the decor of my friends. They have a gorgeous house that uses lots of earth tones with some forest and tree kind of accents. I have been trying to think of ways to use my beiges and this seemed like a perfect opportunity. Still, I didn’t want to hate the project.
I found a great mottled pinky-beige with gold leaves, tastefully, screenprinted over the background. Perfect! I also had a lot of it. I picked out a marbled beige and brown for the lining.
Wine Bag, detail
The directions above say to cut a piece 6″x34″. These measurements did not make sense to me. I knew that wine bottles were neither 6″ around nor 34″ tall, thus there was no way I was cutting a piece with those measurements. I got the measurements, in the end, by measuring a bottle of wine.
NOTE to designers: please give some explanation up front when you want someone to cut a piece that seems way bigger, or more oddly shaped, than needed. I am sure you have a good reason, so please let me know.
The red wine in the bag above was my test bottle. Yes, people will be mad at me for messing up their sediment process. Oh well. I was surprised to find that a wine bottle is about 11″ inches around.
I could have used the leave-a-hole-and-turn-the-bag-and-lining-right-side-out, but I didn’t feel like figuring out where the handles were supposed to go in that process. I put the whole thing together and folded the top hem down, inserted the straps and top-stitched around. It was a tight fit in my machine, but worked in the end.
I also neatly sank my knots and threads. 😉
Wine, wrapped and ready
Above are my wine bags with the actual gift wines in them and ready to go. I have to admit that I thought about the height a bit. I wondered if I should make the bag shorter so the neck of the bottle was slightly visible. In the end, I decided the gift would be more of a surprise if the height covered the entire bottle. There would also be no interference between the neck and the handle.
I realize that some of you don’t drink wine. This pattern could be easily adapted to another gift drink such as Martinelli’s Sparkling Cider, or even a bottle of soda. It might be a nice way to wrap a gift bottle during the upcoming holidays.
I decided, when I was on a recent trip, that I wanted to write a review of this bag, because it is pretty different from the others I have made from fabric.
As you can see from the picture, I packed my tote with things to do plus some tea and chocolate to tide me over. I, at least, have the following in the bag: a zipper bag of Perl cotton, a box of tea, my handwork bag, Beach Town, a magazine, a library book and ….? Not sure what else, though I think there was more.
When I made this bag, I didn’t expect to like it as much as I do. I think I mostly like that I can see into it. I can see whether I have all of my stuff as I pack it. I can also admire the stuff that I have in there. This has led me to carrying around the pencil roll Julie made me. I can see it through the bag and admire it as I go on my merry way.
I made the handles a little shorter and they work for me at that length. They are long enough to put over my shoulder and are just the right length to carry in my hand at my side.
Pen leaks, water spills and other messes are easy to clean up with paper towel and some Simply Green or a cleaning wipe. Sometimes, I can’t avoid putting the bag down in something that someone else has spilled simply because I didn’t see the mess. It also protects my stuff quite well in the rain.
I find that the bag doesn’t look dirty either.
Some of the things that I like about this bag are also disadvantages. It is great for me to be able to see inside the bag, but I don’t want other people to see my iPod or my digital camera or my cell phone, etc. I definitely cannot use this bag to hold a table at a cafe’.
Using this bag in hot weather is not recommended. It becomes very soft and pliable. I think the handles stretch if the weather becomes hot enough.
I don’t find the pockets to be particularly useful either. The plastic sticks very well to itself, thus putting things in pockets means unsticking the pocket from the bag, which doesn’t work very well in a hurry.
I would like the tote to be stiffer so it would stand up better. As it is now, it kind of folds in on itself if I don’t have it full of the right sized and shaped stuff. I can’t think of a way to make it stiffer except to put two layers of plastic together, as I can’t line it with interfacing.
I also am more aware of how much I put in it. I think that the handles might break if I fill the main compartment with too many heavy items. This isn’t, necessarily a bad thing since I shouldn’t be hauling 30 pounds of stuff around with me. I realized that I have a sense of what fabric can take, in terms of weight, but I don’t have the same sense with this vinyl.
All in all, I really like this bag. I enjoy carrying it around and find it to be a very useful shape and size.

 These are fabrics that I bought in Ferndale and the large flower print is by Martha Negley. I do love that color, a reddish pink tending towards salmon. It is a cheerful color.
 I like to make the inside of the bag a light color, so I can see what is hiding inside the bag. I really like that dot fabric! I got some a long time ago with a chartreuse-y / olive background. This colorway works very well for the inside of a bag.