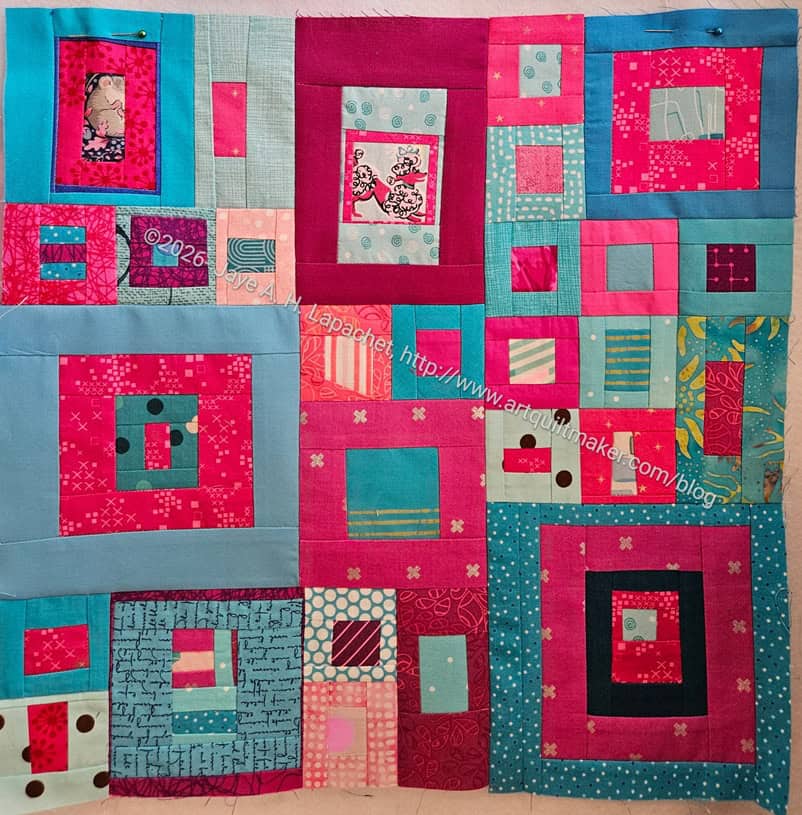
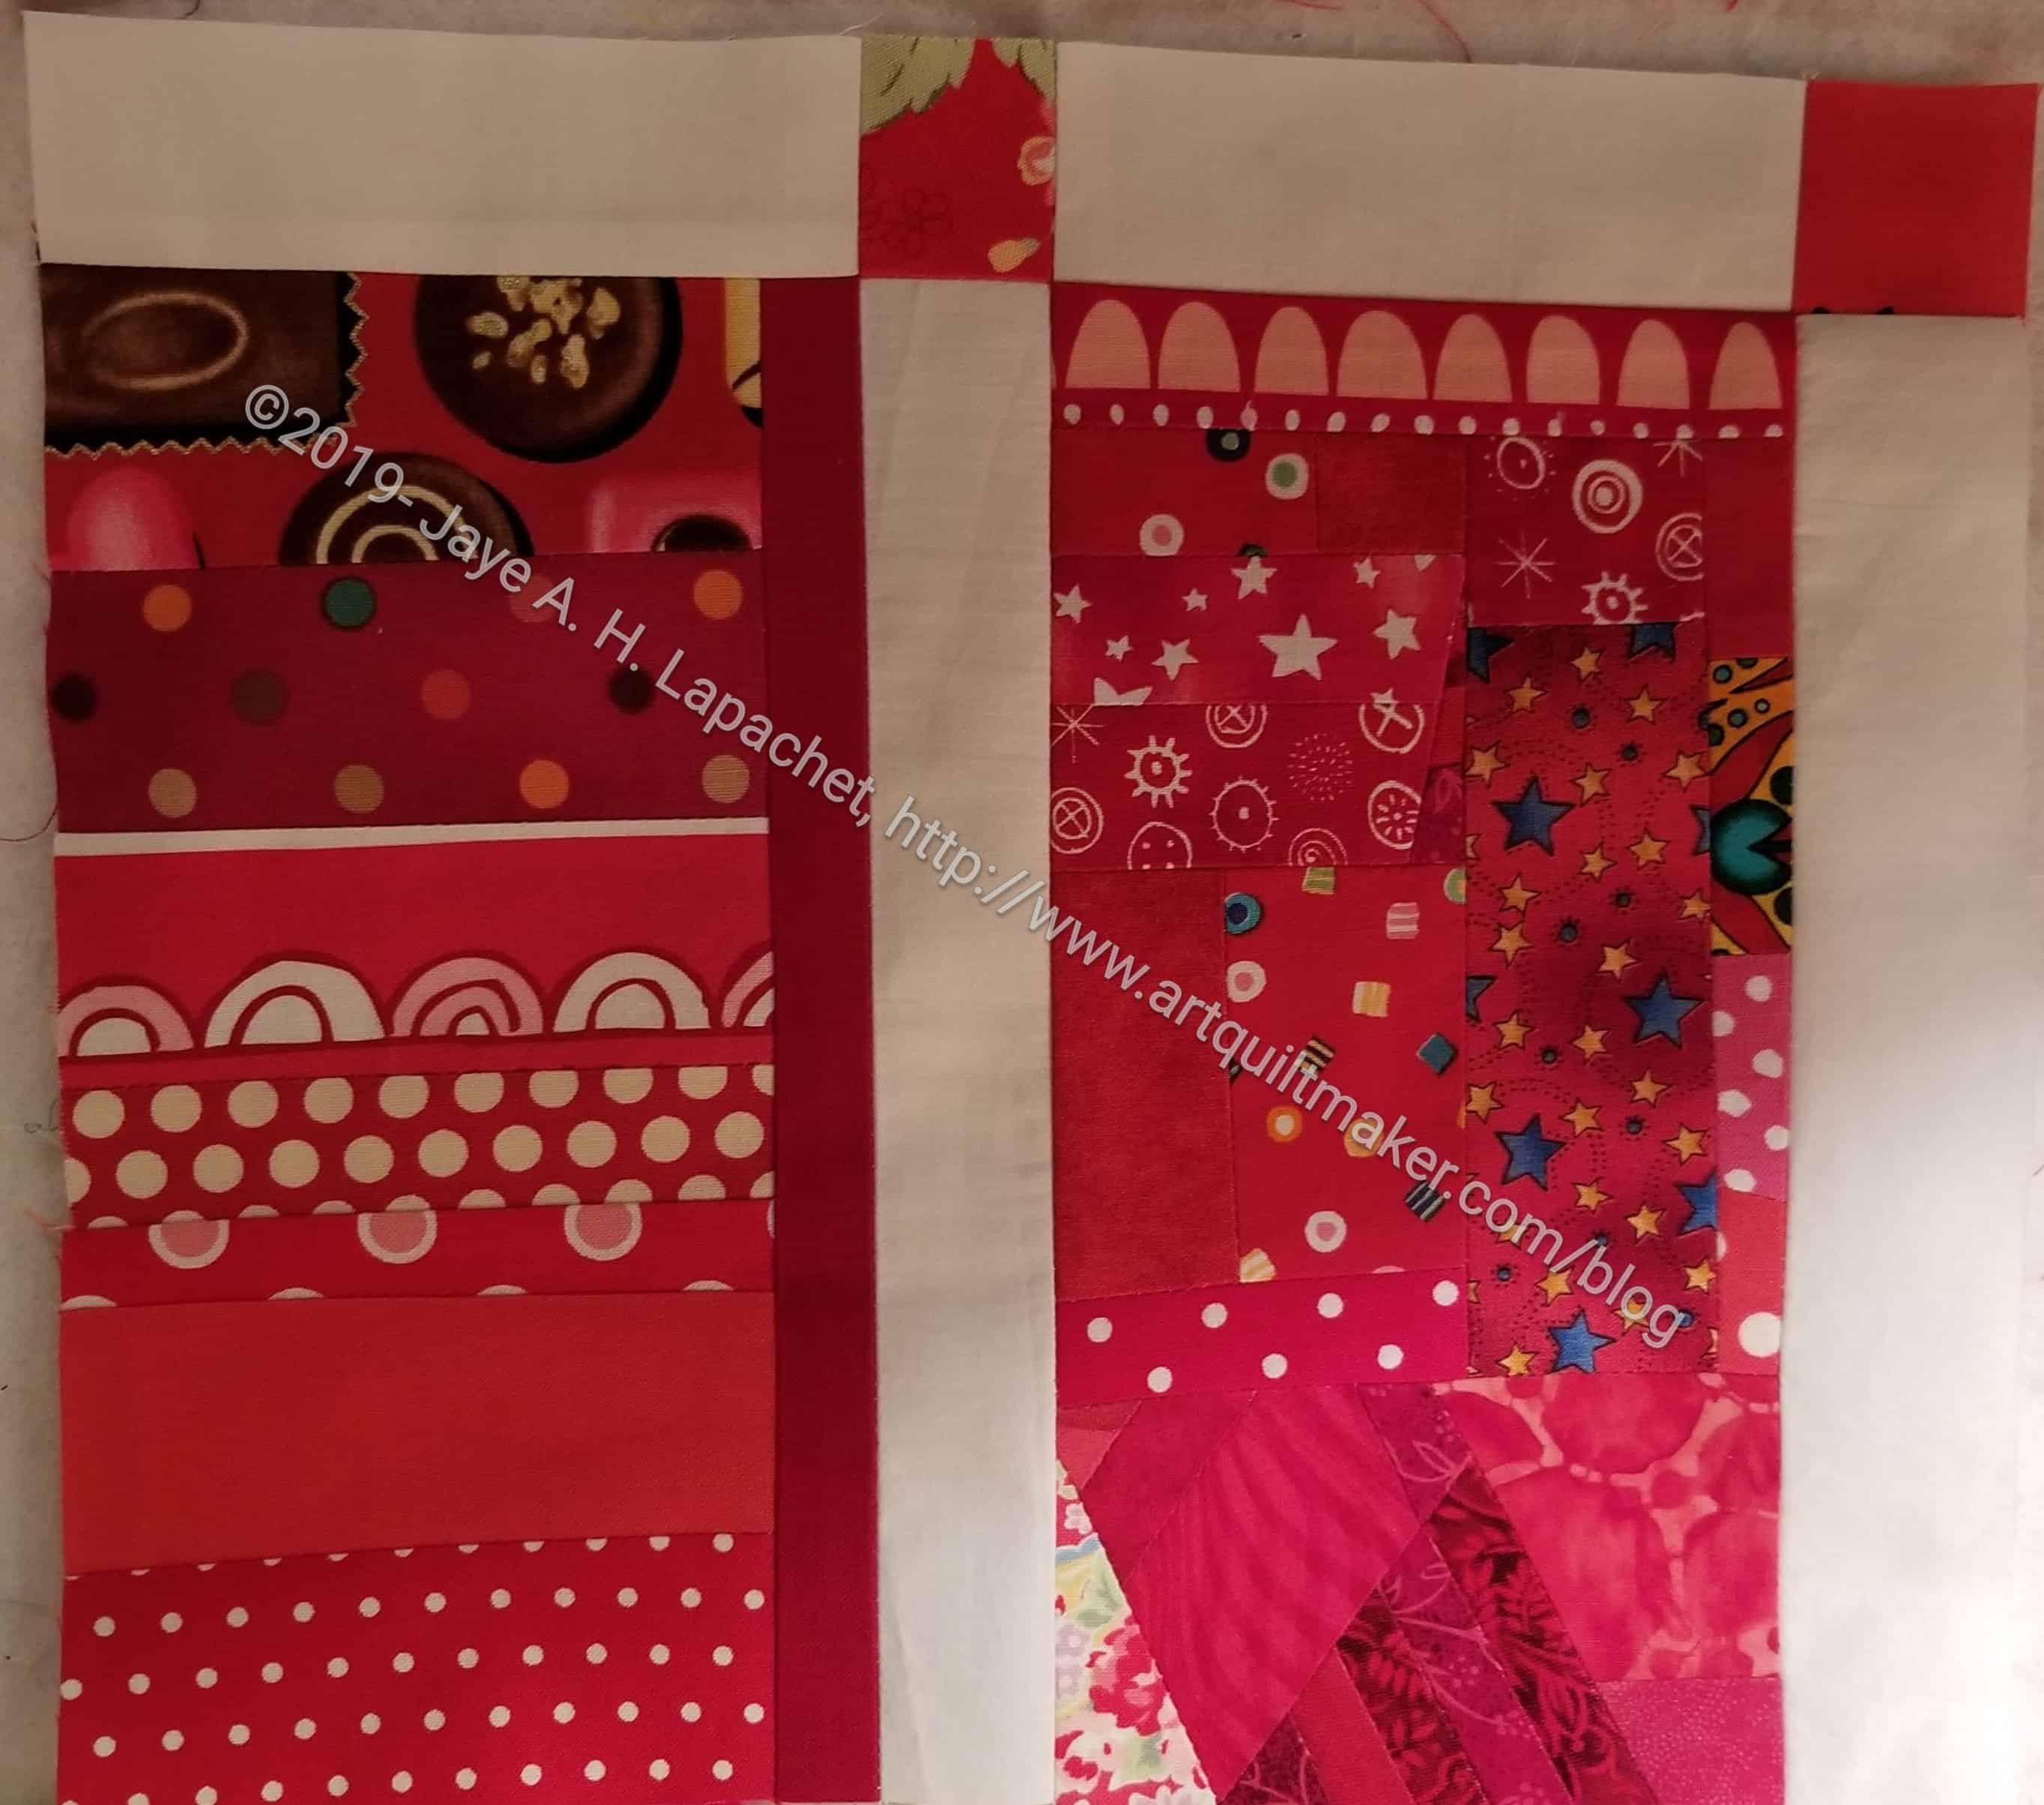
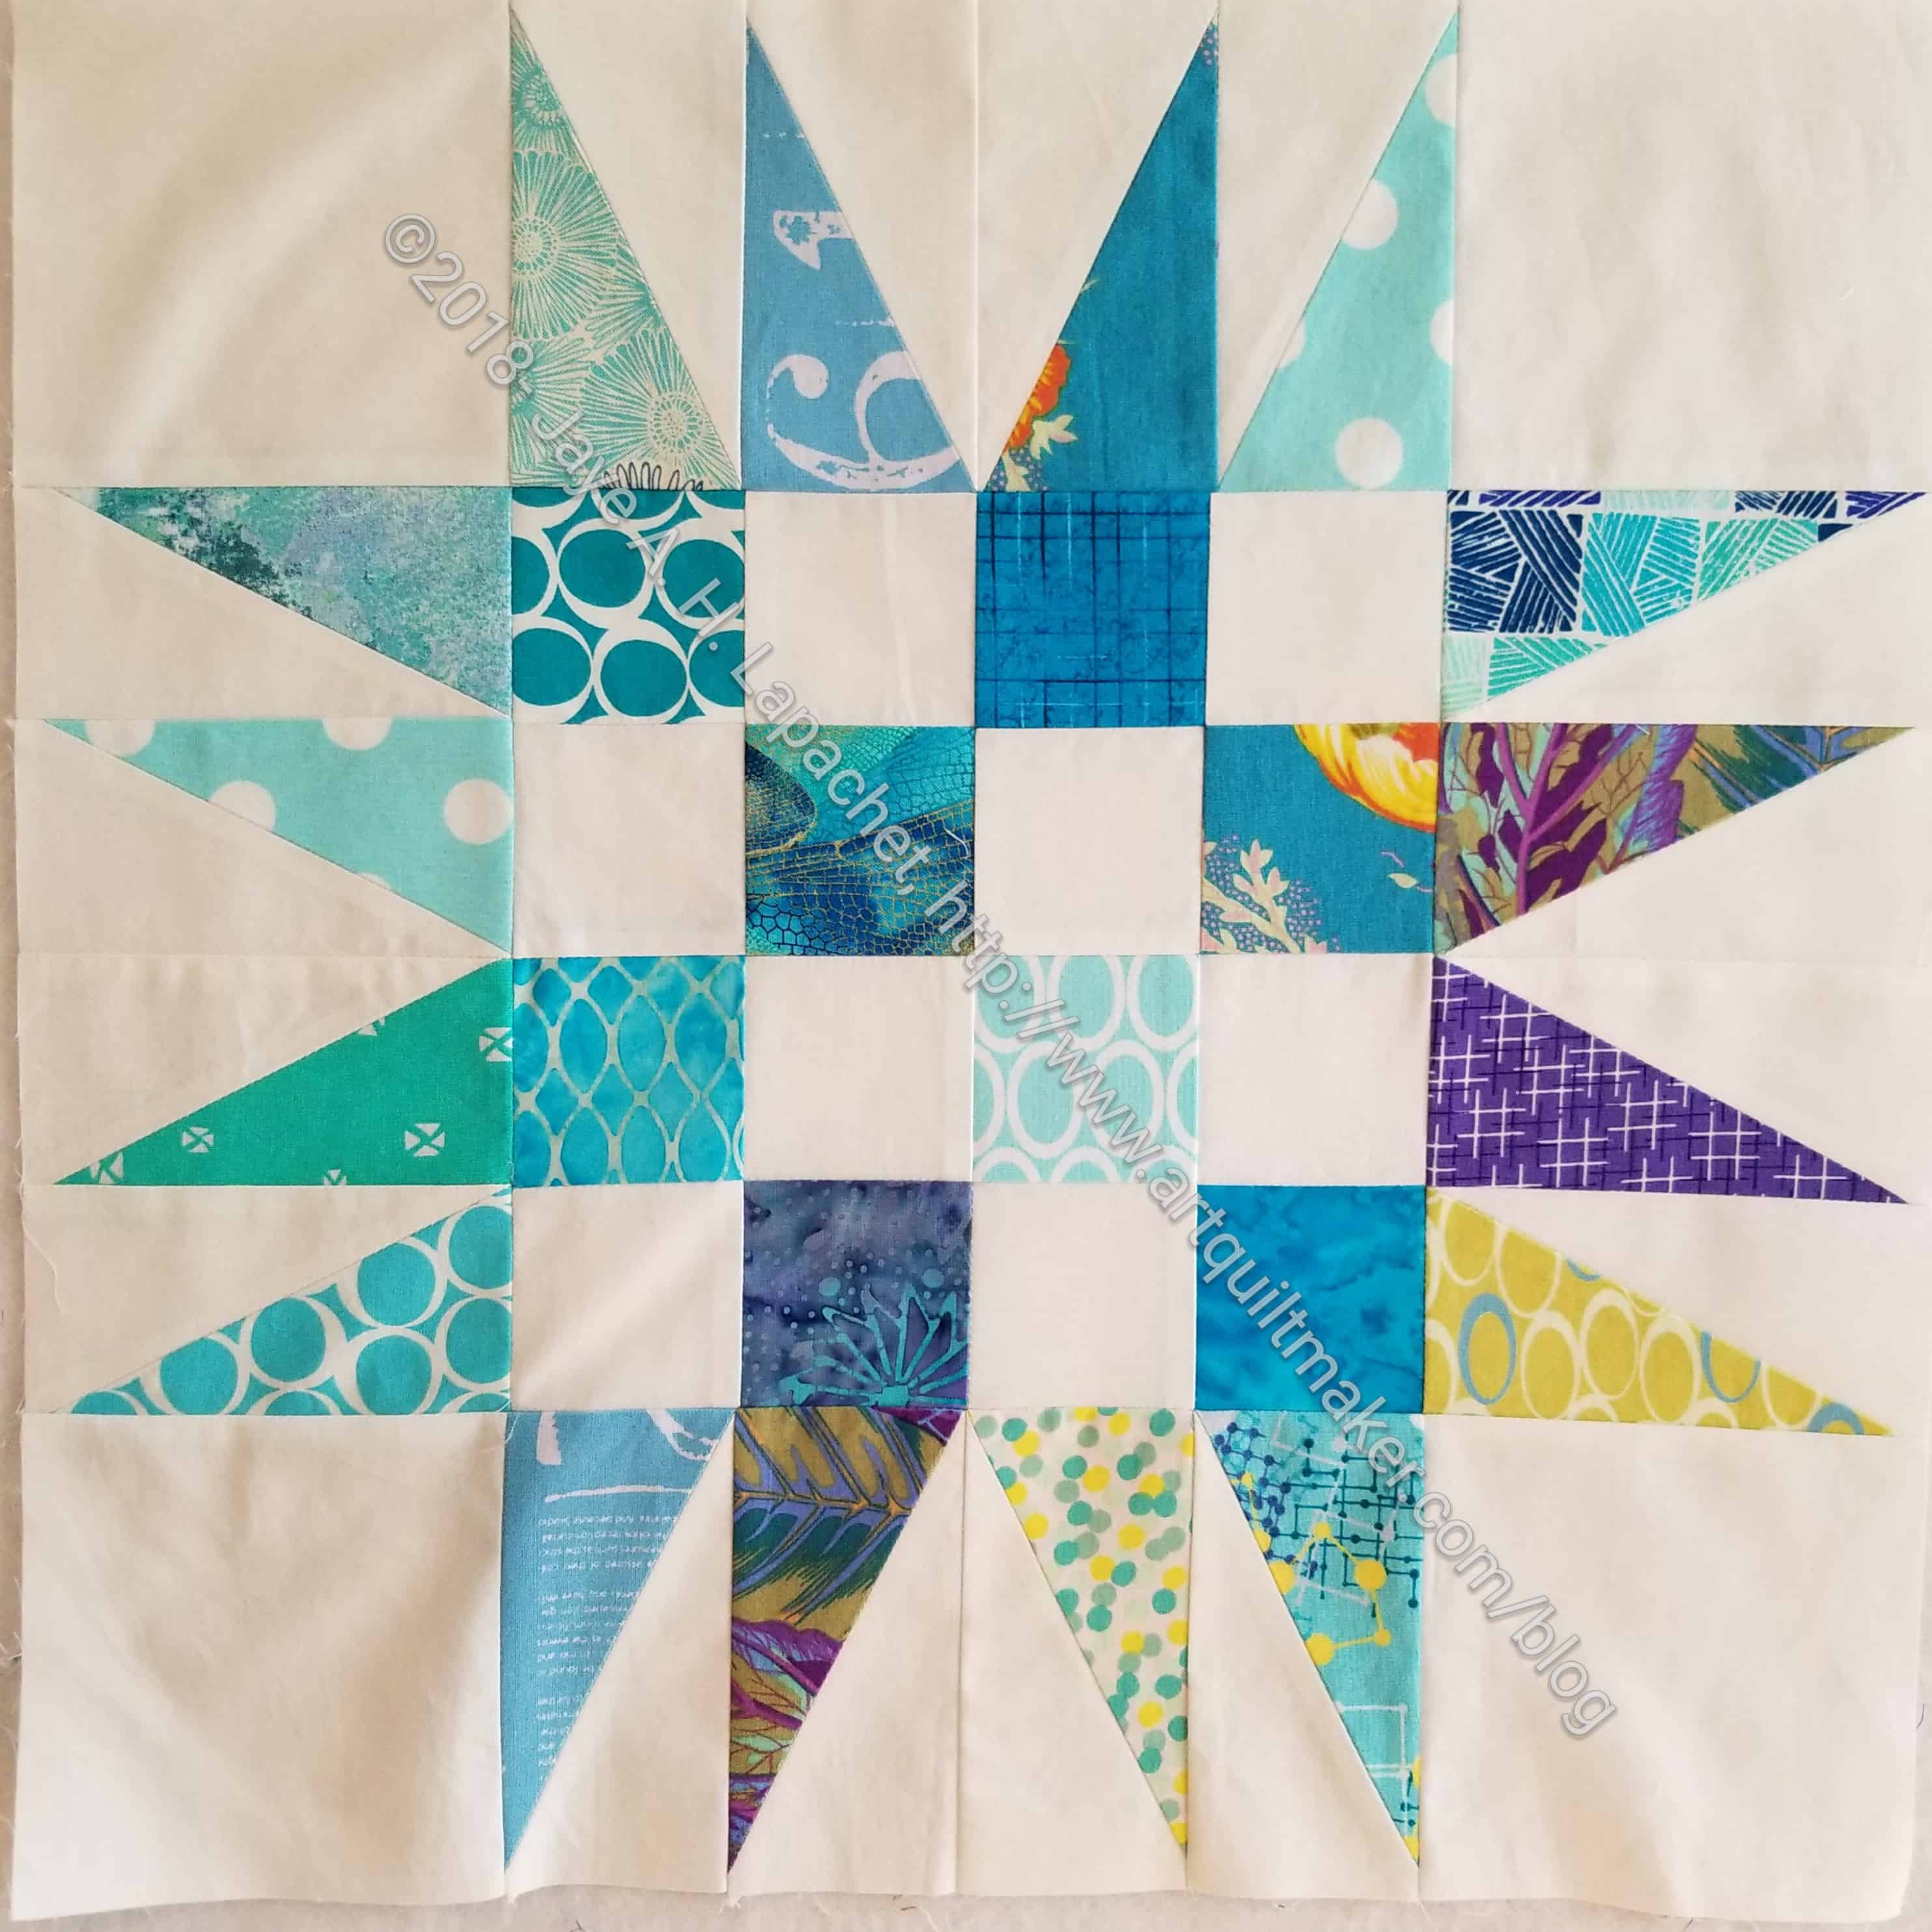
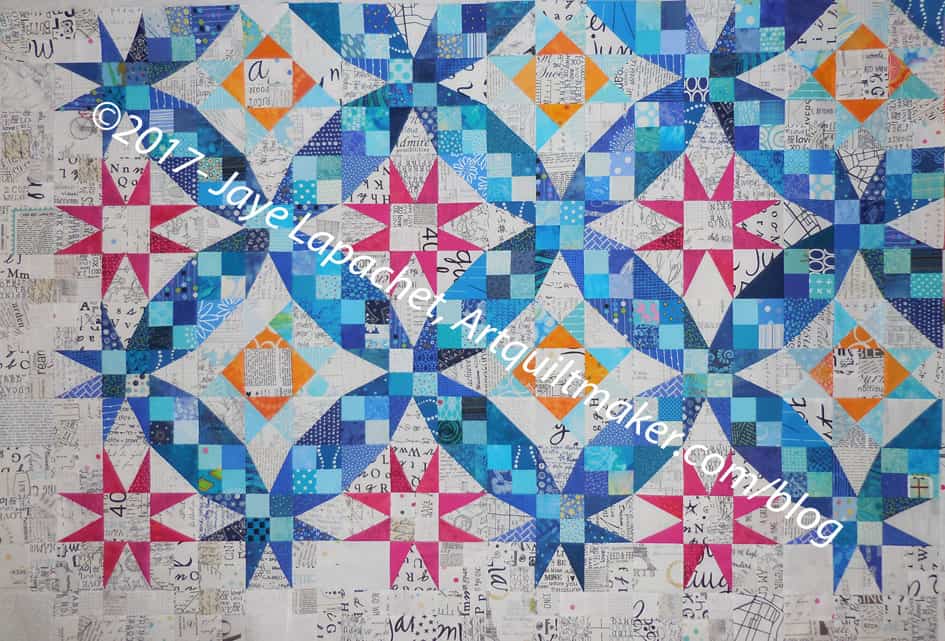
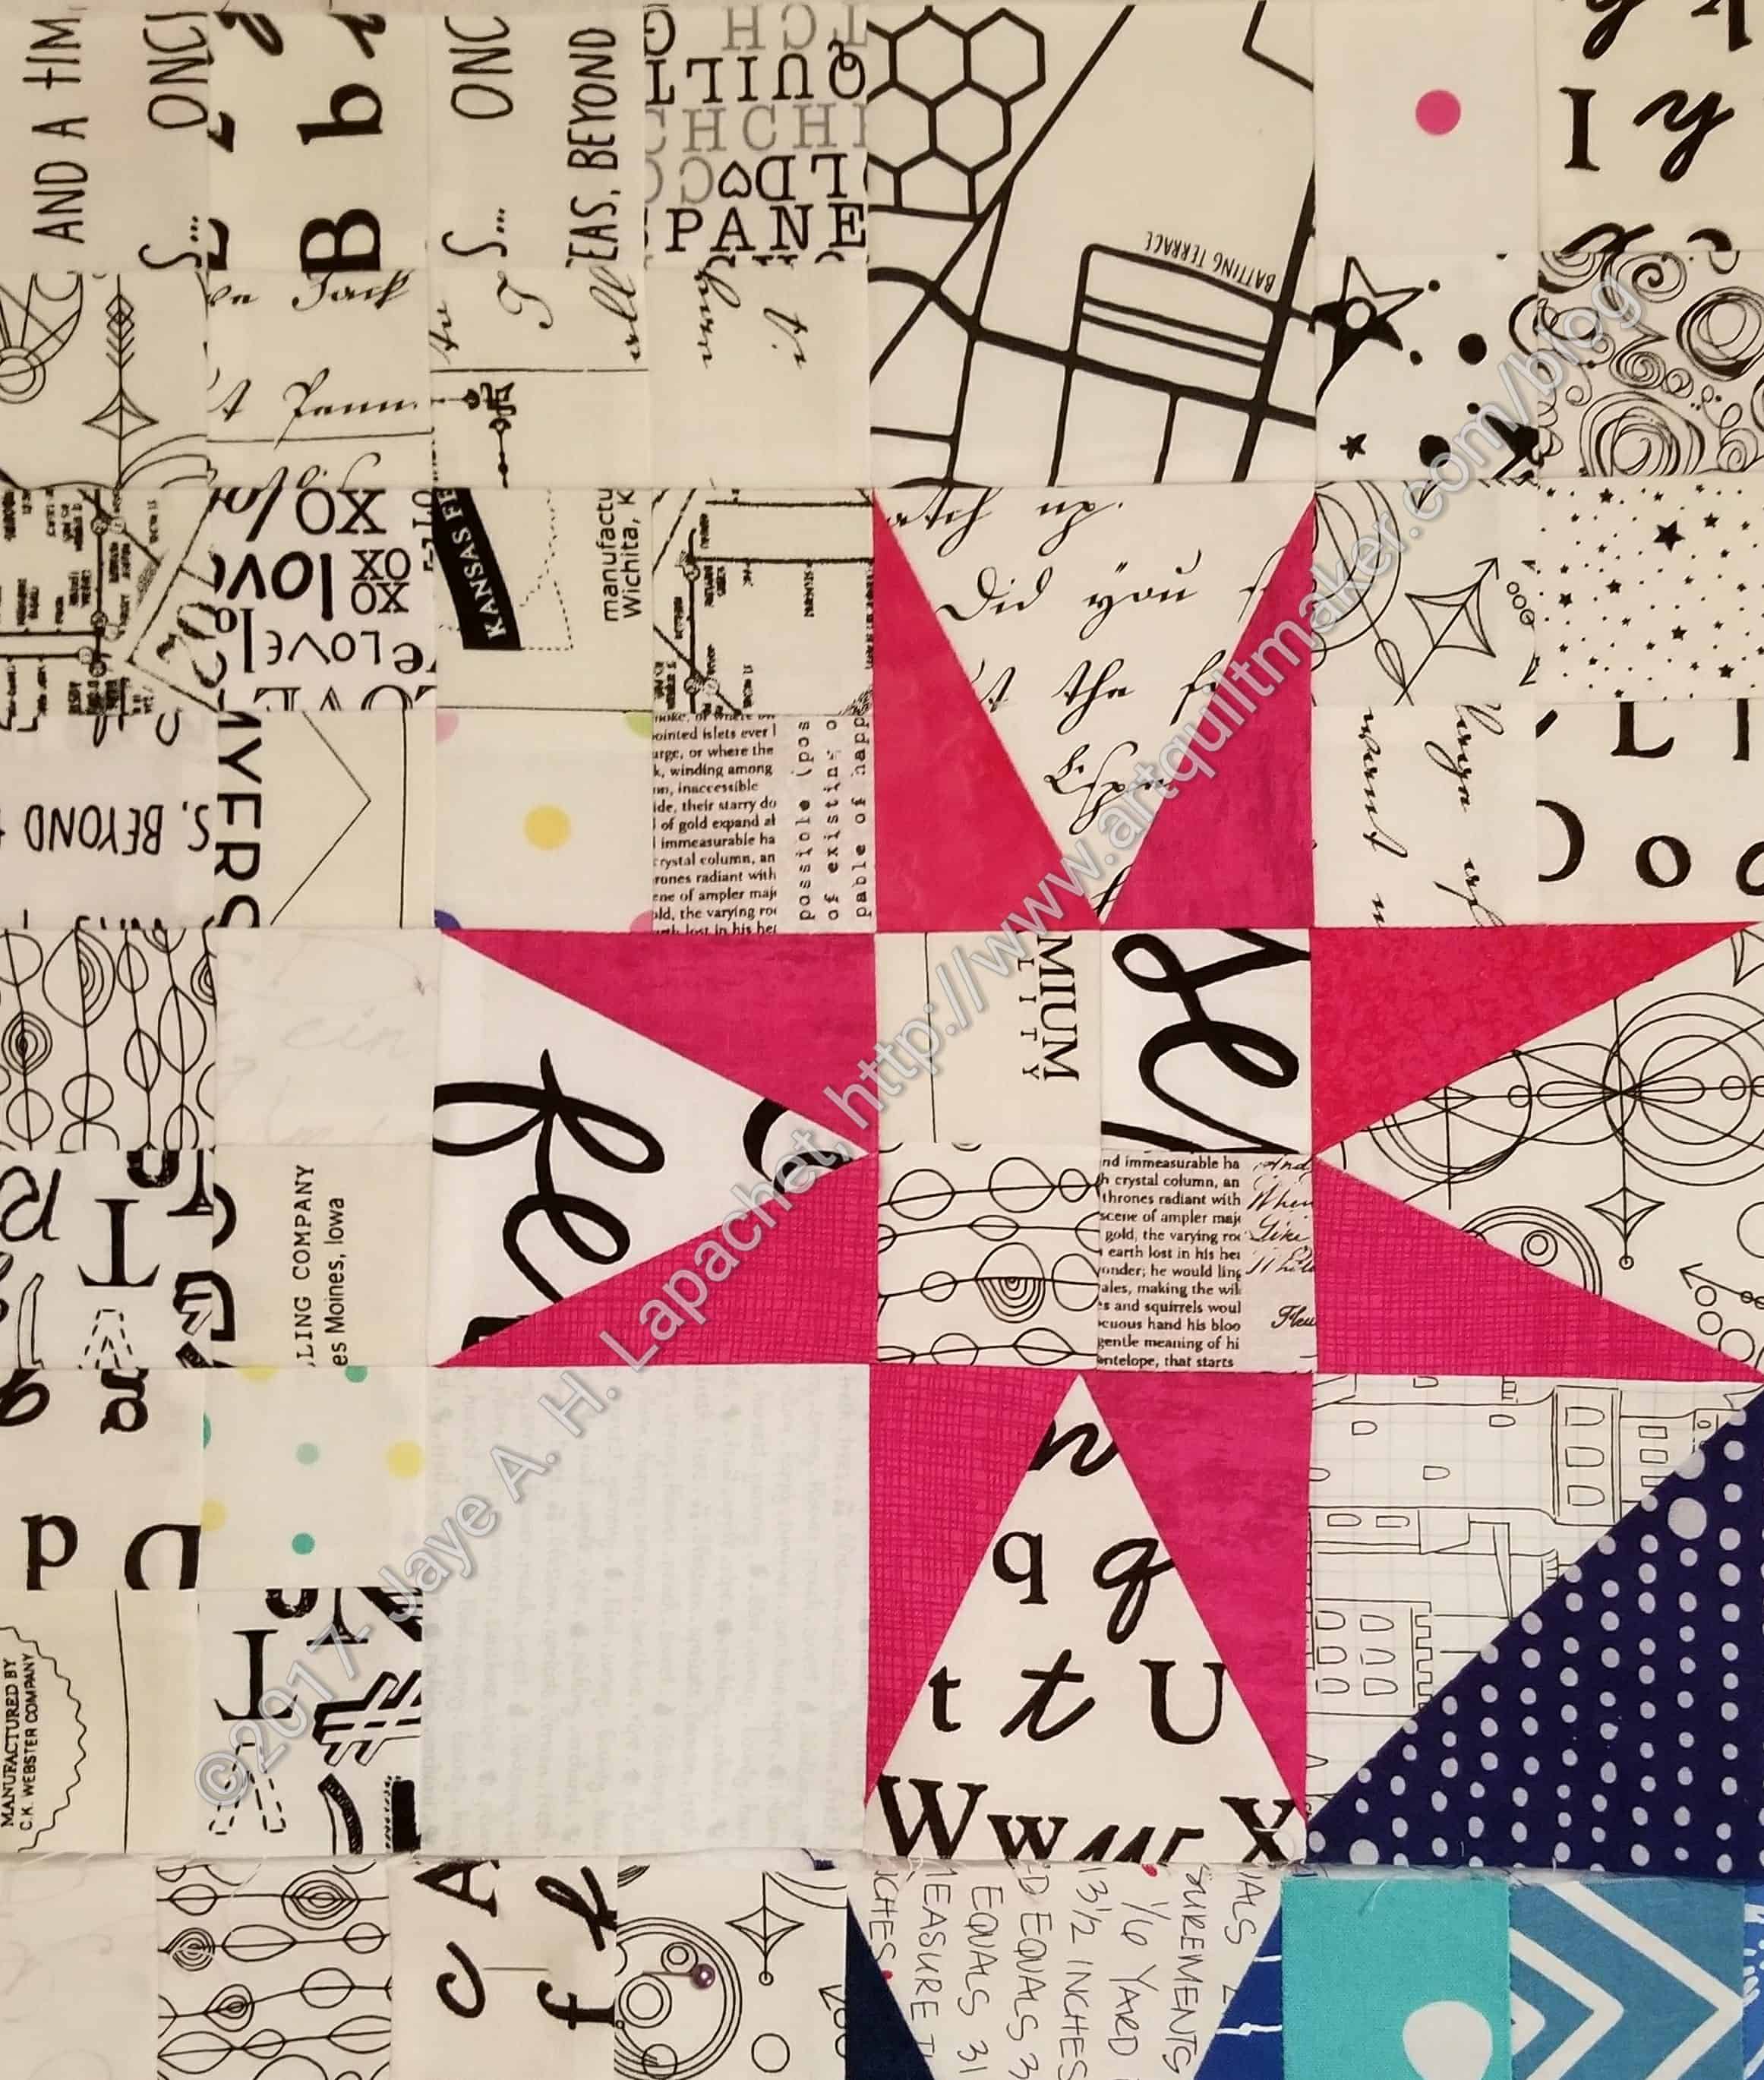
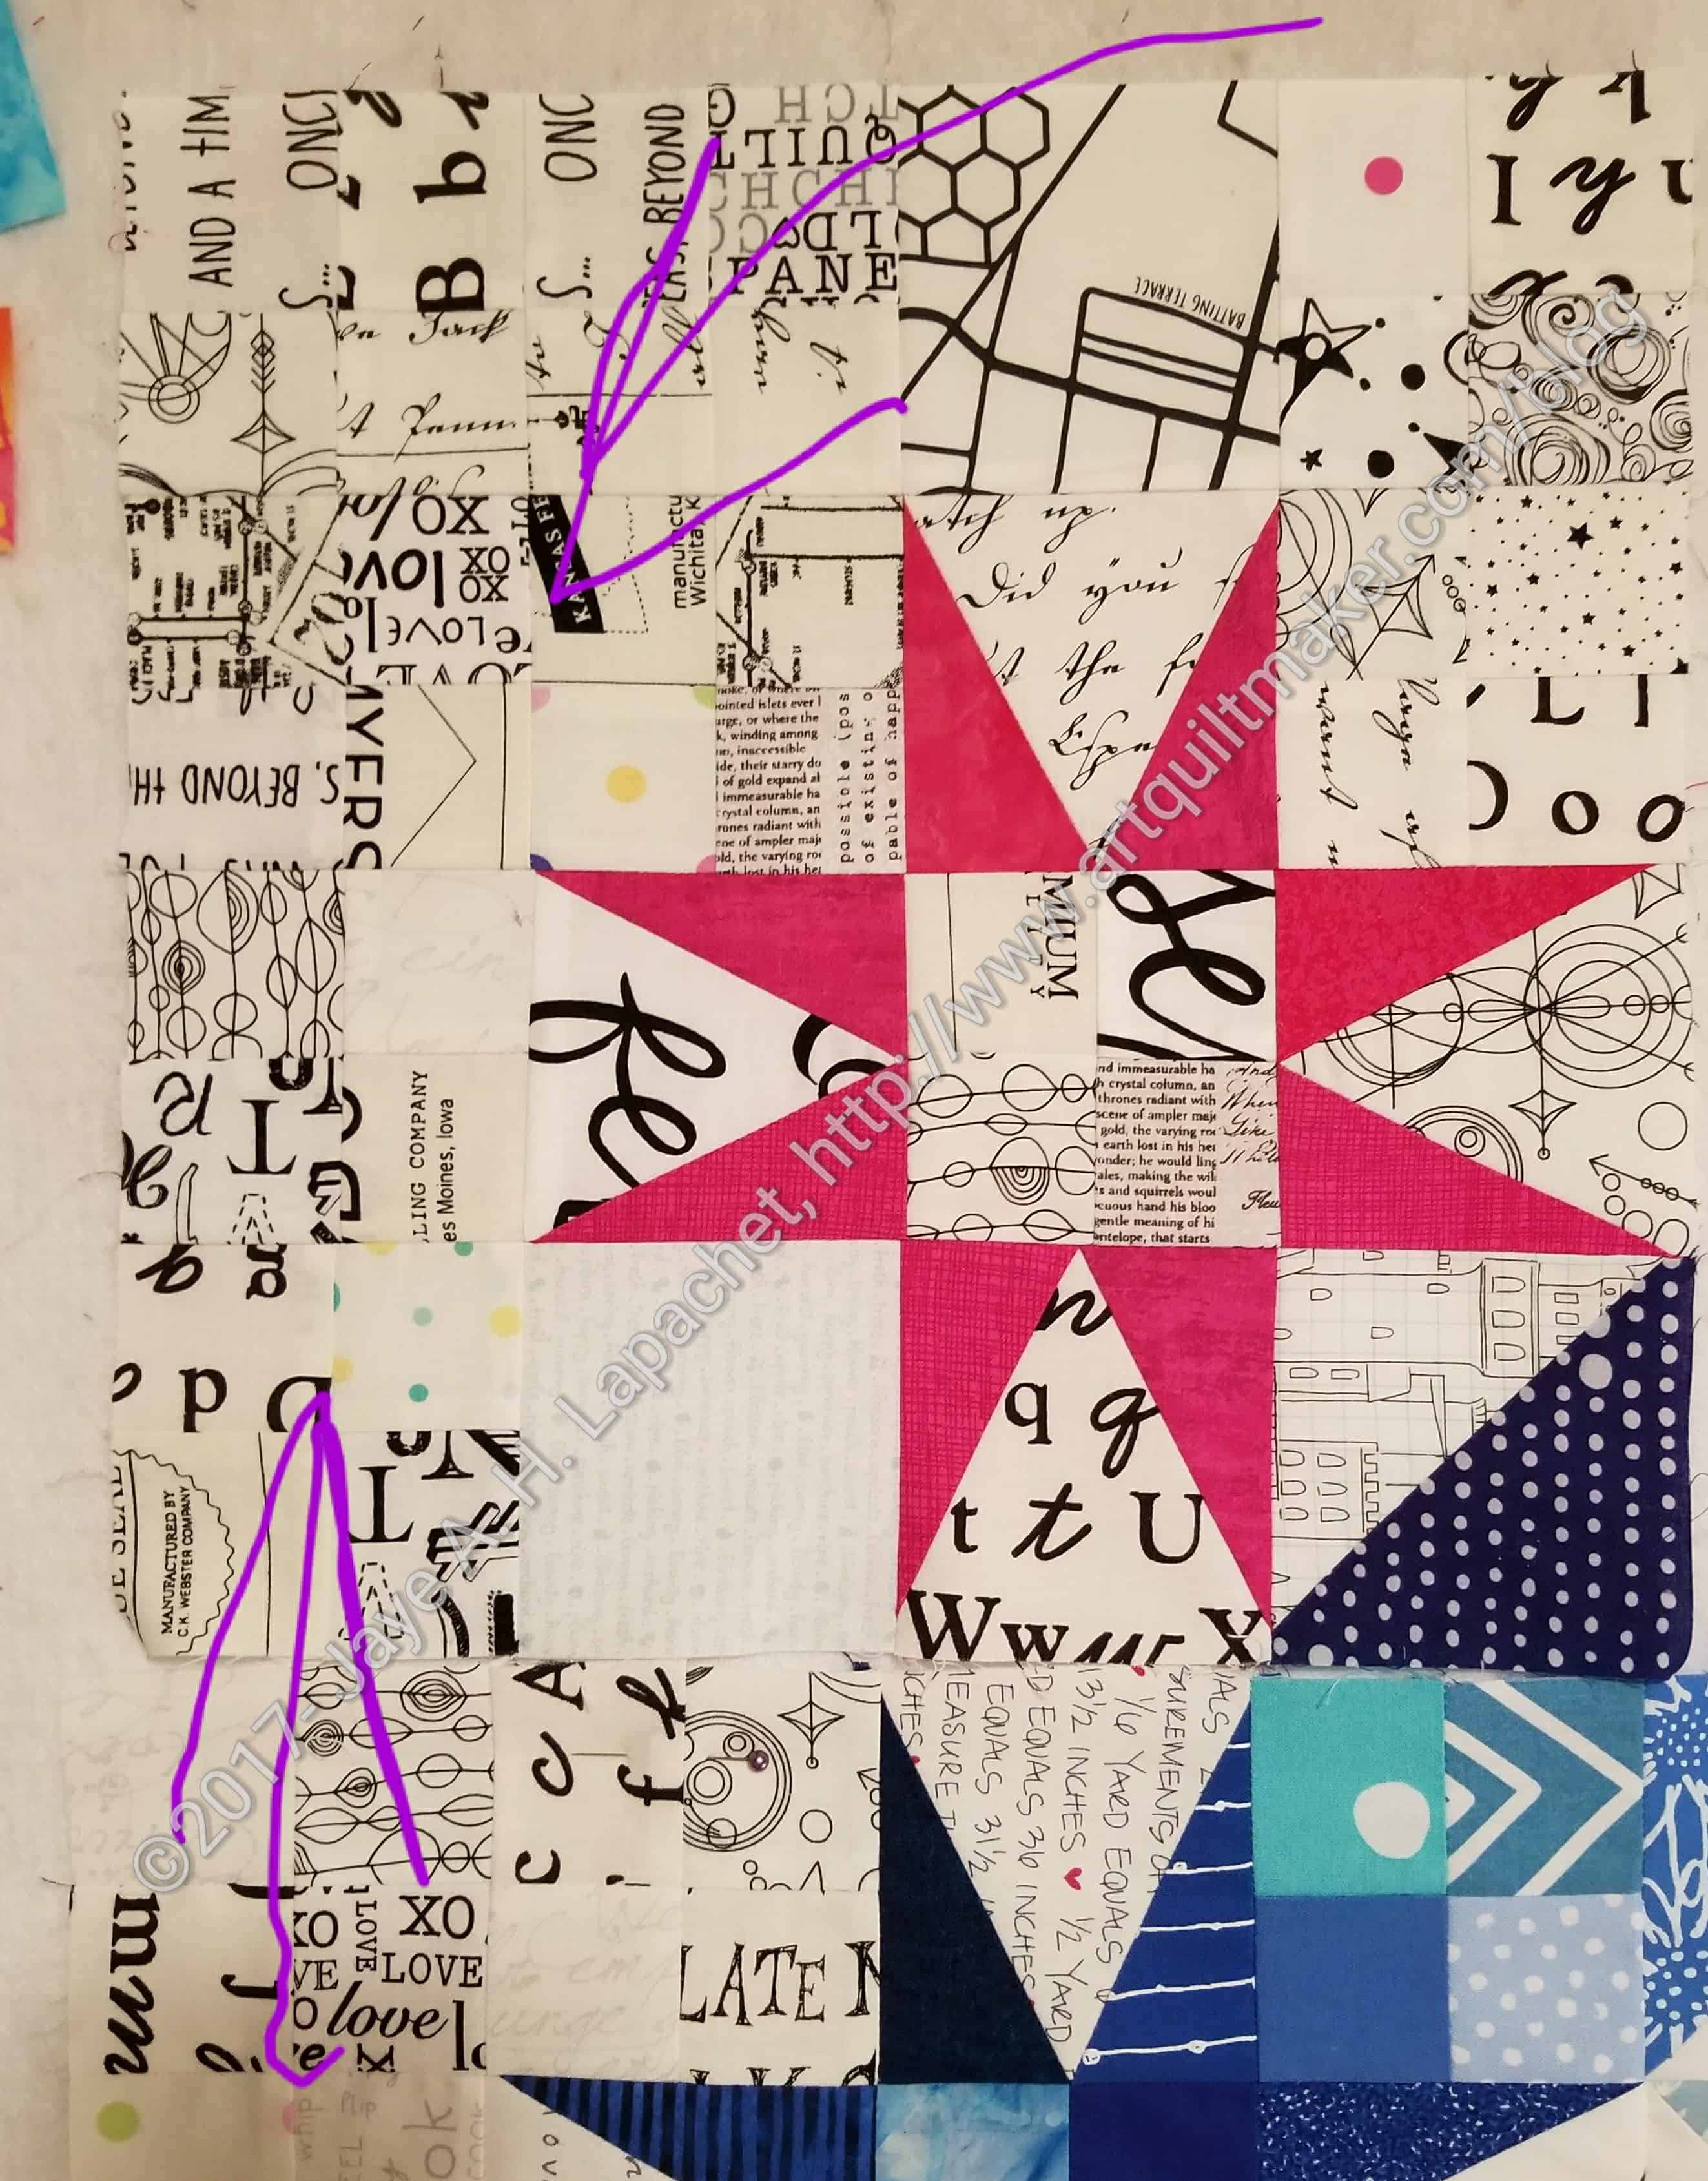
I sewed a chunk of the 1-2-3 Mosaic table runner together. I think it looks great.
I wasn’t 100% convinced that the project was going to work out when I saw it on the design wall. After sewing this bit together, I am much more optimistic.
I think it looks a lot better sewn together.
I sewed it in between sewing all the other things on which I am working, but it still went together pretty fast. I’ll know soon if I need more blocks.
I am glad I didn’t make it wider as it will be the right width for the buffet when I put a facing on it.
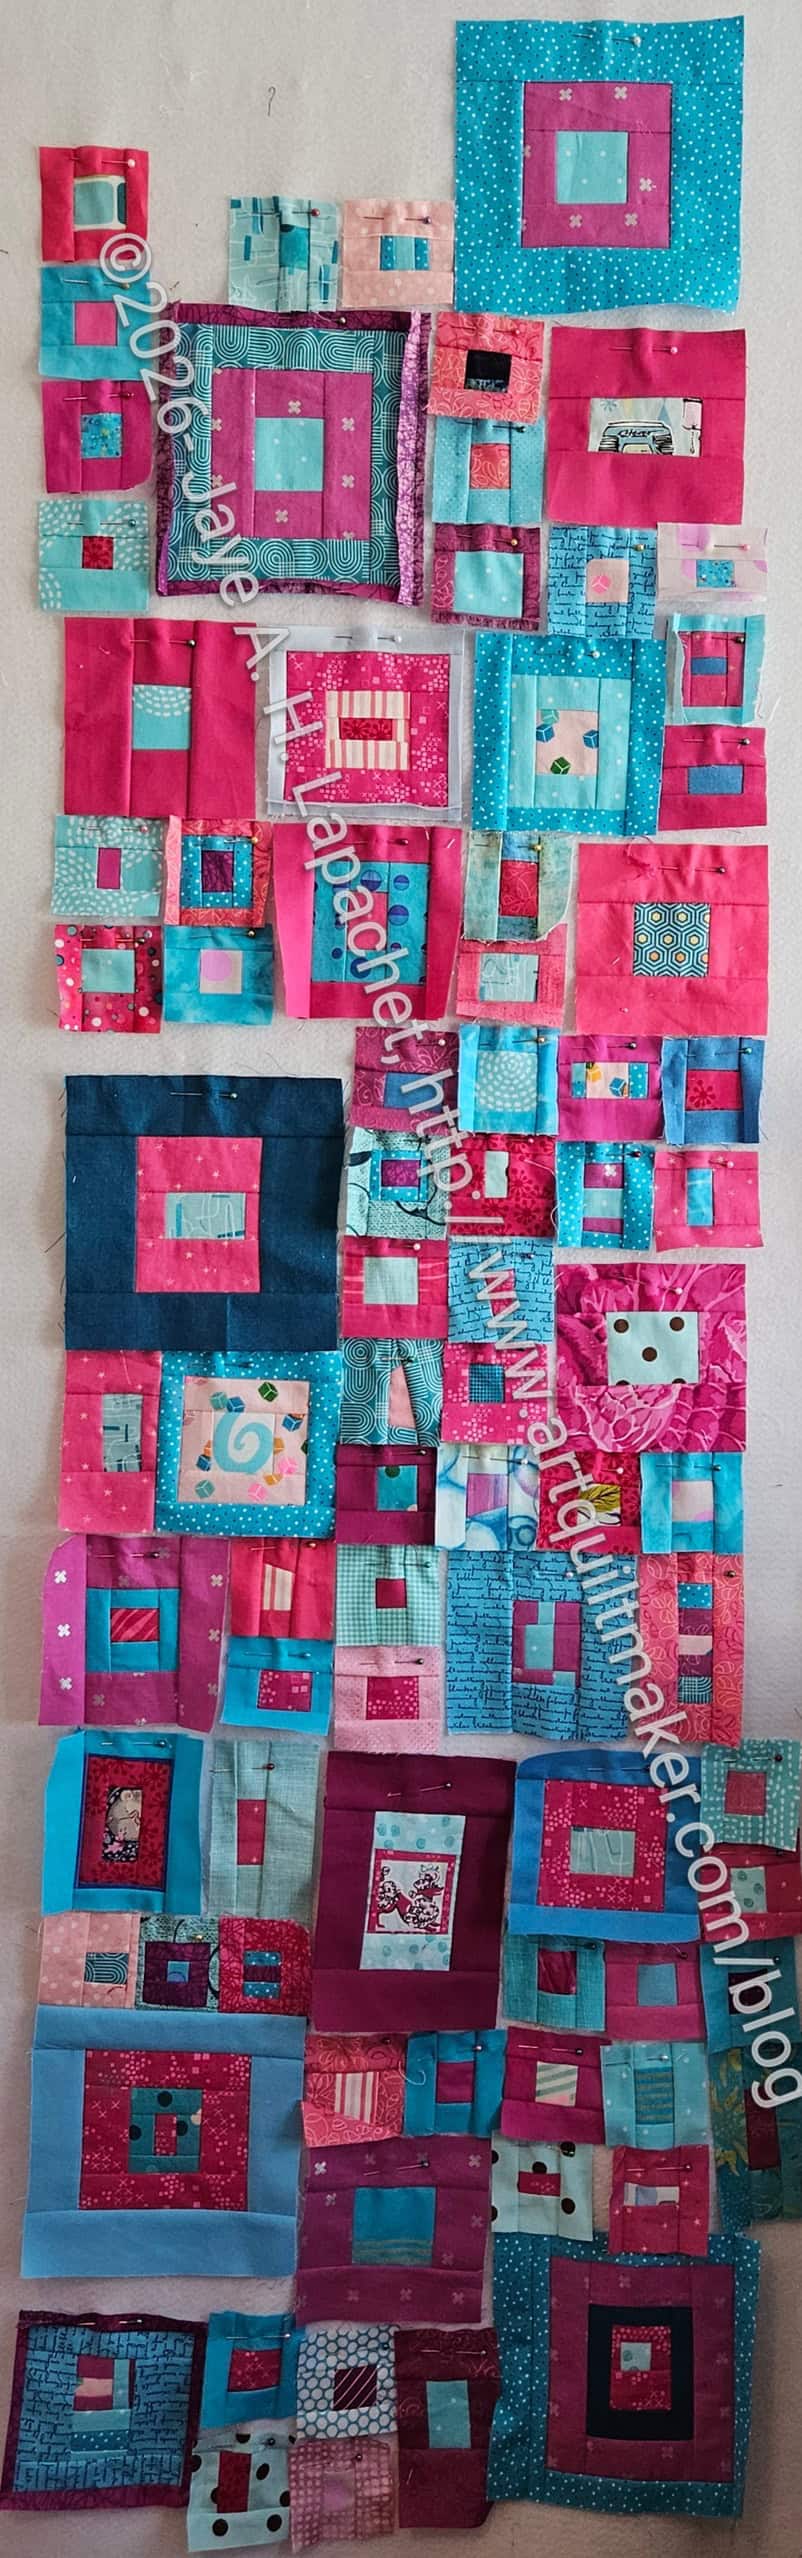
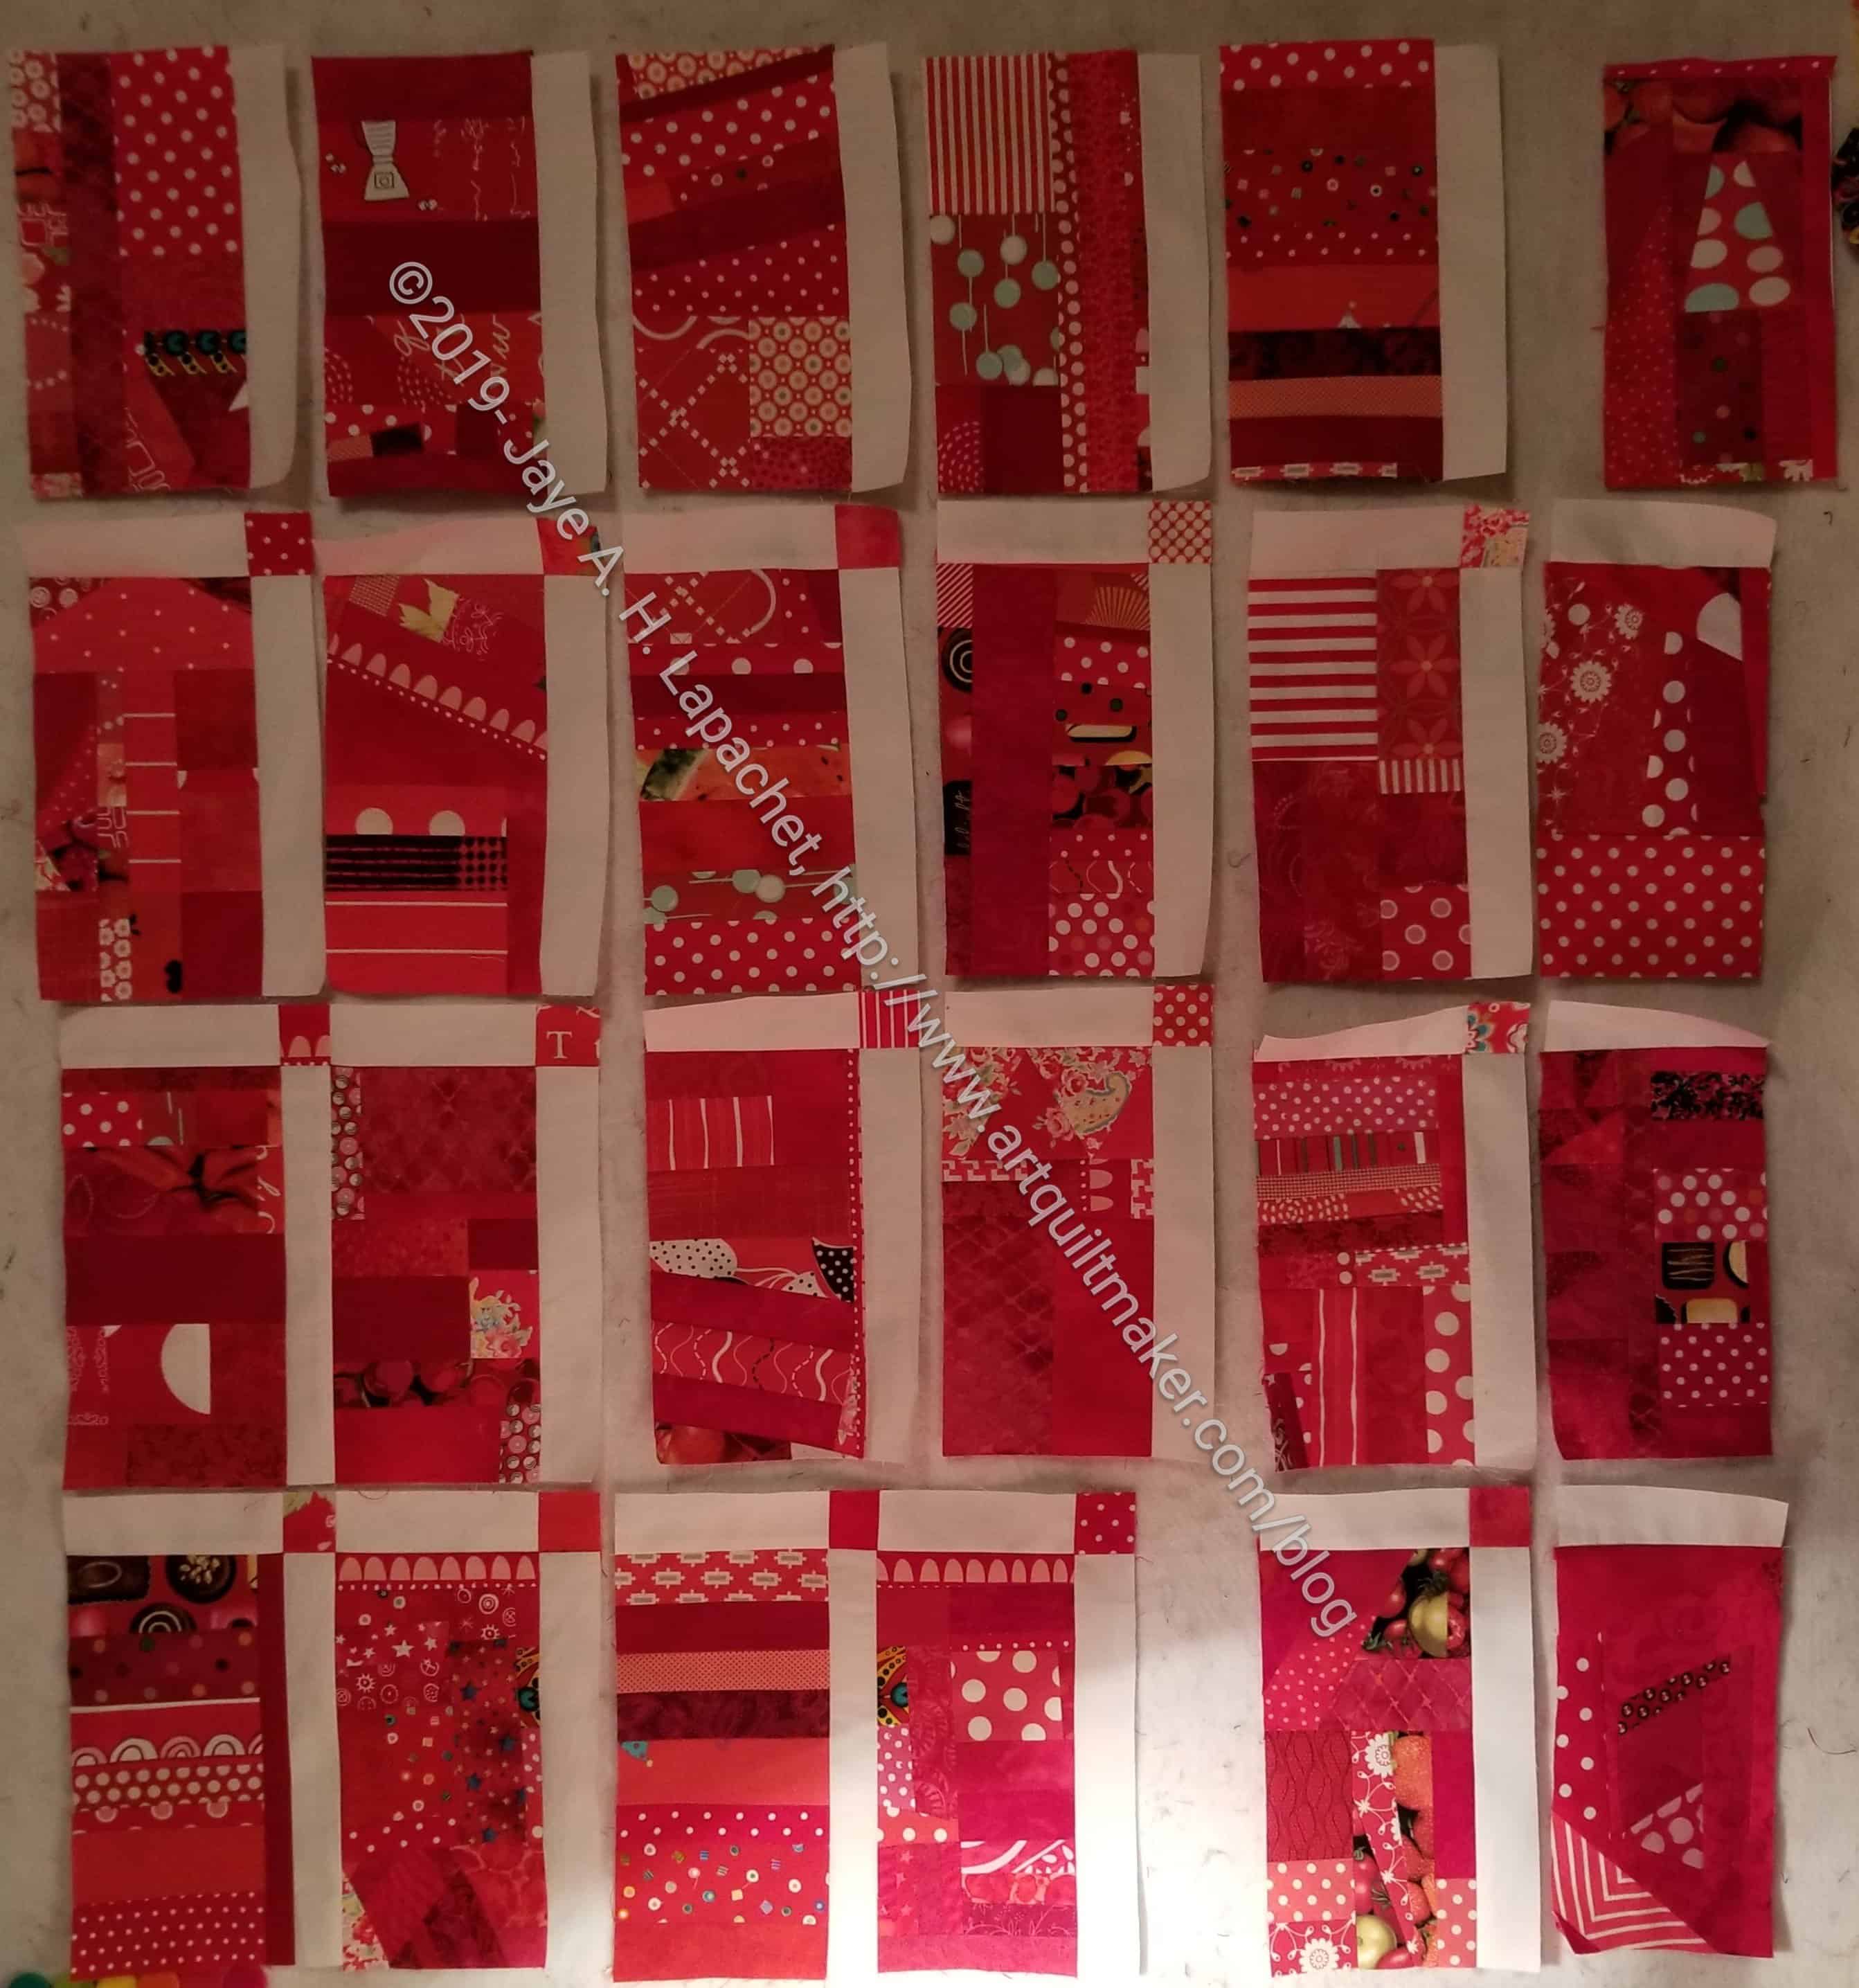
I spent the other day prepping about 20 blocks for the 1-2-3 Mosaic table runner. I want to get this off the design wall and it won’t happen magically.
I felt like I needed some additional blue blocks so I concentrated on those. Not all of the 20 came out the correct size so some went back on the board waiting for another round of fabric. I made enough of them to feel like I am nearing the finish line.
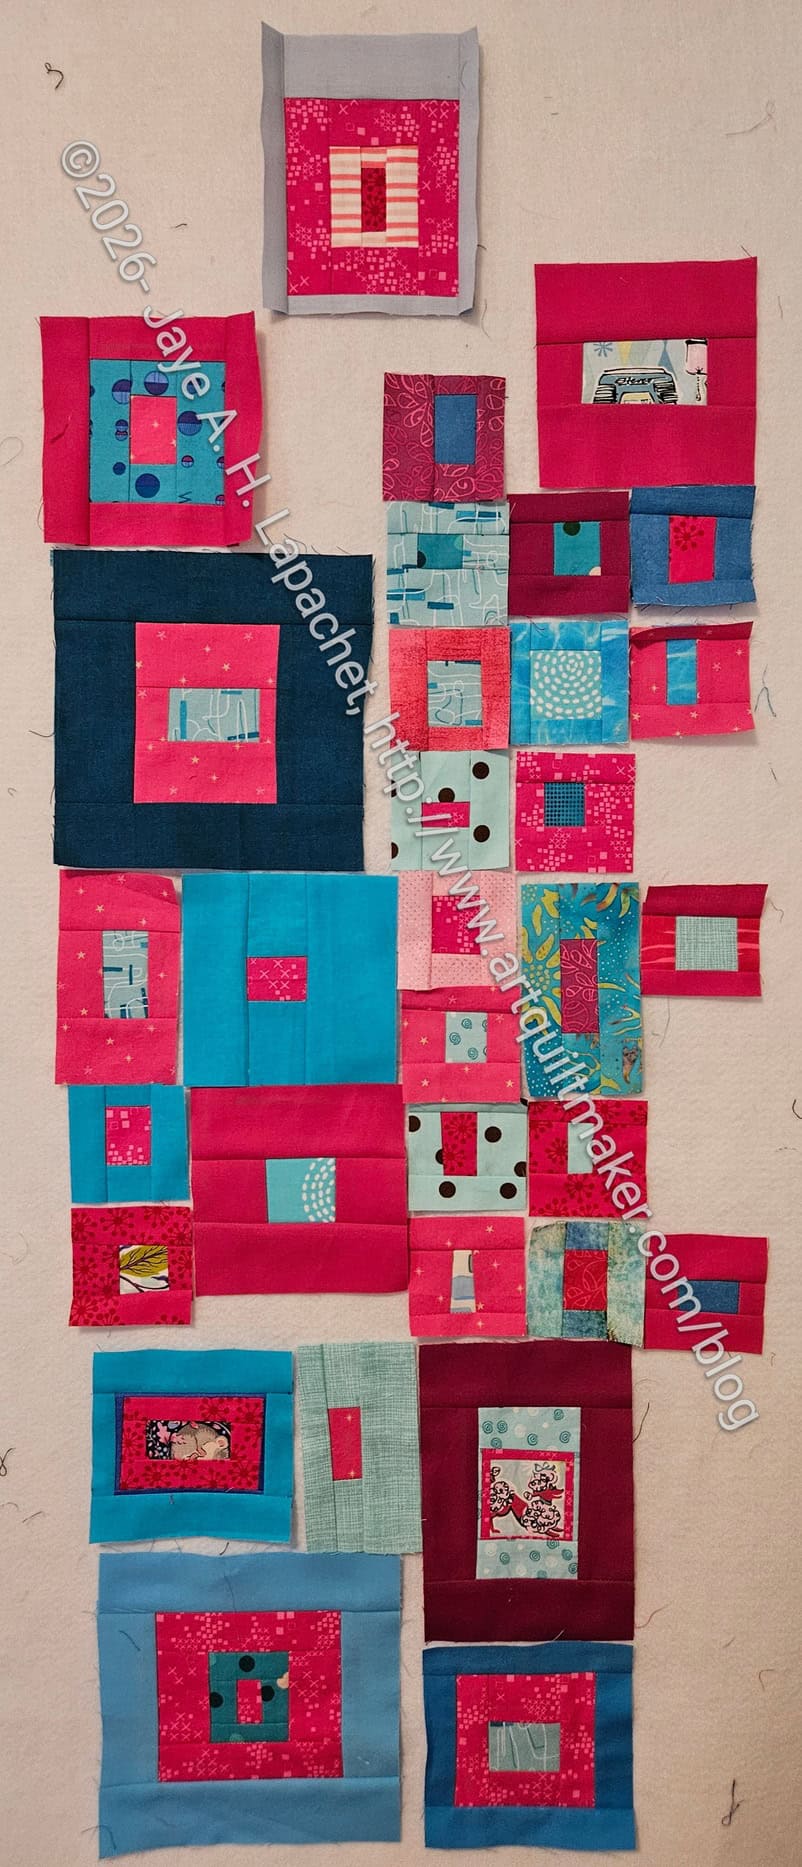
I spent some time rearranging the layout. I am happier with how it looks and will soon start putting some chunks together. The bottom looks darker than it is because the ironing board is shadowing the bottom corner of the design wall.
I have made the photo really large so you can see it more clearly.
I know there will still be some rearranging as I begin to sew, but I think I am pretty much ready to sew some chunks together. It will at least tell me what other blocks I need to make.
1-2-3 Mosaic blocks organized
As an aside, I finally made the travel board and am using it for this project. I cut up pieces, laid them out in order and then was able to sew them in an assembly line fashion. I haven’t figured out where to store this board, but while it is in use, it is very handy.
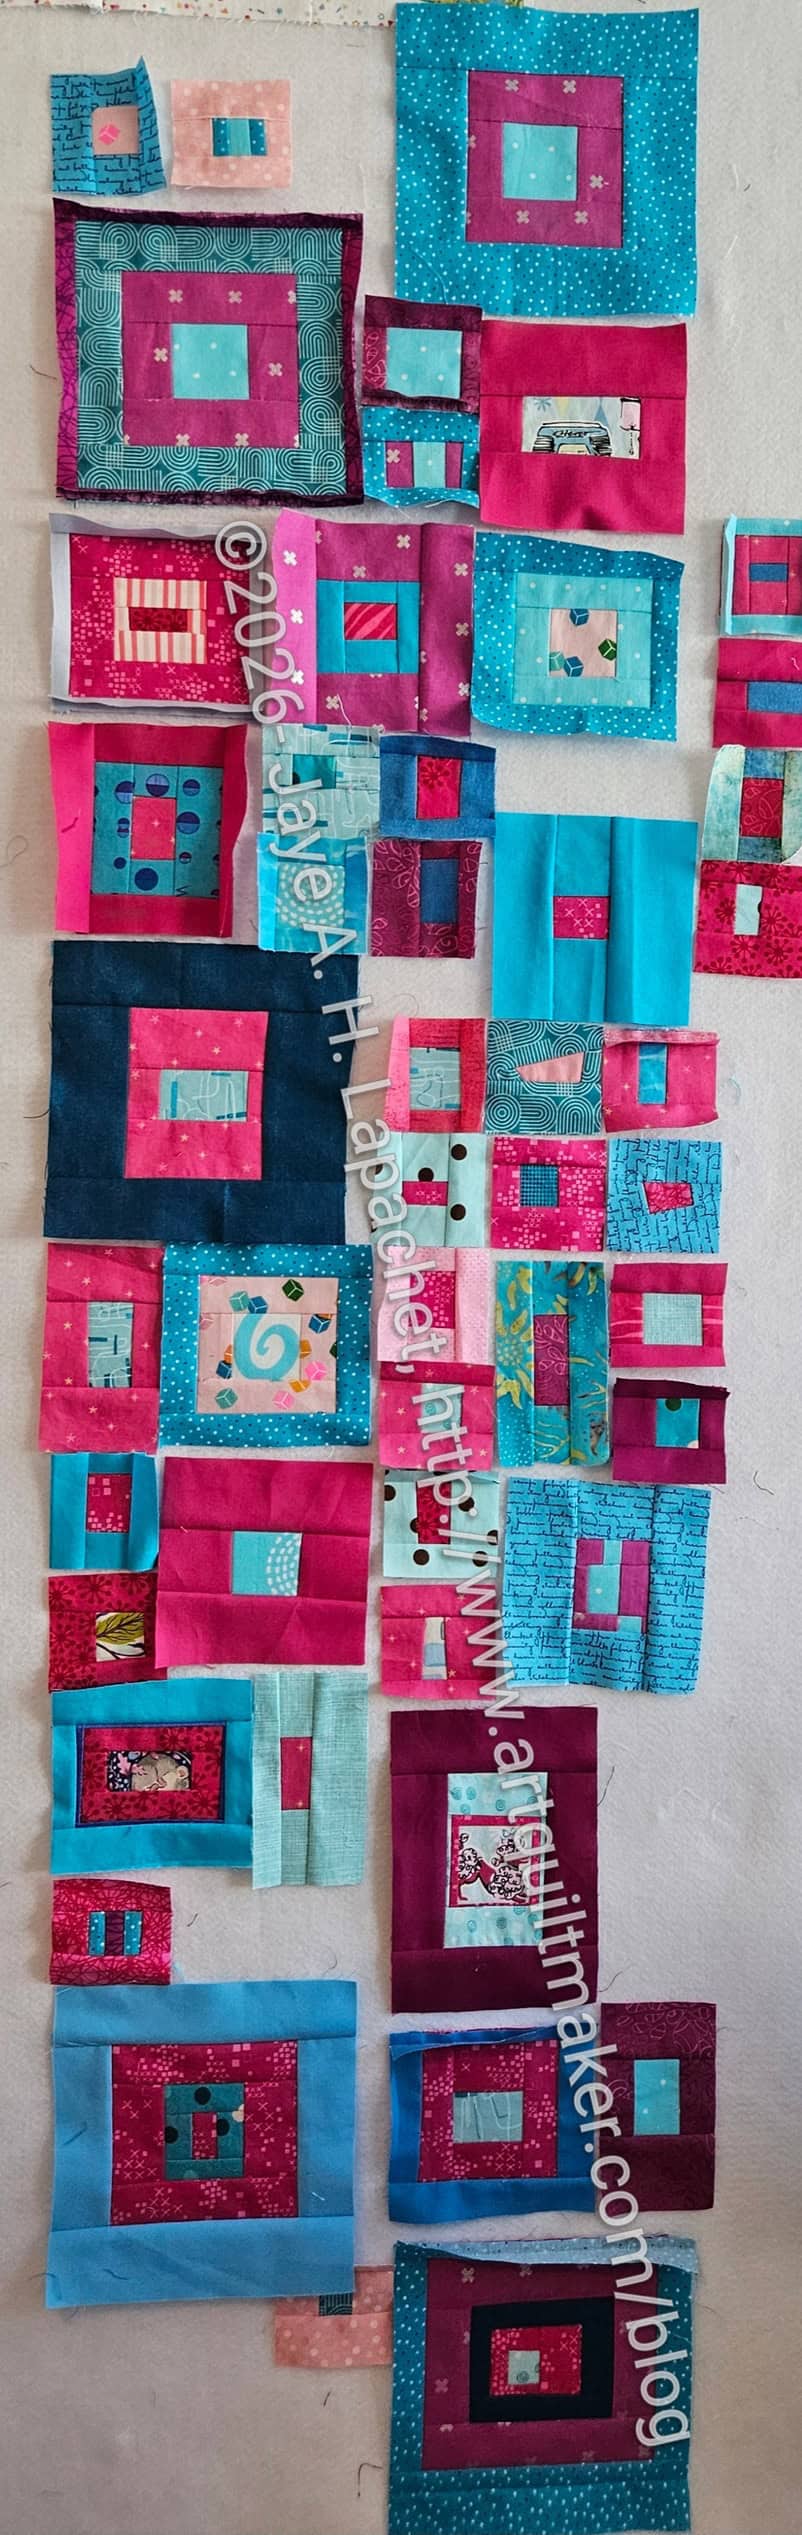
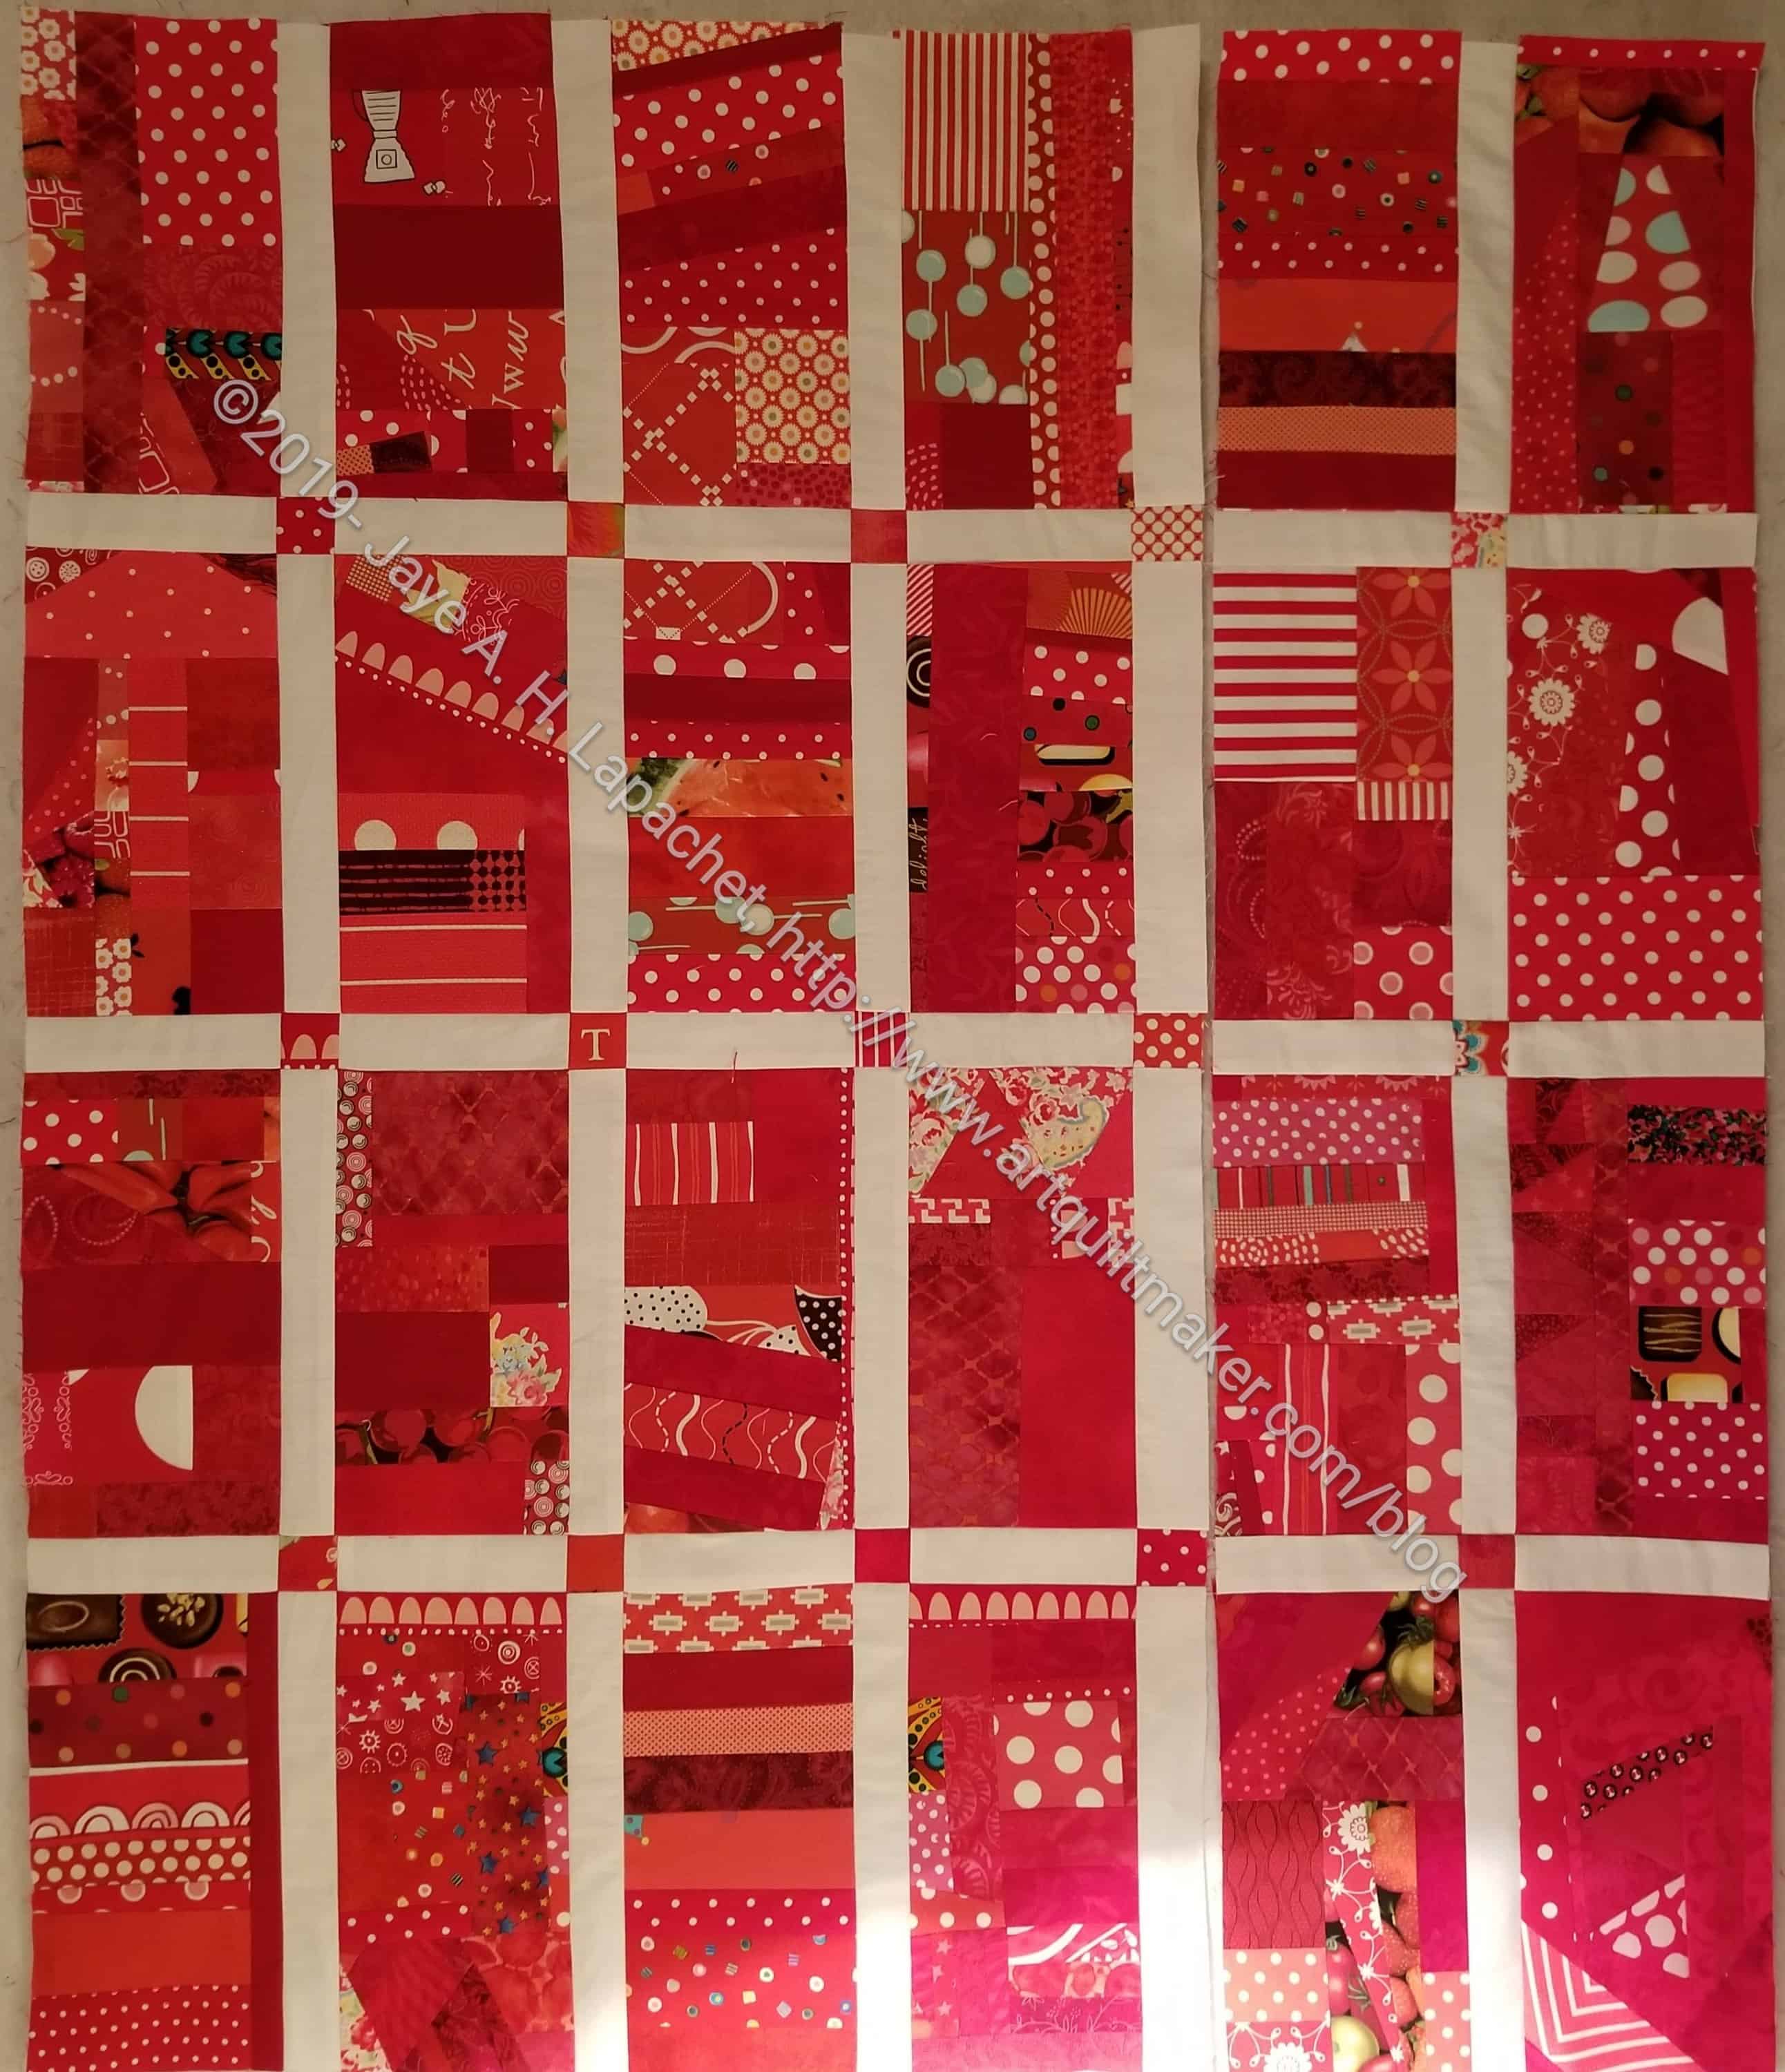
I have been working a bit at a time on more Mosaic blocks.
I think I need to sew some of them together, so I can figure out how many more I need and where.
I have added some more fabrics to vary the contrast and make each block stand out. A two color (ish) color palette can be tricky.
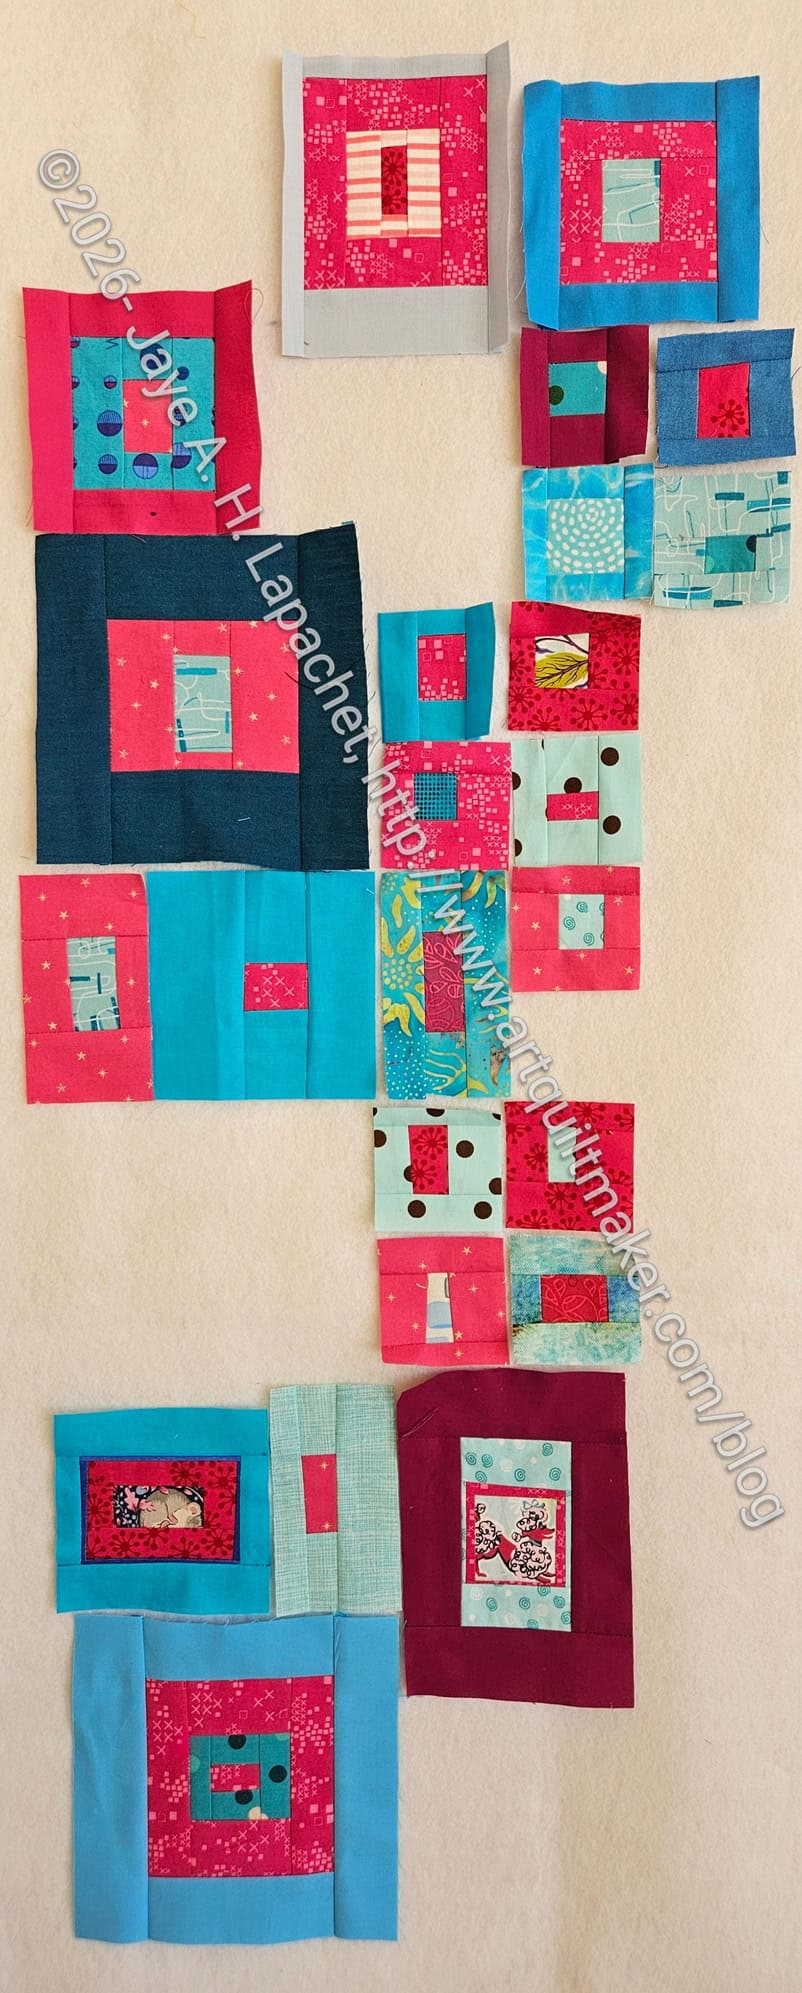
I have been working on making a ton of smaller (2.5 inch) blocks. Lorraine said we would need a lot of them. The size of the blocks I made after I got home from the workshop kept creeping up. I suddenly realized that I wouldn’t be able to put the thing together without more small blocks, so that is my current focus.
Friend Julie wrote a really good post about the workshop. She got some great photos that I neglected to take.
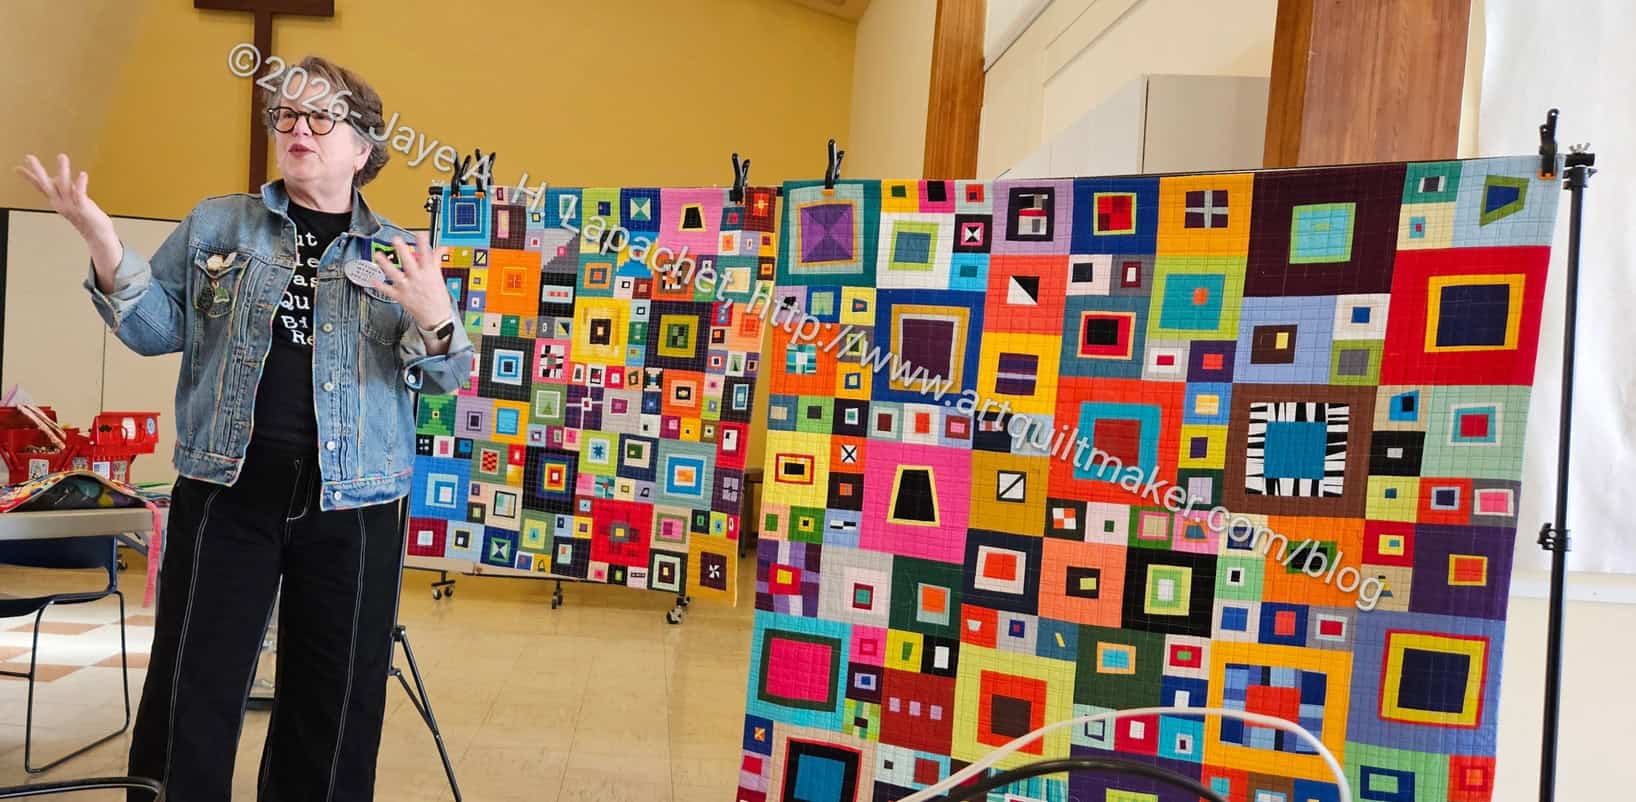
I spent Saturday with the guild and with Lorraine Woodruff-Long. The guild arranged for her to teach her 1-2-3 Mosaic workshop. I have to admit that I wasn’t excited, but I am pleased to report that I loved it. I created a lot of little jewels, which makes me very happy.
The photo, left, shows the blocks I made during the workshop.
After the workshop you end up with enough blocks (or almost) to make a 20 inch or 24 inch cushion cover. DDH has warned me off anymore throw pillows for our living room, but he has not said anything about table runners. As a result, I went into the workshop with the idea of making a spring/start of summer table runner for my buffet. Our buffet is probably our nicest piece of furniture and the top is still pristine. Anyway, I started out with the idea of making a tablerunner, which I will actually use.
As an aside, I am going to have to do a table runner inventory and see what I ‘need’. Thanksgiving and Christmas are well covered, but I could go for all the holidays and have an easy way to change the decor.
Lorraine teaching with her quilts
Lorraine did a nice job teaching.
She has clearly thought through the process and was clear about how to do it. I was super excited about the organization of the pieces to make the blocks. It is a game changer for chain piecing, no question. You really need to take this class!
1-2-3 Mosaic mistake
Lorraine said there were no mistakes, because the blocks could always be enlarged. I found a way to have to use a seam ripper. LOL!
I actually just cut the fabric after I sewed the correct piece on the correct side. I didn’t use a seam ripper all day, though I could have.
All the 1-2-3 blocks
I sewed a third batch of blocks at the very end of the day, but didn’t press them until I got home.
This is about the width I will use for the table runner, but I have to make it about three times as long.
I might sew blocks I like together into chunks so I can move them around more easily. We’ll see.
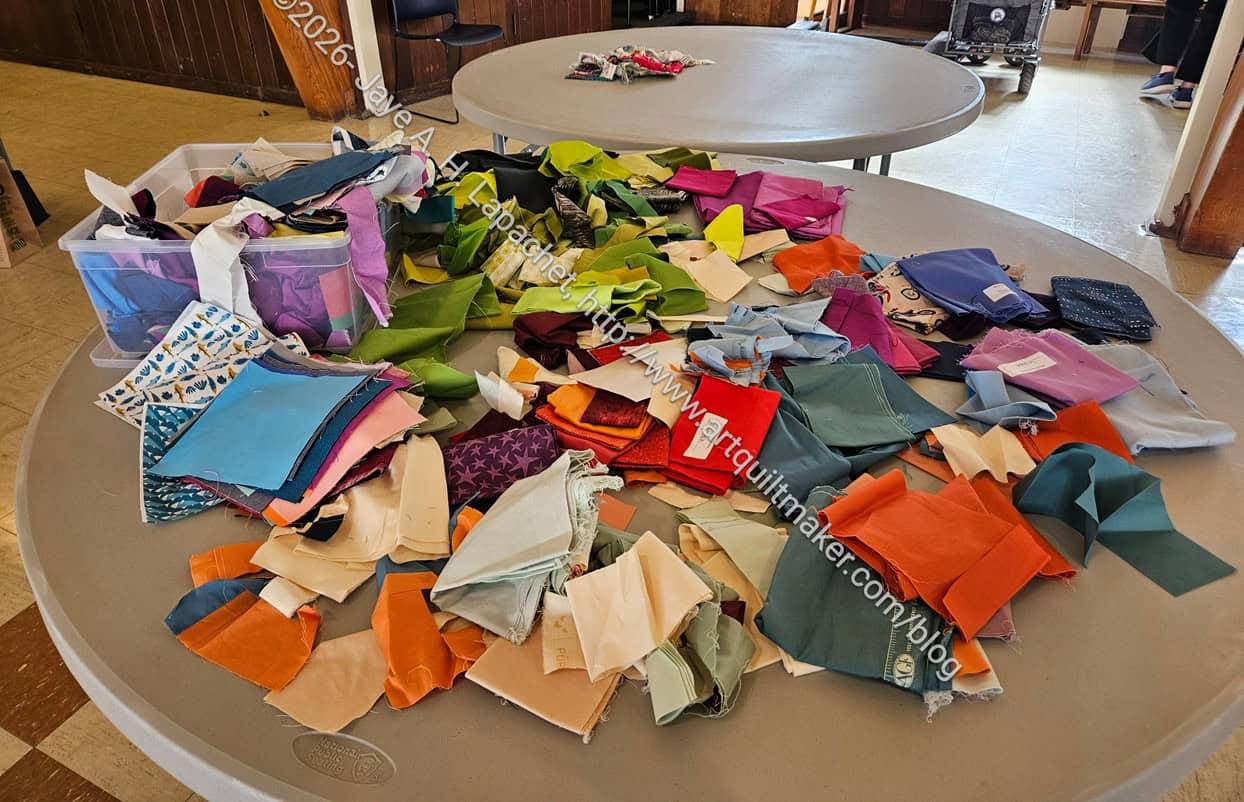
MaryC shared her scraps
MaryC brought a huge pile of ‘scraps’ (some were half yards!!) to share. I pulled some blues and pinks from that pile, so right now the piece is made up mostly of solids and tone-on-tones. I have a couple of fussy cut motifs in the center of blocks, but I think I need to break up the solids and tone-on-tones with some prints on the outside of a few of the blocks.
Gerre’s Jewels
Lynette’s gem
First batch of blocks
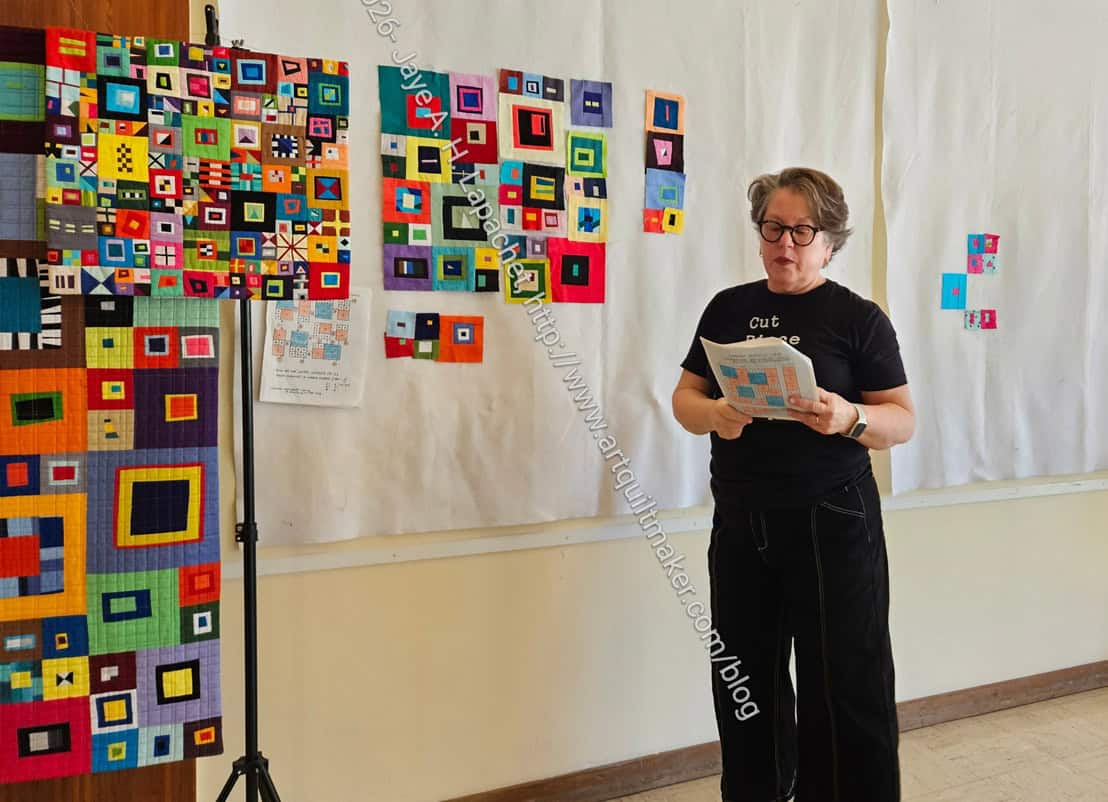
Lorraine with more examples
Above are a few of the blocks other people created as well as the first blocks that I made. Lorraine made an awesome video of all of us in her workshop. Check it and see how fun the guild is. You should join us. 😉
Copyright is only claimed on the photos. Permission is NOT granted to take any photos from this page and use them without permission. Designs of quilts and blocks are copyrighted by the creator.
These are the notes for one of the modules in my quilt and design classes. They are posted on the blog so my students have easy access. You will get something out of them, but you would get more by taking one of my classes. Check the link for more information.
Size and Scale are an element of design
Size and Scale are related terms
Definitions:
-> N.B. Definitions overlap. I have tried to organize them, so keep an open mind.
Size
“Size and scale are words used to describe the physical size that a shape or form has in comparison other shapes or lines within the design field.” (A Fiber Artist’s Guide, pg.98)
“Proportion relates to how shapes interact with each other within a design.” (Adventures in Design, pg. 74)
“Proportion refers to relative size, size measure against other elements or against some mental norm or standard.” (Pentak & Lauer, pg.60)
the comparative relation between things or magnitudes; a proper or significant relation between things or parts; relative size or extent (Random House College Dictionary).
Proportion (Random House College Dictionary): the comparative relation between things or magnitudes; a proper or significant relation between things or parts; relative size or extent
Example: “Proportion refers to relative size, size measure against other elements or against some mental norm or standard.” (Pentak & Lauer, pg.60)
Scale
“‘Scale and ‘proportion’ are related terms that both basically refer to size. Scale is essentially another word for size.” (Pentak & Lauer, pg.60)
“Big is meaningless unless we have some standard of reference. A big dog means nothing if we do not know the size of most dogs. This is what separates the two terms,” size and scale. (Pentak & Lauer, pg.60)
“…the scale of the pattern, that is, its size in relationship to the size of the pieces that are cut, will determine the impact of the pattern on the overall design of the quilt.” (Quilter’s Book of Design, 2d, pg. 80)”‘Large scale’ is a way of saying big and ‘small scale’ means small.” (Pentak & Lauer, pg.60)
a succession or progression of steps or degrees; a graduated series; an arrangement of things in order of importance (Random House College Dictionary).
Scale (Random House College Dictionary): a succession or progression of steps or degrees; a graduated series; an arrangement of things in order of importance
Ratio
the relation between two similar magnitudes in respect to the number of times the first contains the second (Random House College Dictionary).
Ratio (Random House College Dictionary): the relation between two similar magnitudes in respect to the number of times the first contains the second
Example: “…the scale of the pattern, that is, its size in relationship to the size of the pieces that are cut, will determine the impact of the pattern on the overall design of the quilt.” (Quilter’s Book of Design, 2d, pg. 80)
Using these Tools:
Using Size:
“The principle of scale in a work of art is all about the volume of the message you wish to send to your viewer.” (Art+Quilt, pg.64)
“The scale of a work of art in relation to the viewer, its human scale, is often” one of the first considerations an artist makes.” (Art+Quilt, pg.64)
where will it be displayed? the atrium of a large office building or the foyer of a private home? (Art+Quilt, pg.64)
Elements in a design that are larger seem close. (Pentak & Lauer, pg.176)
Elements of a design that are smaller seem farther away. (Pentak & Lauer, pg.176)
Elements of a design that are larger seem more important, conversely elements of a design that are smaller seem less important. (Pentak & Lauer, pg.176)
I don’t want you to get the idea that small is unimportant. A small amount of yellow in a purple quilt can make all the difference to the overall design.
“Scale and proportion are closely tied to emphasis and focal point. Large scale, especially large scale in proportion to other elements makes for an obvious visual emphasis.” (Pentak & Lauer, pg.60)
“Unusual or unexpected scale is arresting and attention getting. Sheer size does impress us.” (Pentak & Lauer, pg.61) Magnifying something that is usually quite small can capture your attention through sheer surprise. A butterfly wing that fills the entire frame gains significance as you see extraordinary details seldom noticed in everyday life.” (Art+Quilt, pg.65)
Georgia O’Keefe is an example of an artist that uses this technique. (Art+Quilt, pg.65)
“An unnatural contrast of scale in your quilts can also be used to achieve interesting effects. Surrealists such as Salvador Dali used wildly confused internal proportions to intentionally create uneasiness in the viewer. One element that is purposefully out of scale with other elements within the quilt will attract the viewer’s attention and become a focal point.” (Art+Quilt, pg.65)
if you want to exaggerate a shape, “have some visual continuity between the shapes.”(Adventures in Design, pg. 75)
Think about the relative sizes of pieces in a quilt. It is important to vary sizes to add interest. (Fearless Design, pg. 32)
think about piecing the same blocks in different sizes in order to add interest to your quilt.
Using Ratio
Using ratios really has to do with proportion. The Fibonacci sequence has to do with ratios of objects to one another on the design field. “One powerful way to help your design evolve to its highest potential is to select the width and height dimensions that promote the natural movement of your design….select your dimensions based on a ratio that best suits your design. Observing your design’s directional flow and focus gives you a starting point to sort through your options.” (Adventures in Design, pg. 77)
“1:1 ratio is a perfect ratio for designs that radiate symmetrically from a center point….if your design is 24″ high in this ratio, it will also be 24″ wide.” (Adventures in Design, pg. 77)
“A 1:2 ratio provides added width to a horizontal design or it extends height to a vertical design. In this ratio, the longer dimension is twice as long as the shorter dimension. If you want one dimension to be 24″ wide, the other dimension would be double that – 48″ high.” An example of this ratio is Poulnabrone Dolmen (Adventures in Design, pg. 77)
The 1:3 ratio provides more lengthwise extension than 1:2 ratio. “In this ratio, one dimension is three times greater than the other dimension. This gives more room for the design to expand in one direction. Thus if you want one dimension of your design to be 24″, the other dimension would be 72″.” An example is a quilt called Acid Rain by Gloria Loughman. This ratio has allowed a “dynamic sky to evolve in her quilt.” (Adventures in Design, pg. 77)
“A 1:4 ratio greatly exaggerates the length of a design. One dimension is four times greater than the other dimension. If you want your 24″ high design to have an extreme horizontal extension, the 1:4 ratio would give you a width of 96″.” An example is Rhododendrons over Water by Amanda Richardson of Cornwall England (Adventures in Design, pg. 77)
” The 3:4 ratio is best used when a design has only slightly more movement in one direction than the other. In a 3:4 ratio, a design that is 24″ in one direction would be 32″ high in the other direction”…. Joen Wolfrom says that “the 3:4 ratio should be saved for such occasions when your design does not need much expansion in one direction or the other.” Example is Ticondrroga Star by Larisa Key, Willimatic, CT. (Adventures in Design, pg. 77) I use this ratio quite a bit, especially for block quilts, because I think it adds interest to the layout.
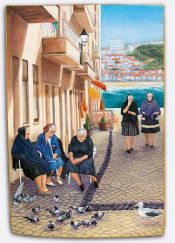
“A 2:3 ratio allows for more extended directional movement than a 3:4 ratio does. It doesn’t exaggerate the length as much as the 1:2, 1:3, and 1:4 ratios do. ” (Adventures in Design, pg. 77) If you have 24″ high quilt, your quilt’s width would be 36″. (Adventures in Design, pg. 78) Example is Fishermen’s Widows by Anna Faustino
The Golden Mean or 8:13 ratio is considered to be “the most beautiful, pleasing dimension for art and architecture…It provides beautifully balanced dimensions”, because of the subtle dimensional change. “The Golden Mean is a component of the Fibonacci sequence.” (Adventures in Design, pg. 81) If you have 24″ high quilt, your quilt’s width using the 8:13 ratio would be 39″. (Adventures in Design, pg. 78) You can find a calculator for Golden Mean ratios at: http://goldenratiocalculator.com/ and there is a chart in Adventures in Design pg.81. An example of a quilt using the Golden Mean Ratio is Pamela Mostek’s Five Apples.
Notes:
A designer can use relative sizes to give a feeling of space or depth. Artists have taken this basic idea and exaggerated it by increasing the size differences. It is very common to many periods and styles of art to use different scales. (Pentak & Lauer, pg.176)
“In past centuries visual scale was often related to thematic importance. The size of the figures was based on their symbolic importance in the subject being presented… This is called hieratic scaling.” (Pentak & Lauer, pg.60)
“Private spaces are perfect for small, intricately stitched works and allow for a more intimate experience with the art.” (Art+Quilt, pg.64)
“The most renowned proportional number sequence is the Fibonacci sequence“…”The Fibonacci sequence begins as 0, 1, 1, 2, 3, 5, 8, 13, 21, 34, 55, 89, 144, and so on. Each successive number in this sequence is the sum of the previous two numbers. You can use small or large sections of this sequence to determine the dimensions of elements within a design.”… “The Fibonacci sequence highlights the strong relationship between mathematics, nature and art. (Adventures in Design, pg. 76)
The images denoting the Fibonacci sequence are fairly common. I imagine you will say “oh, of course! I have seen this!” when you see the spiral. Nautilus shells are also used as examples of the Fibonacci sequence. As we mentioned in the podcast, nature uses the Fibonacci sequence in its design field frequently. By doing a search on the term and looking at images, you will be amazed at the trees, flowers and other natural phenomena that include the Fibonacci sequence.
Resources:
Art + Quilt: Design Principles and Creativity Exercises by Lyric Kinard**.
Design Basics**, 5th, c.1999, David A. Lauer, Stephen Pentak
Painting by Numbers: the Fibonacci sequence in art by Curtis Belmonte and Conor Pappas
**N. B. : Obviously, you should shop at local quilt shops and small businesses. However, if you are too busy or can’t find what you need there, I use Amazon affiliate links and may be paid for your purchase of an item when you click on an item’s link in my post. There is no additional cost to you for clicking or purchasing items I recommend. I appreciate your clicks and purchases as it helps support this blog.
In this case, some of the books I use are out of print, so visit your local independent used book store for copies.
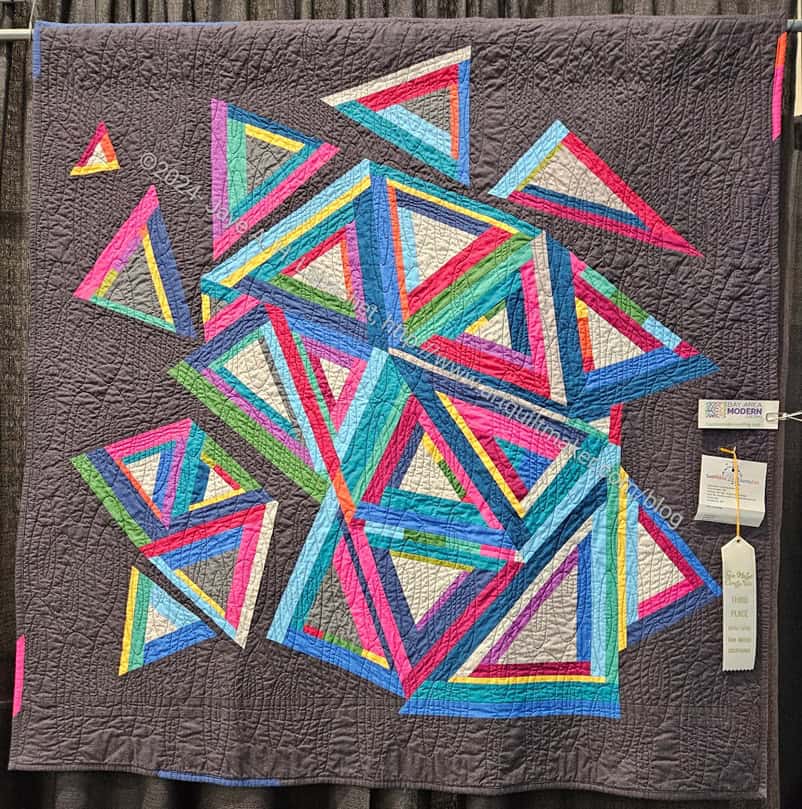
SueG’s entries were amazing! I didn’t know she entered so many projects into the Fair.
Breakage by SueG
This is Breakage by one of my friends (and student). It is her own design and I am so proud of her. She won a ribbon at the Fair as you can see.
She said that she was able to make this quilt, because of what I taught her in the quilt class. That made me feel SOO good.
I have been wanting to write about her quilt, Breakage, for awhile and seeing it at the Fair meant that I could take a photo and then would be able to write about it.
One of the things I teach is that knowing all the techniques allows you to have the skills to not only design your quilts, but actually put them together. Sue knew how to sew and how to make quilts when she joined my class, but she has much more confidence now and is really making some amazing works. Breakage is just one of them.
If you, mostly, do not quilt your quilts yourself, then part of your quiltmaking process should be preparing your quilt for your longarm professional. You can read my longarm rant which implies things to think about when choosing a longarm quilter, but regardless of who you choose, you will still have to prepare your quilt.
To be honest, when I get to the “YAY! I have finished my top” stage, I am done with the quilt. However, I also don’t want a bunch of tops laying around, so I am working on finding the Zen or meditative qualities of finishing my quilts.
Top
My tops are what they are. I press as I need to press, which is usually towards the side. Sometimes my tops have points where a lot of seams meet. I don’t try and change that piecing, but I make a note and point those areas out to Colleen and usually tell her to avoid them.
If there are no borders, I sew around the entire edge about 1/8 inch from the edge. This stabilizes the seams that intersect on the perpendicular with the edge.
Back
However, when I get to the back, I do try to be nice. Part of the process or creating the meditative space in my head of finishing my quilts deals with the back. I no longer piece tiny squares together to create a coordinated back. I try to use very large pieces of fabric, which not only enables me to finish the back quickly, but also lessens the number of seams on the back for the longarmer.
My personal, fabulous longarmer has never complained about seams, but I also don’t want her to become frustrated with me. I make pieced backs. That is just what I do. I see no good reason to buy additional fabric for the back when I have perfectly good fabric in my fabric closet that is not being used.
Lately, I have started to try to remember to press the seams open on the back. It doesn’t really matter in terms of back construction, IMO, but it lessens the number of layers that the longarm needle has to punch through. My personal, fabulous longarmer has never said one way or the other, but I figure that it can’t hurt.
If I know that the end of the seam will be on the outside of the quilt or NOT crossed by another seam I will also backstitch. I do this on the front also, so that the threads don’t pull apart as the quilt is being stretched on the longarm machine. Of course, I don’t always know, but I do my best.
I try to make the back at least 8″ larger (4″ on each side and 4″ on top and bottom) all the way around than the size of the top. To do this, I lay the top on my design floor and build the back on top of it.
Post-it Notes are your Friend
I measure the top and the back and pin a post-it note to the quilt saying what the sizes are. I use hot pink post-it notes. My quilts are generally square, but usually not perfectly square. They are often off by an 1/8″, but not much more. If I put the post-it note on, the longarmer clearly knows what s/he is dealing with and can’t blame me later for lousy piecing (Well, s/he can, but I can just look at him or her sarcastically and not feel bad).
Top and Bottom
You might think that any idiot could tell which is the top and bottom of your quilt, but that is not always the case. I had a quilt where the back was really large – much larger than the 4″ all around that I normally make it – and my personal, fabulous longarmer put it on sideways, because I didn’t mark the top and the bottom. She is not in my head, though she is in my fantasy life head , so now I put a post-it note with the word ‘top’ on both the top and the back. Top on the post-it note means “dude, this is the top of the quilt.”
Pins
I take them out as I piece. There is no later. If my personal, fabulous longarmer runs over a pin I left on the quilt, I pay to have her machine repaired. My fault, my problem. That is why I take pins out of the seams, rather than running over them.
Embellishments
I embellish with anything 3D AFTER the quilting is done. If there is some reason that I put a button or beads in a section of the quilt, then I pin a very bright post-it note to that area. I also point it out to her when I bring the quilt to her. If my personal, fabulous longarmer runs over an embellishment on the quilt, because I didn’t warn her, I pay to have her machine repaired. My fault, my problem.
Press, Press, Press
As much as I despise pressing the top and the back I do it just before I take the quilt to the longarmer. Then I hang the top and the back on a pants hanger. The pants hangers have to be tough and have really strong clips, because those quilts are heavy. If I don’t press the wrinkles will not ‘quilt’ out.
Binding
My longarmer attaches my binding on side with the machine for me, so I include a binding with my top and back. Generally, I put it in a plastic bag and attach it to the hanger so it doesn’t get lost.
This is the last step. Once the quilt is on the hanger, it is ready to be taken to the longarmer.
Keep in mind that your personal longarmer might have different requirements for how you prepare your quilts. Make sure that you know what those are before you take your quilt to be quilted.
I am using a different quilt for this tutorial, but I have faith that that won’t make a difference to all of you intelligent readers and students who have been following along with my various sampler class tutorials.
Supply List:
blocks
fabric for sashing
fabric cornerstones (I used scraps, but my cornerstones were only 1.5 inches square)
Please note that we are only talking about sashing in this tutorial. We are not talking about borders. I will do a separate tutorial for borders in the future.
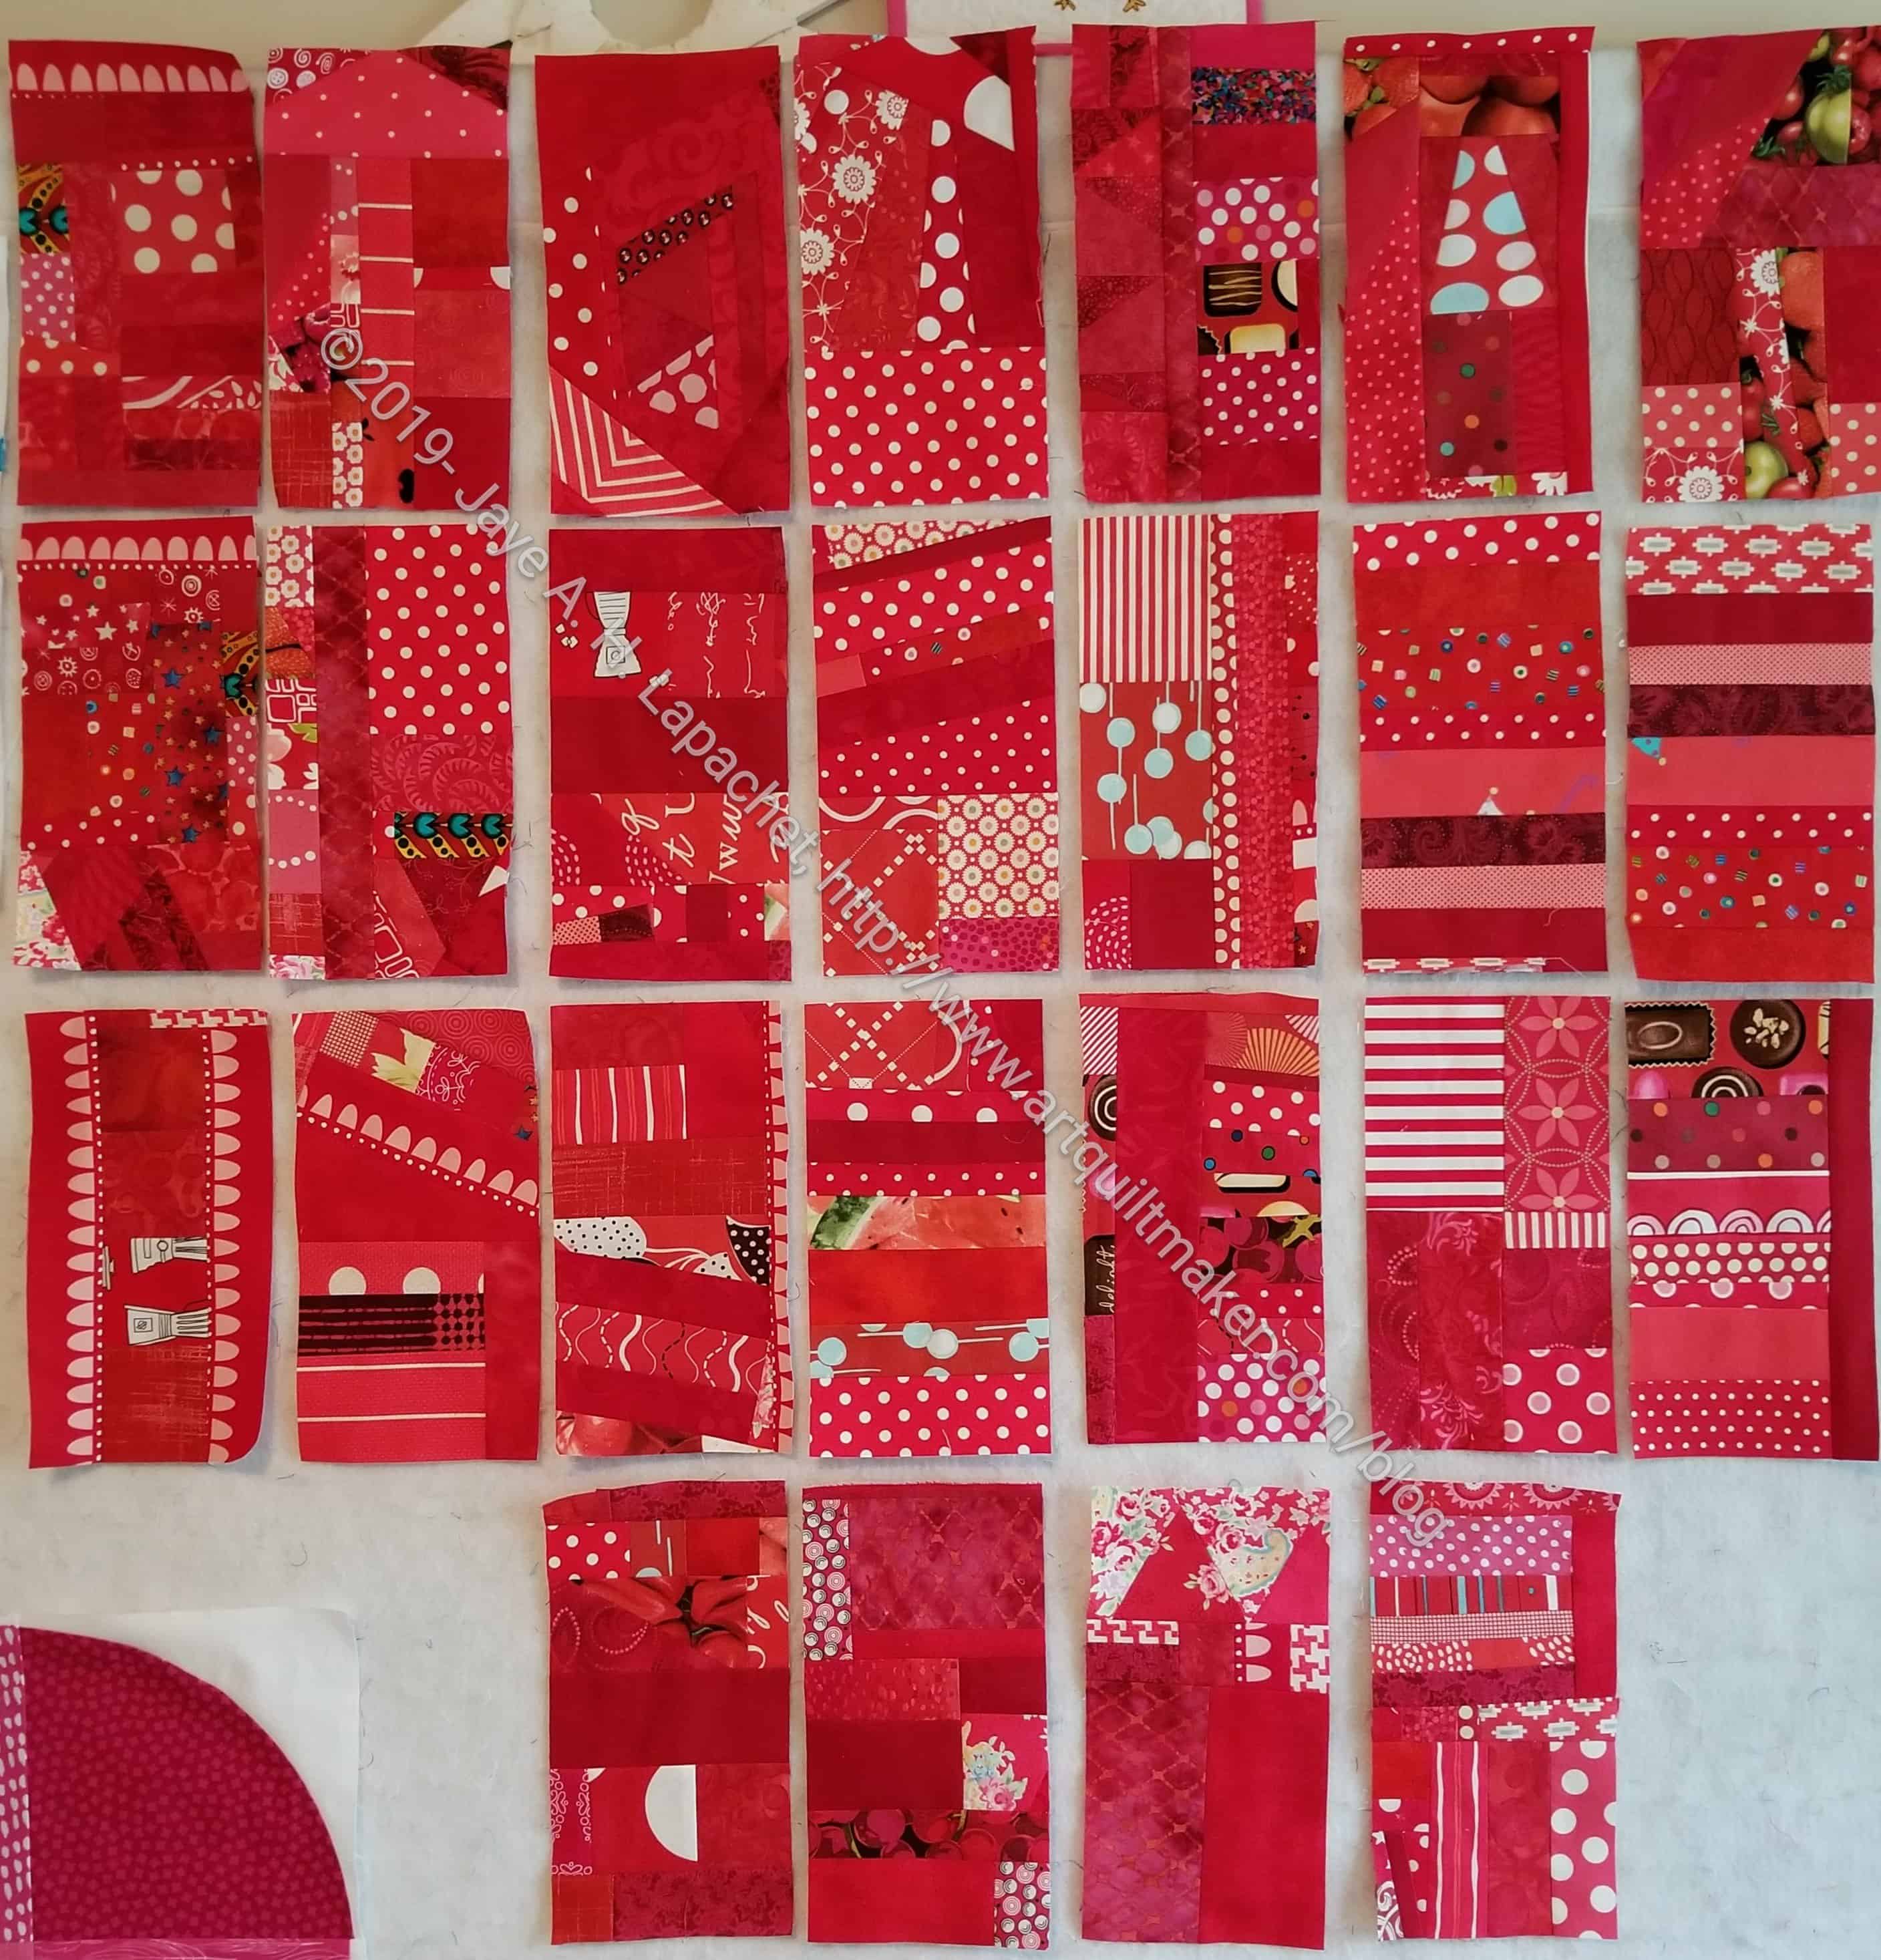
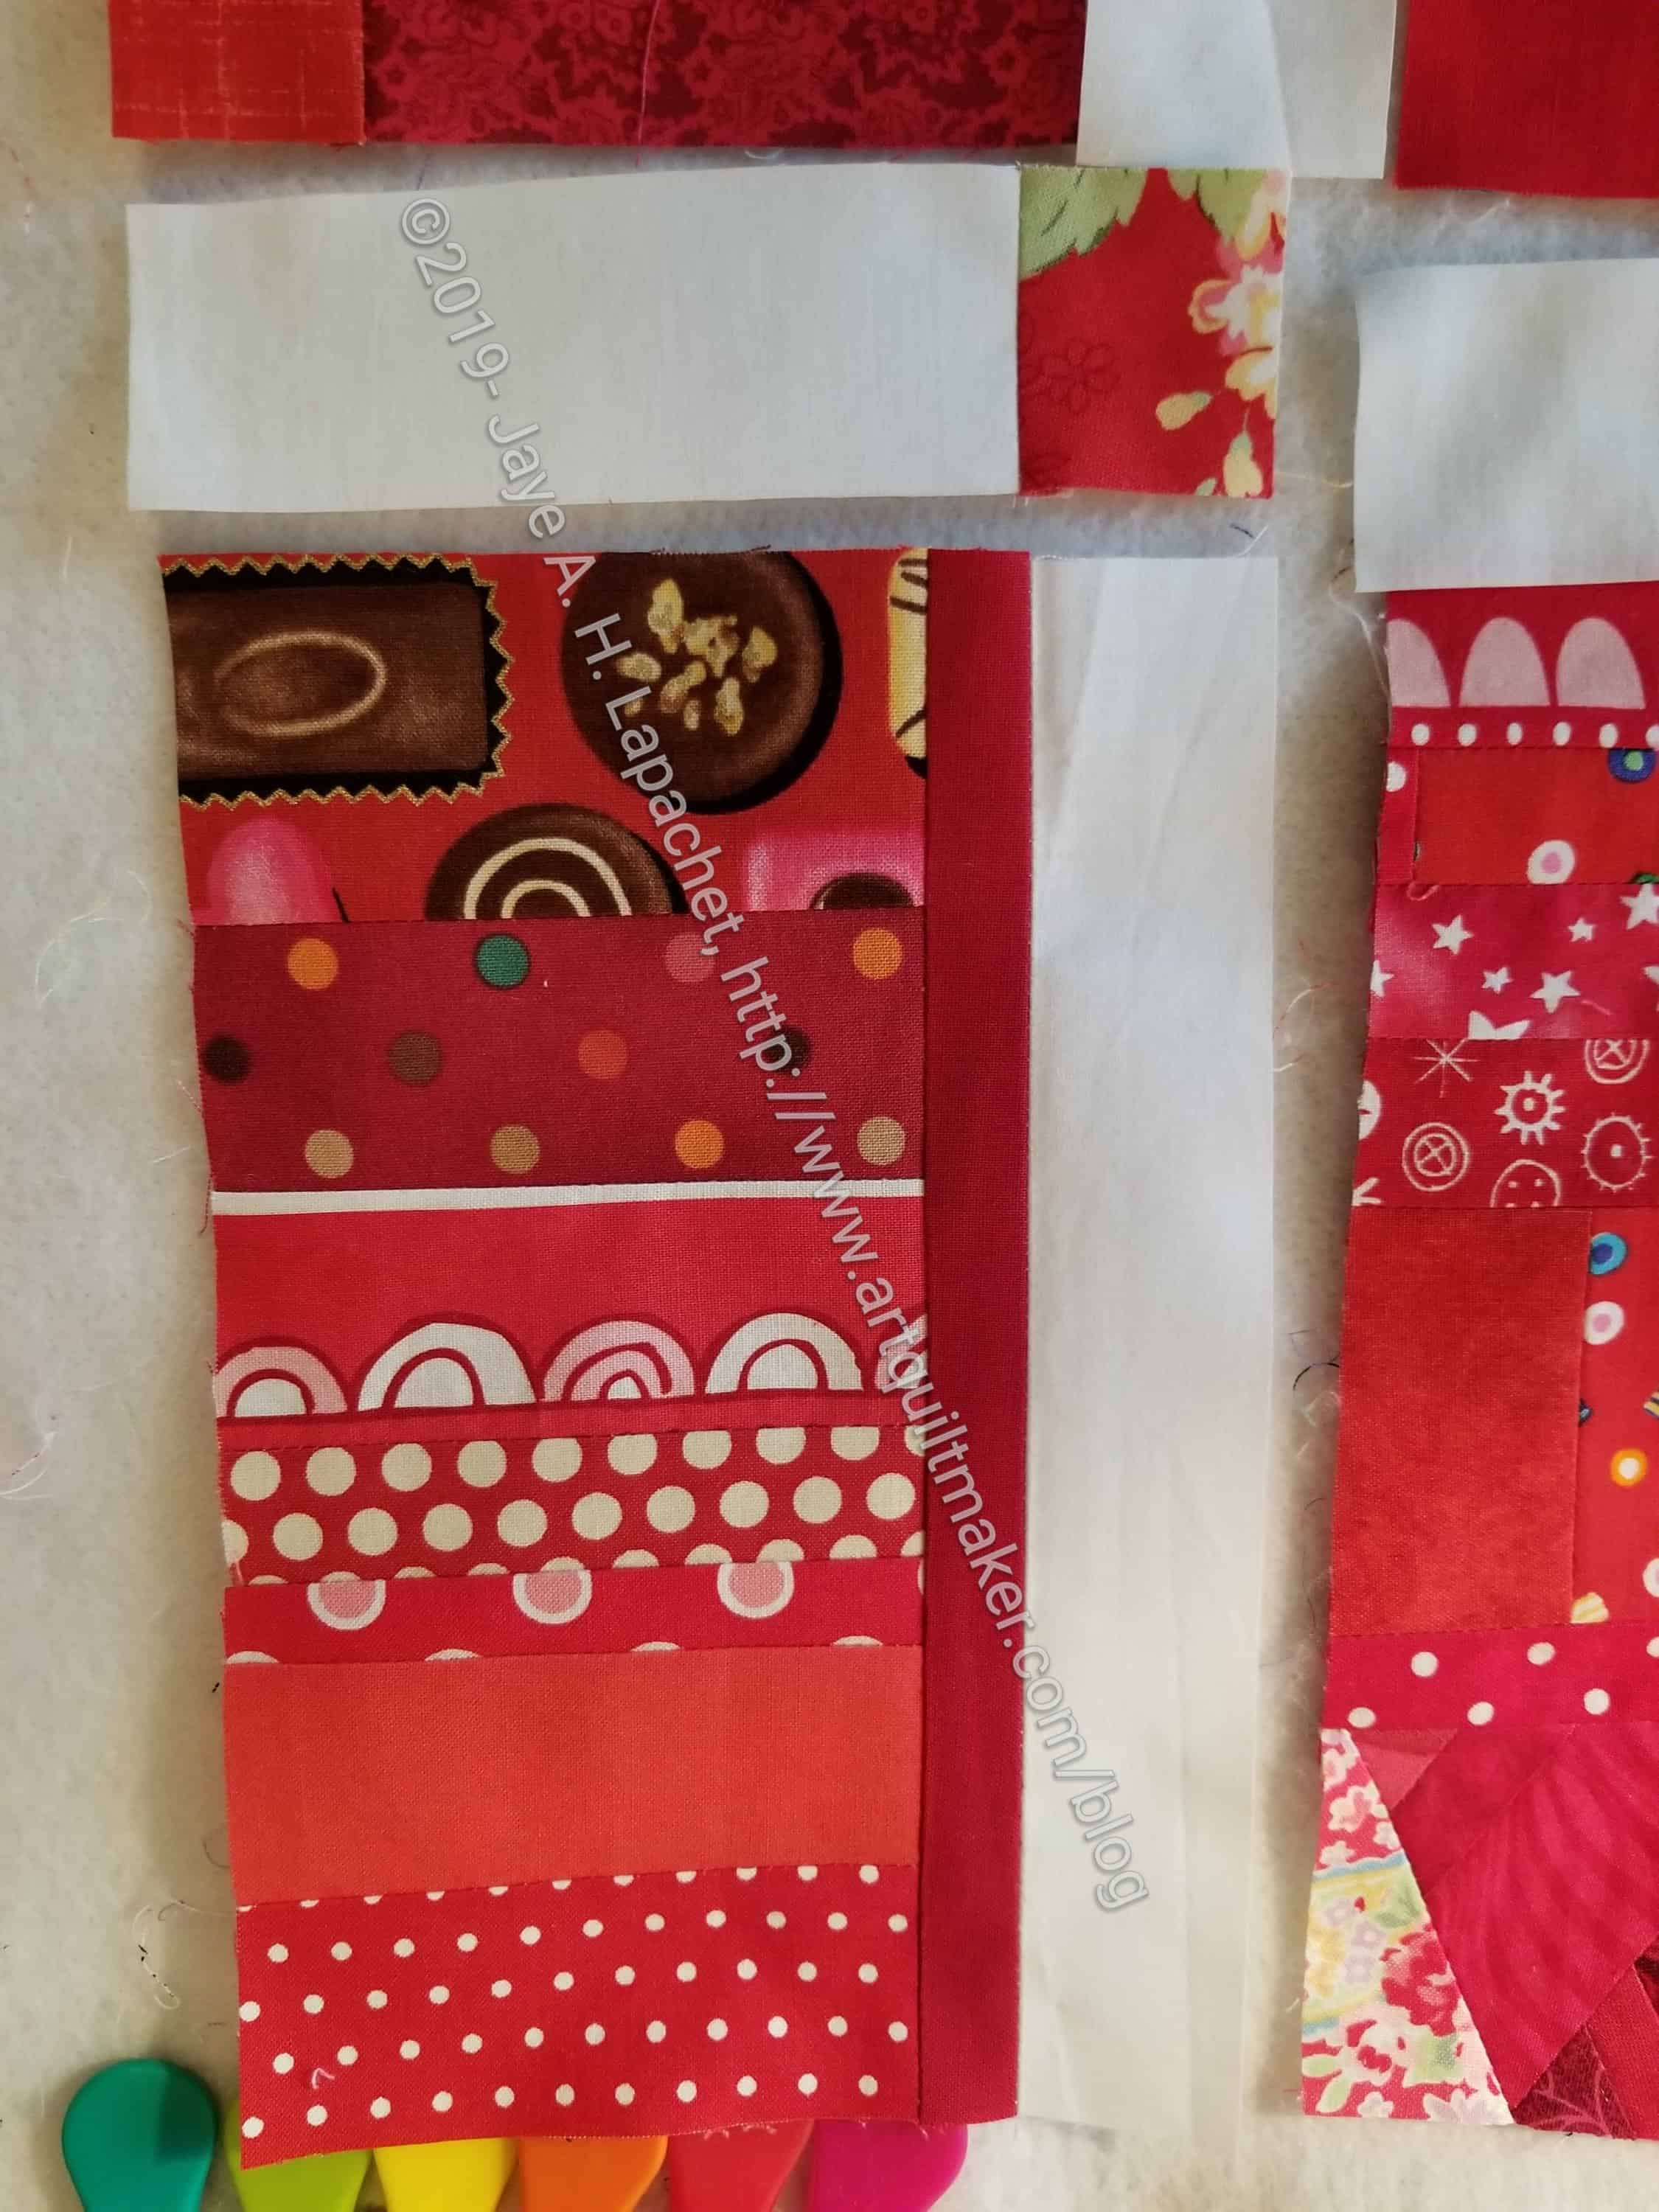
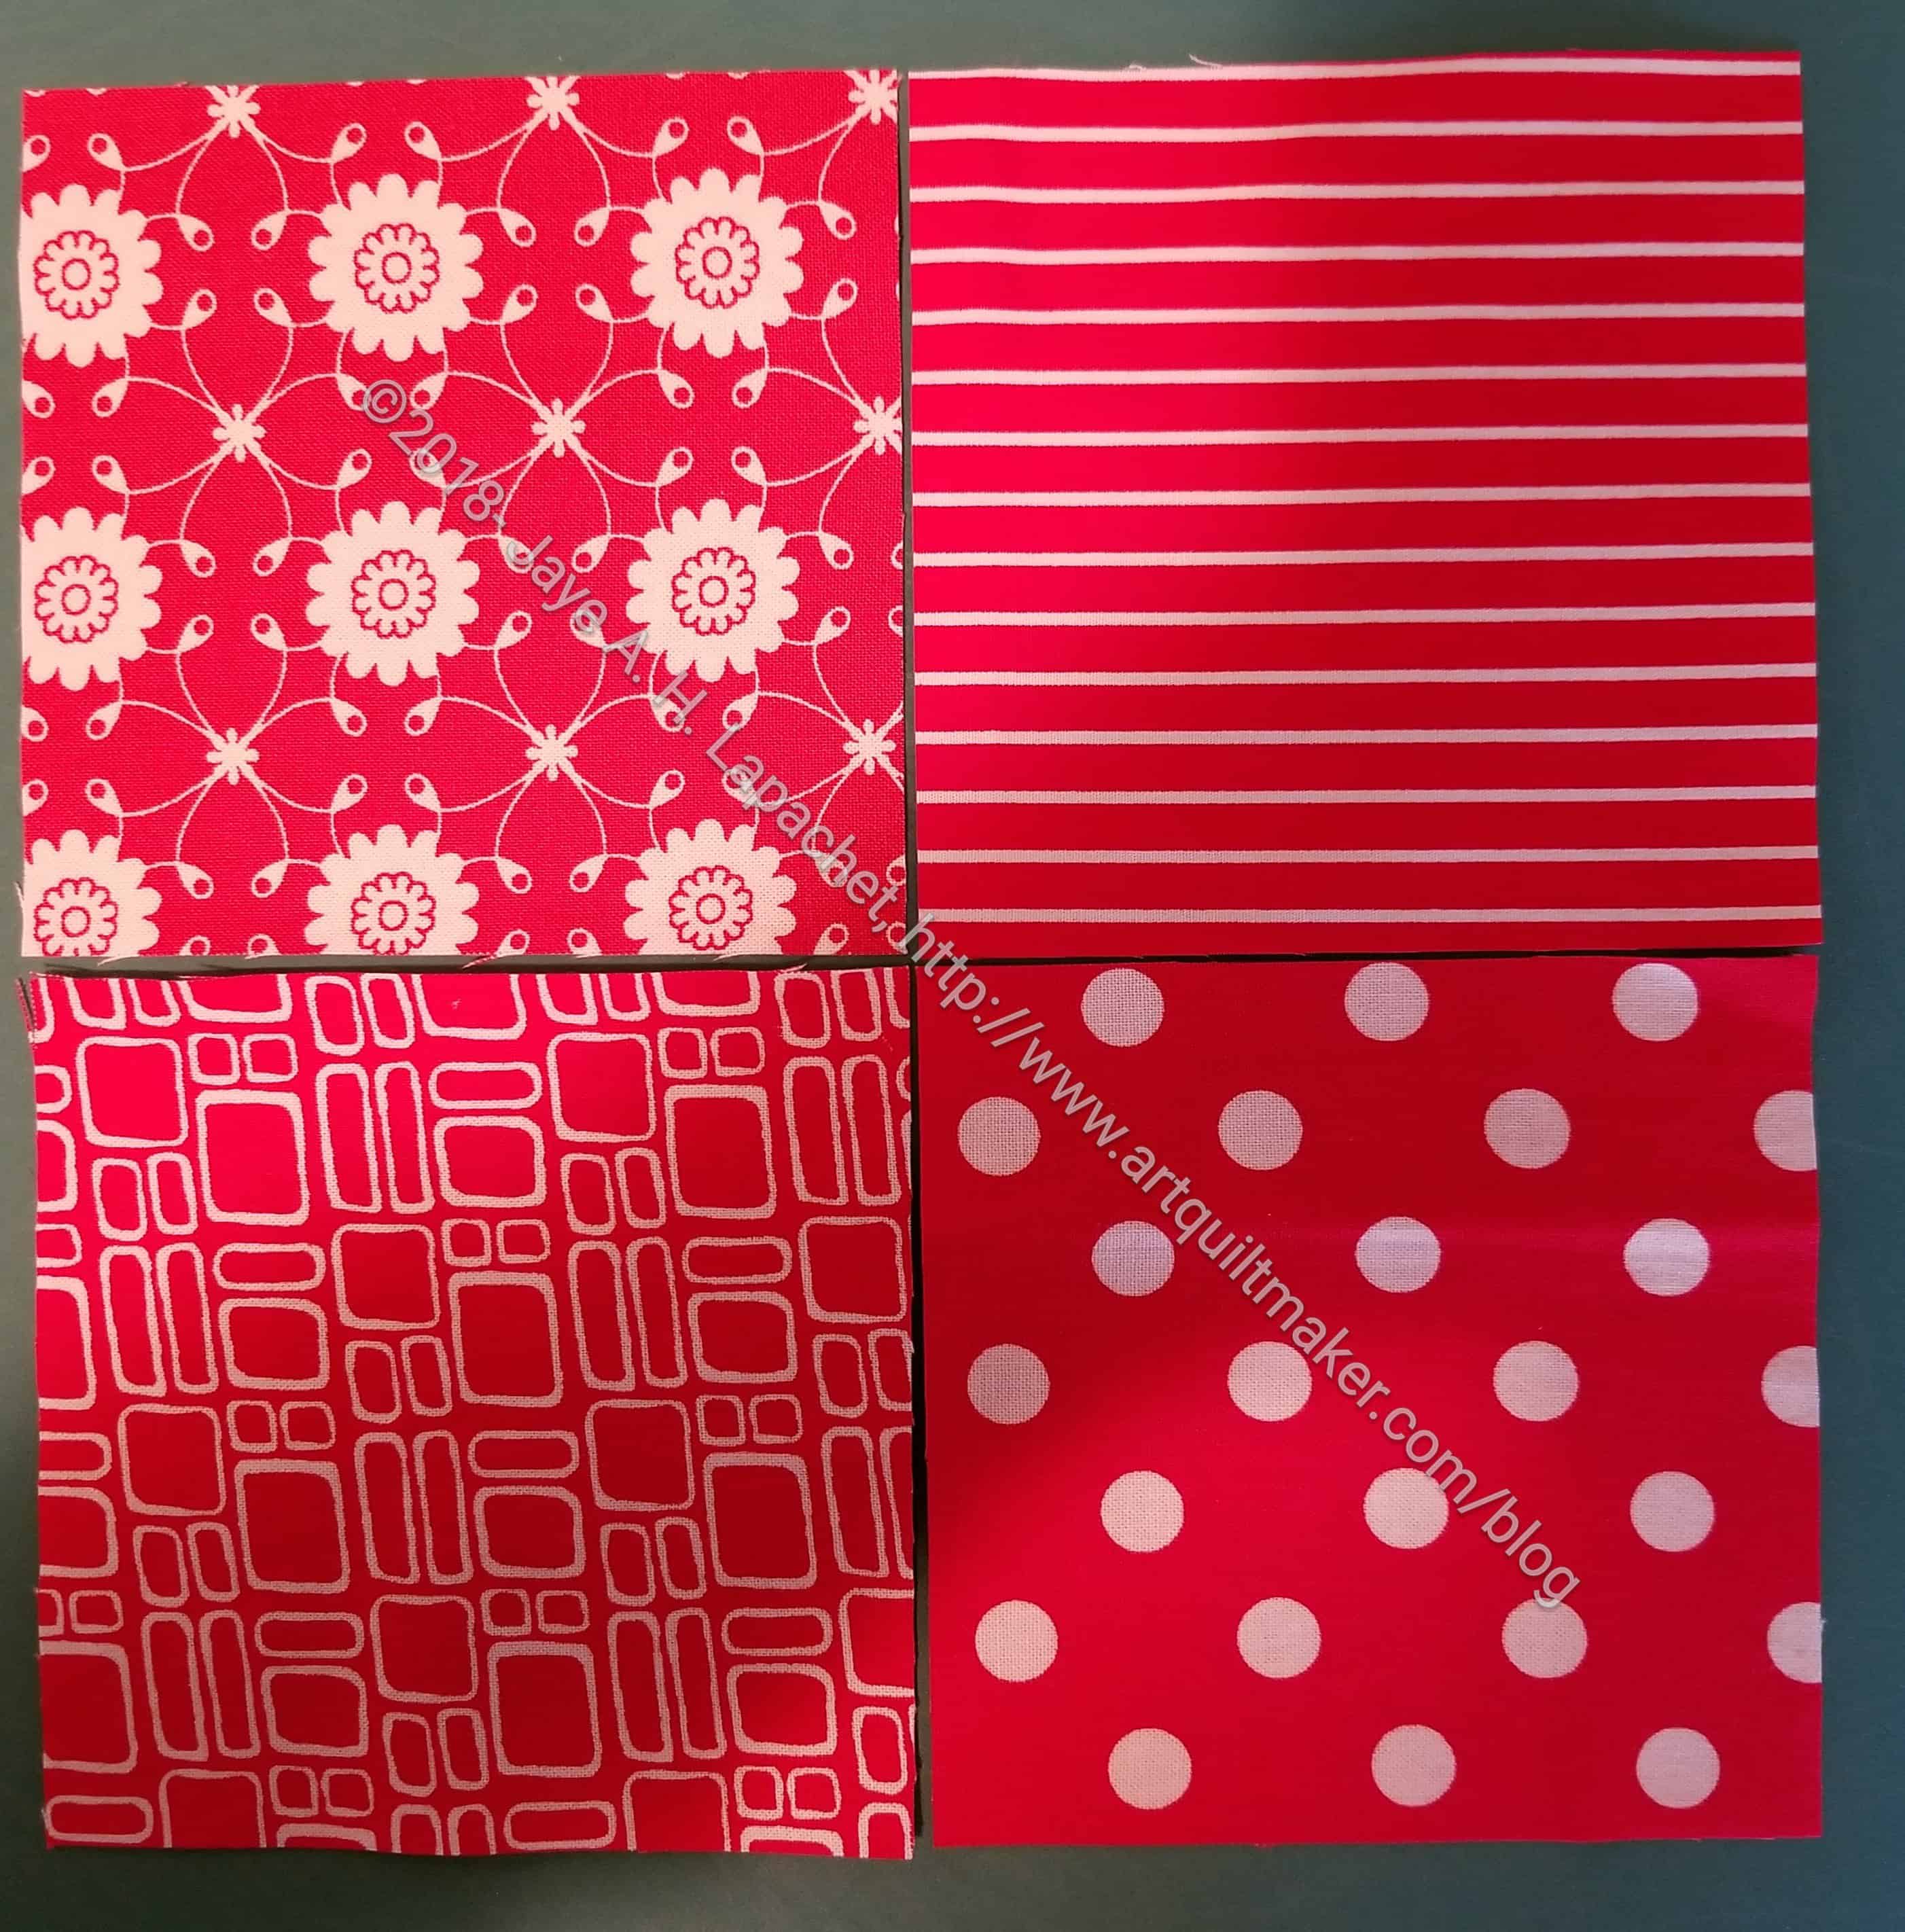
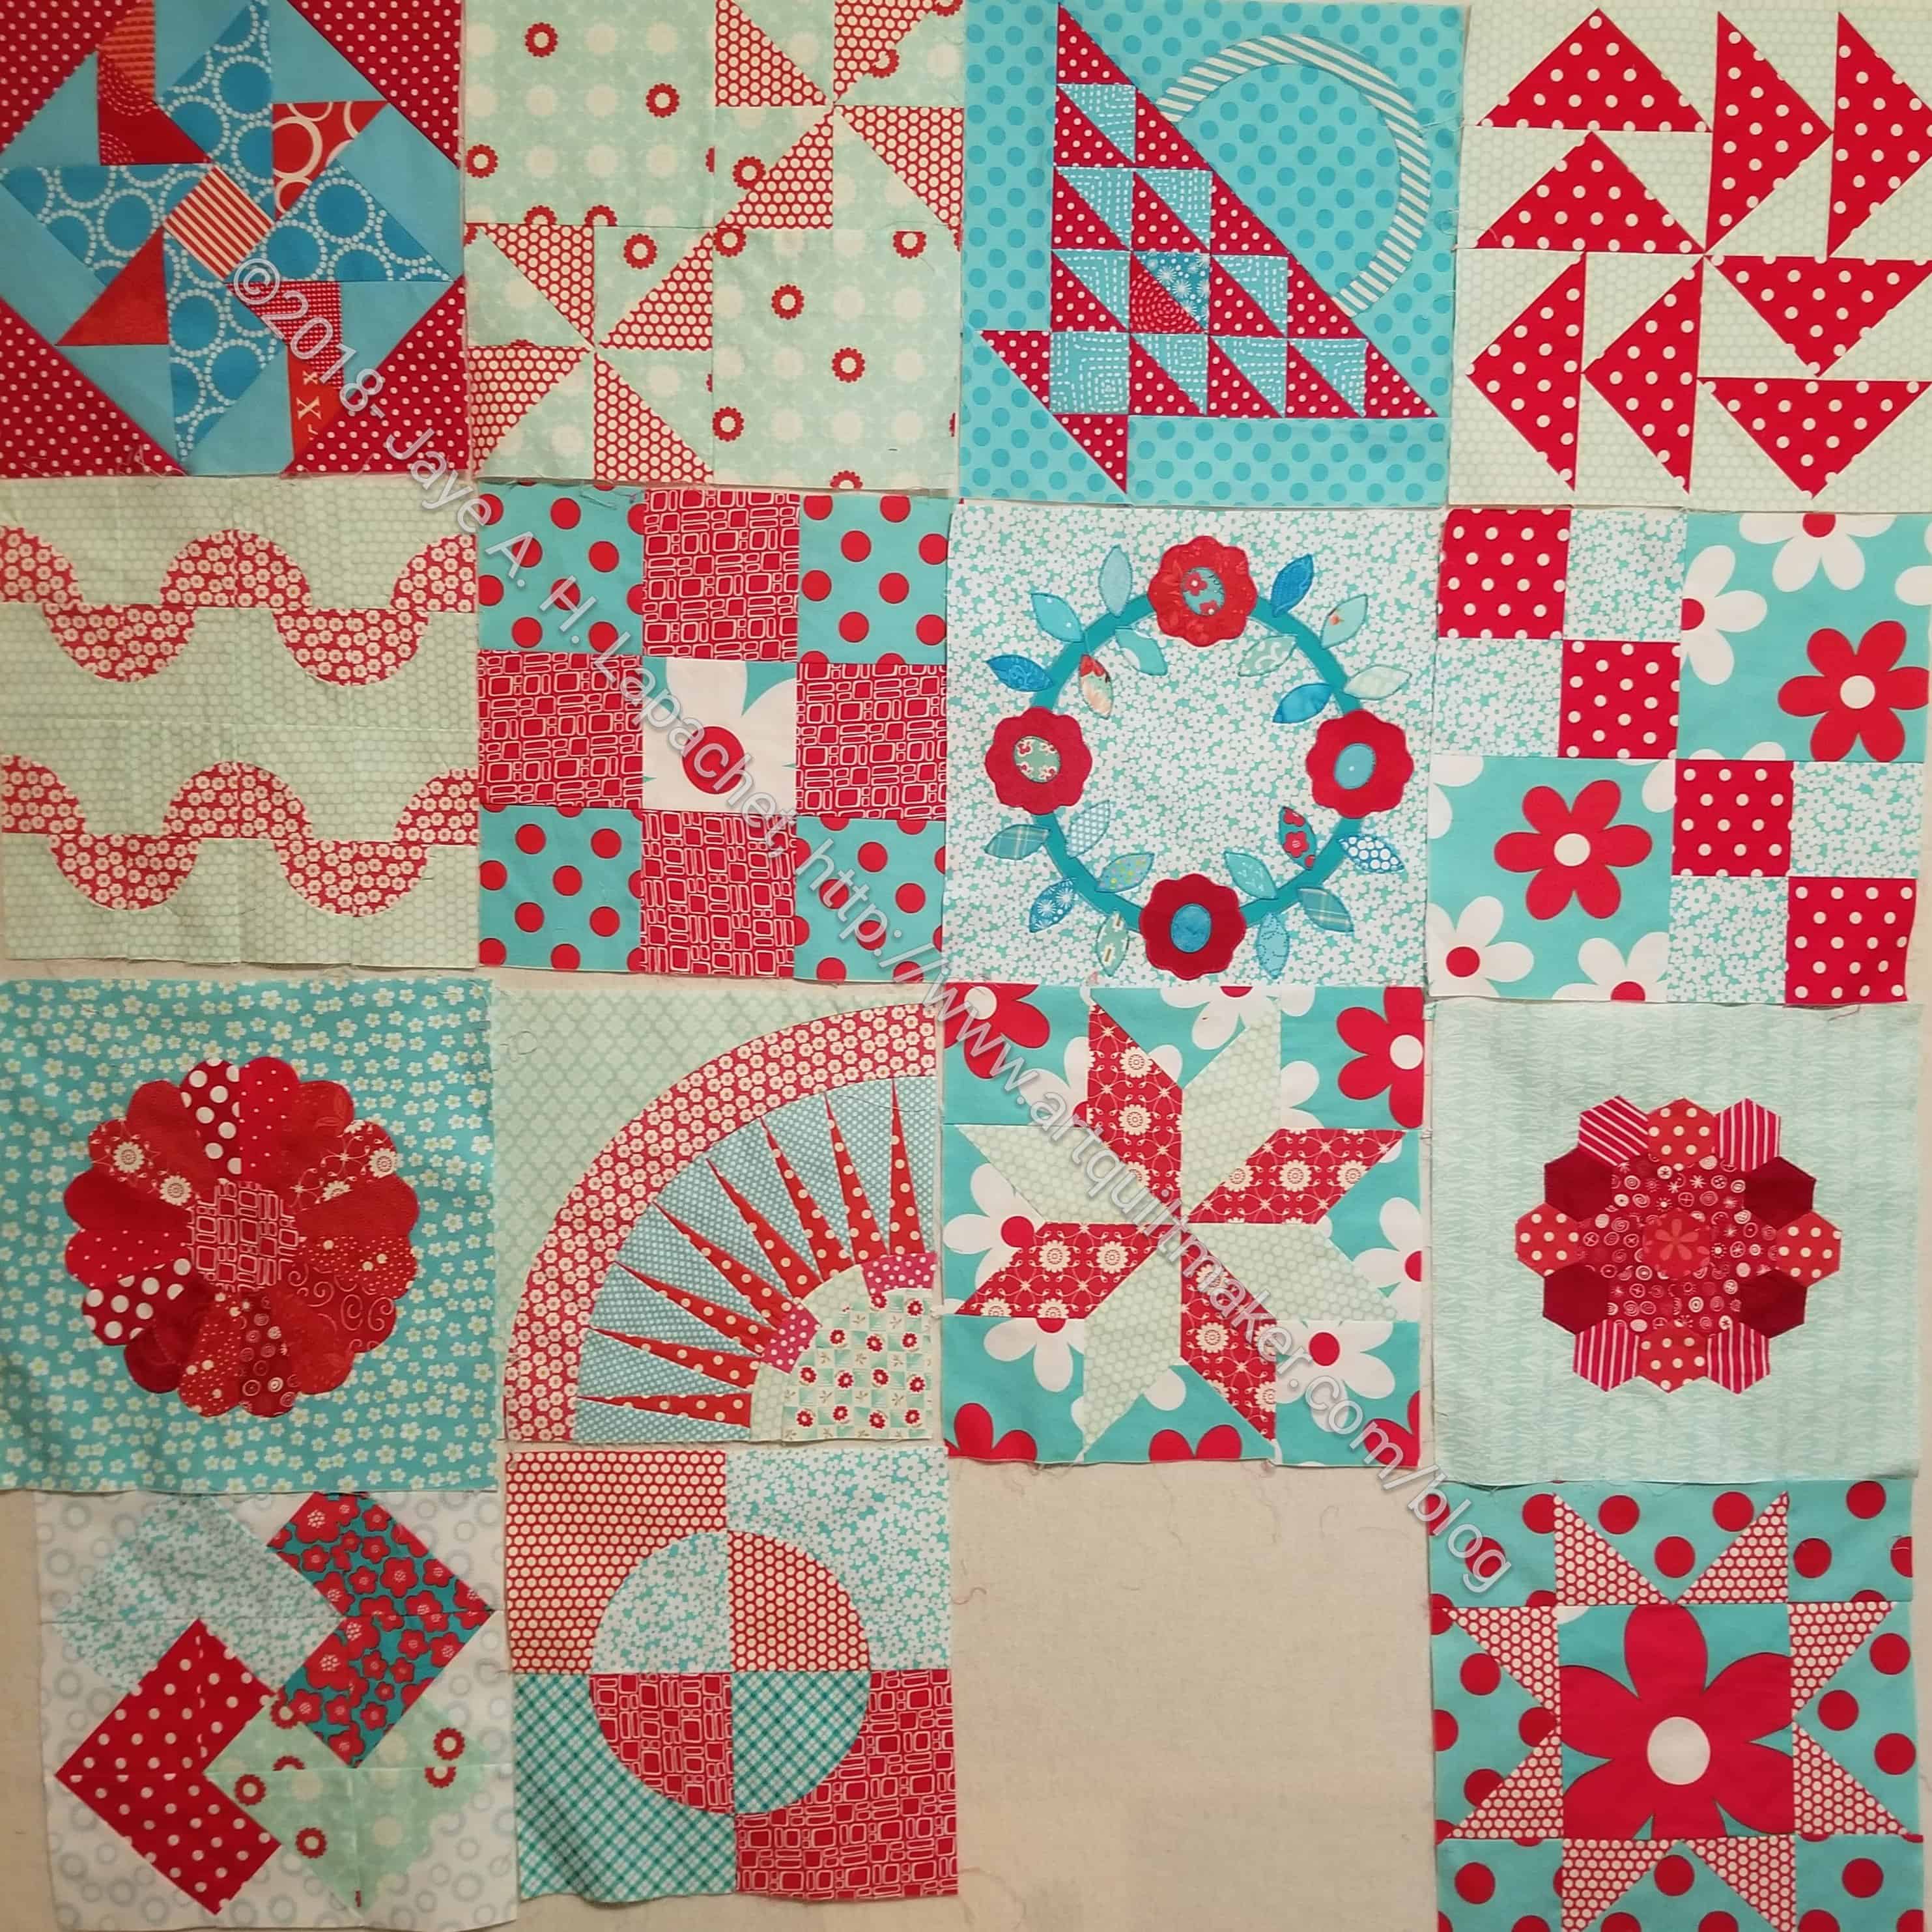
Red Strip Donation Blocks
I started out with the above group of donation blocks. I have been setting these with plain blocks of the same size. I decided that I wanted to do something different with these blocks. Sashing is the answer. Having something between these blocks prevents the seams from getting too thick and hard to sew. Also, it allows each block to shine a little bit rather than being part of a mass. Adding sashing or plain borders or nothing is a design choice. For any quilt, it is important to decide on the look and feel you want.
Even if you put the same sized plain blocks between these blocks, the method I will show you works the same way.
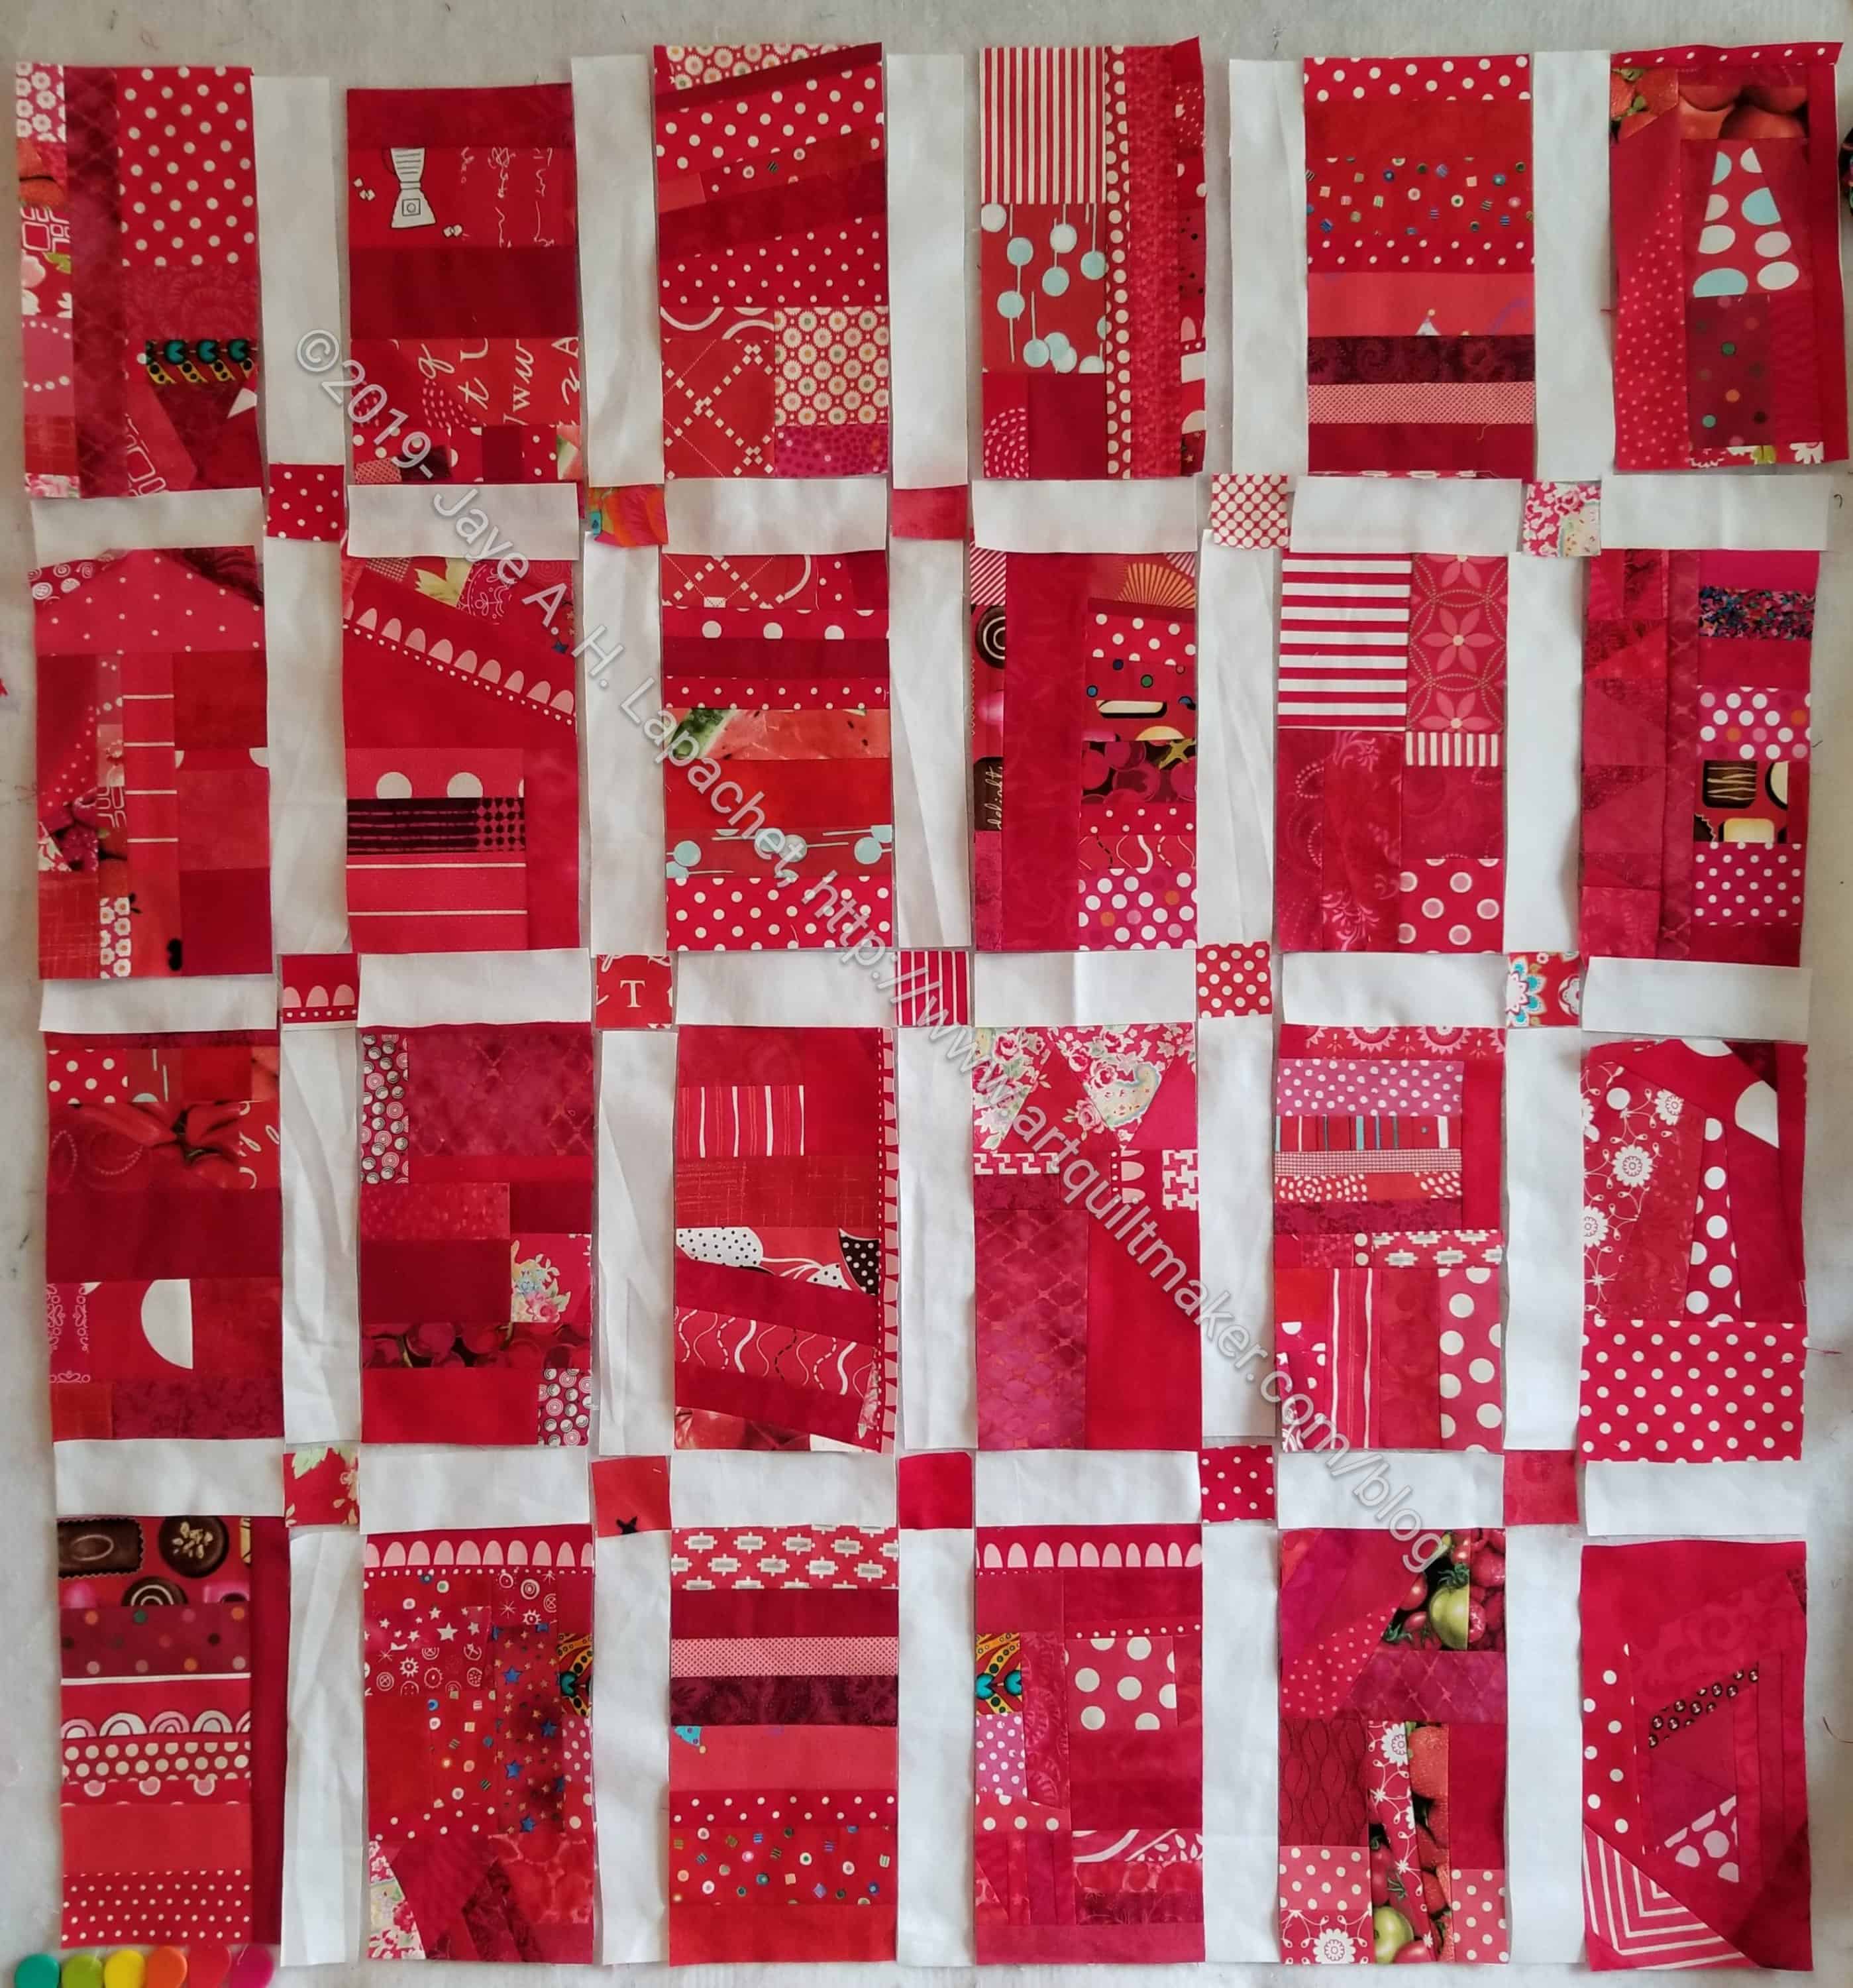
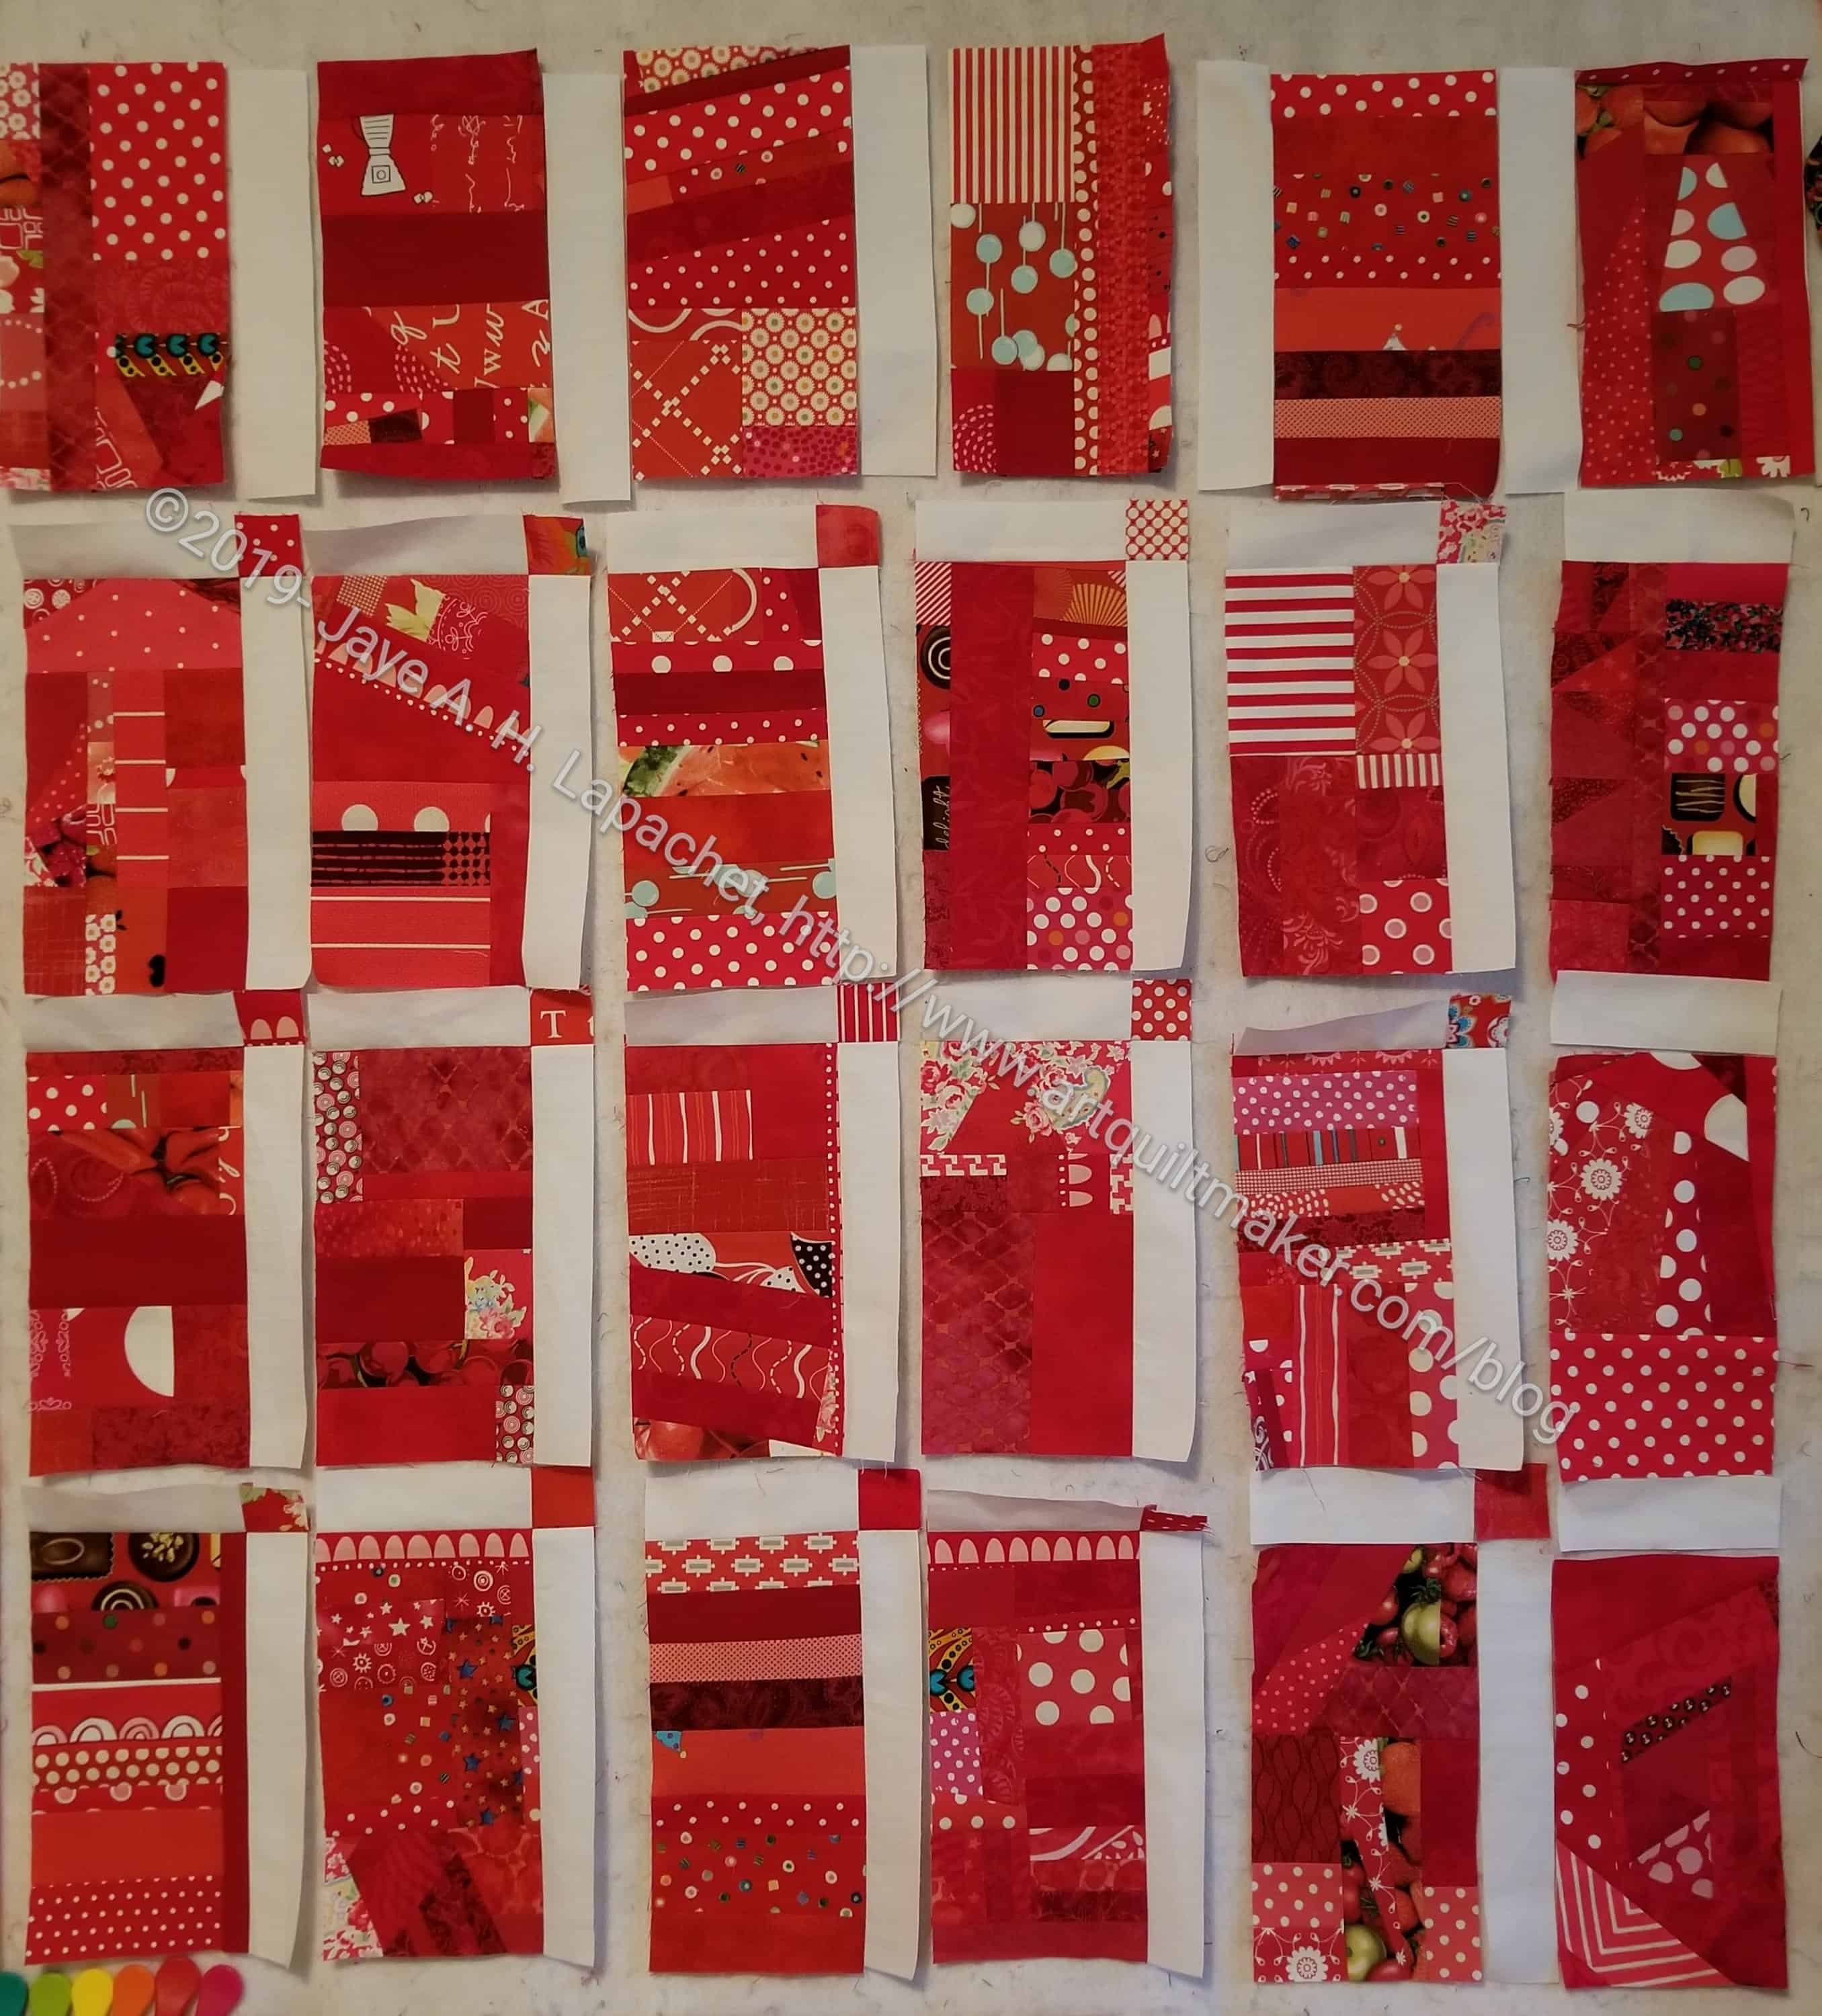
Blocks with Sashing & Cornerstones
The first step is to cut sashing and cornerstones. The photo above shows all the sashing and cornerstones cut and laid out on my design wall.
If you don’t want cornerstones, cut your top sashing the same size as your block + side sashing – 1/2 inch seam allowance (1/4 inch + 1/4 inch = half inch). The formula is:
Block size + vertical sashing – 1/2 inch seam allowance = finished size of top sashing without cornerstones
I can’t tell you the exact size, because I don’t have your blocks in front of me. Use a calculator. I do.
Also, notice that my top and side rows are different. I plan to put a straight strip of fabric across the top and sides as a border, which means I don’t need sashing for the top or sides.
Once you have all of your sashing and cornerstones cut, it is time to sew. I like to start in the bottom left hand corner. I start there because it is closer to my sewing machine when all the blocks are on my design wall. As I sew, the blocks shrink (because of the taken up seam allowance) and get closer to where I am sitting.
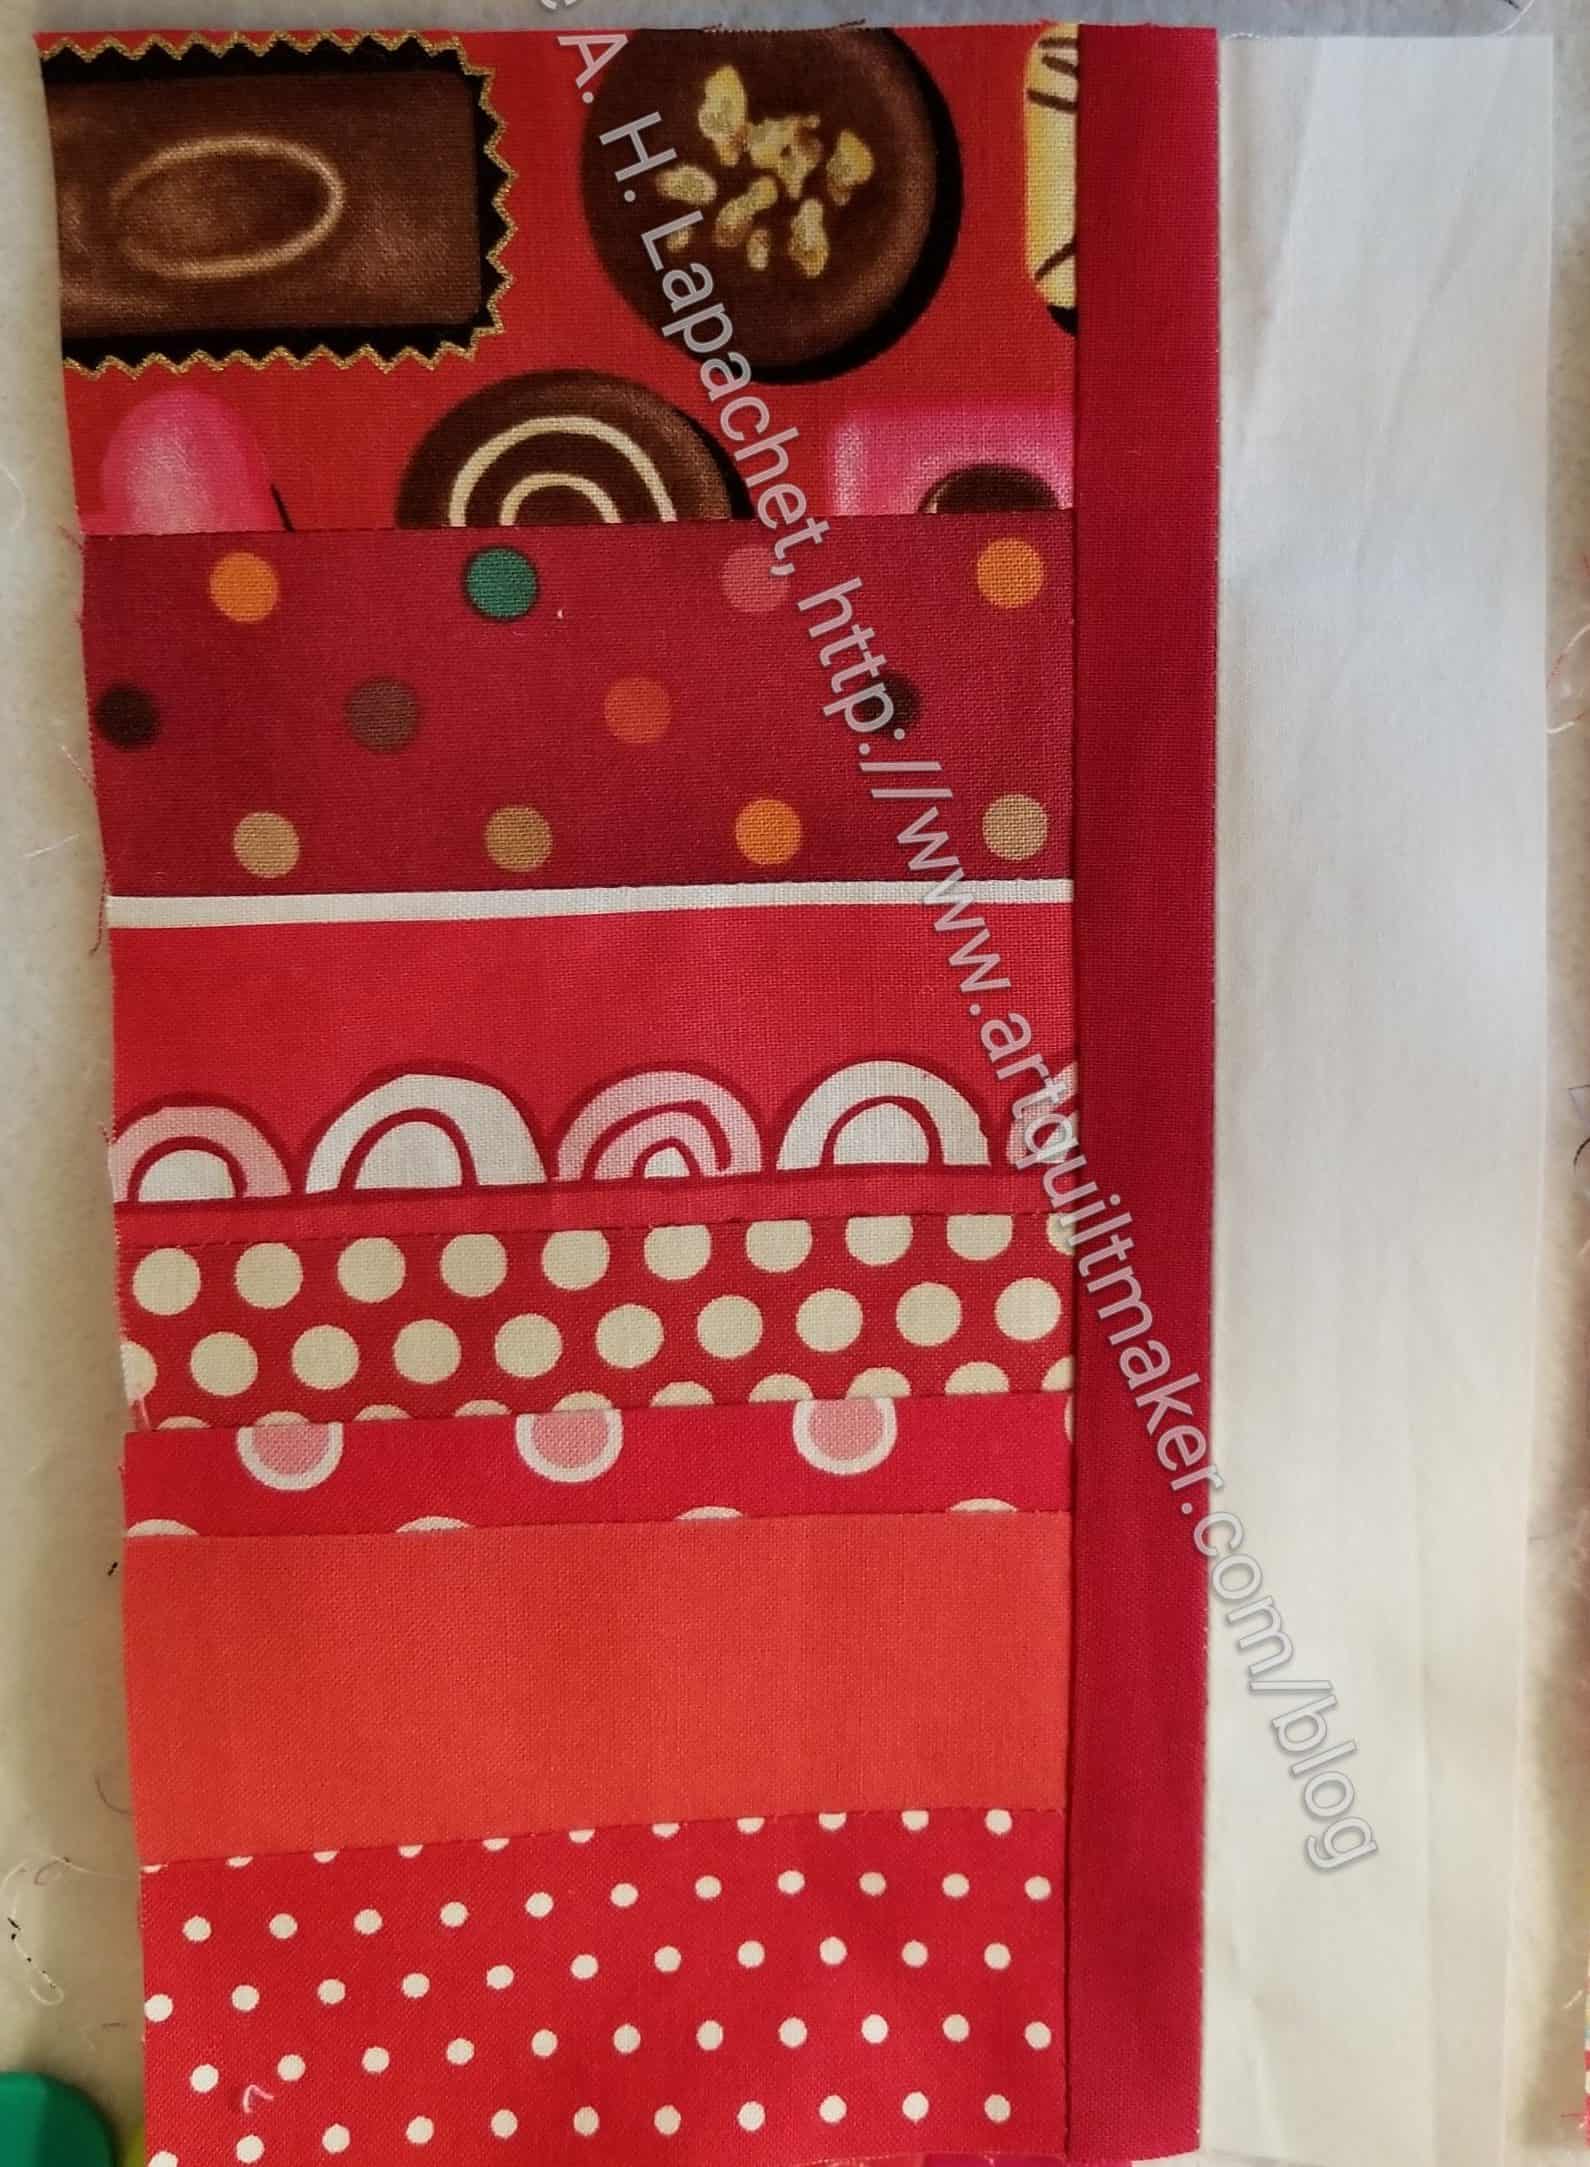
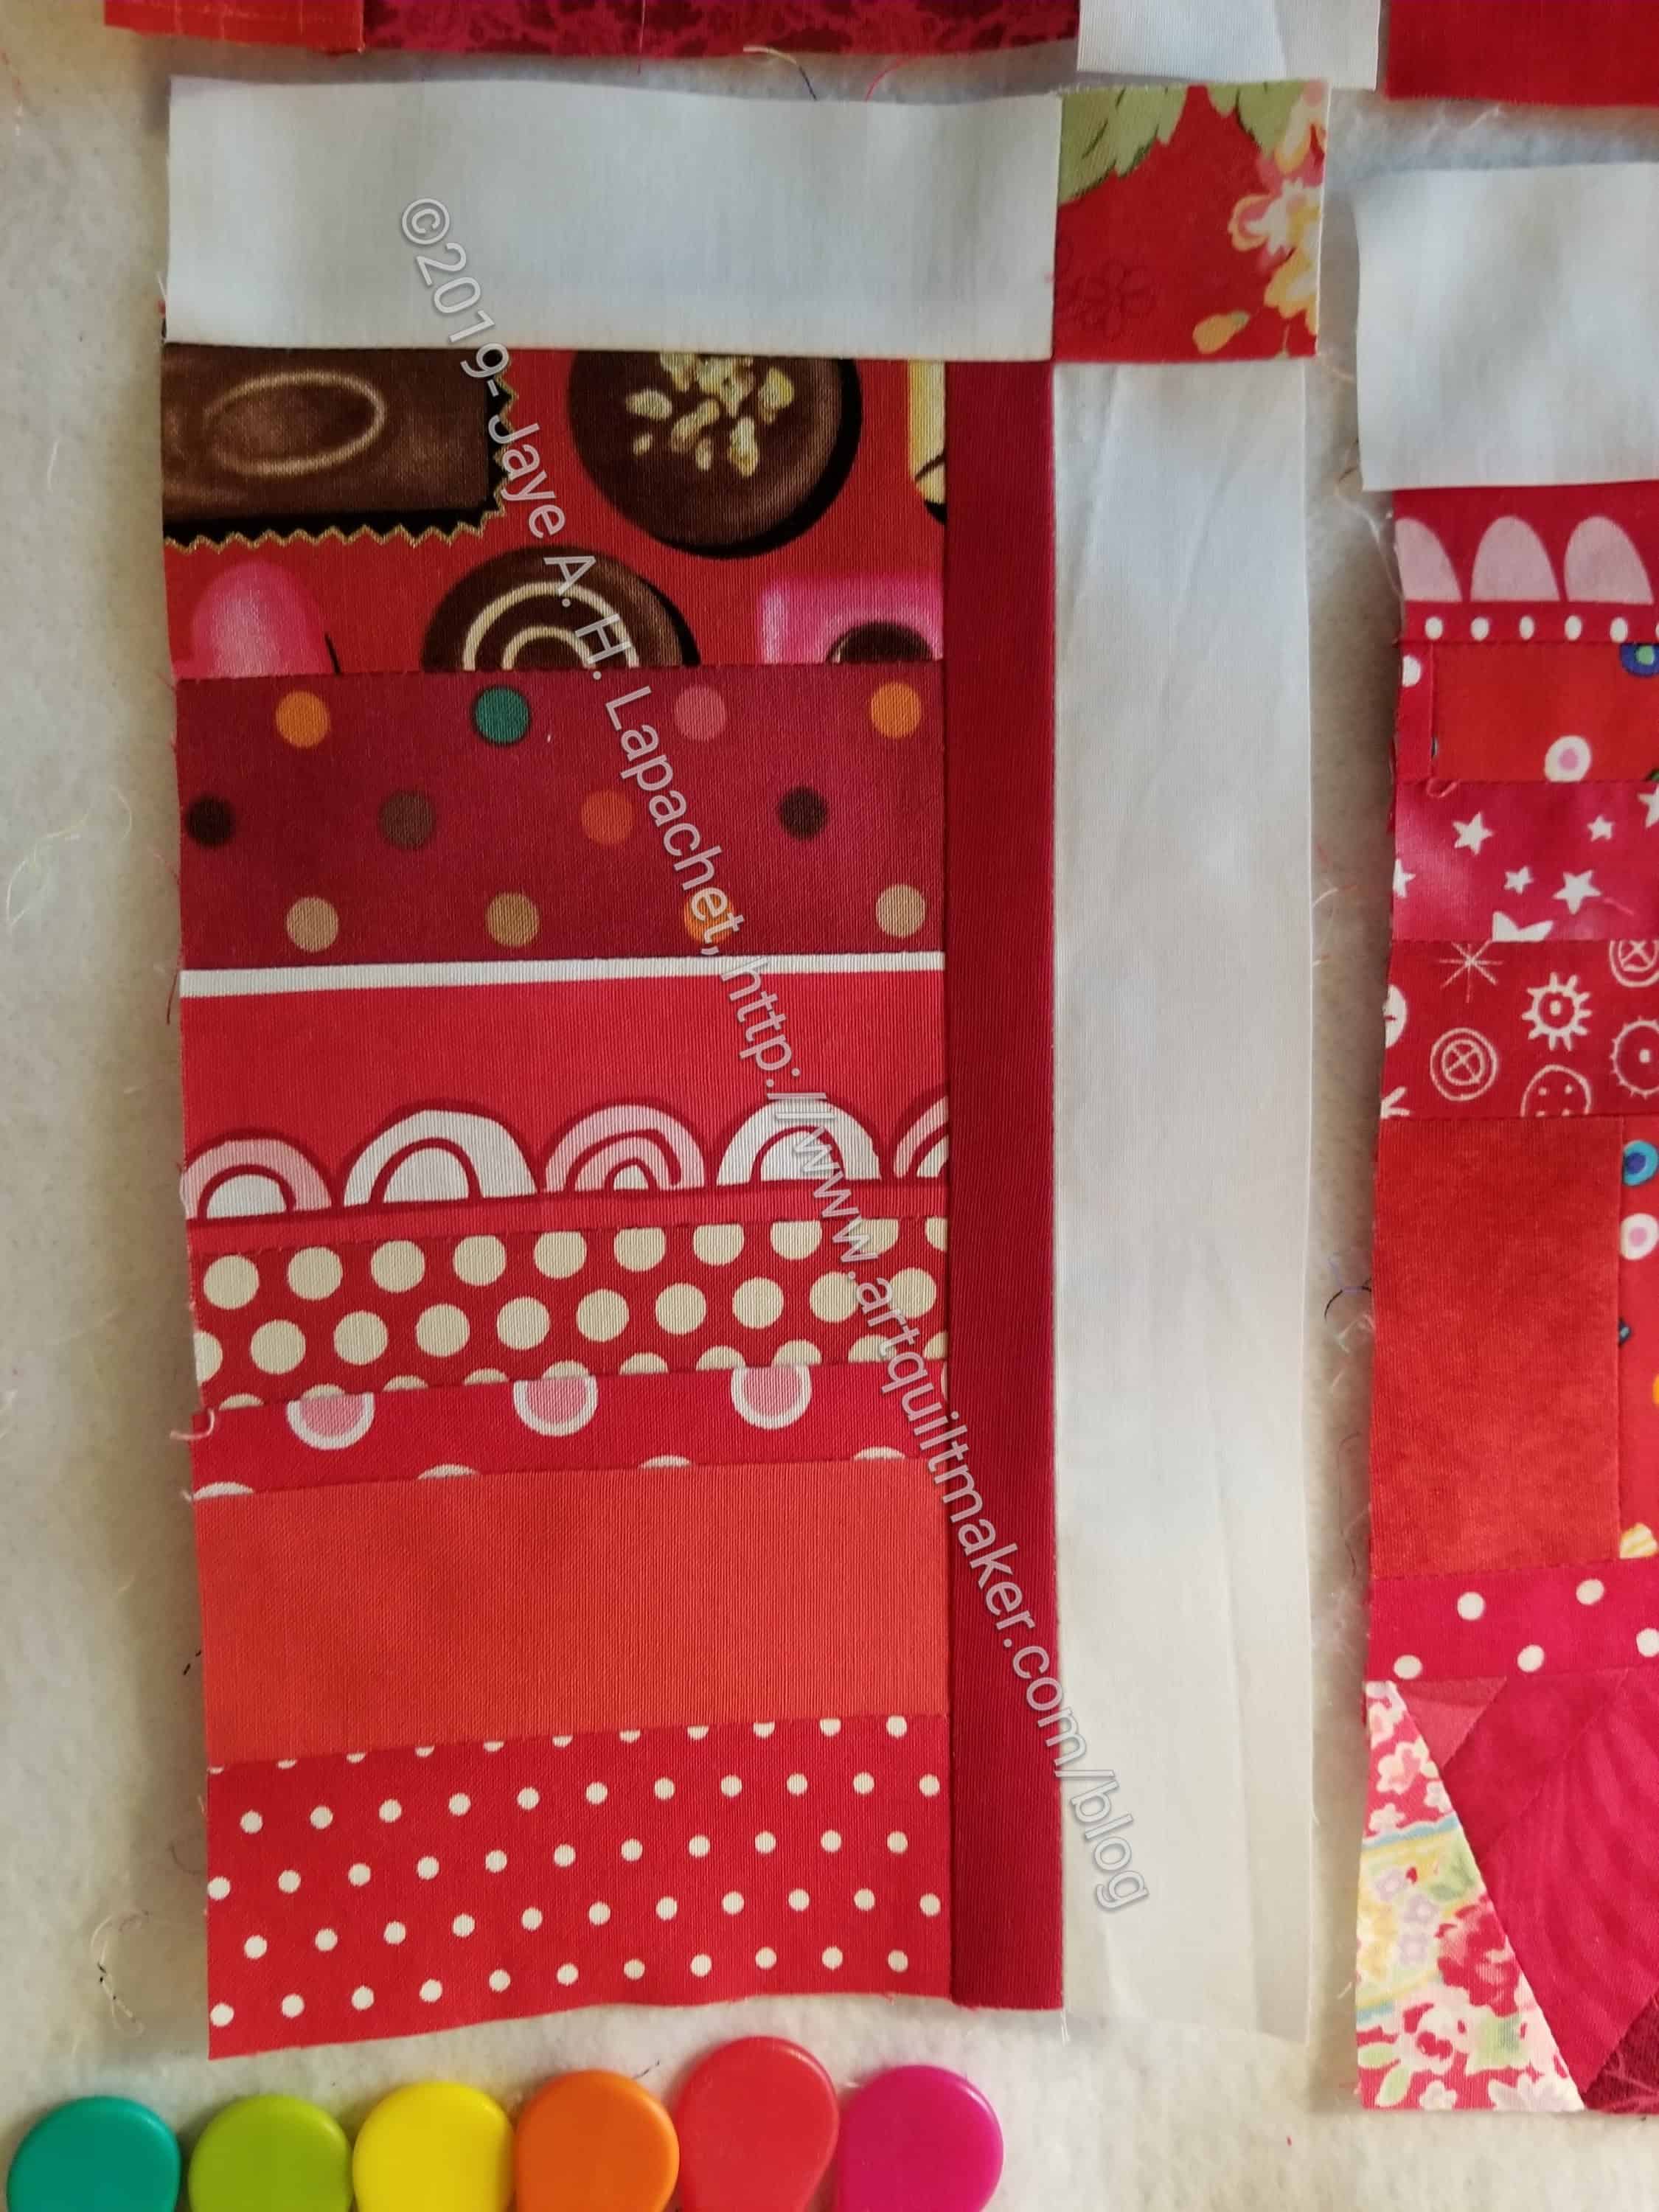
Sew vertical sashing to right side of block
First, sew one vertical sashing piece to the right side of your block.
Press to the red.
Sew top sashing to cornerstone
Next, sew one piece of the top sashing to a cornerstone. In the above photo the sashing is white and the cornerstone is a red flower fabric.
Take your new little sashing + cornerstone piece to the ironing board and press to the red.
Now, nest the seams and pin the top sashing/cornerstone piece to the block with vertical sashing.
The top sashing should be on the top of the block as it moves through the sewing machine. Sew the top sashing to the block.
Top sashing sewn to block with vertical sashing
Sew the side sashing and the top sashing/cornerstone to all the blocks as described above.
IMPORTANT: The top row, as mentioned above, in my quilt, is different, so just sew the vertical sashing to the blocks in the top row and the top sashing to the blocks on the right edge.
All of the blocks have sashing/cornerstones sewn to their correct side
Once you have sewn all the sashing on to the blocks, you will begin to sew the blocks together. This is chunking. I have talked about it before. I ‘chunk’ because 1) I don’t like sewing long rows together and 2) it keeps my piecing more precise.
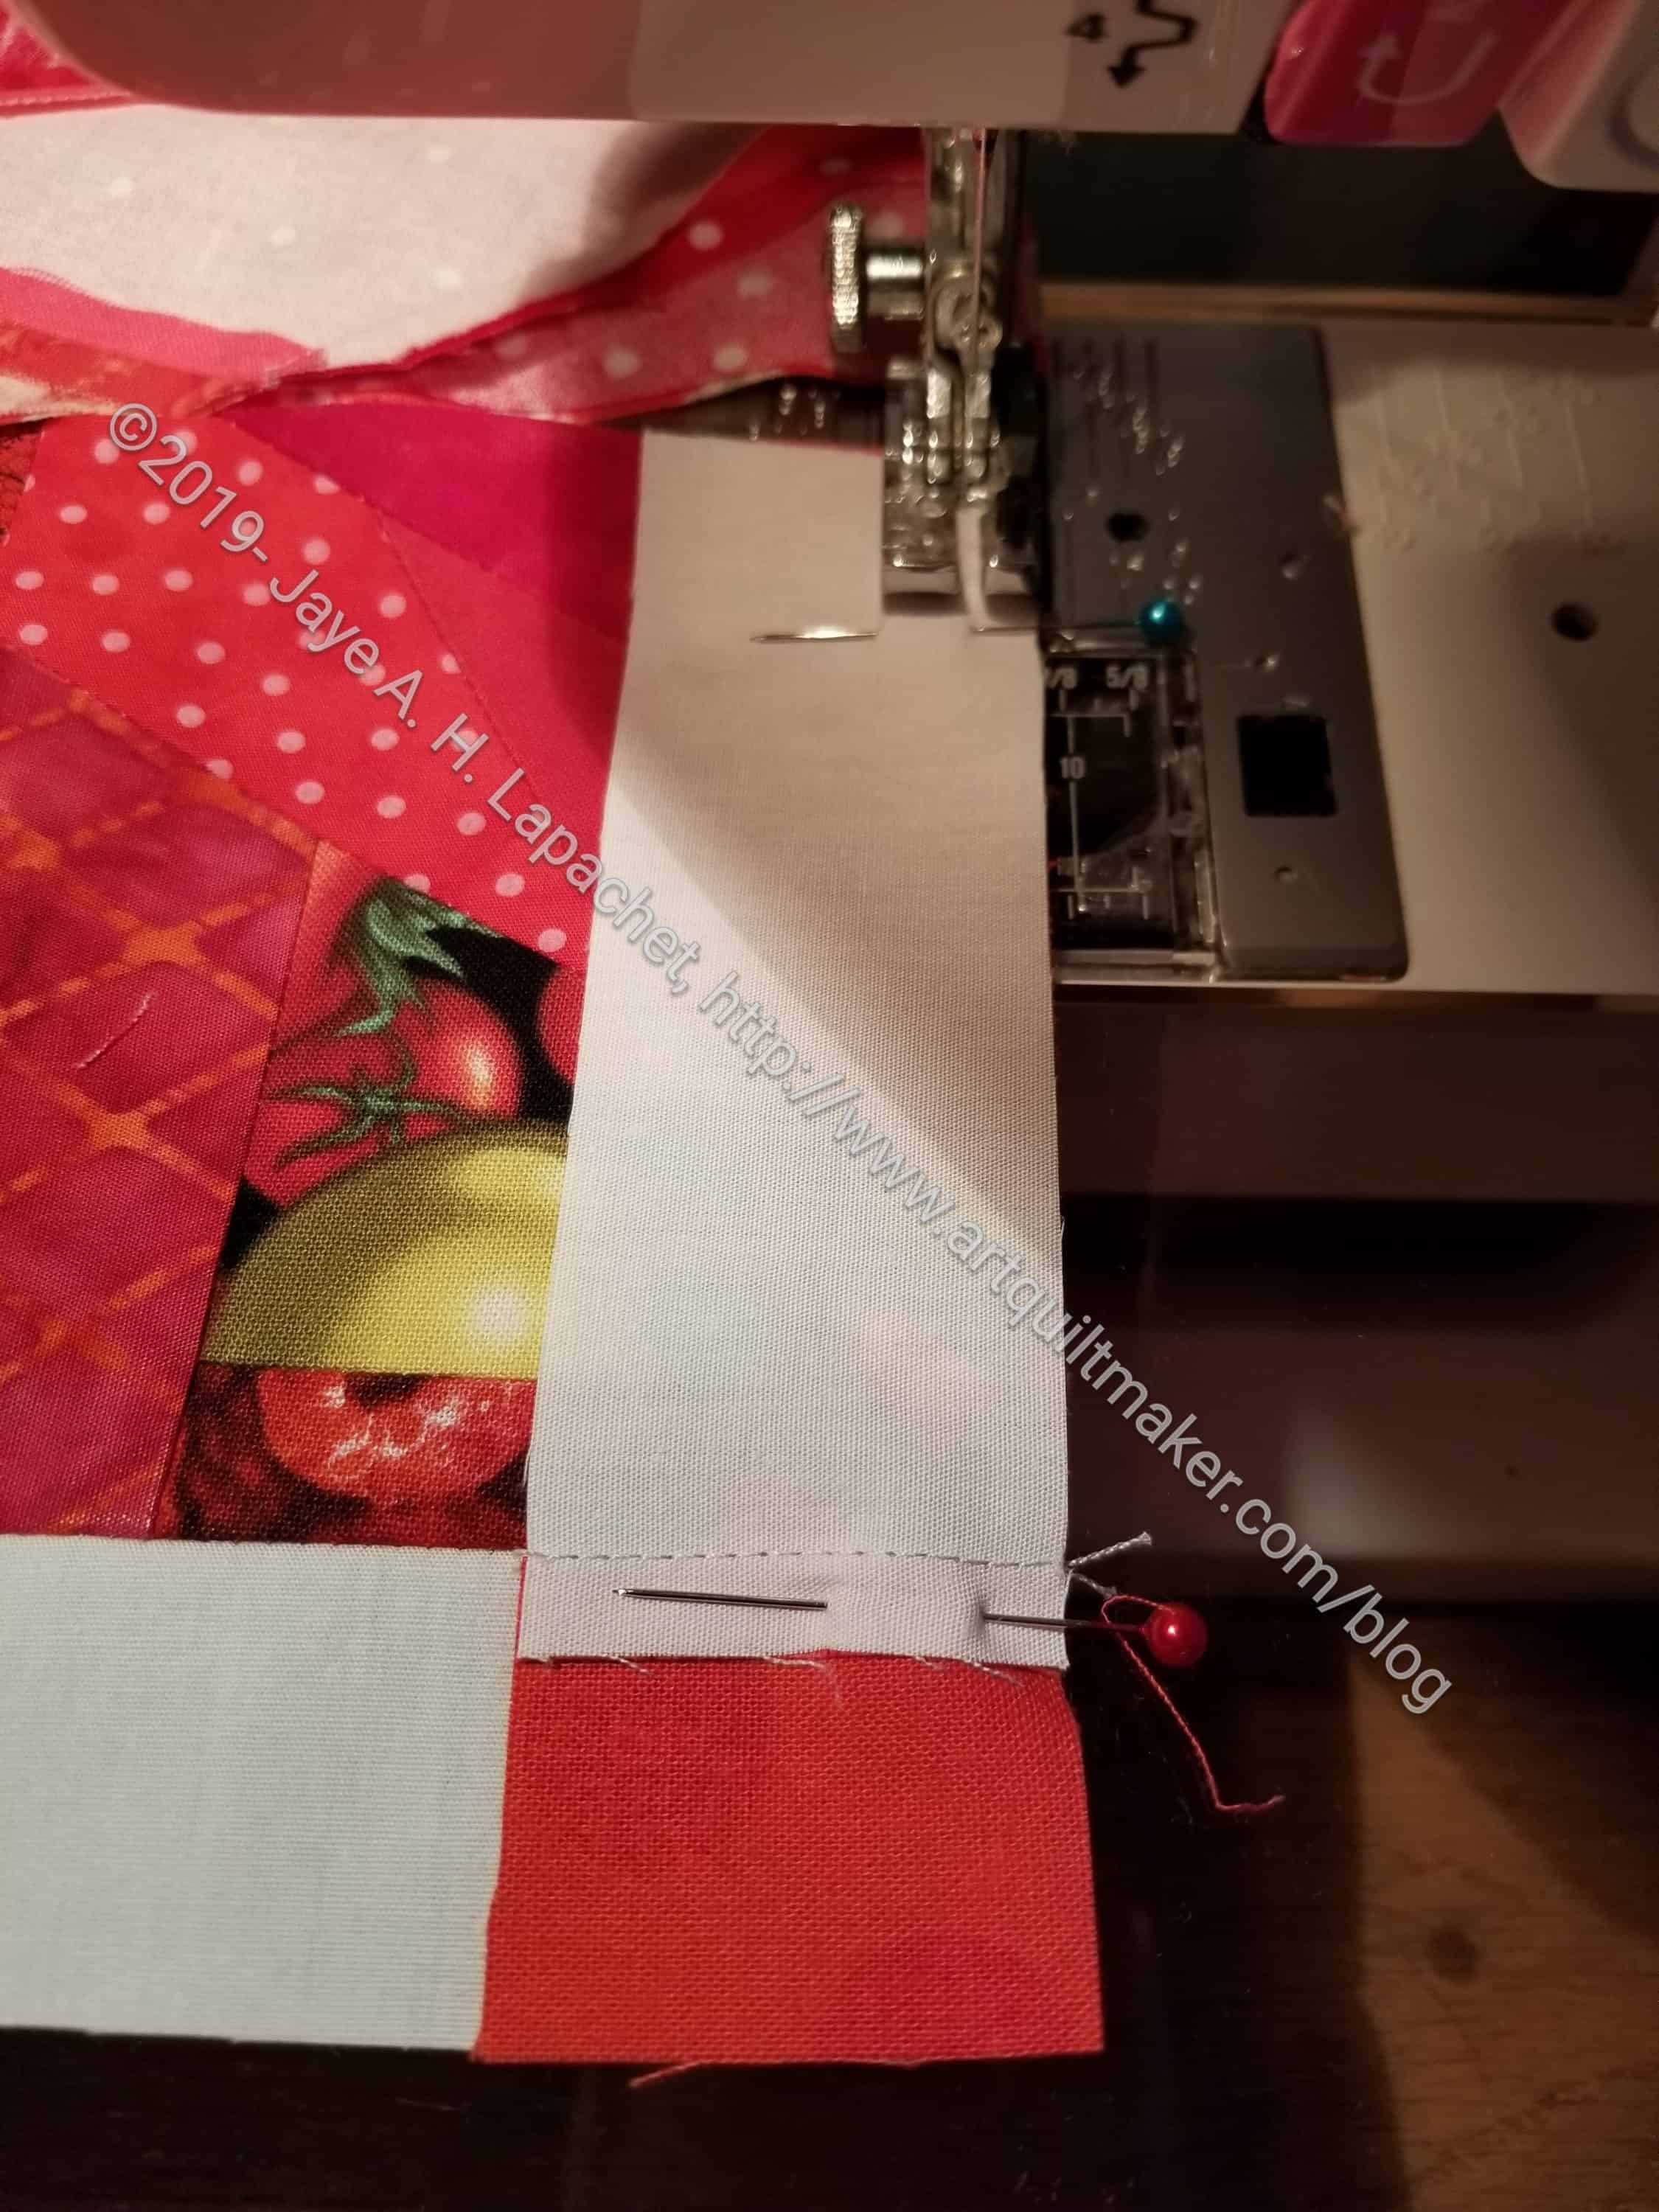
Take two blocks with sashing & sew them togetherPin blocks together, matching seams and sew
First take the two blocks in the bottom left hand corner, pin them with matched points and nested seams. You will pin them together so that the top white sashing is sewn to the red cornerstone. The white vertical sashing will be sewn to the red block.
Sew them together. I pin in the seam allowance so that i have a better chance at the seams matching up. When I take the pins out as I am sewing, chances increase that the seams won’t match. In general, to increase my chances of perfectly matching seams, I try to sew towards the seam allowance, but that didn’t work on this quilt, because I pressed towards the red. Use a stiletto to keep the seams in place for as long as possible.
Two blocks with sashing sewn together
Now you have a block with sashing on two sides.
Once you have sewn all of the sashing and cornerstones to the blocks, you will have completed the first step in putting your quilt top together.
Sew sashing to top of blocks on the right edge only
On the right edge of the quilt, you will only sew the top sashing to the blocks. As mentioned before, there will be a border without cornerstones in my quilt, so I don’t need vertical sashing or cornerstones on the edges. If you want cornerstones in your border, follow the directions above for all blocks.
One long seam left
After you have sewn the various blocks together, you will have one long seam left.
Finished Center with sashing
Once you sew that seam, the center of your quilt top is done.
I know that the common way of sewing a quilt together is sewing it together in rows then sewing all the rows together. Using the row method is easier to explain than ‘chunking’, but, as I said above, my method is more precise.
**I use affiliate links and may be paid for your purchase of an item when you click on an item link in my post. There is no additional cost to you for clicking or purchasing items I recommend. I appreciate your clicks and purchases as it helps support this blog.
Today we are cutting hexagons from strips to make the hexagon block for our sampler quilt. This tutorial is a follow-up to the Large Hexagon tutorial. The principles are the same; the sizes are different.
Cut your strip the unfinished size of your hexagon. In the example, I cut mine 2 3/8 inches. This is 1/8″ larger than I need, but I have a little wiggle room in this block. If you don’t have wiggle room, cut the strip the size of the unfinished hexagon
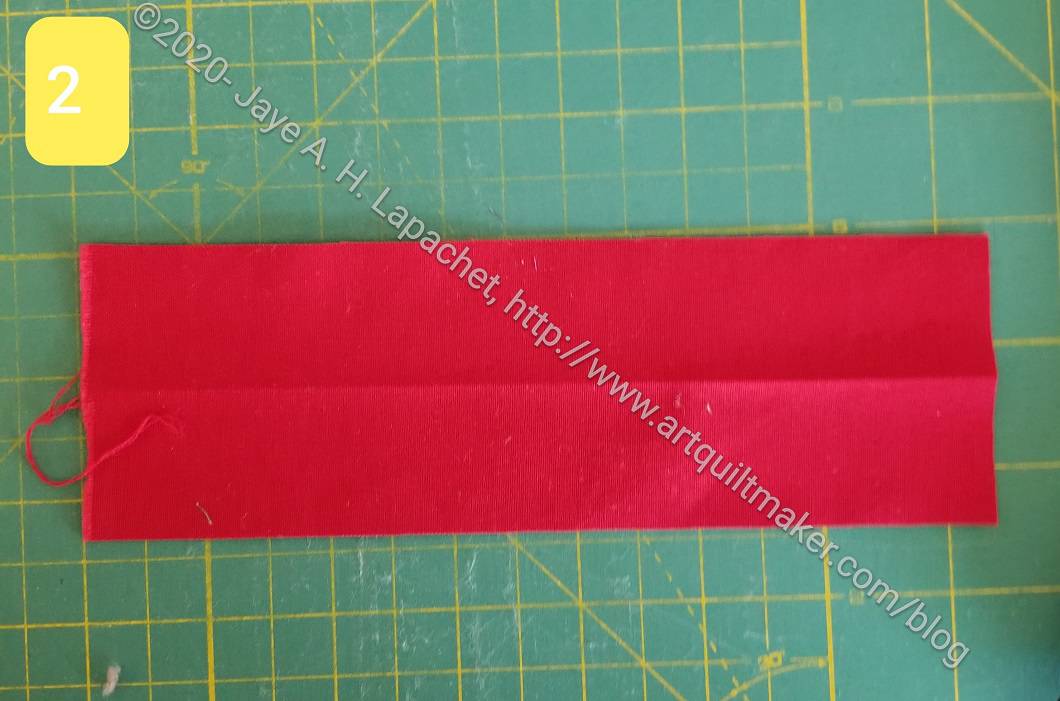
Strip cut to sizeFold your strip in half lengthwise
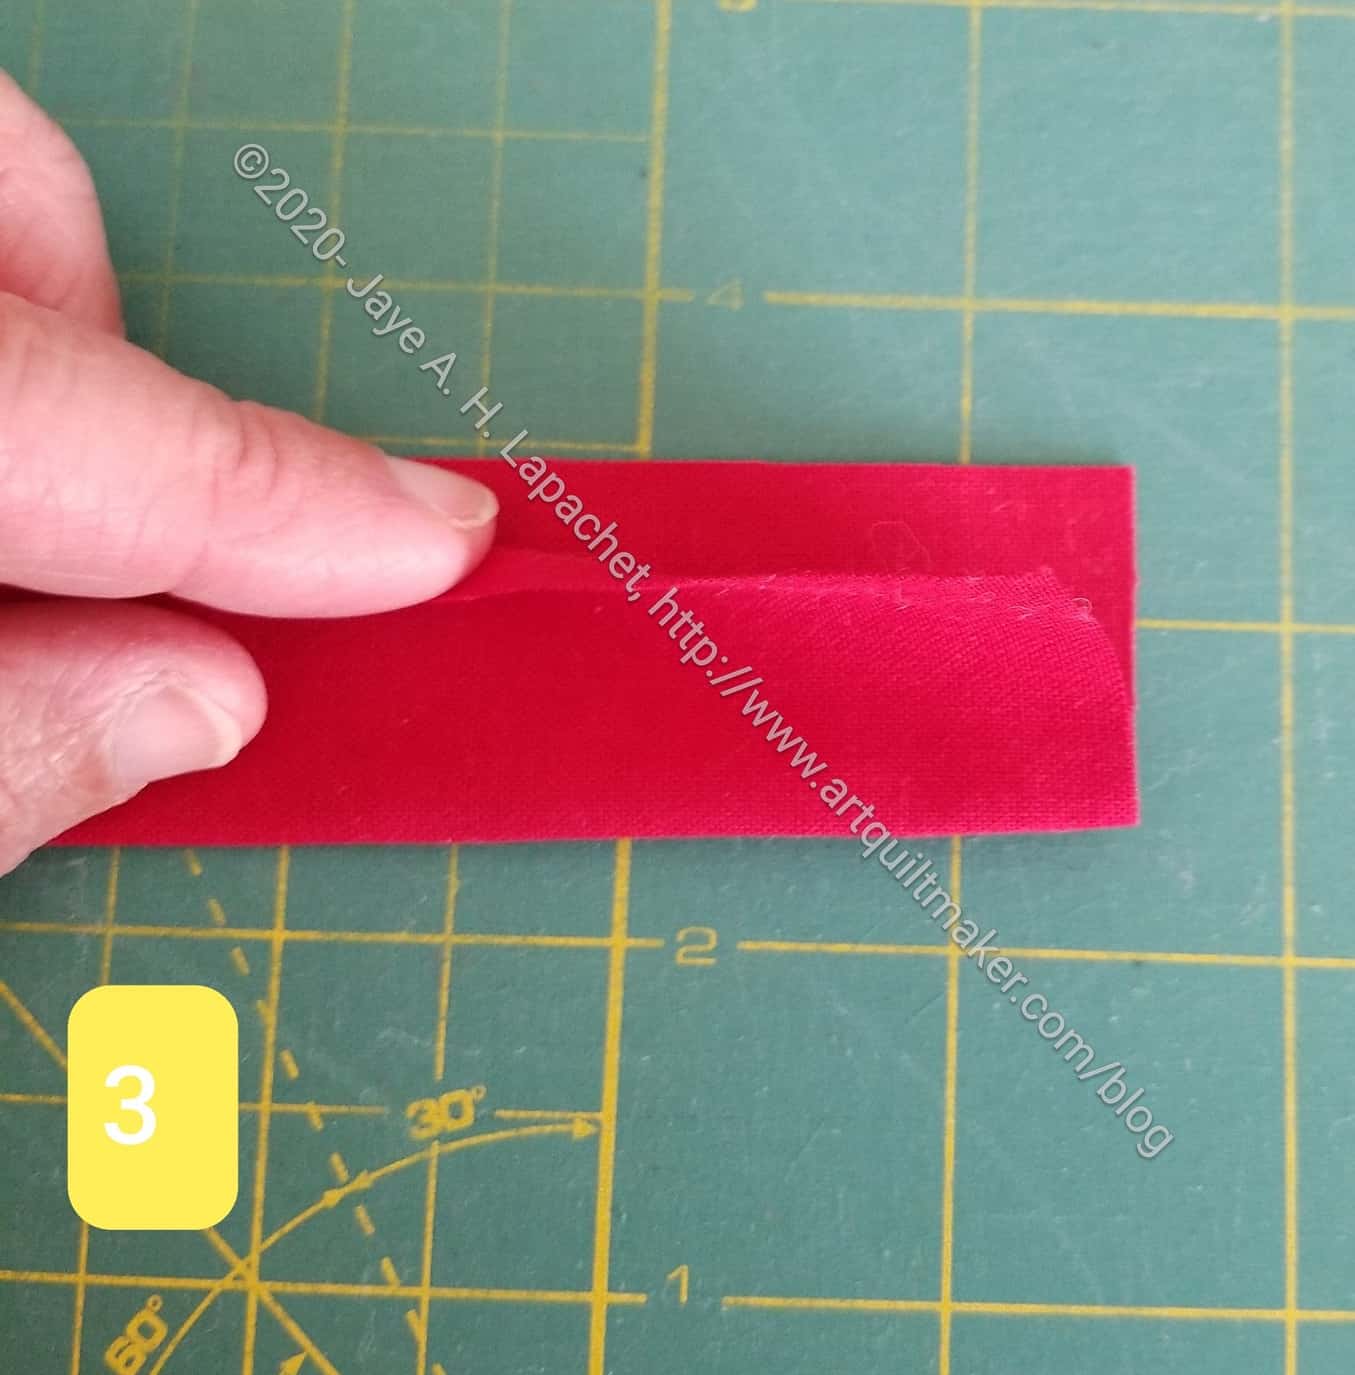
Fold your strip in half lengthwise
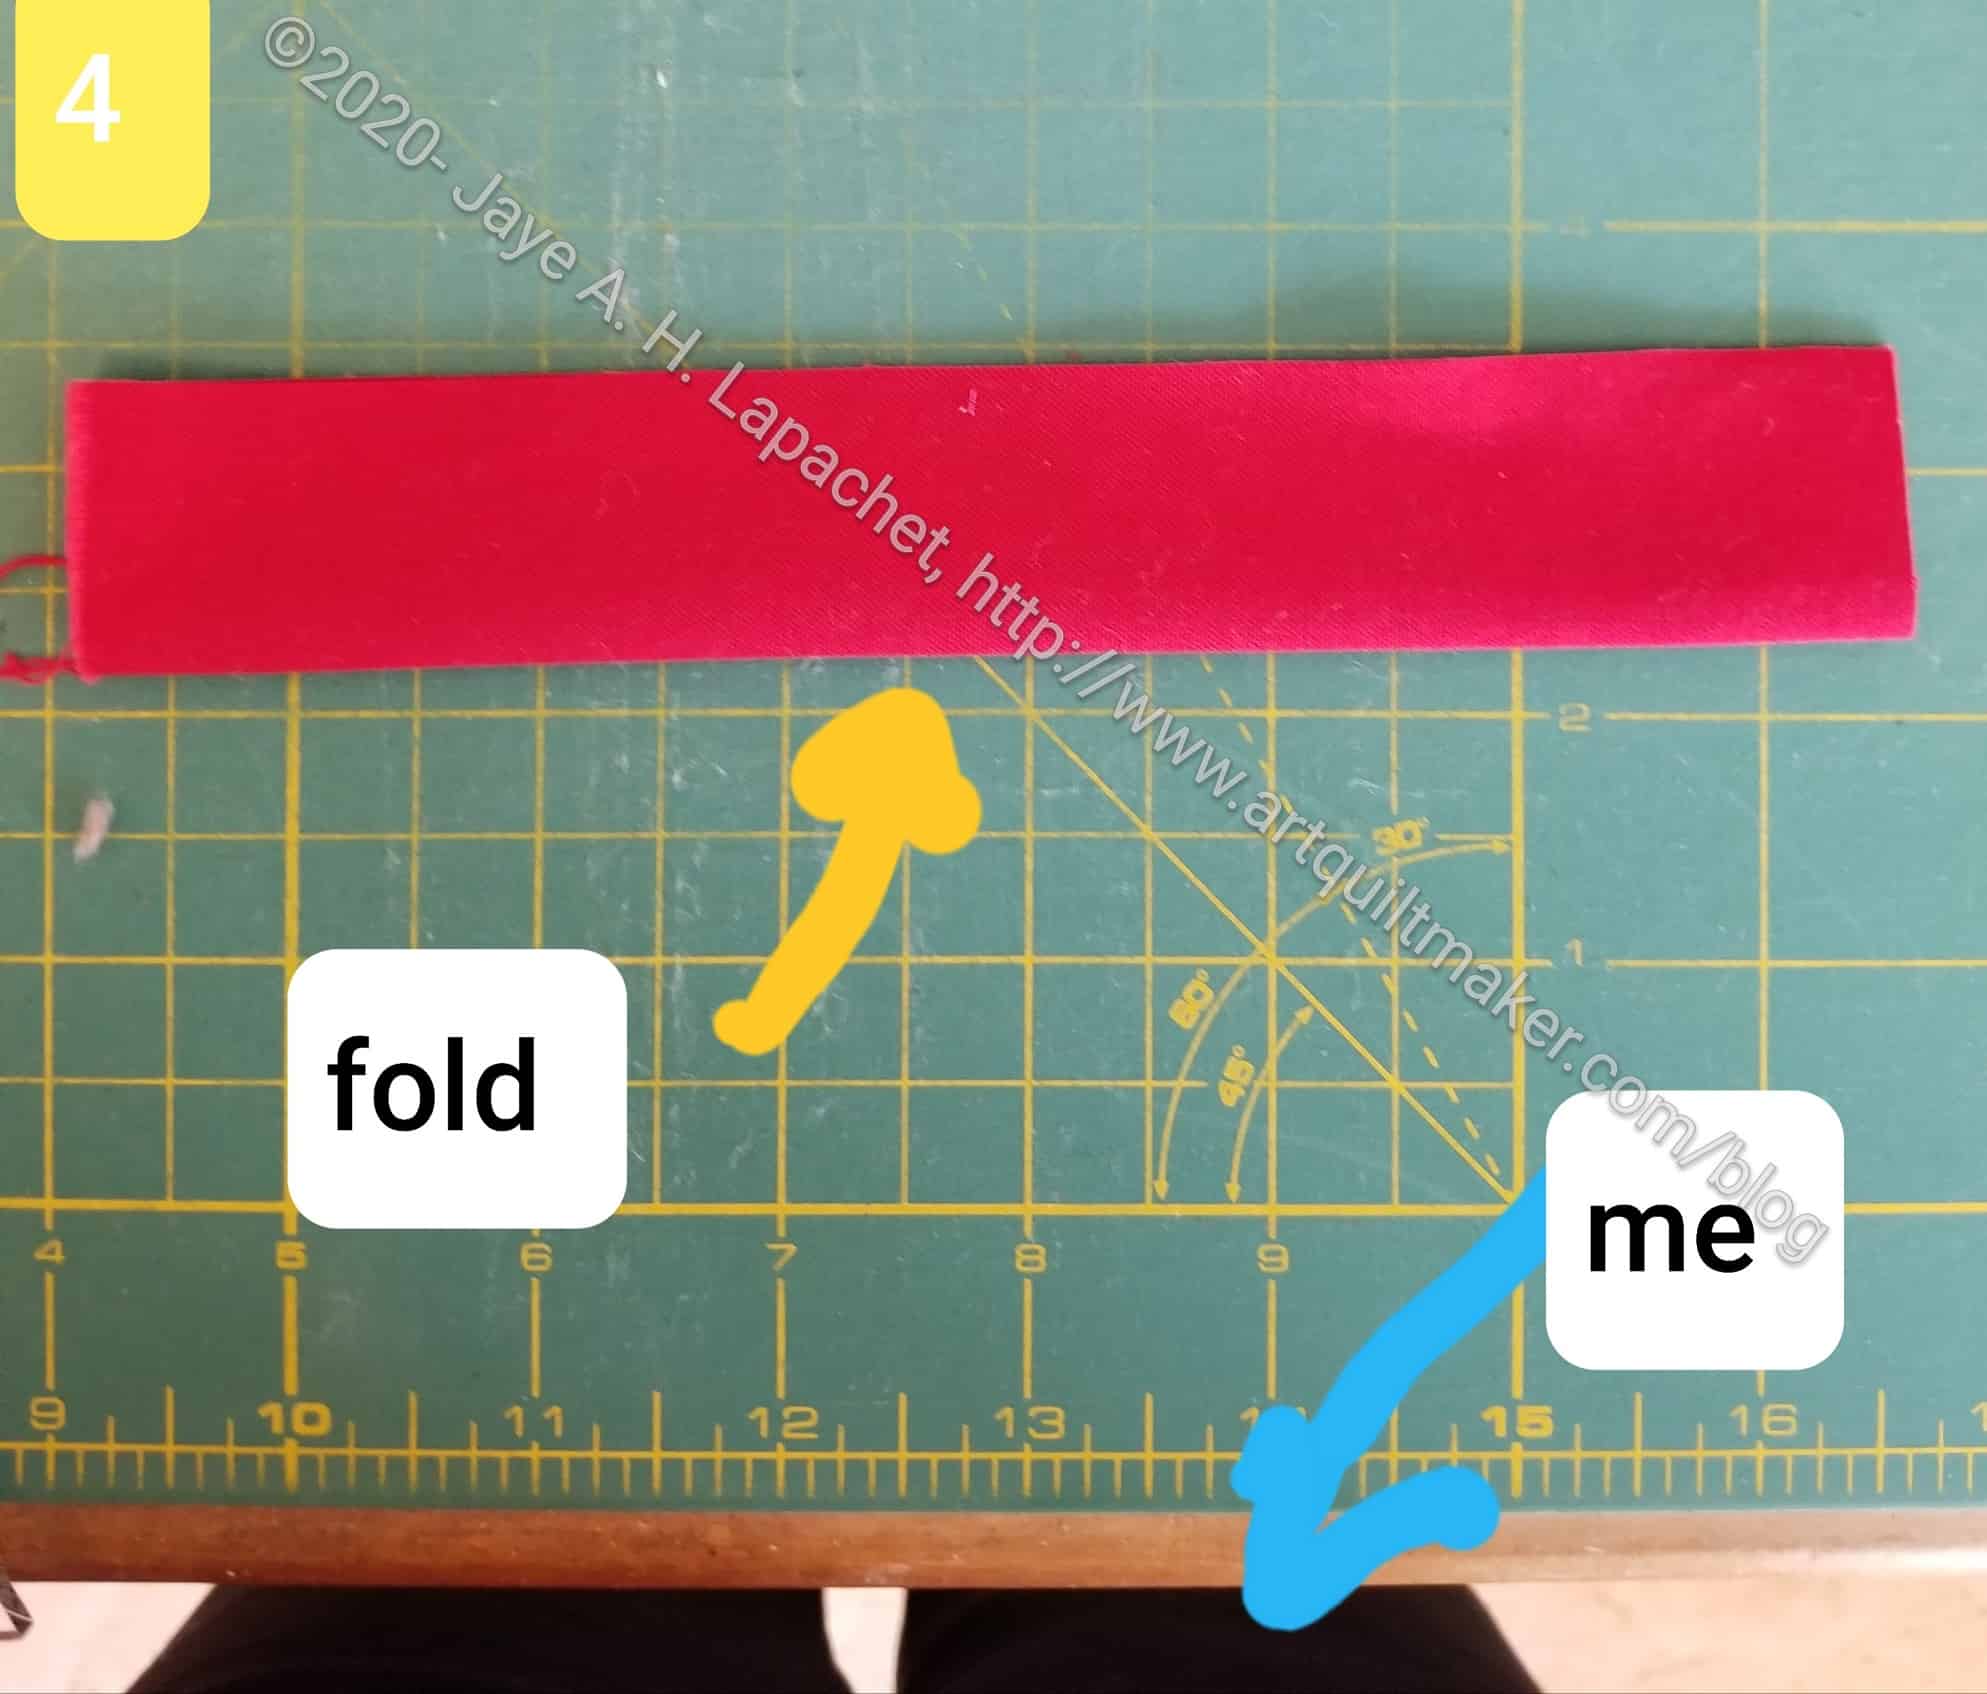
Position strip with fold near you
Position the strip so the fold is closest to you.
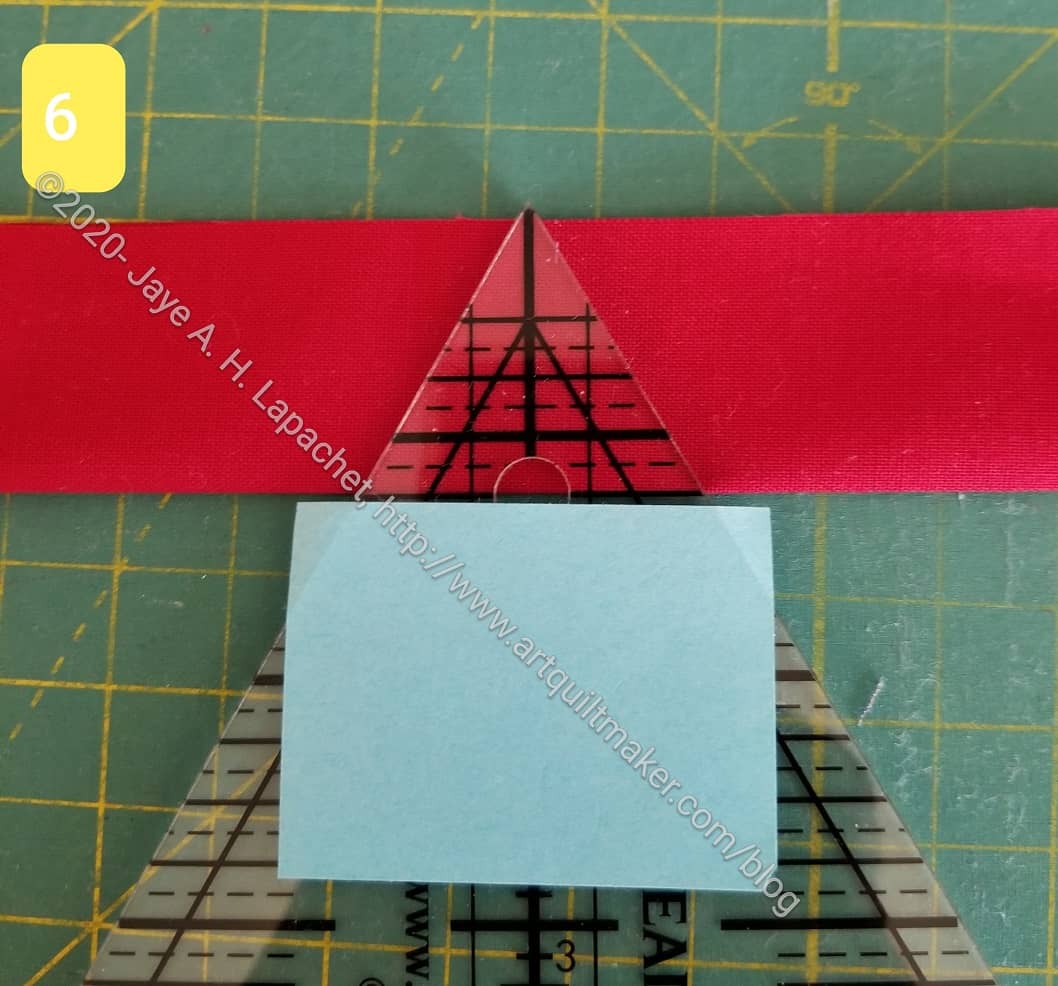
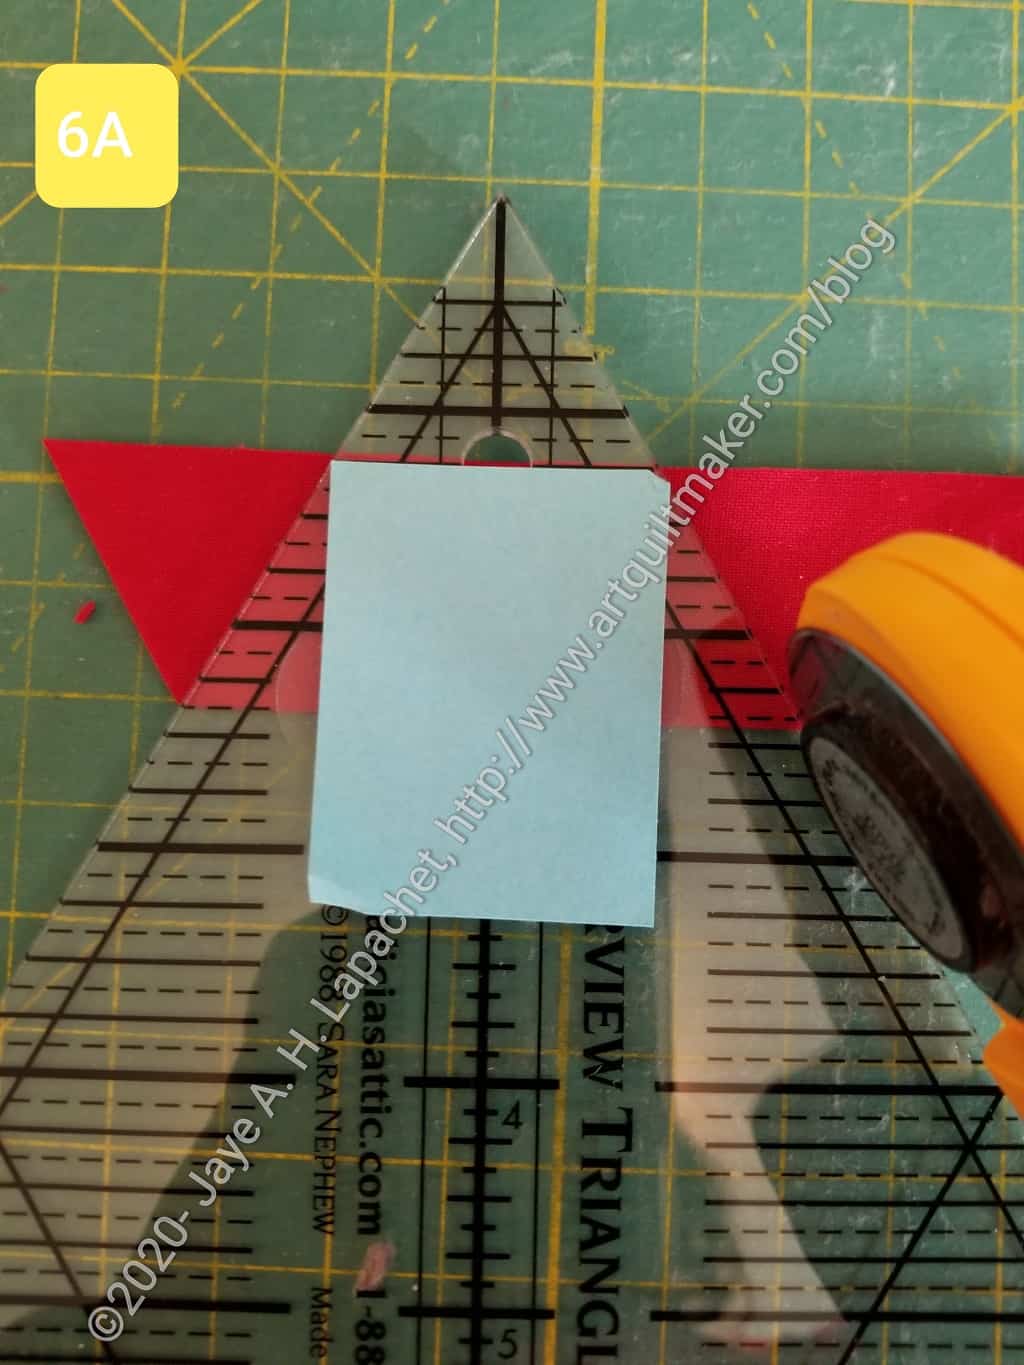
Line up Clearview ruler
Line up your Clearview ruler with the tip on the raw edge
Place post-it note on ruler
Place a post-it note on the ruler. Line up a post-it note with the fold of the strip
Move ruler up even with the raw edge
Move ruler up until the post-it note is lined up with the raw edge of the strip. N.B. I rotated the post it note, because I couldn’t cut with the edges hanging over.
N.B.2- Be very careful if you cut towards you on the left side. It is never a good idea to cut towards you, so I recommend getting a rotating mat. Place your strip on the rotating mat, make your first cut the rotate the mat and make your second cut.
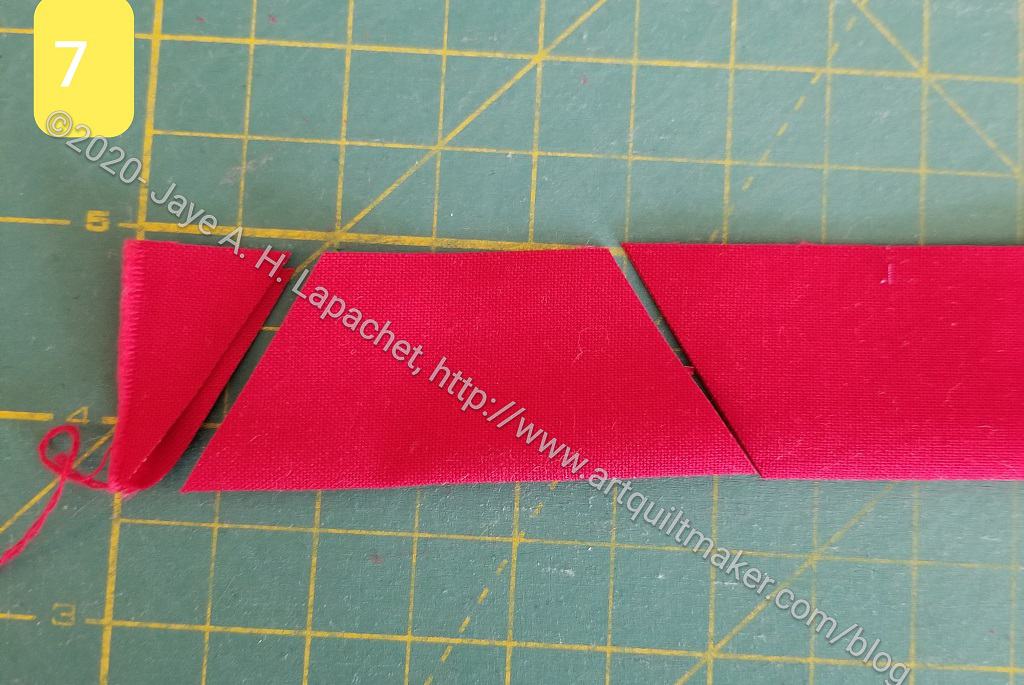
Cut on both sides of the ruler
Cut on both sides of the ruler
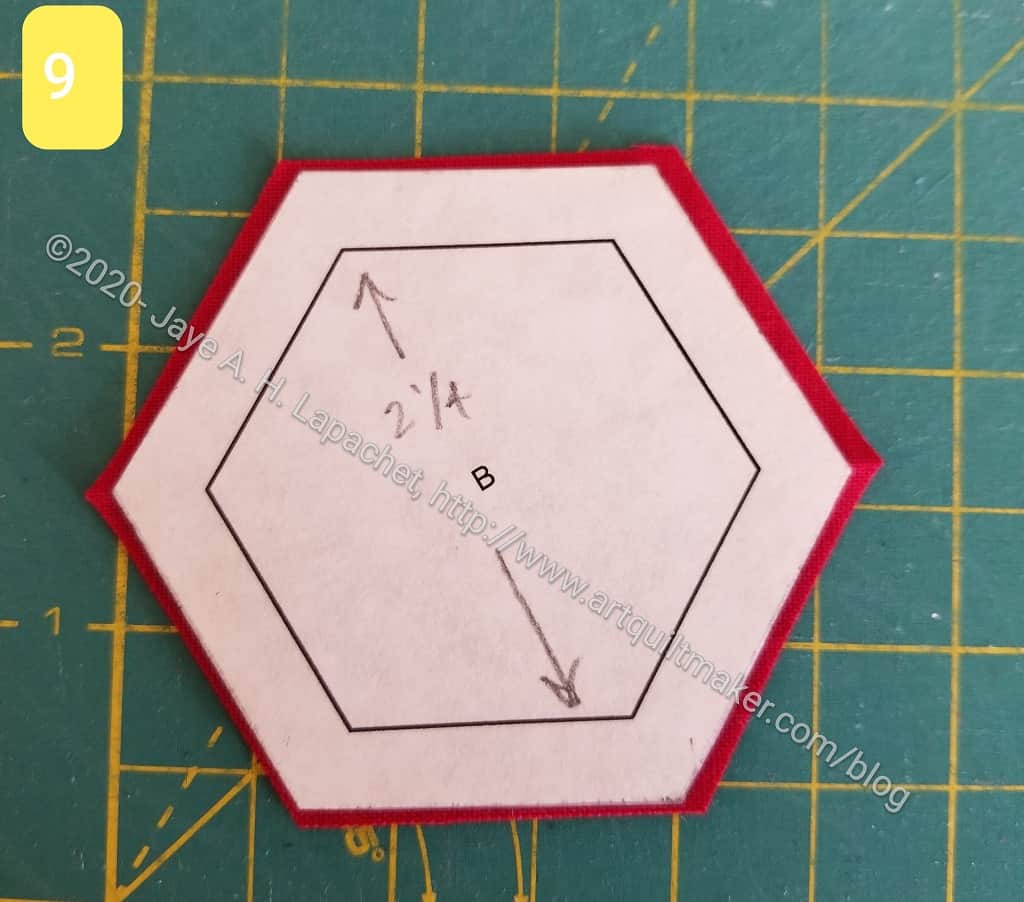
Perfect hexagonCompare size with your template
Your hexagon should be perfect. N.B. As I said above, I have a little wiggle room with this patch, so I cut it slightly larger, which is why the template looks a little smaller.
Move ruler so post-it is lined up with raw edge
Move the ruler along the strip and cut the next one
Note: you will not be able to cut every single bit of fabric. You will have small triangles leftover from in between the hexagons. You can use these leftover scraps to stuff pet beds.
**I use affiliate links and may be paid for your purchase of an item when you click on an item link in my post. There is no additional cost to you for clicking or purchasing items I recommend. I appreciate your clicks and purchases as it helps support this blog.
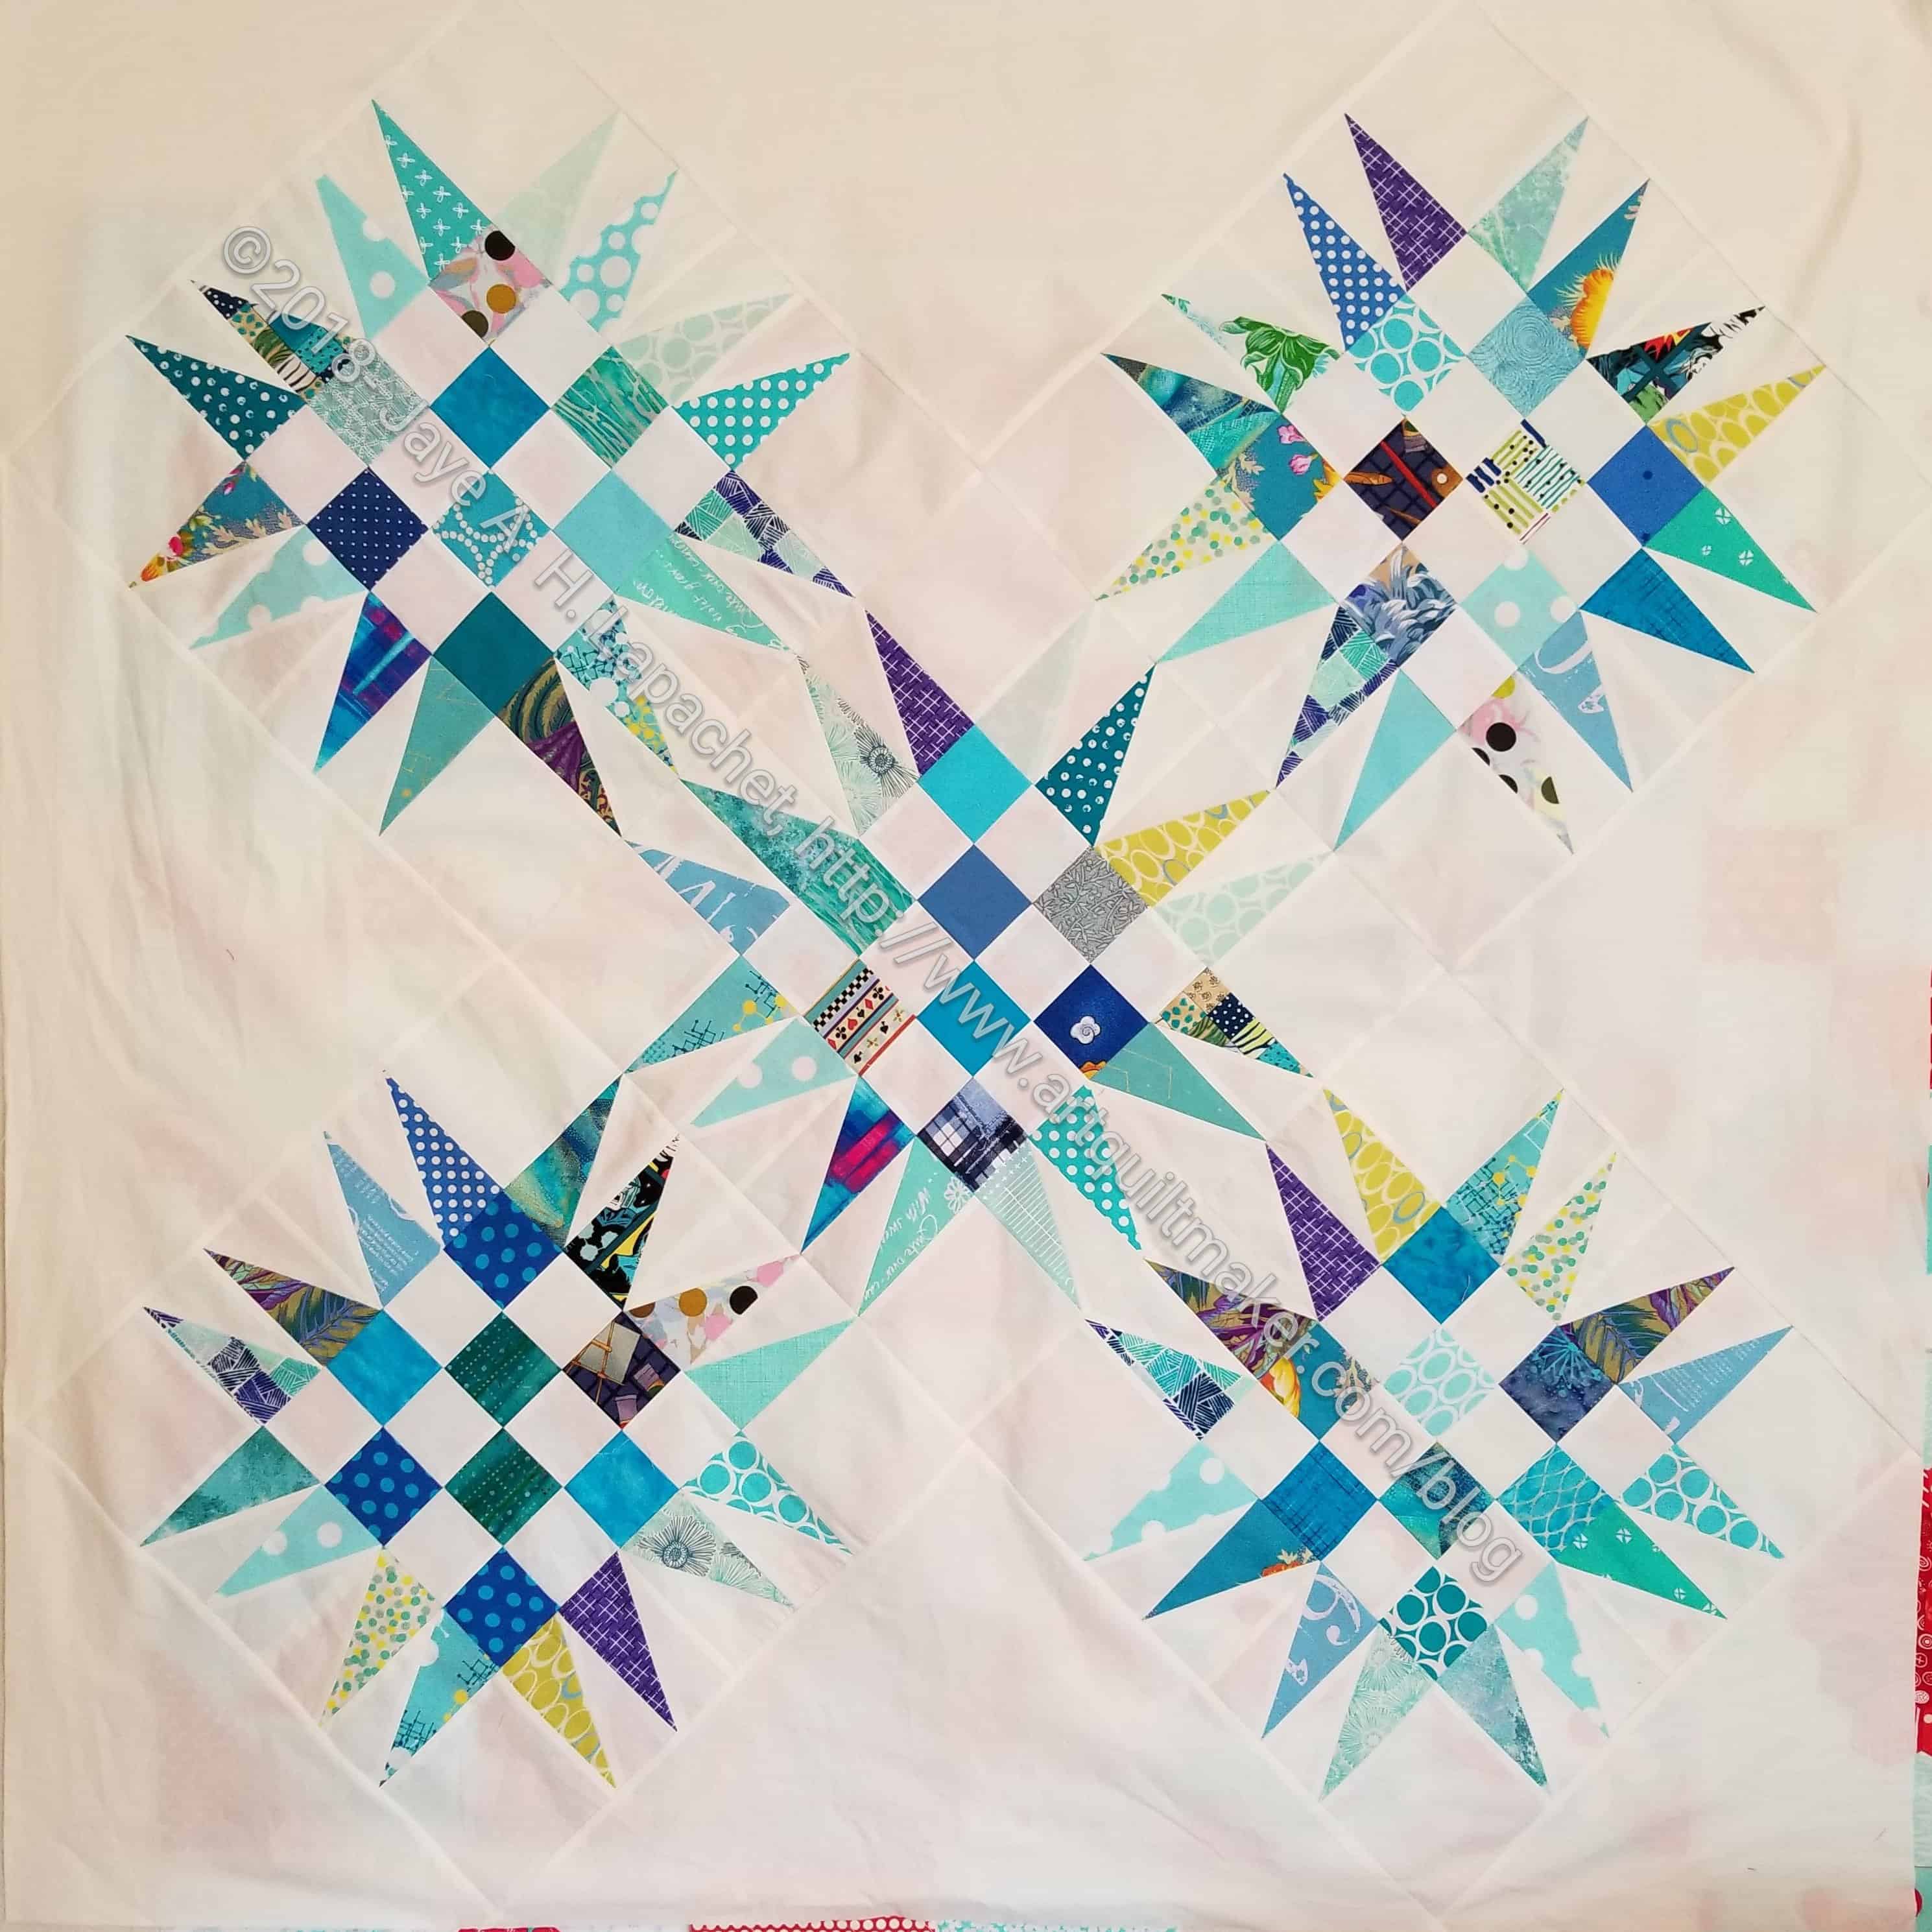
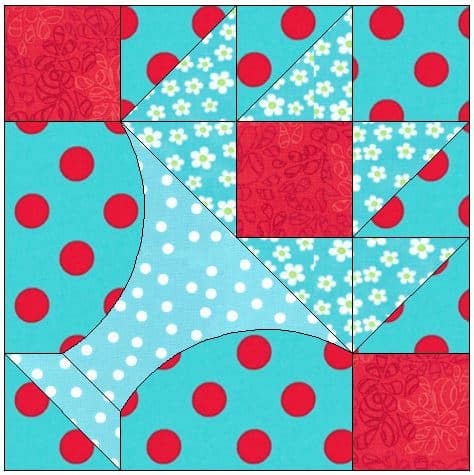
I decided to make this block after finding I needed one more block to complete my Aqua-Red Sampler. I have never made one of these, so I thought “what the heck?”. I had seen some directions for it and it caught my attention. As mentioned, I had to cobble together instructions from at least three different tutorials to be able to make the block. Below is my version. The tutorials I referenced are noted below.
Finished Block Size: 12 inches (12.5 unfinished)
Supplies
Fabric
In this tutorial, the background is turquoise and the foreground is red.
Thread – you might want to use your regular piecing thread for the first part of the directions, then switch to a thread that matches the background fabric for sewing the curves shut
A pen or pencil you can use to draw on fabric (I like Sewline pencils)
Stiletto or dental pick type instrument (something thin and pointy)
hand sewing needle
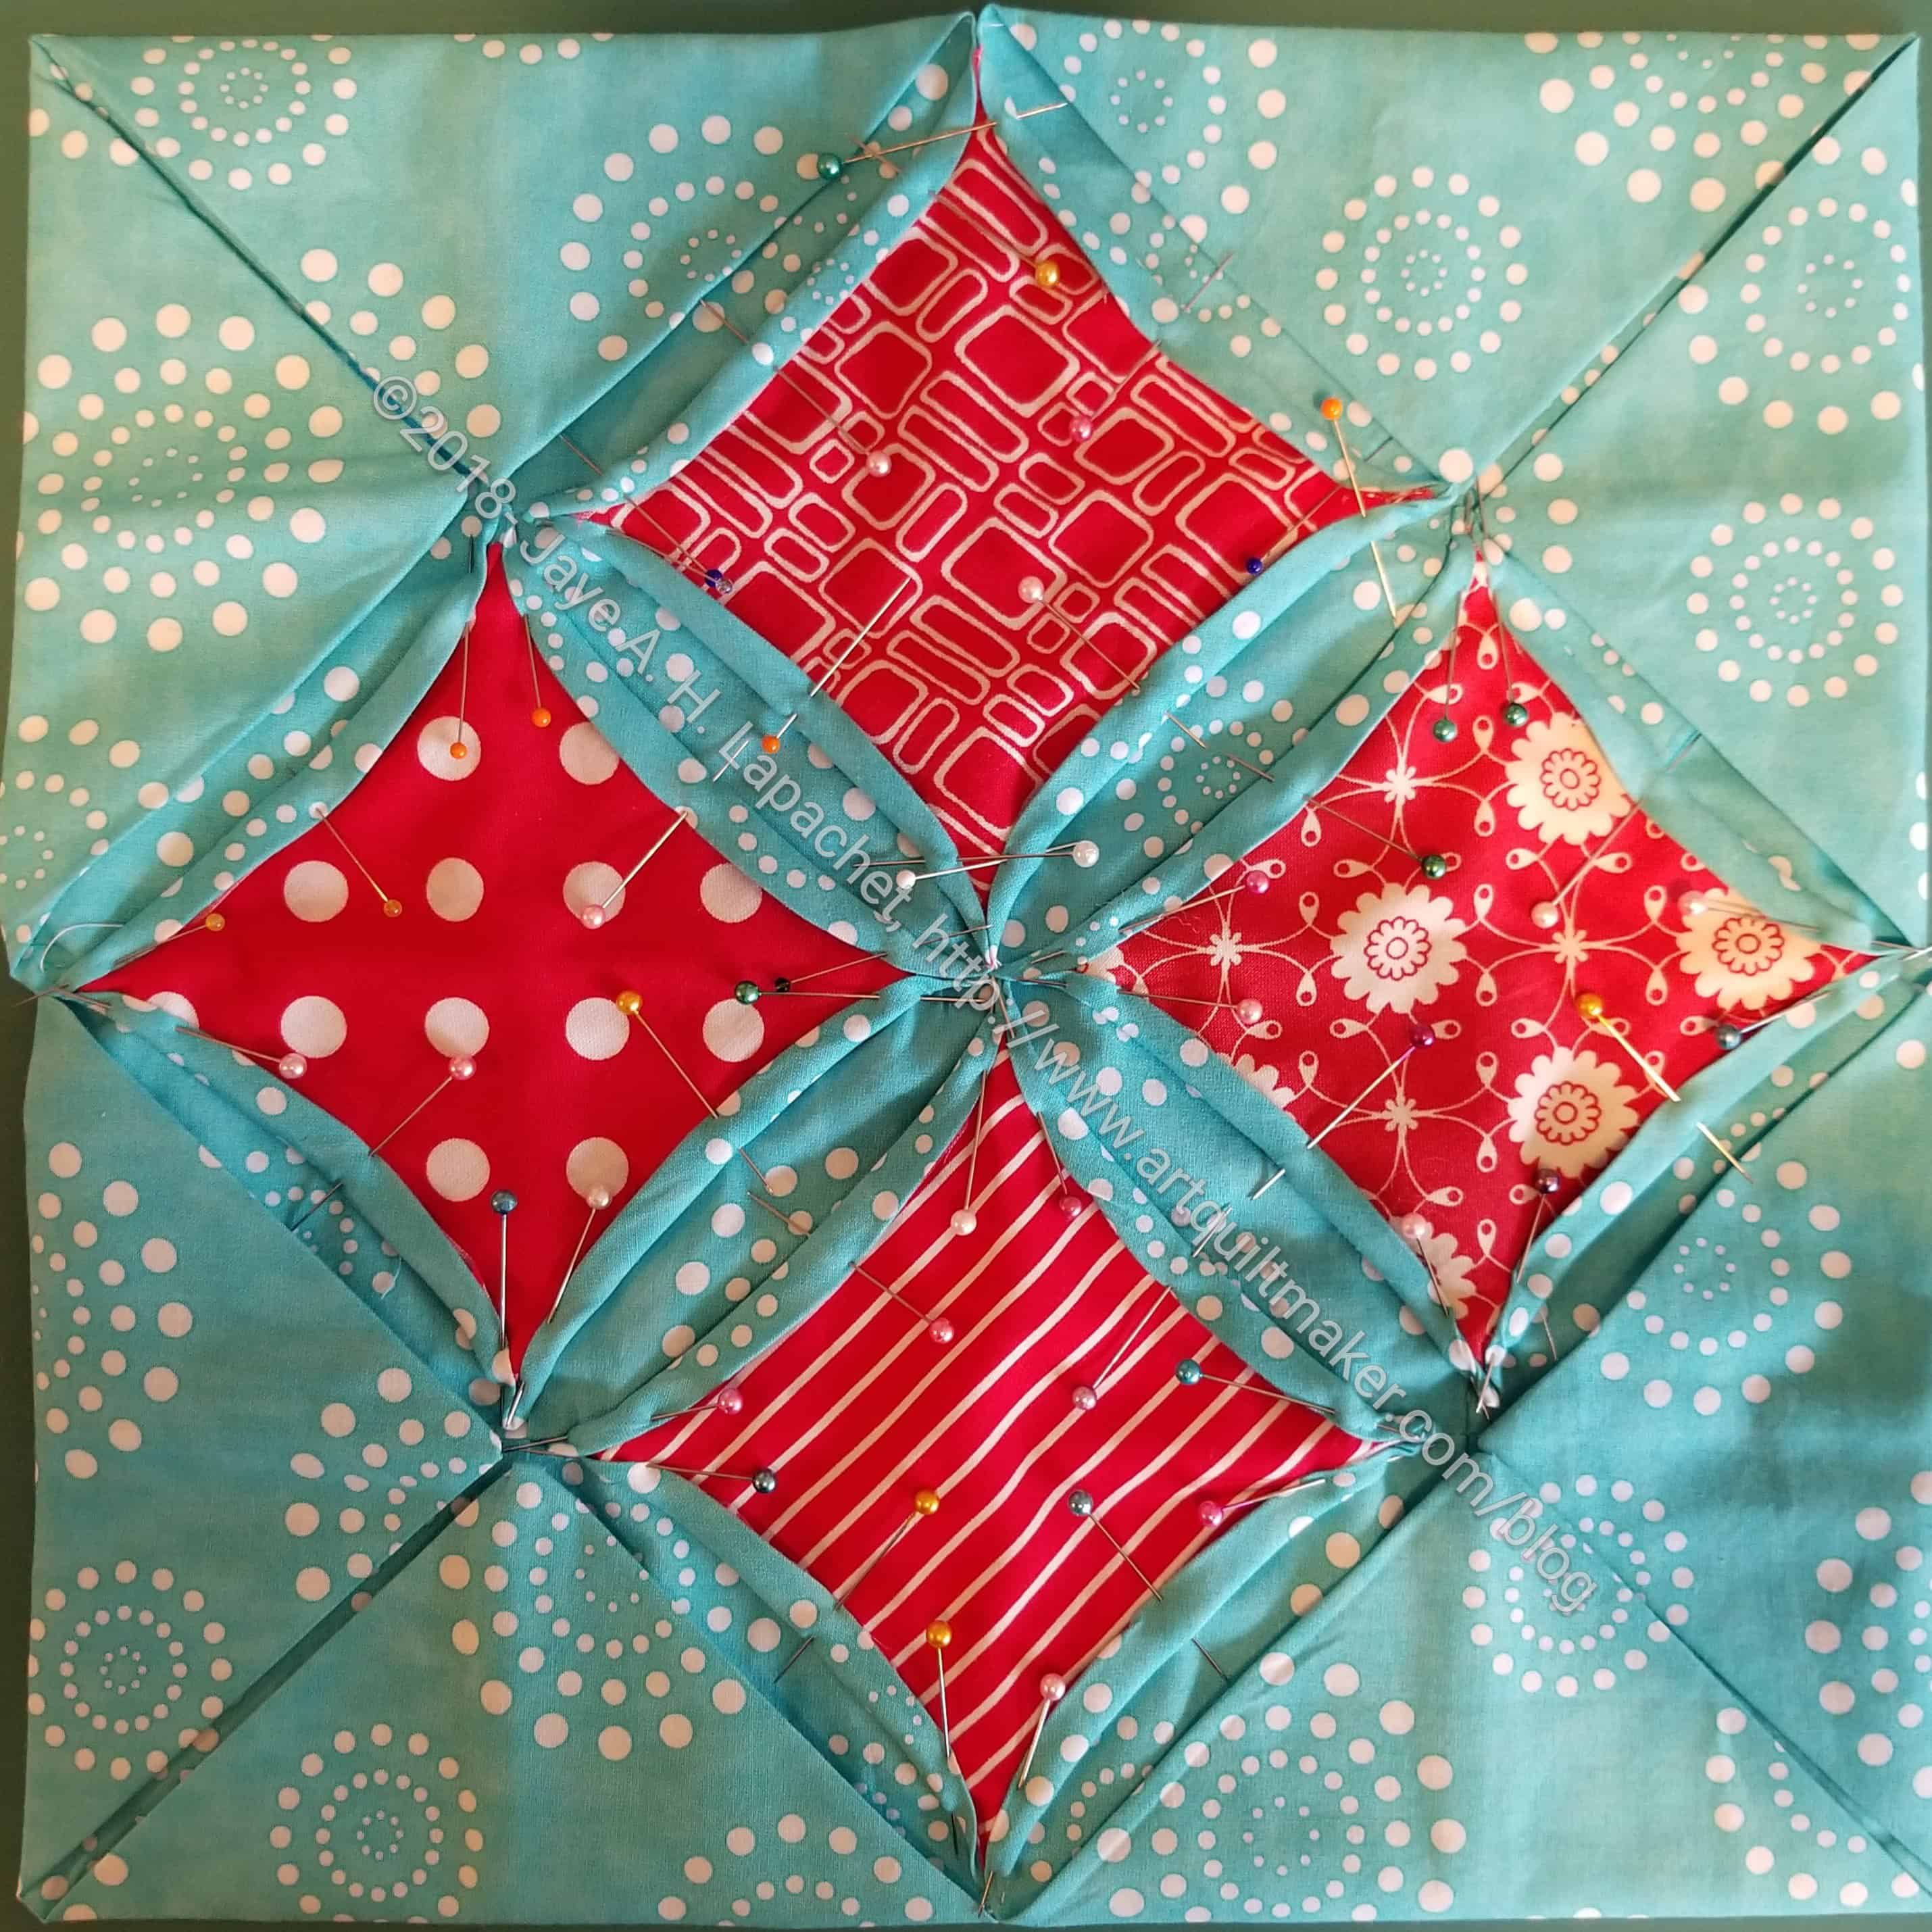
Instructions for making a 12″ (finished) Cathedral Windows block
1. Cut 4 squares of background fabric 12.5 inches by 12.5 inches
4- 4 x 4 inch foreground squares
2. Cut 4 squares for inset pieces 4 inches by 4 inches.
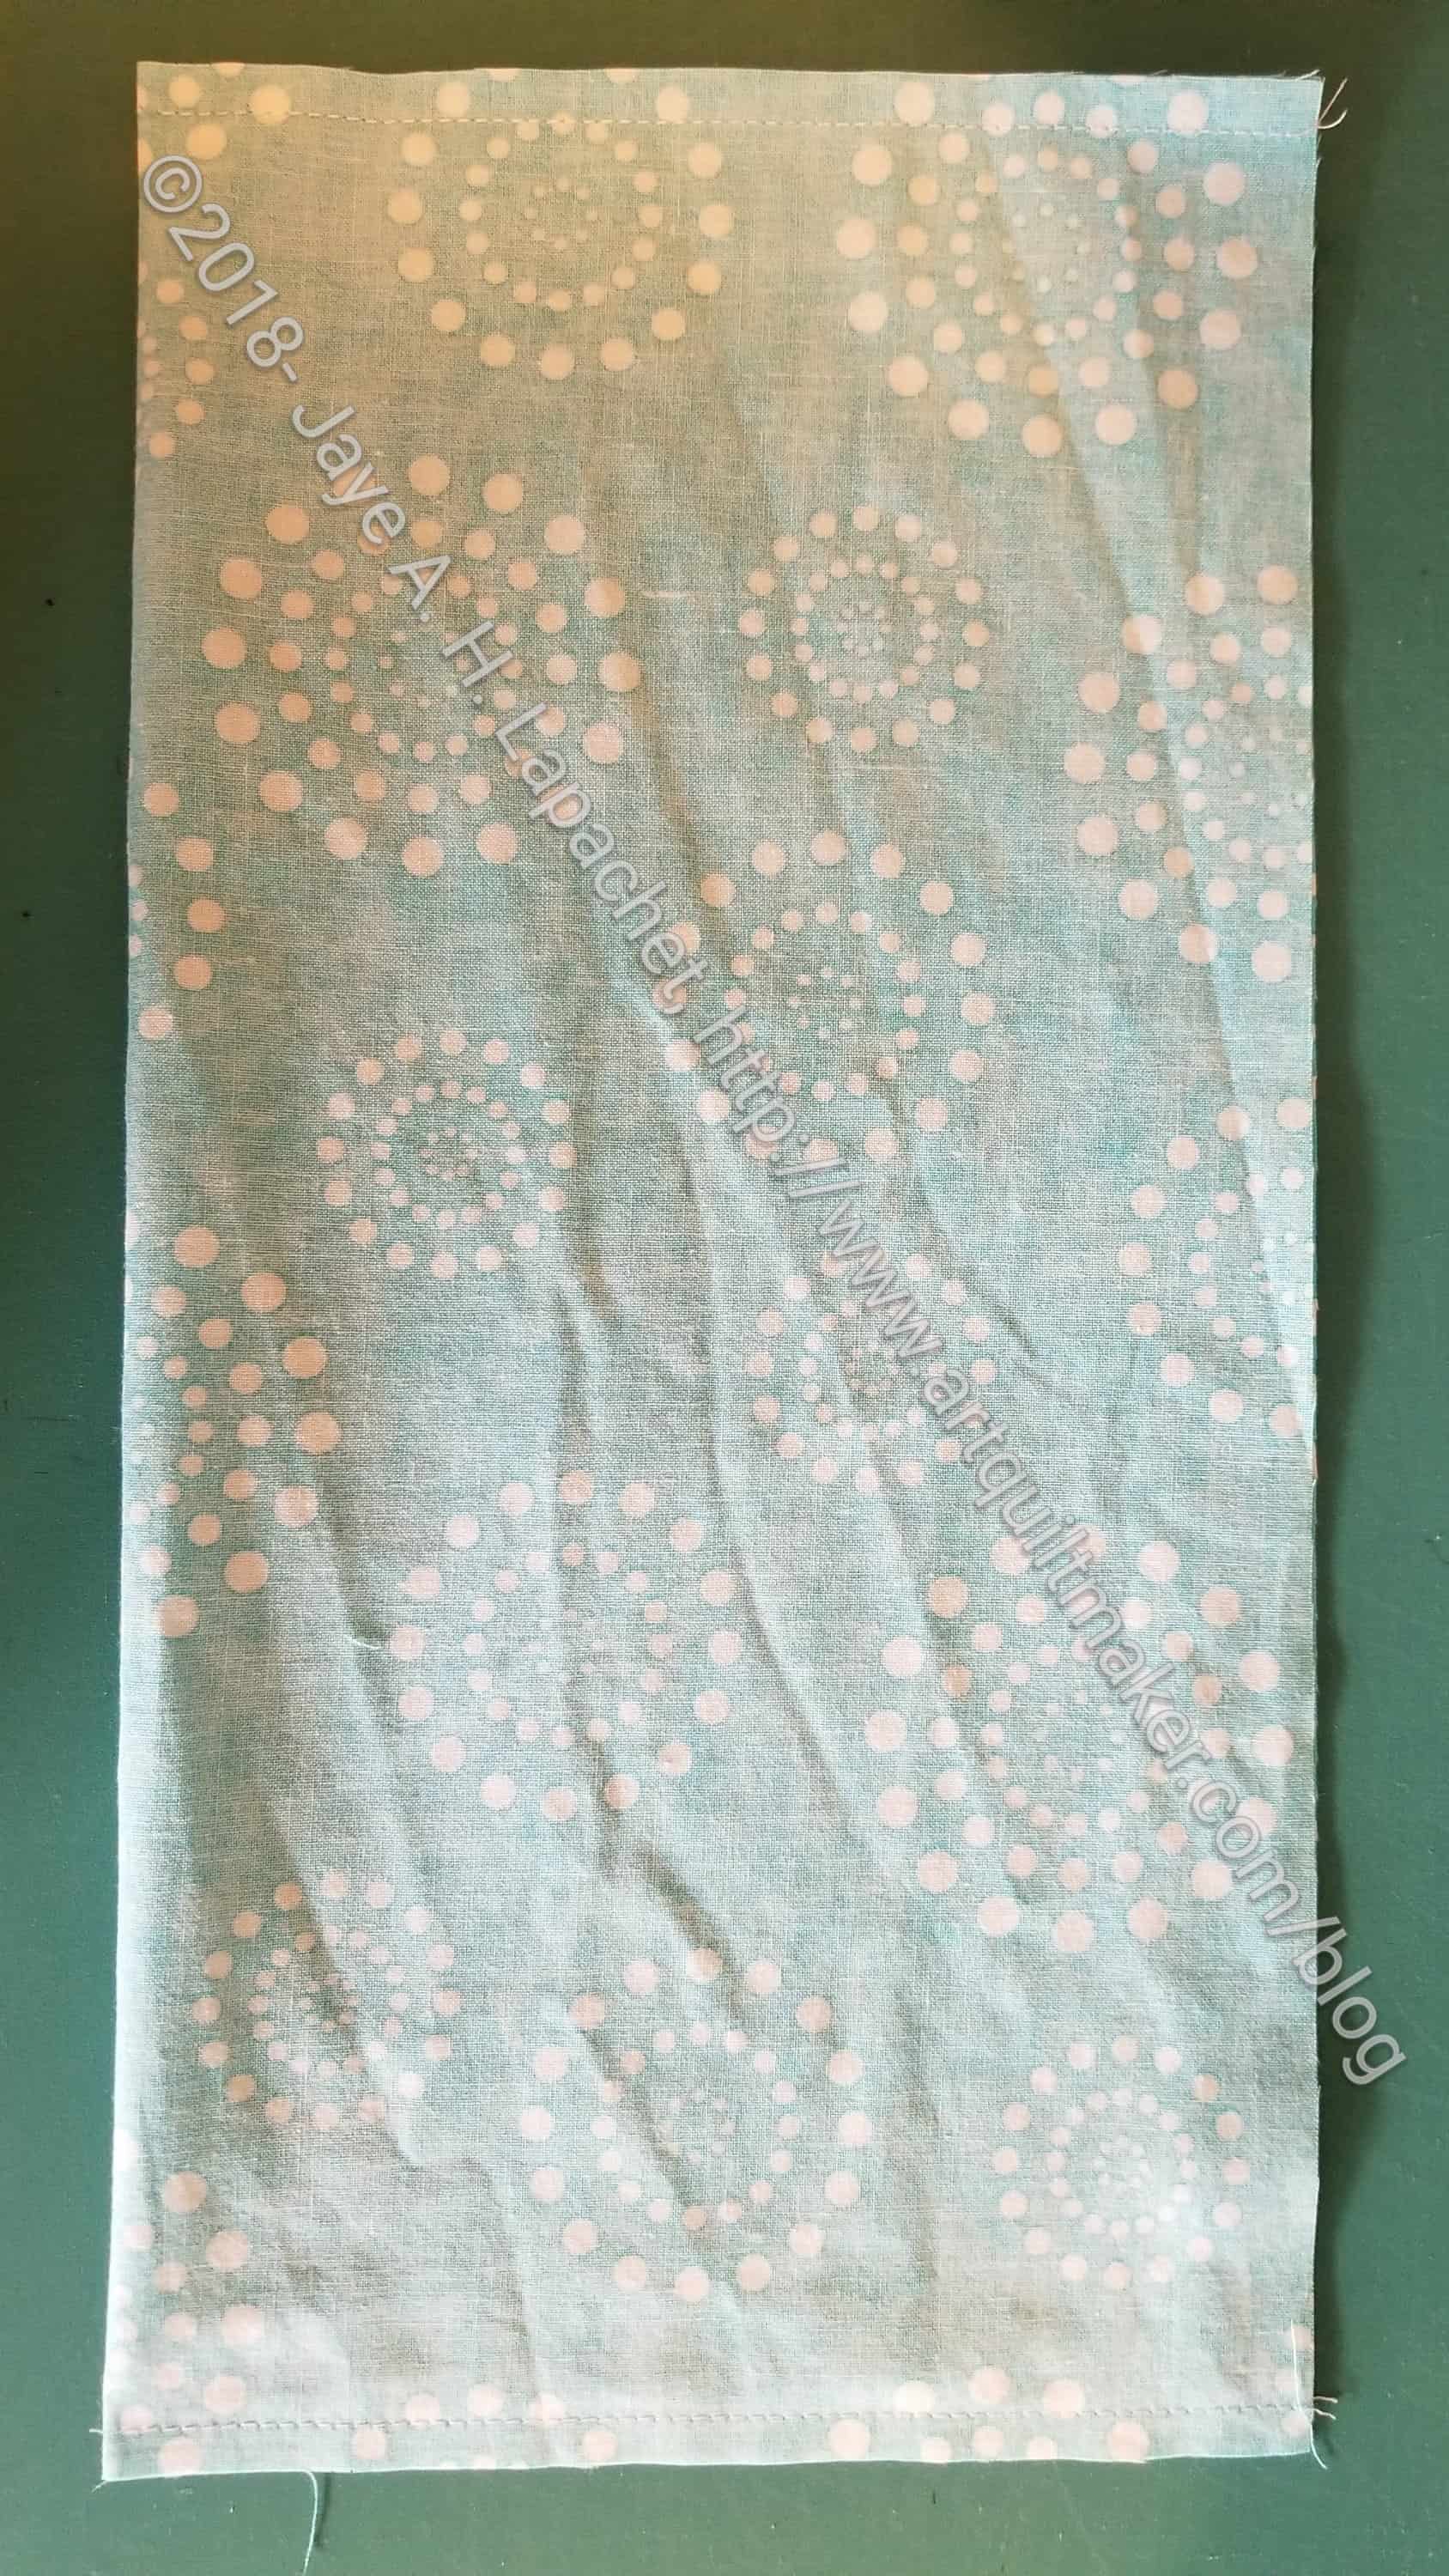
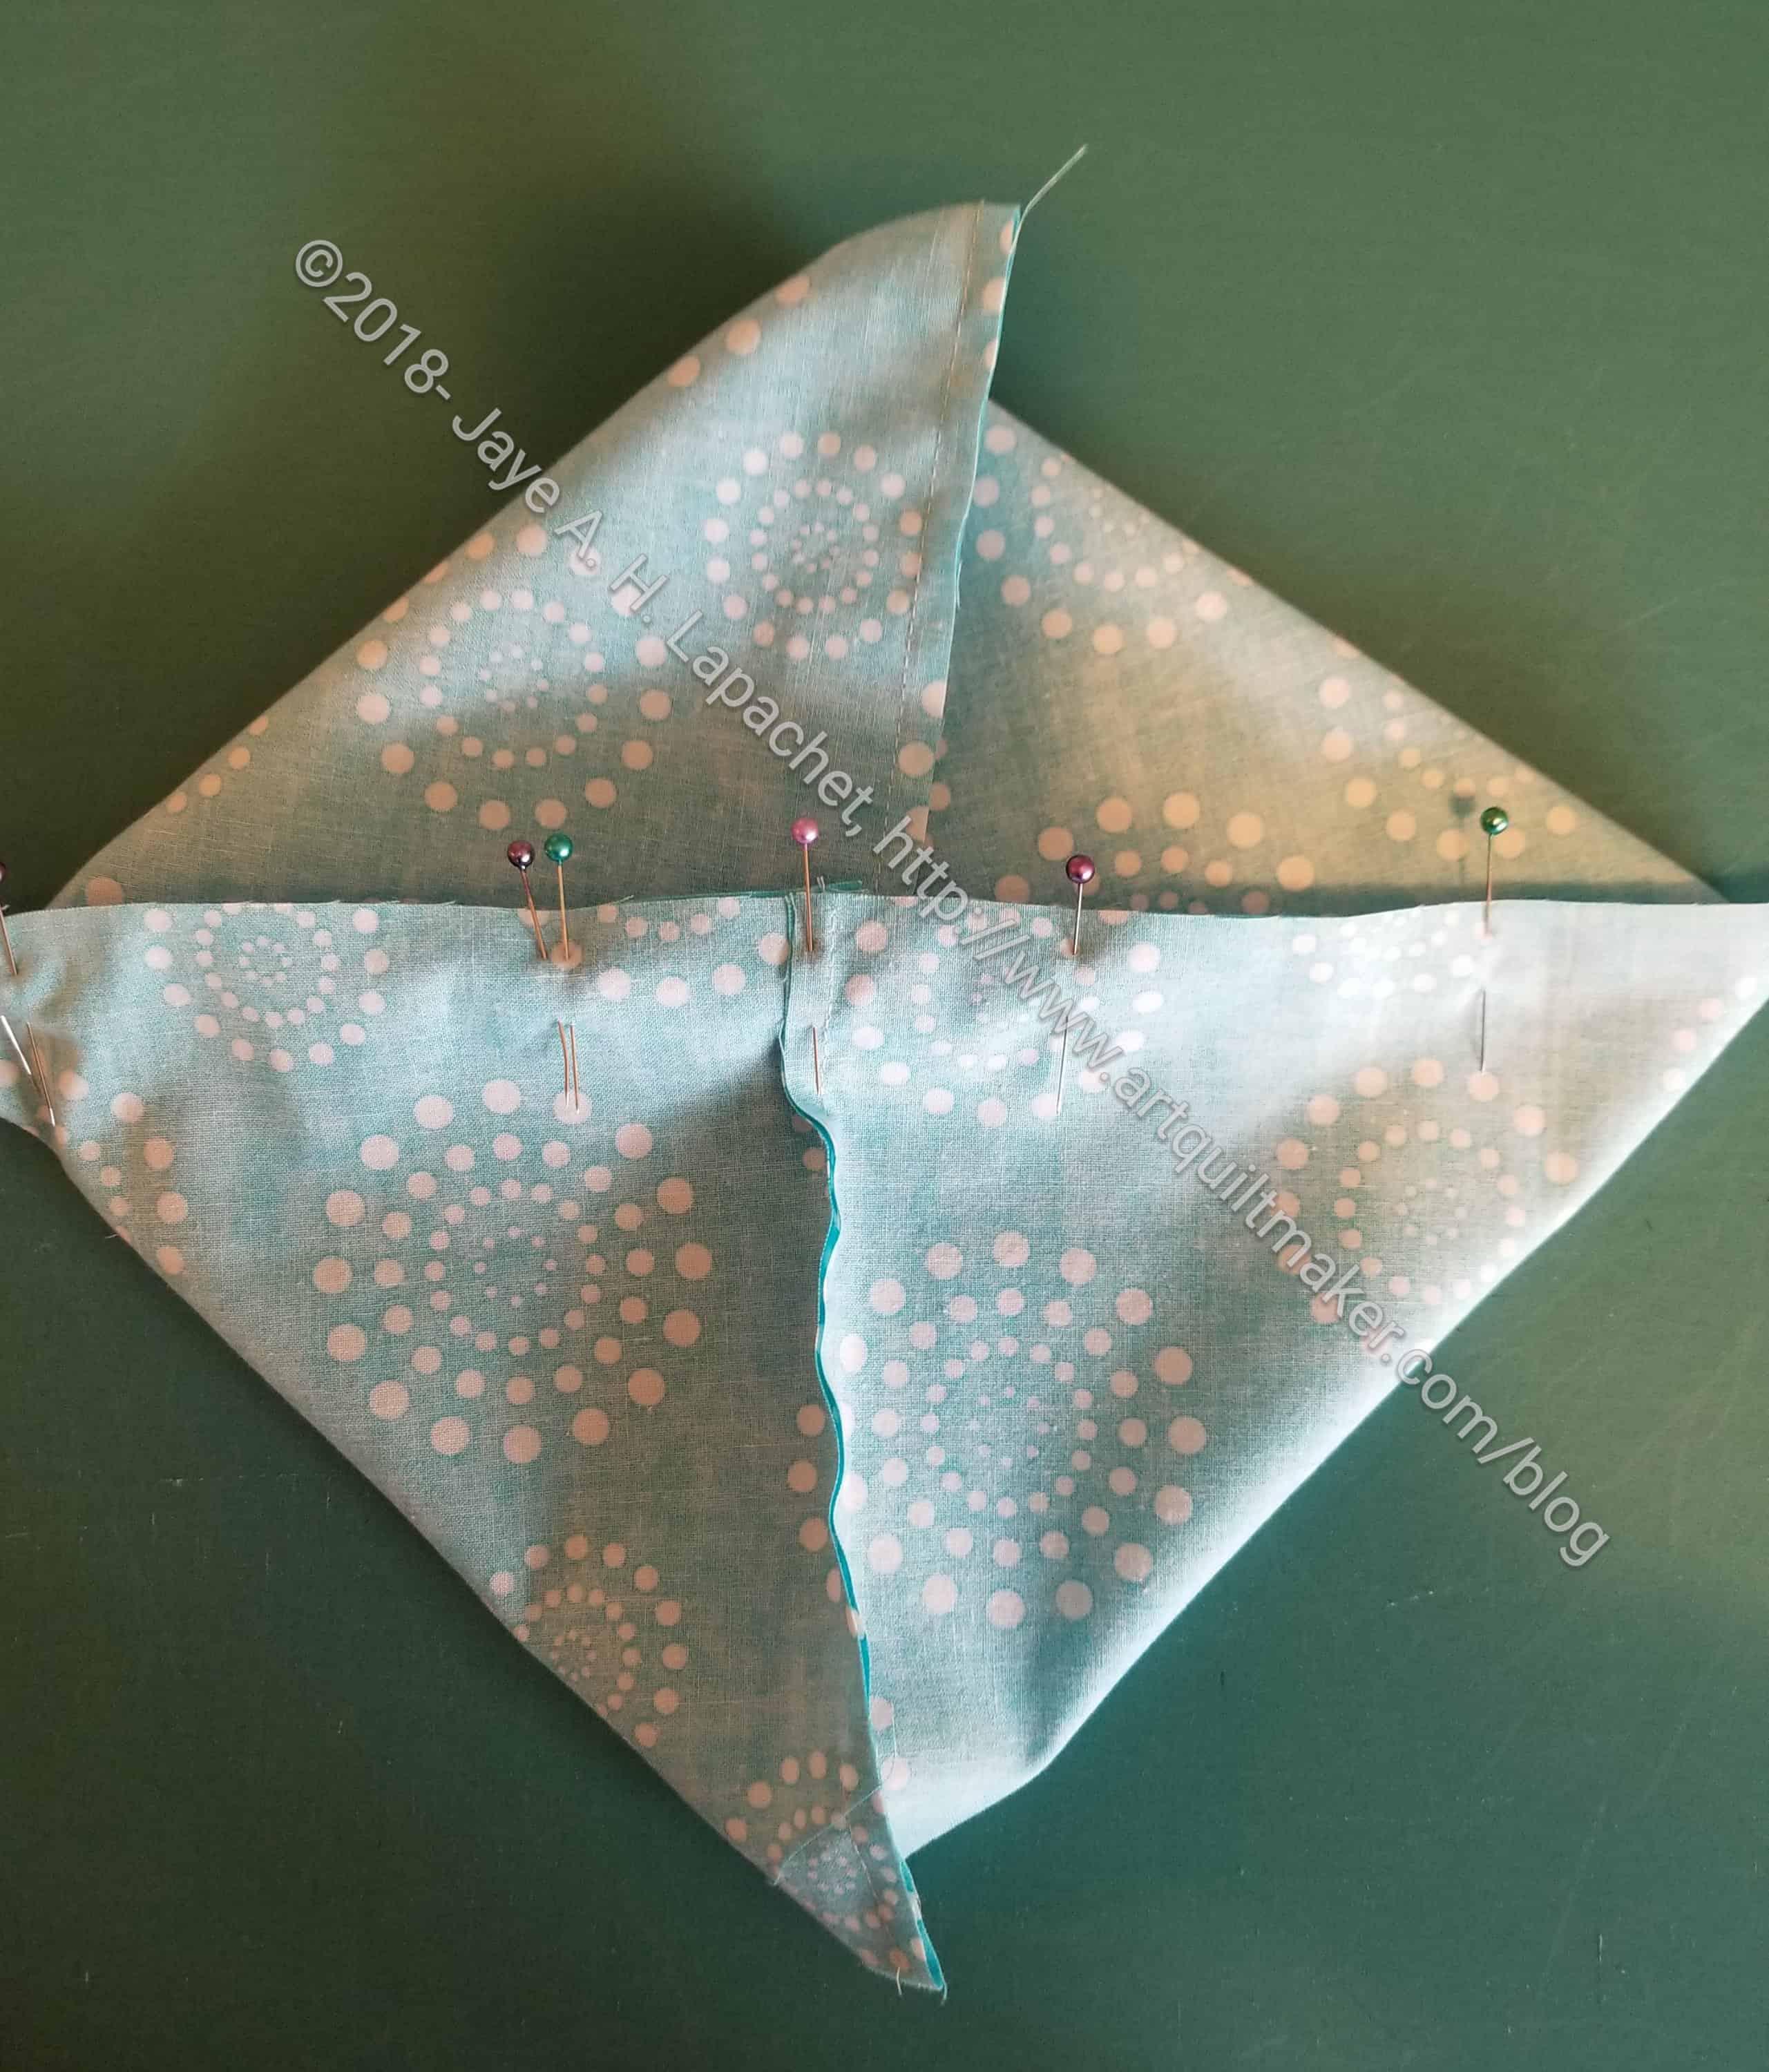
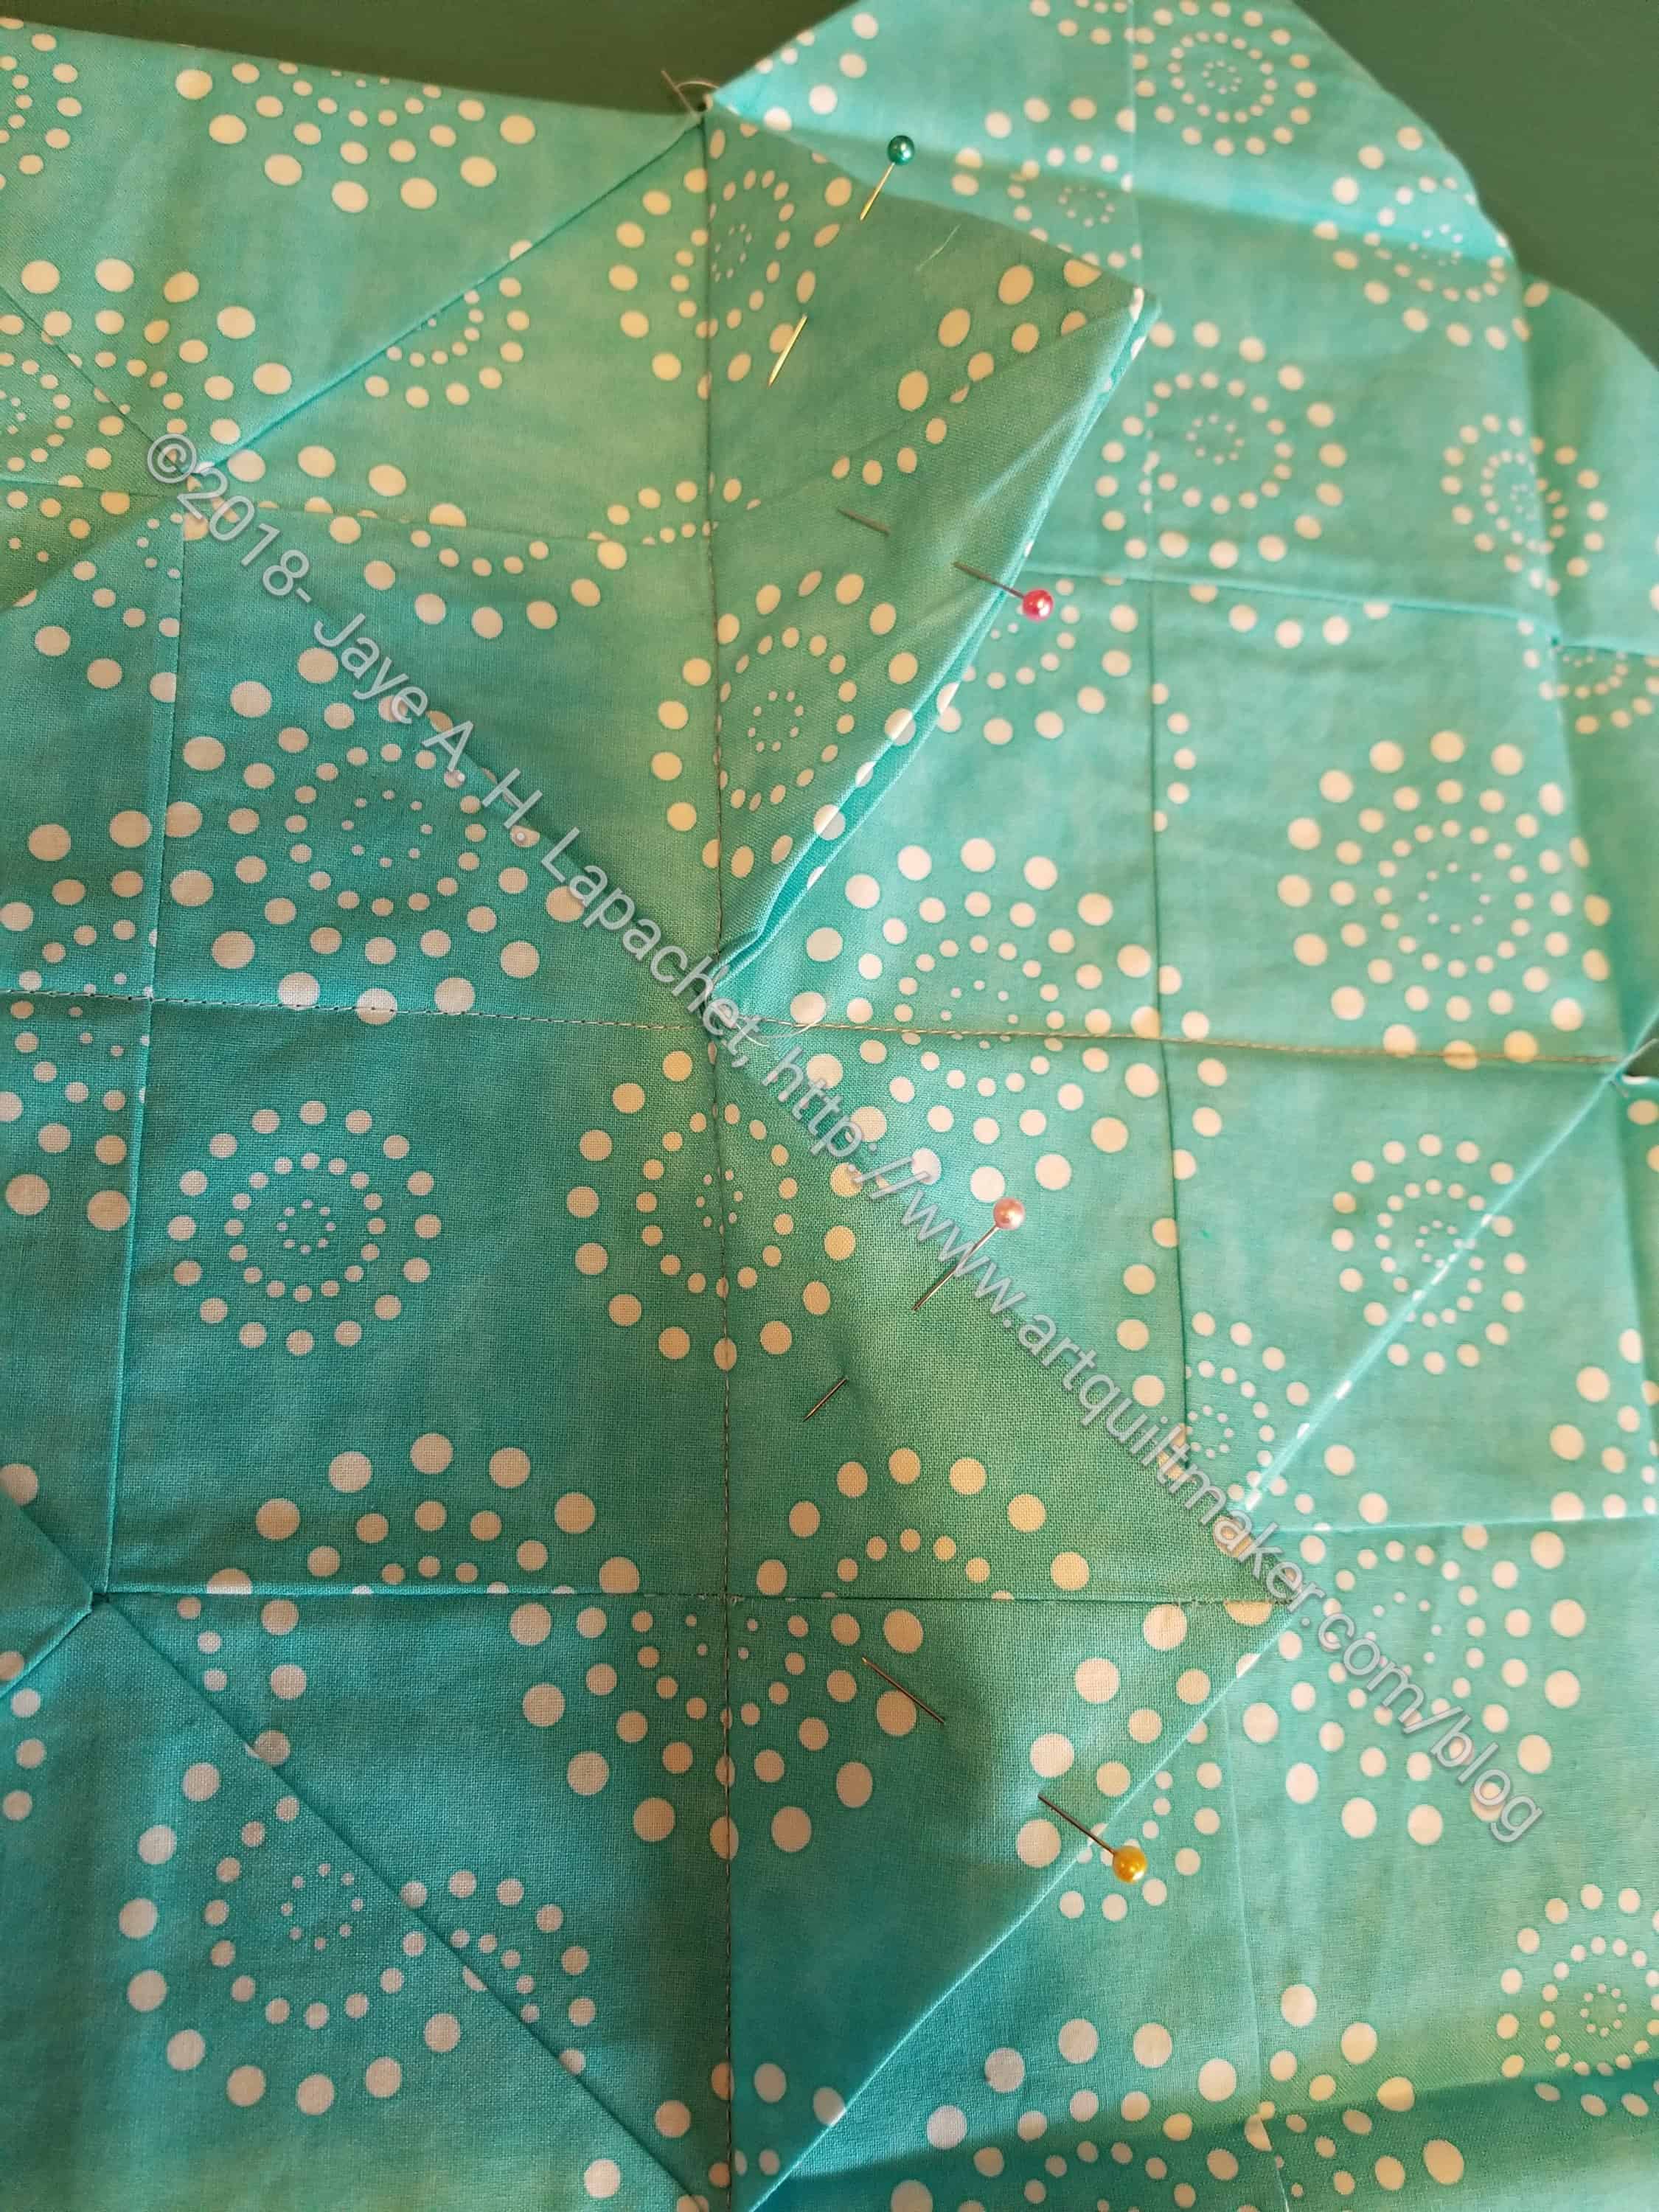
Fold 12.5×12.5 inch squares in half
3. Fold each of the 4 background squares in half. This will make your 12.5 x 12.5 inch squares into rectangles (e.g. do not fold NOT along the diagonal).
Hint: I sew all four one after another, but you can sew one at a time, if you prefer.
3A. Sew along the short side, backstitching at the beginning and the end.
Open up rectangles & match edges
4. Open your rectangles and match up the raw edges.
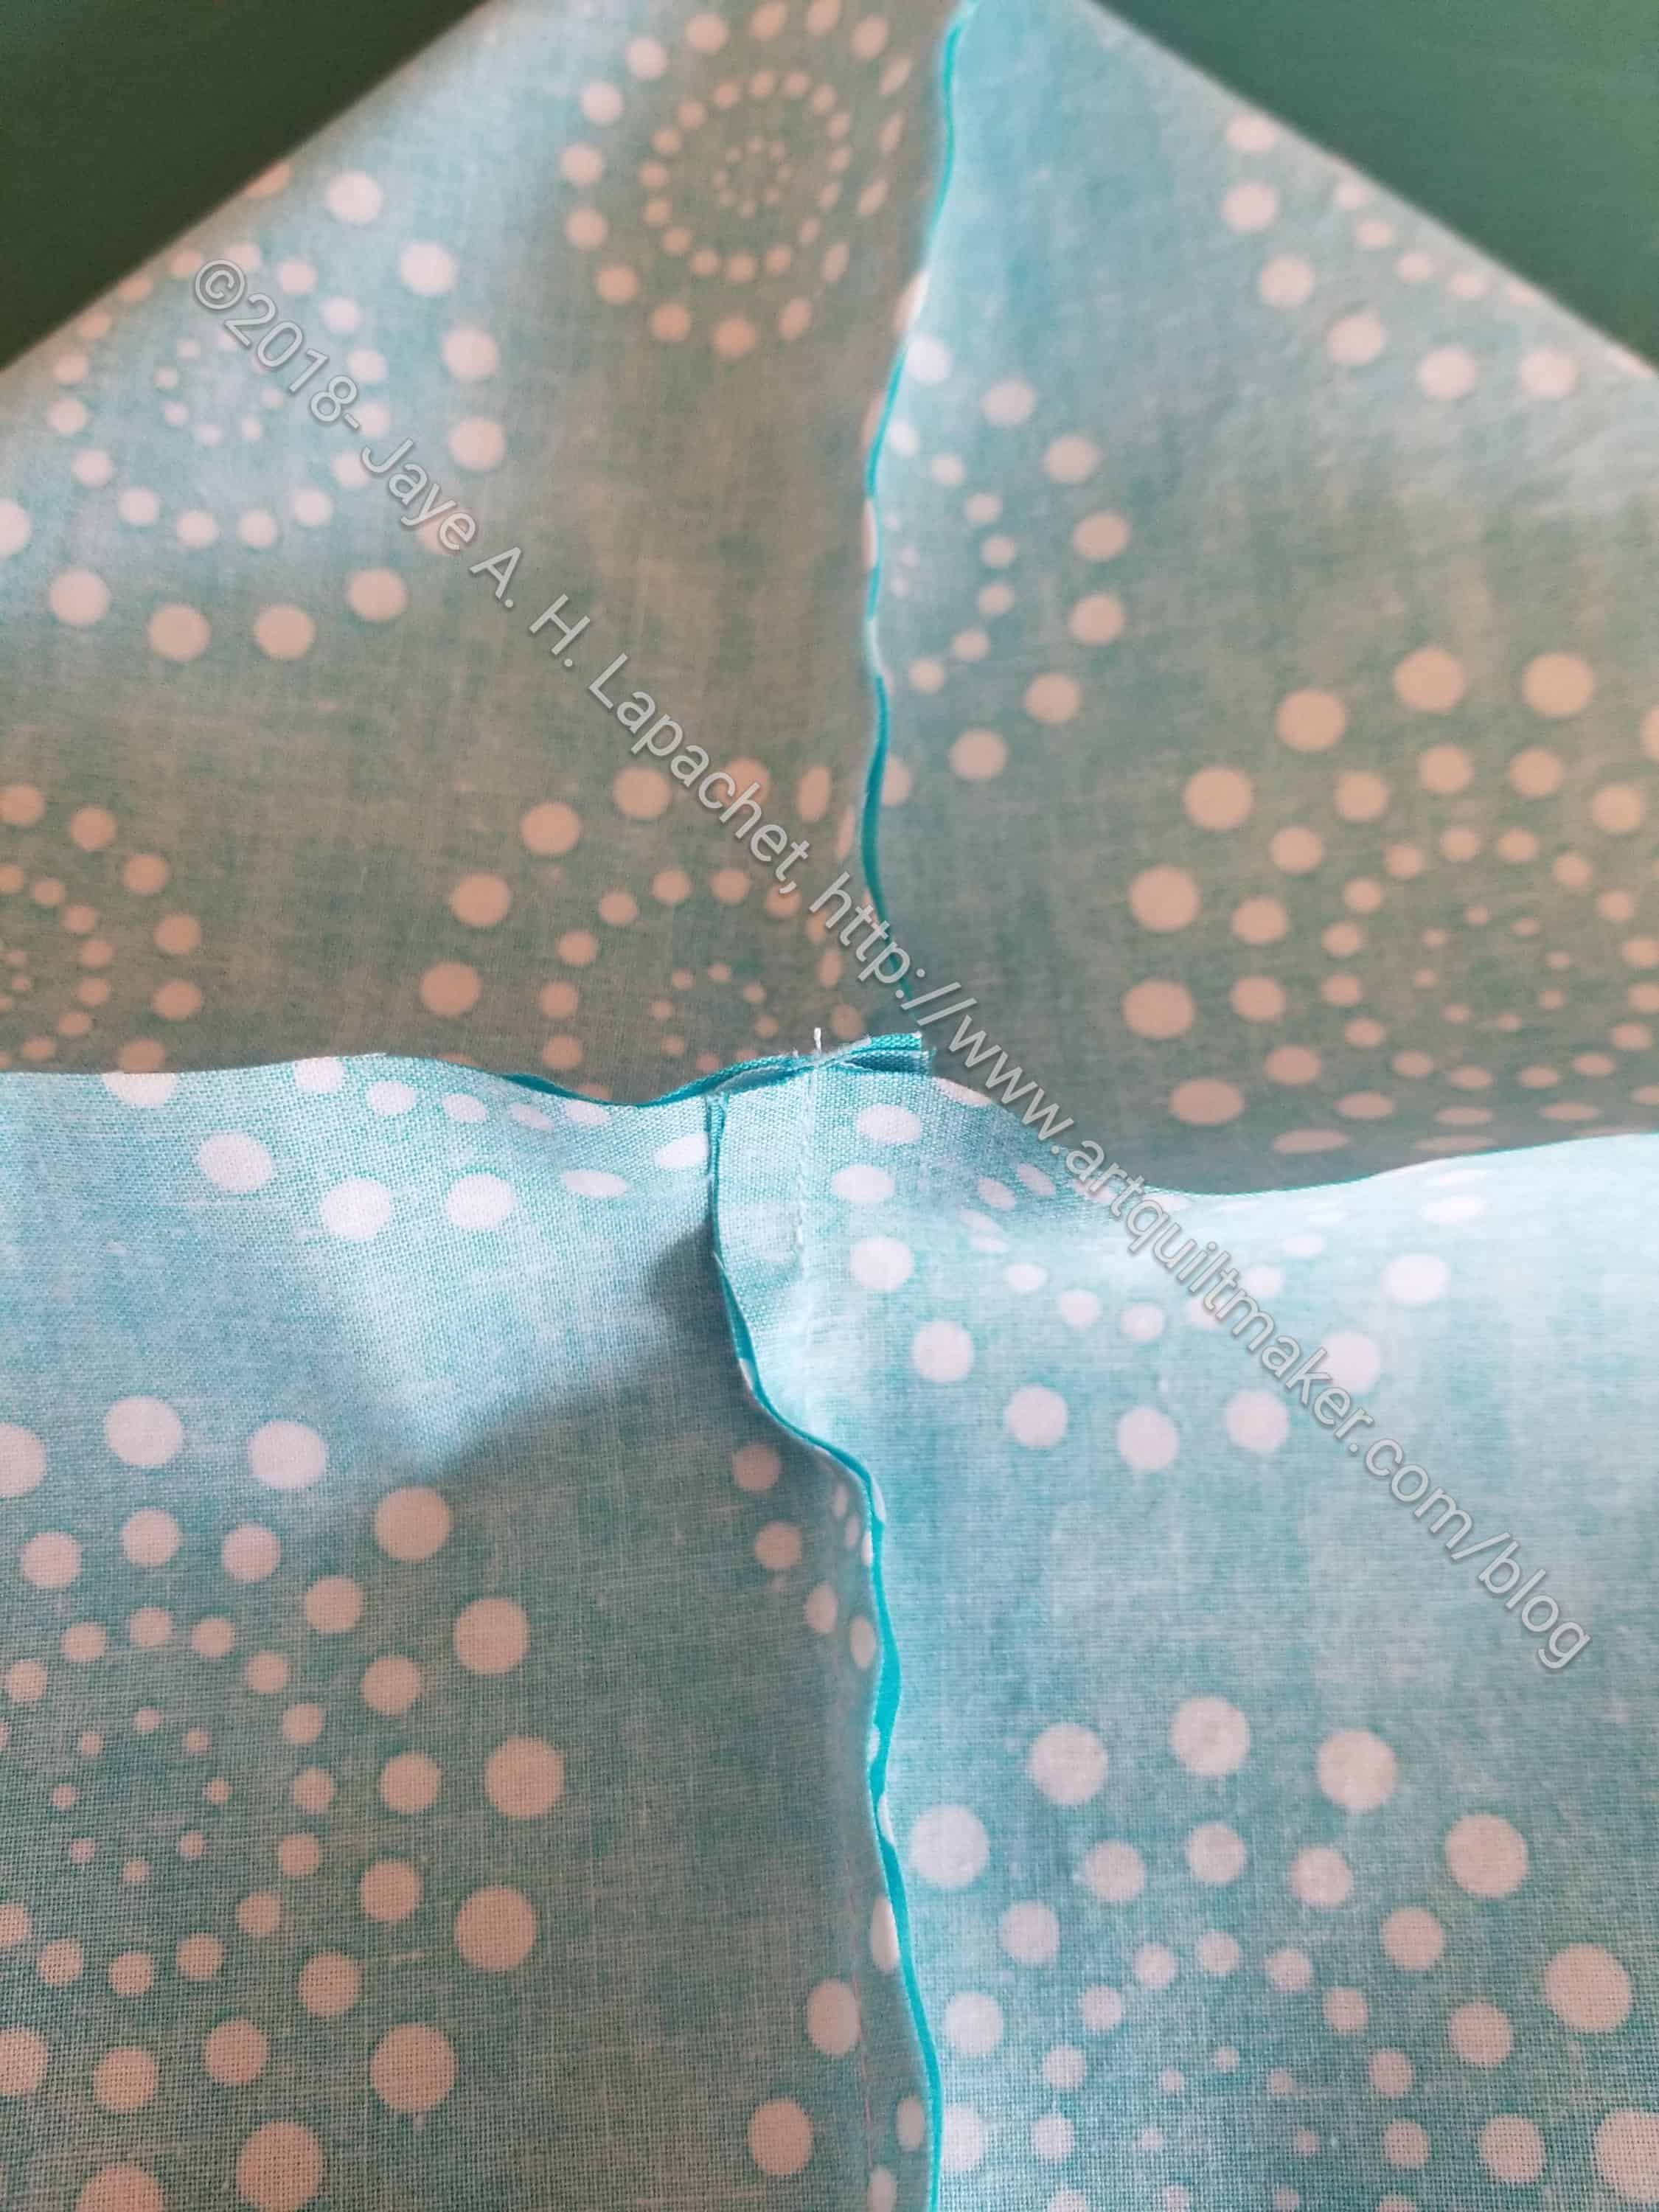
Match edges and nest seams
Hint: I nest the center seams and pin, starting in the middle
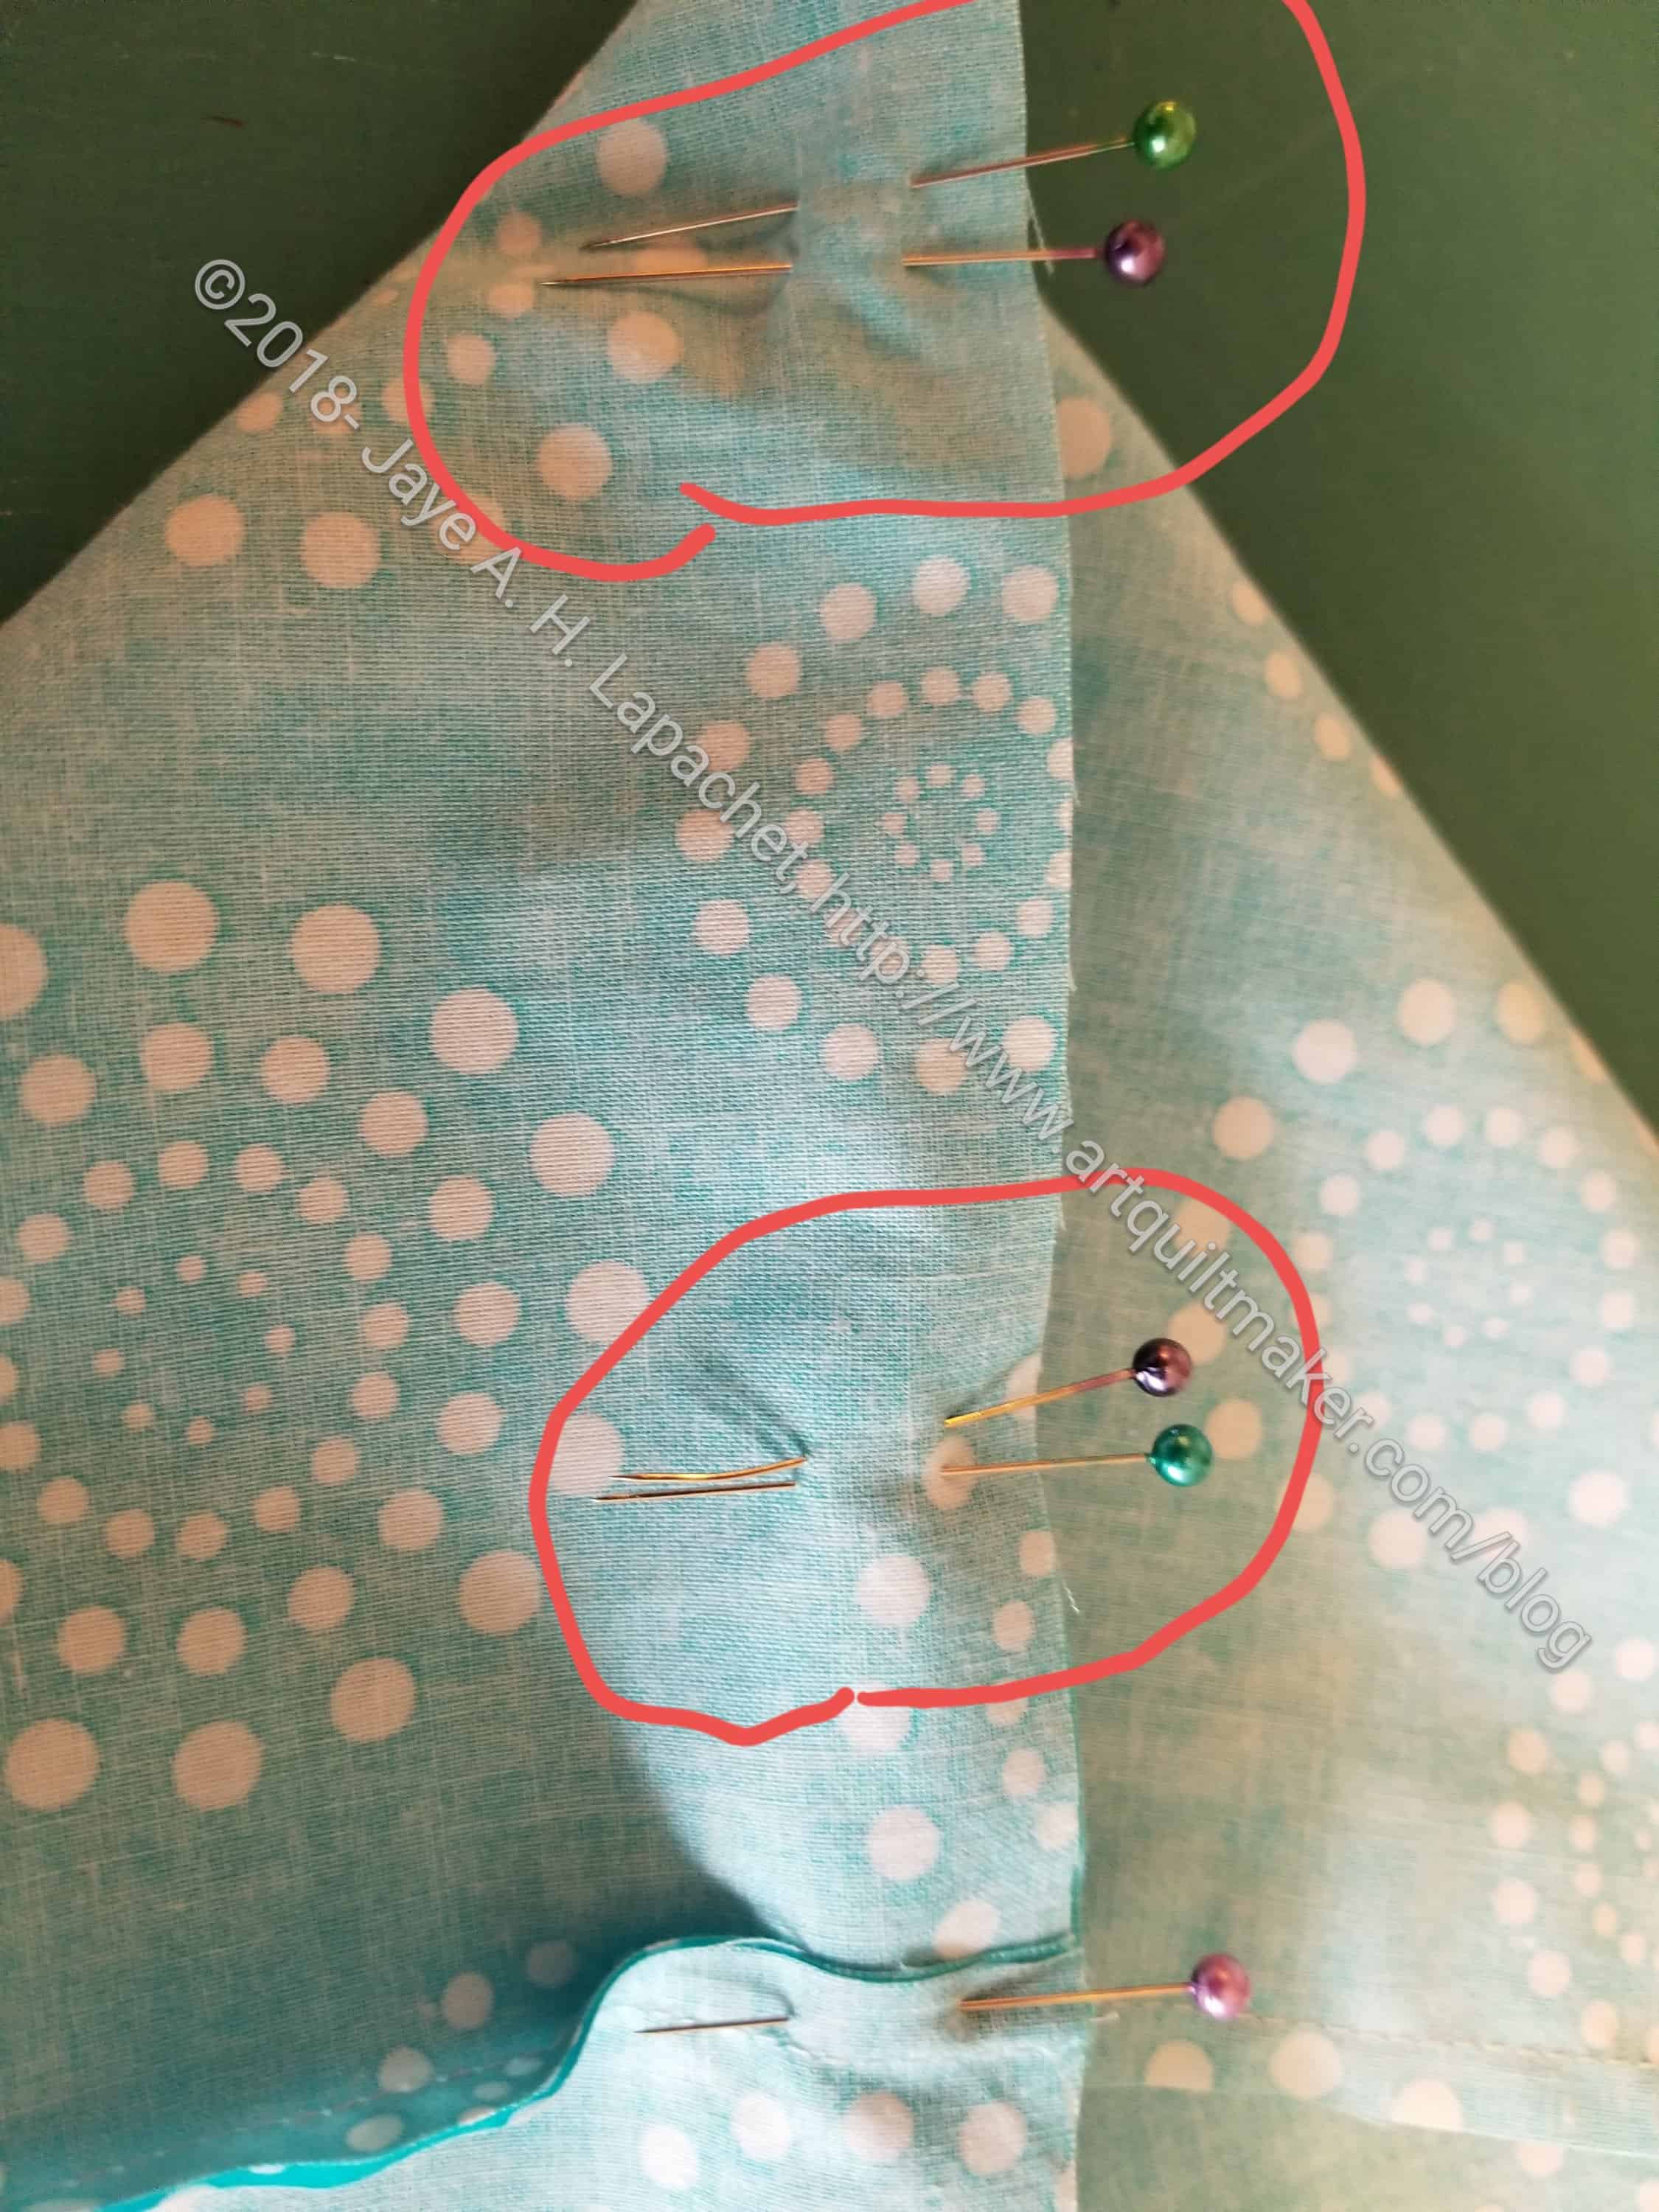
Leave openingPin edges closed, leaving an opening for turning
Hint: leave an opening 2-3 fingers wide for later turning. I mark this with two pins right next to each other.
Sew seam shut
5. Sew your pinned seam shut except for the opening you have left.
Backstitch at beginning and endBackstitch at beginning and end
Hint: I backstitch at the beginning and end of the seams including next to the opening. Yes, it is a hassle to start and stop, but I don’t want the edges of the seams to come apart when I turn.
Smooth out blocks
6. Place recently sewn squares on the ironing board and smooth out wrong side out (above). They should make nice squares.
7. Press nested seams in opposite directions from the center out.
Press seam open to minimize bulk
8. Press long seams in one direction, being careful to line up edge of opening as best you can. You can press this seam open if you want.
You should now have 4 nice flat squares with wrong sides out.
9. Turn squares right sides out.
10 Poke out corners carefully. I use a knitting needle whose mate broke.
Your squares are now on the bias, so be careful when you handle them.
Press right side
10A. Press
Press
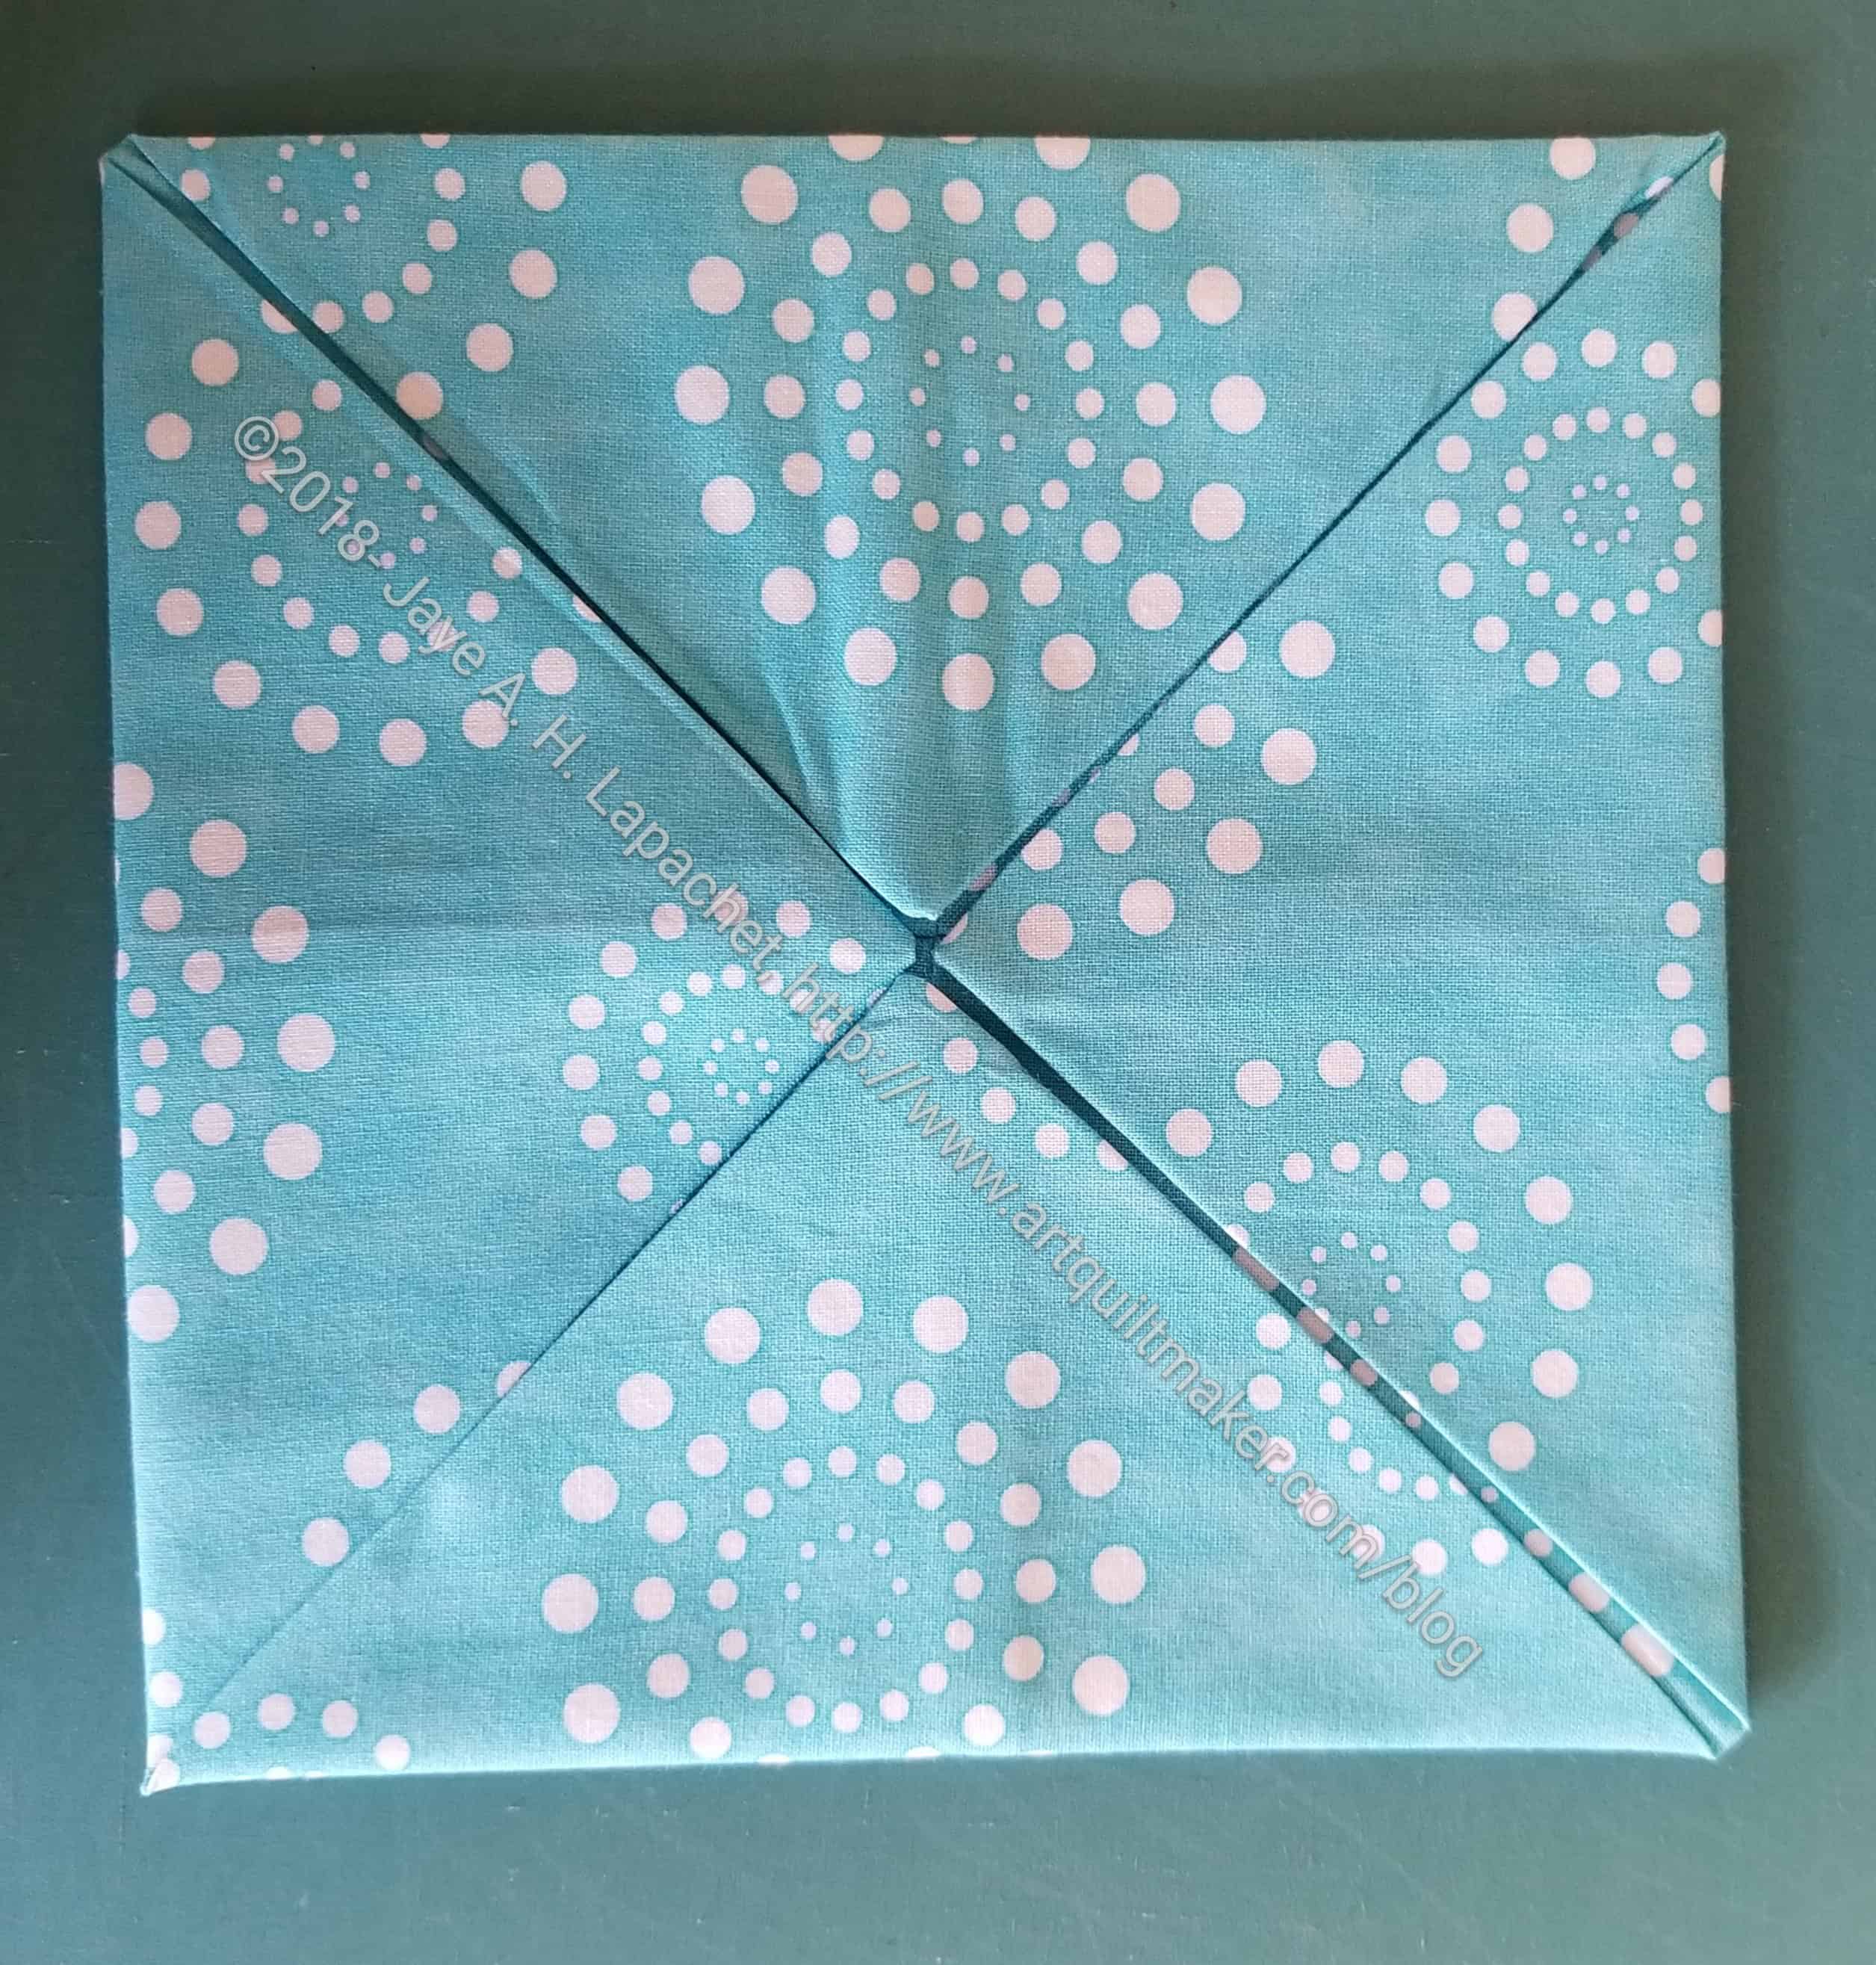
Corners folded in
11. Fold corners into the center. Do this with all four corners and make a new square. The square should be 6 inches.
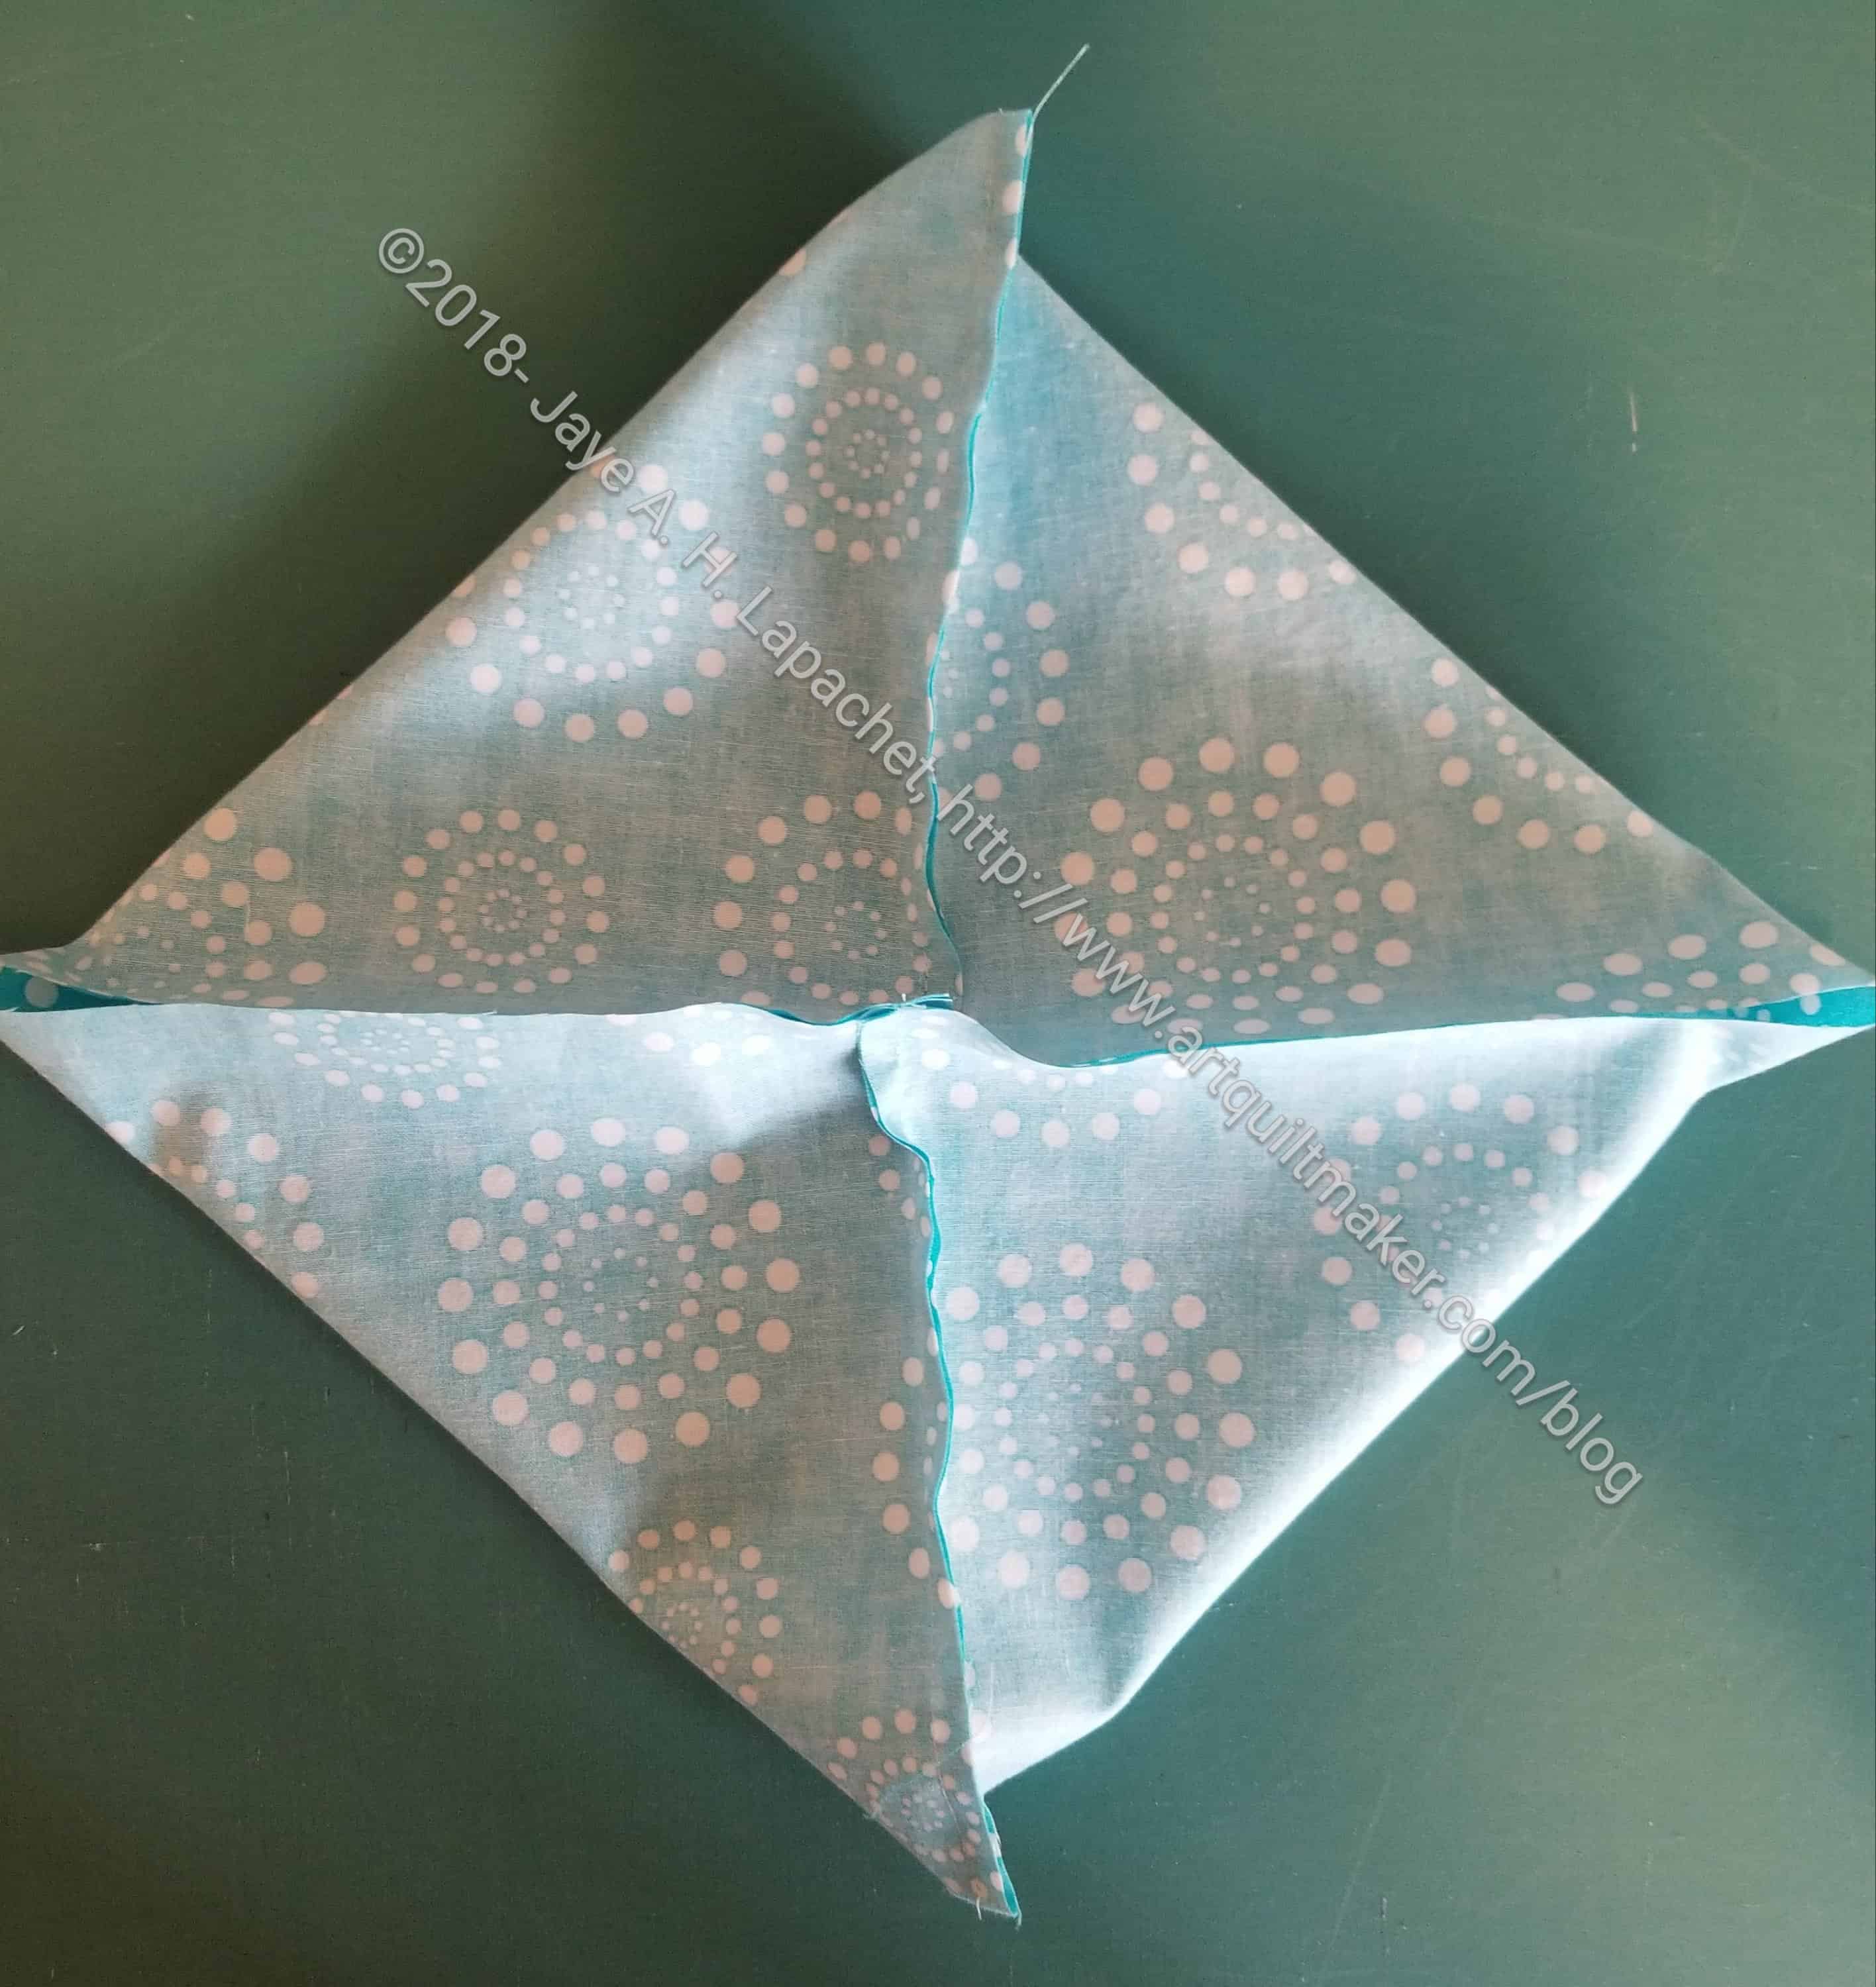
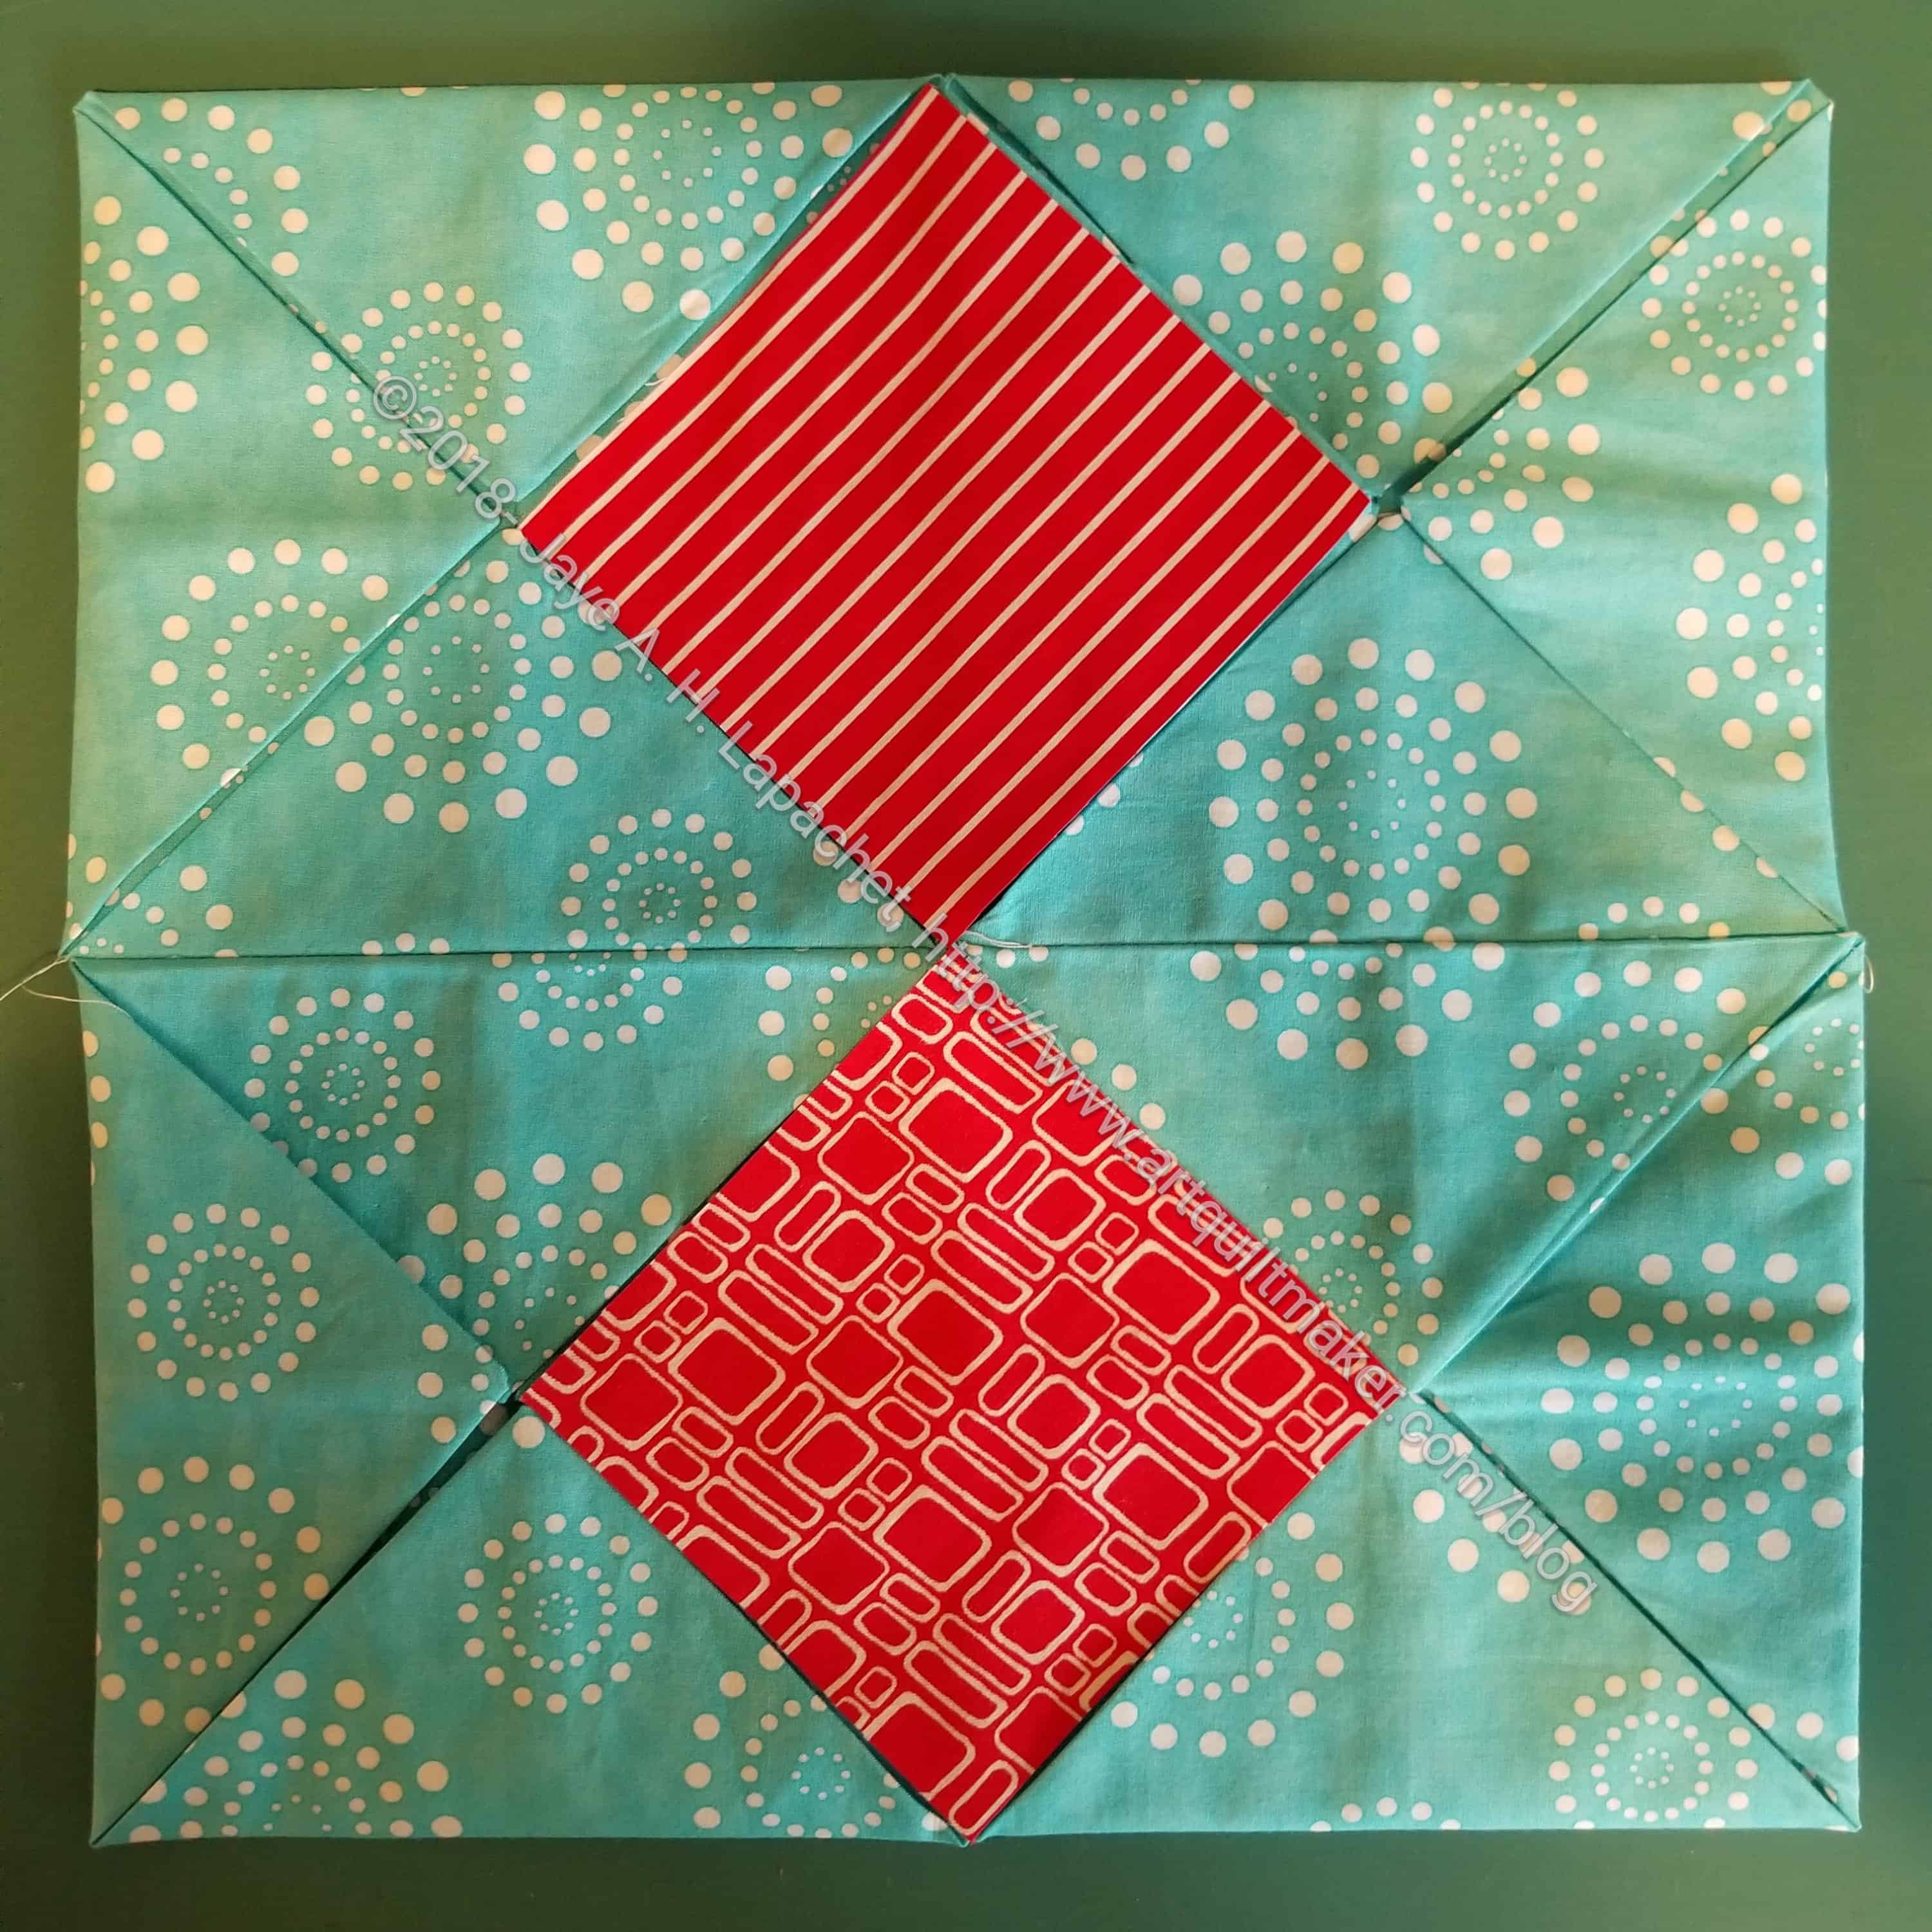
4 blocks laid out in a 2×2 grid
12. Lay out the blocks in a 2 x 2 grid, so you can see what you have
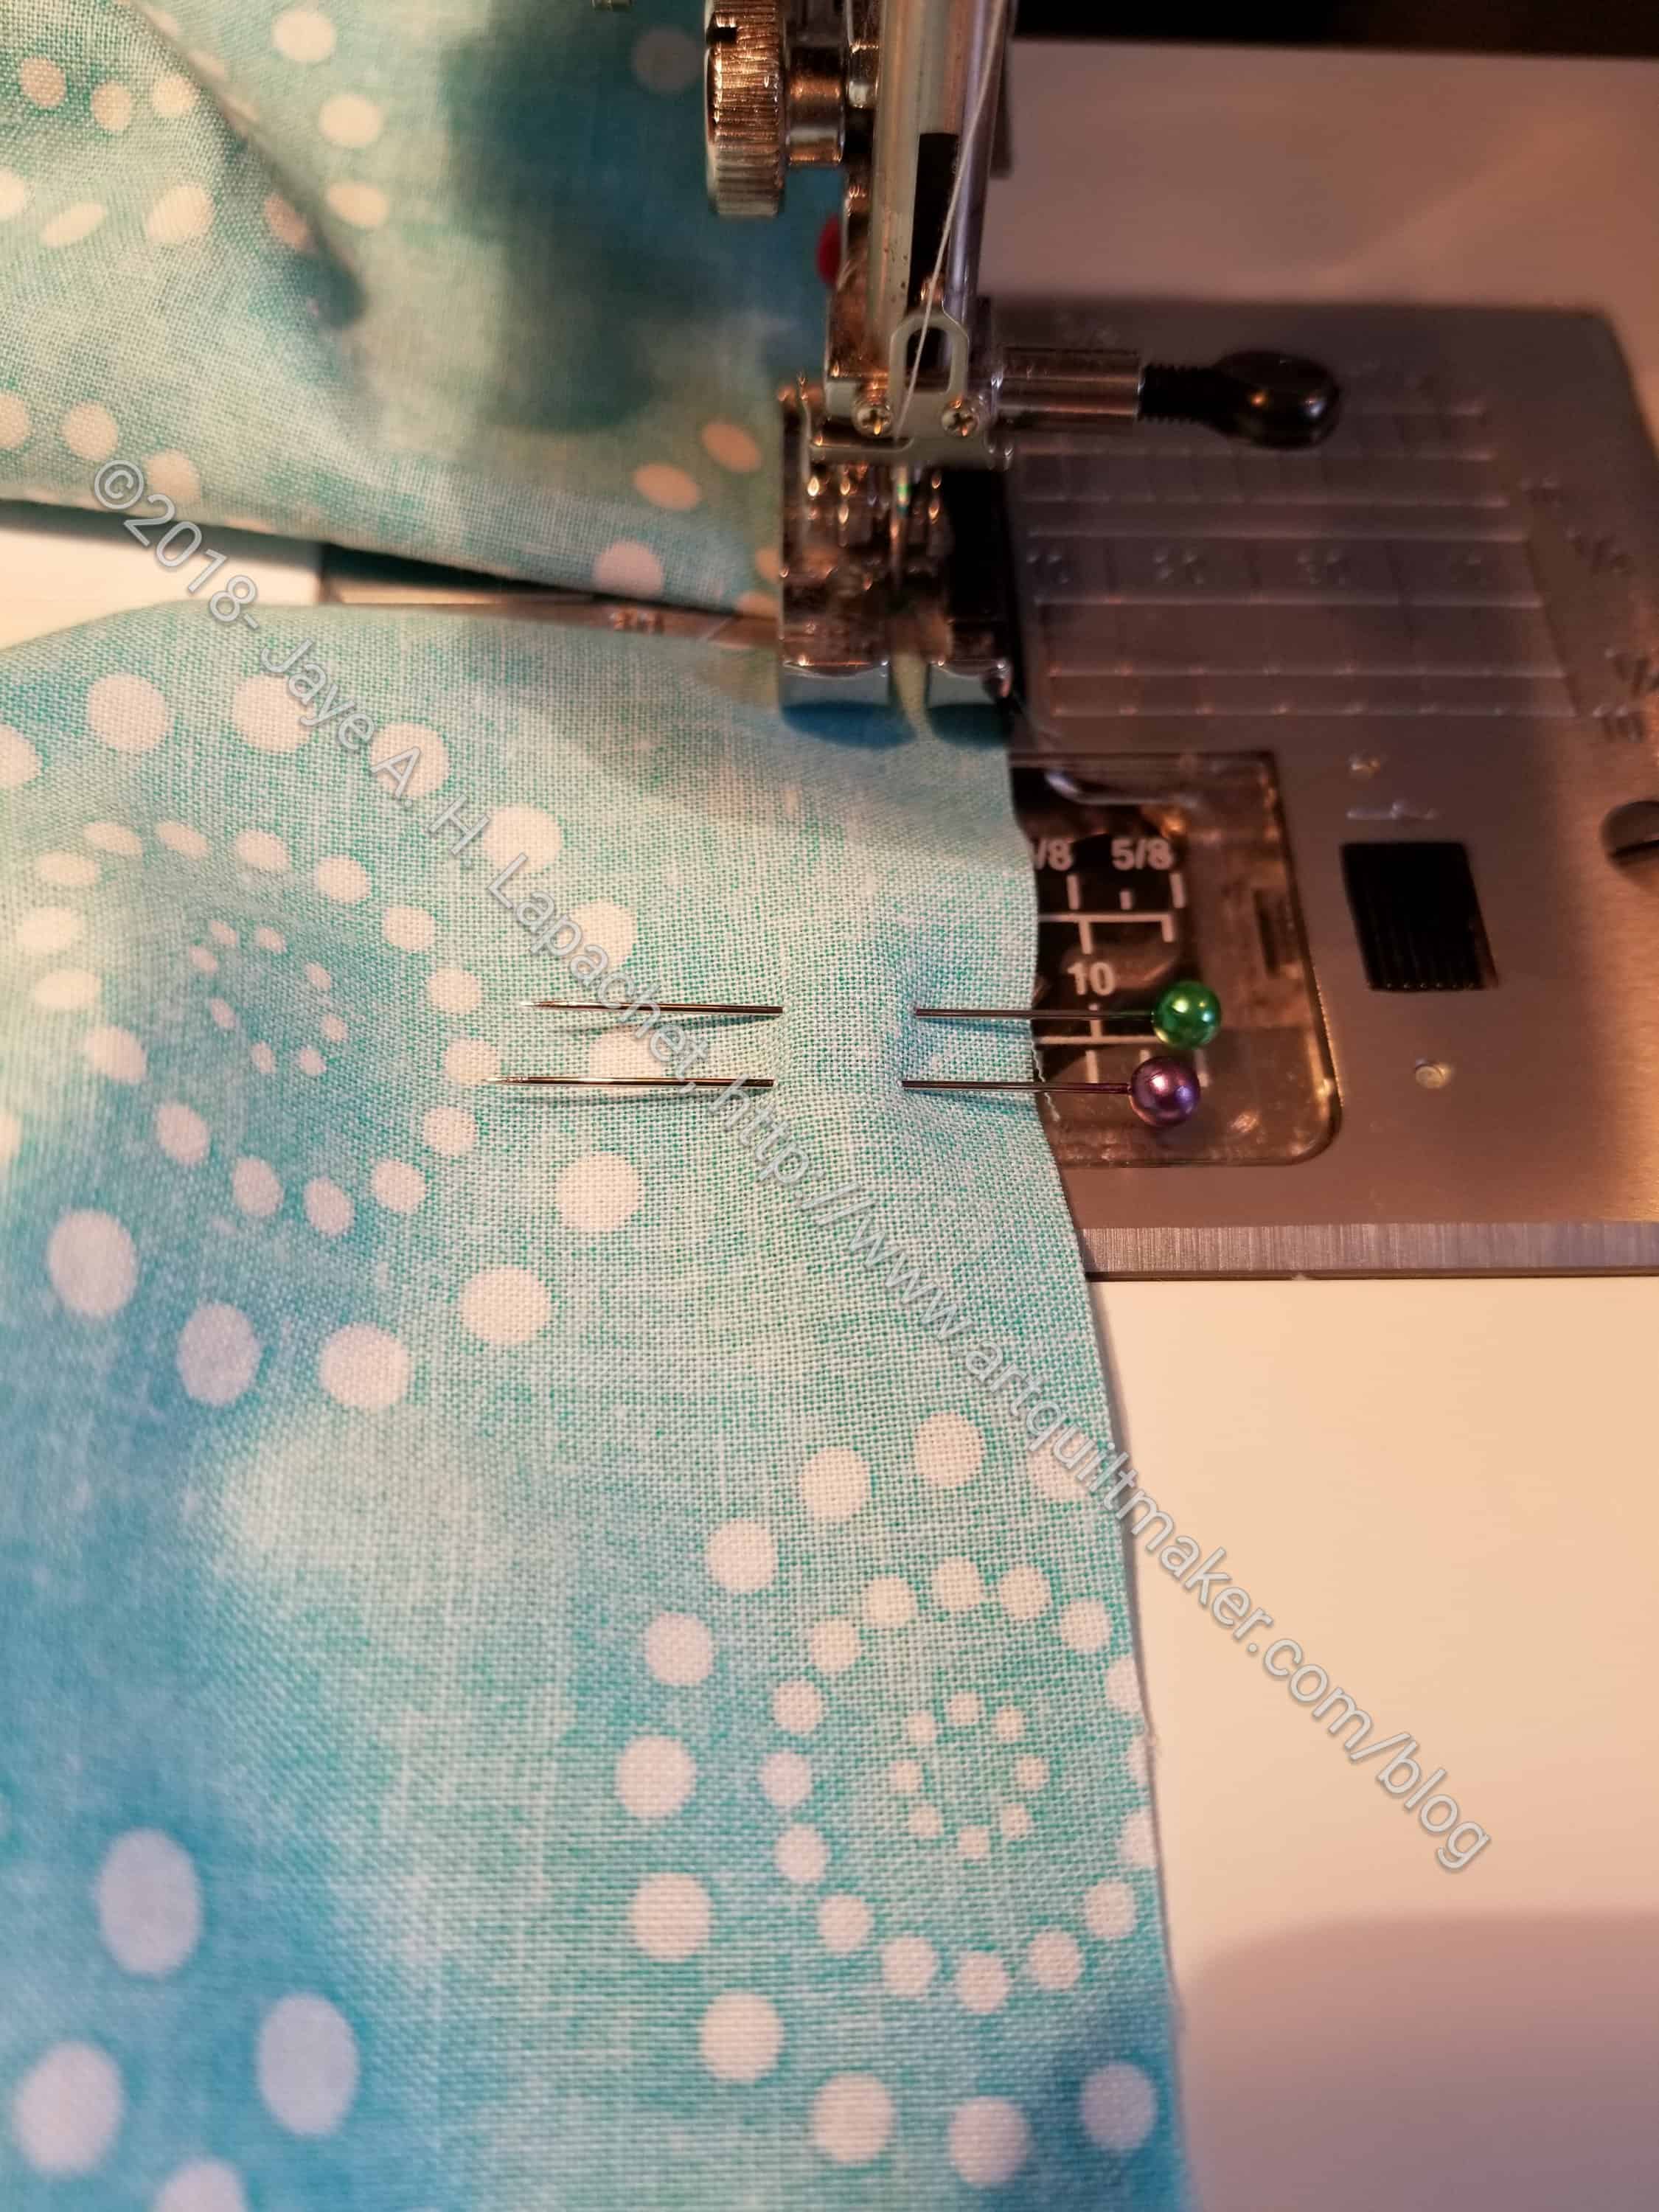
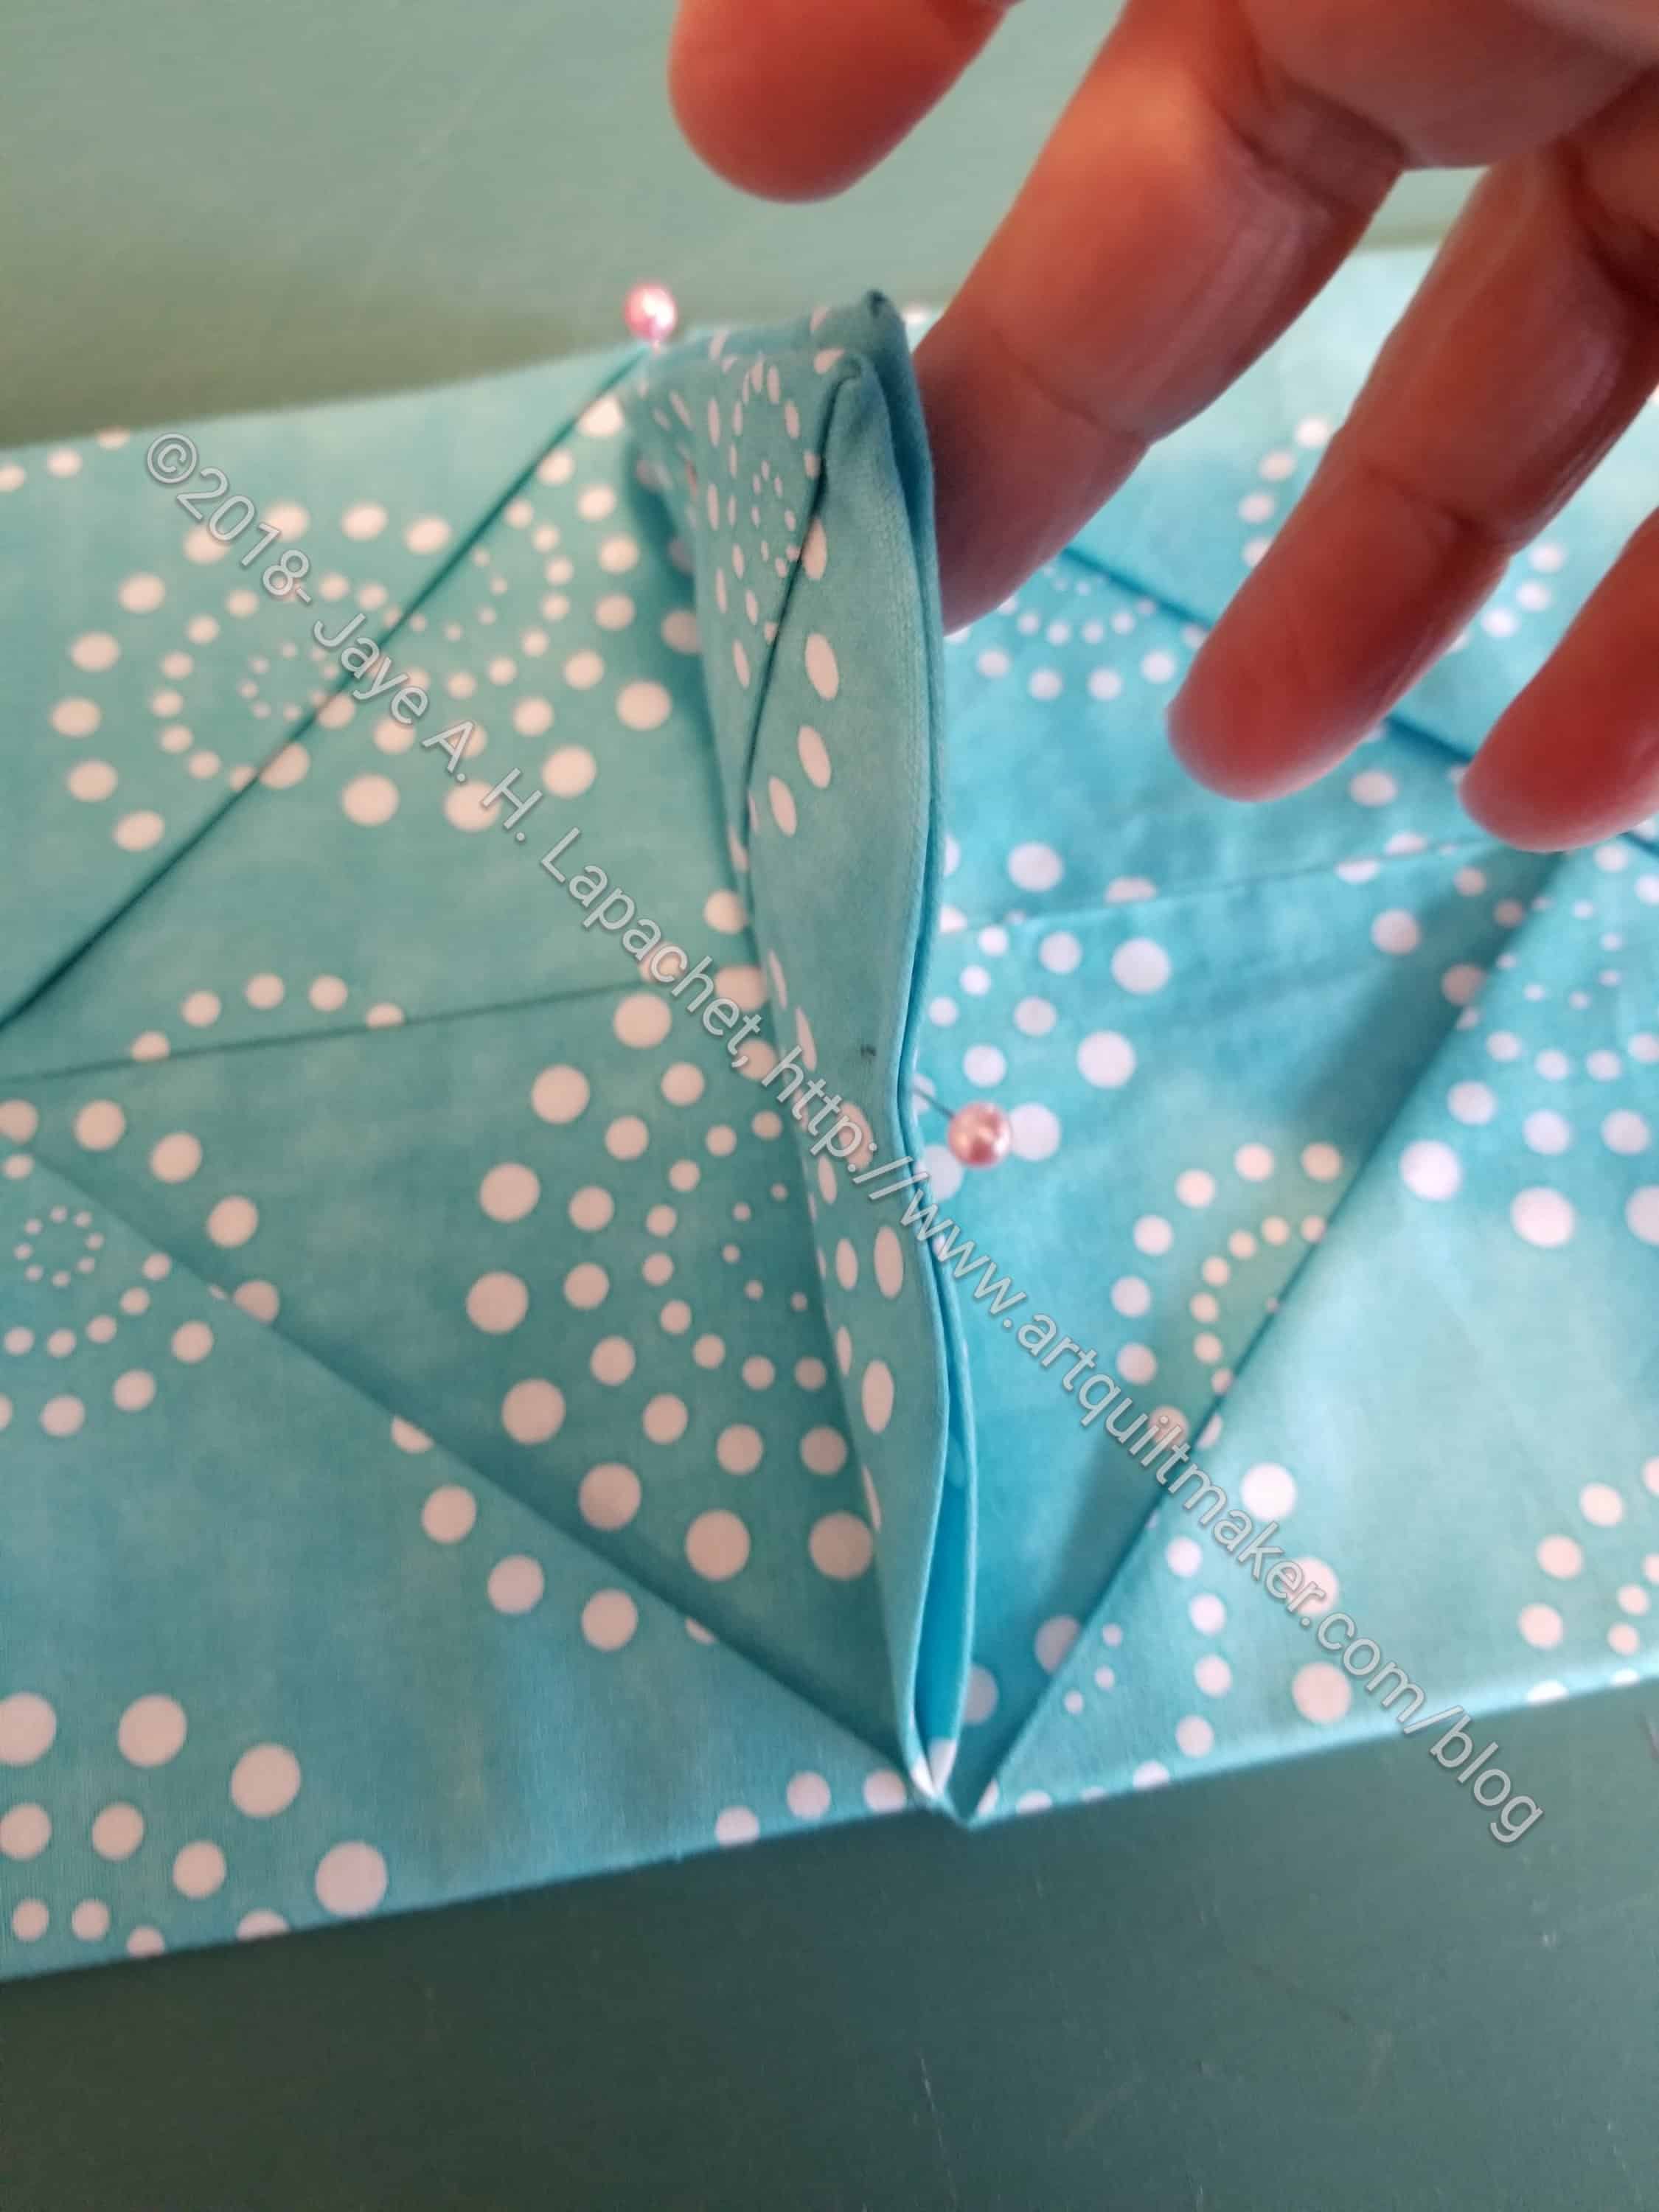
Pin triangles together
13. Pin the center triangles of the two top triangles together. Do the same for the bottom triangles. Now your 2×2 grid will be pinned together in two rectangular sections
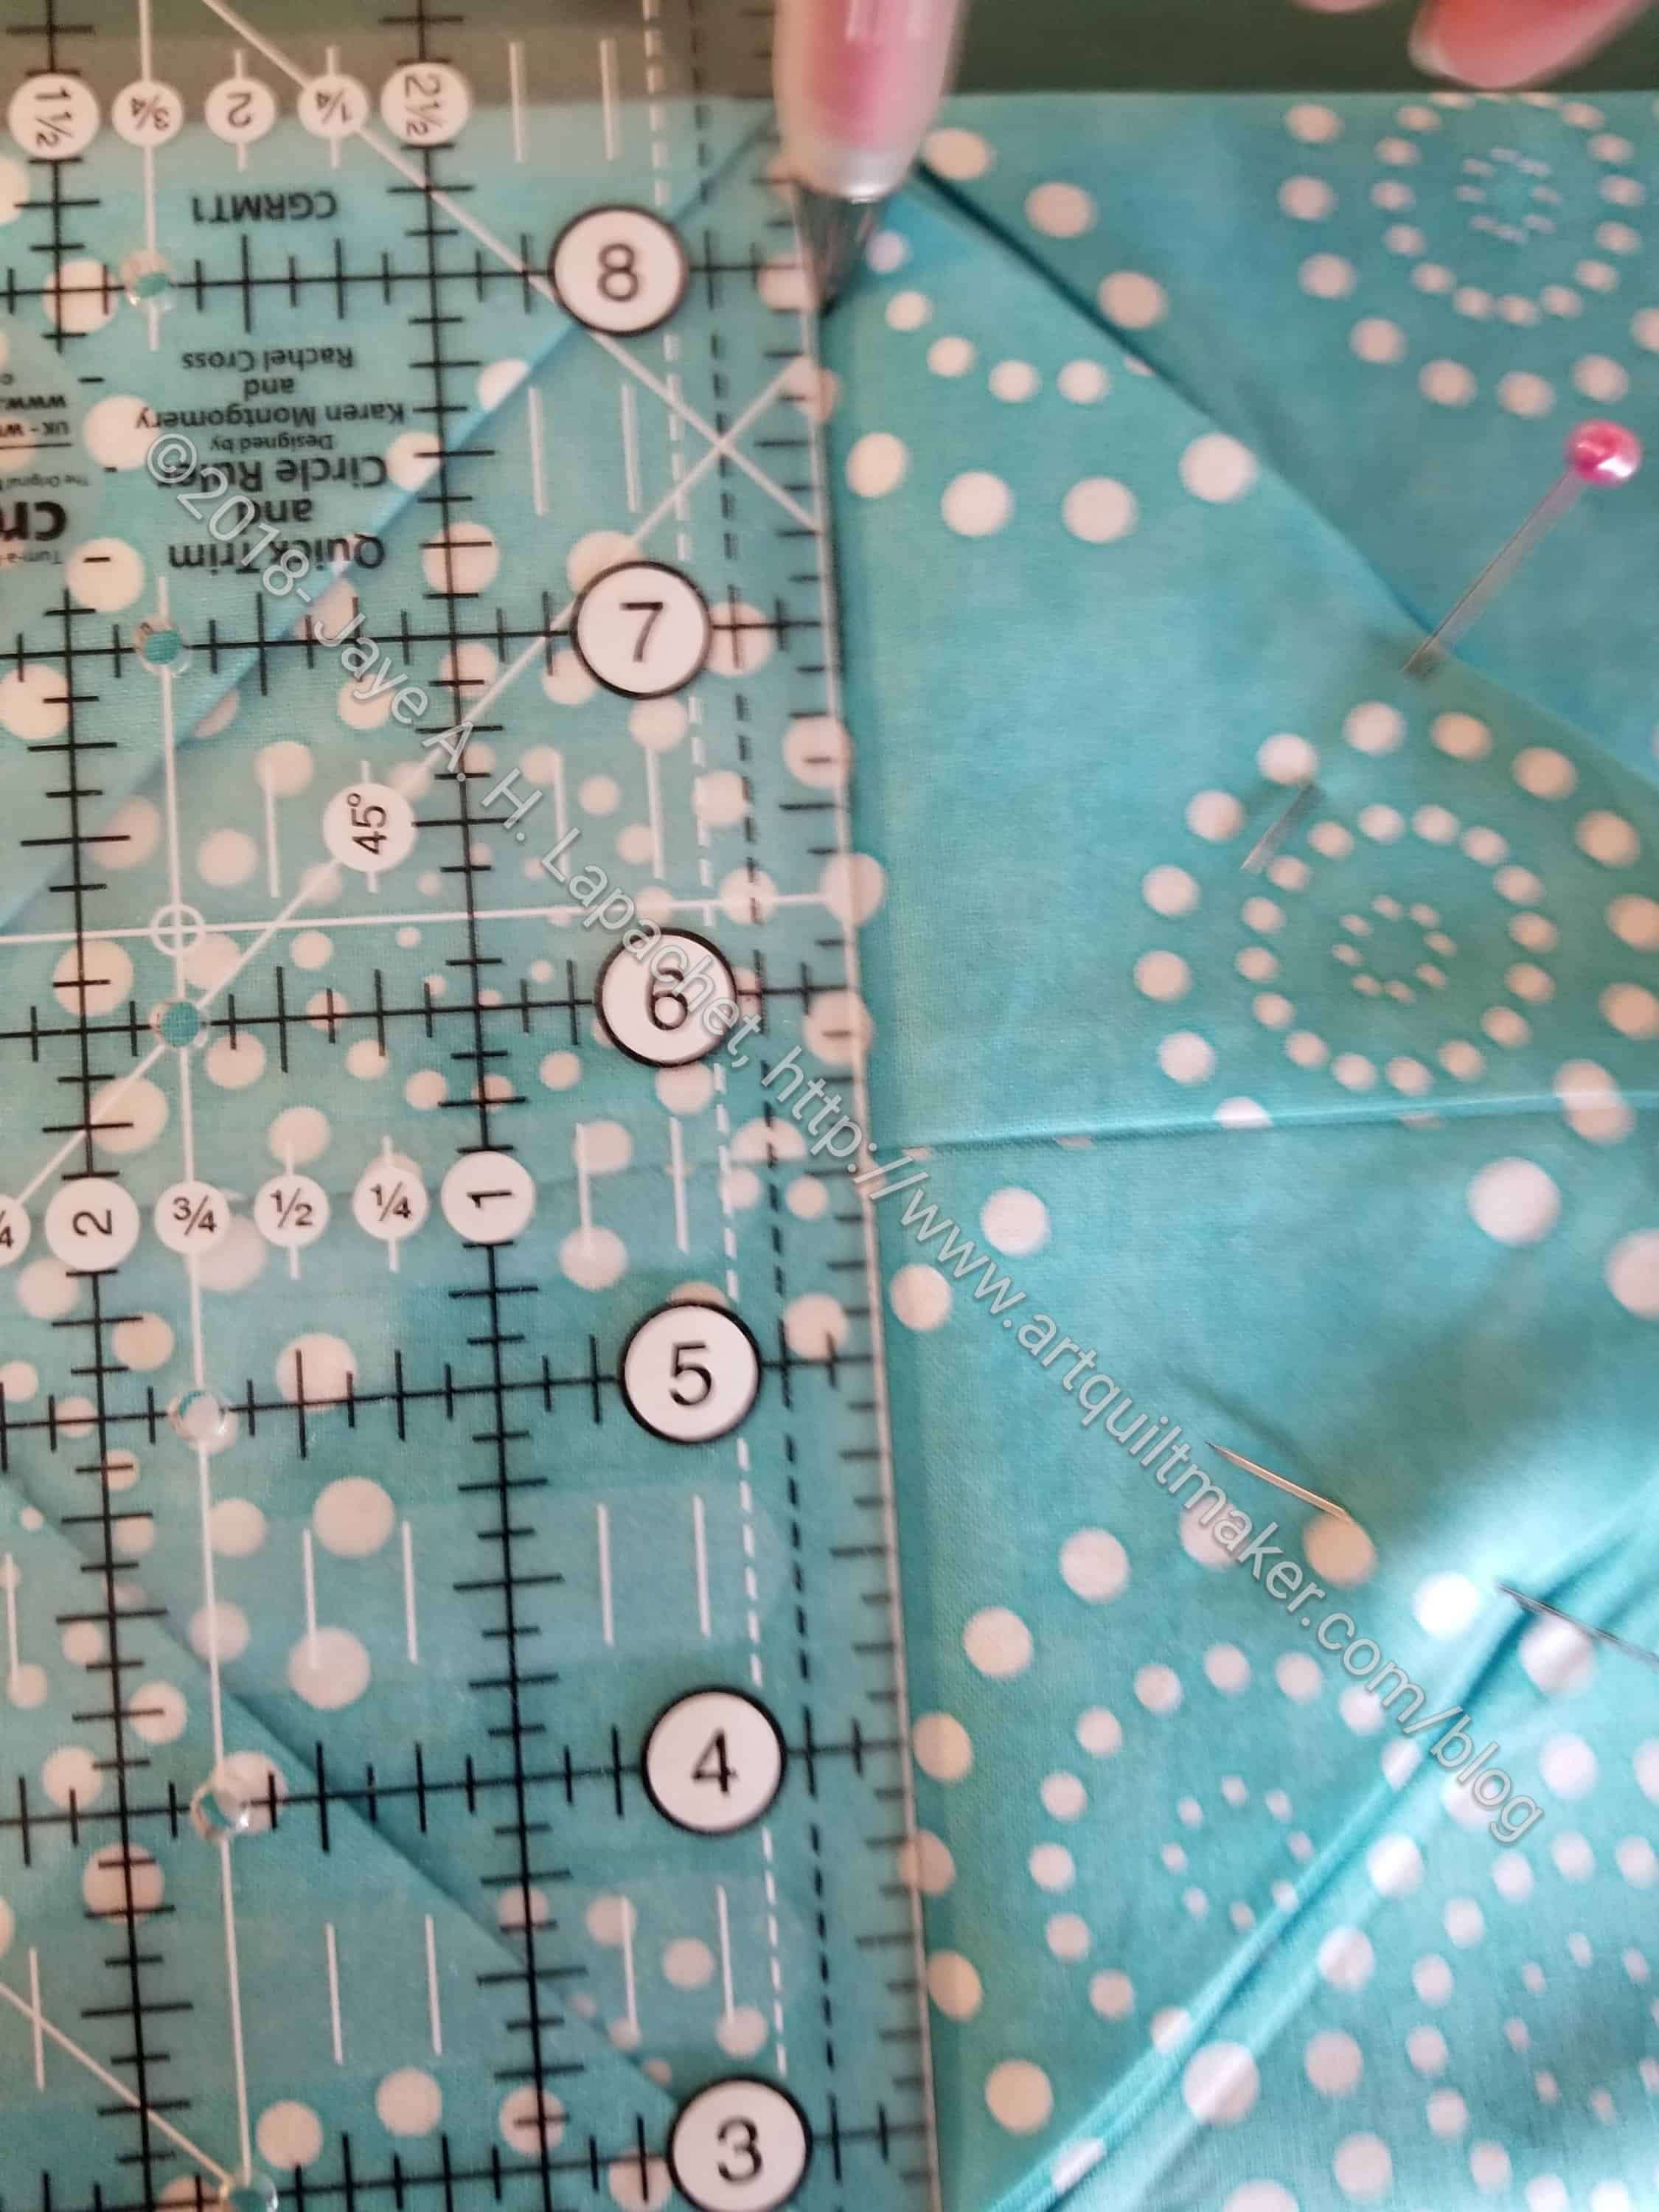
Draw a line in the crease
14. Using a ruler (I use a 3.5 x 12.5 Creative Grids), and your marking implement (I like Sewline pencils), draw a line in the crease under the triangles you are about to pin
Line up squares
15. Line up squares with backs together and triangles pointing to the right.
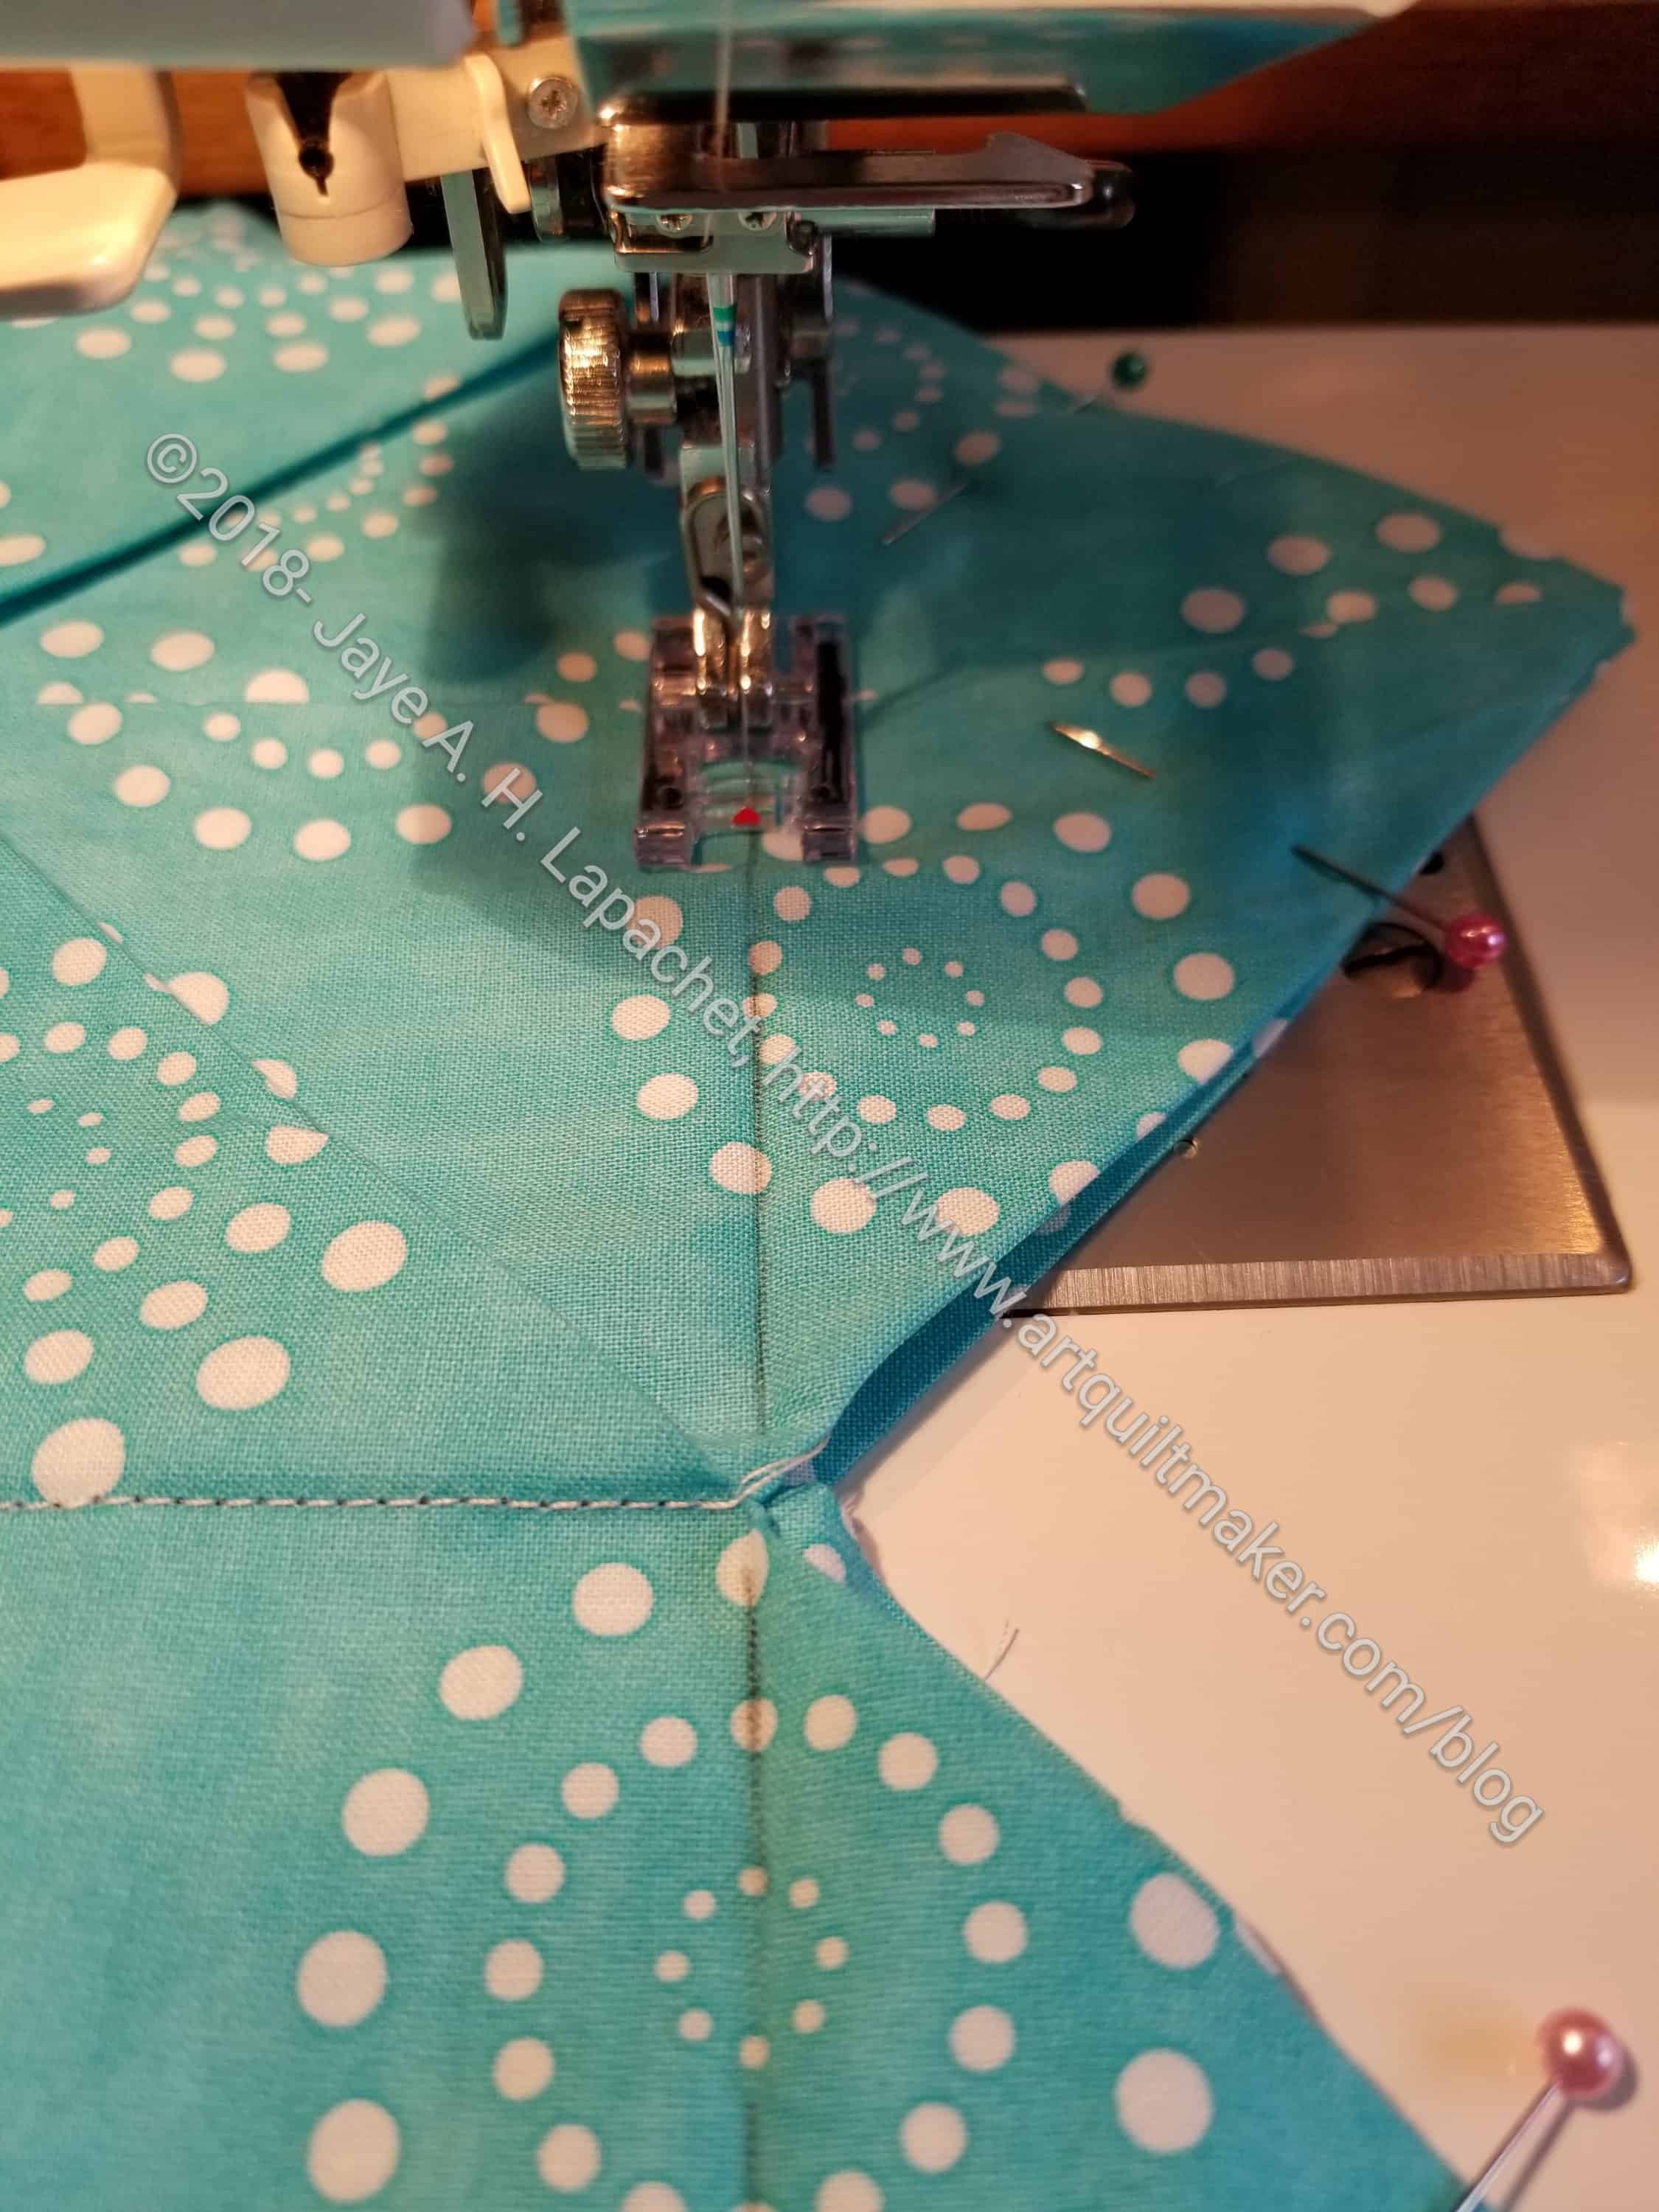
16. Put your applique’ foot on your sewing machine.
17. Sew along the crease on both sets.
18. Lay out the 2×2 grid again. Now you will have two ‘rows’. You are going to sew the rows together.
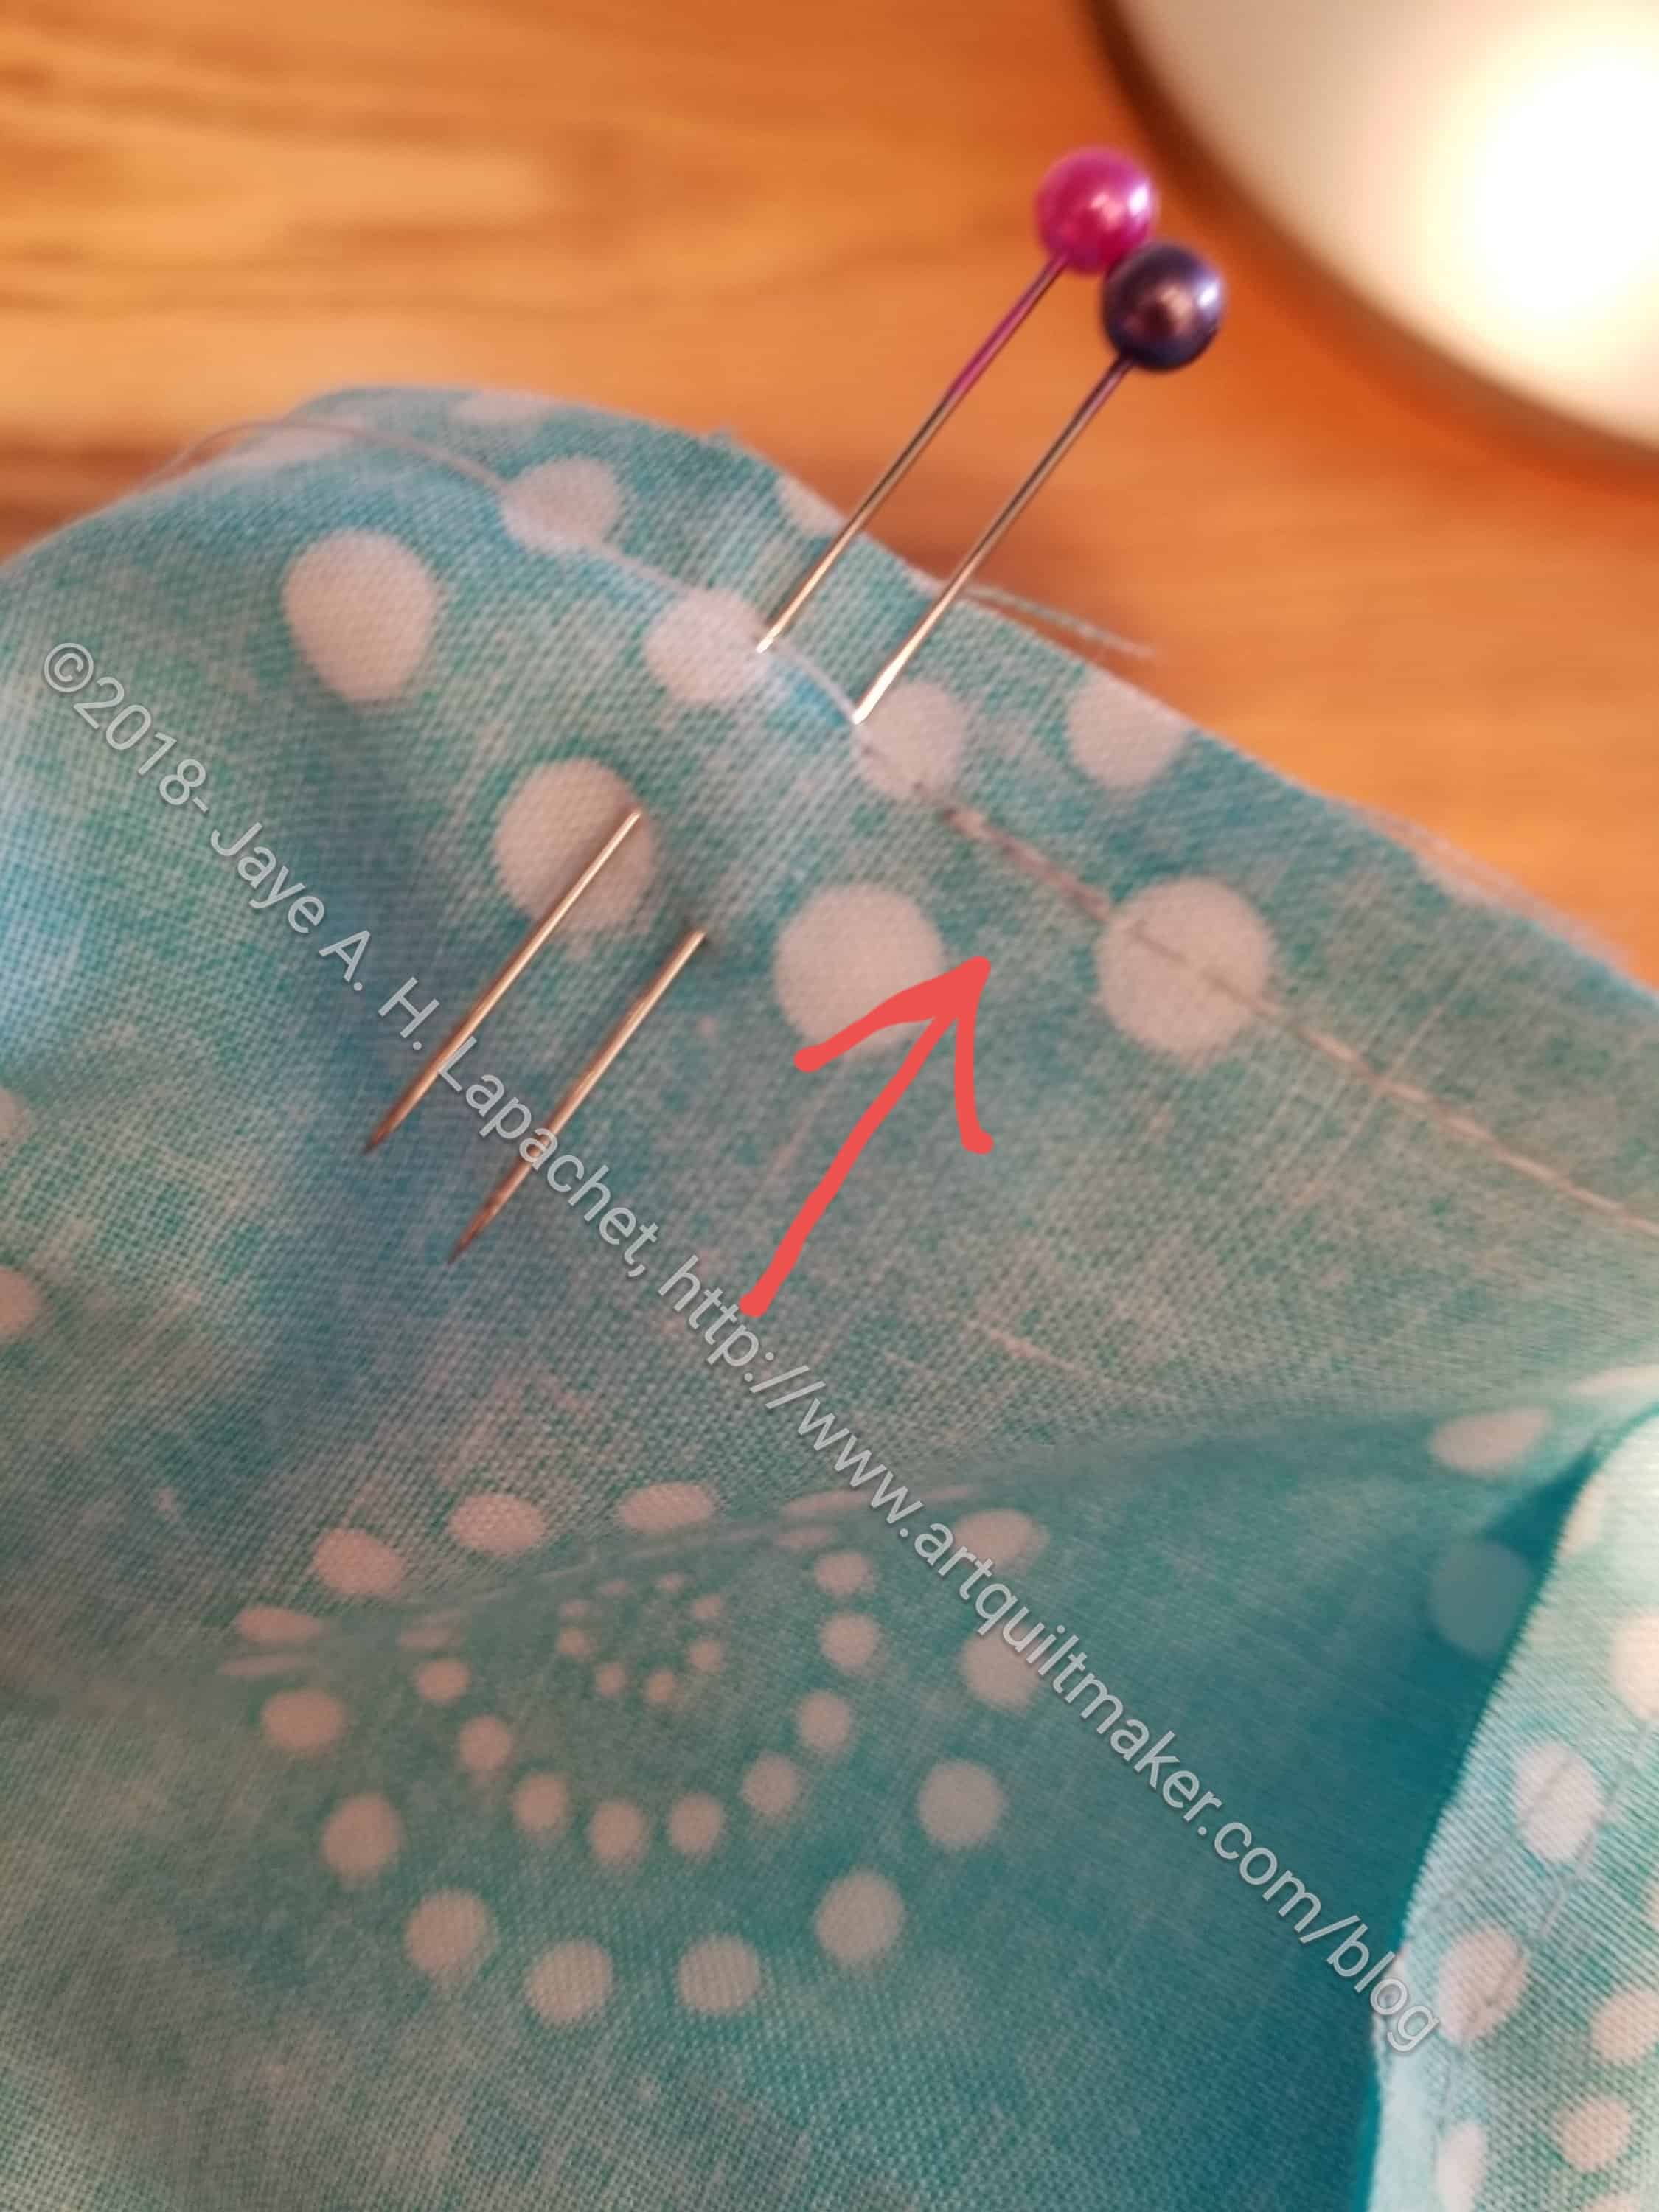
Pin them together
19. Fold up the top triangles from the bottom row and the bottom triangle from the top row.
Draw another line between the two ‘rows’ in the crease
20. Draw a line along the crease at the bottom of the two triangles.
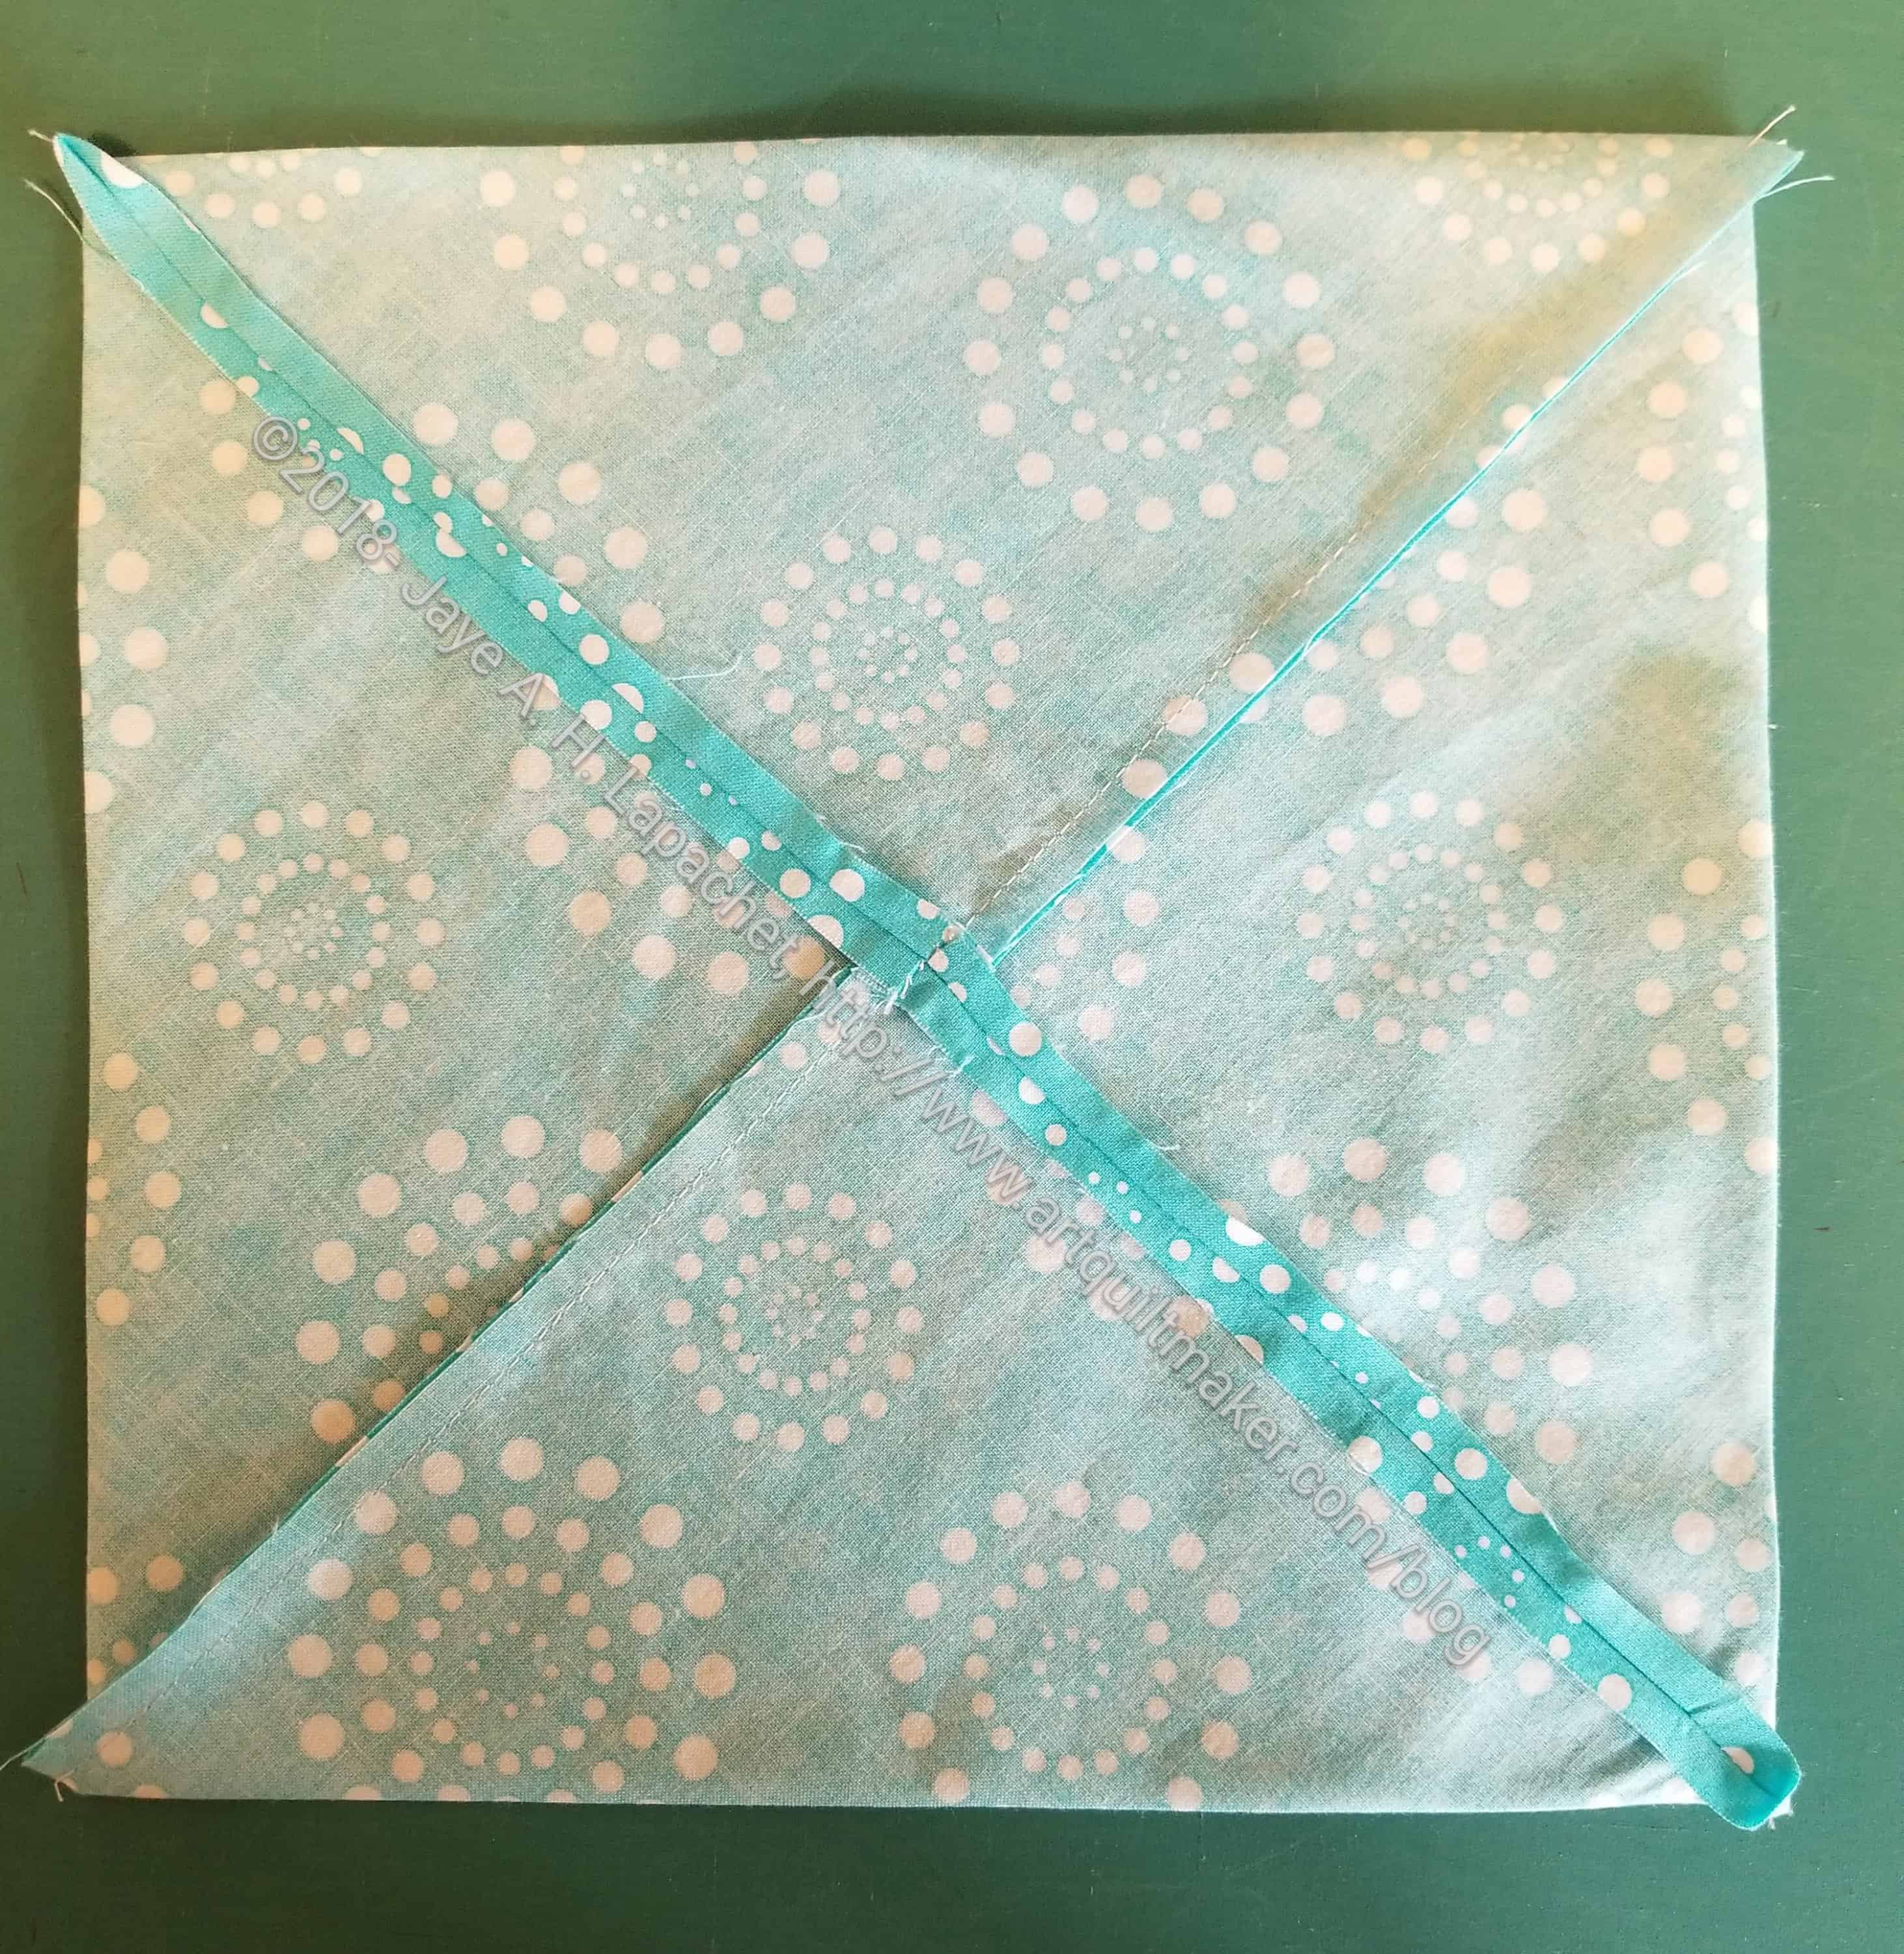
21. Sew along the line. After, you will have your 2×2 grid of squares sewn together and the triangles will be flapping around.
Start laying out your foreground squaresForeground squares laid out
22. Take your foreground triangles and lay them on top of your background
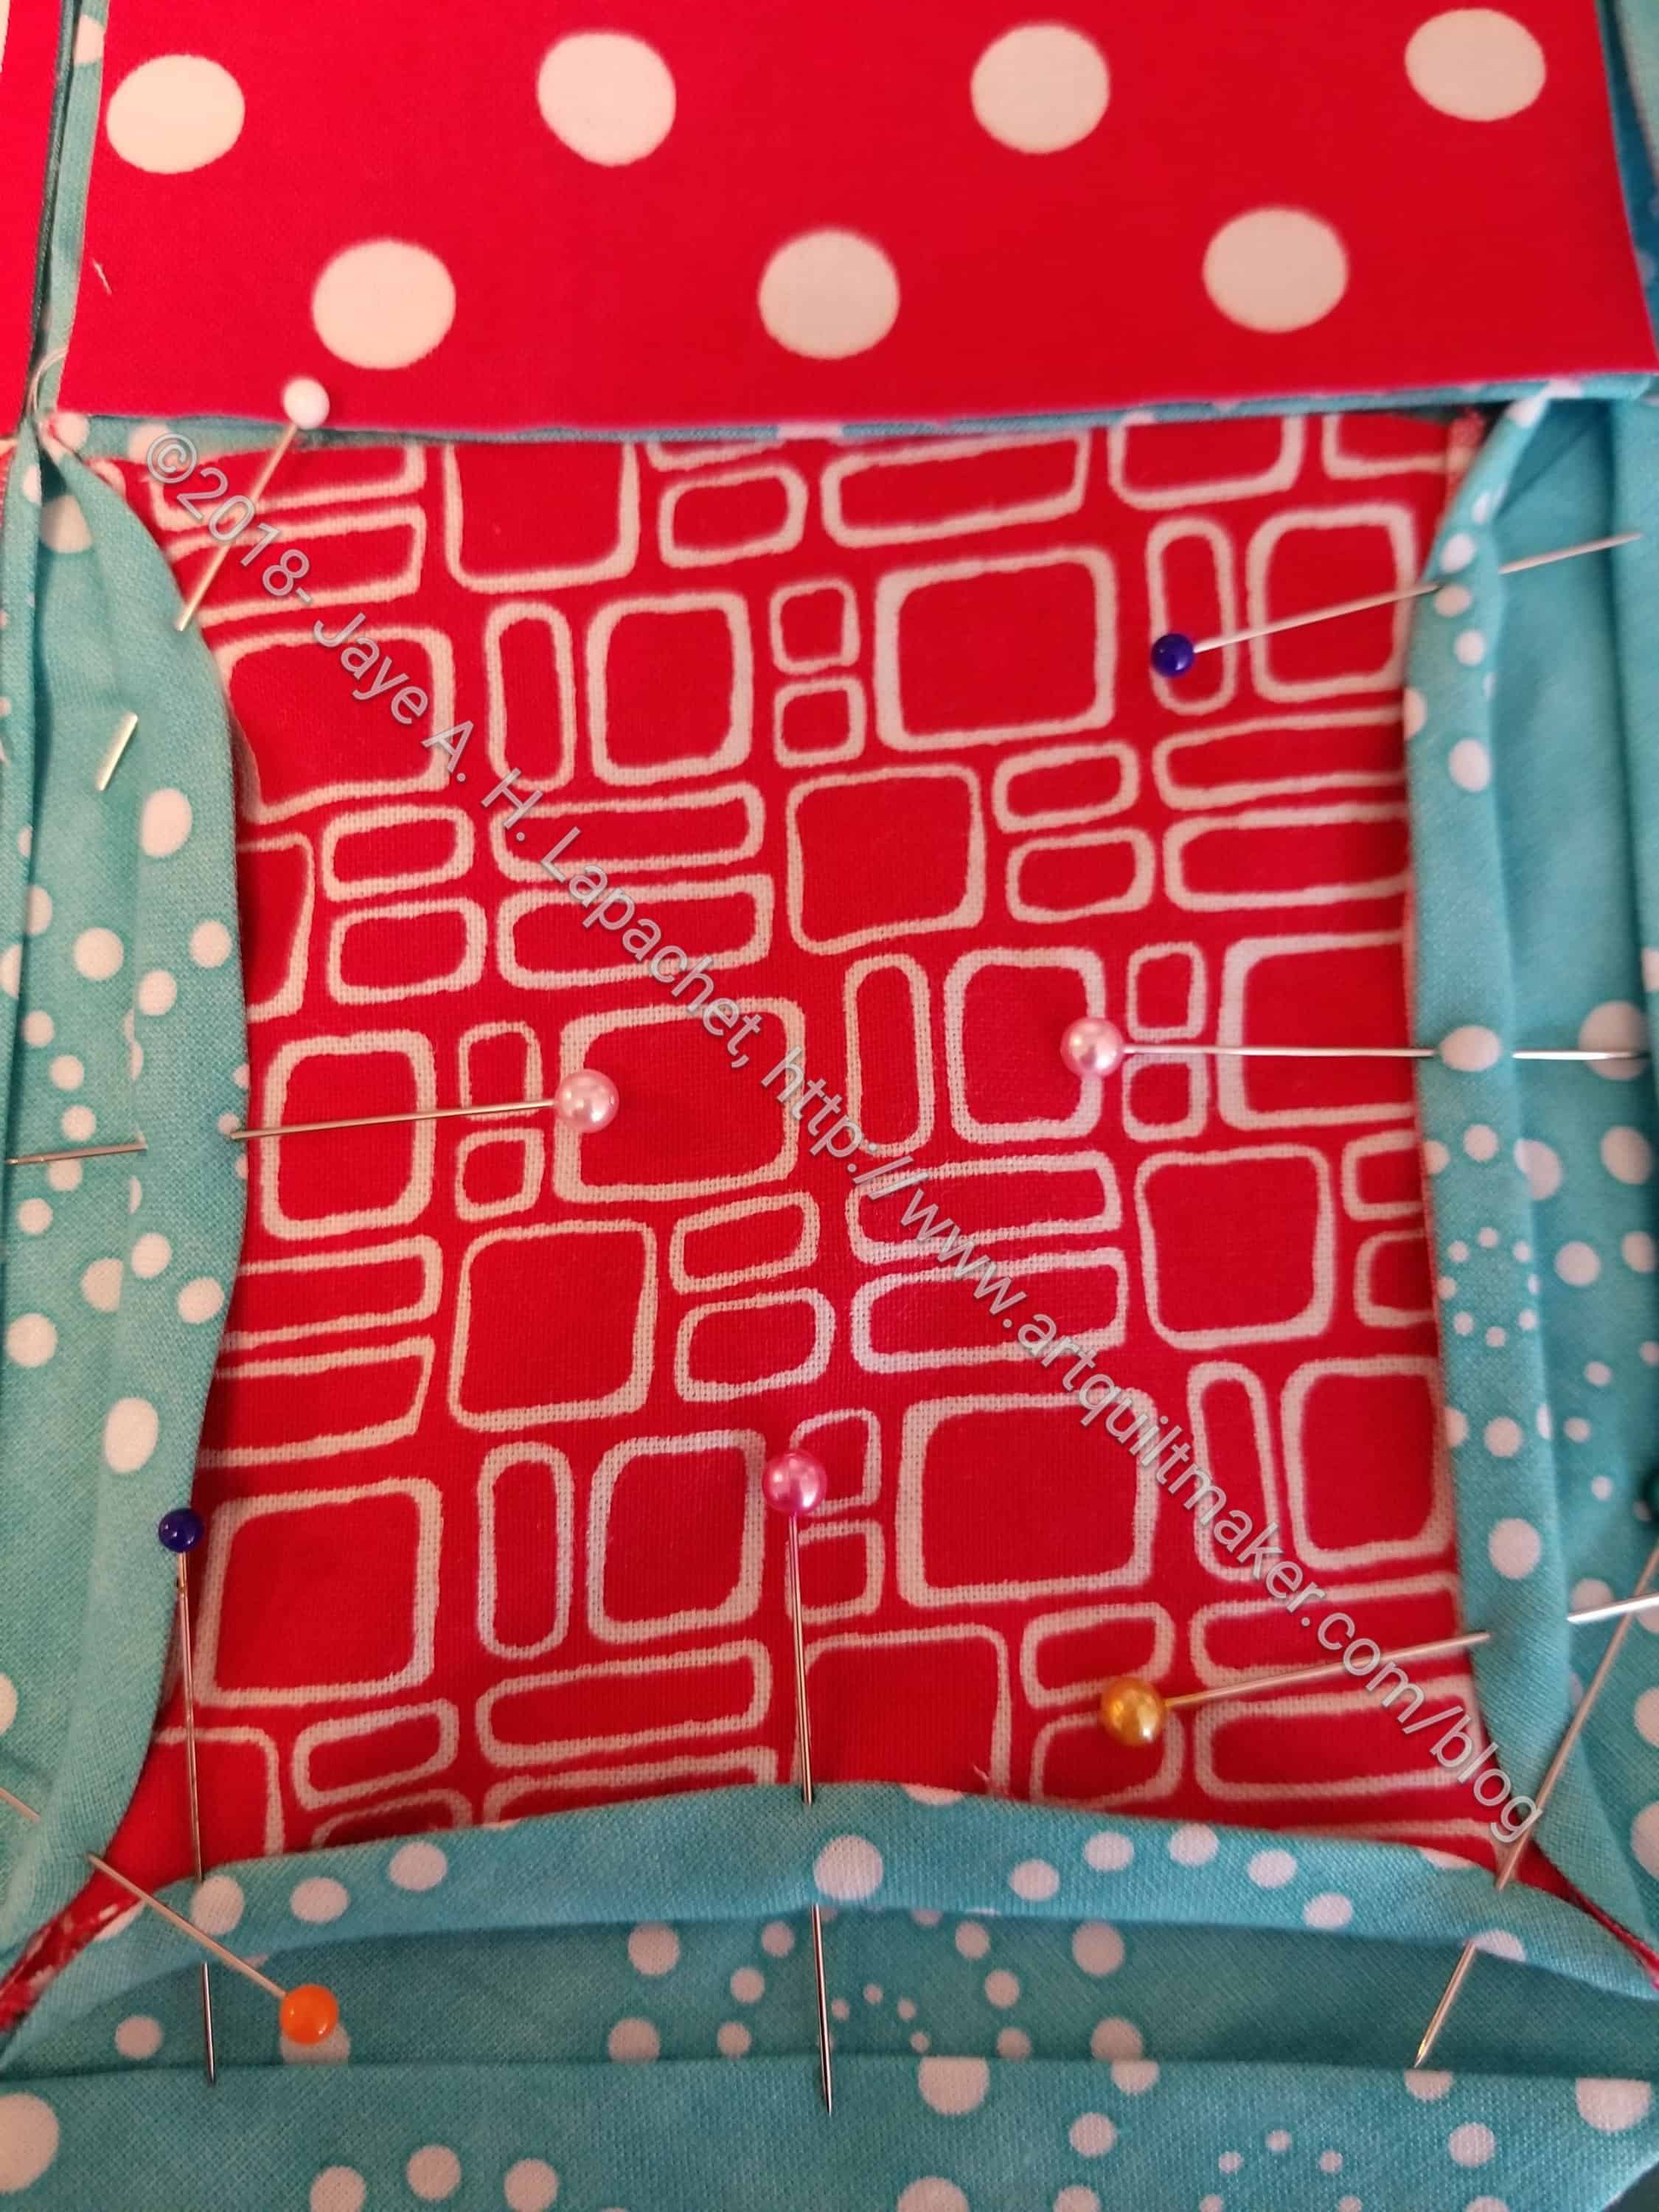
Tuck flaps over foreground
23. Tuck the flaps in towards the center and pin in place. Watch out that the edges of your foreground squares don’t show. Make the edges curve slightly
Note: this was confusing to figure out and it turned out that I did not have all the sewn triangles in the right place. After you sew the triangles together, make sure you flatten them back in their original places, e.g. one layer of background on top
You may need to use a stiletto
Note: I had to use a thin sharp tool, like a stiletto or dental instrument to tuck in some of the foreground edges. I sometimes use a seam ripper, which is a very bad habit, because if you aren’t careful, you can rip your fabric. You can definitely trim the foreground fabric, but trim a little at a time very, very carefully
Pinned and ready for sewing
24. Pin each edge in three places with the heads of the pins facing the center of the foreground fabric. This is not micro management; this technique will allow you to sew as long as possible with the pins in place
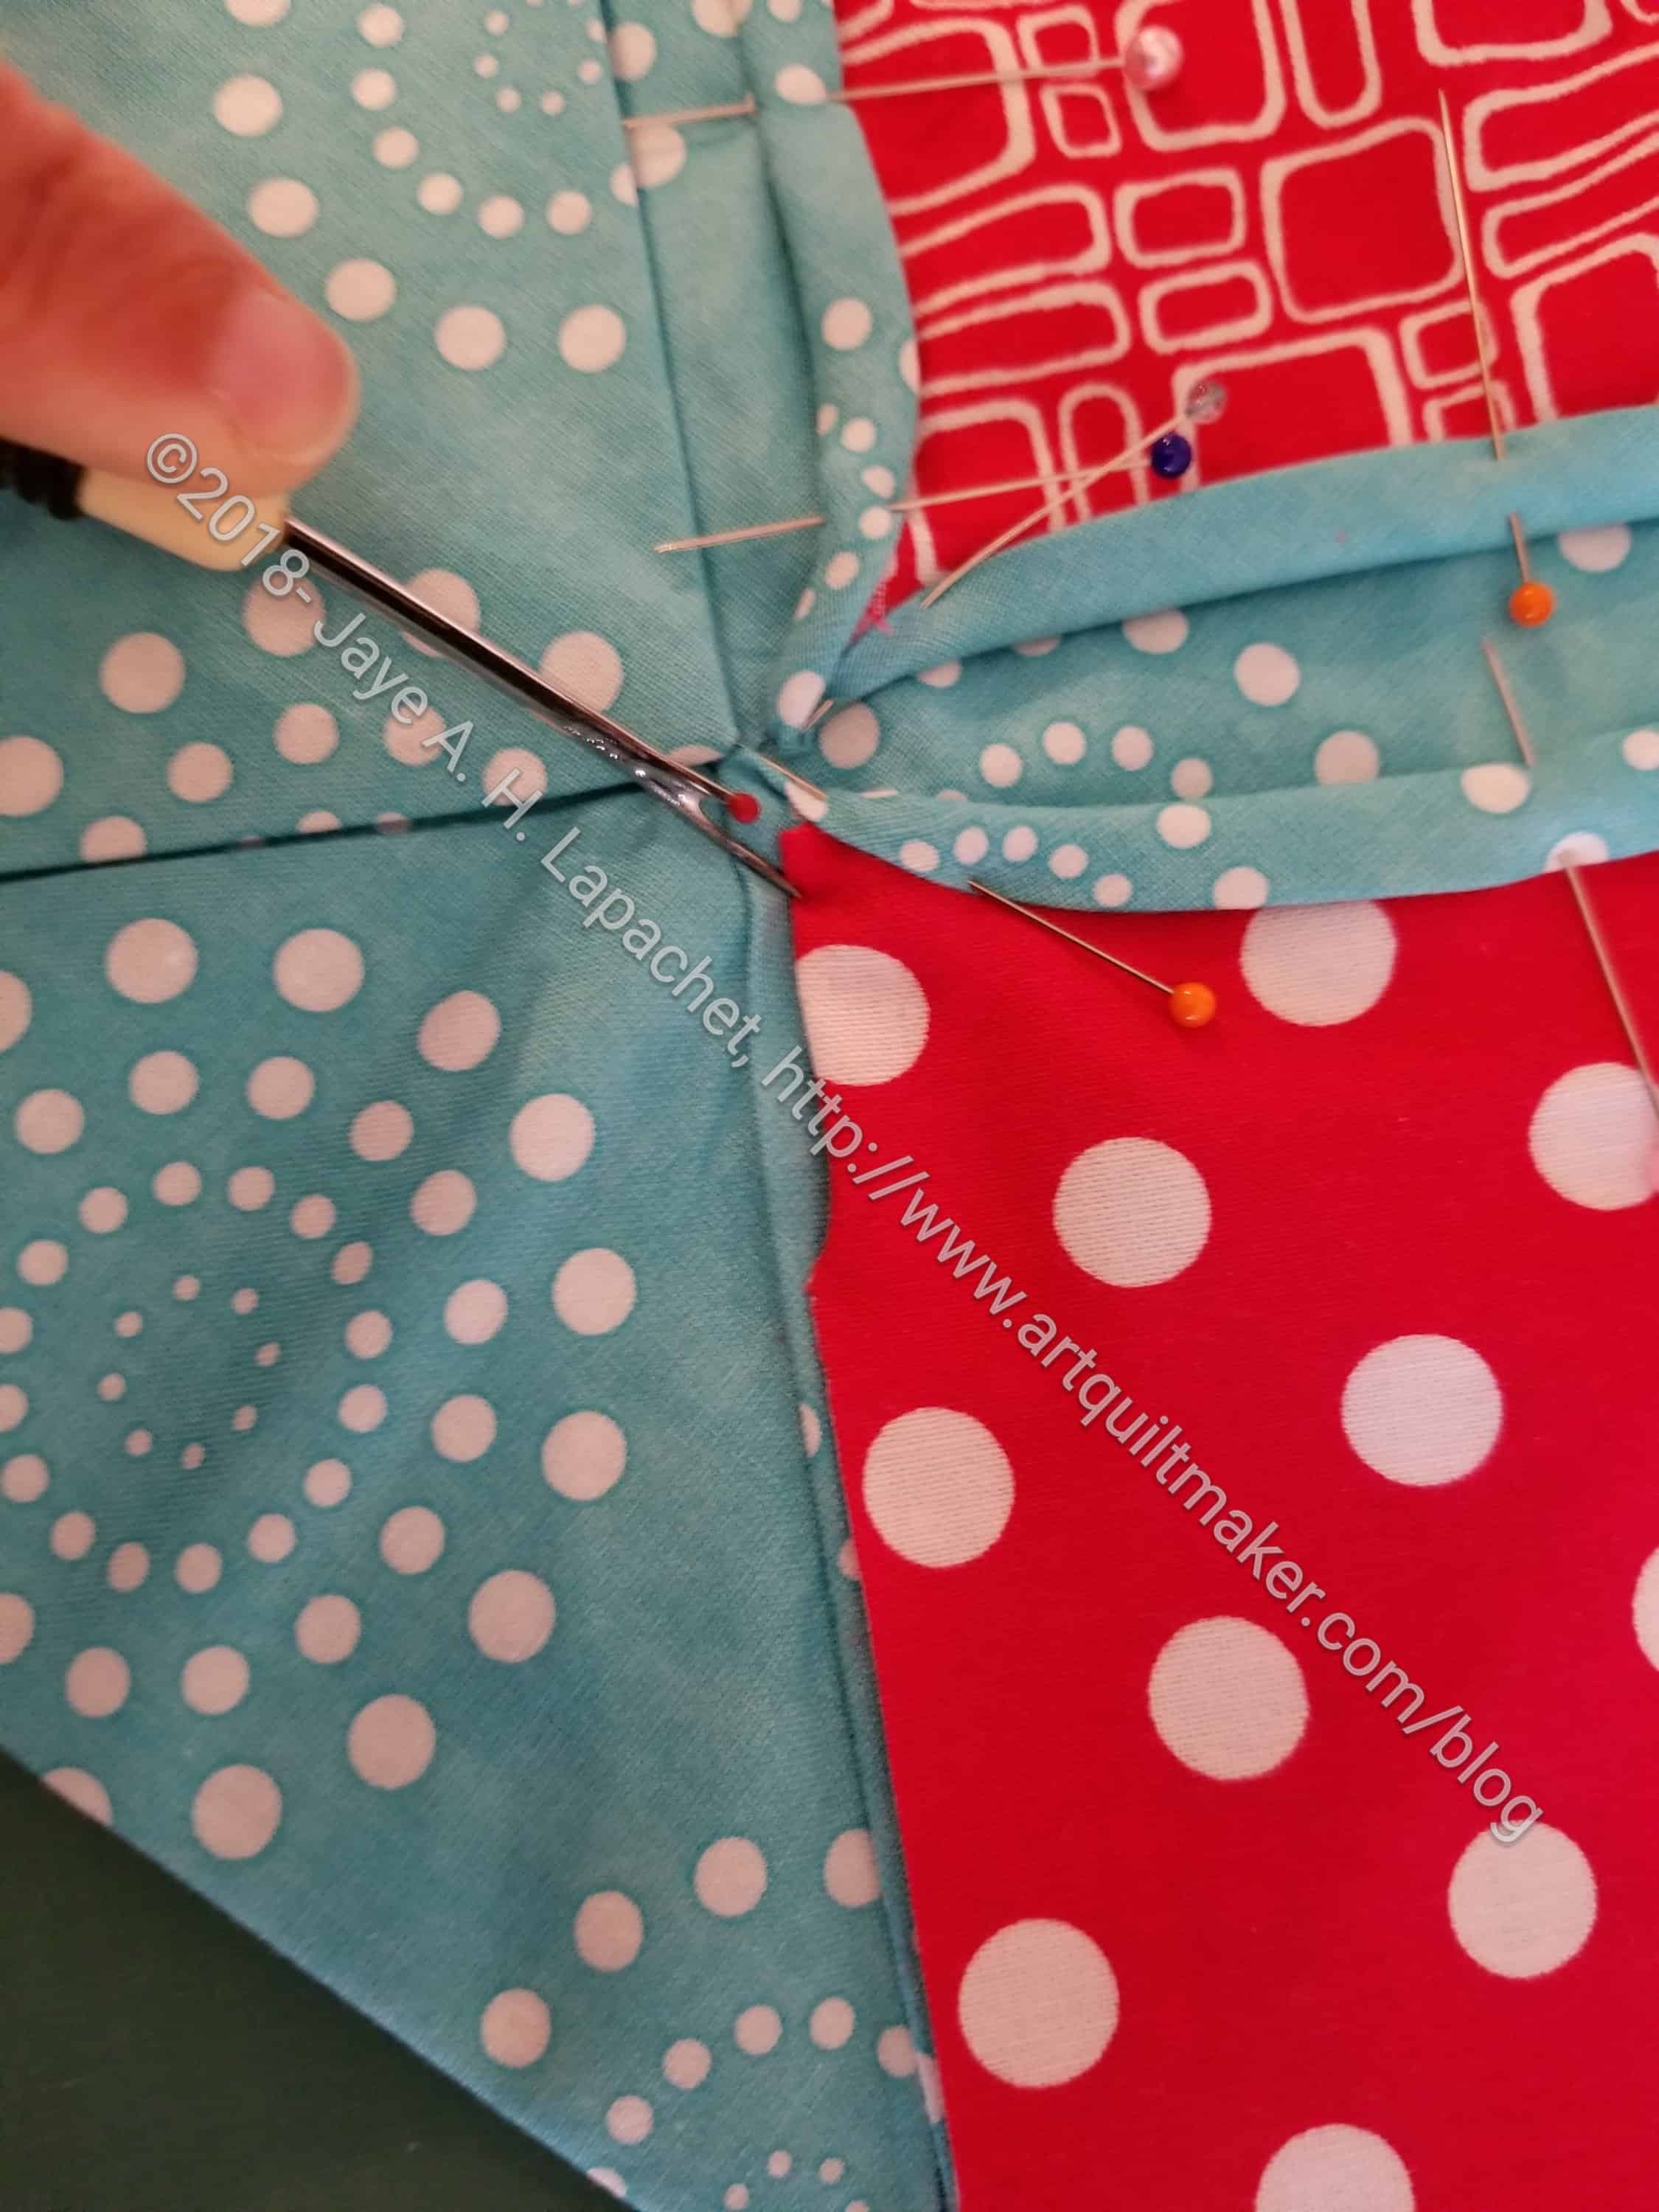
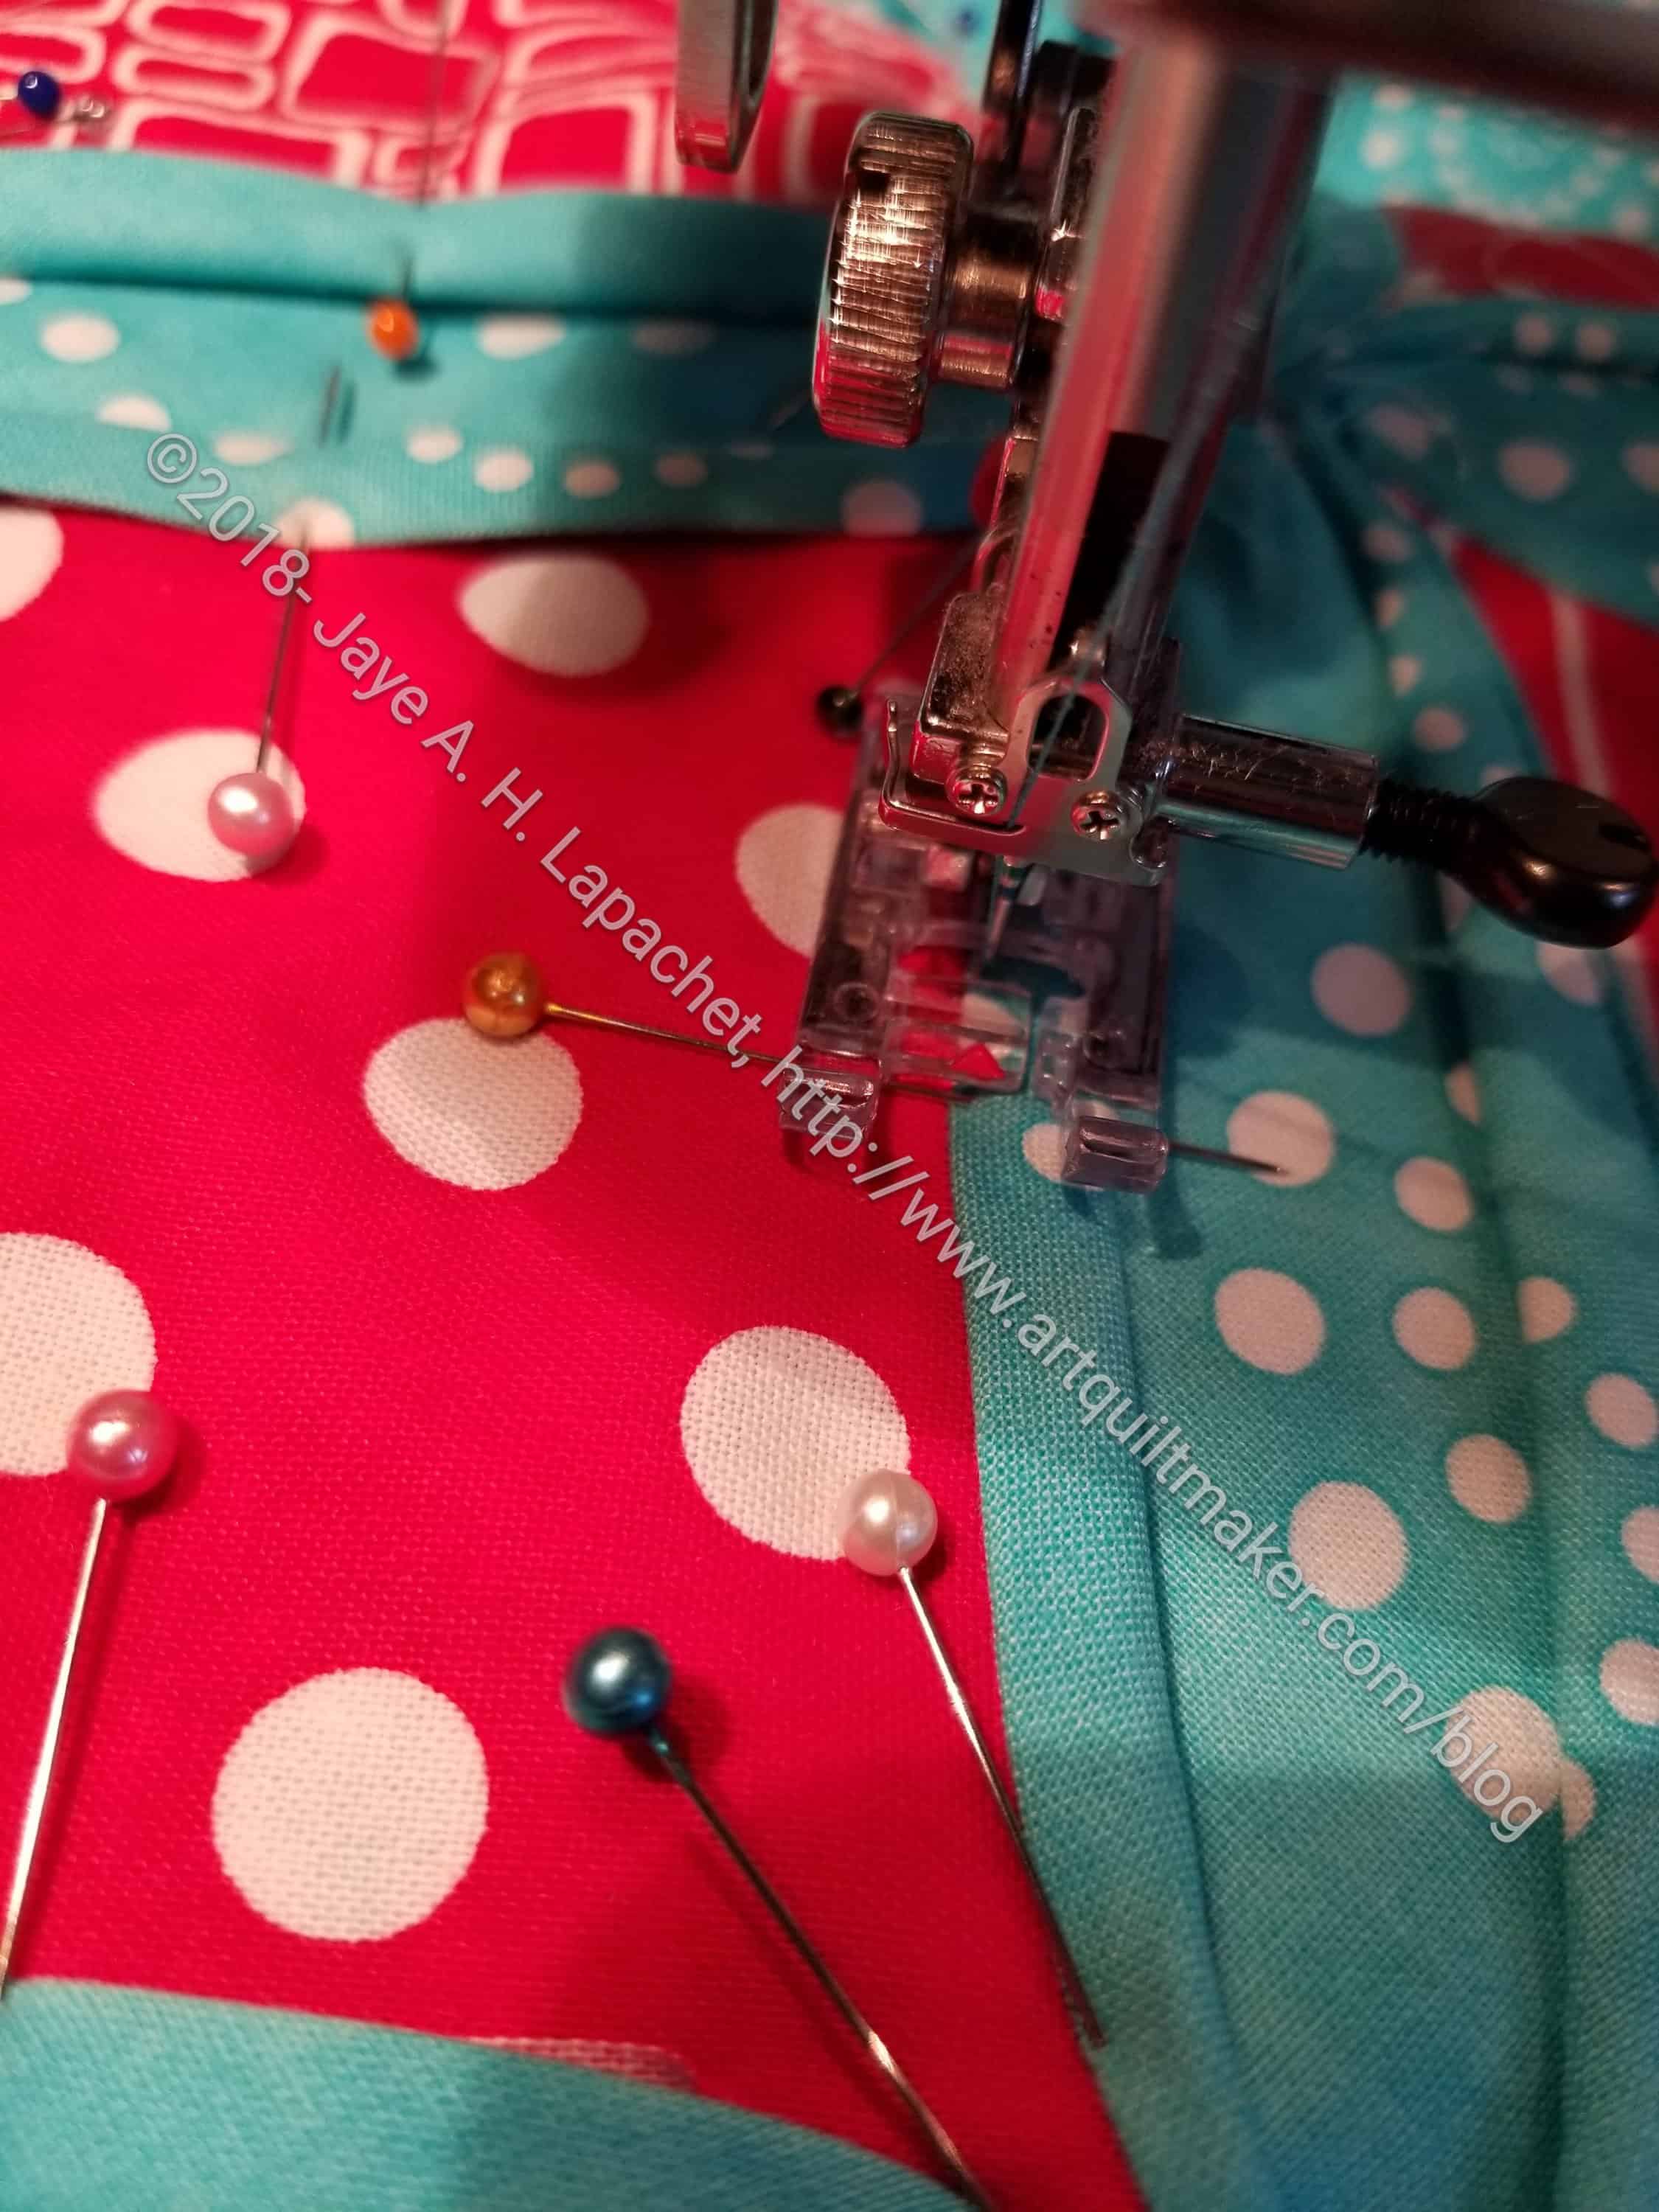
Sew close to the edge of the background fabric
25. Sew very close to the edge of the background. I sewed slowly and carefully. I used the above mentioned sharp tools when I needed a little help. Leave LONG tails so you can knot off and hide the threads
26. Handstitch the other triangle flaps closed with a few stitches. The other tutorials said to use the machine, but 2 stitches is a pain and an irritant on the machine, so I hand sewed the flaps closed when I was sinking threads.
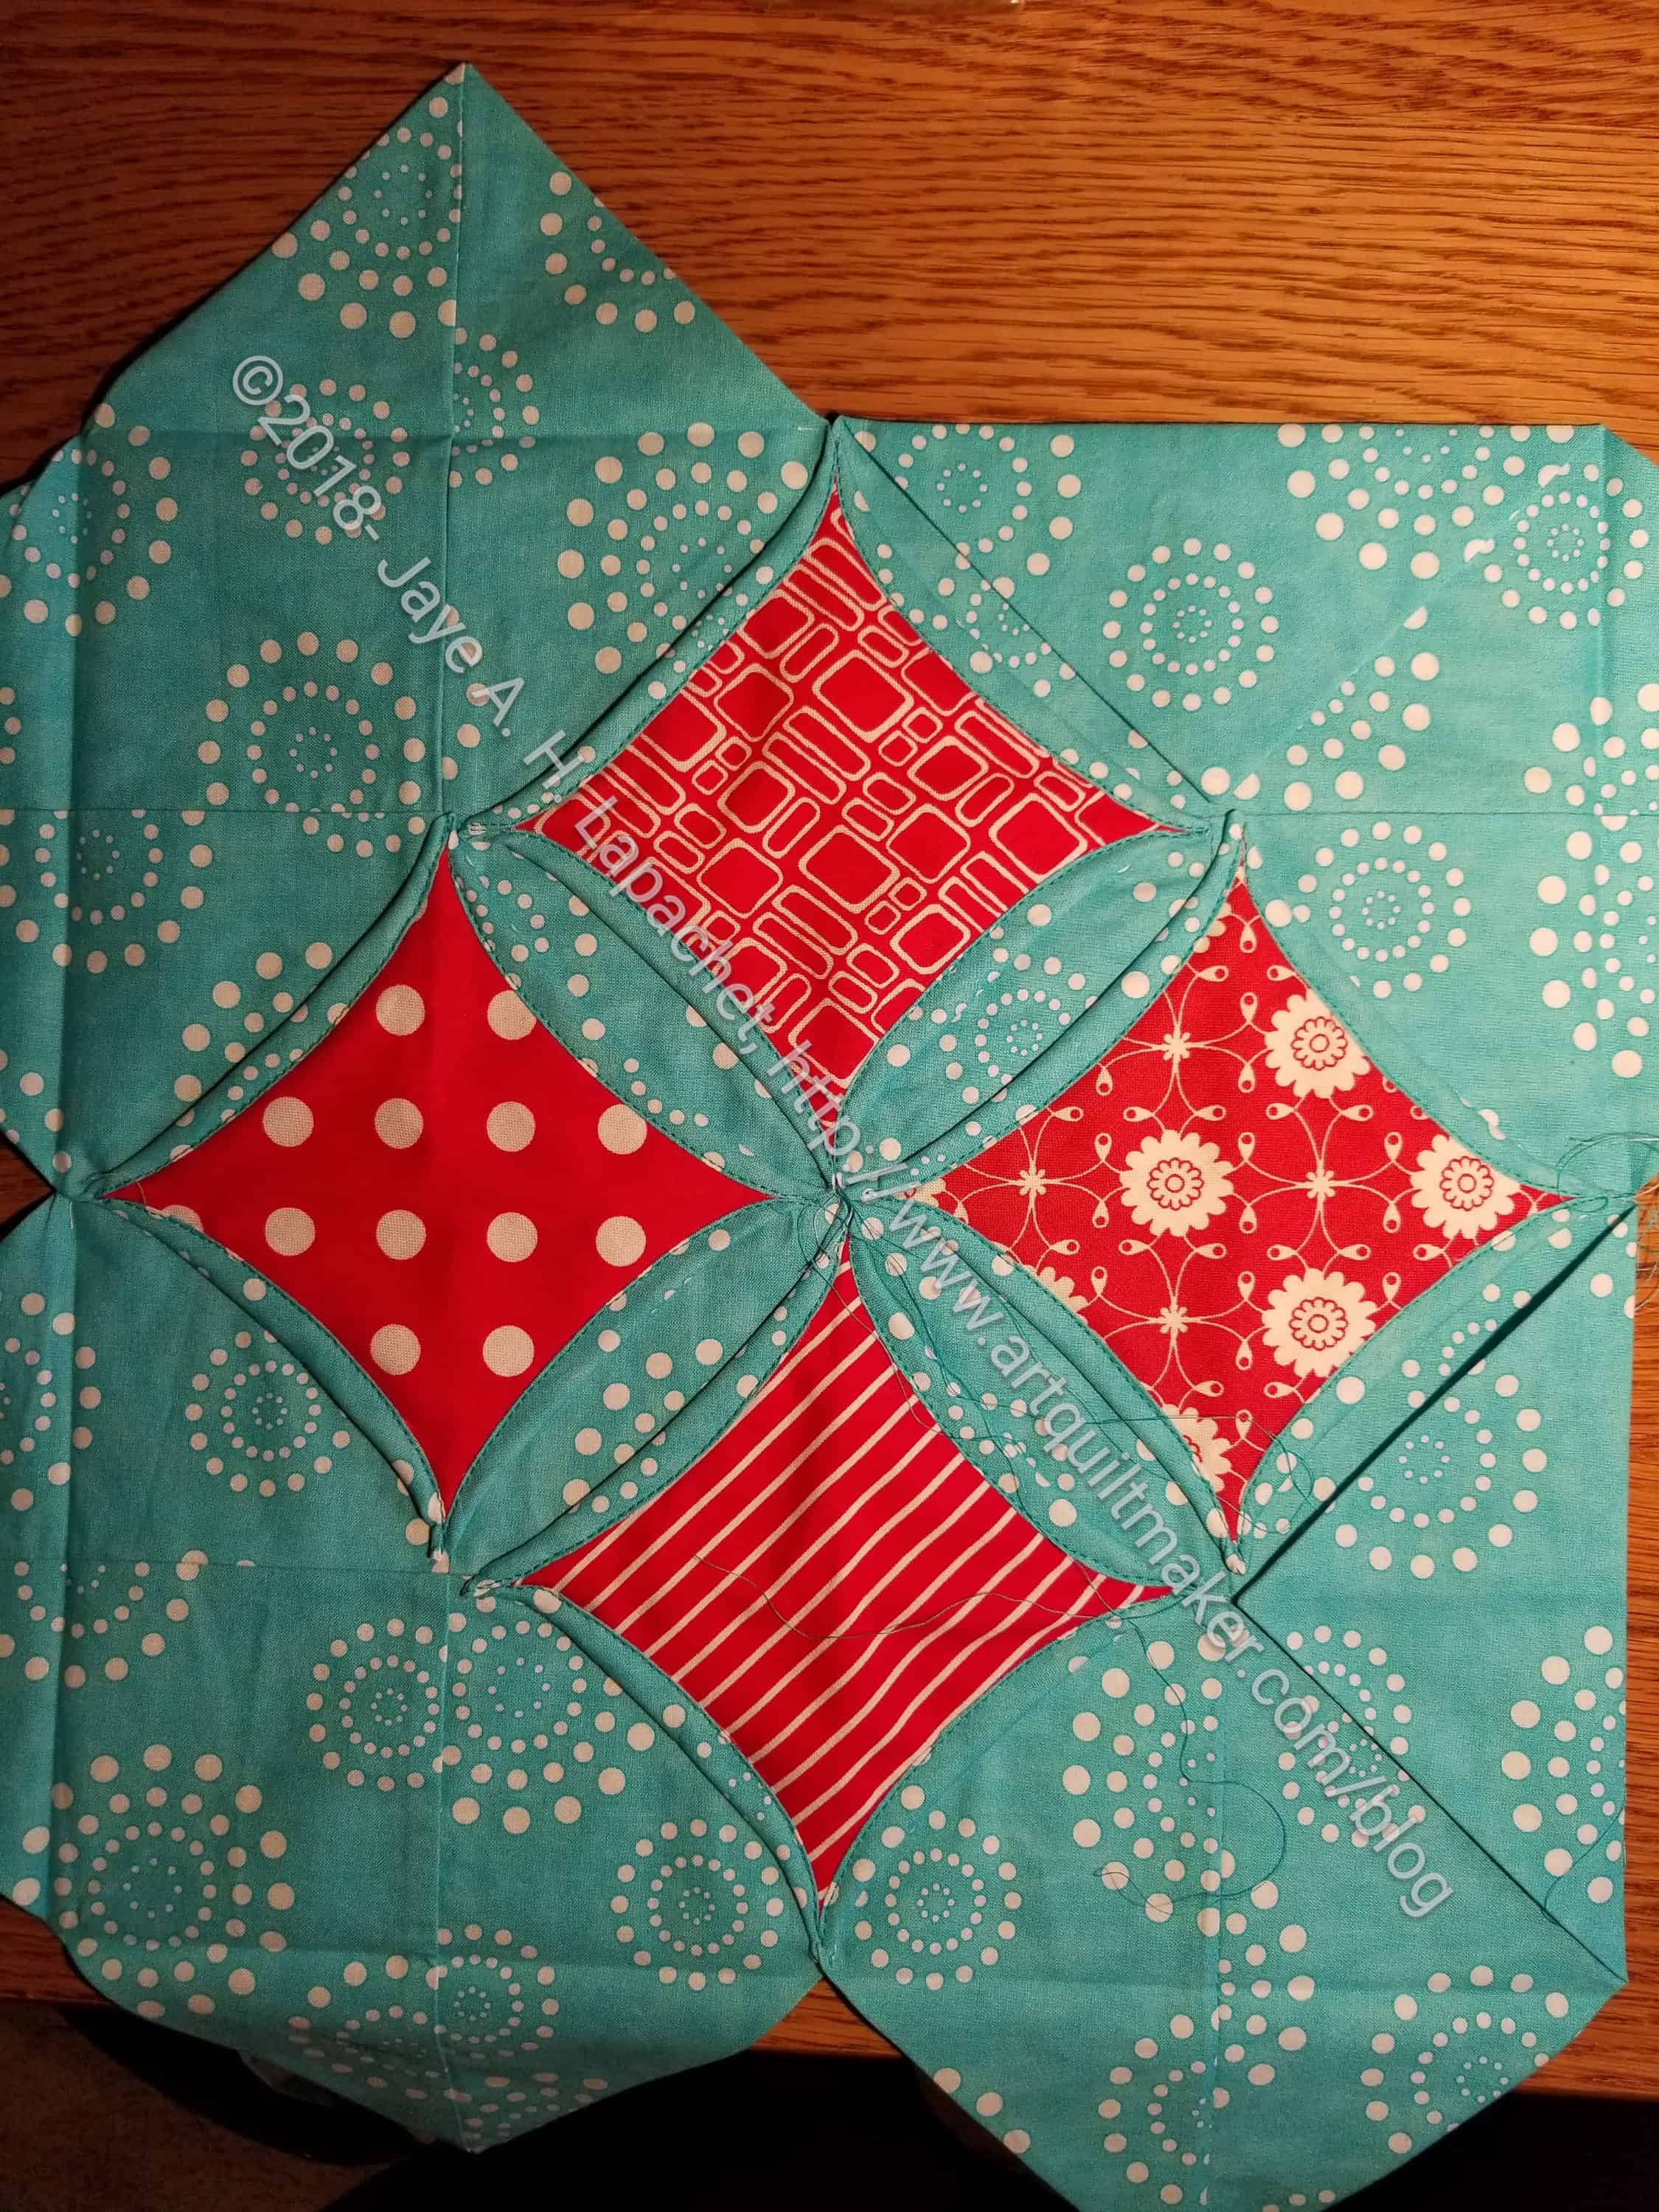
Cathedral Window Block in process
I never thought of making it before, but this block did kind of take my fancy. This is kind of a strange block, partially because of all of the layers. It is lumpier than I expected. Warn your longarmer about it.
Resources:
Fons & Porter Cathedral Window block– I originally found the instructions in one of their magazines as part of their ‘learning to quilt* series’. I had to go looking for other instructions when I found the directions had no sizes or actual cutting instructions. Directions are brief.
Lovely Little Handmades Cathedral Window block – uses a printed background, so you can see how that works. Most people use white, so it was a little confusing for me when I wanted to use the blue.
Sometimes Crafter Cathedral Window block – some missing detail, but has the instructions for cutting the right sized patches. I also don’t like it that the viewer cannot enlarge the photos to see the details.
*Nota bene: not sure if this is the correct name, but it describes the basic idea of the series.
After seeing my Spiky 16 Patch quilt, Mrs. K asked that i give the math on putting blocks on point. This post is an addition or adjunct to the Sampler Class tutorials. Different quilt, but you can use this information to put your sampler blocks on point as well.
Setting blocks on point tutorial
There are two aspects to putting blocks on point: the setting triangles and the corner triangles. The setting triangles are on the inside of the quilt. The corner triangles are on, shockingly, on the corners.
In the photo, right, the corner triangles are indicated by the orange half circle. The setting triangles are shown with a purple circle.
Setting Triangles
Setting Triangles, also called side triangles, are giant quarter square triangles. You want to use this method, because the bias will end up on the outside of the block.
1. Measure the block.
Spiky 16 Patch n.7
In the quilt above you want it to end up looking like it is shown. The Spiky 16 patches.
The Spiky 16 patch measures 16.5 inches.
2. Take the finished block size and divide by 1.414.
Note: the finished block size is different than what we measured. You need to remove .5 inches for seam allowance, which gives you a finished block size of 16 inches.
16 x 1.414 = 22.624
3. Round up
I rounded up to 22.75, but you can round up to an eighth of an inch, if you want.
4. Add 1-1/4″ to the resulting number for the correct size to cut squares for side triangles.
22.75 + 1.25 = 24
5. Cut this square in half diagonally twice in the shape of an X to produce four side triangles.
Nota bene: Cut one square for every four side triangles needed for the quilt setting.
6. Lay setting triangles next to your blocks to make the quilt square.
YAY! You did it!
Corner Triangles
1. Measure the block.
Spiky 16 Patch n.7
In the quilt above you want it to end up looking like it is shown. The Spiky 16 patches.
The Spiky 16 patch measures 16.5 inches.
2. Take the finished block size and divide by 1.414.
Note: the finished block size is different than what we measured. You need to remove .5 inches for seam allowance, which gives you a finished block size of 16 inches.
16 / 1.414 = 11.315417256
3. Round the size up
Take the number you got and round it to the nearest quarter or eighth of an inch. I rounded up to 11.5.
4. Add 7/8 inch
11.5 + 7/8 = 12 3/8
5. Cut two squares the size determined above.
6. Cut both squares in half diagonally.
Now you have four triangles.
7. Place on each corner.
YAY! You did it! You cut corner square triangles. Sew them on. You may need a quick trim and you are done with corners.
Lay all of the setting triangles and corner triangles out with the blocks on your design wall. When you are ready to sew, sew. I fold the blocks and the setting and corner triangles in half so I can line them up properly.
Trim once the whole piece is complete, if necessary.
If you don’t believe me, you can find Bonnie Hunter’s tutorial on Quiltville.
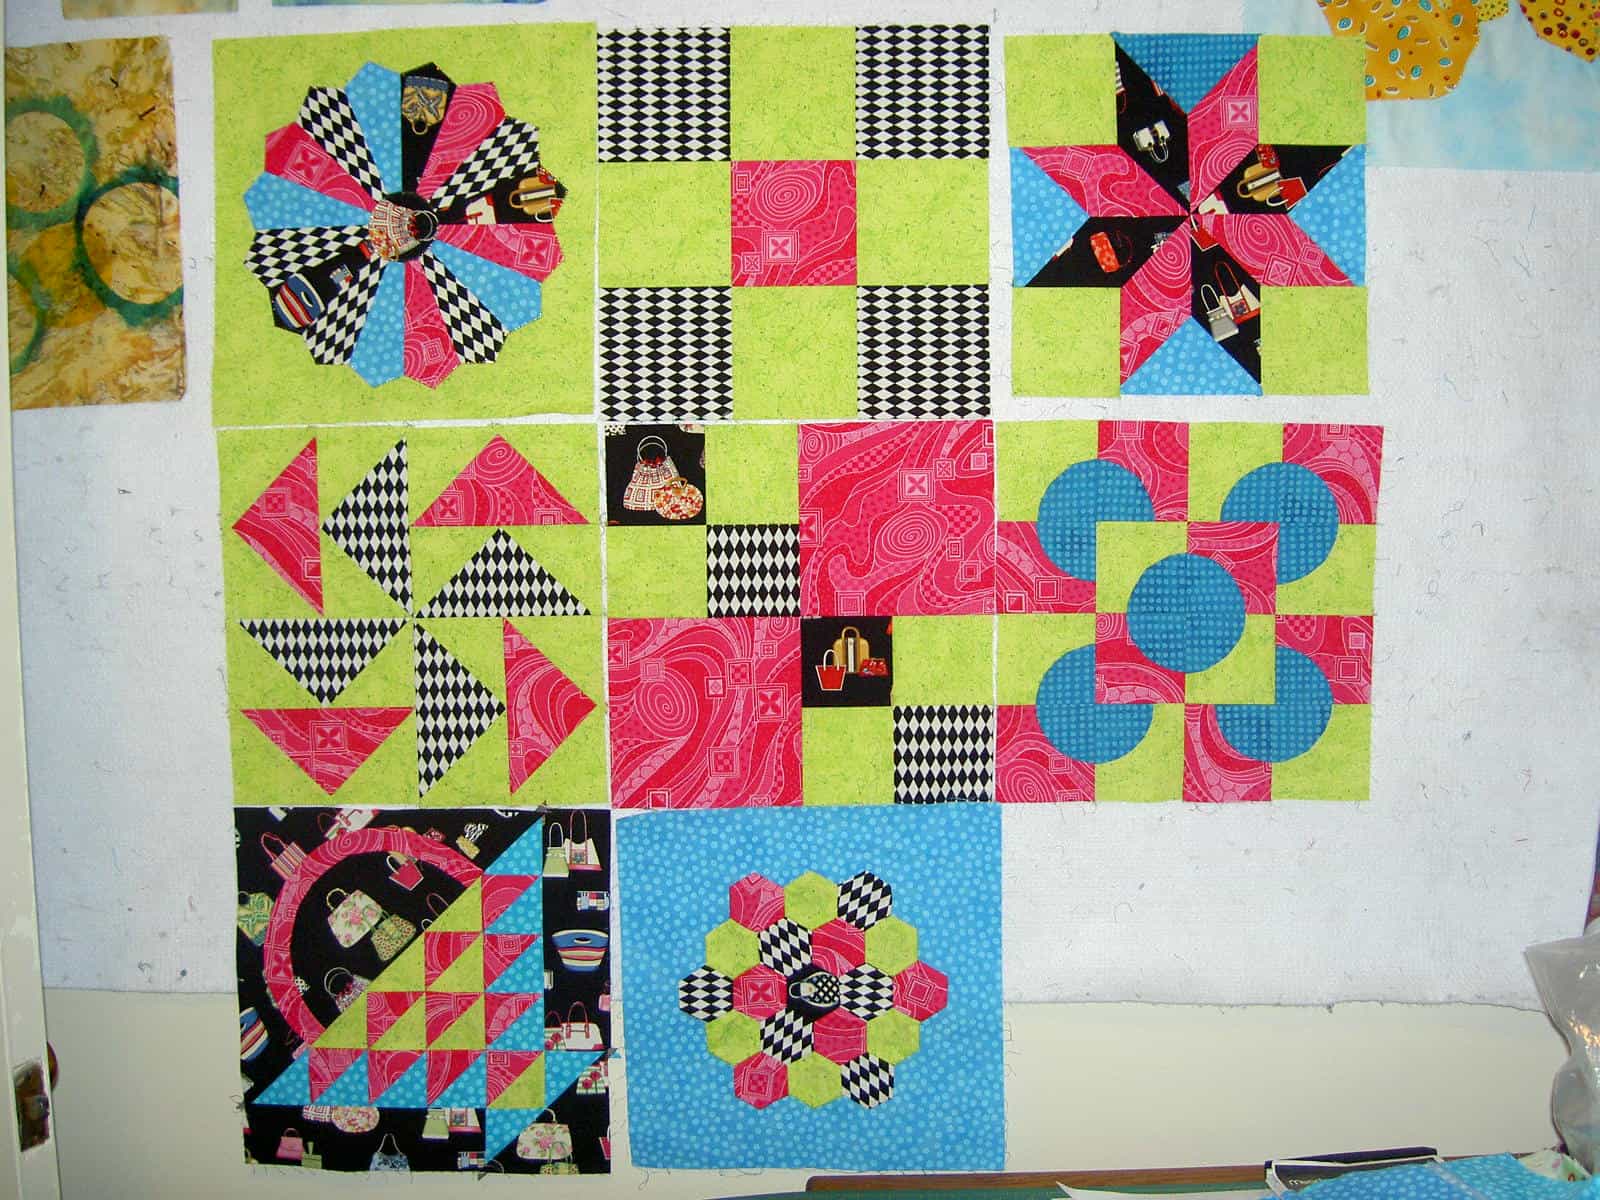
In going through old photos, I found photos of the Handbag Sampler I have been talking about recently.
I haven’t actually found the blocks, but, at least, I have a photo and sort of know what I have.
Handbag Sampler Nosegay
I found a photo of a Nosegay block that I made (or am in the process of making as well. The 9th block is good, because that means, if I find the blocks, I can just put the quilt together. I don’t have to search out fabric, which is all very distinctive. Of course,in terms of learning, it isn’t quite as comprehensive a Sampler as the Aqua-Red Sampler. There is no applique completed.
I have to find the blocks before I decide what other blocks to make.
As I mentioned a couple of days ago, I have the Aqua-Red Sampler on my design wall and I am trying to figure out what block to make as my last block.
Tea Basket block
I was thinking of the Nosegay. I have a great version for the Handbag Sampler, so it isn’t pressing that I make another one. Still, it’s a good block. Then I remembered the Tea Basket block. It isn’t very popular. In fact I don’t know if I have ever seen a quilt that included that block. It is in Jinny Beyer’s The Quilter’s Album of Patchwork Patterns, so I was able to find it. I also found it in BlockBase and made some adjustments so the BlockBase version looked more like Jinny Beyer’s version. I also added some color to get an idea of how it would look. Looking at it now, I think it is more of a contender than I thought.
Self-Bordering is a technique that I use pretty frequently, though I don’t always know what I am doing. Basically, self-bordering means that you treat the border blocks the same as the blocks in the main part of the quilt. You piece them in as you would regular blocks rather than as a long row.
I don’t know if I made this technique up. I am sure others have done it. If they have, I am not sure what else it would be called.
There are several advantages to using a self-bordering technique for adding borders:
Precision is improved, because you are adding a block or so at a time
It makes it easier to get the border lined up correctly
Eliminates long lines of stitching
Makes adding pieced borders much easier
This technique works with Chunking. If you are sewing all your blocks, for the whole quilt, together in rows, then don’t bother with Self-Bordering.
En Provence – late October 2017
As you have seen recently, I am working on the En Provence quilt by Bonnie Hunter. The border is optional, but I am putting a pieced border on the quilt using self-bordering technique. In the photo, left, you can see the border on the bottom. It is made up of one row of four patches (or 3.5″ squares) all the way around the quilt.
All the blocks in this quilt are, essentially, nine patches. As I sew the blocks together, I work in threes – I sew three blocks in a horizontal row together. Once I have three rows made up of three patches, I sew two rows together, then I sew remaining row to the set of two I have just sewn together.
On the border, there is an extra 3.5″ piece. It is either a 4 patch or a 3.5″ patch. Instead of sewing 3 rows of three blocks together, I sew 3 rows of 4 blocks together and then sew three rows of four patches together.
En Provence Corner Block
The corner block ends up looking fatter, because of the extra patches. Once the corner and border blocks are integrated into the quilt, they look like blocks and a pieced border.
You cannot tell which way a border was made, if it was well done.
I like this method because I don’t like putting on borders. I also really like pieced borders. Depending on the design, of course, they really add additional interest to a quilt.
En Provence corner block annotated
Once I finish a quilt, there is really no way to tell where the blocks end and the border begins from a quick glance.
The top arrow, left, shows the very edge of the border – the seam line between block and border.
The bottom arrow shows the border.
As I have said, they integrate so well that a casual viewer can’t tell where the border is. I really like that.
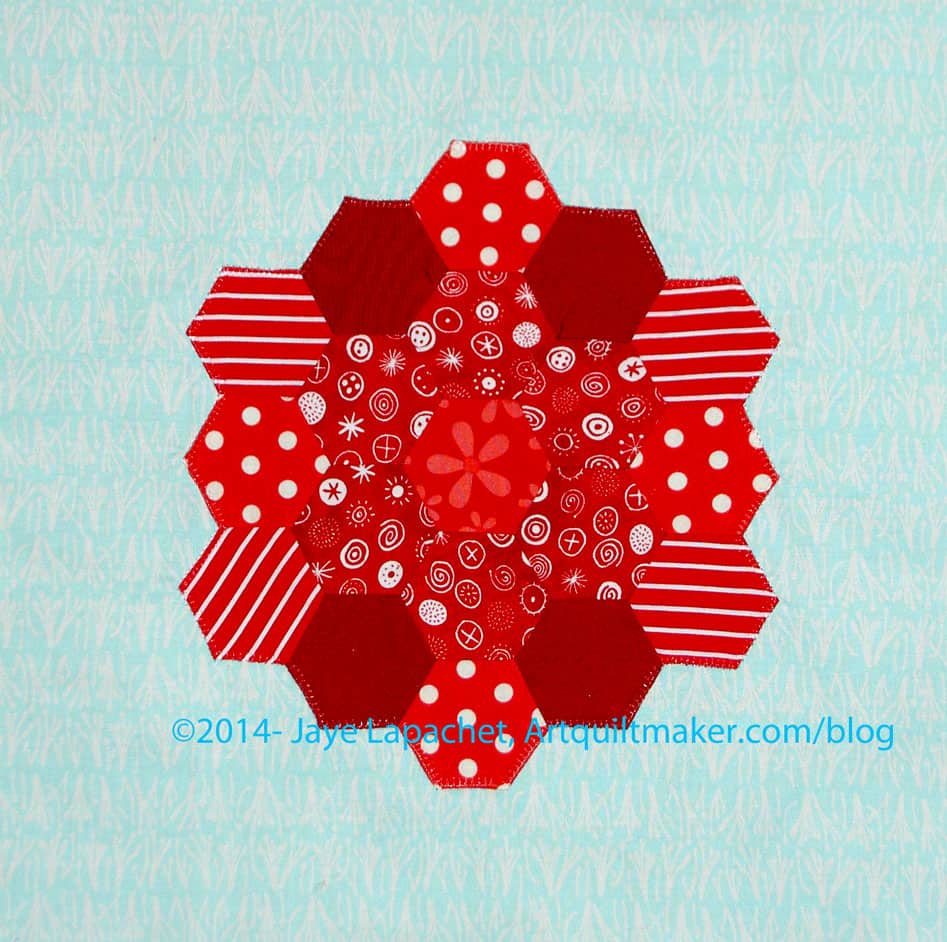
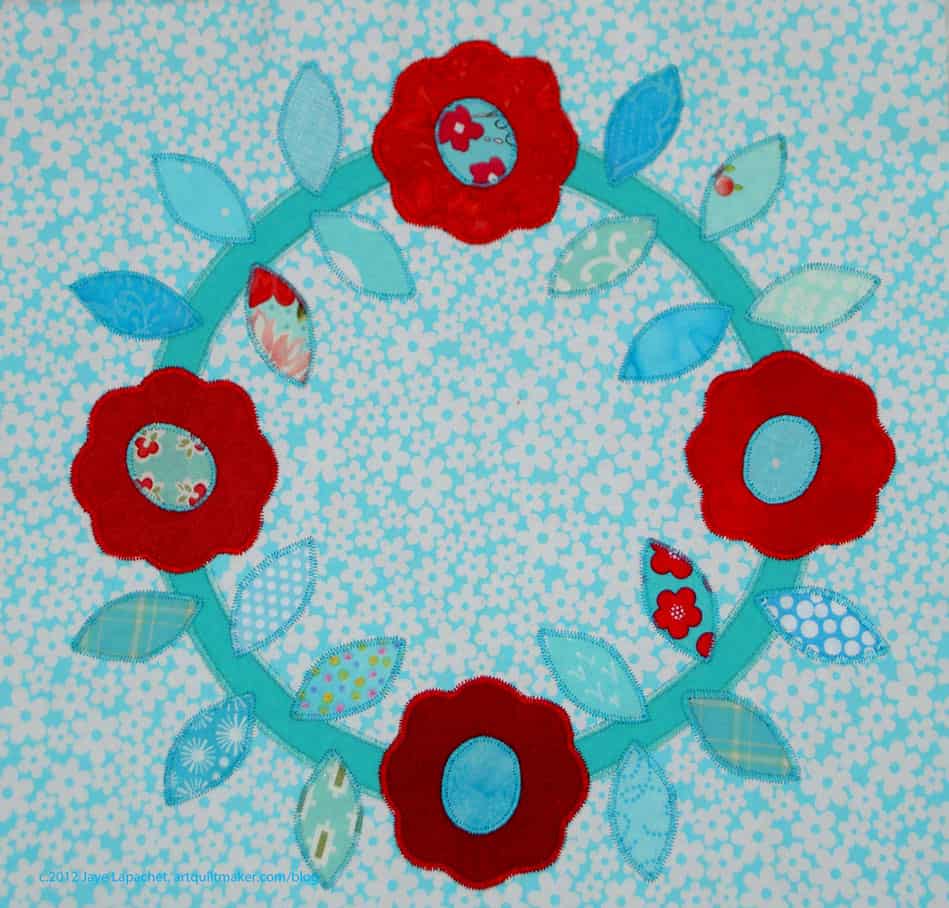
We are making the Flower Wreath block. To find out how to make templates, including the ring, see Part 1 for making templates and Part 2 for making the ring and positioning the ring on the background.
Flower Wreath
Now we are going to stitch the ring. If you haven’t started, check the Supply List in part 1 and grab your 3″x5″ tearaway backed fabric. Your ring should be applied to the background and ready to stitch. If your ring is not fused and ready to stitch, go back to part 1.
I stitch in layers, so that the stitching is easier, there are fewer starts and stops and the piece looks more finished. Now that you are ready to stitch, it is time to choose your thread.
Choose thread
Whenever you choose thread, you must consider the stitch. If the stitch will be dense like a satin stitch, you should choose the color by looking at the thread wrapped around the whole spool. That will give you a better sense of the color the satin stitch will end up.
It you will be using a straight stitch, you should unreel a bit of the thread and look at one strand on your fabric. You may need to pool a little of the thread together – less dense than the whole spool and more dense than one strand.
Now set up your machine for zig zag stitching. You will need to choose a stitch density. I like a semi-open zig zag that is not too wide. Dense satin stitching, however, can really highlight and outline each piece. I use the following settings on my machine:
Ring: width: 3.0, density: 0.45
Flowers: width: 3.0, density: 0.45
Leaves: width: 2.0, density: 0.5
Flower centers: width: 2.0, density: 0.5
YMMV: Your machine will vary so use the test piece and try out your settings.
Even if I haven’t chosen all the fabric, I like to get the ring stitched down first, so I can audition the other fabric without worrying about the ring. Yes, it is fused and shouldn’t go anywhere, but I still like it to be stitched down.
In order to choose the stitch density, you will need to test. Get the tearaway backed sample piece you have prepared and start testing with the width and densities I have provided above. Stitch lines of zig zag stitching 2-3″ long using a contrasting thread similar to the thread you will be using to stitch the ring. Adjust the width and density on your machine until you are pleased with the look.
Stitch ring
Put the ring on the machine and start stitching. I always leave a long tail that I can pull to the back and tie shut later. My zig zag does not automatically tie the ends. If your machine is more advanced you may not have to tie a knot on the back. I don’t want my zig zag to come out if it gets snagged while the quilt is being used, which is why I tie the ends.
I use my applique’ foot, which has a red arrow in the center to stitch out the zig zag. I place the tip of the red arrow on the raw edge of the ring and follow it around. You want a smooth curve, so you should stitch with needle down or use the hand wheel to put the needle down when you stop. If the center point on your foot gets off the raw edge of your ring, stop and readjust. Stop with the needle down on the outside of the ring’s curve whenever you need to readjust the needle to accommodate the curve. Turn the fabric to the left to get the center point of the foot back on the raw edge of your ring. The stitching will be slightly closer together on the inside of the shape, when the needle punches the fabric to the left, and more open on the outside of the shape or when the needle hits the background.
Tail of thread
When you have done about half – 3/4s of the stitching on the ring, stop and pull the beginning thread to the back and tie it off.
I tie the beginning off before I get to the end, because the beginning and ending threads can get tangled up and make it impossible to make small, neat knots. I have tied all four ends together in a pinch, but prefer to make the knots as small as possible.
Fold work back to tie
I also use this technique also if I have to stop and pull the work out of the machine because of thread breakage or necessary bobbin refill.
I fold the work back (I only used my pincushion so I could photograph what I was doing. Normally, I just hold it with my wrist as pull the front through to the back and tie the ends together.) I don’t take the work out of the machine unless there is a good reason – like a big knot, or thread breakage, etc.
Completely stitched ring
Once your knot is tied, continue stitching to where you started. I don’t overlap much once I get to the beginning, perhaps only a stitch or two, because I don’t want the look of the stitching to be too different.
I pull the work out of the machine and tie off the ending threads. Again, you may not need to do this if your machine does it for you.
Now follow the same steps, but on the inside, to finish stitching down the ring. Once you have stitched both the inside and outside of the rings, your ring will be complete and you will be ready to place the leaves and flowers on the ring.
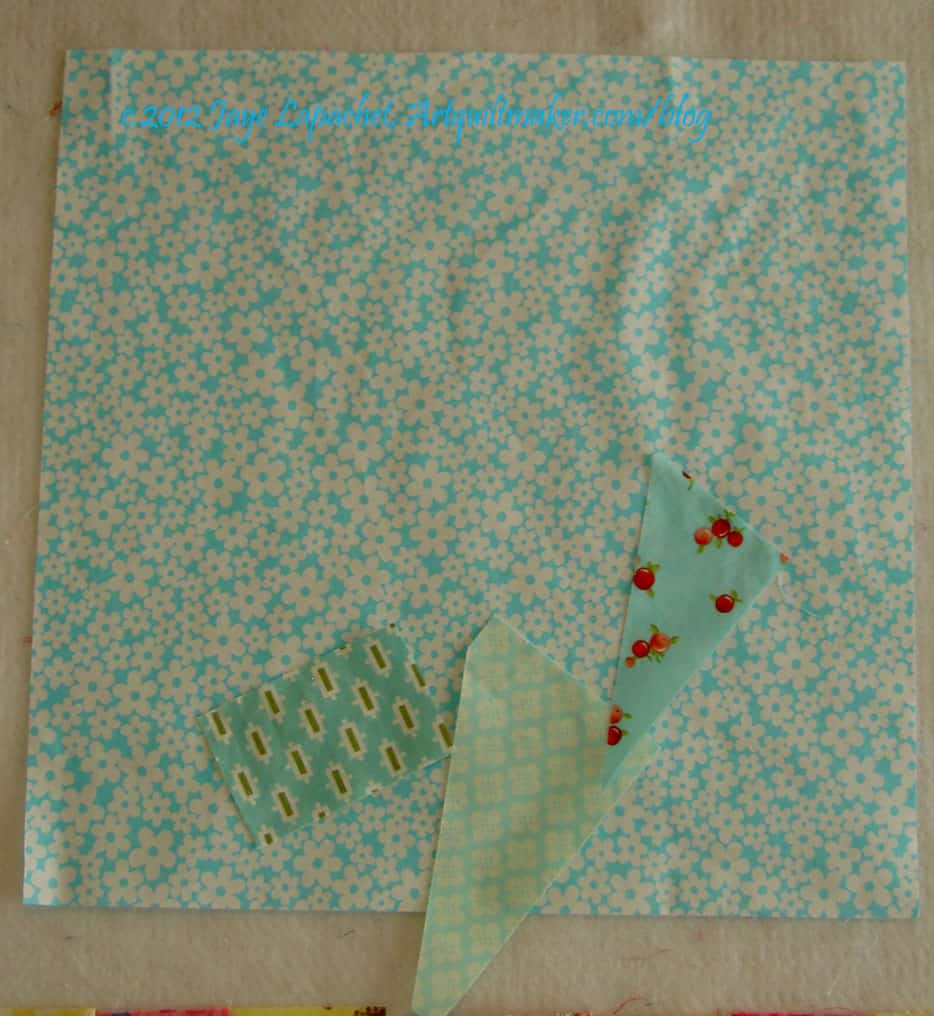
Choose fabrics by putting scraps on background
If you have not already done so, choose the rest of your fabrics. You will need fabric for the flowers (1-4 fabrics) and leaves (1-20 fabrics). If you have not cut out and fused the wreath to the background, please go back to part 2. The leaves can be the traditional green or you can use something else. If you use one color, you might want to mix up prints to increase interest. You can also use different colors. Make the block your own.
Make visual decisions visually
I thought about making the leaves green to make them more realistic, but decided I still wanted to use a variety of turquoises and aquas and to stay with my quilt’s color scheme. I found more fabrics to use in my scrap basket.
It is important, with my limited color scheme, to make sure the viewer can see the individual leaves. For that, I need to have enough contrast between the various aquas and turquoises. Remember, when choosing your fabrics, to make visual decisions visually. Put your potential fabrics on the background and step back to look at them. From my test piece (right) you can see that there are a variety of tones of aqua and turquoise. Some of them blend a bit into the background. I want movement and interest.
Cover fusible with fabric
Once you have chosen all of your fabrics press the fabric. Add fusible to the wrong sides.
Use the pressing cloth or applique’ pressing sheet to keep the fusible from sticking to your iron.
Follow the directions on your fusible’s packaging.
Trace leaves & Flowers
Mark all of your leaves and flowers. Flip the fusible so that paper side is up. You will be able to see your different fabrics through the paper. Place a template face DOWN on the appropriate fabric and trace with a writing implement. I use a Sewline pencil, but you can also use a pen, regular pencil or anything. I wouldn’t use a Sharpie even though I don’t think the paper will allow the marking to bleed through to the fabric.
Once you have traced all pieces**, cut them out right inside the drawn line. You should have 20 leaves, 4 flowers and 4 flower centers.
Take all of your pieces and arrange them the pleasing way. Arrange them into the final position. You are using this try-out to look at the overall effect of the whole block. Once you are pleased with the arrangement, take a photo or sketch out placement.
Fuse & Stitch Flowers
You will need to stitch the flowers first, then the leaves and finally the flower centers. The flowers and leaves are on the same layer, so you can stitch them in any order. Anything that will be covered by another piece will need to be stitched before you fuse the covering piece.
Place the flowers on the ring using the press marks you used to place the ring on the background (or fold the background in quarters and finger press again). Place them symmetrically along the ring, or in a pleasing way to your eye.
Fuse them into place and get ready to stitch. You can also reference the machine applique’ tutorial for more information. Again, pay attention to where the layers of the design are placed. If there are leaves that you want to place under the wreath, you will need to satin stitch them before you fuse the wreath down entirely. For the flowers, you will need to satin stitch down any parts of the design that will be covered by another piece of fused fabric, such as the centers. The design will look better if you satin stitch a layer and then fuse the next piece down.
Place the interfacing under the background. You could use a machine basting stitch to stitch the interfacing (Pellon Stitch & Tear or similar) temporarily to the background, but pinning works fine, too. You will need to zig zag with the interfacing under the background.
Stitching flowers
Satin stitch all the other pieces down using the thread you chose. When you stitch, the middle of the stitch will cover the outside raw edge of each piece. I line up the red arrow on my foot (see photo) with the sharp edge of that raw edge. The pieces you will satin stitch have curves, thus you will need to manipulate the stitch so it is smooth. Stitch with needle down.
Stop stitching to create smooth curves
Stop with the needle down on the outside of the curve for the leaves and flower petals. For the inside point between the flower petals stop above that point on the inside. If you do not have a machine that automatically stops with the needle down, again, you can use the hand wheel to move the needle into the downward position when you stop. Do thisMove the handwheel carefully without moving the fabric. Once the needle is down you will need to assess the way to turn the fabric. Always turn the fabric very slightly to ensure a smooth curve. You may only need to take one stitch before adjusting the fabric again in order to get around the curve smoothly. For the outside curves, generally, you need to turn the fabric to the left to make a smooth curve. (Updated 10/30/2012: My engineer SIL says: You turn it clockwise for outside curves and counter clockwise for inside curves. YMMV) The stitching will be closer together on the inside of the shape and more open on the outside of the shape when you move in this direction. For the inside point of the flower, between the petals, you will need to take a slight adjustment of the background to the right. For the pointy ends of the leaves, stop the needle on the outside of the leaf near the point and adjust the fabric to the right very, very slightly. Take one stitch, stop on the outside of the point again. Adjust very slightly to the right. Your goal should be to get the needle into the same hole on the inside of the leaf until the arrow or line on your machine’s foot is in line with the raw edge of the other side of the leaf. When you move the fabric always keep the needle down. Before starting, take a few of the templates, e.g. a leaf and a flower, make some test pieces and do a test with junk fabric so you get the feel of the procedure. This is not skill you should work on when you are pressed for time.
Arrange leaves
Once you are finished with the flowers, change your thread and adjust the width and density of your stitch, if desired.
Arrange the leaves in a pleasing manner. I placed 5 at a time on the background and stitched them down.
Stitch leaves
Arrange and stitch all of the leaves. My photo shows only 10 sewn leaves, but I did eventually stitch all of them.
Place the centers on the flowers and stitch them down. Follow all the directions above for tying off and moving the needle to create a smooth curve.
Back of block
Once you have stitched all the pieces, rip off the tearaway. I use a seam ripper to get the ripping started on pieces that are surrounded by stitching. Try not to distort the block while you are tearing out the stabilizer.
Once you are finished with the entire stitching and ripping out the tearaway, trim the background down to 12.5″
Fusible Machine Applique’ Block
Finished block! Hooray! You did it!
**Nota bene: These pieces have no right direction. You can trace them any way and apply them anyway and they will look fine. Pay attention if you are cutting out letters or another motif that has a special direction. Put the right side down on the paper backed fusible and trace the motif backwards.


